Making the tool
Magnetic Spin Sander
© Frank Ford, 2008;
Photos by FF
This is actually the second version of a tool I first made half a dozen years ago. I gave that one to a friend, so when I made this one I took a series of photos of the process. It's a little rotary magnet holder that spins a magnetic sanding block inside a guitar for cleaning up or leveling in relatively inaccessible areas.
First, the arbor. I turned a piece of cold rolled steel rod to 1/2" diameter to accept a standard sealed ball bearing and stepped the shaft down toward the end:
Reversing the piece in a 1/2" collet, I turned a collar, and turned and threaded the end:
I was able to remount the shaft in a 1/2" collet by loading it from the back end:
Set in a collet block, I had no difficulty milling the drive end of the spindle to the 1/4" hex that would fit my cordless screwdriver:
With the bearing pressed in place, my spindle was complete:
I drilled and tapped an aluminum disc on the lathe, moved it to the mill, located center, and drilled four holes to press in .400" diameter magnets:
I made a second identical disc, thinner and without the central hole - it would become the driven unit.
My 6" Wilton vise made quick work of pressing in the magnets:
With disc screwed onto the spindle, I trued it on the lathe, facing right up to the magnets.
I wanted a transparent holder to show off the contents, so I rummaged around and found this thick hunk of acrylic, which I drilled with a regular wood cutting Forstner bit:
And, I bored the hole to a stepped configuration that would allow clearance for the rotating disc and a mounting for the bearing at the end.
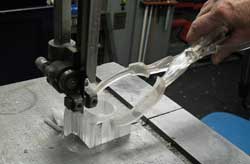
I didn't want to try trimming all that excess off by turning on the lathe, so I used a band saw to cut the bulk away:

Above, I'm making relief cuts, holding the piece with one of my favorite
garage sale finger savers - a salad tongs cut for clearance. The plastic tongs
are just strong enough for this kind of work. I they or I should slip,
there's no chance of damaging the saw blade with plastic tongs.
The rough-cut piece:
I just happened to have an expanding collet that fit the hole I bored:
OK, it wasn't exactly a coincidence - I checked the fit as I made the part.
Now it was safe and easy to turn the holder to diameter:
With the holder in a chuck, I polished the inside by first sanding to 1200 grit and finally using a stick covered with a cloth saturated in Simichrome:
The drive unit mounted in the holder:
There's around .015" clearance between the drive disc and the end of the holder. I wanted to have maximum magnetic power, so I kept things close.
The front of the holder needed a window, so I glued on a piece of 1/16" acrylic. Simply sticking the holder down to the band saw table gave great clamping power with those four Neodymium magnets inside:
The completed drive unit, after I polished the outside with plastic compound on the buffer:
Here's the driven disc, ready for application of "Dragon Skin" carbide impregnated steel sheets:
Fine on one side, coarse on the other.
I stuck the sheets on with some epoxy, and cleaned up the outer diameter on my little belt sander:
The full rig on a test board - a salvaged piece of a guitar top:
Application of power:
Because the holder doesn't rotate, I can sand inside a guitar without worrying about damaging the finish outside, and the magnetic spinner follows along precisely.
On a different test piece, the result of all that nasty spinning grit: