
Bridge Plate Overlay
Here's a topic that usually sparks heated discussion (argument) in the guitar repair community. I'm hoping to try to sidestep the controversy by stating from the outset that I'm presuming that the reason for performing this operation is a matter of survival of the guitar. In many cases, we can perform a bit of delicate surgery and remove a damaged bridge plate and replace it with one of appropriate size and style.
Here, we're talking about a guitar that's seen damage from heat and previous repair. This is not an uncommon situation. Quite a bit of my work consists of making the best of a lousy situation. Maybe the instrument was badly abused in the heat of a parked car. Certainly a well intended (or maybe not so well intended) previous repair attempt left the guitar even worse off.
This guitar is a 1971 Martin D-28 which had obviously been subjected to the stress of high heat. The braces were loose from the top directly under the bridge. In my experience high heat is the ONLY cause of this problem in a finely crafted guitar. The bridge had been sloppily reglued, the pickguard was curling up, and the fret ends were sticking out where the fingerboard had shrunk a little.
Quick note: WATCH OUT FOR HEAT. Your car can get up to 175 degrees (F) out there parked in the sun. At 150, most glue is history! If you MUST risk this heat, slack the strings off completely. At least you'll save the bridge, top braces, neck and fingerboard joint. It really is a big deal.
Here's the reason this guitar came to see me:
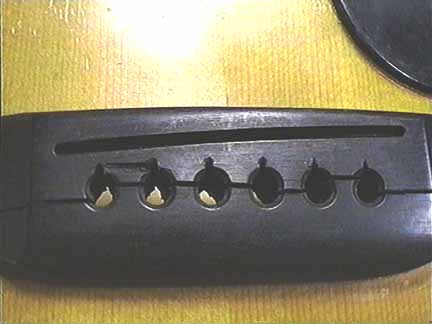
The bridge is cracked badly right through the pin holes. When I look inside, I see the smears of glue from the regluing of the braces right under the bridge, where all the stress is concentrated. In this picture you can see the pickguard curling up as well.
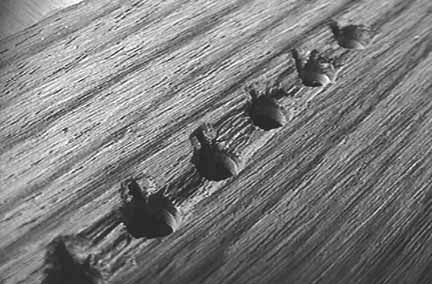
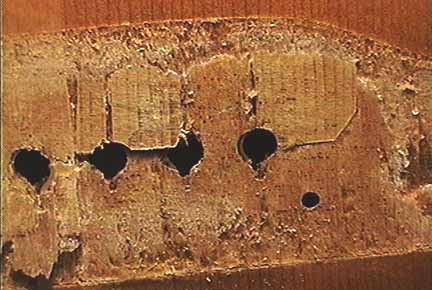
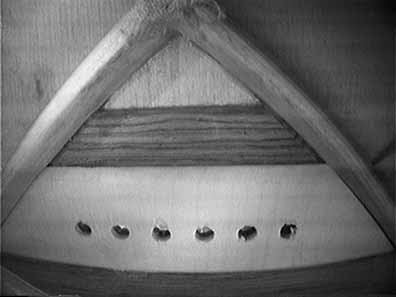
Looking at the bridge plate I see that the wood was mostly chipped out between the holes. Here's a view with the INSIGHT inspection camera. Notice how the wood is missing for at least half its thickness right at the holes.
I do not understand why virtually all makers run the grain direction of bridge plates parallel to the length of the bridge. With the grain running this way the bridge plate can't do its job so well. The function of the bridge plate is to reinforce the top for seating the string balls, and TO KEEP THE TOP FLAT SO THE BRIDGE STAYS IN PLACE. Without a bridge plate, the spruce top would have a much greater tendency to "peel" loose from under the bridge.
When the holes are drilled through the plate, most factory guitars suffer a little chipping out. Then later, as strings are changed, more chipping. This poor guitar's top began to fold right on the dotted line!
On to the business:
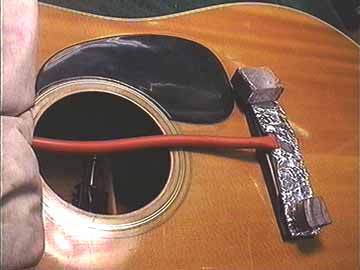
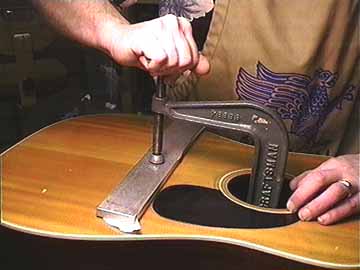
I'm heating the bridge to soften the glue underneath. My heater is one of those rubber heat elements like the ones sold by L.M.I. I specially ordered this one 1" x 6" for regular steel string guitar bridges. The L.M.I. ones are 5" long and do the job well also. I wrap the element in aluminum foil for a little better contact, and weight the ends with lead and the cord with a sandbag to keep it from shifting. The heater reaches about 400 degrees, so I have to keep close watch!
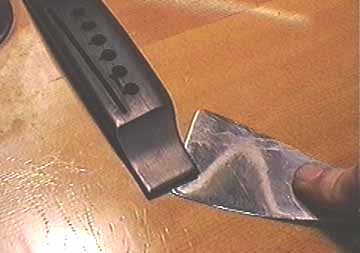
I reach inside to feel when I think the temperature is about right, take the heater off, and start to lift the bridge with my flexible knife. The glue is very soft and the bridge comes off cleanly.
Holy Moly! Look what I found:
The top is a real mess under that bridge. It's not the worst, but it's bad enough. Whoever took the bridge off last time ripped big holes in the spruce. Those inlaid patches of spruce were an attempt to do the right thing, but they obviously cut right through the spruce in the very area where the holes, grain direction and chipped wood of the bridge plate make it the top weak as well. The inlaid patches are well done, and tightly glued. The bridge was tightly glued, too, but it cracked because everything underneath folded on the line of the bridge pin holes.
The job is clear now. It's time to overlay the bridge plate to improve rigidity.
Removing the old bridge plate would be a big risk, what with all the damage right where the bridge glues on. There's no big problem in gluing on a new bridge, but I don't want it to crack. Cost is also a factor. Replacing the big original rosewood bridge plate is just too expensive for the owner, and for the value range of the guitar. Bridge plate overlays can always be removed, by the way, should there be a future reason to change the style of the repair.
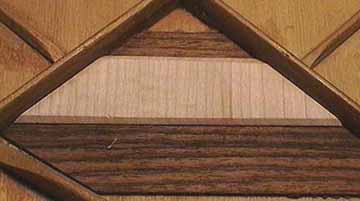
I happen to have a top which was removed from a similar vintage D-28. I used it as the model for making the new bridge plate overlay, and as the model for this photograph:
Here's that big rosewood bridge plate, with my maple overlay. My overlay is a bit thinner, about 3/32" thick. The grain is vertical, and oriented the same as the top grain. The overlay is wide enough to span across the holes and get a good grip all under the area where the bridge sits.
The idea is to span the area with a stiffening plate overlay so it will be less like likely to bend under the relentless pull of the strings. It's a long slow pull, and I'll use hide glue to avoid any possibility of "creep." Even if it gets warm, hide glue won't slide and allow parts to slip.
If I had my way, guitars would be made with bridge plate grain running parallel to the top grain to avoid the chipping between holes, and the tendency to curl or crack in the direction of the string pull.
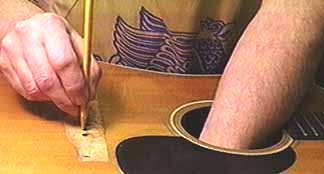
Holding the overlay inside, I'll mark the string hole location.
I'll adjust the size of the overlay until I have the holes lined up where I want them. In this case I want them centered:
Because the surface under the bridge isn't as flat as it might be, I'll need to think about what I'm doing when I clamp the overlay. I'll use a resilient caul inside and press the whole business upward to a rigid outer caul. Then, any deformation caused by clamping pressure will push the top surface toward an even better contact with my new bridge.
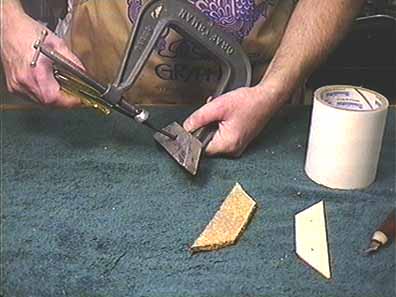
I'm screwing the heavy aluminum caul to the bottom of my biggest bridge clamp. I'll use the cork pad and cover the whole business with masking tape so the cork can't get stuck to the glue squeeze-out from the overlay.
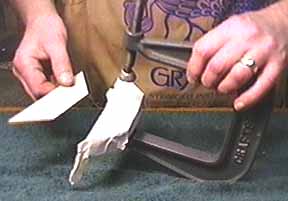
Wrapped, and ready to go:
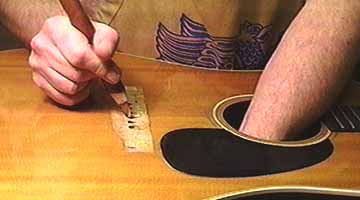
I've coated the overlay with glue, and I can see my marks to line up the overlay in the right position. I'll take my small knife and stab right through a bridge pin hole to hold the overlay in position:
See? Set at an angle the knife holds the plate nicely so I have both hands free to start clamping:
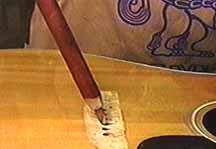
Well, that's about it. I'm clamping this plate firmly against a 1/2" x 2" steel bar I keep around for just this sort of thing:
I have masking tape under the steel to keep it from sticking in case any glue comes up through the holes.
I have confidence that the new bridge won't crack from folding at the line of the pin holes. No telling what other troubles this guitar might see in the future, though!
Here's a final fisheye look through the INSIGHT camera:
The overlay went on well, and I backed it up with a scrap of hardwood when I drilled the holes so there's no chipping. Why don't the factories do that?