
Refret Technique
In 1994, Dan Erlewine urged me to get into teaching. Thanks, Dan. I think I've learned more about the way I work by teaching than my students have! To teach effectively, I really have to analyze how I do things. I want to share my refretting technique because I think it is an important repair process that can be broken down to a routine.
Here's a list of the operations in case you want to jump ahead:
1.Get Ready 2.Evaluate 3.Remove strings, etc. 4.Loosen truss rod 5.Check tuning posts 6.Lube open gears 7.Protect top 8.Heat & remove frets 9.Level fingerboard 10.Create "drop-off" 11.Check neck12.Bevel top of fret slots 13.Clean up fret slots 14.Trial fit fret wire 15.Prepare a set of new frets 16.Tap in frets17.Trim fret ends 18. Sight down fingerboard 19.Level & seat frets 20.Check for high or unseated frets 21.Check for loose tuner parts 22.Fill fret slot ends 23.Glue Frets 24.File fret ends flush 25.Finish fret "corners" 26.Level tops of frets 27.Round fret tops 28.Buff frets 29.Buff edges of fingerboard 30.Clean fingerboard 31.Set up
Bear in mind that my goal is not to suggest that this is the way to go about refretting an acoustic guitar. This is just a view of the way I work when I'm doing the most generic refret job on a standard acoustic guitar, with no neck warp, loose binding, or other complications. Here, I'm working on a 1973 Martin D-35 with a nonadjustable truss rod. As I go along I'll mention a few techniques that apply to other instruments as well.
I figure I've refretted somewhere near 1000 instruments by now, and if my Arthur-itis doesn't get the better of me, I've got about 1000 more to go. I try to view my work as a flow of jobs rather than a series of crises.
OK, here we go:
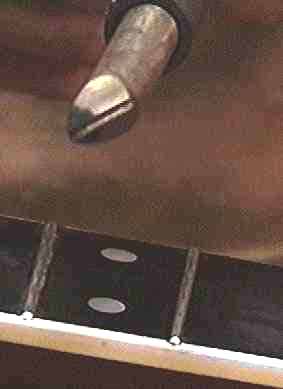
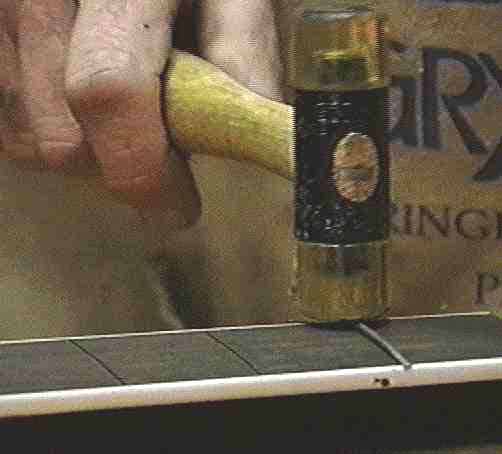
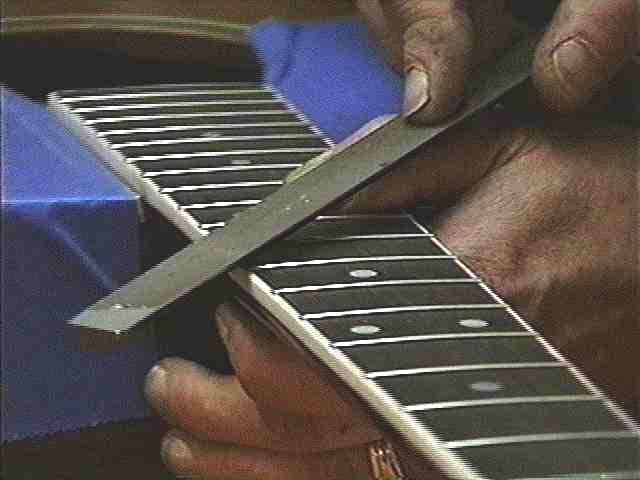
1. Plug in soldering iron. I have a 50-watt soldering iron with groove filed in the tip to balance it on top of the fret:
I don't try to remove a fret without heating it, and I clean the soldering iron tip frequently to get good heat transfer. I want the fret to get hot. Heated, the fret lubricates its path out of the slot by searing the wood surface of the fret slot a little, releasing natural oils and such.
2. Check out the neck. With the guitar tuned to pitch, I make note of the gauge of strings , evaluate straightness of neck, sight the fingerboard for evenness, check neck angle, etc. This is a matter of "feel" and experience. Flexible necks can be stiffened with tight fitting frets; necks with no relief can be made a bit more flexible with loose frets. If the guitarist wants to use heavier or lighter strings, I'll take that into consideration as well
I'm not going to try to get into this process any further here. I'm not even sure I could verbalize beyond saying it's a matter of feel. It takes only a few minutes to draw on 27 years' experience. Within limits, I think we all must make some of the same mistakes and learn along the way.
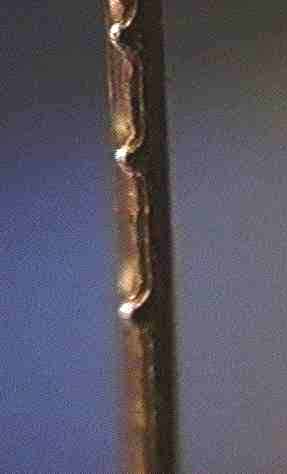
Here's a close-up with the strings removed for better visibility:
.
No question about the worn frets. The only way to restore full playability is to replace them!
This D-35 had no neck problems other than the usual very slight hump that occurs at frets #13-15 as a result of the neck being fretted before installation on the body. In refretting, I'll have an opportunity the factory didn't have. I can level the fingerboard precisely through its length and over the body, so it's probable that I can get even better playability than when the instrument was new.
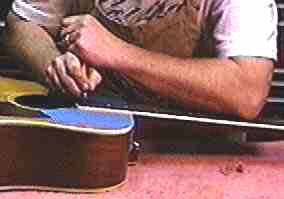
3. Remove strings, bridge pins, nut and saddle.
Using the .010" kerf X-acto #34 backsaw blade I'll saw through the peghead veneer just behind nut to the depth of the nut and tap the nut toward the peghead with a small hammer and a block of hardwood to break the glue joint & remove the nut.

The tiny saw cut is hardly visible when the nut is reglued in place.
4. Remove, lubricate and replace truss rod nut; tighten slightly. Truss rod nuts are rarely lubricated by the factory. Oiling the threads makes it much easier to judge the action and tightness of the rod during adjustment, and prevents unnecessary twisting of the rod when the nut is turned. A few guitars have double-acting truss rods, which usually can't be lubricated easily. (Of course, lots of old ones have none at all.)
If I refret an instrument with the truss rod tightened slightly, I can create a little extra forward bow, or relief, if needed after the job is complete by simply loosening the rod. Now is a great time for a tiny drop of thin superglue in the truss rod cover screw holes to harden up the threads in the wood -- those little guys are frequently almost stripped out.
5. Check tuning posts for clearance. I'll remove first and sixth tuners if they're likely to be bumped in the sanding process. If it seems like a close call, I'll apply some masking tape over the tops of the tuners just in case they might be grazed by sandpaper.
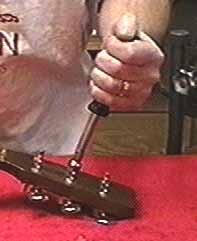
6. Check for loose tuners, screws or parts.
Tighten tuners, Lubricate open tuning gears. This is a good time to catch the kind of thing that is easily forgotten during setup after the frets are done. If the tuners have press-in bushings that might fall, I wind a rubber band around the posts to keep the bushings in town while I'm working. It still amazes me how far those teeny parts can travel when they hit the deck.
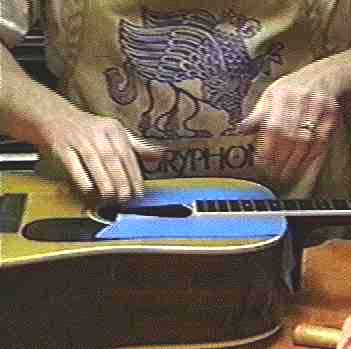
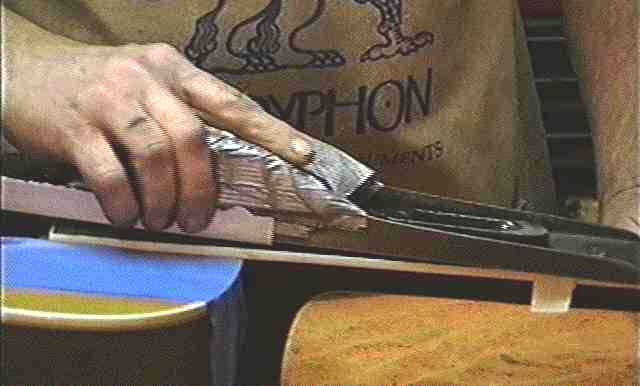
7. Protect the top around the fingerboard.
I like to lay on a section of 5" wide low-tack masking tape, and tape a sheet of .005" steel shim stock over the wide tape. The wide tape Stewart-MacDonald now sells is perfect for the job -- low tack and not likely to lift even delicate old finish. The shim stock is easily cut with regular scissors, and will protect against a slip with fret saw or file. Here, I'm using some low-tack blue masking tape I found at a surplus shop:
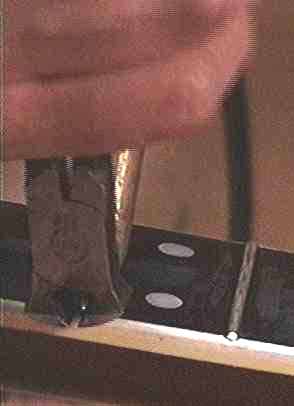
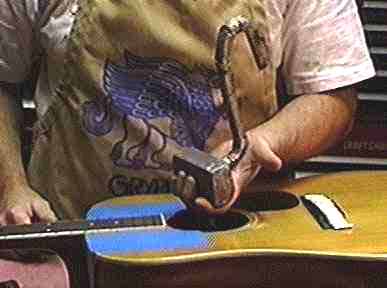
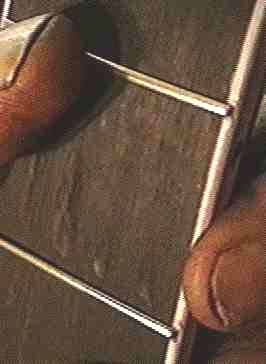
8. Heat & remove frets. I hold the soldering iron on the fret for about 10 seconds and bite under the fret with flush cutting end nippers. When the fret is hot enough, the cutters lift it easily with a little pressure. I slide the iron along, heating the fret as I bite under it with the nippers. The nippers tend to hold chips down against the fingerboard. If the fret is particularly obstinate, or the fingerboard is very flaky, I have a second pair of nippers ground dull, so I can give a second "bite" to raise the fret out gently. I'm not pulling upward, just squeezing the nippers to wedge the fret up and out.
If you look closely, you should be able to make my fret pulling nippers and the soldering iron just behind:
As I reach the other end of the fret, it should come out cleanly:
If all went well, I have removed the frets without pulling up any chips of fingerboard. If the frets didn't come out cleanly, then it's time to glue down the chips. I leave the chip in place, and run thin superglue under it. I spray superglue catalyst (accelerator) on a broad putty knife, and using firm pressure, "iron" the chip in place. Keeping the knife moving and pressed down, I avoid sticking the knife to the fingerboard. I've found that it is much easier to clean out the small amount of glue that might run into the slot than it is to prevent the spill, so I just ignore that problem for now.
Sometimes tiny chips fall out and disappear. I fill these little holes with medium viscosity superglue mixed with a bit of the appropriate color dust or lampblack. A little catalyst dabbed in the hole ahead of the superglue helps the fill harden very quickly. (Catalyst applied on top of the superglue is more likely to cause the fill to turn white in spots.) In any case, I glue back all chips before starting to sand the fingerboard level, even if the filled areas are eventually to be sanded through.
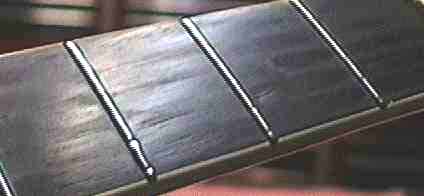
These frets came out quite well, leaving only little trails at the very edge of the fret slots where the barbs on the fretwire tang pulled through:

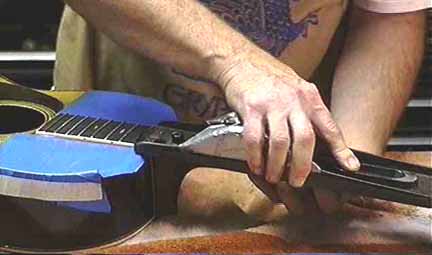
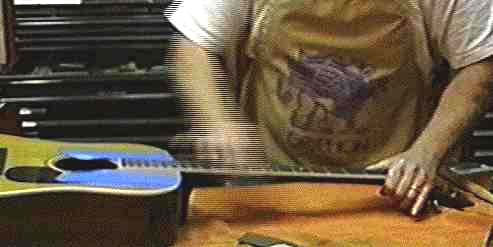
9. Level the fingerboard. My sanding block is a #5 cast iron Stanley jack plane body with all the parts removed. It is 14" long and I find it easy to use as a guide for tearing the sandpaper, which I simply crease and hold on the block as I sand. This is a hard, massive block that glides easily and mercilessly cuts anything in its path. No problem knocking down high spots and leveling with the full 11" length of a sheet of sandpaper.
I've found I can't handle radius sanding blocks, so I never use them. Even if I hold my flat block at a slight diagonal, it still cuts a perfectly straight path, which I can view easily by the dust that packs into the fret slots. When I'm being especially careful, I pencil a few "witness marks" to make it even more clear. If I have really bad areas to level, I'll scrape them first to avoid unnecessary effort with the sanding block. As I sand, I "roll" the block from side to side to match the radius of the fingerboard as closely as possible.
I may use a circular sanding motion with coarse paper to grind down a hump in one area of the fingerboard, but I'll always finish by sanding with the grain. I'll sand until I feel the sandpaper begin to load. At that point it suddenly feels as if the fingerboard has been greased. We're only talking about 25-30 seconds of sanding per piece of sandpaper, using each grit available in succession (80, 100, 120, 150, 180, 220.)
I vacuum out the fret slots after each piece of sandpaper so I can see my progress and avoid excess loading. My sandpaper of choice is no-load stearate coated silicon carbide A-weight. I've not found any difference in performance, so I buy the cheapest Korean stuff and throw it away with no regrets when it begins to load up. The coarsest I use is 80-grit; I finish with 180 on rosewood and 220 on ebony. I choose my starting grit based on the amount of sanding I think will be necessary -- anywhere from 80-150. My goal is to level the board and give a perfect substrate for the new frets without removing any more wood than necessary. My final sanding scratches are removed when I polish the frets.
I have my fingers spread as far as possible supporting the neck from underneath and I'm raising the peghead off the bench. When I sand, the neck "floats" as I support it. That way I'm not bending the neck as I sand, no matter how hard I press with the sanding block.
If I wanted to introduce a "reverse bow" I'd support neck by resting the peghead on the bench. Then, as I sand, the neck would flex forward, causing me to take a little extra off the fingerboard at the nut end. This would be helpful in correcting a seriously flexible neck that pulled forward under string tension.
I can create a little forward relief by supporting the neck in the center and using a heavy lead shot filled bag to flex the peghead backward as I sand. This is especially useful in refretting classical guitars. Definitely one of those times where judgment from practice and experience comes in to play.
If my method seems a bit uncontrolled, bear in mind that the stiffness of the neck will be somewhat unpredictable as a result of changing the compression in the slots after removing old frets and installing new frets. I count on my ability to judge the way things feel and look as I go, and I am always ready to redo the work completely if it doesn't come out just right.
Preparation of the fingerboard is so important to me that I'll put in whatever effort it takes to get the surface as perfect as I can. I like to leave it to the customer to decide whether to fill very deep fingernail damage between frets. Most of the time I recommend not filling those divots, because I think that they look ugly after they're worn later, like little islands of synthetic material. A little honest wear gives an instrument character, don't you know.
10. Create drop-off" at end of fingerboard. Next, I apply 4-5 layers of masking tape at 6th fret to raise & support the end of my sanding block. Then I sand the upper end of the fingerboard with half-length sandpaper in same grit sequence to create a "drop-off" over the body.
I like to see the end of the fingerboard drop about .015" over the body to compensate for the neck pulling upward under tension. I find that it provides the best overall contour if the drop-off starts 2 frets out from the body: at the 12th fret for a 14-fret guitar, etc. I think there is too much chance of that slight "hump" at the body if the drop-off starts right at the 14th fret.
11. Check with straightedge for neck straightness and drop-off. I like to start with the neck perfectly straight through its flexible portion (nut to twelfth fret) so the string tension will pull the neck forward just a little to create the proper relief. If the body flexes a little under the string tension, the drop-off may be reduced or eliminated.
I don't usually look under the straightedge, but instead listen for the straightedge bumping the fingerboard as I rock it back and forth pivoting on the apex I've created at the 12th fret.
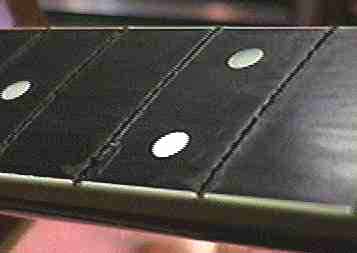
12. Bevel the upper edges of the fret slots. With a small triangular file, I bevel the slots to make it safer for the next guy to pull the frets without chipping and to avoid chips when cleaning out the slots and driving frets in. Beveling the tops of the slots helps drive frets in more easily, but that's not my reason for doing it. If I really want to drive extra-tight frets, I'll file the tang of the fret to a taper at the bottom.
13. Saw or pick slots to clean & deepen. My favorite fret saw is actually a Japanese razor saw that cuts about .018" kerf. It's insanely sharp and cleans & deepens slots with ease on the pull stroke. I cut inward from each end of the slot to avoid chipping out. I'm not too concerned with the saw kerf actually matching the size of the fret slot, as long as it's a just little narrower. When I deepen the slot accommodate new fretwire, I'm usually cutting below the part of the fret tang where those little bumps grip the slot, and I don't want to widen the slots.
I'm more cleaning than deepening the slot, so my new cut doesn't have much influence on the fit of the new fretwire. If my choice of fretwire is limited, I'd rather file the tang thinner than widen the slots. (When in doubt, the conservative approach is always a good choice -- you can always go back with different frets, but you can't replace the wood in the fret slots if you widen them.)
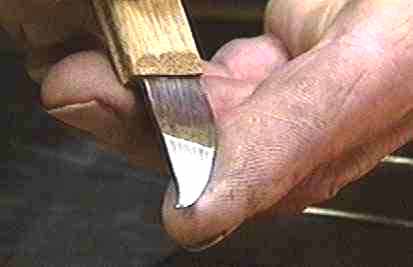
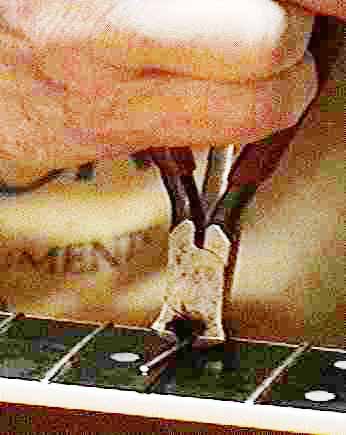
I've made a special little pick for cleaning out the slots of bound fingerboards:
It's hollow ground from a violin knife and is a hook that cuts and scrapes like a chisel only at the point. I've rounded all edges except the very chisel point. I hold it like a pencil with my right hand, and grip the back of the handle with my left. Using my right palm as a fulcrum, I can bear down very hard, dragging the pick along, deepening & cleaning with no chance of slipping or widening the slot:
Unnecessarily widening fret slots will limit future refretting.
14. Trial fit fretwire. I take a short piece of a fretwire candidate and cut the tang, bending a right angle about 3/8" long. I tap this tiny section into a fret slot to check the fit and feel:
I pull on the "handle" of the fret to see how easily it pulls out of the fingerboard. With a little luck it doesn't take long to find the right size wire. Usually I predict which wire will fit based on previous experience with the specific model guitar I'm working on. Any time I hear of a kind of fretwire I don't have I get at least a pound to have it available, just in case.
Ace repairman, Larry Cohea, gave me a swell tip: Take this same little trial piece of fretwire and file the tang very thin. It then makes a perfect depth gauge for the fret slot, using the wire that will actually be used. Larry just runs it through the slots to find high spots at the bottom.
15. Radius and cut a set of frets to fit the fingerboard. And trim the ends to overhang binding, if any. Nothing like the Stewart-MacDonald fret trimmer for overhanging frets. A couple of years ago I got a phone call from my friend, Jeff Traugott. He was revising his repair price list and asked me how much more I charged for unbound fingerboards. I said I charged less for them because I didn't have to overhang the frets. He claimed that filling the fret slot ends made the unbound fingerboard harder to work on. I've timed both jobs many times now, and I find they take nearly the same time on the average, thanks to that swell tool. As a result, I charge the same for both. For unbound fingerboards, I'll cut the frets 1/4" longer than the slots.
I like to have the fretwire radius about 10-20% smaller than the fingerboard radius. Given the choice I buy fretwire in coils, which just happen to be the perfect radius for refretting Martin guitars. Otherwise, I use another Stew-Mac tool, the fretwire bending roller, to radius the frets before I cut them. I'll bend frets by hand if I feel I need to change the radius as I go, depending on how well the frets seat as I tap them in. After I cut them to length the frets go into a block with numbered holes so I can keep track of them. I have two rows of holes in the block in case I change my mind and decide to use a different fret wire for the job and want to save the first set for another.
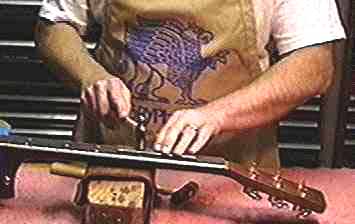
16. Tap frets in with plastic hammer. I hold the hammer with the handle parallel to the fret to minimize the chance of kinking the fret if I tip the hammer sideways. If I hit the fret with the corner of the hammer face, I'll bend or kink it enough so that it absolutely can't be driven perfectly. Holding the hammer handle parallel to the fret means I'd have to tip the handle up or down to catch the corner of the face, which is much less likely than accidentally rotating the hammer side to side.
Choking about halfway up the handle, I'll deliver the sharpest blow I can, by swinging very little with my forearm and mostly whipping the hammer down with my wrist and fingers:
I'm looking for a sharp snap of the hammer, not a hard blow, because I think the fret seats more accurately if it goes in with a maximum number of small sharp taps. Positioning the fret exactly where I want it, I hold it vertical with one finger in the center of the fret. Then, I tap the ends lightly at first to hold the fret so I can move my finger out of the way, then tap the fret back and forth along its length to drive it in slowly and smoothly as possible. It's normal for me to tap a fret 20-40 times, with increasing intensity.
If I hit the fingerboard I won't make a dent, and I can't overdrive the frets by hitting too hard with my plastic hammer. I've tried every kind of hammer I can find, and always come back to my lightweight hammer with a transparent hard yellow plastic face. Dead blow hammers don't seem to deliver as sharp a blow, and metal hammers can scar the frets.
My neck support is a piece of redwood four-by-four covered with two layers of leather. I use this simple neck support for virtually every instrument, except banjos and guitars with removable necks. I like the pattern maker type vise with swivel jaws to hold removable necks while tapping in frets.
I don't need a support under the guitar when I'm tapping frets into the fingerboard over the neck block but I'll support the fingerboard with a heavy lead ballast weight inside the body where possible. This is a hunk of lead a little over 1 x 2 x 3 inches that weighs about 4 pounds including the handle. I melted the lead on the kitchen stove and poured it around a 1/2 inch square steel rod handle in a small wood box lined with aluminum foil. It's a tool I made for my very first guitar in 1968. (Seems we weren't hearing so much about heavy metal toxicity back then.) I've used it on every flat top guitar fret job ever since:
Backed up with this heavy mass, I can hit a fret over the body as hard as I can swing the hammer without endangering the top of the guitar. I'll tip the rectangular weight to get the flat surface or just the front or back edge positioned exactly under each fret as I work my way to the end of the fingerboard. If there is a brace under the fret, then I back up the brace with my weight. Most of the time, I hold the weight from underneath, and the handle just serves as a reminder not to lose the weight inside the guitar. Think of what might happen if I picked up a guitar with four pounds of lead loose inside. I have enough troubles without that! A sandbag laid on the face of the guitar keeps down the vibration, and noise, too.
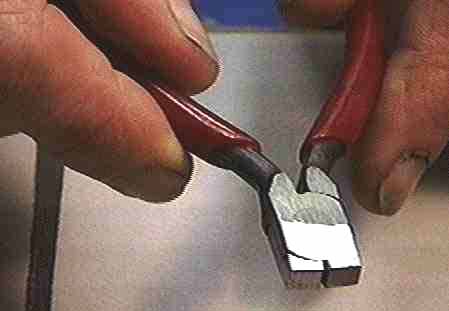
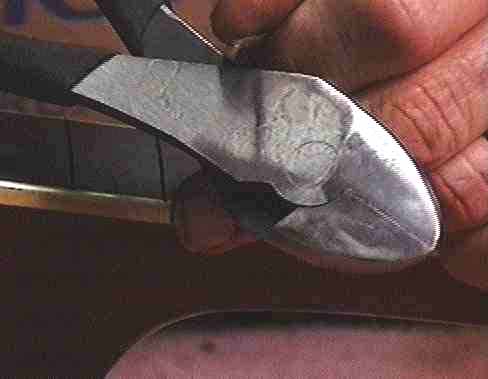
I don't like to glue frets, so I always tap them in without glue or lubricant. For me, the major problem with epoxy & clamped frets is that the job is too cumbersome: it takes too long, and is too messy to clean up. All my work is on acoustics, so I don't use the fret pressing techniques because of the difficulty over the body. If the frets fit a bit too tightly, I'll mash the barbs on the tang a little with my cut down long-nose pliers::
This tool gives me incredible leverage, and I can easily squish the tang completely flat if I squeeze hard.
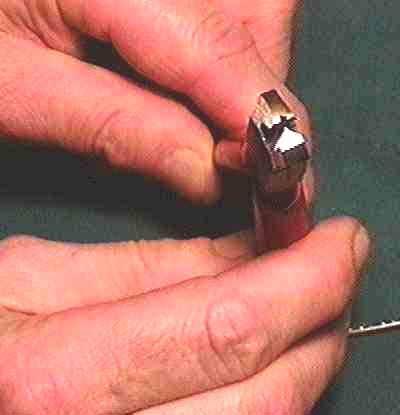
If the fret ends or individual frets are too loose I'll widen the tang with my special little ground fret tang expander pliers:
I made this tool by grinding a pair of end nippers, using my Dremel with the 1" diameter carbide cutoff wheel. With this tool I can make little zigzags on the fret tang to make it grip the walls of a wide fret slot:
I can even use this tool to widen a full set of frets to grip the walls of slots previously widened to .040 for the glue-and-clamp fret method. Thankfully, I don't encounter that need very often. See the article on Making the Fret Expander Pliers.
These techniques are especially useful in refretting because all the slots are not necessarily uniform or identical. Many instruments have had partial fret replacement that left some of the slots wider than others. Naturally, if I misjudged the wire entirely, I'll just start over with a different size. With my fret expanders, I can make a fret grip reasonably well in a slot that is nearly twice the ideal width. Following up with a dose of superglue run under the fret, I have confidence that the fret will stay in place.
I think it's a good idea to make as many of your own tools as you can. You not only get the tool you need, but in the process you'll invent tools, modifications and improvements that will help you work. You'll also limber up the old brain a bit and reexamine some of your techniques along the way.
I've been using my homemade fret tang pliers for over 20 years and they've bailed me out of some nasty fret troubles.
17. Trim fret ends with diagonal flush cutters. Before any further work on the frets, I want to trim the ends. That way there won't be an overhanging length that may bend easily if hit or snagged. Not to mention that these ends are dangerously sharp. My fret cutter is a pair of diagonal cutting pliers I've ground flush cutting on the back side:
I always hold my left hand under the cutter to catch the cut off ends. I don't want to have a sharp piece of a fret loose on the bench to scratch the instrument while I'm working on it. Once was enough, if you know what I mean.
18. Sight down fingerboard to find high, unseated frets. I sight from the peghead down the fingerboard at varying angles, viewing against oblique reflected overhead light. As I tip the fingerboard, any high frets will generally be revealed as brighter, and low frets will appear dark. Uneven or dented frets are easy to spot by their different reflection when compared to all the others. Ideally, as I lift the guitar to sight straight along the fret tops, they will seem to merge to a single metallic stripe.
19. Level & seat frets by tapping with steel hammer and steel protective plate. I never hit a fret with a steel hammer. I have a plain little 1/8" thick hunk of mild steel that I lay down over the frets when I hit them with a 2-ounce ball peen hammer:
The steel hammer delivers a much sharper blow that the plastic one, and will drive a fret much faster and more firmly. I can hit the frets as hard as I want without making a scratch on the fret surface. I'll move quickly up and down the fingerboard hitting each fret 4-5 times. I frequently skip this step if all the frets look perfect after the initial seating with the plastic hammer.
20. Check for high frets. After "ironing" the frets down, I check for high ones by rocking a short straight edge across small groups of frets along the length of the fingerboard. This takes almost no time as I slide the straightedge along, pressing down alternately on one end. then the other. I'm not looking, but listening, and feeling for the straightedge to rock on the occasional high fret. Naturally, if I find a high one, I swat it down with my ball peen hammer and steel plate.
21. Check for loose tuner parts. By now, all this vibration is enough to loosen the buttons on old Grover Rotomatics, and parts of other tuners as well.
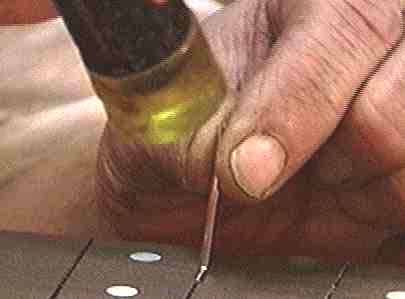
22. Fill fret slot ends. On unbound fingerboards, I dab catalyst, then drop medium superglue into the ends of the fret slots. Even though it's clear, this stuff looks appropriately dark in the slot when it hardens, blends with the finish, sticks well, and polishes off just like lacquer on the fingerboard edge.
Catalyst applied ahead of the superglue speeds the reaction, and makes for a shallow fill at the fret end. I bought a box of 5000 of these cheapie plastic half-ounce portion cups from a restaurant supply outfit. They are great for superglue application. With a small amount of glue in the cup, I can pick up individual drops and place them exactly where I want. Best of all, I can only spill one drop at a time. . .
23. Run superglue under frets if desired. Here's how I glue frets: If I'm unsure of frets seating well enough, I'll use a little superglue for insurance. I drop the thin superglue right at one fret edge, along the full width of the fingerboard. It runs right under the fret. Right away, before the stuff sets, I follow with a wipe of acetone to clean the glue off the fingerboard. Working swiftly with the rag, I can avoid drips, and catch the glue before it runs. It's actually easier than it may sound because I already have a rag damp with acetone in my hand before I run the glue under the fret. I have to be very careful not to get any acetone or superglue on lacquer finishes!
I never count on glue actually sticking to metal. I'm assuming that the thin superglue runs into the fret slots by capillary attraction and lands on the fret slot wall around the little fret tang barbs. If the glue only sticks to the fingerboard, it'll still help keep the fret in place mechanically, like a bunch of little "dams" above the barbs.
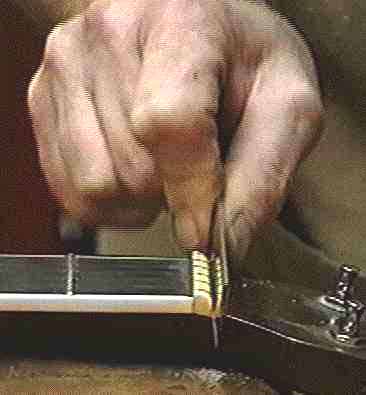
24. File fret ends flush and bevel with mill file. I like mill bastard files because they are cheap. I can replace them often and my sharp files cut very cleanly. I grind safe edges all around, and taper the ends so they won't bump into the fret ends as I start to level them. I hold and guide the files by hand because I use a different bevel angle for different instruments.
Generally speaking, I like to use as few specialized tools and fixtures as possible so I have the greatest amount of flexibility of work. I don't just refret guitars. Banjos, mandolins, tiples, bouzoukis, tambouritzas -- they all deserve attention and they all have their special needs.
The steel shim stock protects the guitar top from my file, but I have to be careful at the peghead to avoid nicking it with the file end. When the file begins to touch the fingerboard corner I immediately hear and feel a difference. I finish by "draw filing" the fingerboard edges. Sideways strokes with a regular file cut more cleanly, and allow much greater control of the angle of attack. I can cut cleanly just as far down the edge of the fingerboard as I want without any fear of slipping down onto the finished surface of the neck.
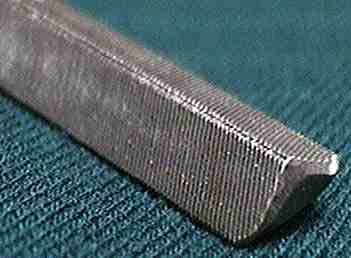
25. Finish fret "corners" with cant saw file. I have a triangular cant saw file with all the corners ground smooth:
This file has two 37.5° angles and one 105° instead of the usual 45° angles found on regular triangular files. It is a standard Nicholson file available through machinist catalogs or large hardware stores. After examining the ends of frets on a number of instruments, I decided on a look I liked. I spent some time figuring out my technique for holding the file, and reduced the job to the simplest movements I could. I file the end of each fret in succession up and down the neck holding my hand and arm in the same position, hitting each fret end with a single stroke. I touch the very edge of the fingerboard with the safe corner edge of the file, slide over to the fret and push the file smoothly and firmly to avoid chatter marks.
My first cut is with the obtuse angle (105°) held level against the fingerboard, tipped down slightly, approaching the fret end at about 45°
The second cut is with the file rotated 90° cutting with the flat side vertical and acute angle down. I again attack the fret at 45° and roll the file a little as I cut the tiny little corner left by the first file stroke. By turning the instrument over to work the other fret ends, I routinely file the ends of all the frets in less than 2 minutes without rushing at all. It's just a matter of 160 very similar strokes. Here's a view of the finished fret ends:
26. Level tops of frets by sanding. With my jack plane body and 600 grit waterproof silicon carbide paper, I sand the frets until I make a little flat stripe on each one. This is easier than it sounds. Using circular sanding motion, I avoid snagging the paper on the frets:

Here again, I support the neck broadly with my left hand, lifting the peghead off the bench, so I achieve a straight and flat fret surface. The drop-off over the body remains the same as I level the fret tops. While sanding I'm constantly checking the frets to see that each one is touched. I'm confident that if my sanding makes a little flat spot on each fret I have leveled them all very accurately. Usually one sheet of 600 grit is enough. It tears into two useful pieces for leveling frets, plus a handy narrow leftover strip. Here's the best shot I have of the top of a fret after leveling. I think you can see the flat strip on top, which extends across the full length of all the frets:
Speaking of sandpaper, I don't economize on the waterproof stuff. I've found that 600 grit Klingspor waterproof paper from the Sanding Catalog is far more aggressive, cuts longer and loads less than 3M 400 grit. It costs more, but it's well worth it!
27. Round tops and ends of frets. Backed by fingers only, I scrub 600 grit waterproof paper up and down the fingerboard bumping along over the fret tops and ends, rounding off the little flat stripes, and cleaning the file marks at the ends. I usually use the strips left over from tearing the pieces for my plane body sanding block. These are a bit over two inches wide and are just the right size for hand sanding.
28. Buff frets by hand, using Micro Mesh. Starting with 1500 grit, working up to 12,000 grit, I can polish the frets quickly and easily, sanding at about 45° across the fingerboard. With each successive grit, I reverse the angle so the sanding scratches cross each other. It takes only about ten seconds per grit to do the full sequence. For years I was too cheap to buy the Micro Mesh kit. I know better now. The small 3" x 3" pieces I use for buffing frets will last me about 6 months.
29. Buff edges of fingerboard by hand with Micro Mesh. The same sequence of rubbing will polish the edges of the fingerboard and finish at the same time as I buff the frets, or I can use my buffer, and do it by machine. In most cases, the results are the same either way. On unbound fingerboards the filled ends of fret slots buff right along with the finish, and are hardly noticeable even on close inspection.
30. Clean up. The fret polishing drags particles into the fingerboard, so I clean with mineral spirits, and oil the board lightly with mineral or lemon oil to give it a fresh look. I hear of fingerboards being ruined by over-oiling, but I don't think I've ever encountered one in my work. Generally, I suggest that oiling the board has only cosmetic value, and should be no more than an annual event, and lightly done at most.
31. Set up. Time to reassemble, restring, adjust action and check it out. If all went well, the finished product will pass inspection, and play better than new. If not, well, it's time to fix it. I don't try to level frets to correct neck problems, even at this stage. If there's a hump at the body, difficulty with relief or straightness, I'd rather redo the entire job than try to fix it up. If I've kept my sense of time and rhythm, I'll realize that I can afford to redo a job now and then. About once or twice a year, I grit my teeth and start over from scratch to make the job come out just right.