
1867 Martin 1-26
FRETS.COM Repair Blog, September, 2010
Restoration of an antique
1867 Martin 1-26
Once again I'm presenting a project in "blog style," showing the various steps as in the order I did them - the days are sequential but not contiguous, or, in this case even current. Some of the operations have repetitive steps that occurred over a period of several days; they are included as single day descriptions. I actually did the job some time ago, but I'm writing it up blog-style as I go through about a thousand photos I took along the way.
Here's a real old timer, a Martin guitar built in 1867, so that makes it a "post-war" Martin - post-Civil War, that is. (What an absolute outrage and tragedy that our so-called culture marks history by wars!)
OK, I'll get off that soapbox. This guitar was made some three decades before the first serial numbers were used by Martin, and about twenty years before the Factory had the custom of pencil-dating the inside of the guitar tops. But, there is a hand inked date on the case label, and the guitar conforms to the work done at the time, so I think it's quite reasonable to assume the date was written there when the guitar was new, probably by its new owner or the person who may have presented it to the owner. The presence of that niece silver plate with the initials suggests a presentation of some sort.
Day 1: Inspection
Day 2: Removing the Back
Day 3: Cleanup and Regluing
Day 4: Regluing Back Braces
Day 5: Top Repair Starts
Day 6: Bridge Plate
Day 7: Regluing the Back
Day 8: Neck Removal
Day 9: Binding Work
Day 10: Home Work
Day 11: Bridge
Day 12: Gear Repair
Day 13: Together Again
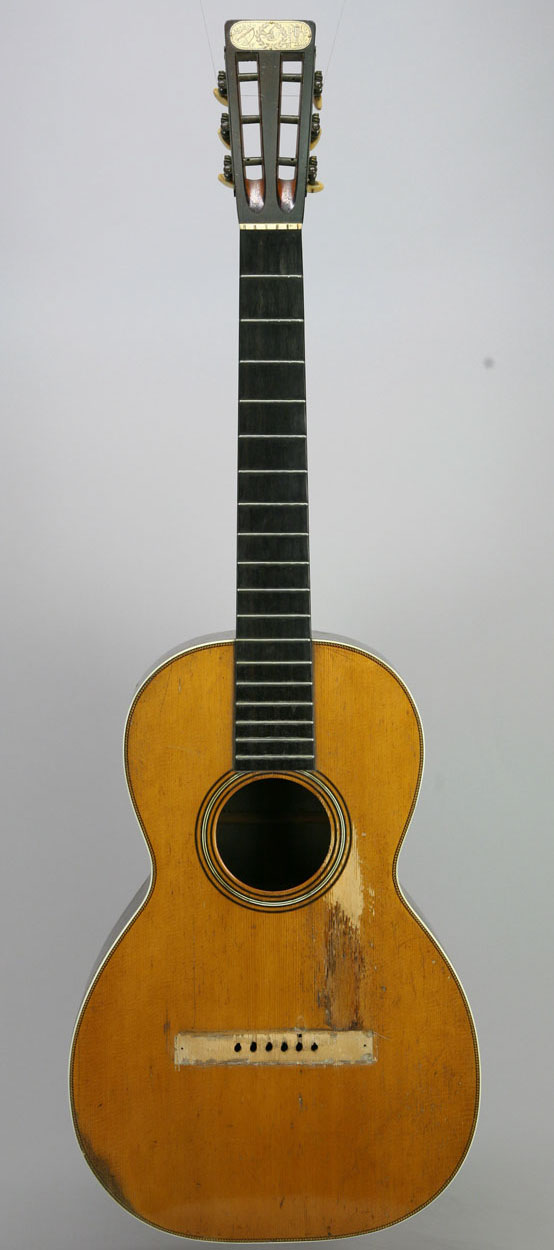
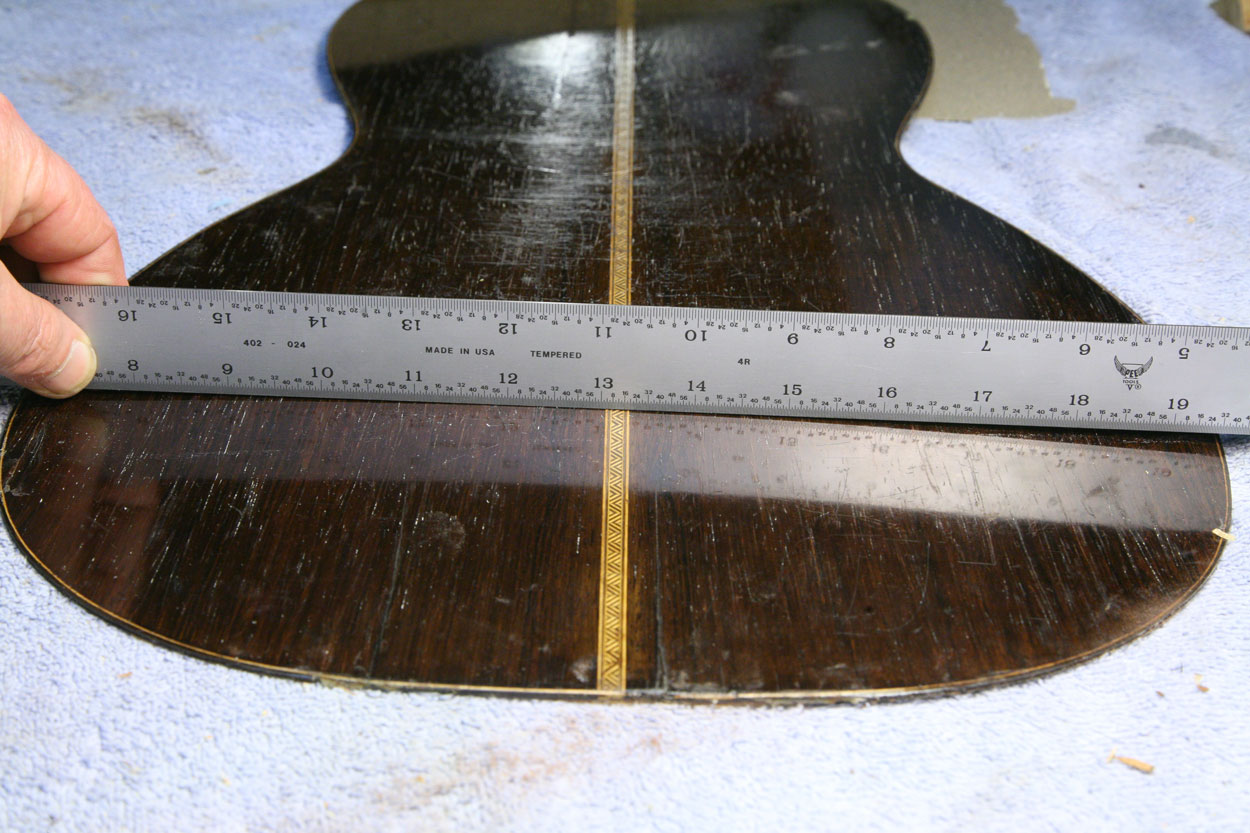
The Martin guitar, style "1-26" was a medium size instrument in its day, but is quite small by today's standards. Intended for home use rather than the concert stage, its body has a maximum width of 12-3/4 inches. The back and sides are of Brazilian rosewood, the neck is Spanish cedar, and it has African ebony for the fingerboard in bridge. The top, or soundboard, is local Adirondack spruce. these materials are still considered among the most desirable for guitar construction.
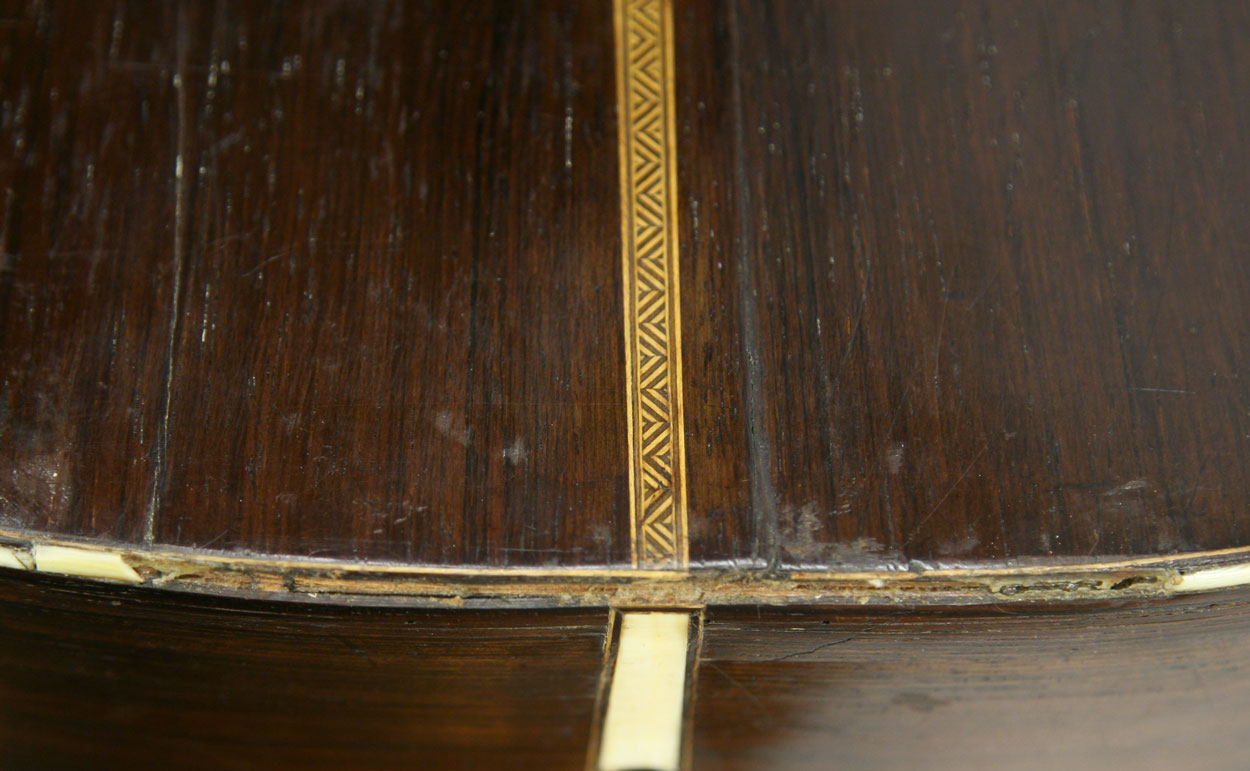
The body is trimmed with binding made of elephant ivory. "Inboard" from the ivory binding, the top has decorative purfling made of colored wood marquetry.
The model designation includes the body size (1) and the level of decorative trim (26). The number 26 represents the number of dollars the factory charged for this style of guitar when the model was first introduced. Many of these original numbers are used today as model designations more than a century and a half after their introduction!
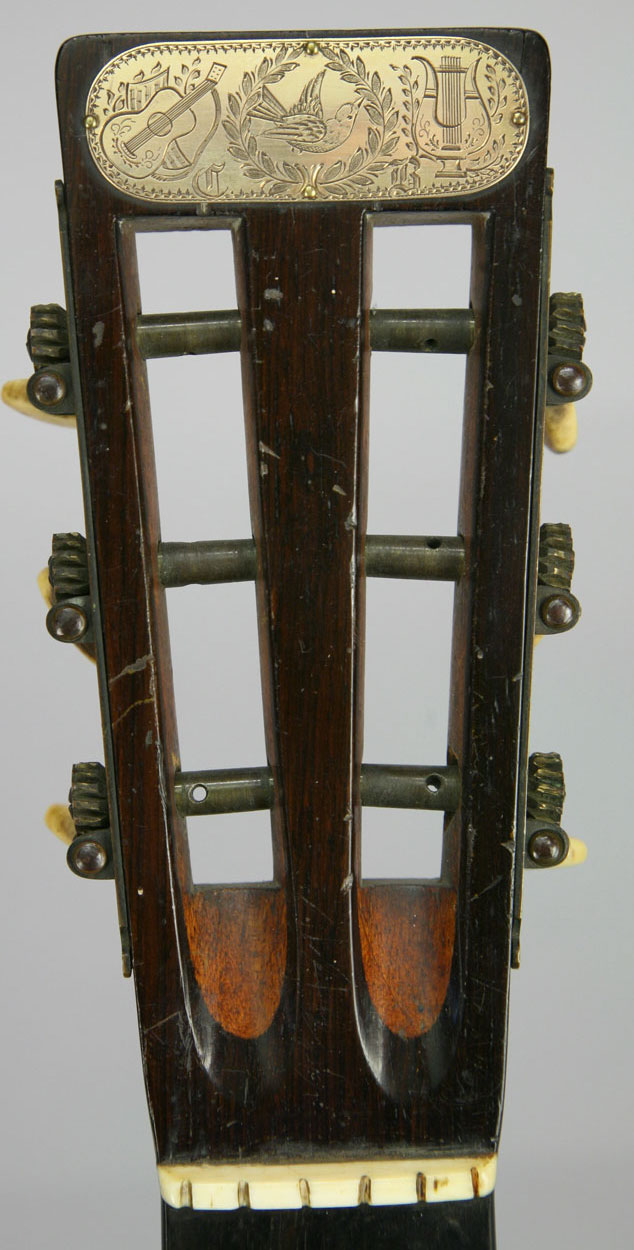
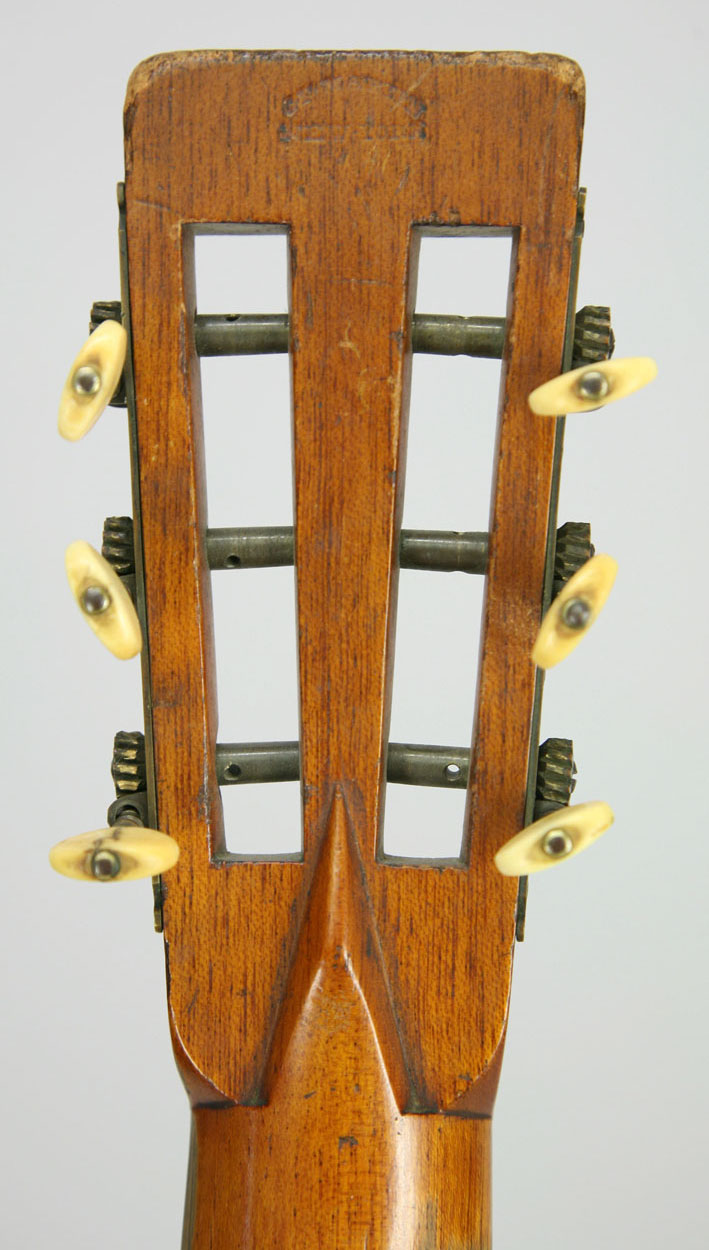
This particular guitar has a silver "presentation" plate on the peghead with initials "C.B." engraved - presumably those of the original owner. The back of the peghead and interior of the guitar are stamped "C. F. Martin, New York." This stamp was used during the period 1867 - 1898:
There were no serial numbers used on Martin guitars before 1898, so precise dating is often difficult. Starting about 1885, the factory foreman would initial and date the underside of the guitar's top, providing us with a nice record of production date. This instrument has no such marking, so it clearly fits the period 1867 - 1885. The general interior construction details are also typical of the earliest part of this period.
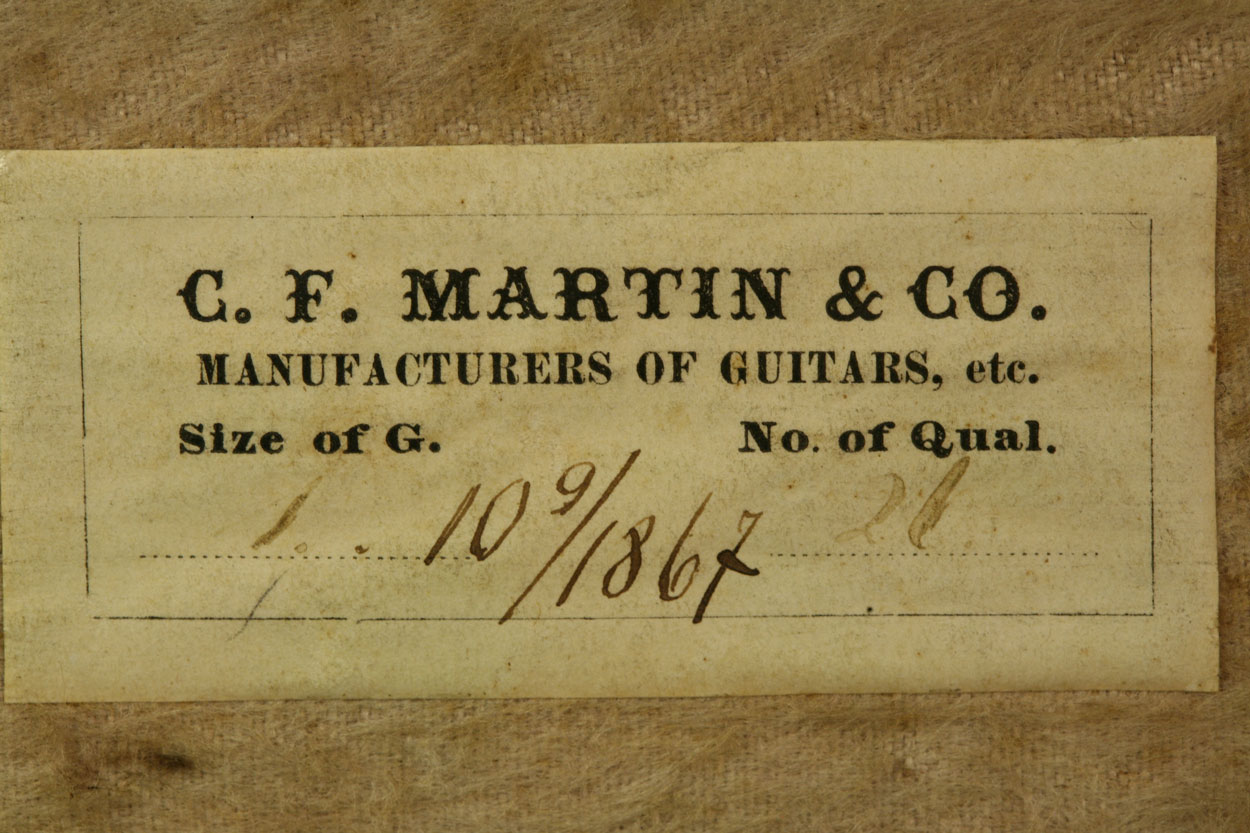
This guitar was found in its original wooden case, which has the standard label on the interior of the lid. In addition to the usual factory notation there is a date written in a different hand. Owners sometimes wrote their names and dates of acquisition on instruments, and I think that considering the other evidence, it's fair to assume that this date is accurate:
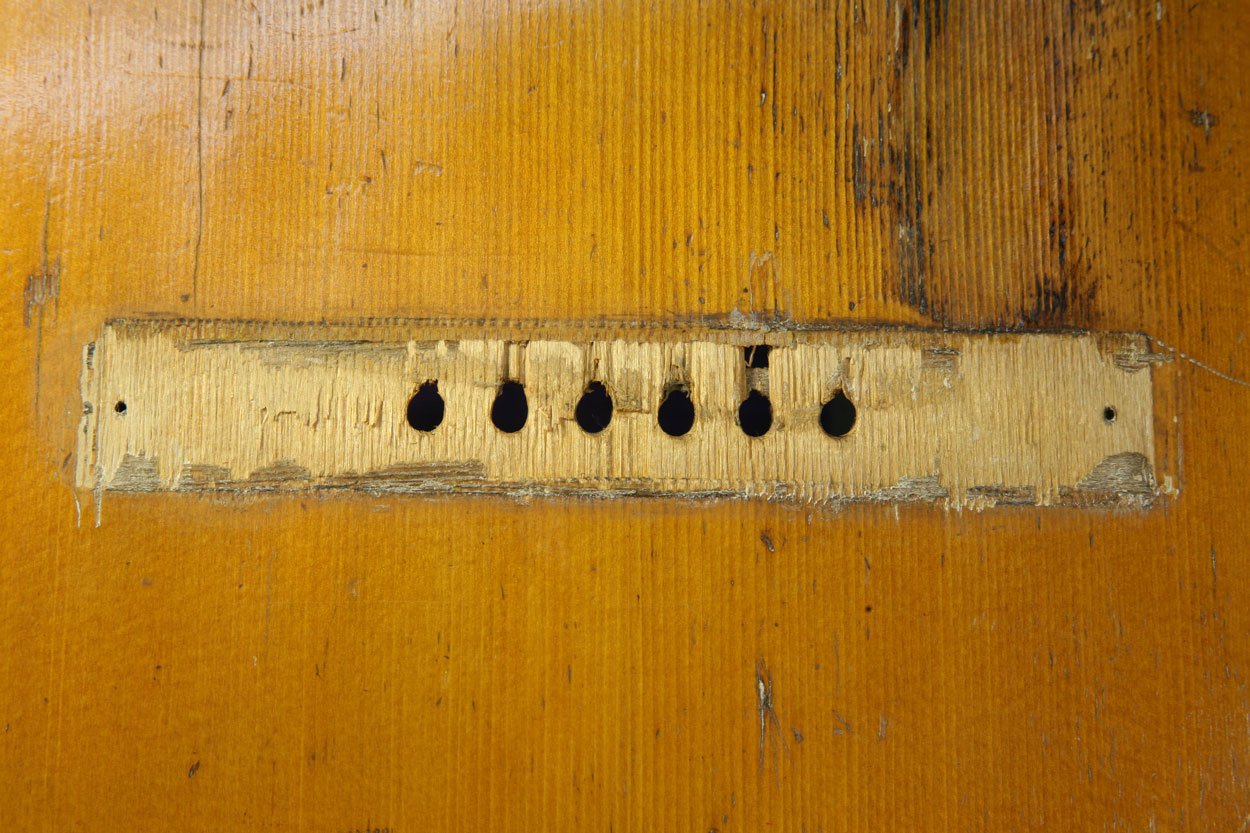
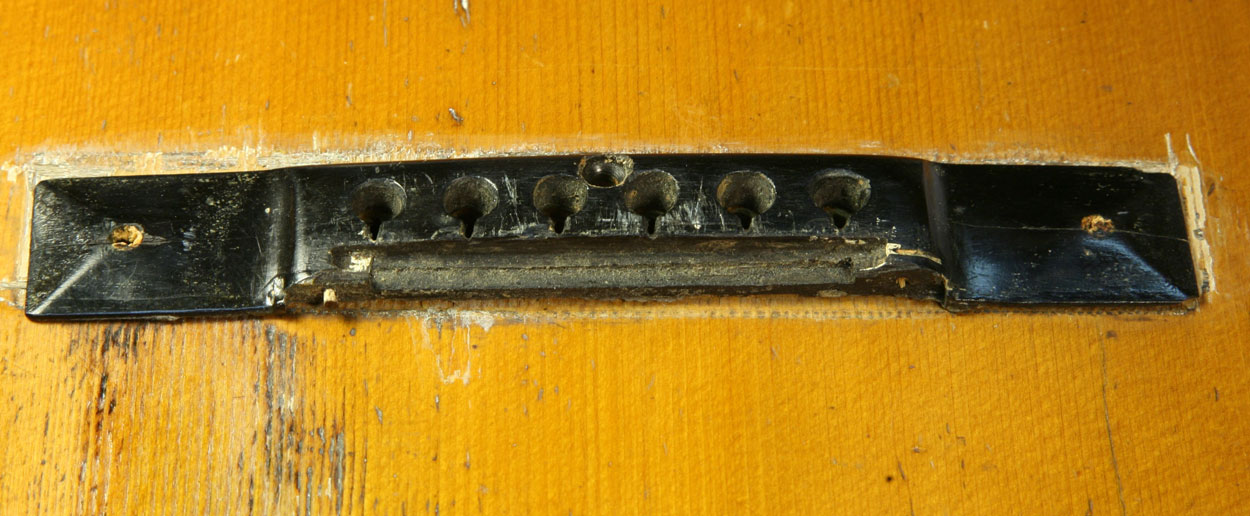
Years of neglect have left this guitar in pretty bad shape. Here you can see the area where the bridge pulled off as a result of moisture, heat and mechanical stress. The top was broken across the grain, so simply regluing the bridge would be ineffective at best. The bridge itself failed and was stored in the case, separated from the guitar. There's considerable playing wear and other scratching on the spruce top. The top of the guitar has turned quite amber from UV exposure, suggesting that this guitar spent much of its time out of the case:
There's a lot of moisture and structural damage at the end block area. Inside, the guitar is incredibly dirty, with most of the dirt caked like mud at this bottom section. I'd say it was sitting in a upright leaning against something, or hanging on a wall when it received a generous application of moisture (likely liquid water at some time) and dirt.
Some nice cracks in the rosewood back round out the set of structural issues. (Unfortunately, I didn't take photos of repairing those cracks, but there wasn't much to see because I did the job with the back removed from the guitar. It was a simple matter of gluing and clamping.)
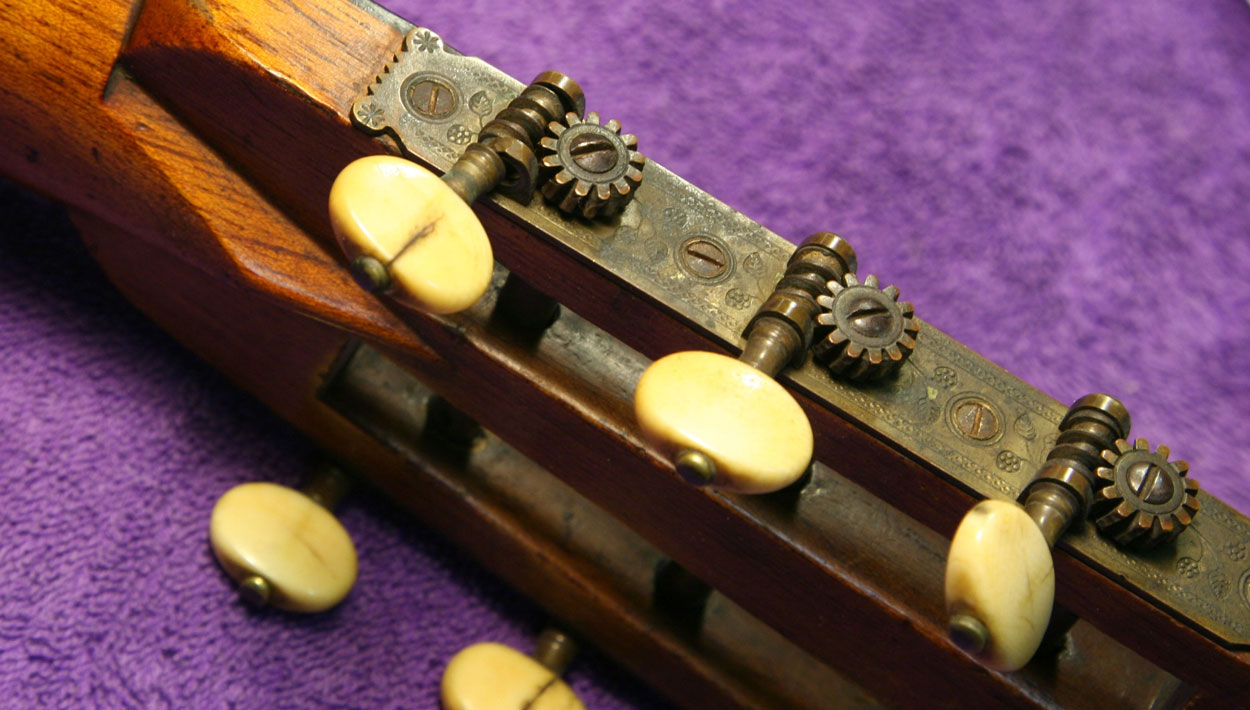
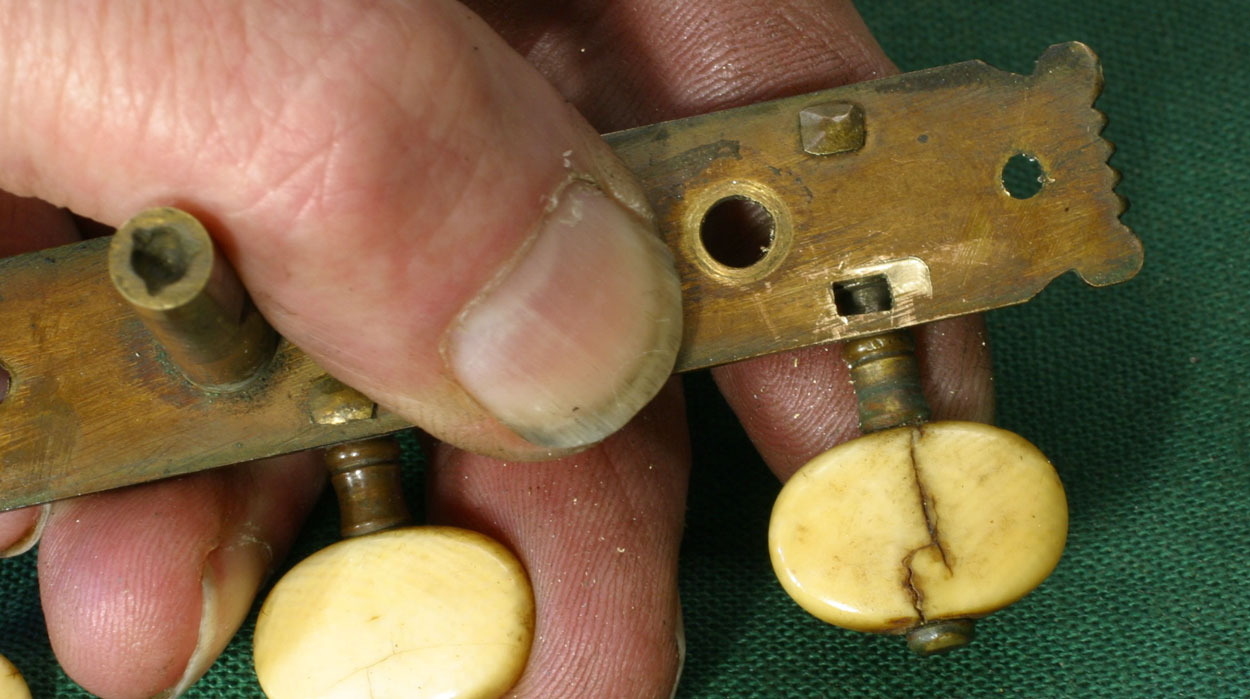
The original tuners have ivory buttons that are cracked with age, but still intact. One of the tuner "bearings" was so severely worn that it broke completely. Rebuilding this tuner and reproducing two case latches will test my metalworking skills:
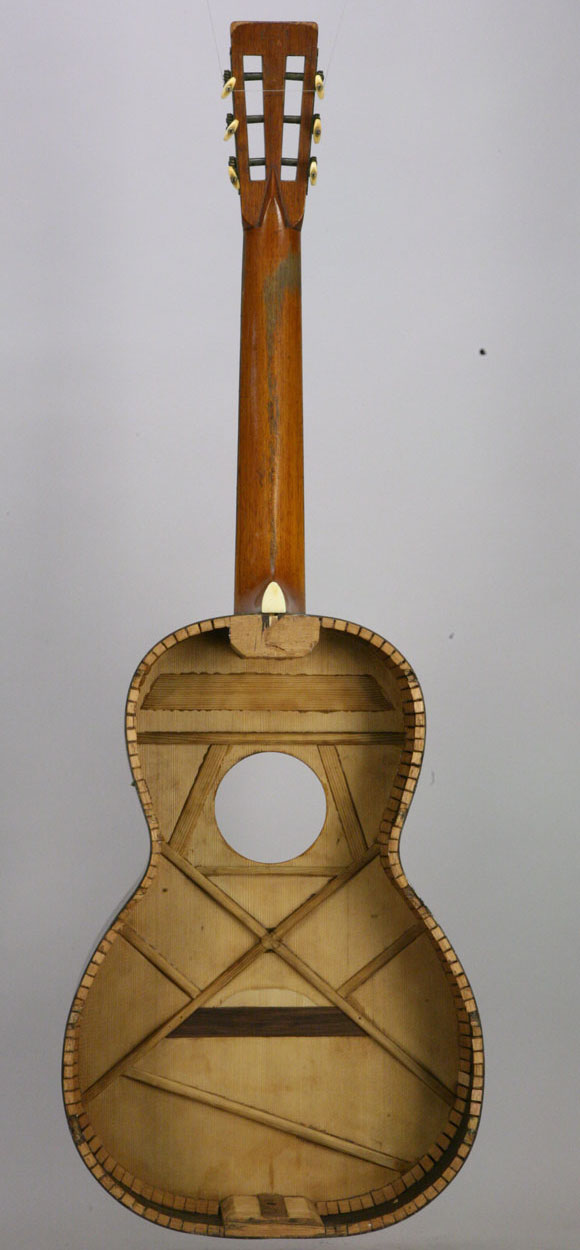
Because of the top damage in the bridge area, and the nasty cracks in the back, I decided to take the back off to get better access for my repair efforts. Given the choice, I'd rather work without body disassembly for a host of obvious reasons: time, cost and potential risk to the structure. With the back off I have an opportunity to do some kinds of repair that are simply impossible otherwise.
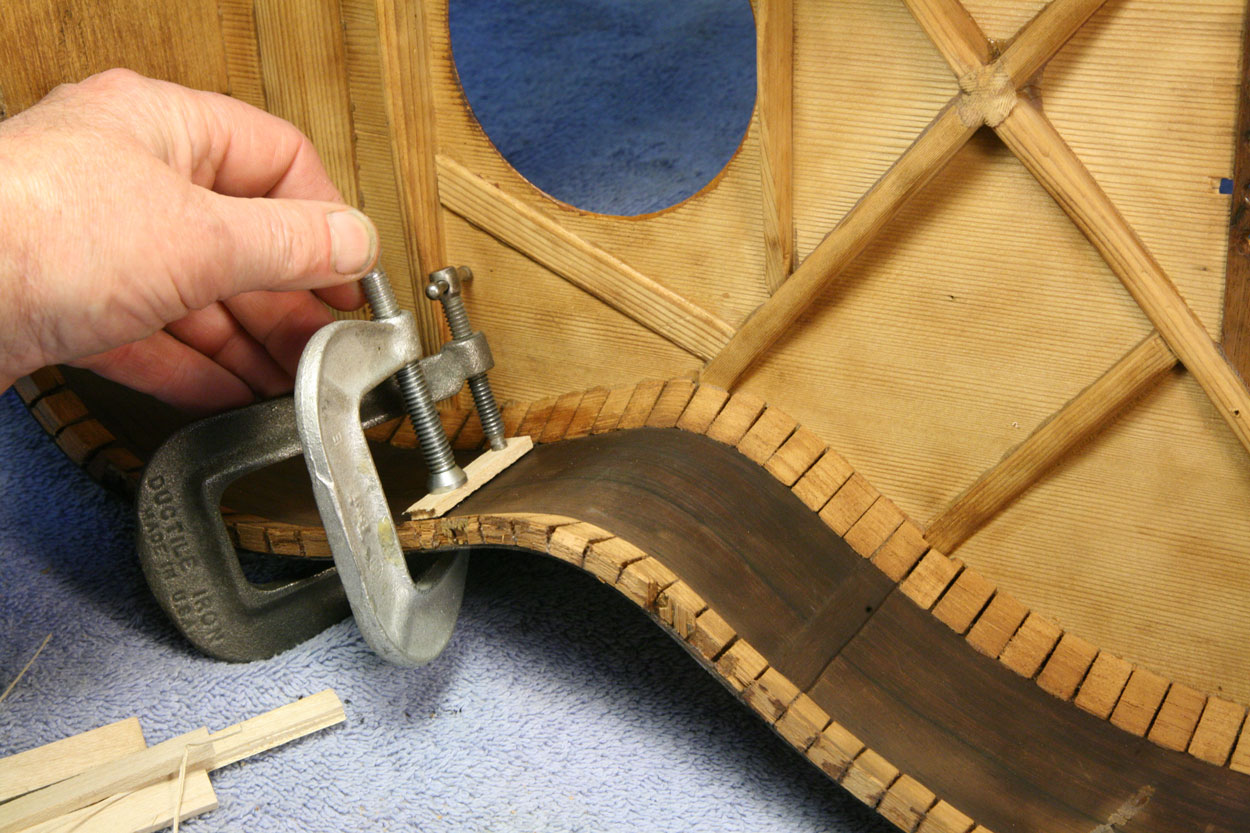
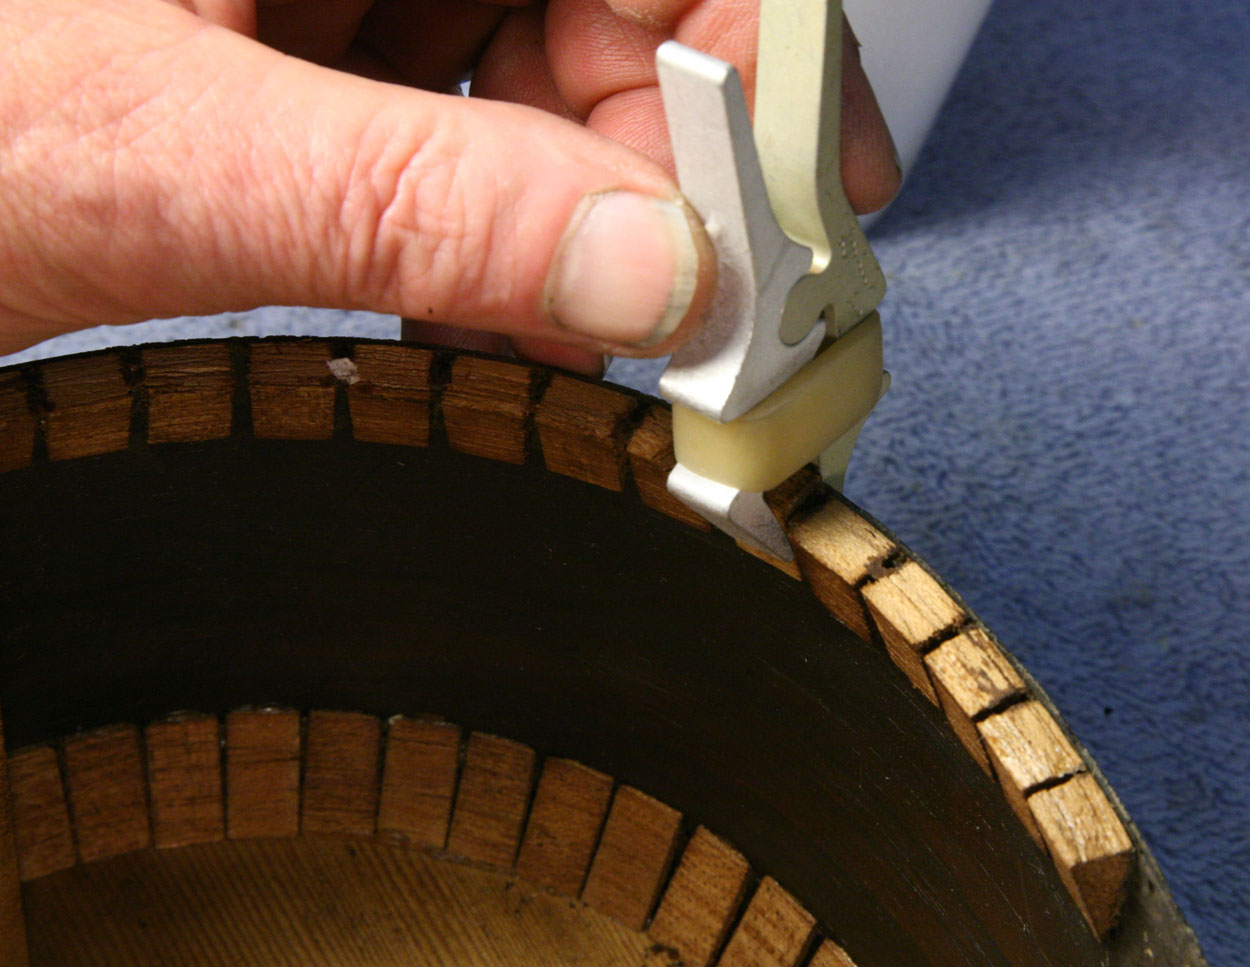
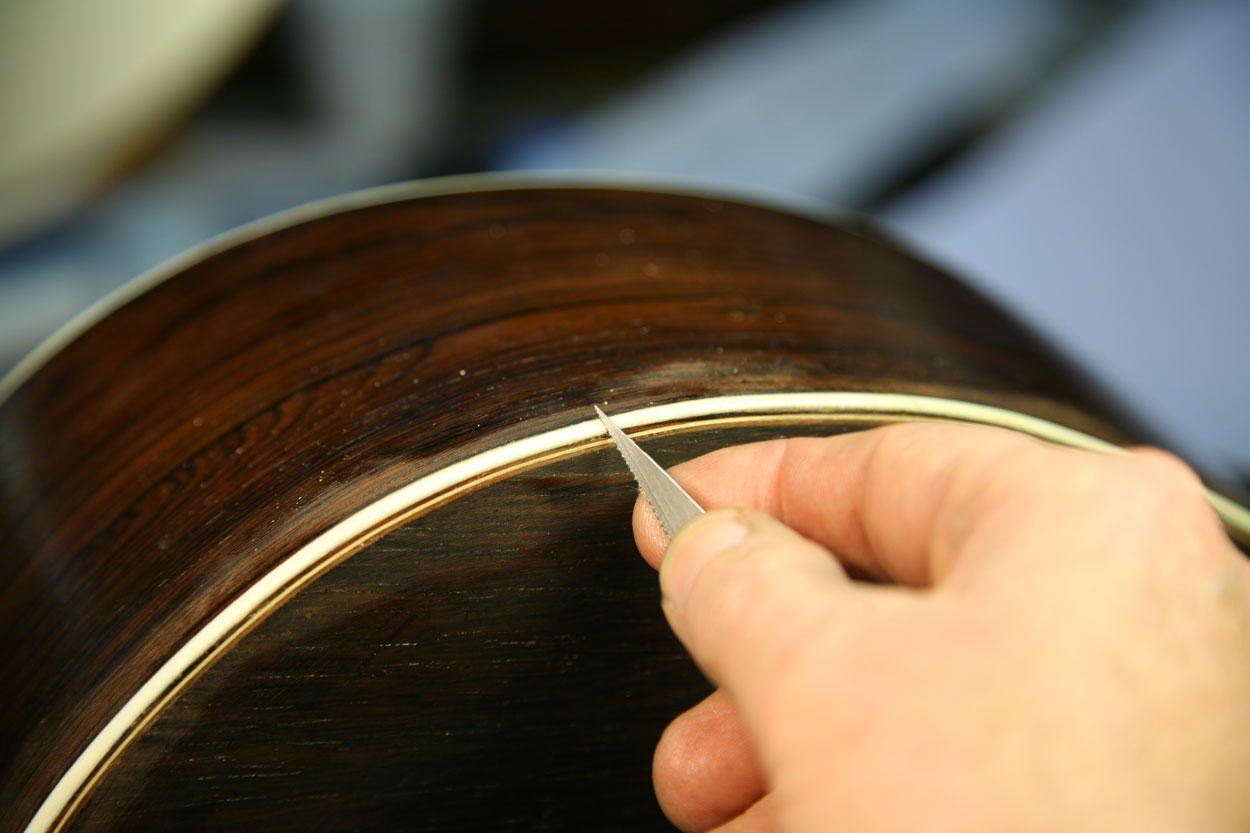
In addition to a large missing section, the ivory back binding was cracked in multiple places. I needed to take off all the pieces preparatory to removing the back so I'd have access to the interior for repair. Working slowly with a thin palette knife, I "teased" the binding off.
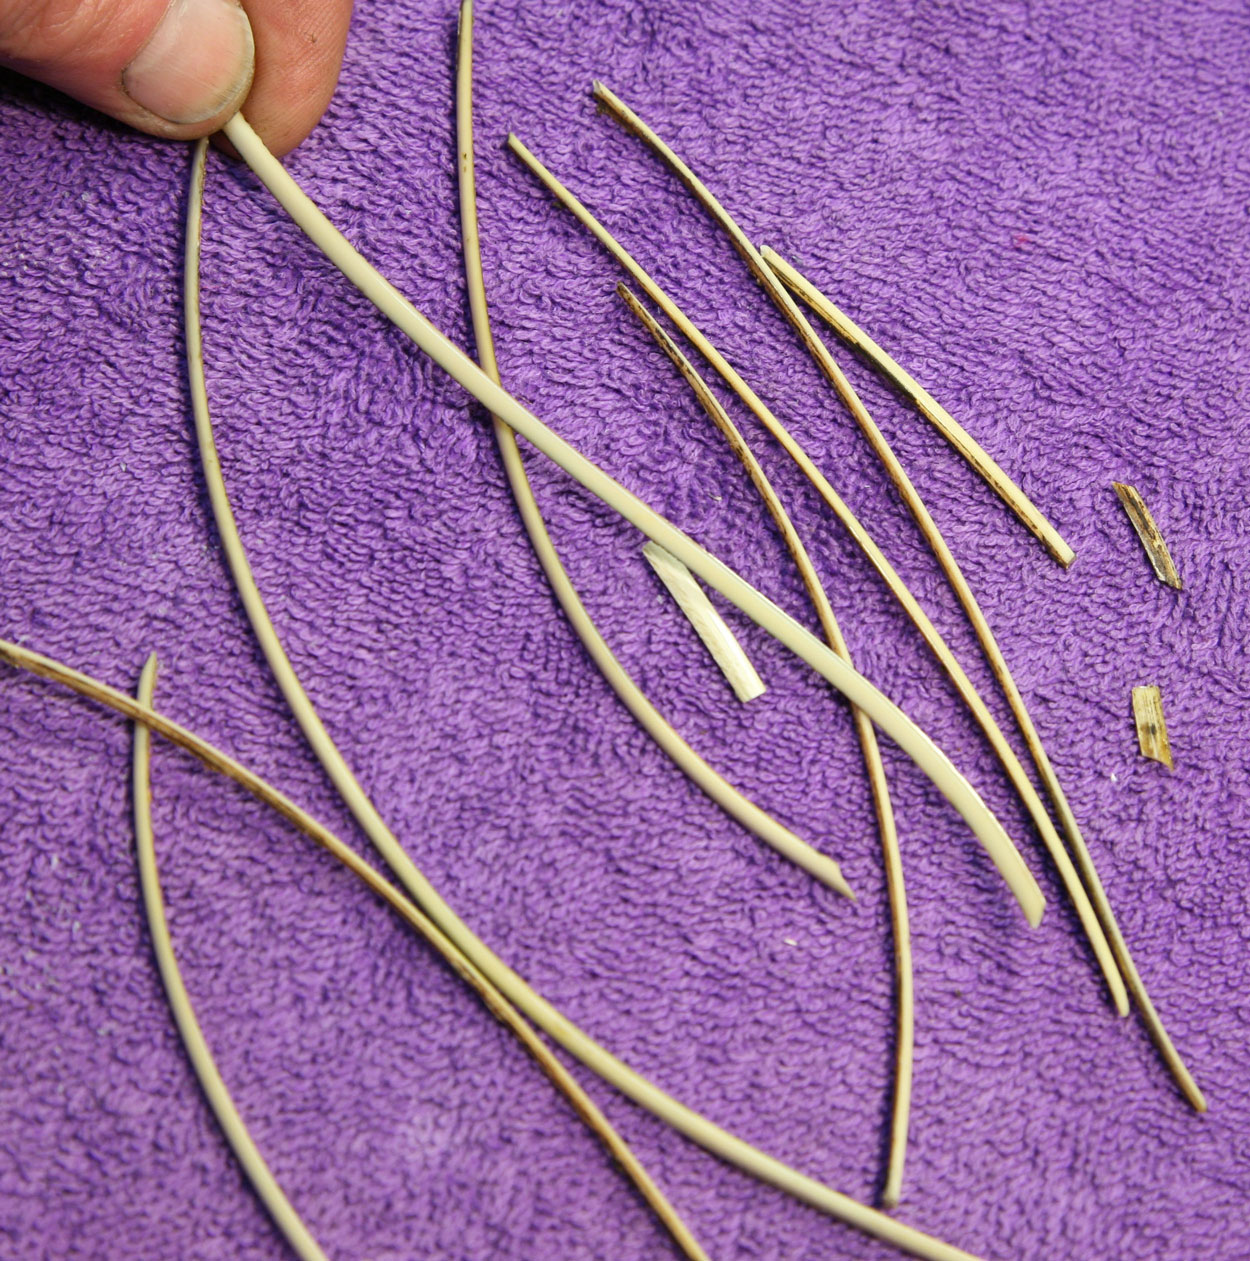
Each piece came off separately. I didn't need to keep them in order because their curvature and irregularly broken ends made it clear how they would fit back in place.
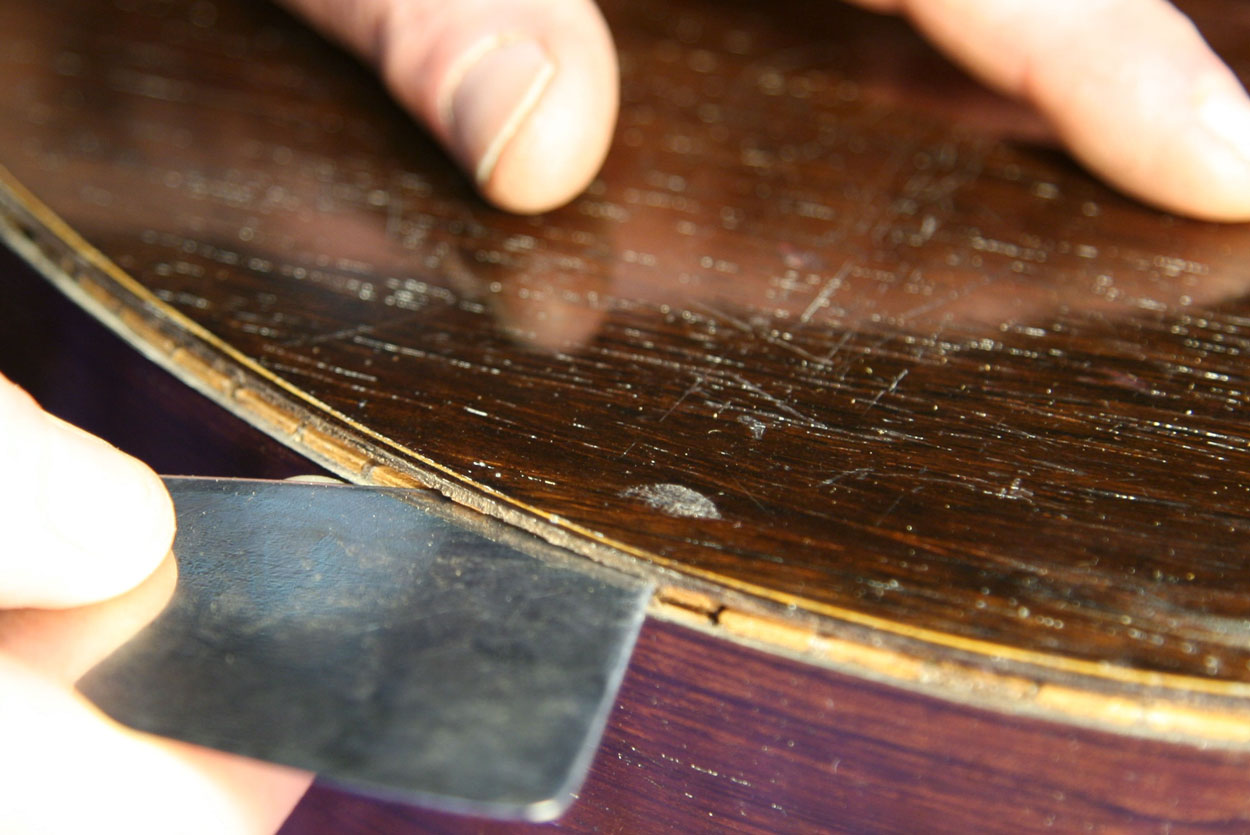
Starting to pry the back loose from linings and blocks, I used a broad, thin, highly sharpened putty knife to penetrate and break the old glue line:
It took a good part of the day just to remove the back, and I worked slowly and carefully so as not to damage any more of that brittle rosewood.
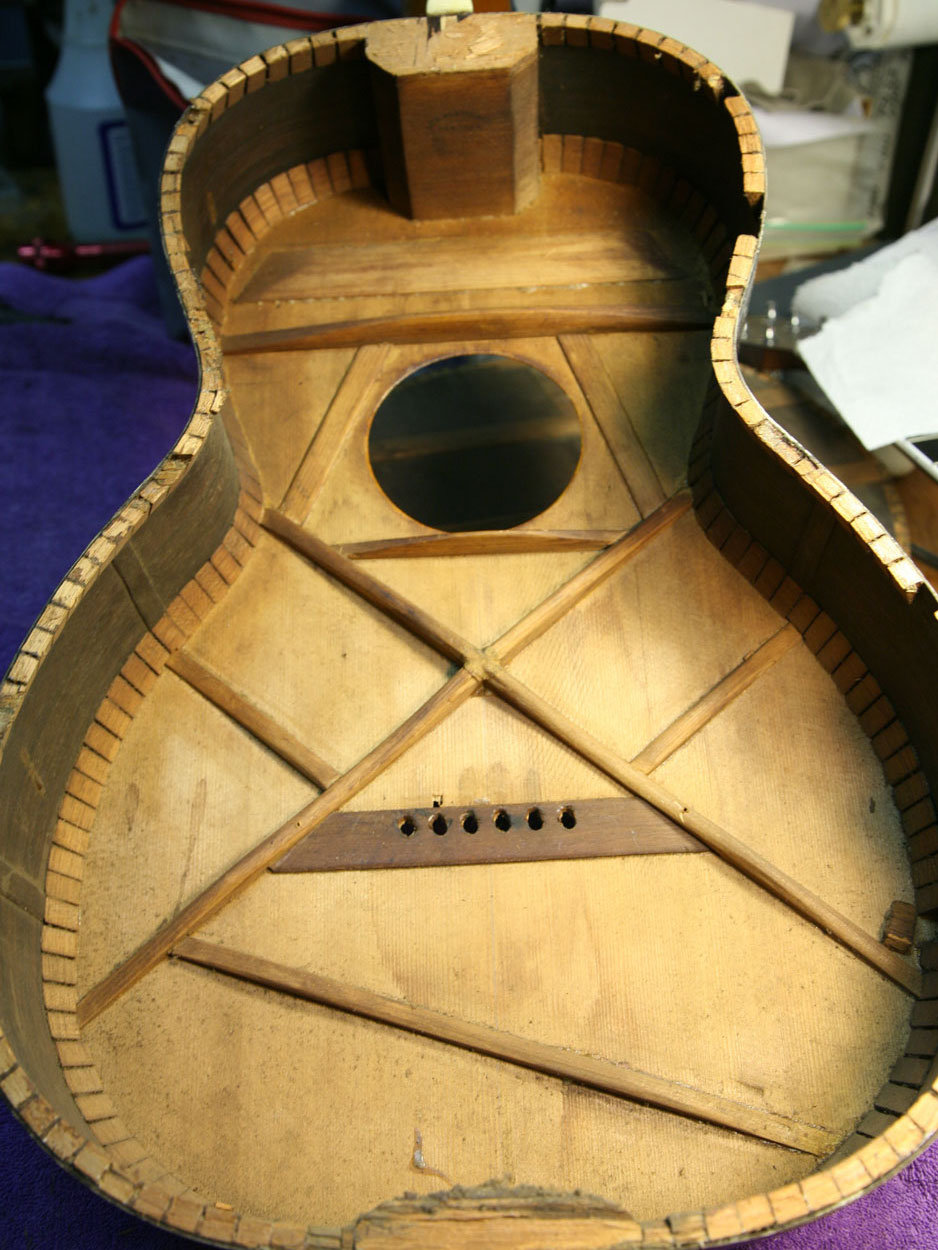
Now that the back was off, I could see that this instrument was incredibly dirty inside, much dirtier than I expected from my cursory look through the sound hole. It had what looked like smoke damage, and lots of caked mud and water staining. While there was a lot of dirt everywhere, it was more concentrated on the back and built up down at the end block, making me think that the guitar was probably on the floor, leaning against a wall when it got wet:
I wonder if this was a victim of flood. Some of the instruments from the recent Nashville flood have a similar interior mess. Hide glue can stand an amazing amount of cold water before it dissolves, and there are stories of guitars having been dropped in the water, completely filled and simply dried out with minimal if any damage. Most are not so lucky, of course.
Day 3: Interior Cleanup & Regluing Small Bits
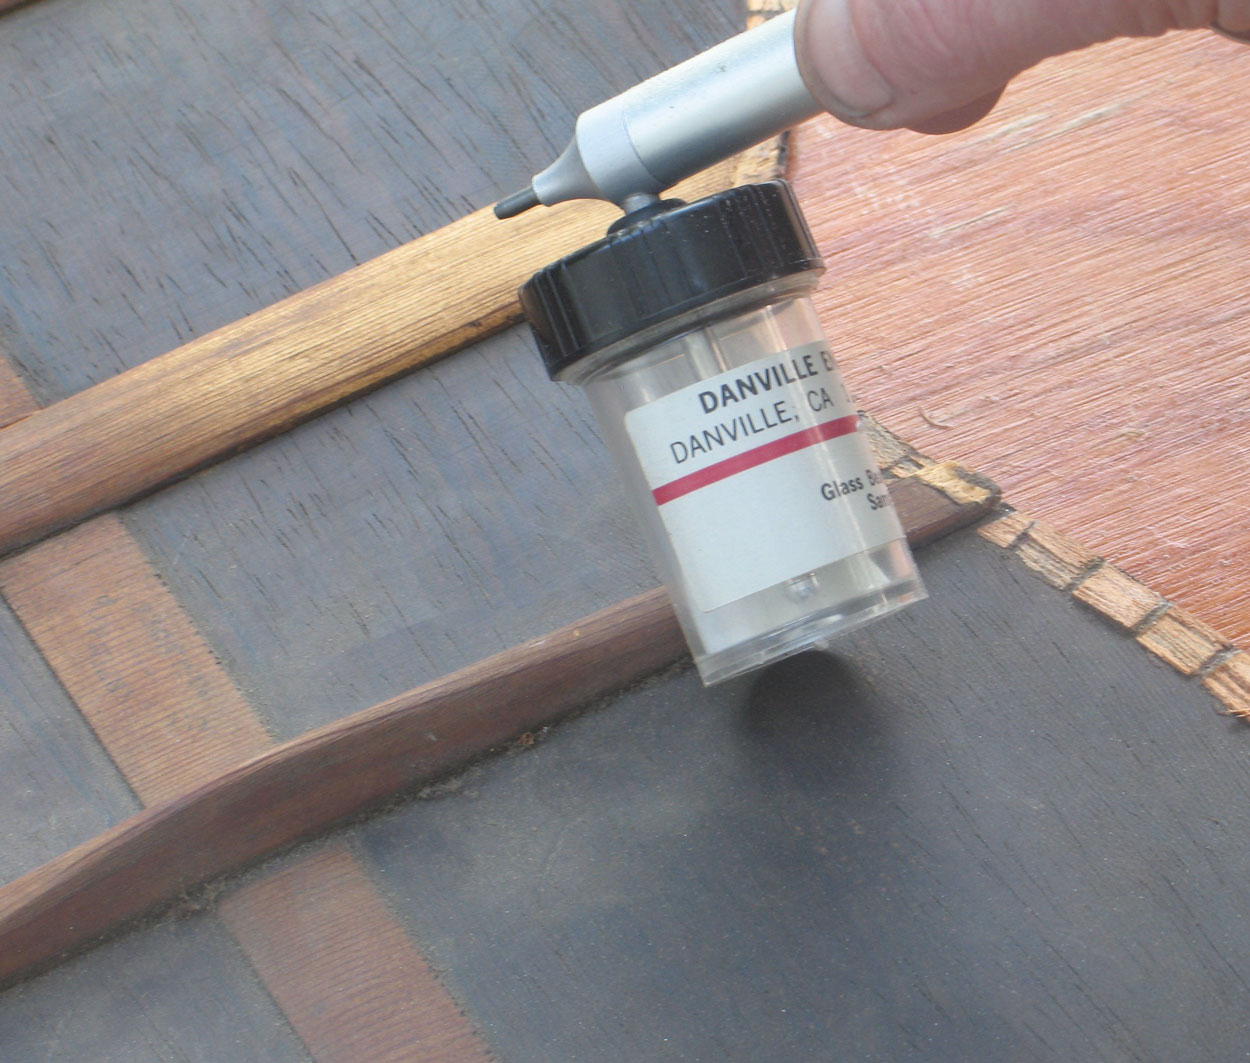
The inside of this old-timer was so caked with dirt I thought it might be a bit problematic to use water to clean it up. So, to avoid driving stains into the light colored wood, I decided to blast the dirt off. I used a little jeweler's airbrush sandblast unit to blow 600 grit glass beads at the surface, neatly taking off the dried dirt and exposing the wood underneath/
You can see the remarkable dirty surface and the progress in cleaning it up.
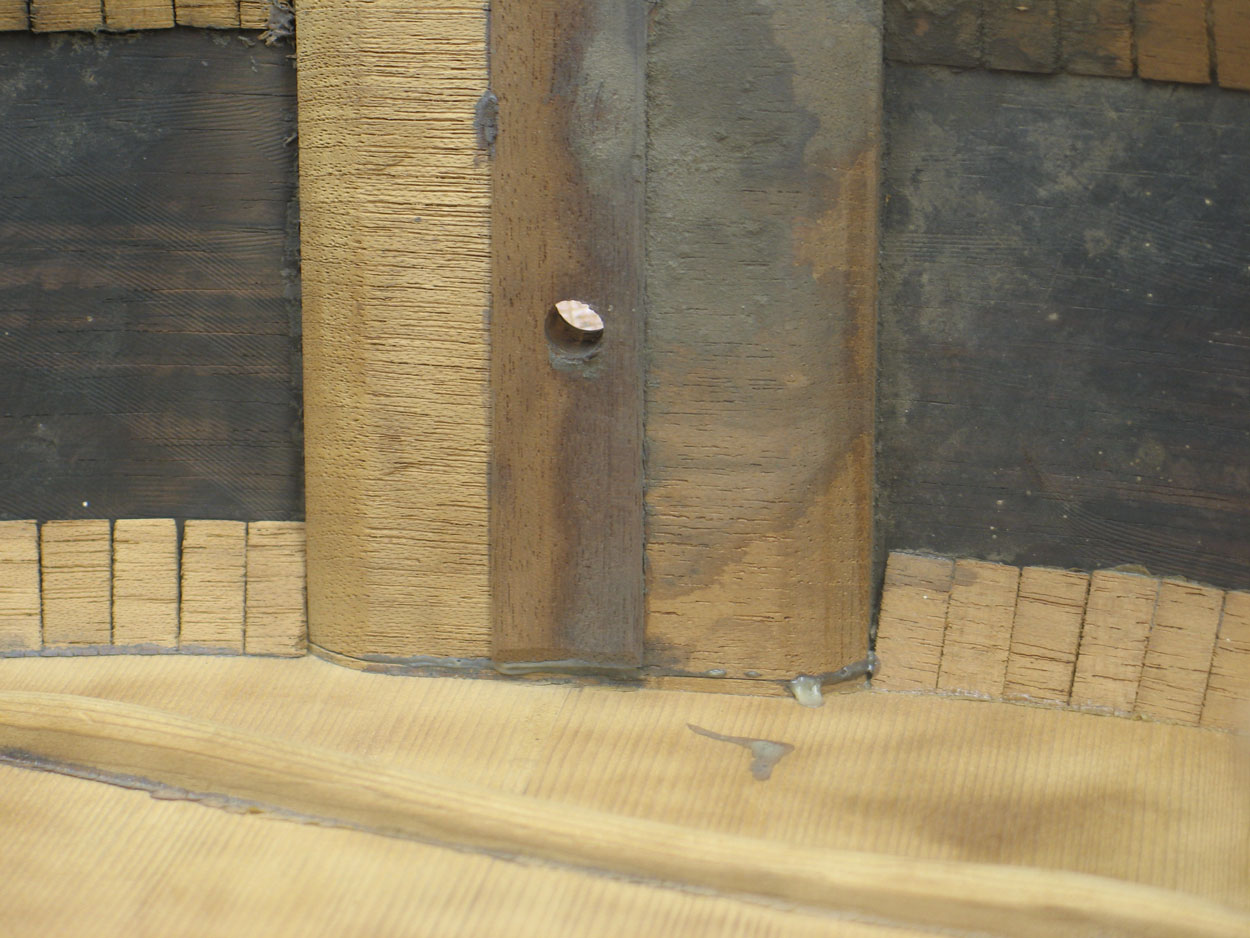
Notice in particular the super muddy end block:
I worked very slowly to avoid blasting away at the wood grain, and I think the result was worth the effort.
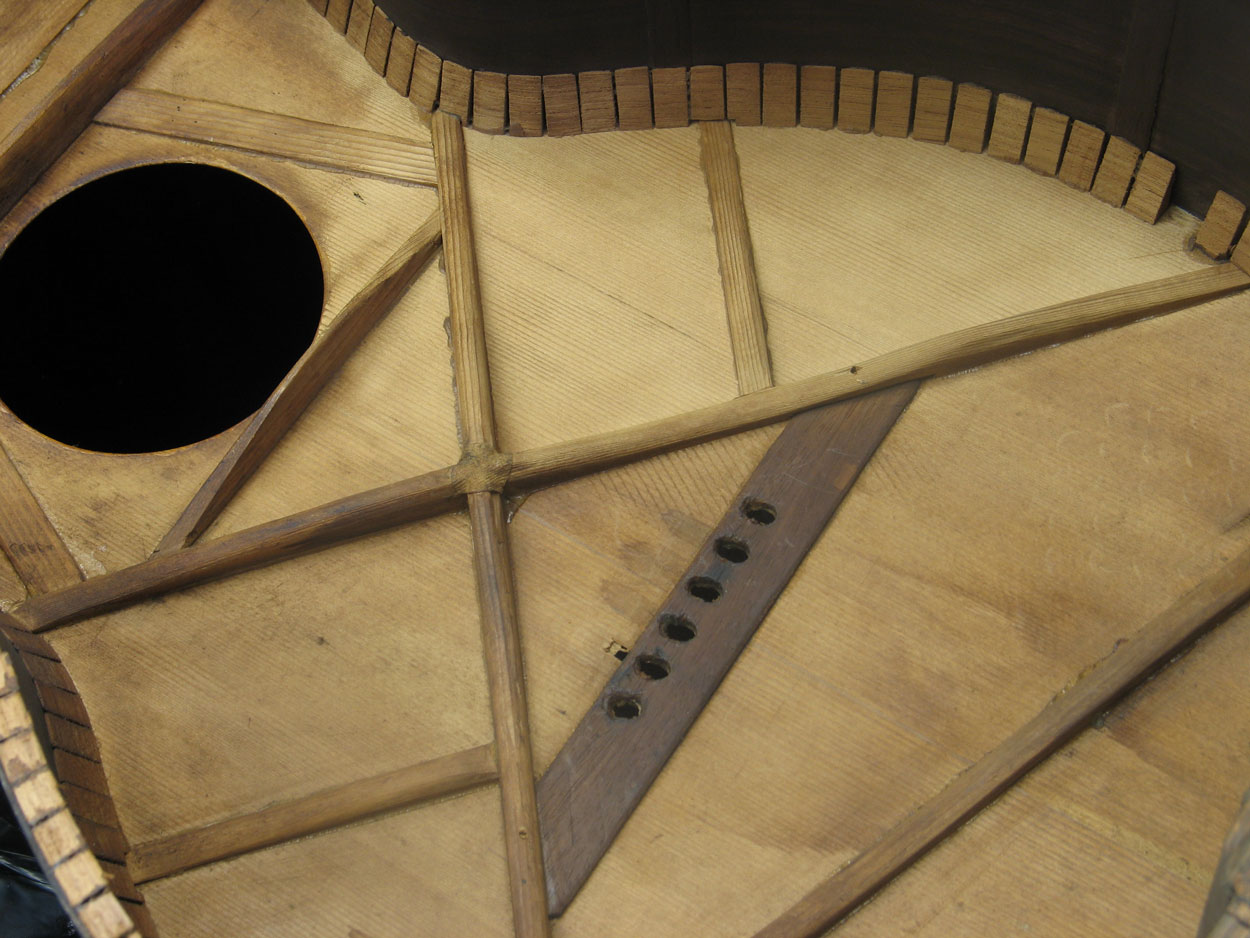
The original side reinforcement braces were all loose, so I glued and clamped them. Various individual lining blocks were loose, and a few had broken as I removed the back, so I glued them in place as well:
For this entire restoration job, I used traditional hide glue. In 1867 that would have been the best choice for woodworking, and it is still considered the appropriate adhesive for fine instrument construction and restoration.
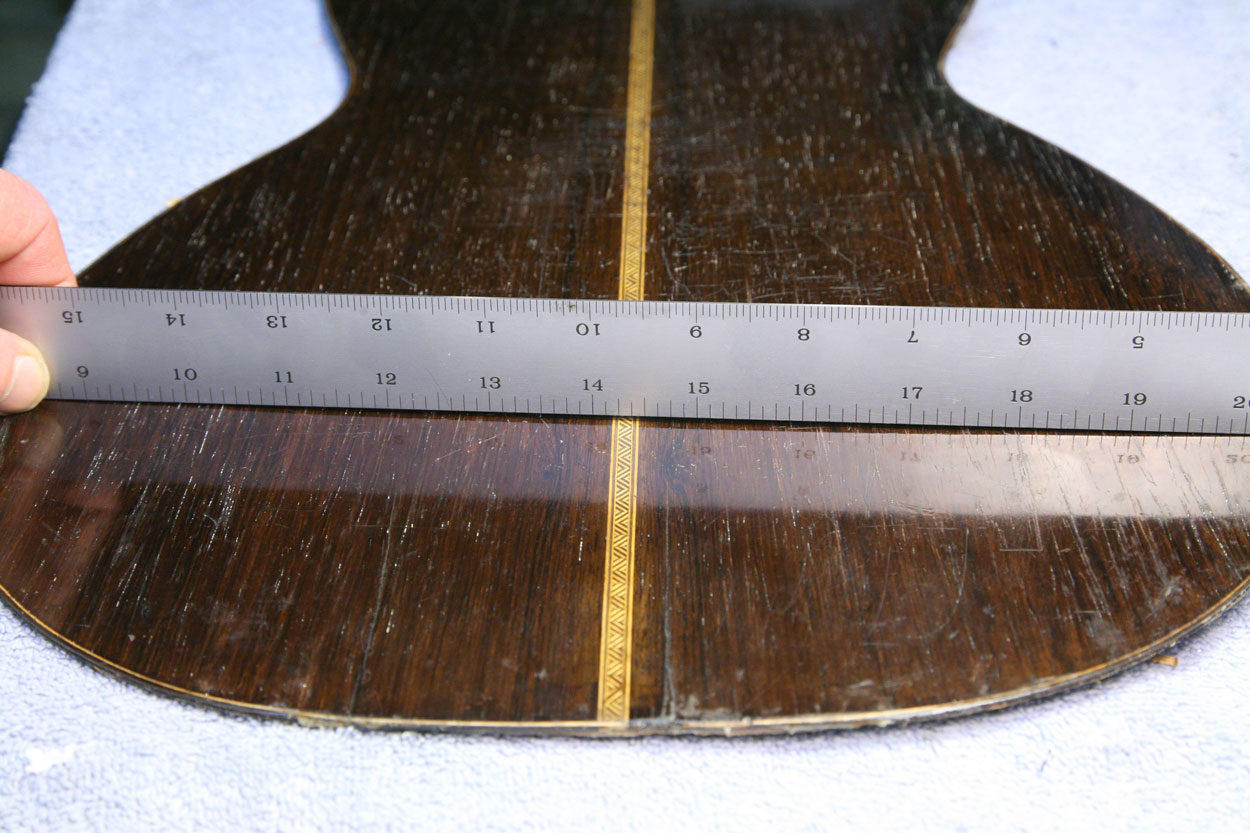
As a result of age and dryness, the back had shrunk slightly so that it became concave in spite of the bracing on the inside:
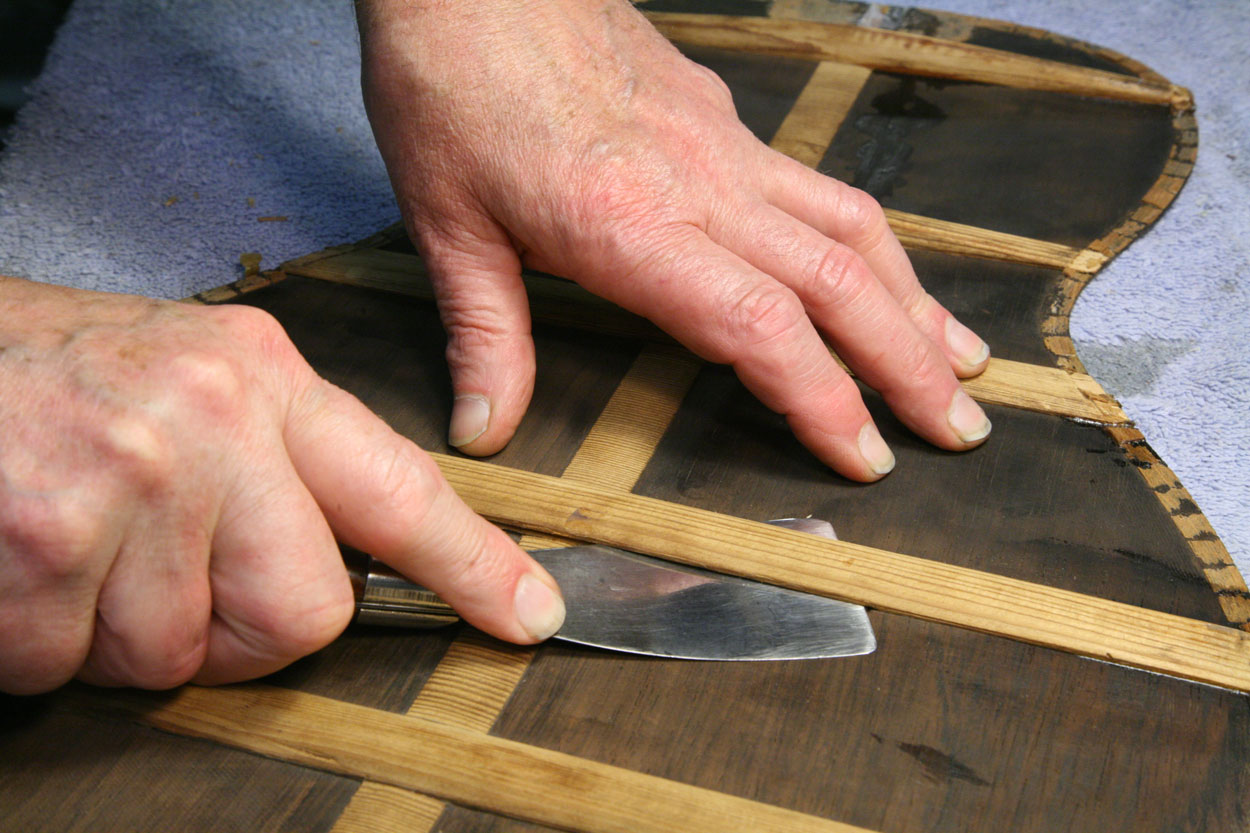
Removing back braces would be the only way to regain the original shape of the back. Once the braces were off, I could bend the back into its previously curved shape.
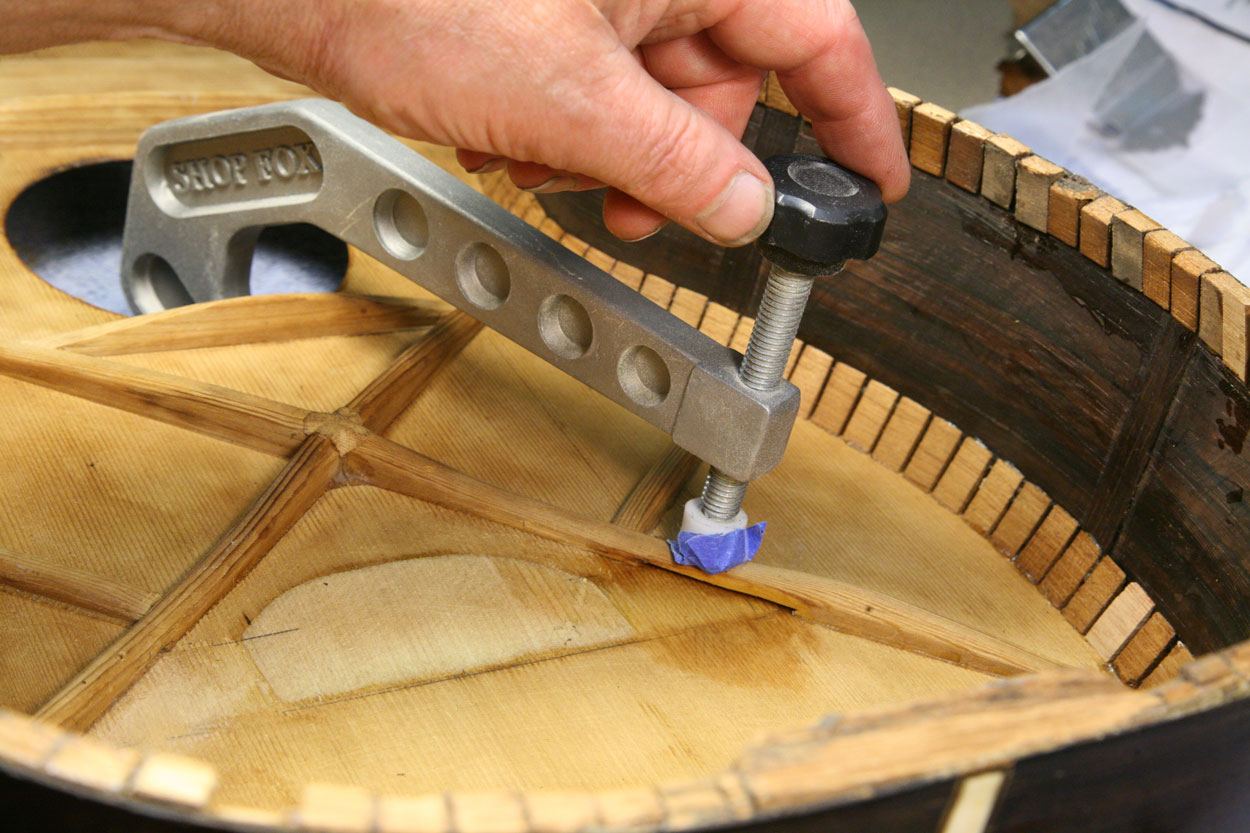
Regluing back braces individually and clamping against a curved form that matched the original back arch, I was able to reconstruct the arch.
Now, this job actually took several days, working one brace at a time, but I thought it would be a bit redundant to present each one, so here's a shot of the result - a nice reestablishment of the back radius.

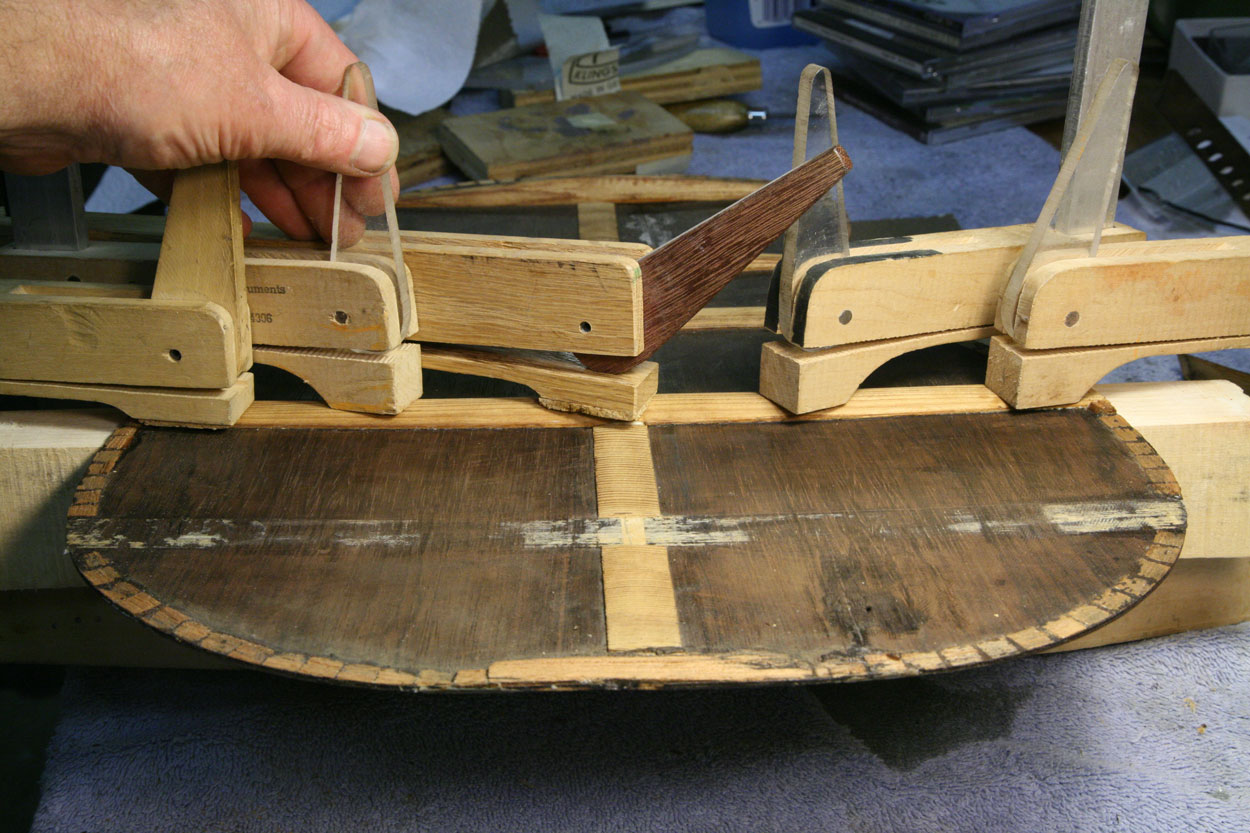
Just in front of the bridge there was serious "cross-grain" cracking of the top, which caused the top to sink in that area and allowed the bridge to roll forward under string tension. Most likely, this was a result of the increased tension of steel stringing. This guitar was, of course, built for low tension gut strings, and we're lucky the damage from over-stringing was relatively minor:
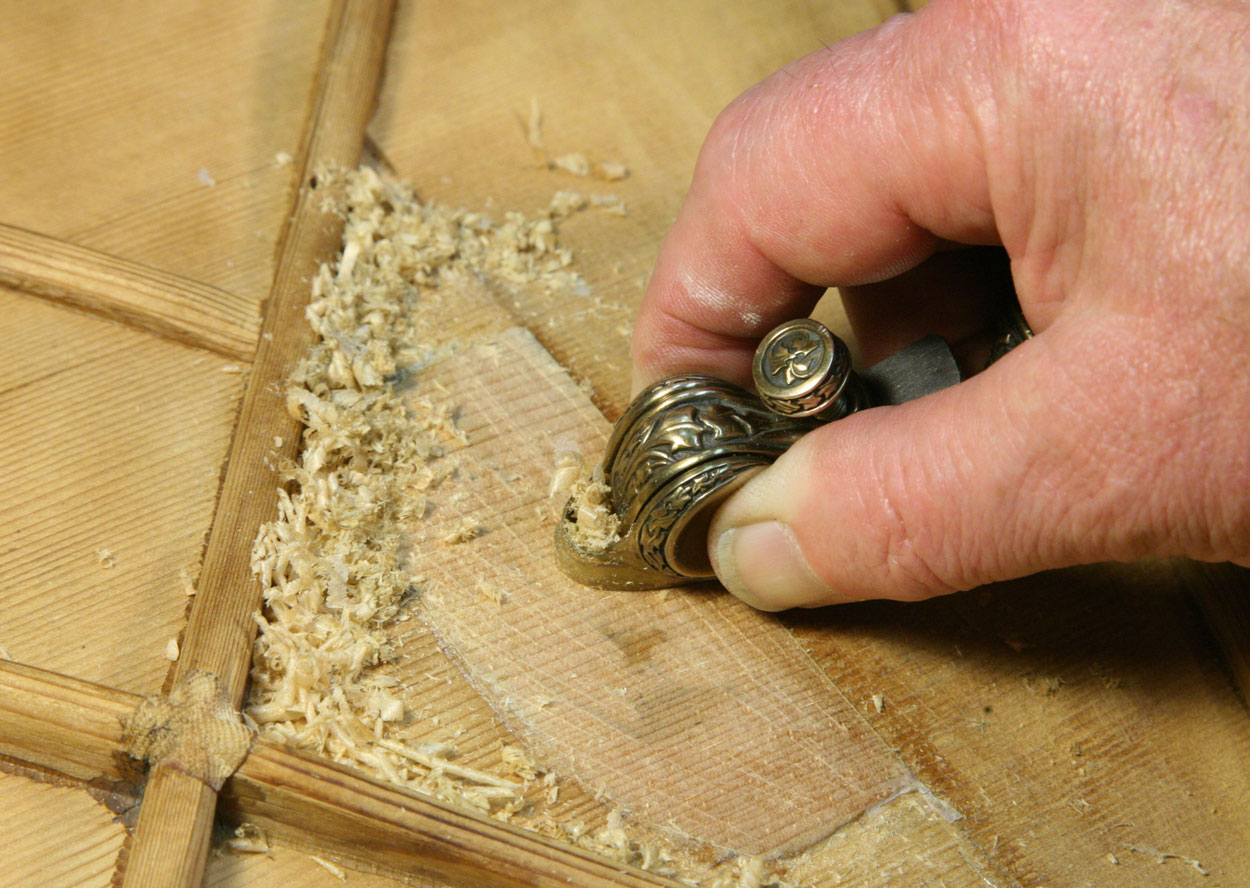
I needed to remove the bridge plate to repair the broken top. The bridge plate needed replacement anyway, because it was cracked as well. My thin blade putty knife was just the tool to pry the bridge plate loose:
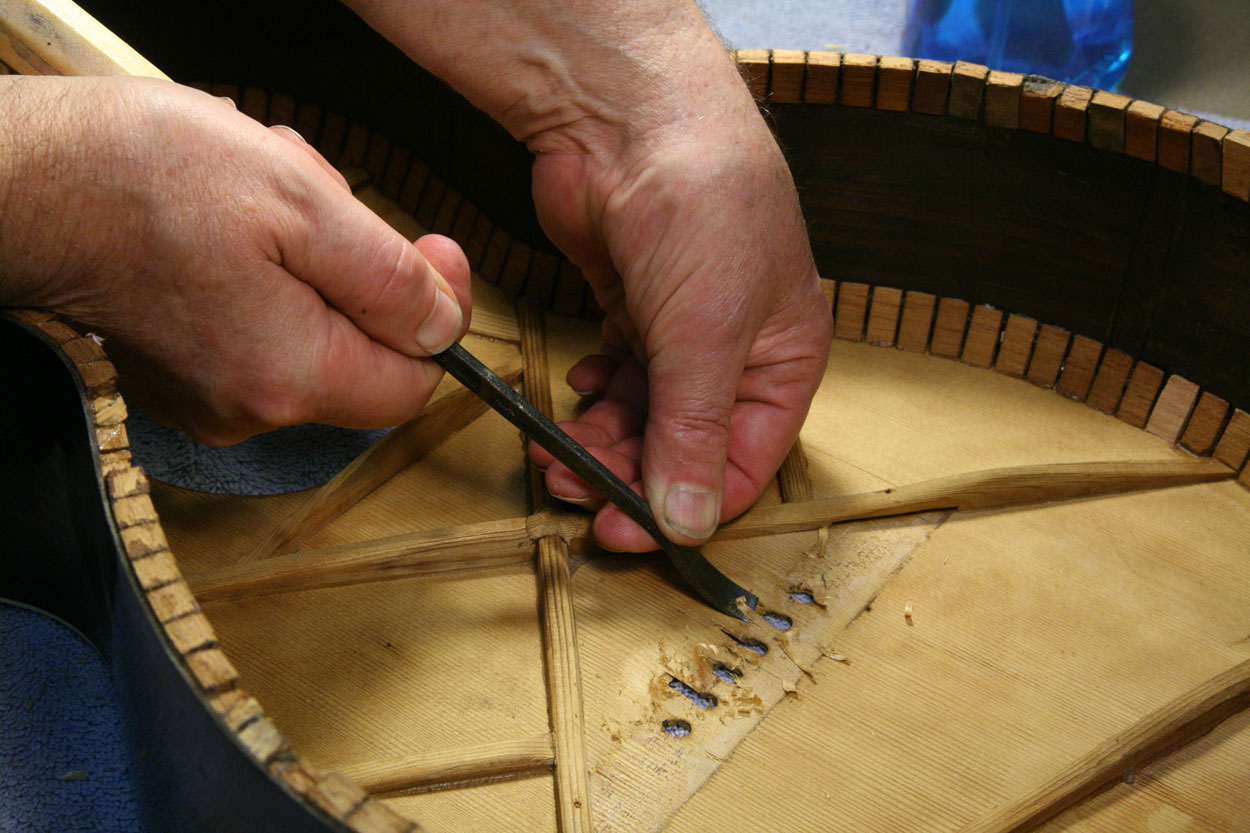
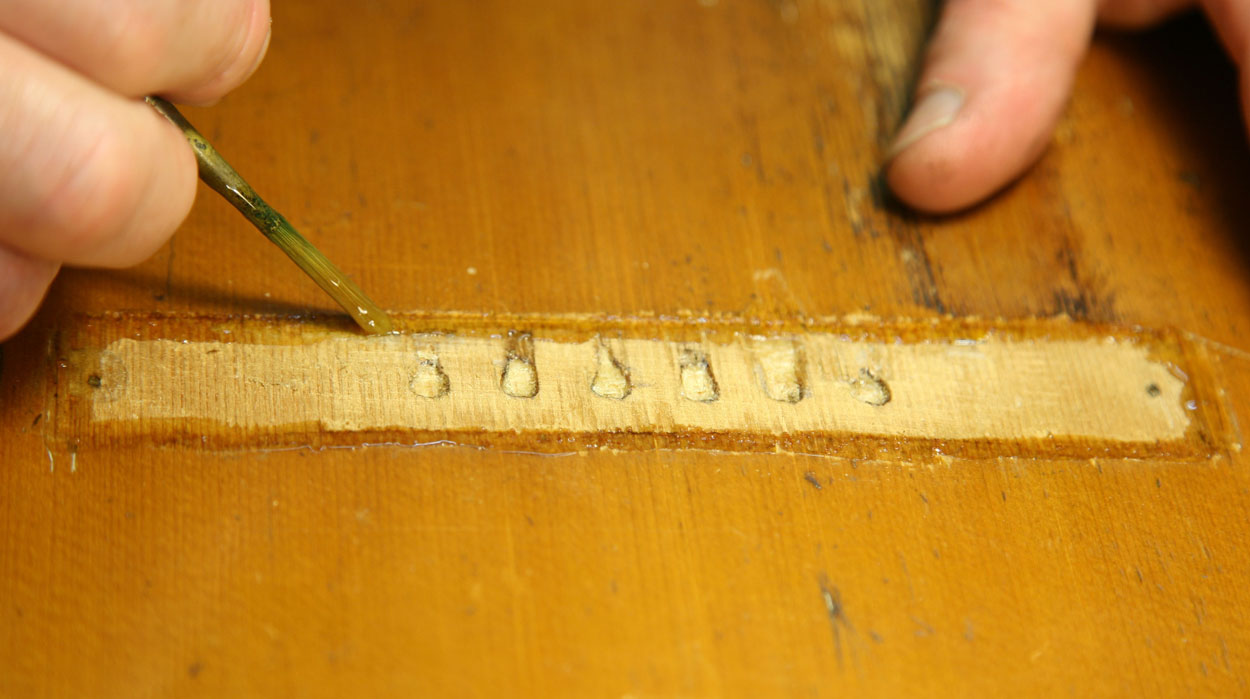
Here's the trickiest part of the whole job. I'm using a bent chisel to cut wood from the inside of the top in the are of those cross grain breaks. I cut more than three quarters of the way through the top, leaving only 1/2 millimeter of thickness in the immediate area of the break, with the "hollow" tapering fore and aft to make a smooth transition on the inside.
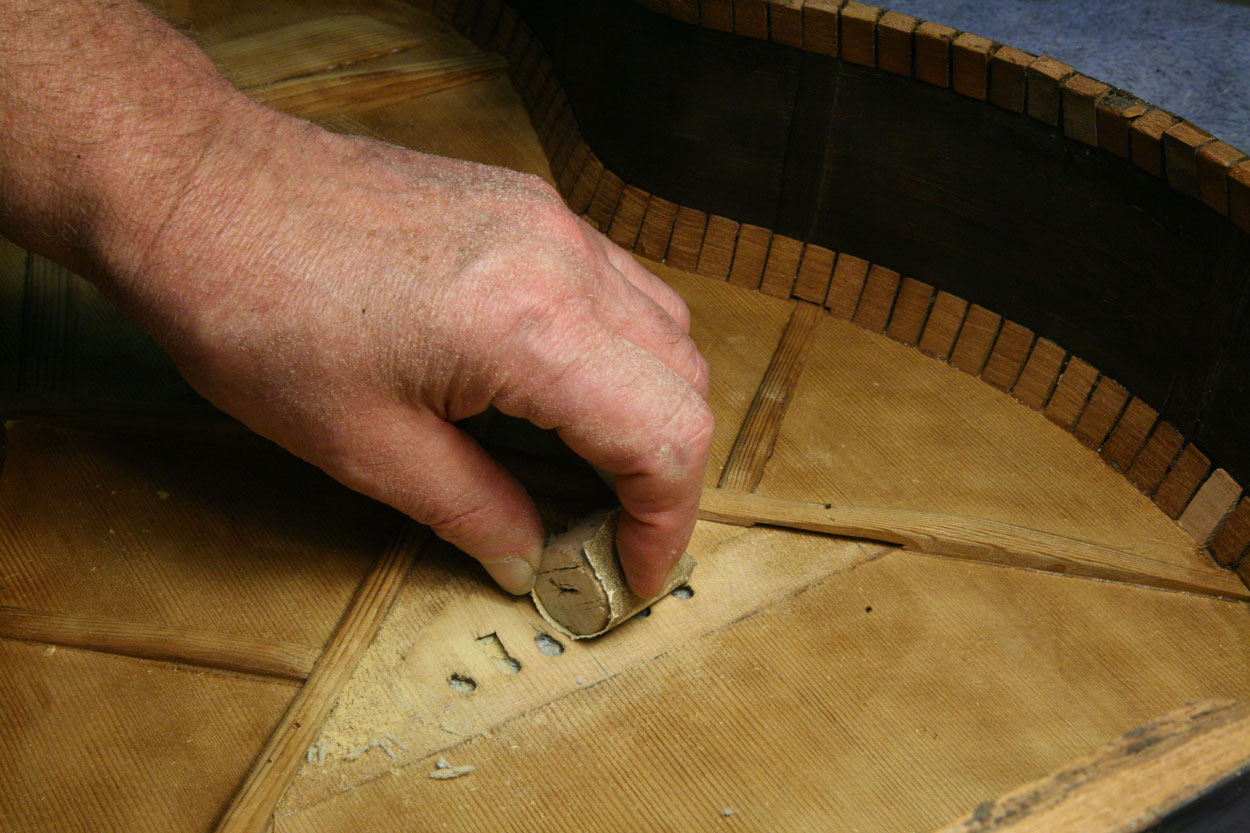
A bit of sanding with a curved block rounded and smoothed the area a bit, too:
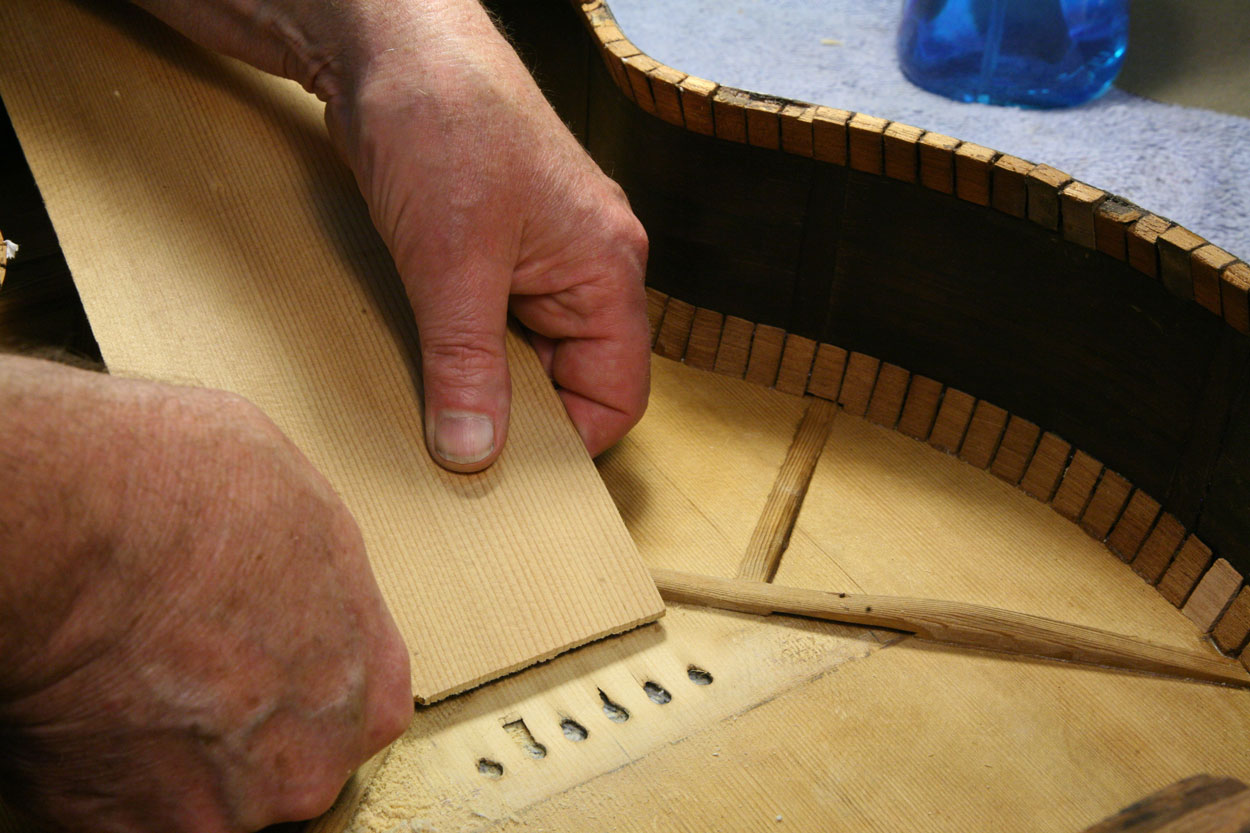
After searching around for a suitable match, I made a spruce patch to inlay into that recess,
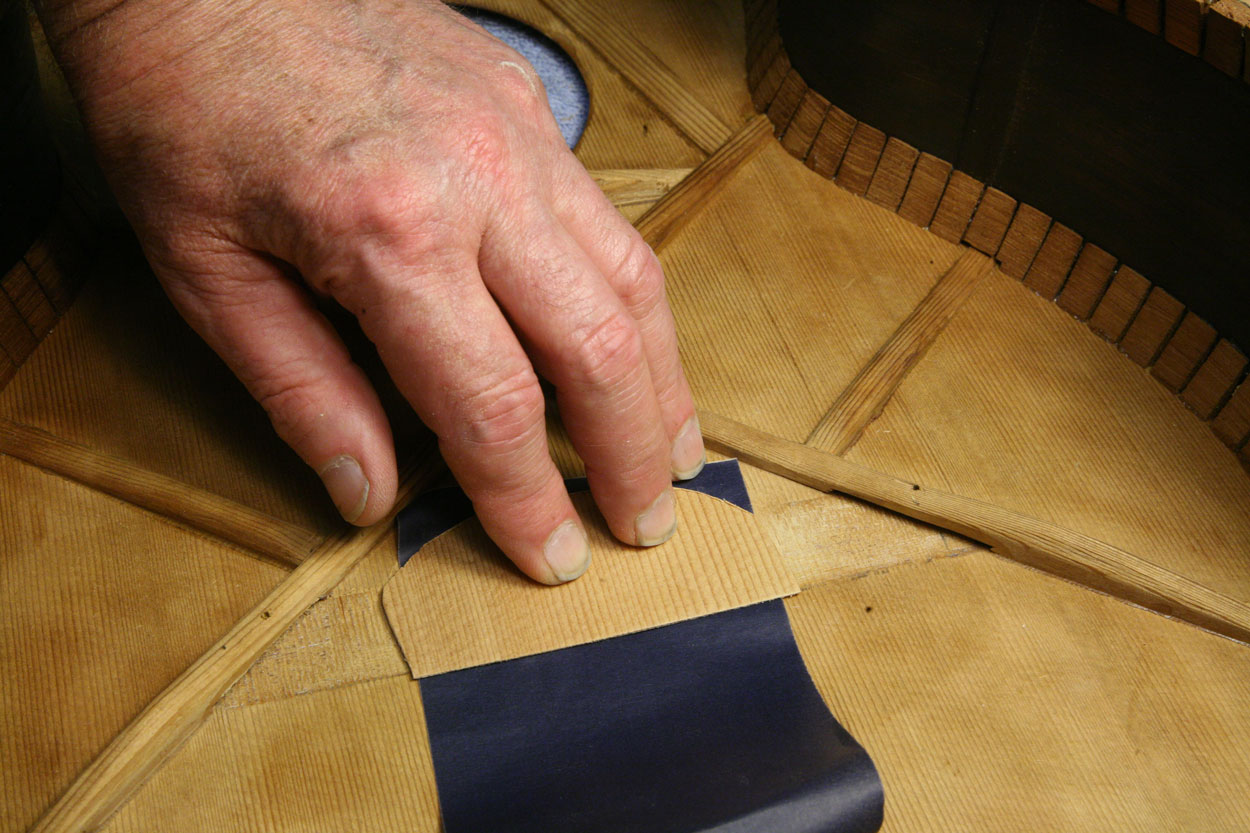
and using some thin carbon paper, I rubbed my patch of new wood to see where it touched.
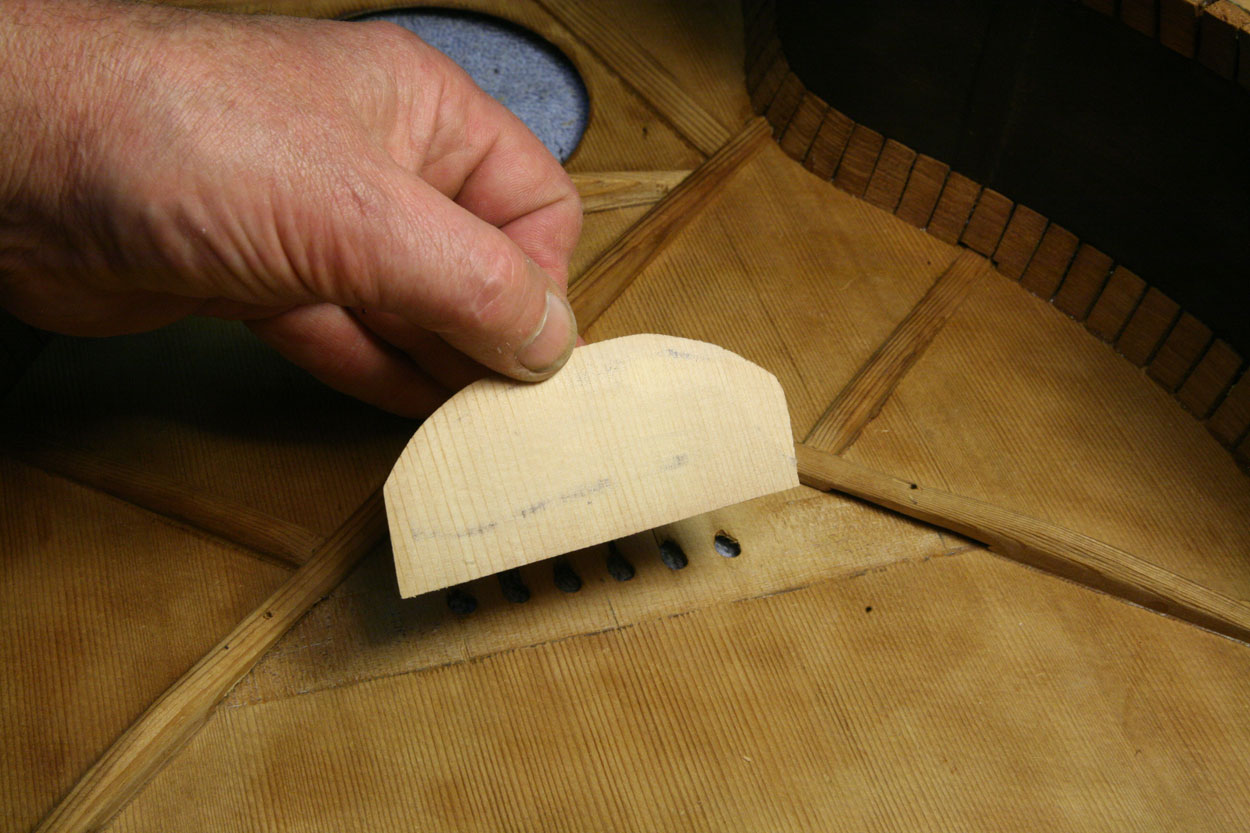
Clear blue marks guided my shaping of the patch to get a nice uniform fit in the irregular hollow I'd made. I cut away the blue marks, rubbed again, cut again, until it fit well:
Then it was the simple matter of gluing the patch in place with some fresh hot hide glue:
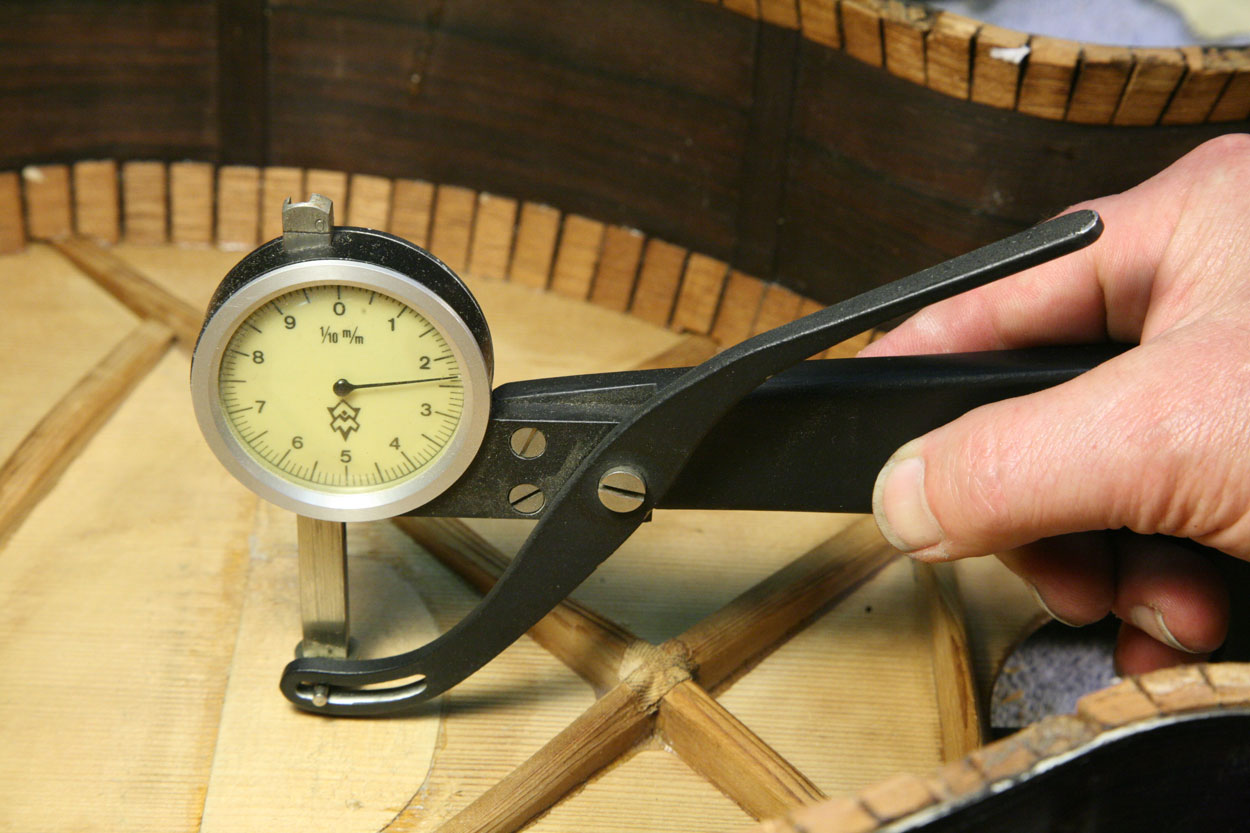
I used my smallest flat bottom "finger plane" to get in there and level the new wood in the bridge plate area, checking as I went to make sure that the final thickness was uniform and the same as the original:
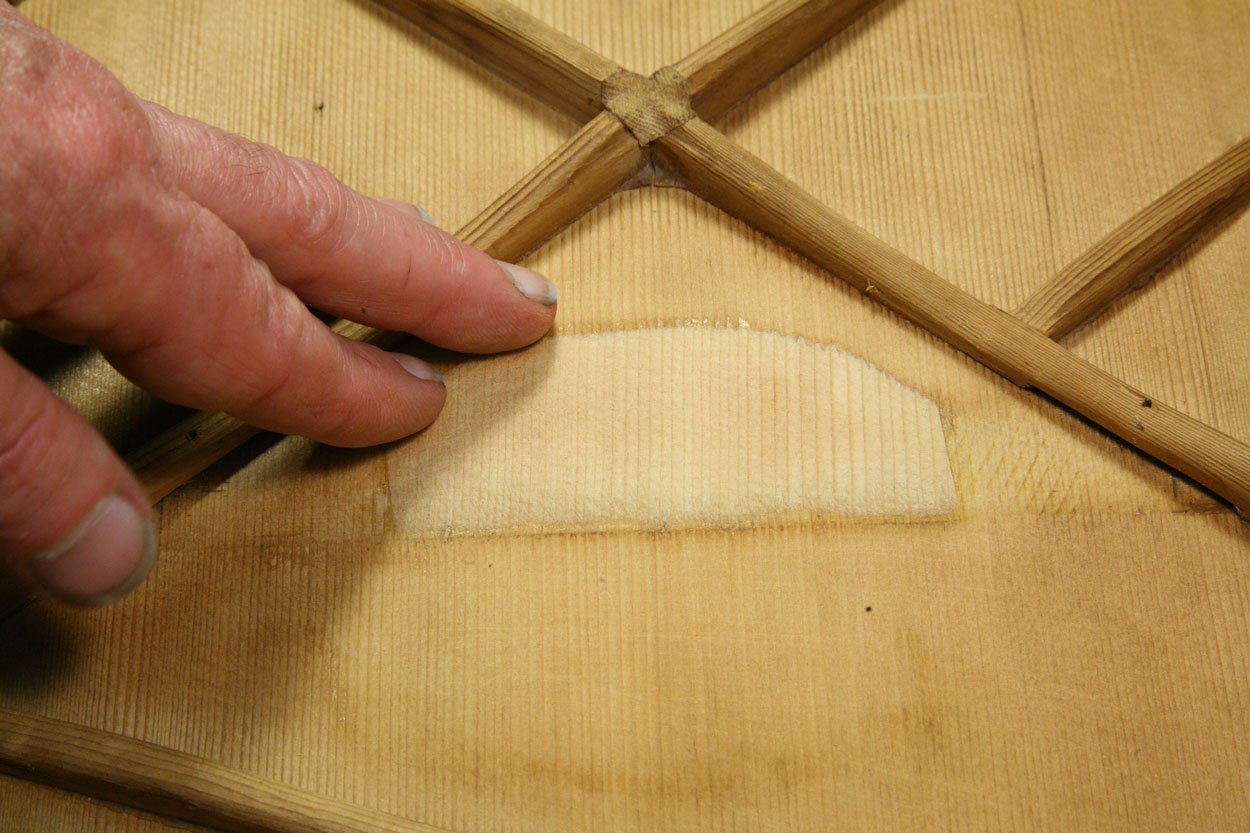
My reinforcement "chest patch" is complete, and the edges feather out very nicely, restoring the original strength of that top area without adding any new thickness that might dampen or alter the tone of the guitar. It's important to not have any sharp edges on this kind of patch, for strength and flexibility, and also to avoid propagating cracks along the grain lines. That's why, for example, a router would have been a very bad choice as a tool for excavation.
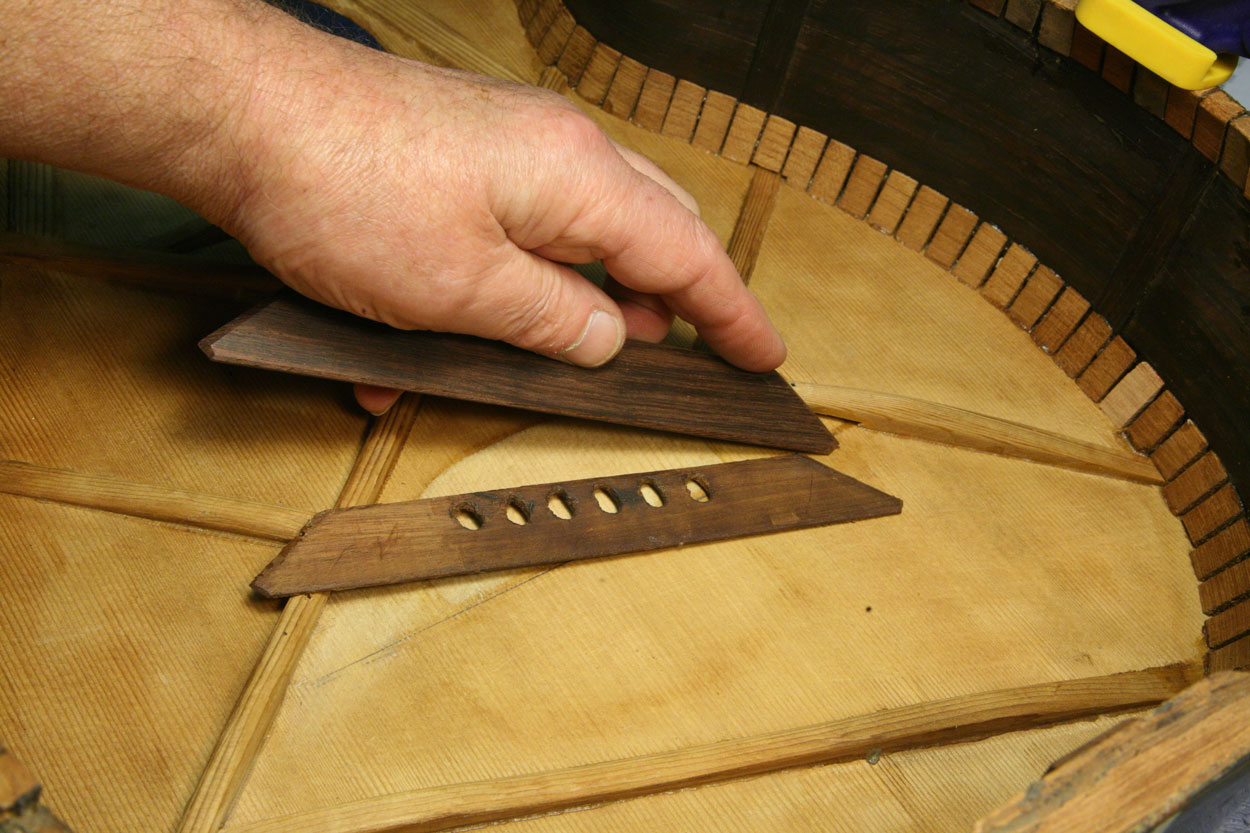
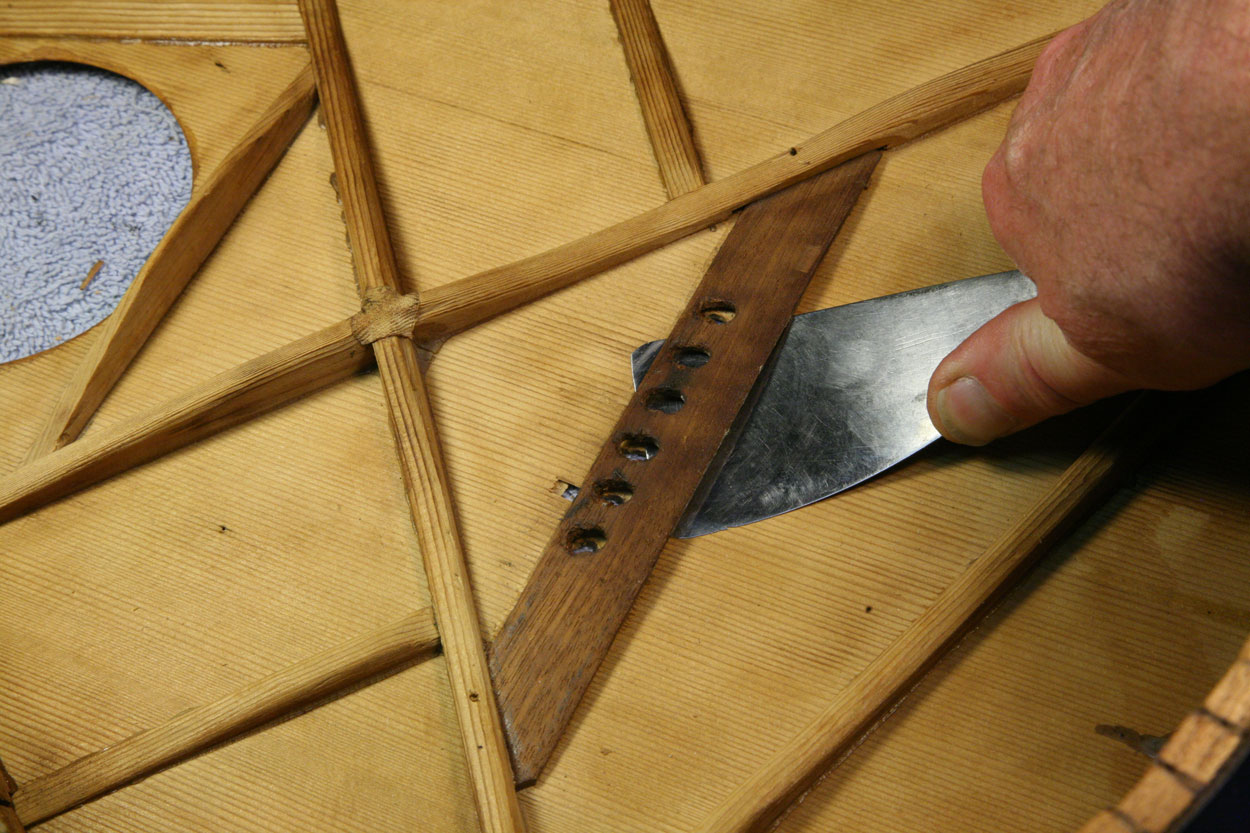
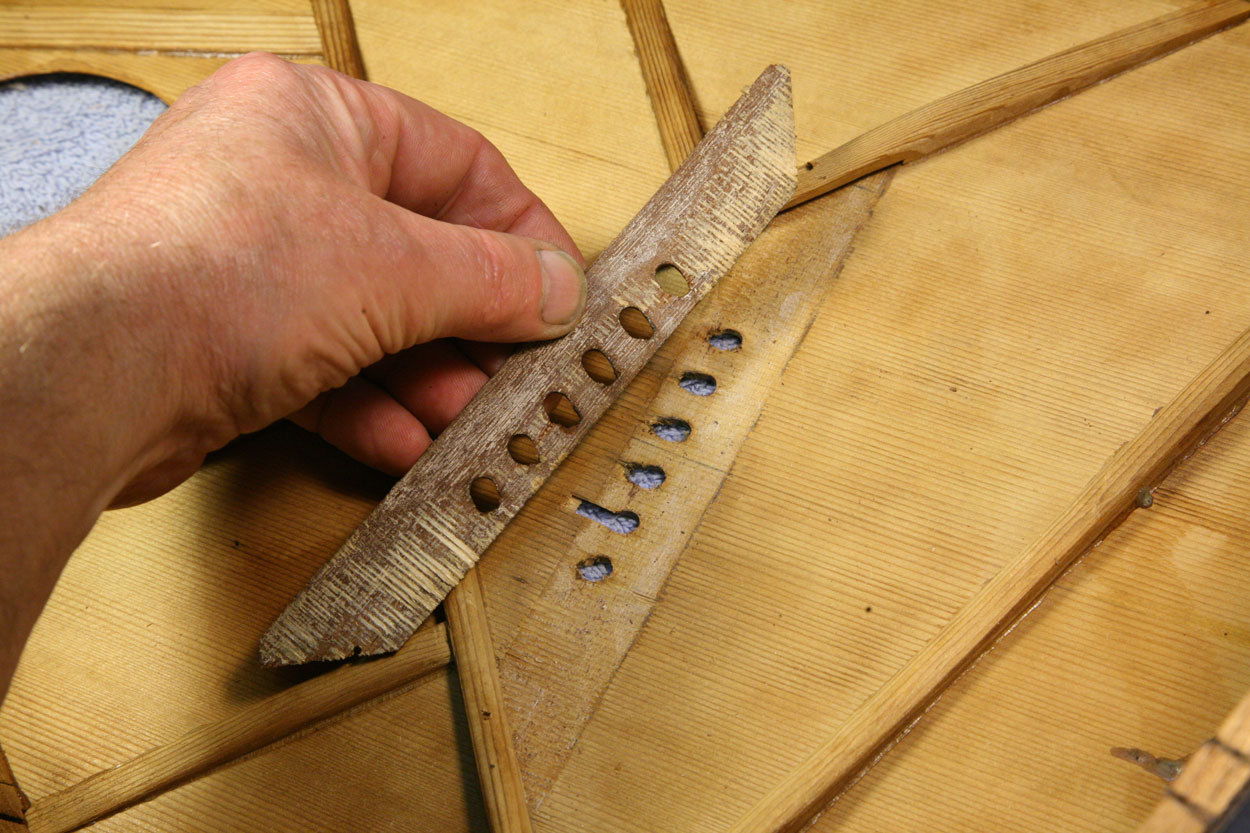
I made the new bridge plate just the same as the original. There was no need to make it larger for extra strength - I'd achieved that with the wide spruce patch:
As I worked inside this old guitar, I found any number of loose glue joints, and I reglued each as I found it - with hide glue, of course. By this time, the interior of the guitar was rebuilt, looking pretty good:

Day 7: Back On (Only one photo today)
Working with traditional hot hide glue means that I need to apply clamping pressure within a few seconds of the glue application, unless the work environment is maintained at a temperature near 100F. So, to make the job a bit more reasonable, I reglued the back a small section at a time, over a period of a week, allowing each section to dry before moving on:
By taking it slow and easy that way, I was able to achieve perfect alignment of the sides and back so that the ivory binding would fit back in place neatly.
Whenever I take a guitar body apart and rebuild it, there's always a chance of small changes in the body shape that can affect neck alignment, so I waited until the body was back together to determine whether I'd need to remove the neck to recut the joint and reset it to the correct angle. Here I'm heating the fingerboard and prying it loose:
Because there's no finish on the ebony fingerboard, I can heat it directly to help loosen the glue joint. Too bad I couldn't use that kind of heat to take the body apart!
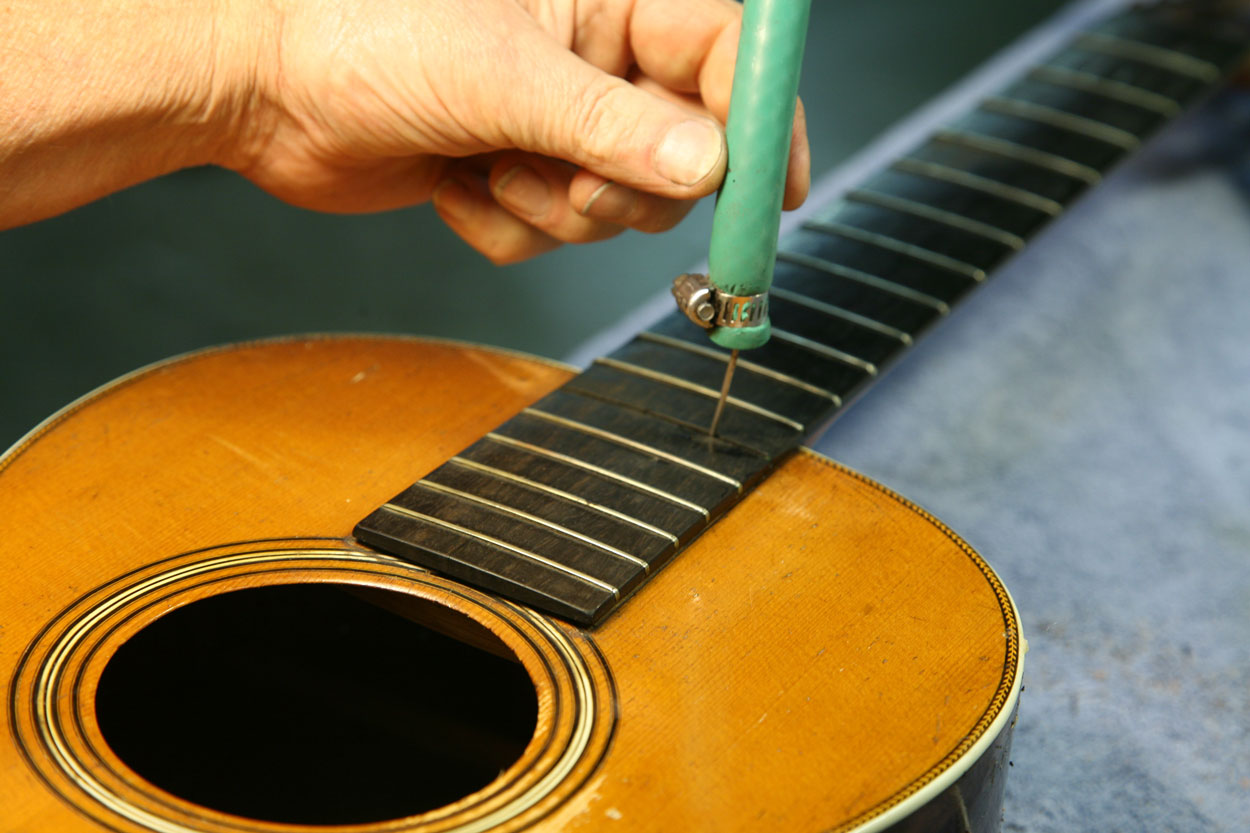
Steam injected into the dovetail pocket provides both heat and moisture to soften the glue, I pulled the fret just above the end of the dovetail, drilled a 1/16" hole through the fingerboard and inserted the needle connected to my steam hose:
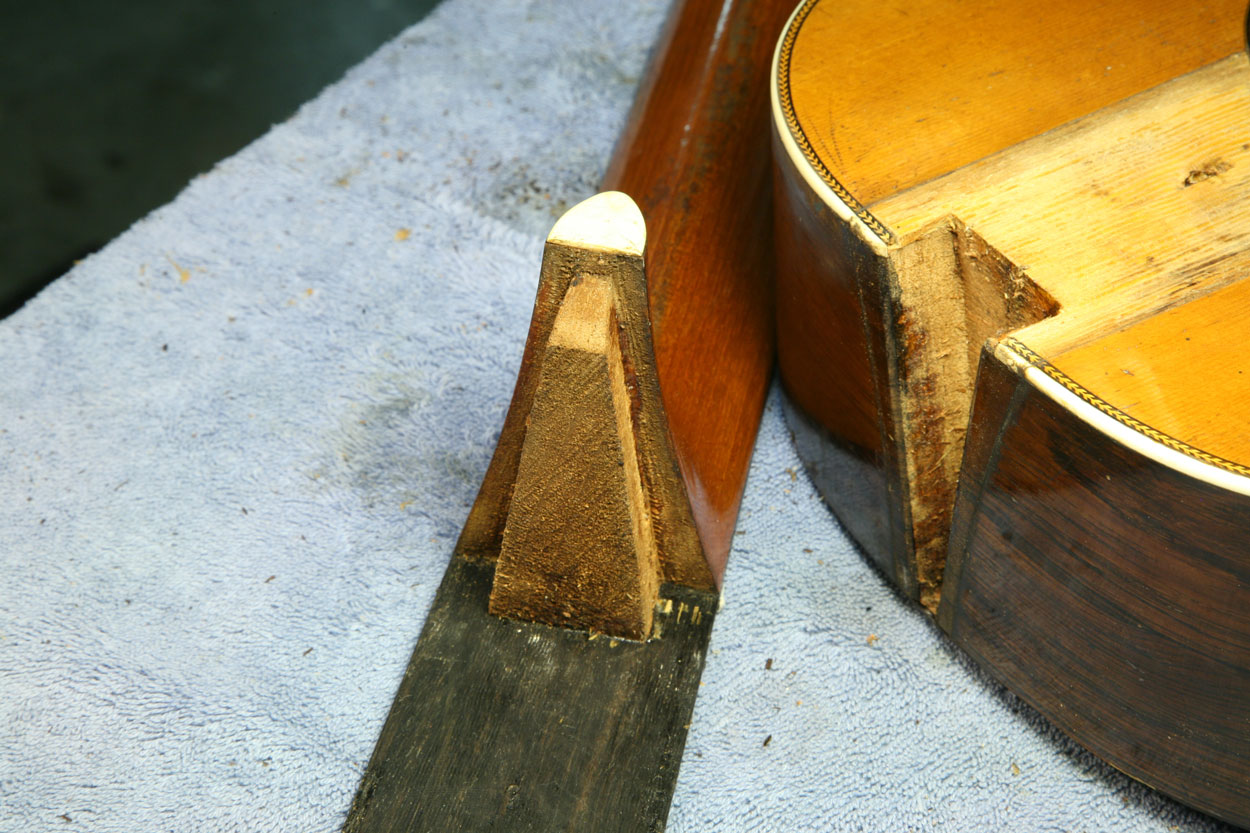
Within a few minutes, the steam had softened the glue enough for me to slide the dovetail joint apart:
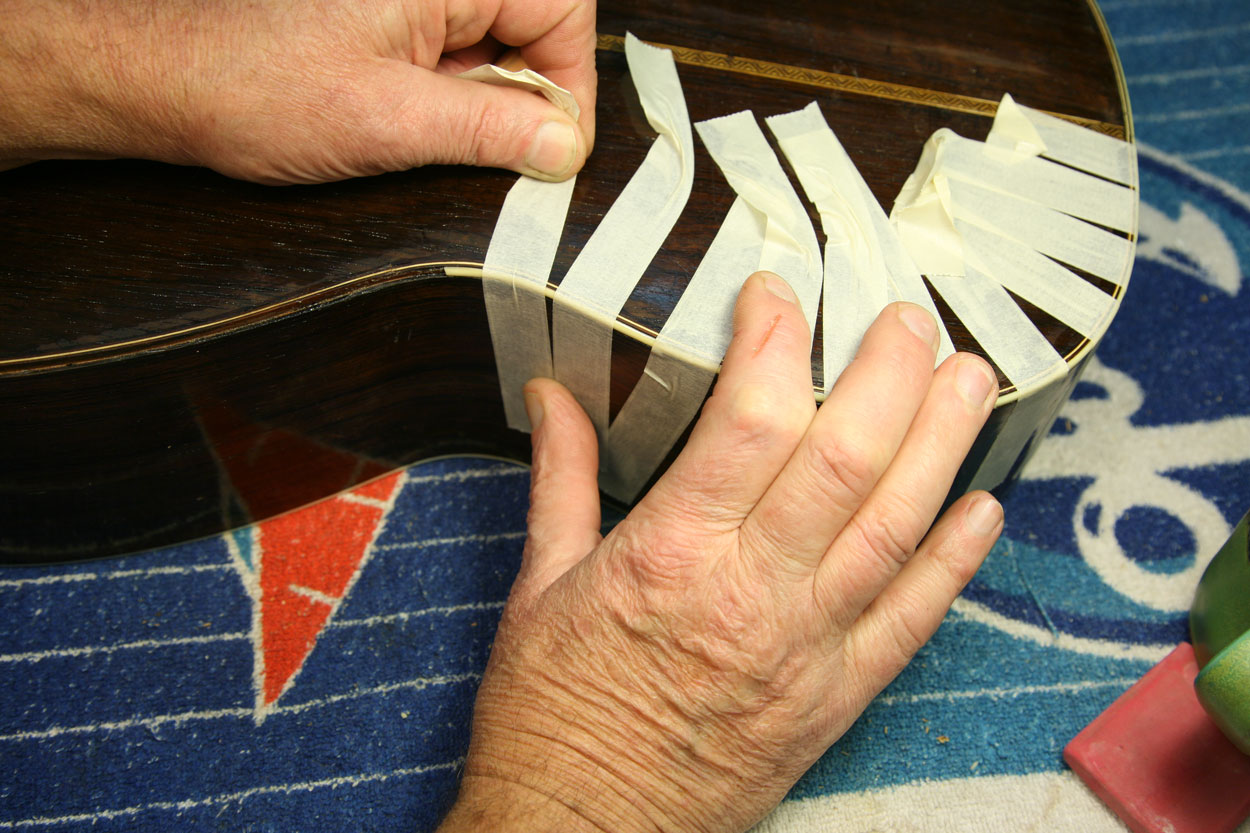
It's a bit more convenient to work on a guitar body when the neck has been removed, so I waited until I had the neck off to replace the back binding and do other cosmetic work. Here, masking tape makes a great clamping system for reattaching the ivory binding:
I used hide glue for this operation as well.
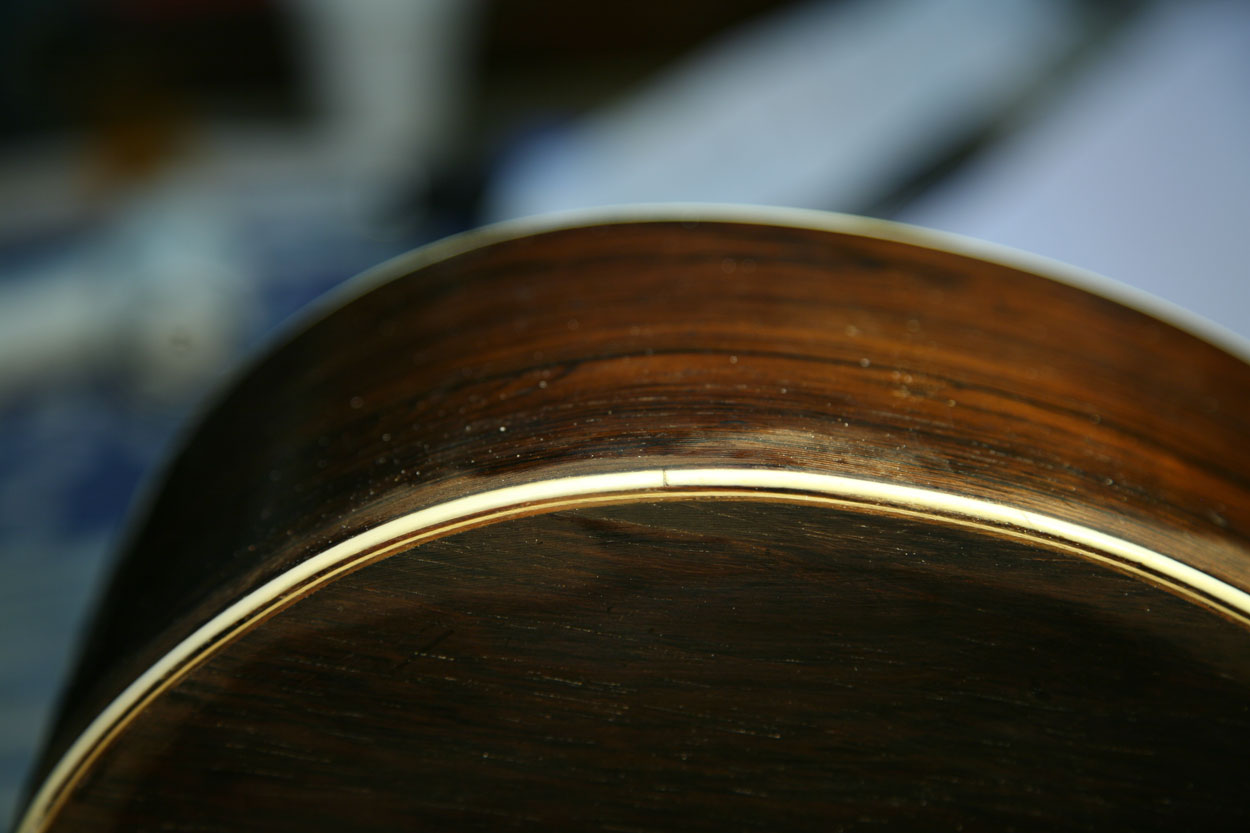
Not only were the cracked ends of the binding dirty but my glue made them all the move obvious once all the binding was back in place:
I "cleaned" the cracks by cutting them just a bit wider with my smallest little saw blade.
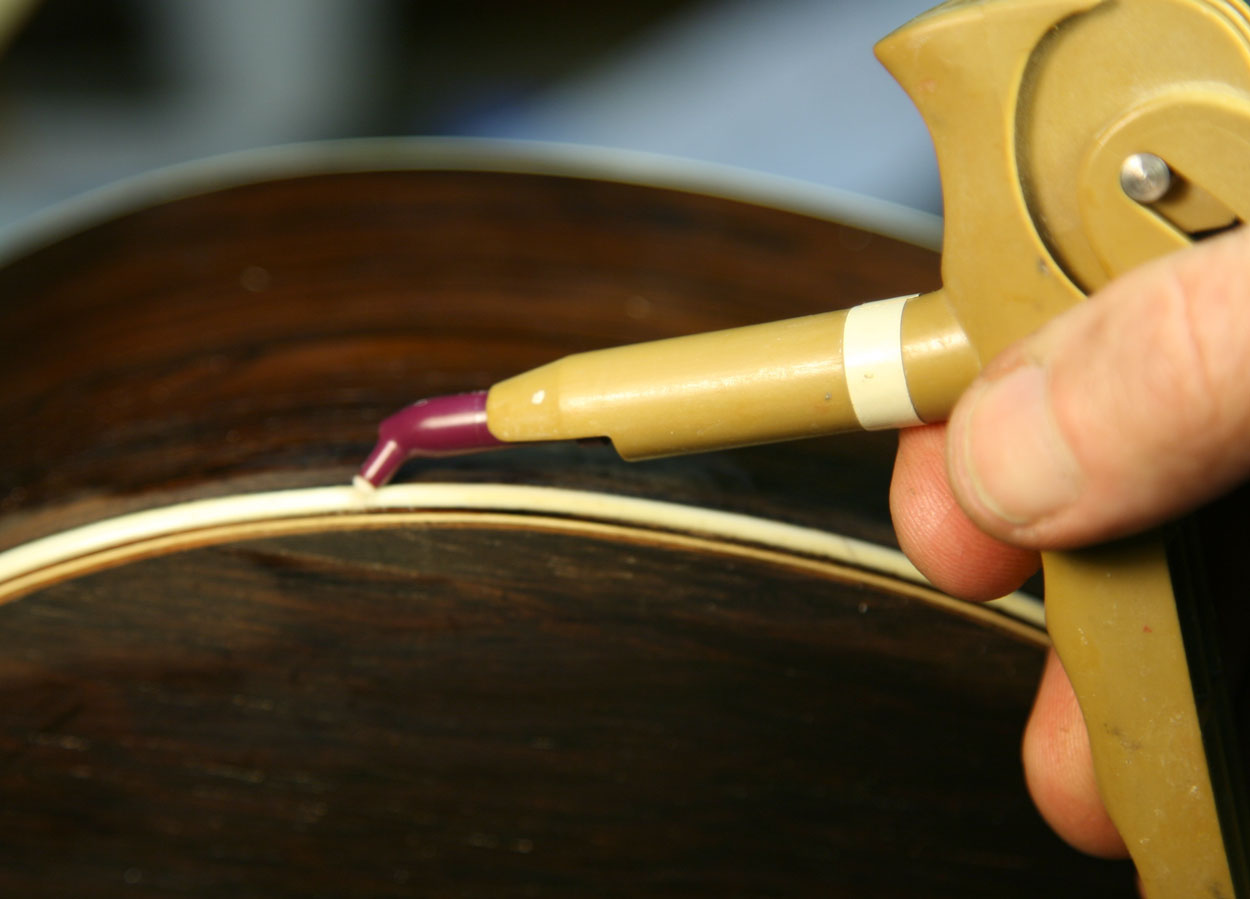
I don't use a lot of "high tech" equipment or materials, but I can't resist this one. It's a dental tooth filling material I can inject under high pressure and it comes in a variety of tooth colors, so I can select one that suits this ivory:
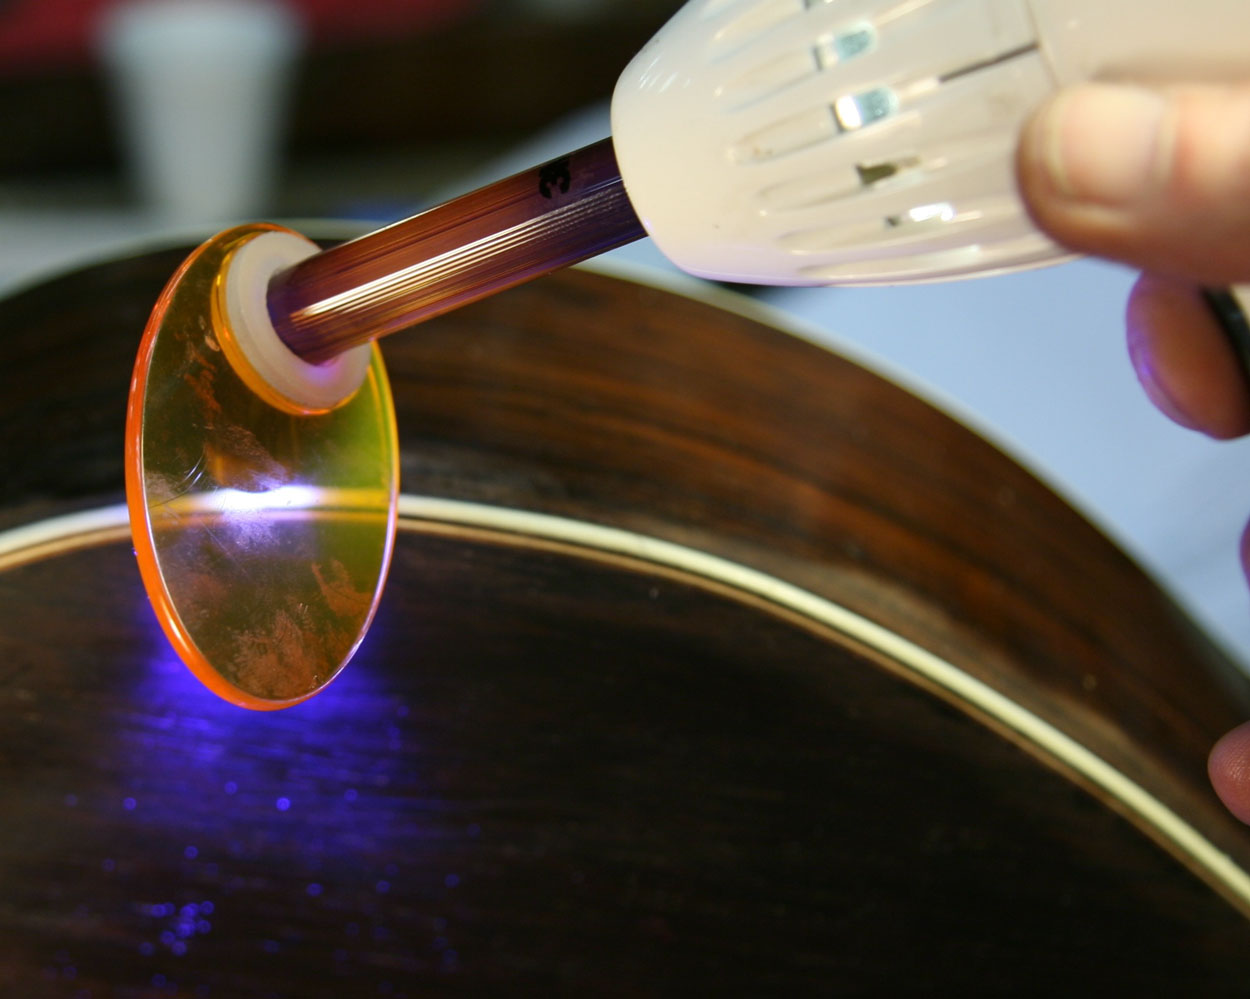
A hand-held narrow band light source cures the filling in a matter of seconds:
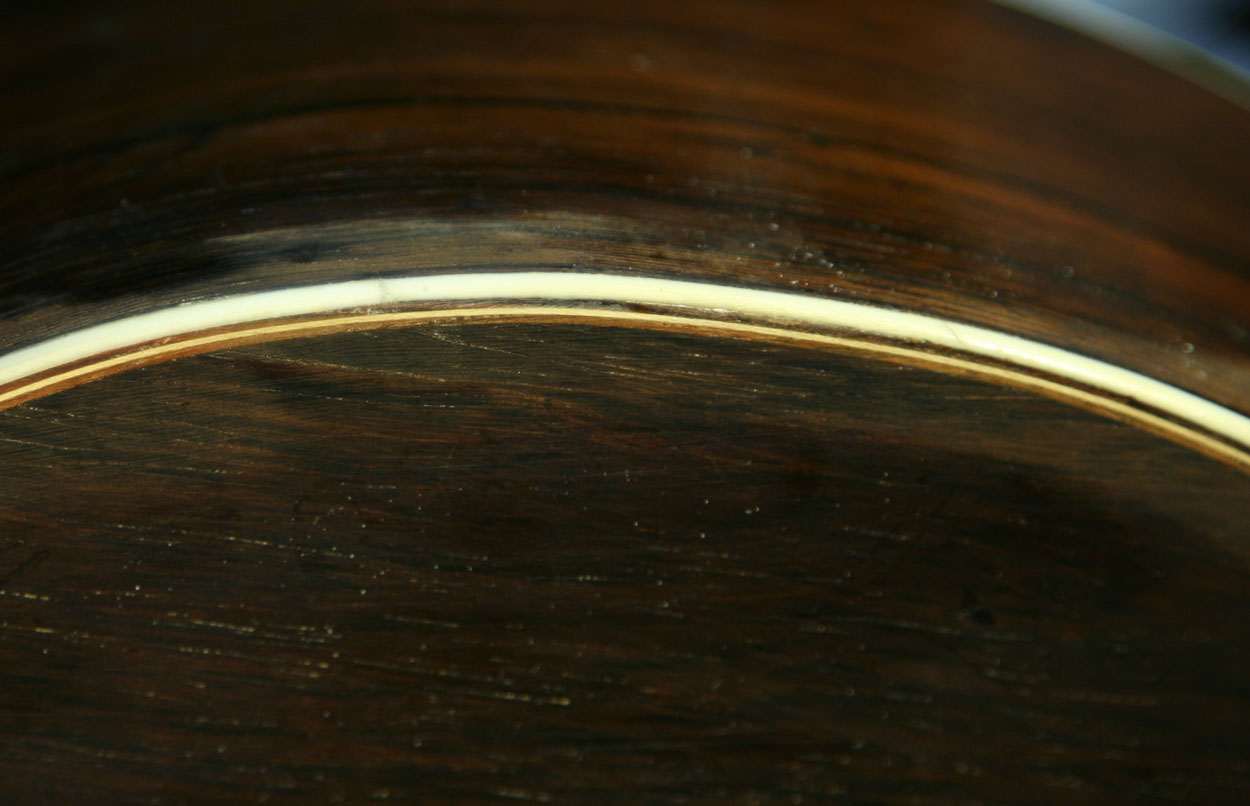
Once leveled, the cracks looked much better!
Since the beginning of 2004, I've been seriously interested in metal work and machining; I've set up a machine shop at home where I can make tooling, instrument parts, repairs, and learn more about all that "machinist" stuff. So, this part of the restoration job was a natural for my home shop.
Martin actually made cases for their instruments in the Nineteenth Century. They were made of wood, and today are generally called "coffin" cases because of the general shape of the box. The latches were missing on this case, so I took on the job of reproducing those pieces of hardware.
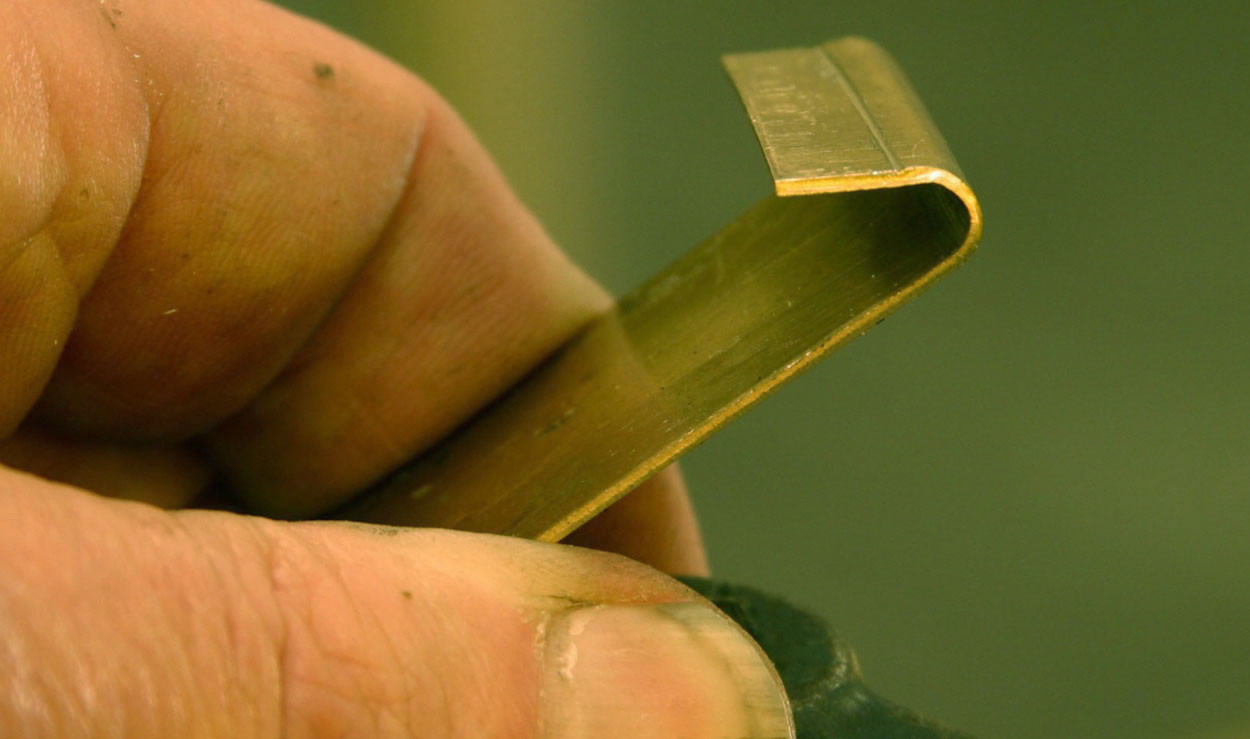
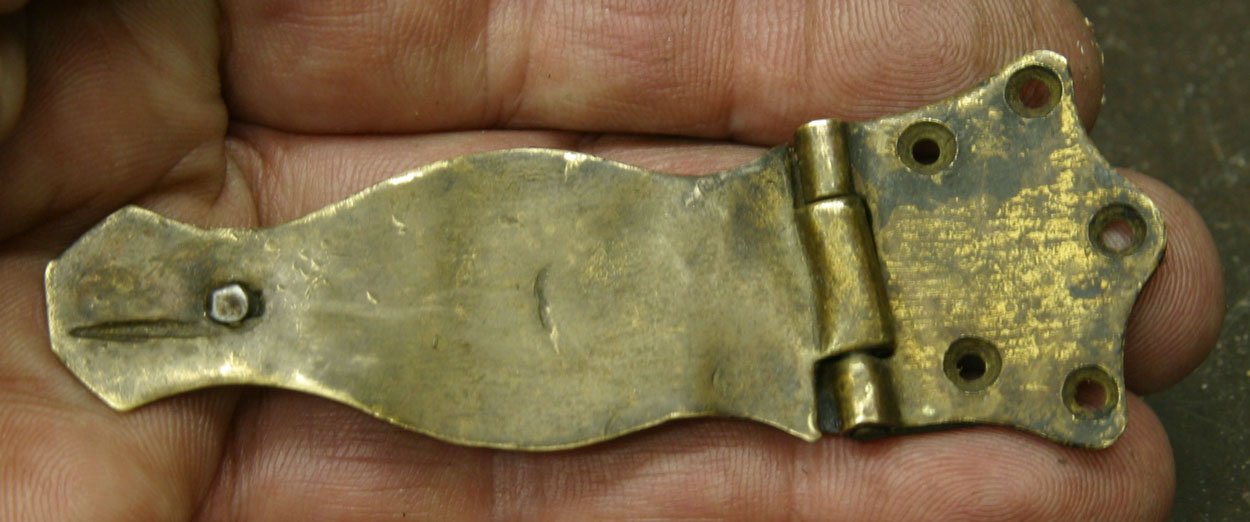
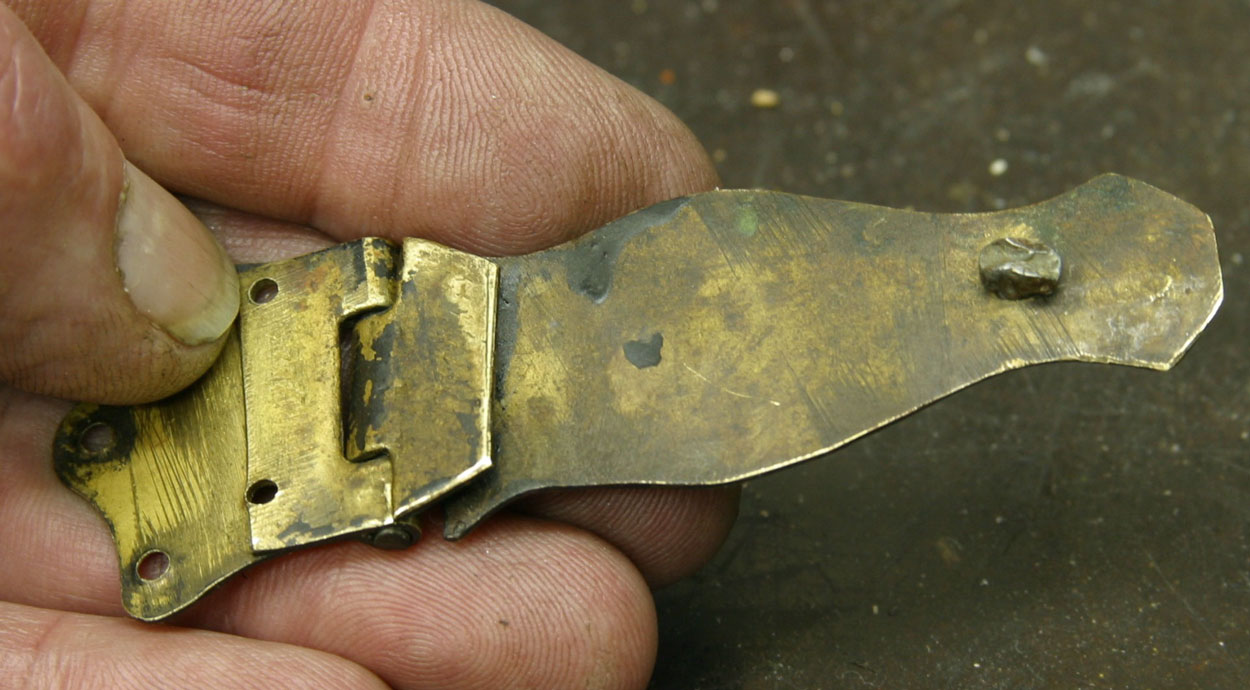
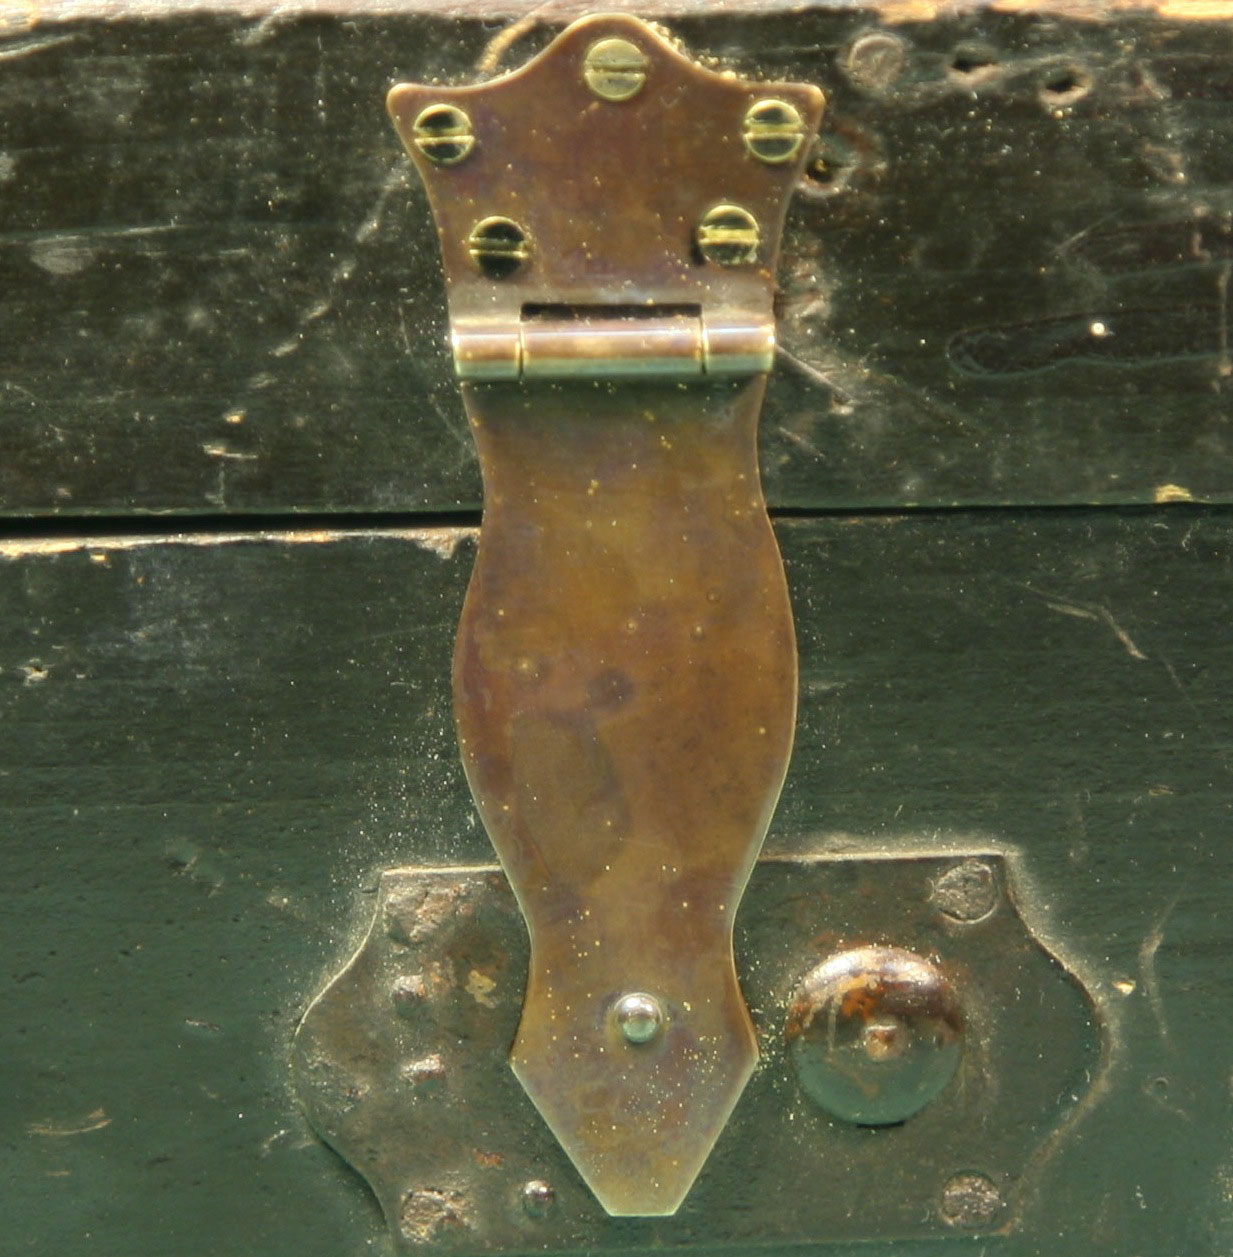
Fortunately, I had access to another period case and was able to remove a latch to use as a model for my restoration. As you can see, these were originally hand made, so I figured I'd have a good chance of being able to do the work myself:
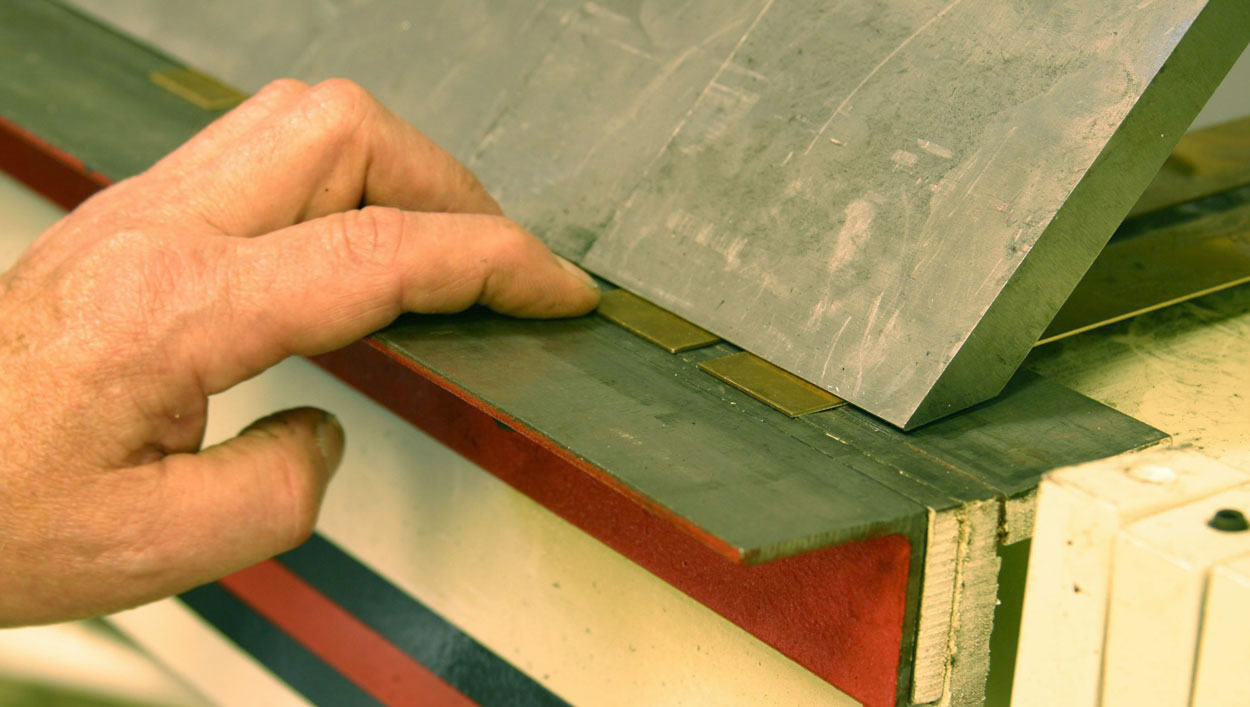
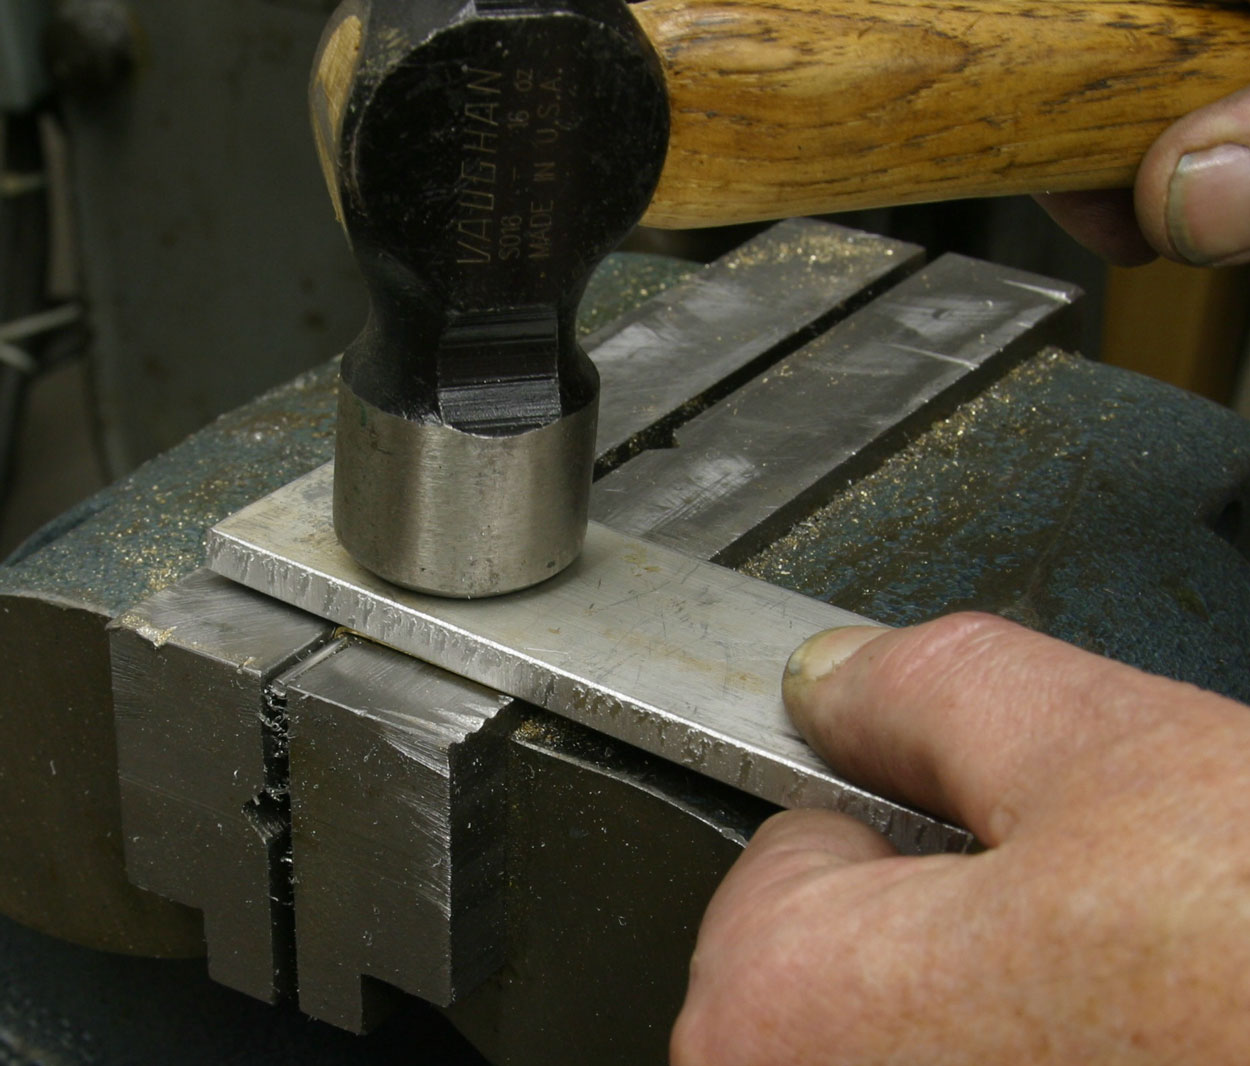
I'm one of the original members of TechShop, a DYI club in Menlo Park, where I have access to some machines I don't have room for at home. Here, I'm using the sheet metal brake to make a preliminary angular bend in the ends of some 1/32" thick brass strips wide enough to make my hinged parts:

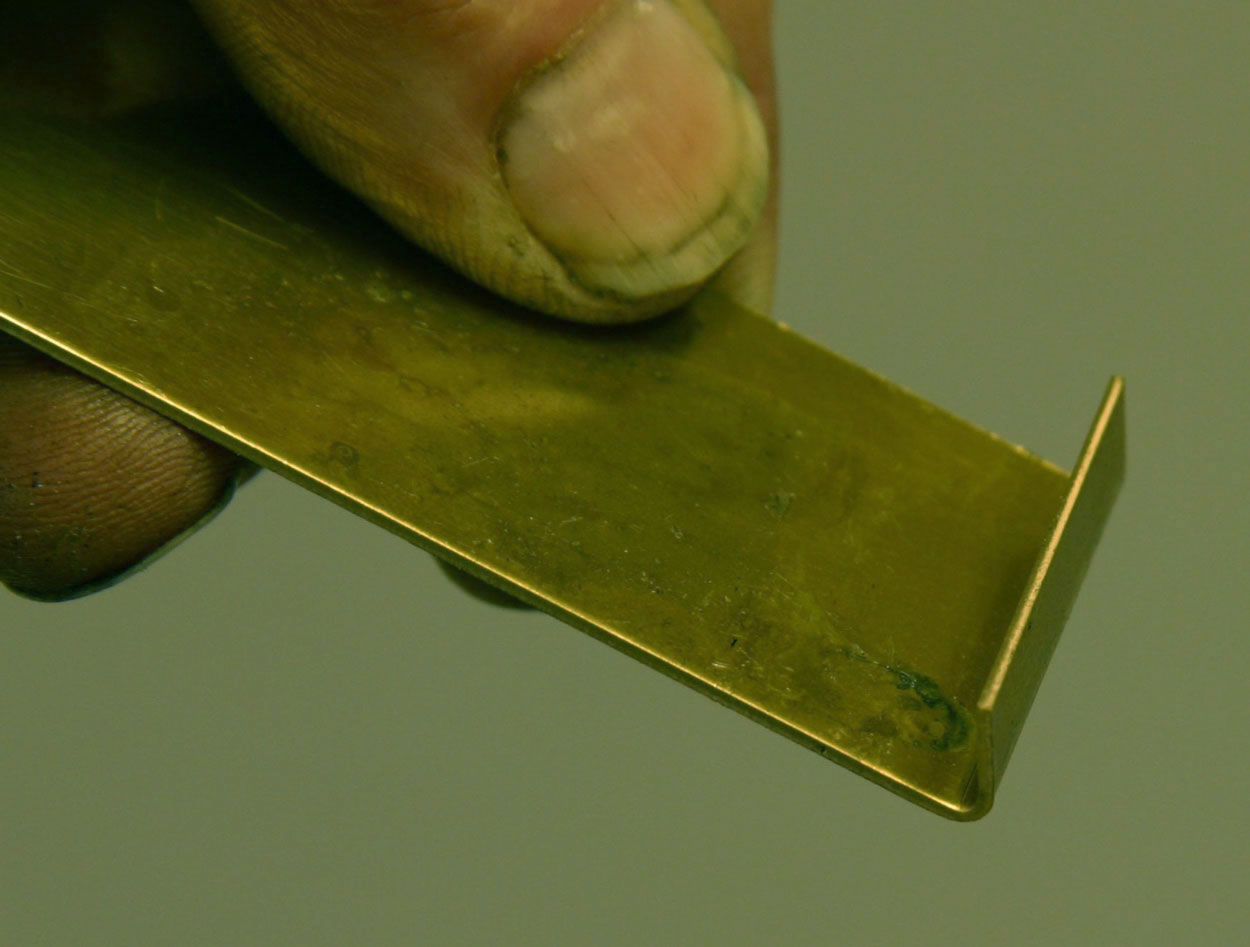
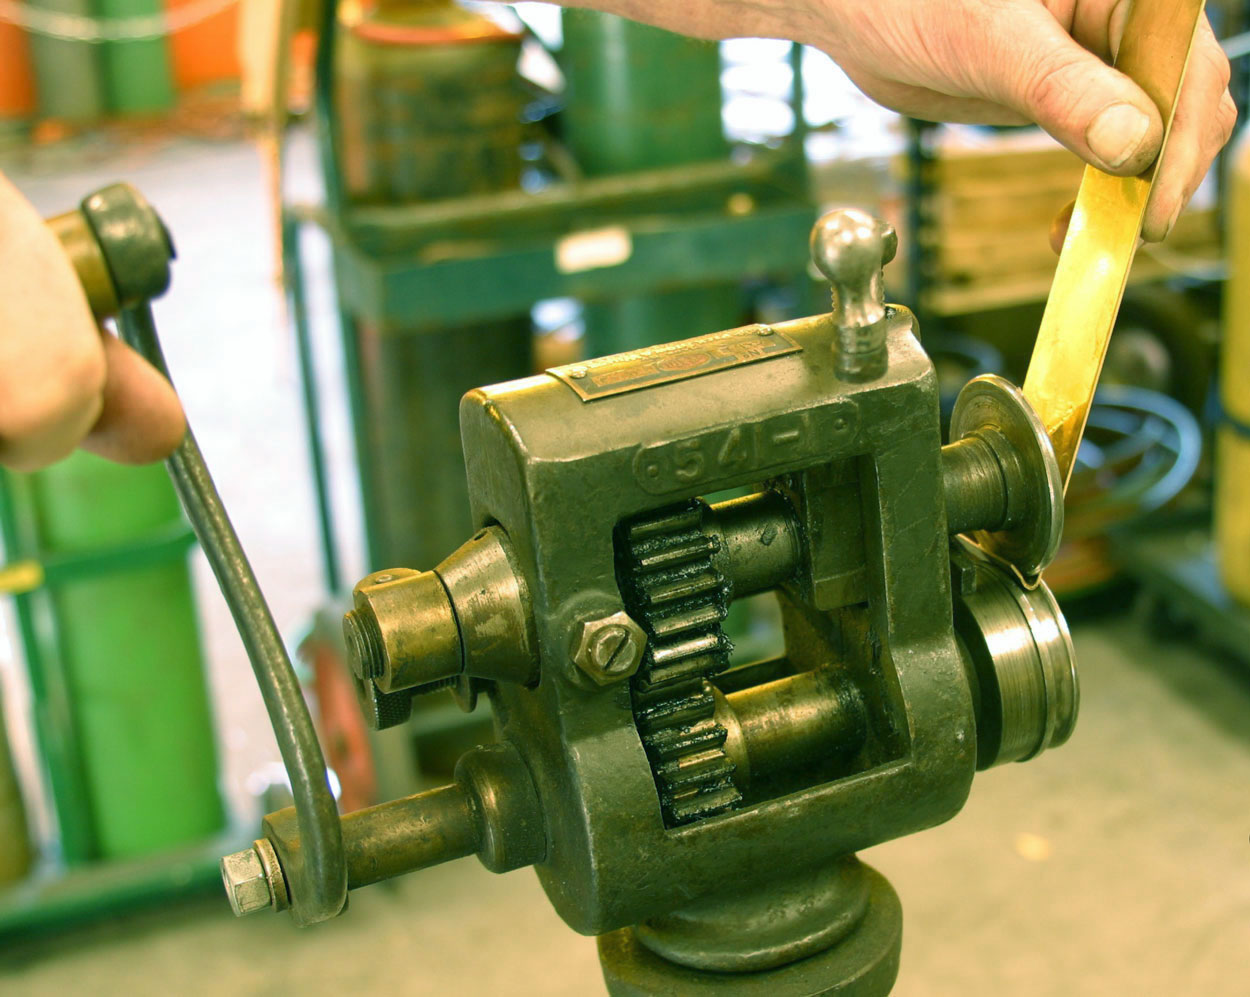
I spotted this little bead rolling tool over in the corner, and used it to make my angular bend into a curved one with about the right radius:
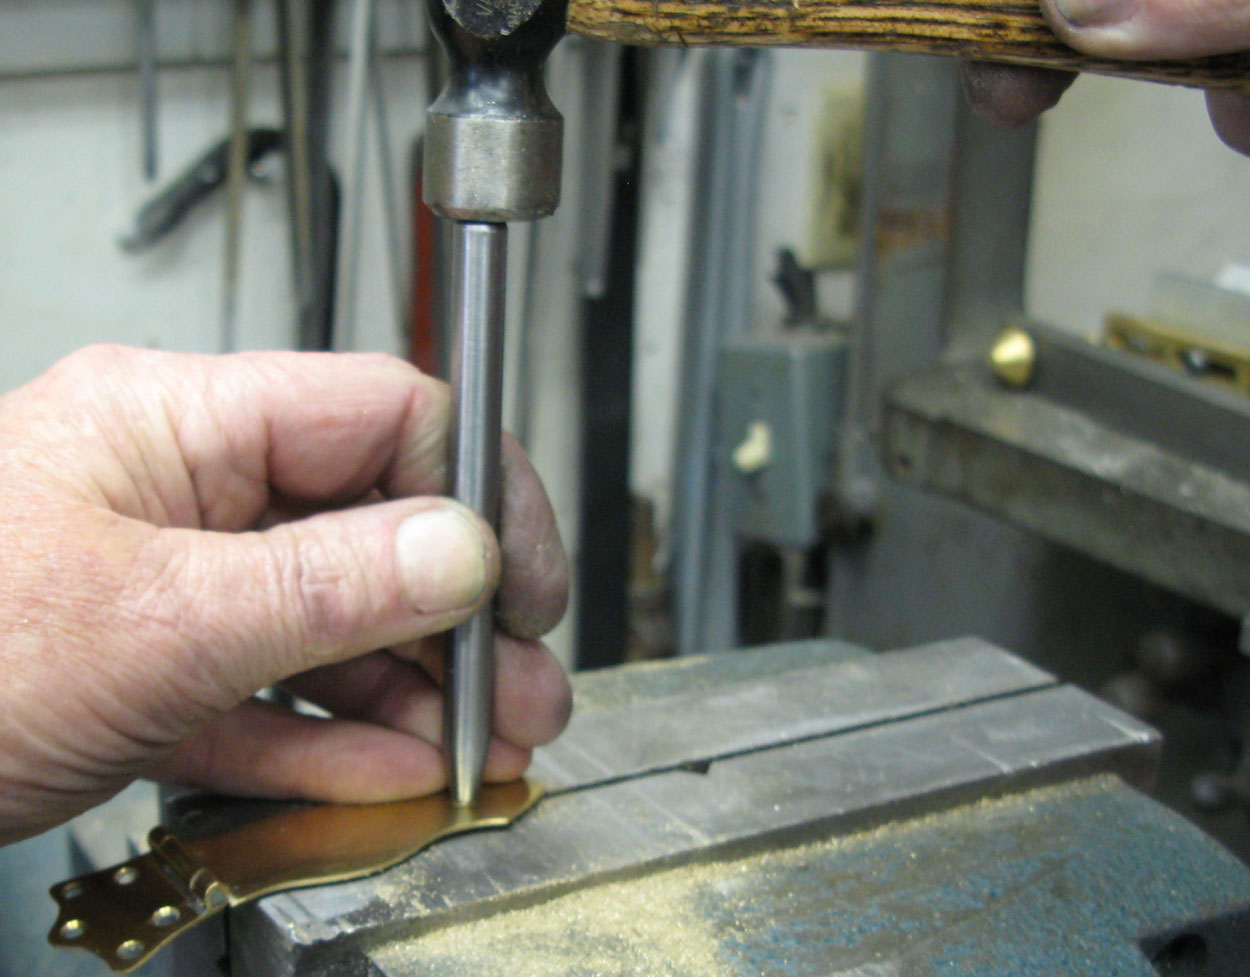
Back home in my shop, I cut the short end of the bent section off to prepare to roll the strip around my hinge pin:
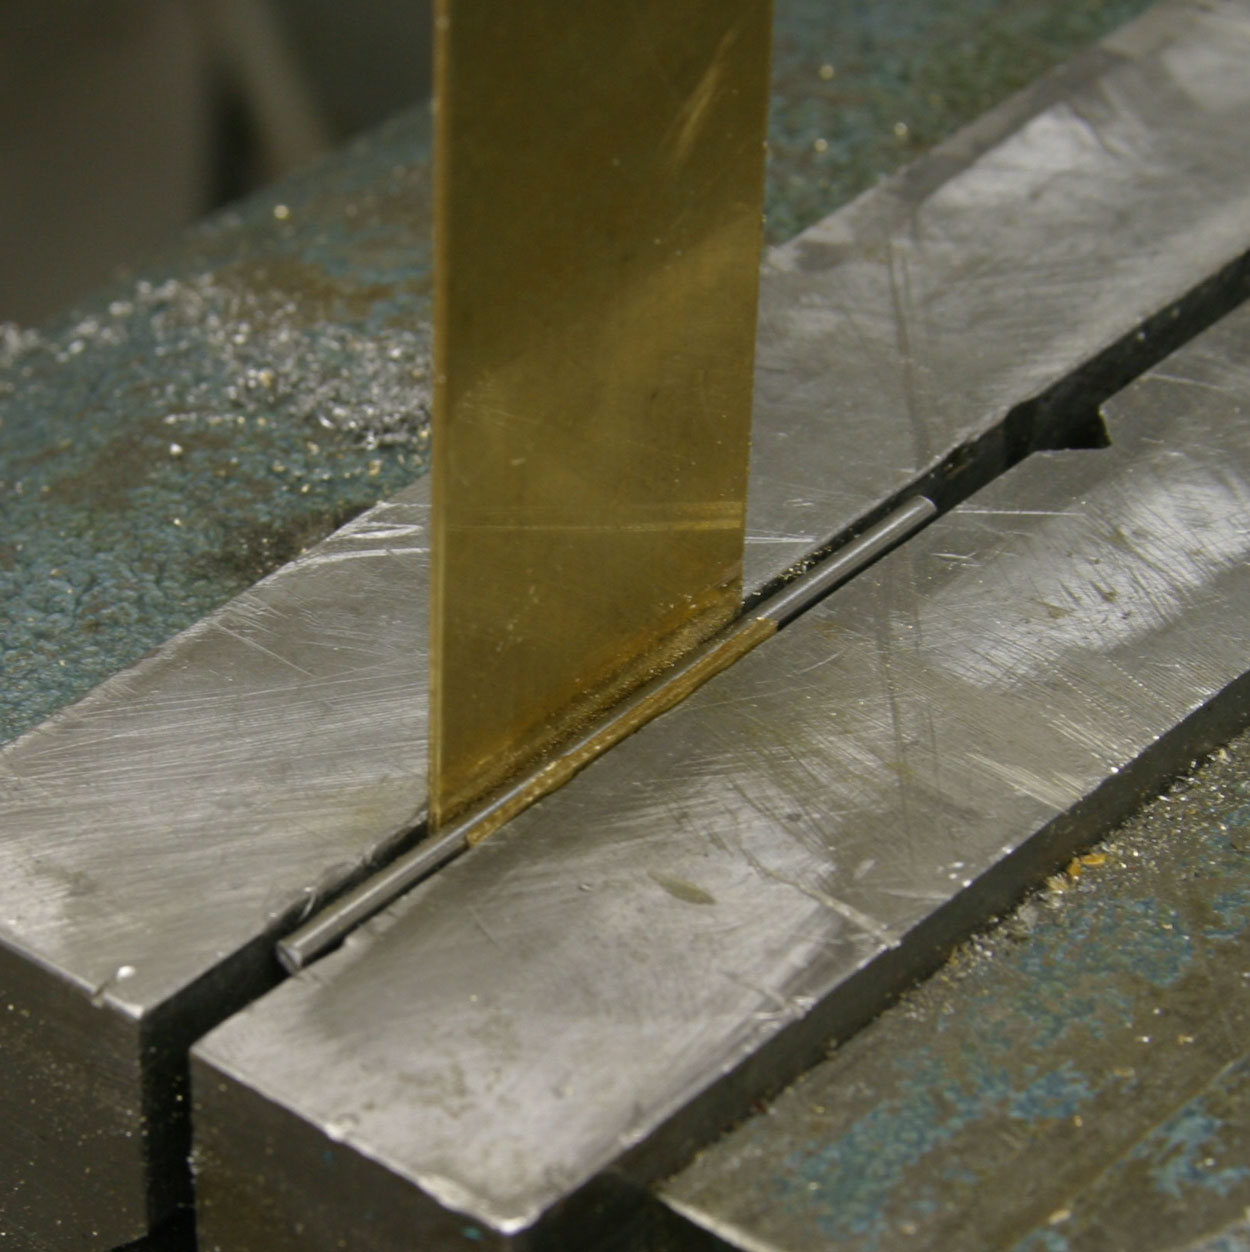
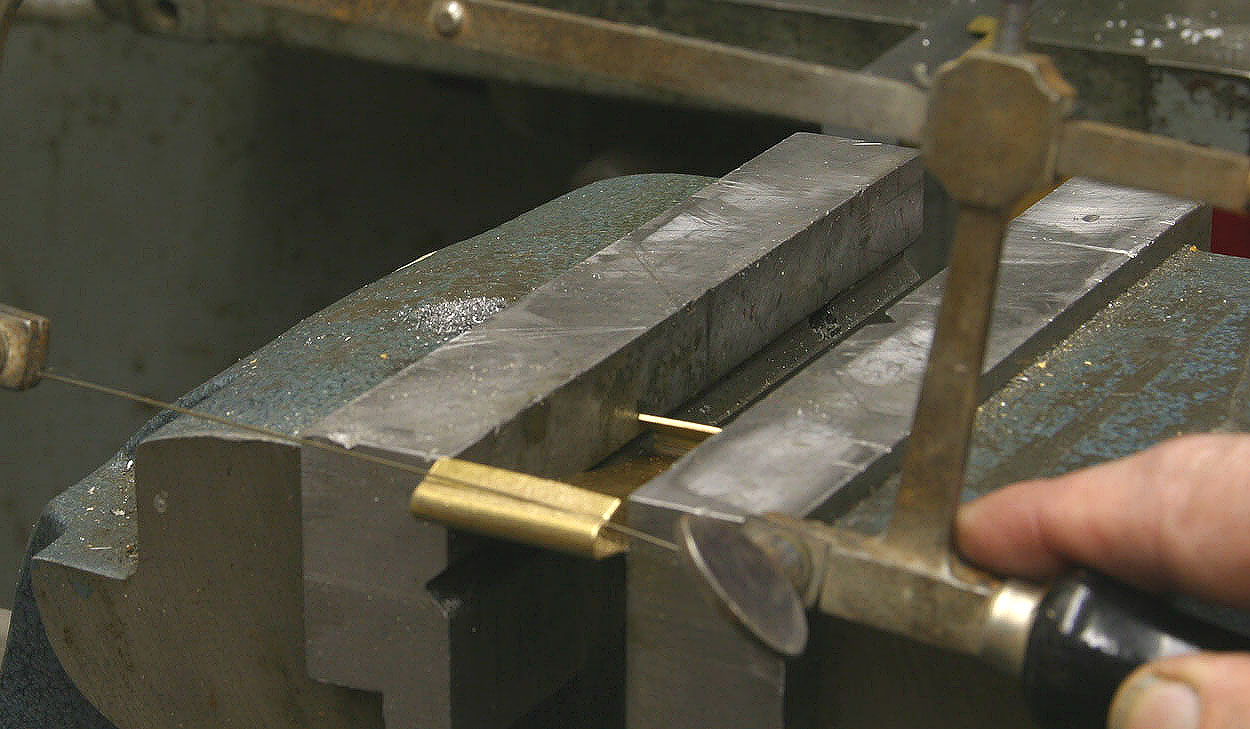
Clamping the 1/16" steel pin in the vise with the brass strip around it, I was ready to finish the roll:
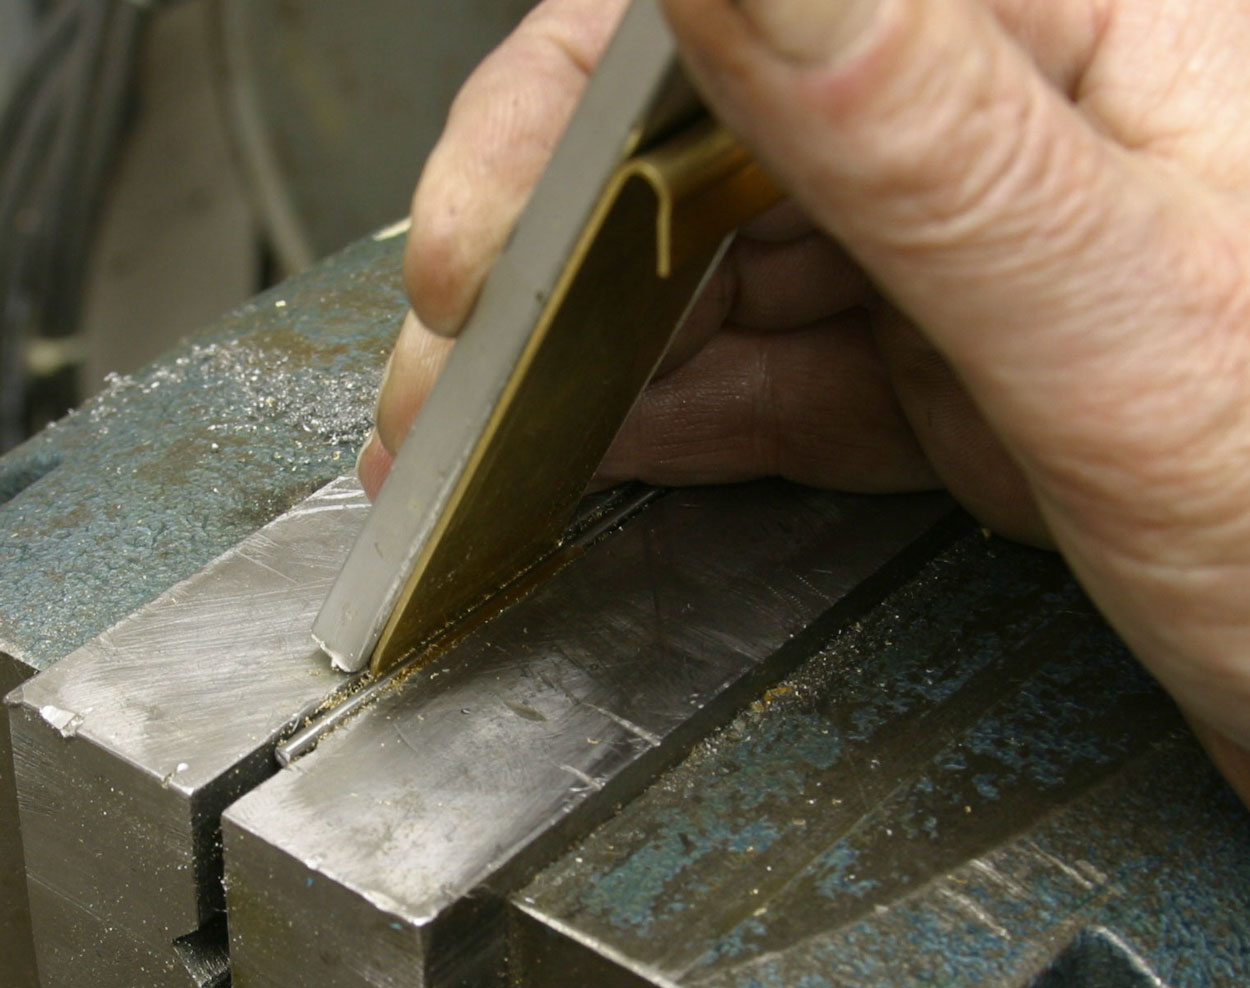
The brass was soft enough to allow me to bend it by hand, supporting the length with a 1/4" thick aluminum strip to keep from bending the section I'd want to remain straight.
A tap or two finished the roll nicely:

After cutting the profile, drilling, and notching for the parts to fit together, I had a nice little hinged latch:
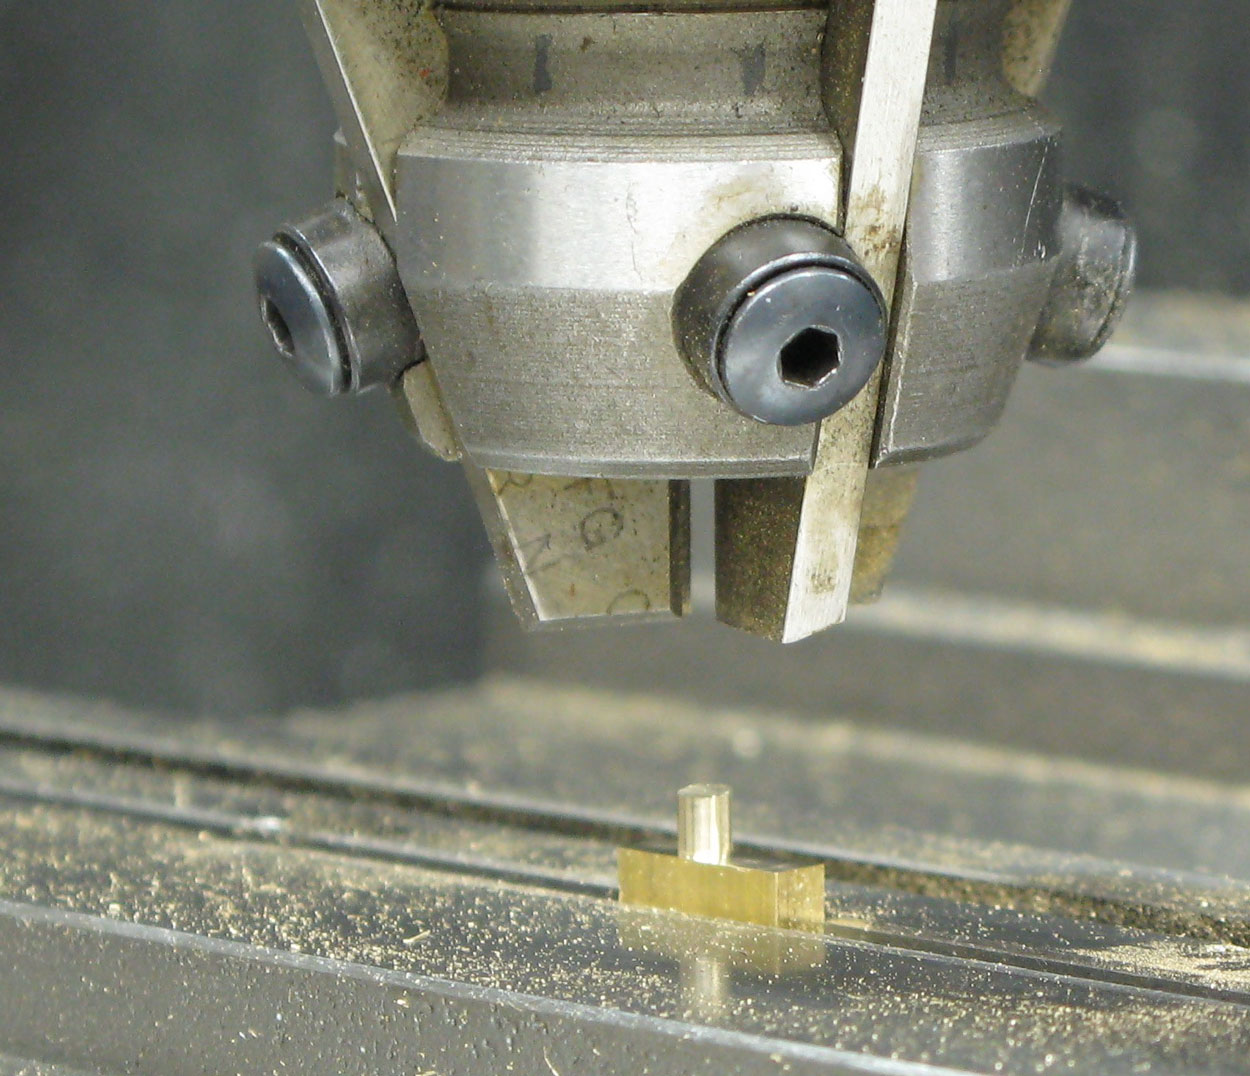
I used some 1/8" thick brass to make the little barb that actually holds the latch into the lock. Here I'm using a "hollow mill" to produce a little round stub on the brass blank:
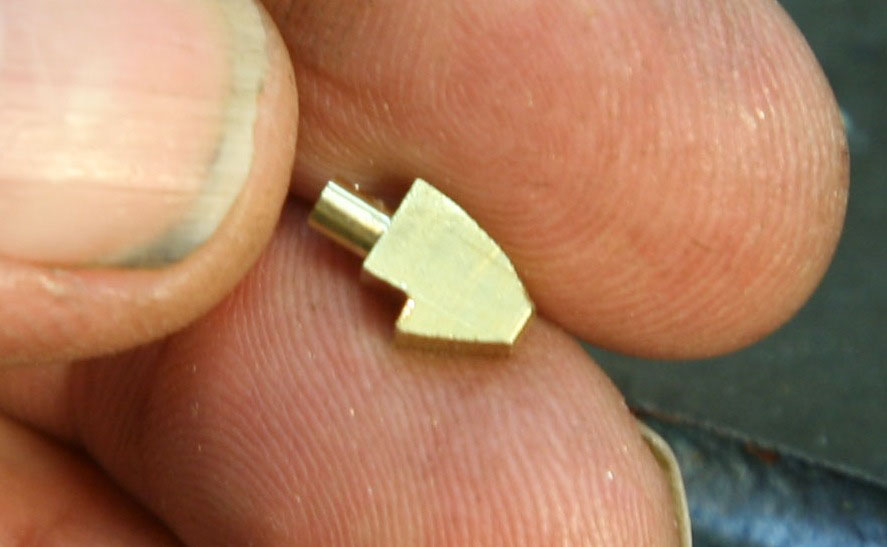
After a fair bit of hand filing, I had my little barb ready for installation. The round tab would serve as a "rivet" to attach the barb to the latch:
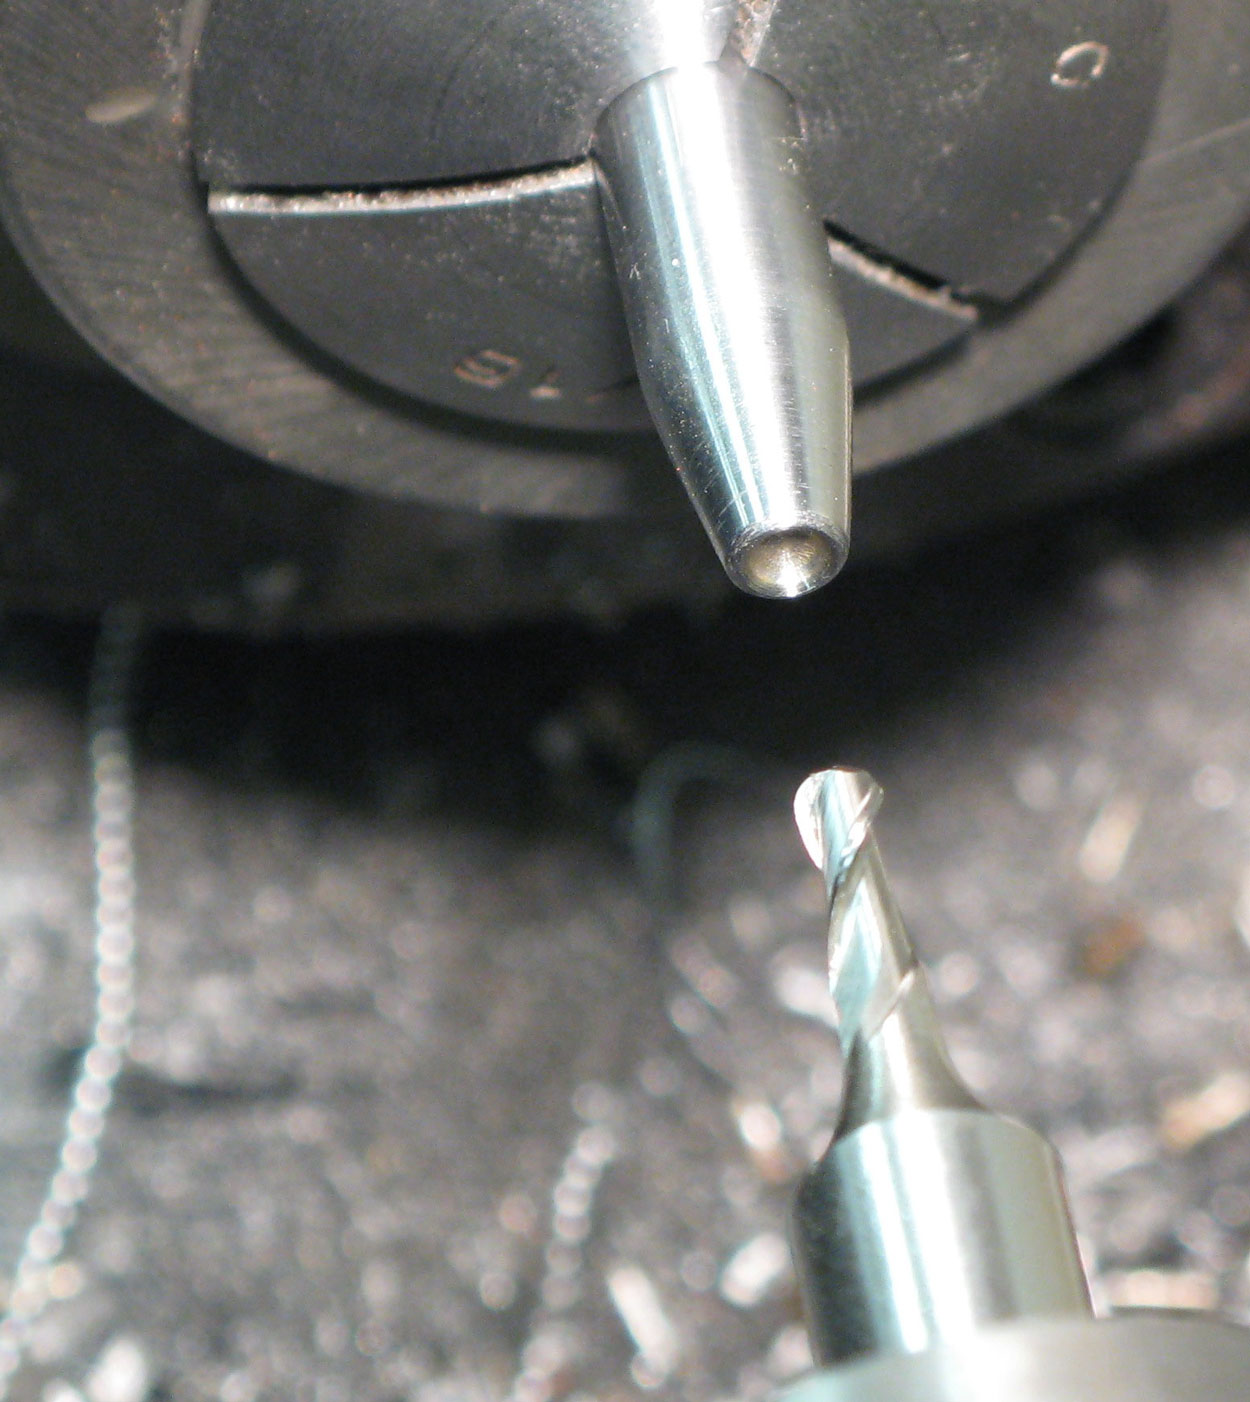
I used my lathe to make a little cupped tool to form the round head of the brass rivet:
With the barb held in the vise I attached it to the drilled latch, and peened over the back side:
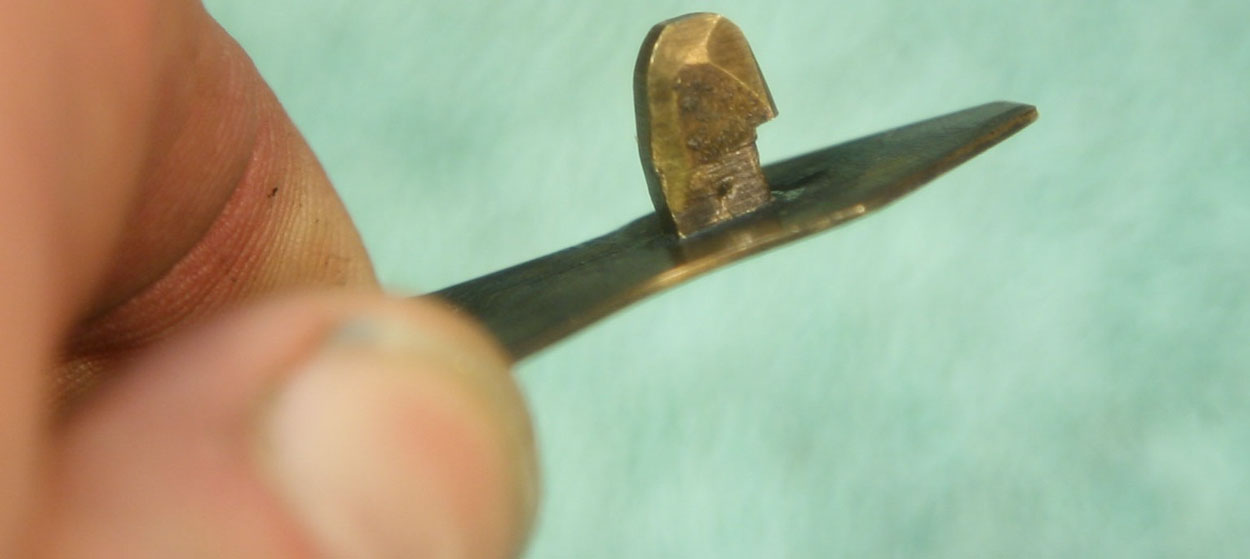
Here's the finished "business end" of the latch:
I discolored the brass by heating it slightly, wiping it with gun bluing solution, and generally smudging it so it would old.
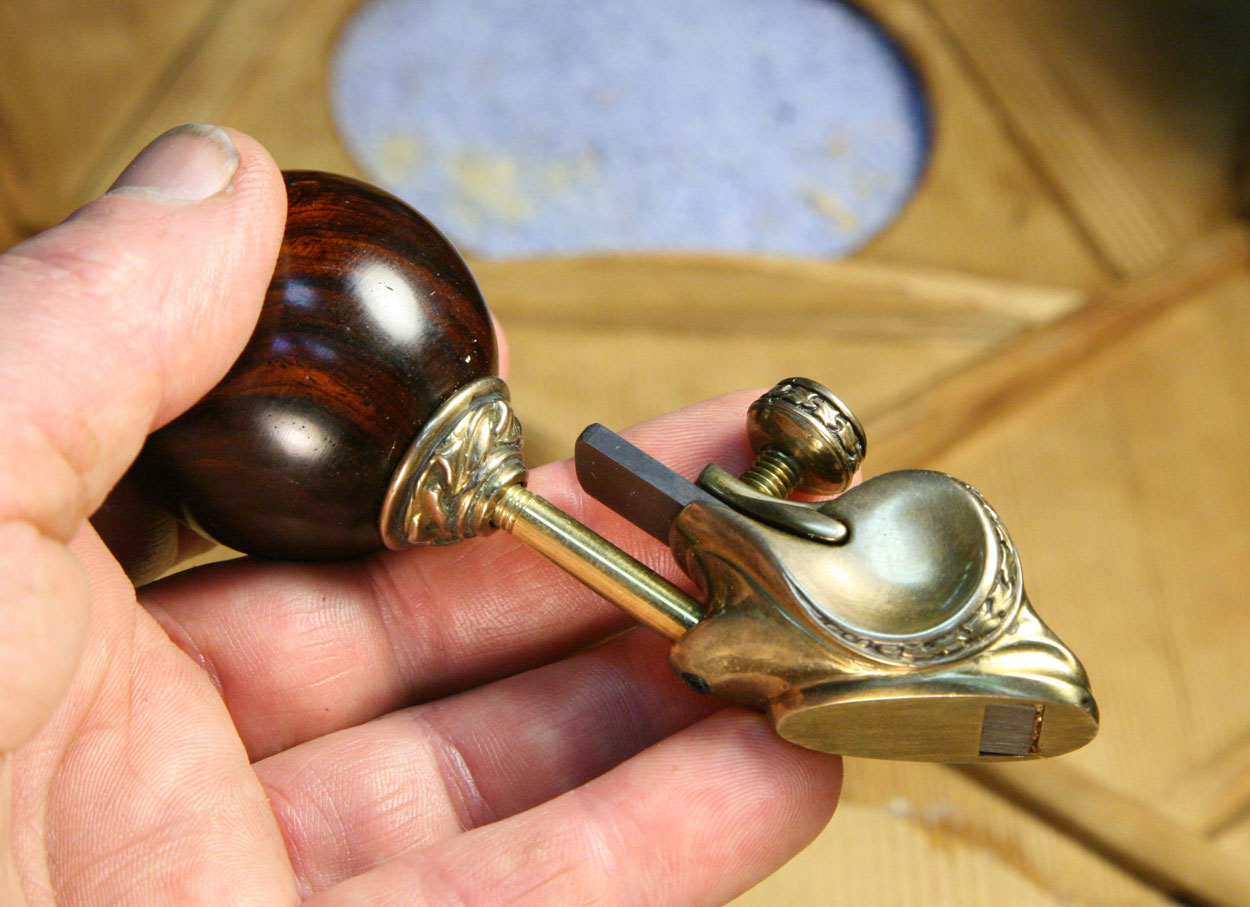
And, here's the latch, mated up with the original lock.
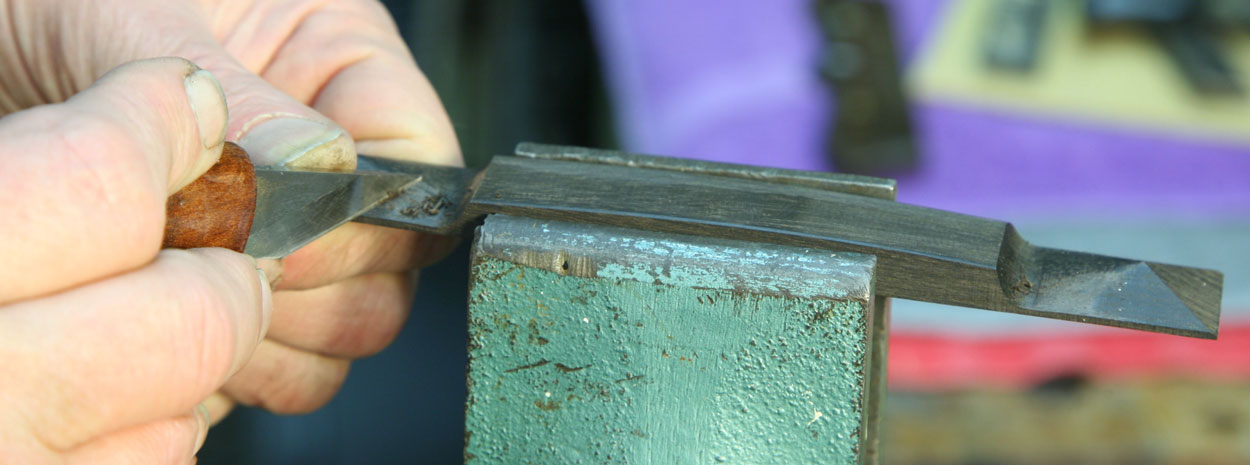
Reproducing the original style bridge was a matter of slow hand work. I spent some time carving the ebony to the style and size Martin used on this guitar when it was made:
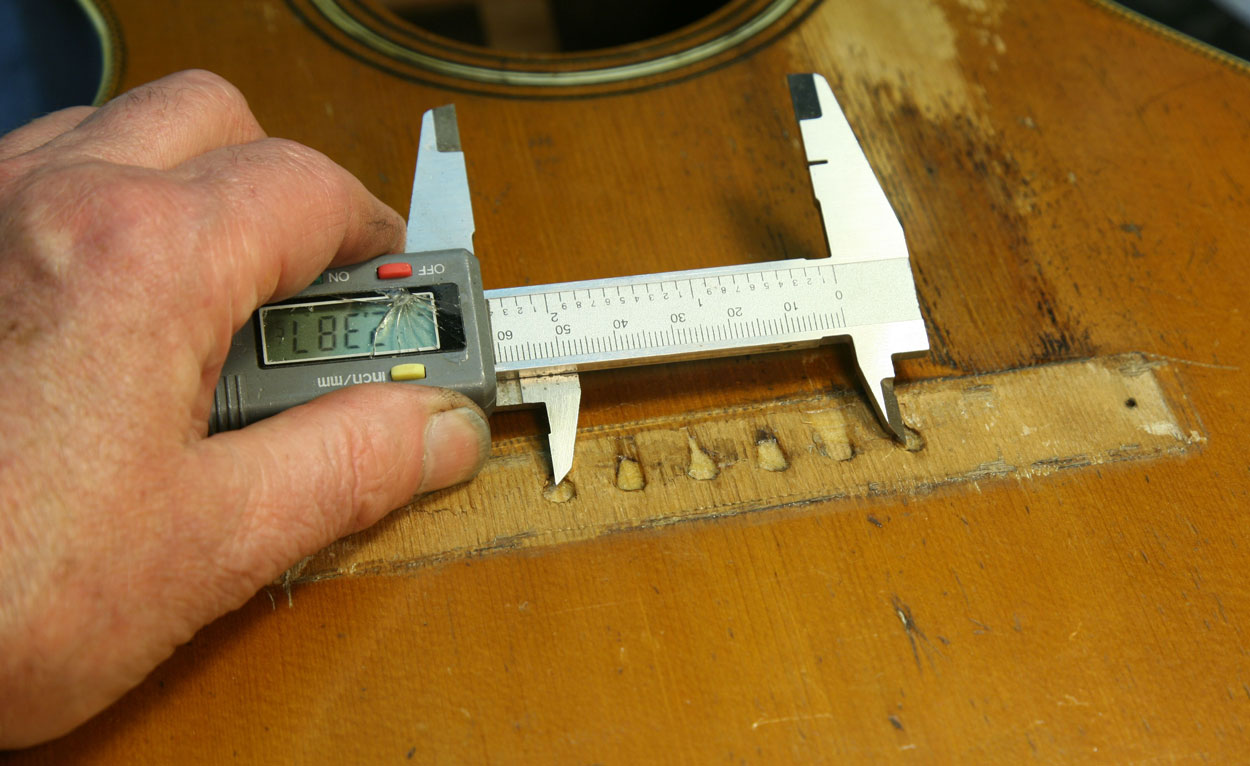
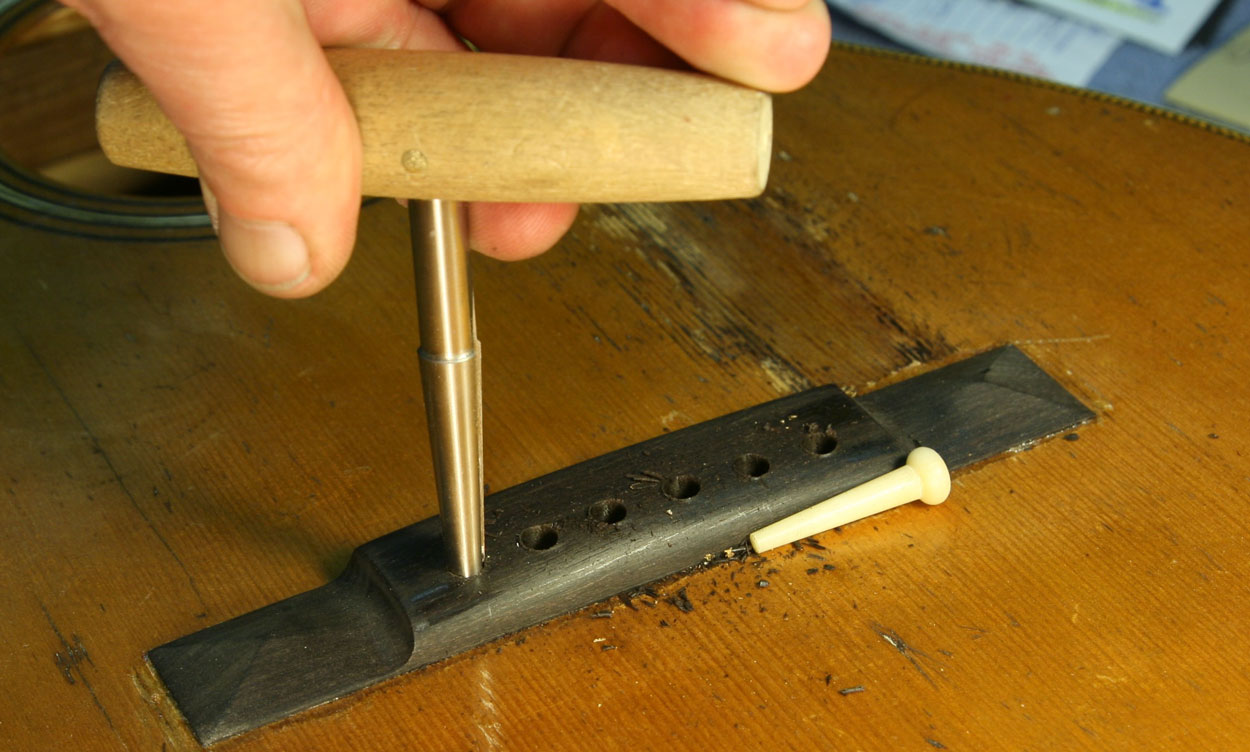
Measuring the center distance between the bridge pin holes:
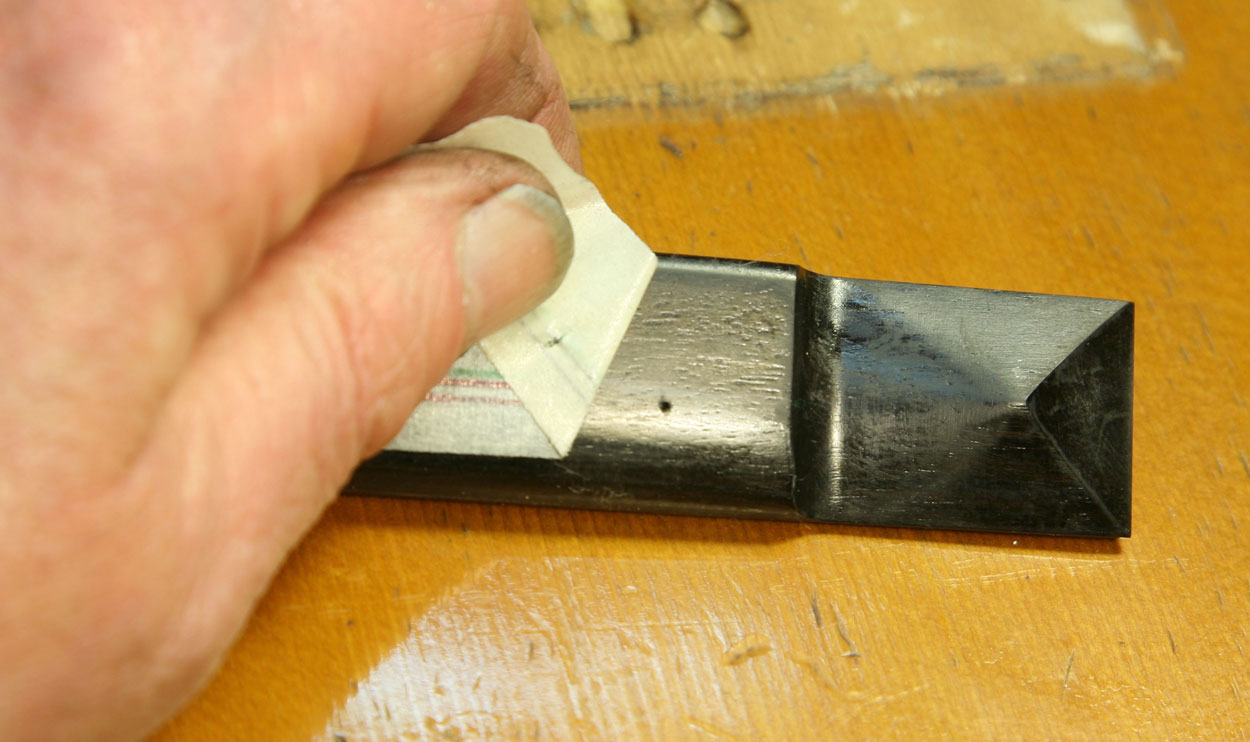
I had covered the top of my new bridge with masking tape for clarity of marking out, and once I transferred the center positions of the first and sixth string holes to the tape, I marked through the tape with an awl:
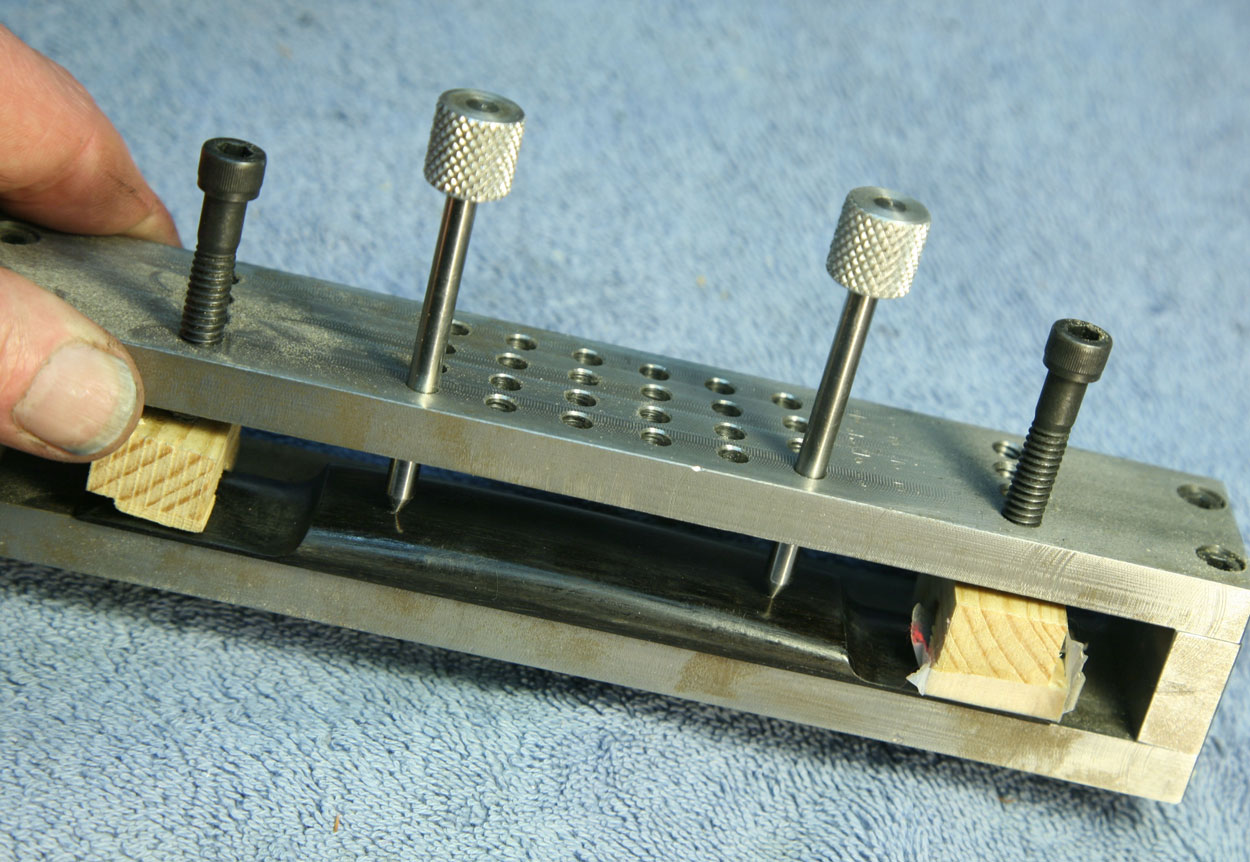
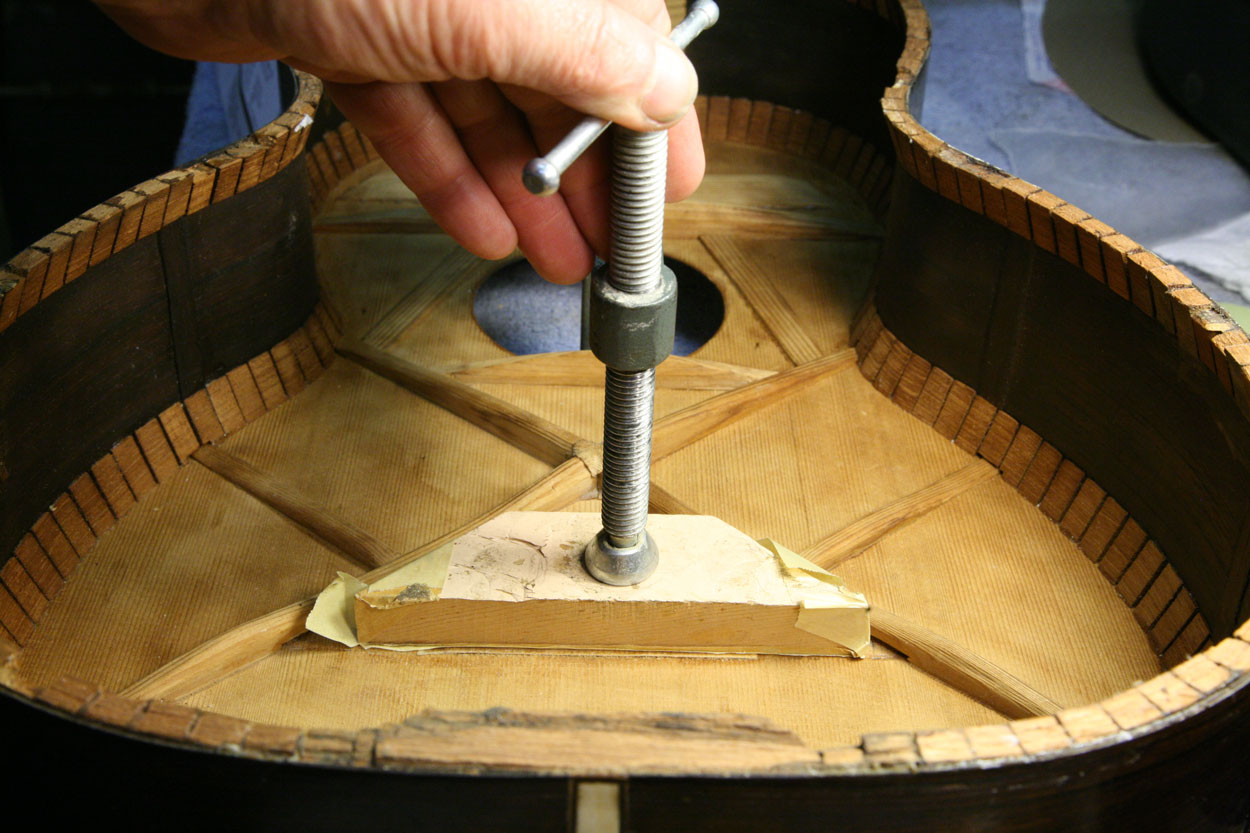
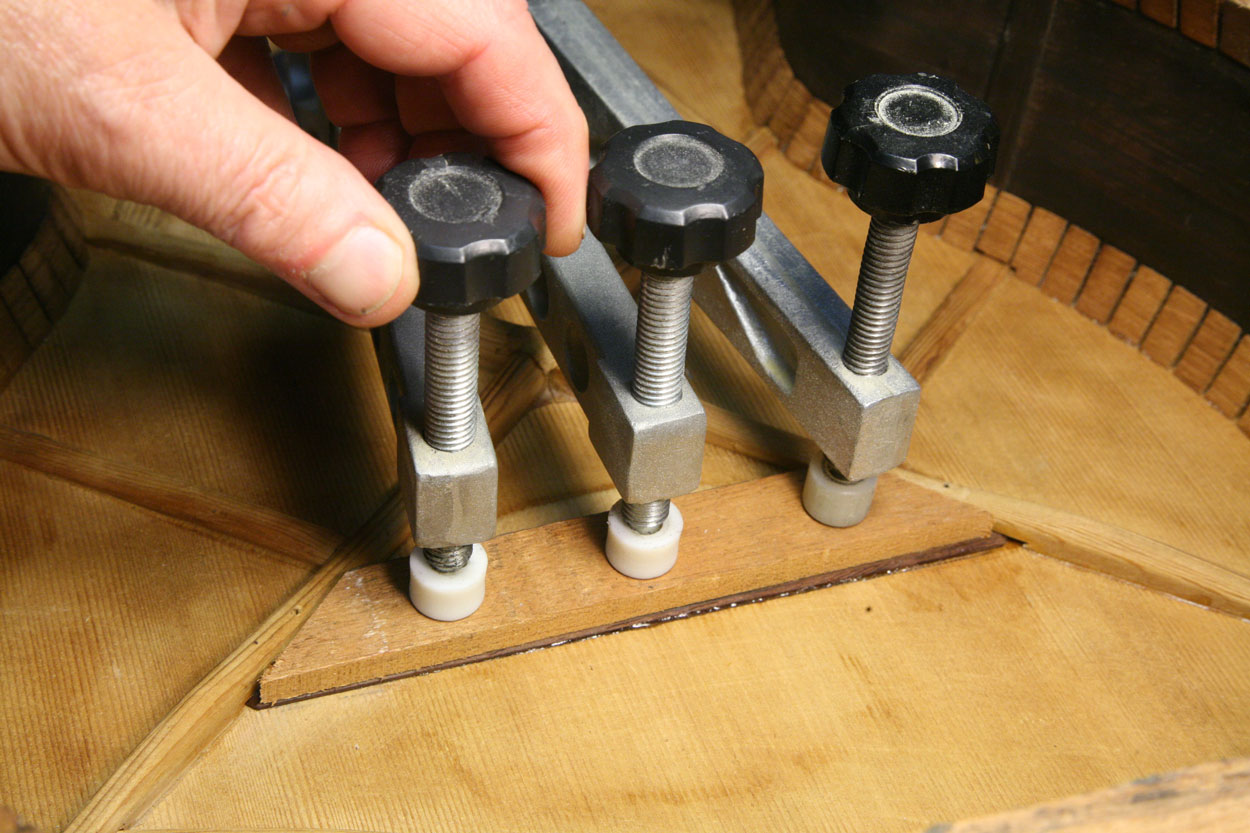
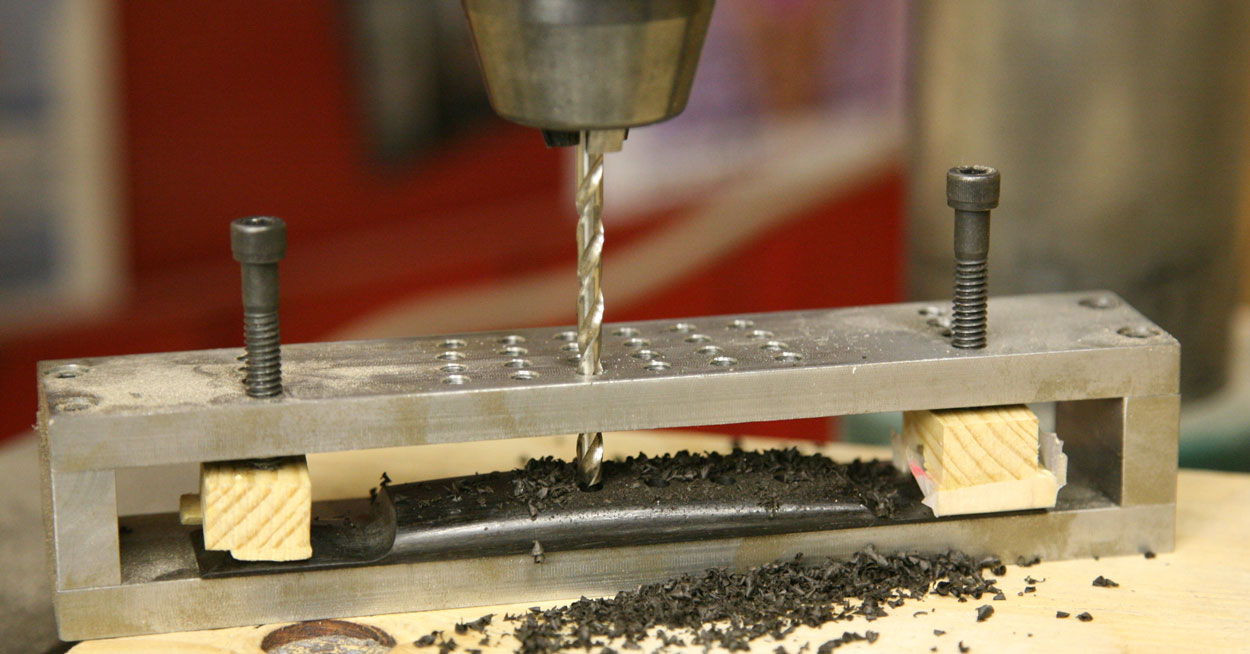
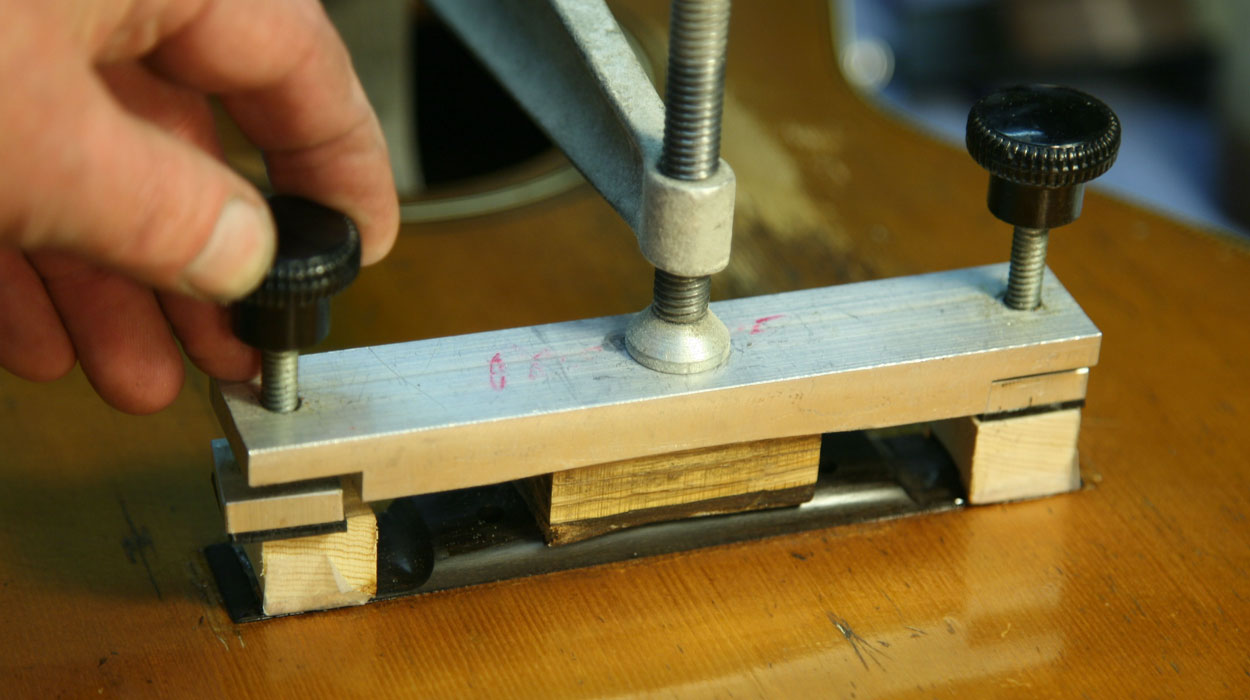
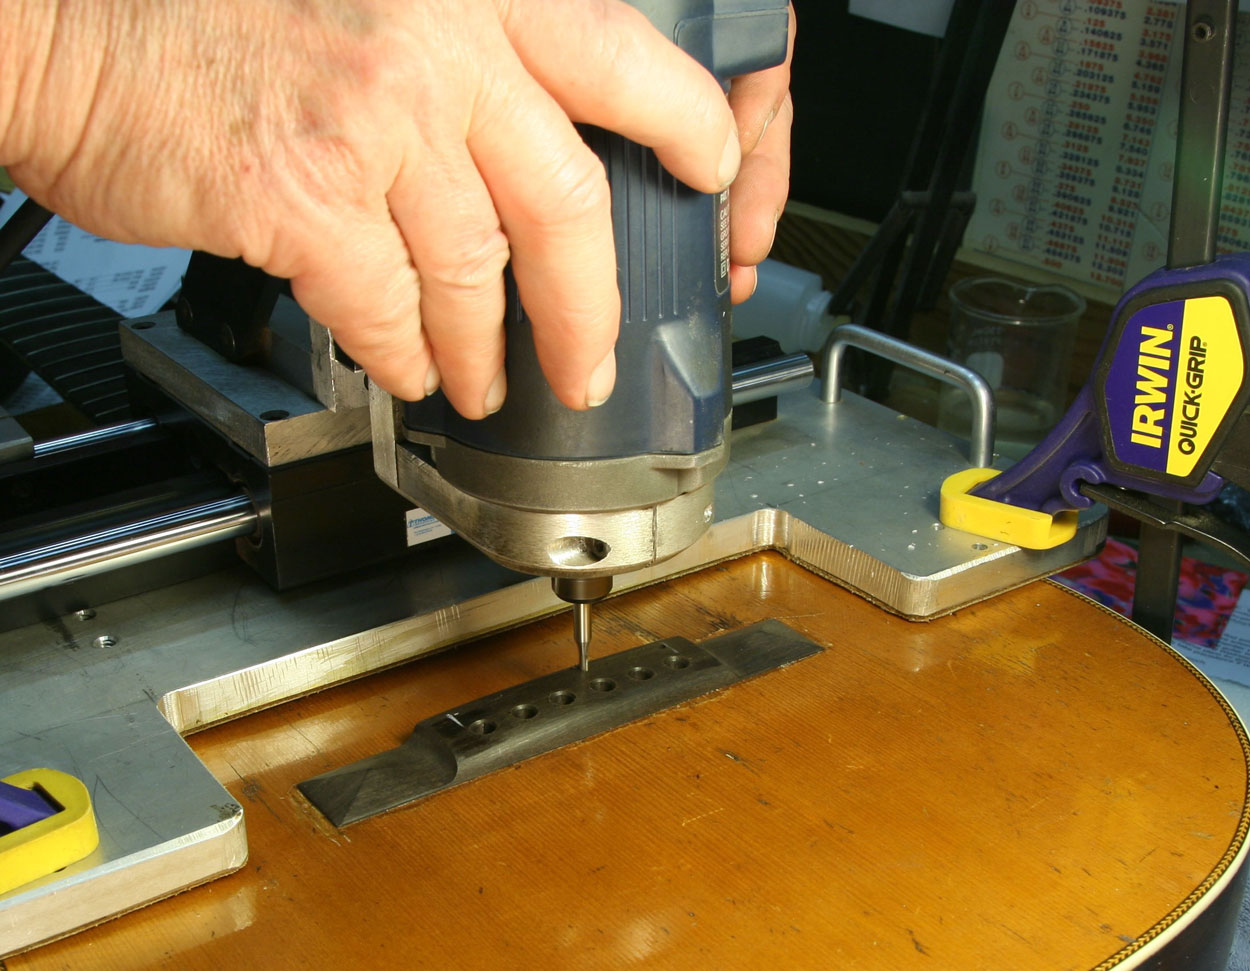
I use a drilling jig to ensure that all six bridge pin holes line up exactly. The bridge goes inside, and is located by the two pins with knurled knobs. The pins have sharp points so they stick right into the marks I'd made in the bridge. Once clamped in place, the bridge can't move as I drill through the setup to produce the six string holes:
I developed and made this jig some years ago, and eventually gave the design to LMI - it's available in their catalog.
I'd done some finish touch-up around the bridge area to conceal some old damage, mostly a matter of brushing orange shellac in the area, and blending it with the surrounding finish:
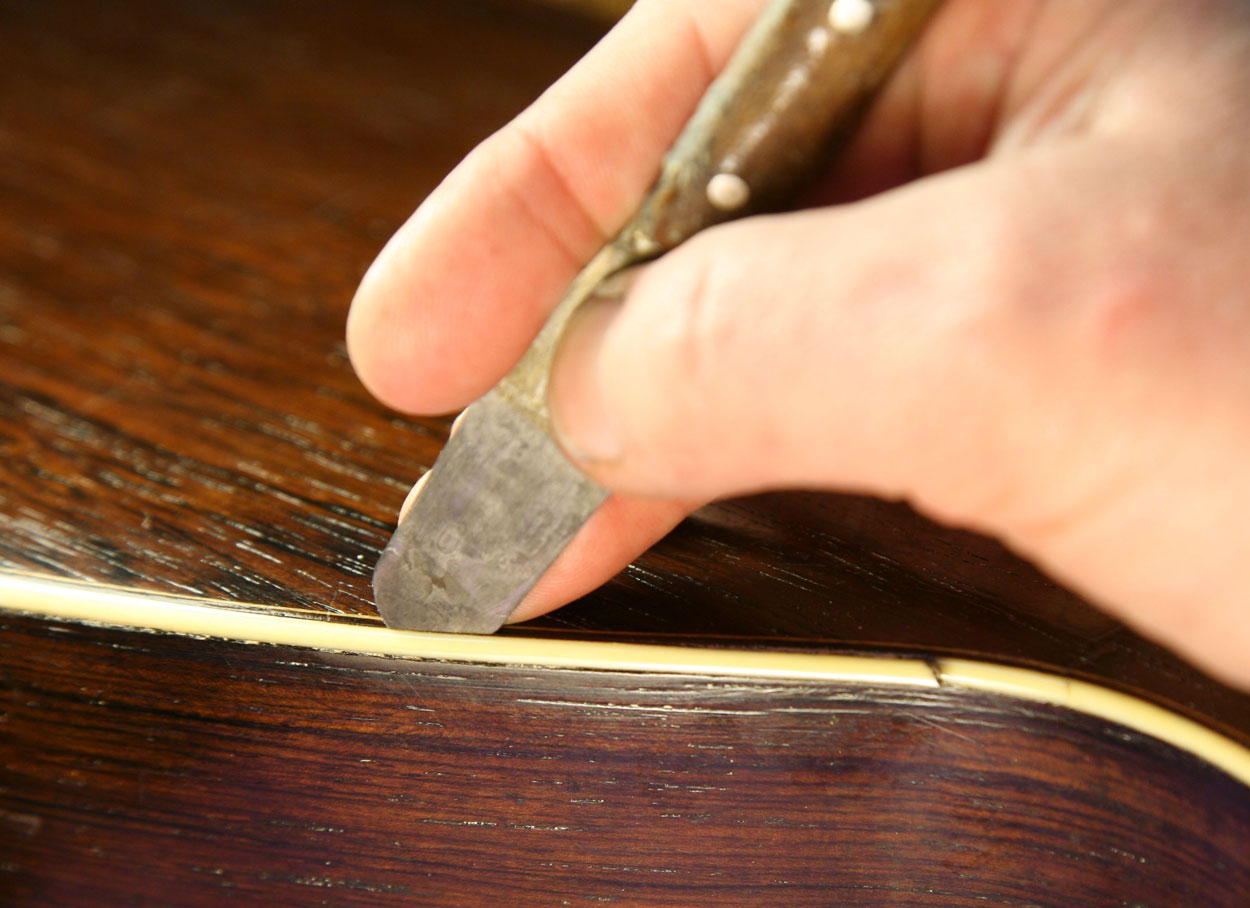
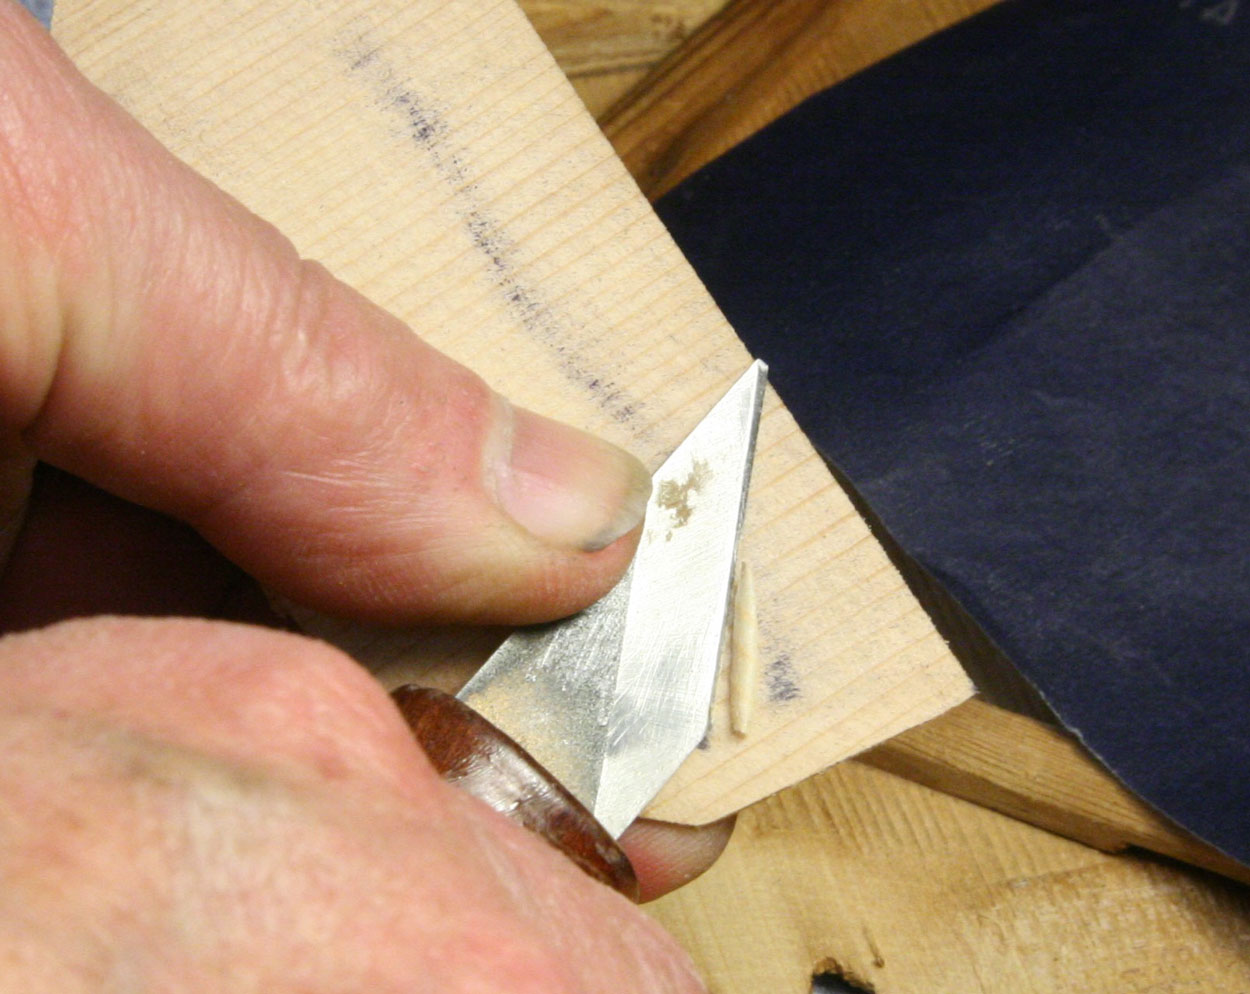
Holding the bridge exactly in position, I marked the perimeter right up next to the bridge using a thin blade knife:

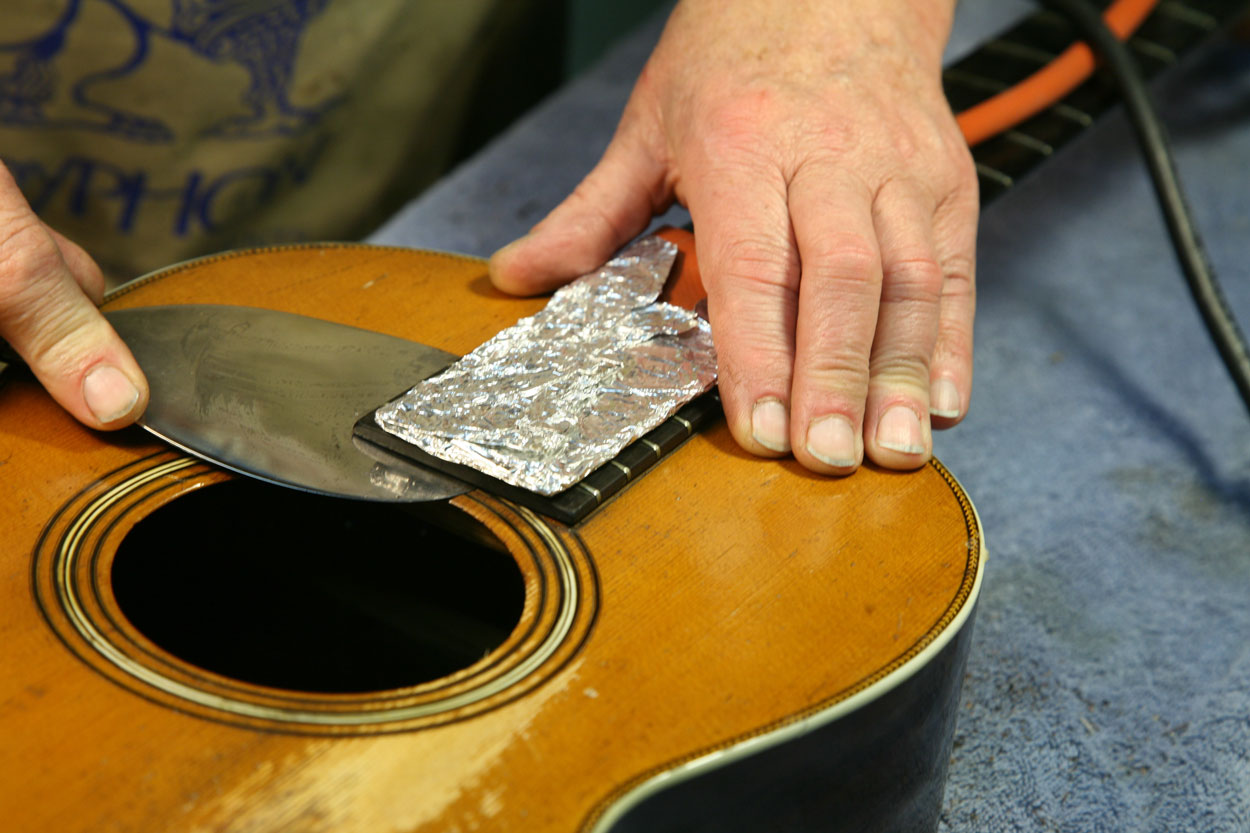
Using a simple hand scraper, I cleaned off all the finish in the area where the bridge would make contact to make sure the glue would hold well:
My scraper is a kitchen carving knife cut off and sharpened to a 45-degree angle.
As with this entire restoration, I used traditional hide glue when I clamped and glued the bridge:
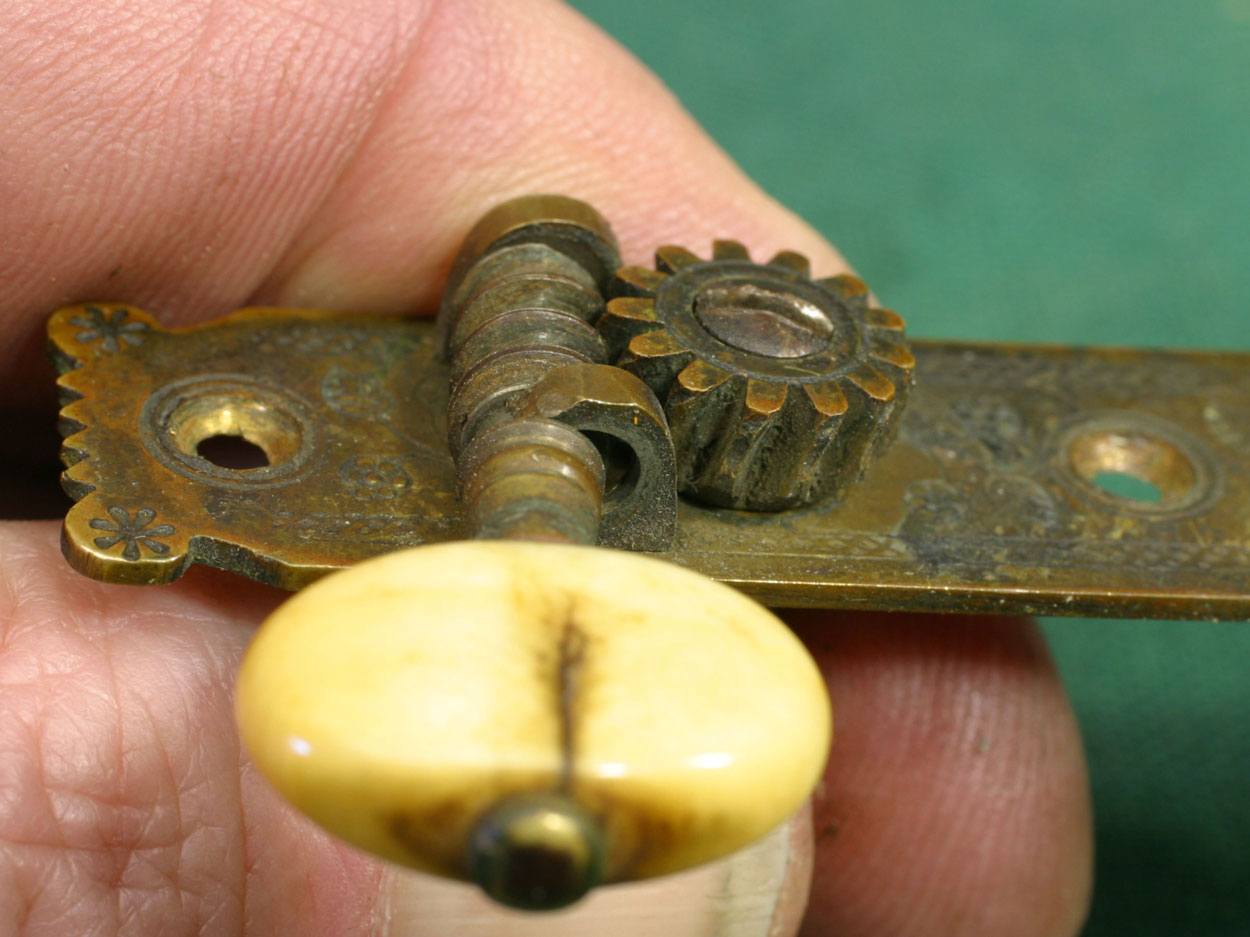
My challenge was to replace this bearing post without disturbing the cracked button or taking apart any more of the assembly than necessary:
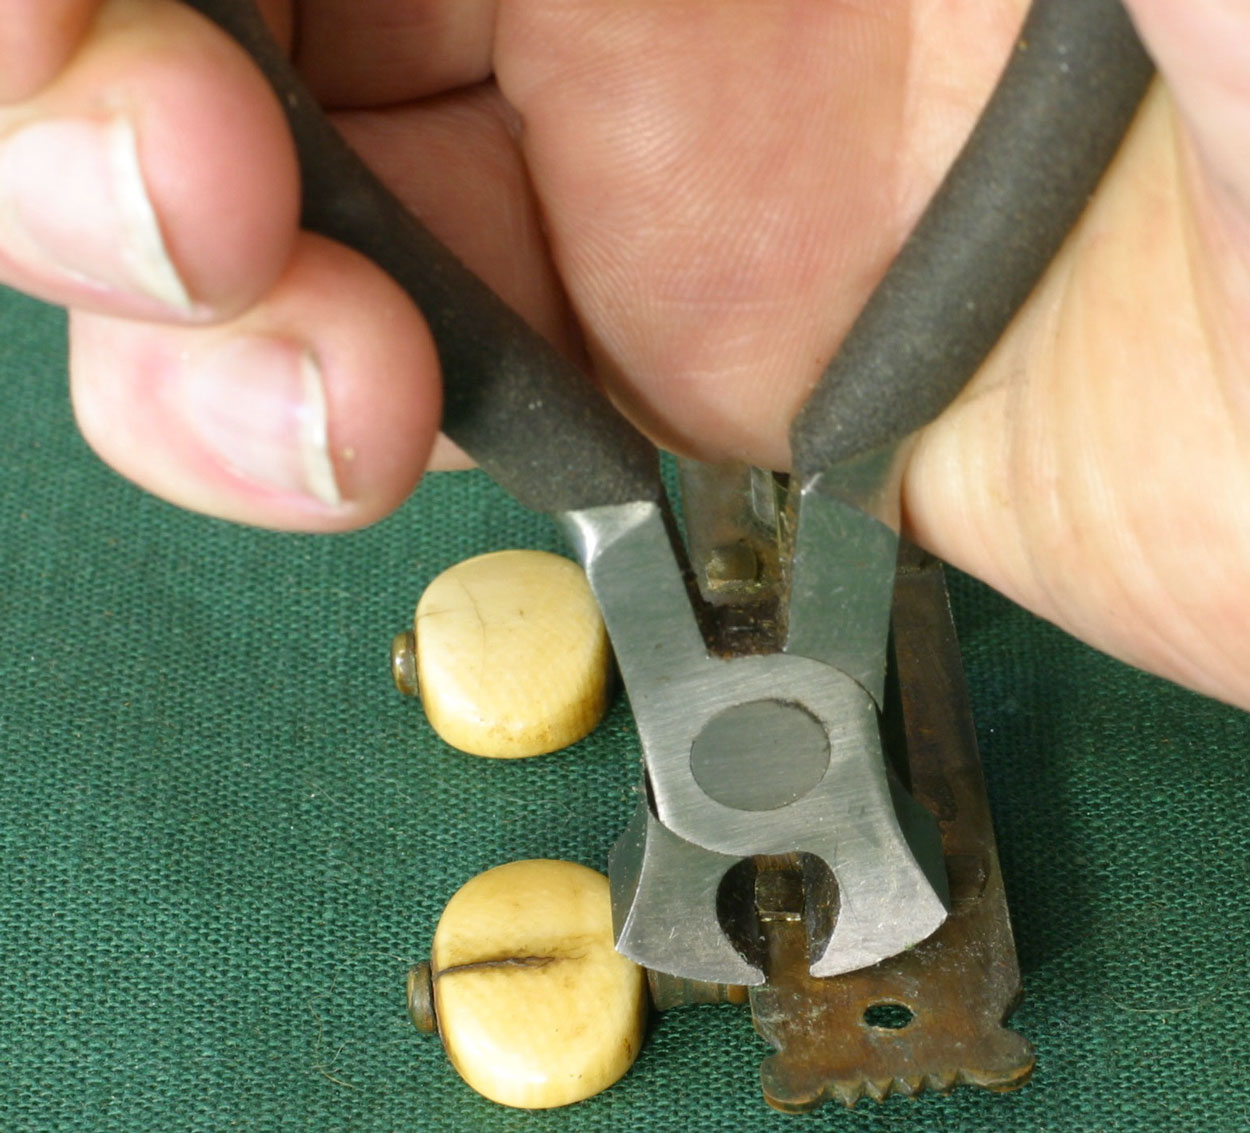
I started by using my flush cutting end nippers to cut the protruding bit of the worm gear support rivet:
With the post and gear removed I was able to push out the bearing out, revealing the rectangular mounting hole:
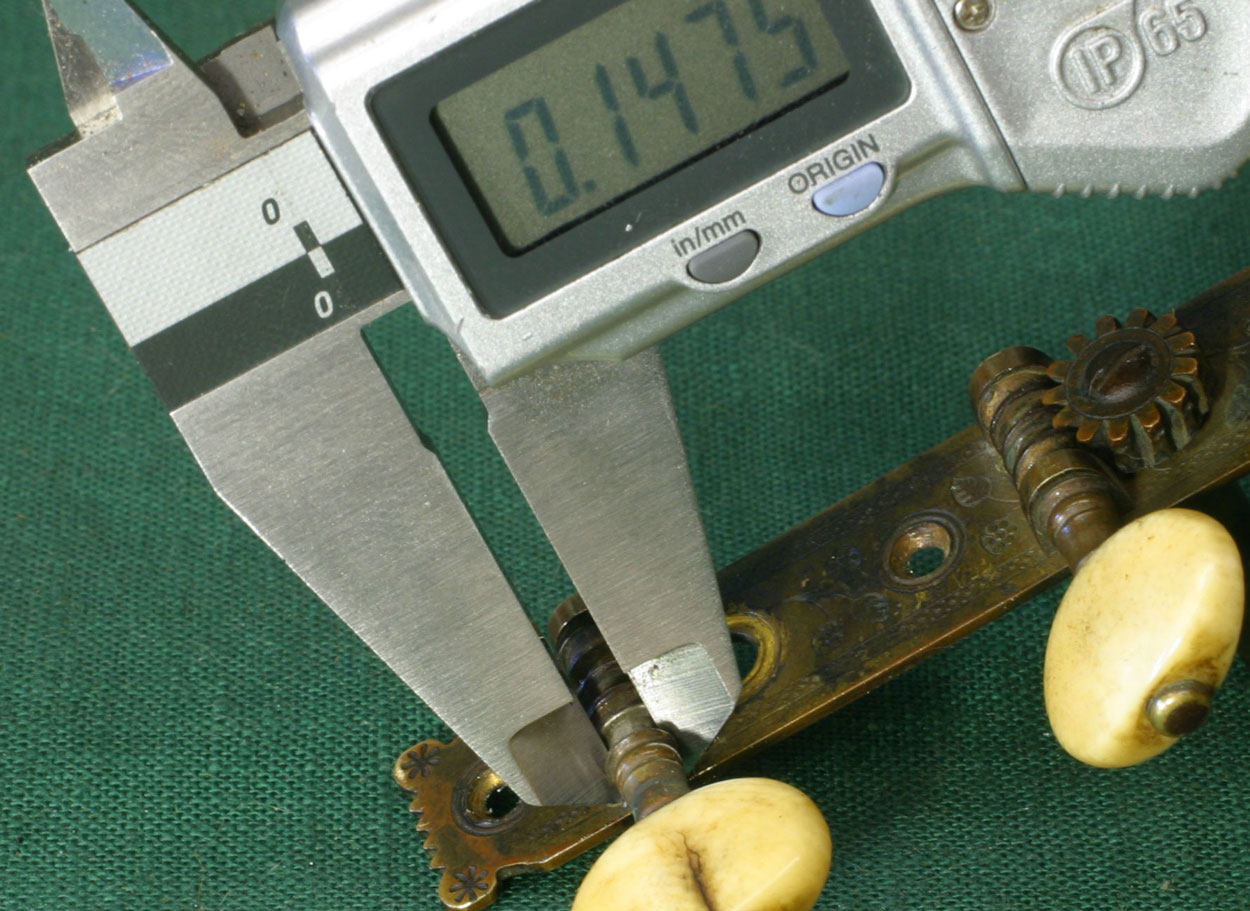
Next I measured the diameter of the bearing area of the worm gear shaft so I could fabricate a new bearing:
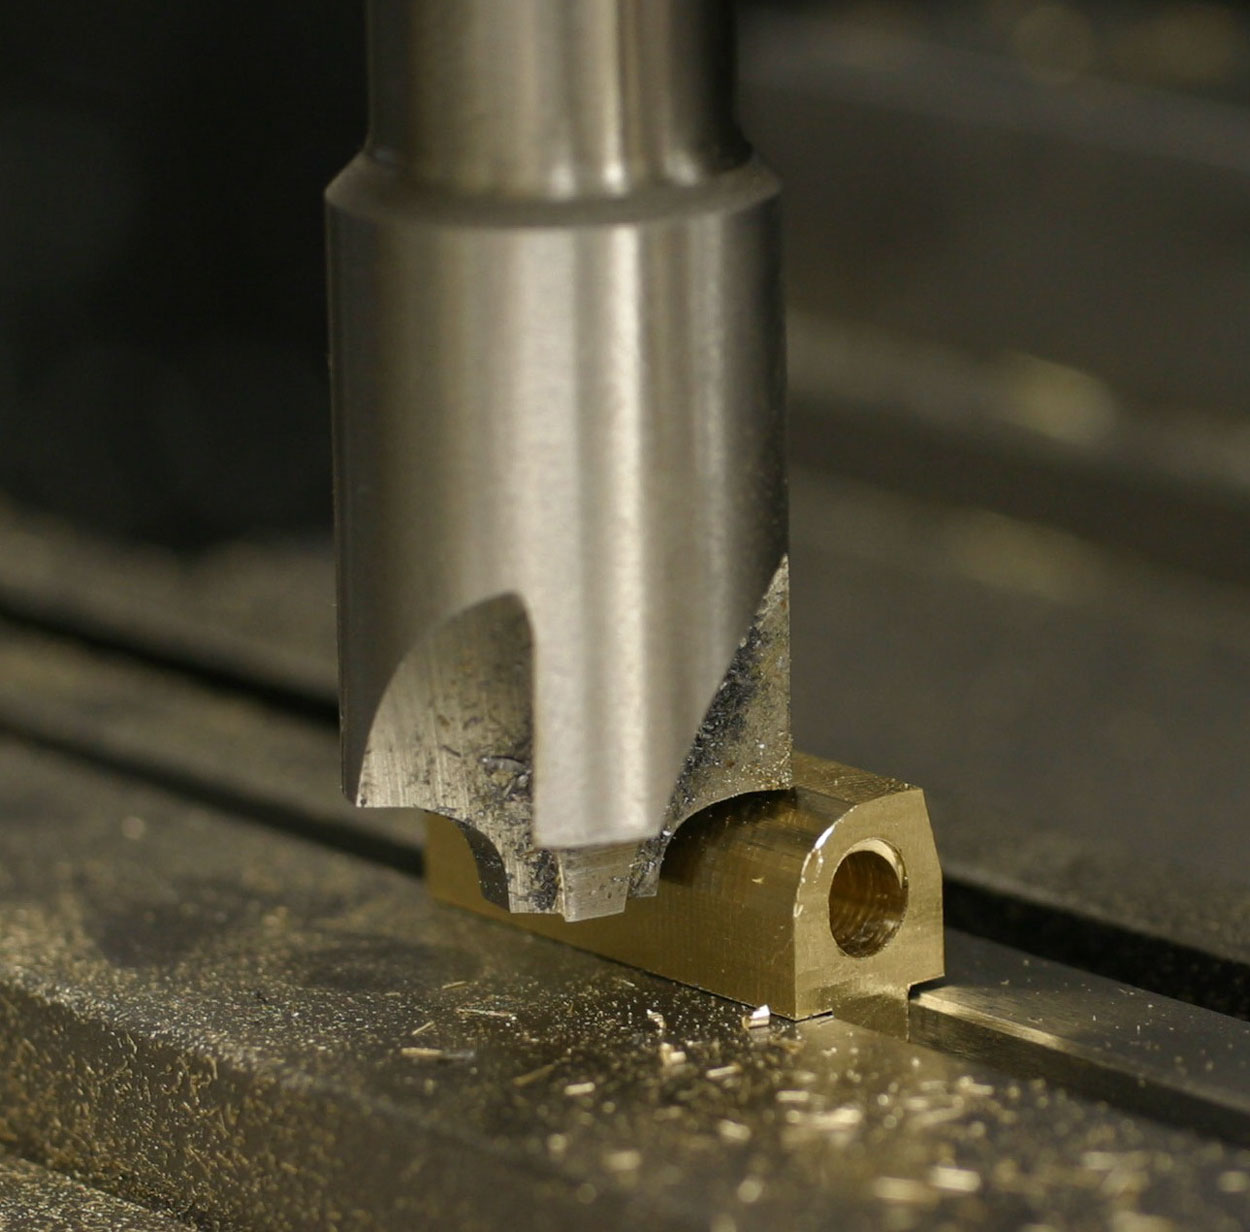
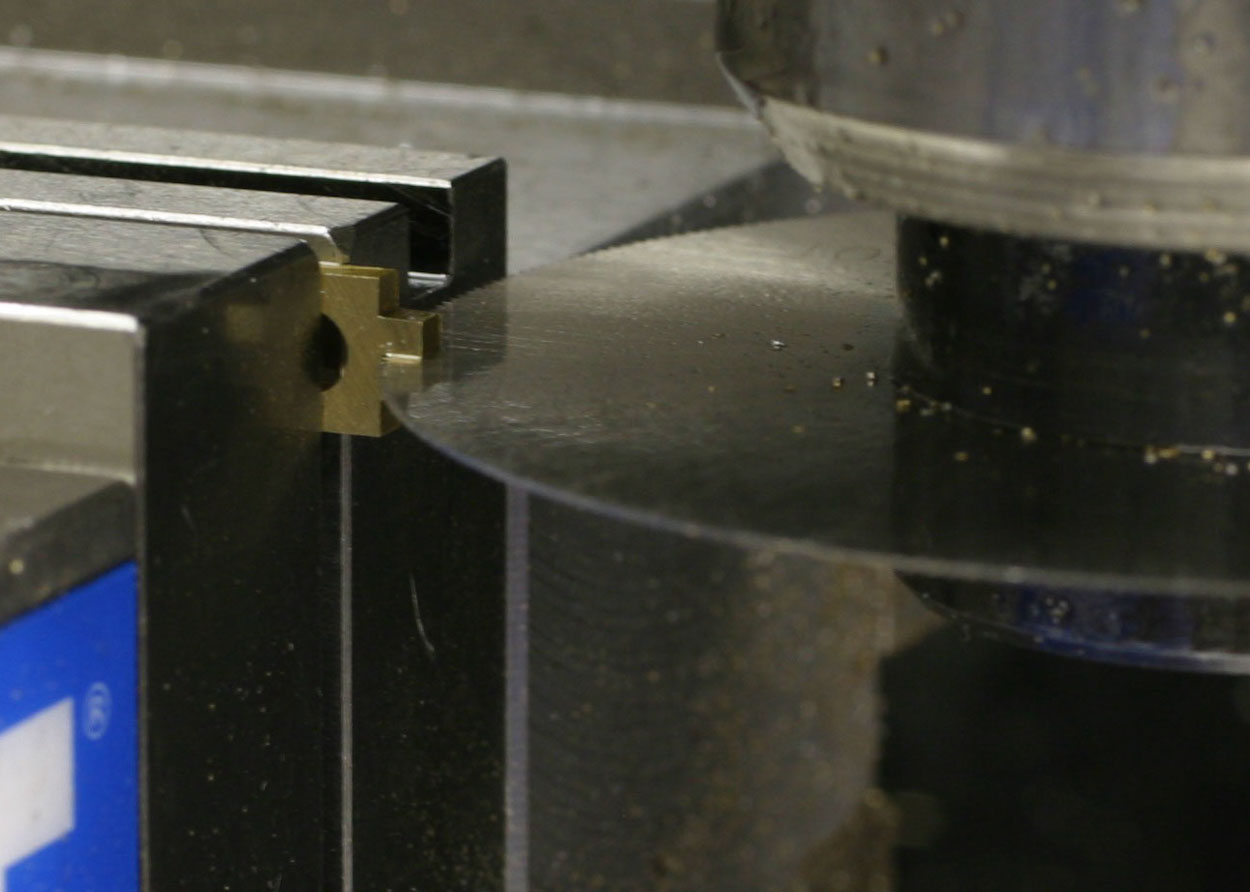
After making a brass section with a long "foot" the same width as the length of the rectangular mounting slot, I drilled the length to the same diameter as the bearing, and rounded off the piece on the milling machine:
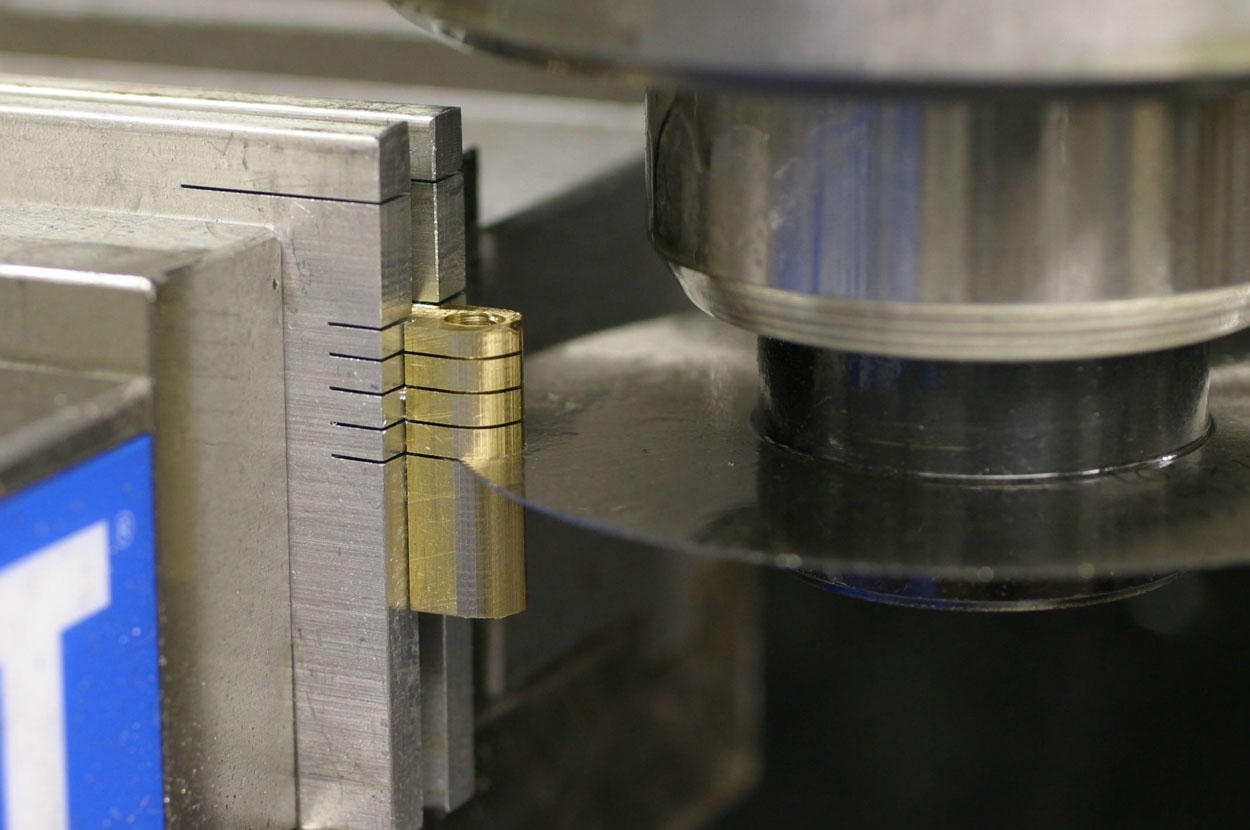
I'd made this part in a long section so I could slice it and have several identical sections. That way, I could experiment with my fitting technique, and not worry about messing up. I used a .010" slitting saw:
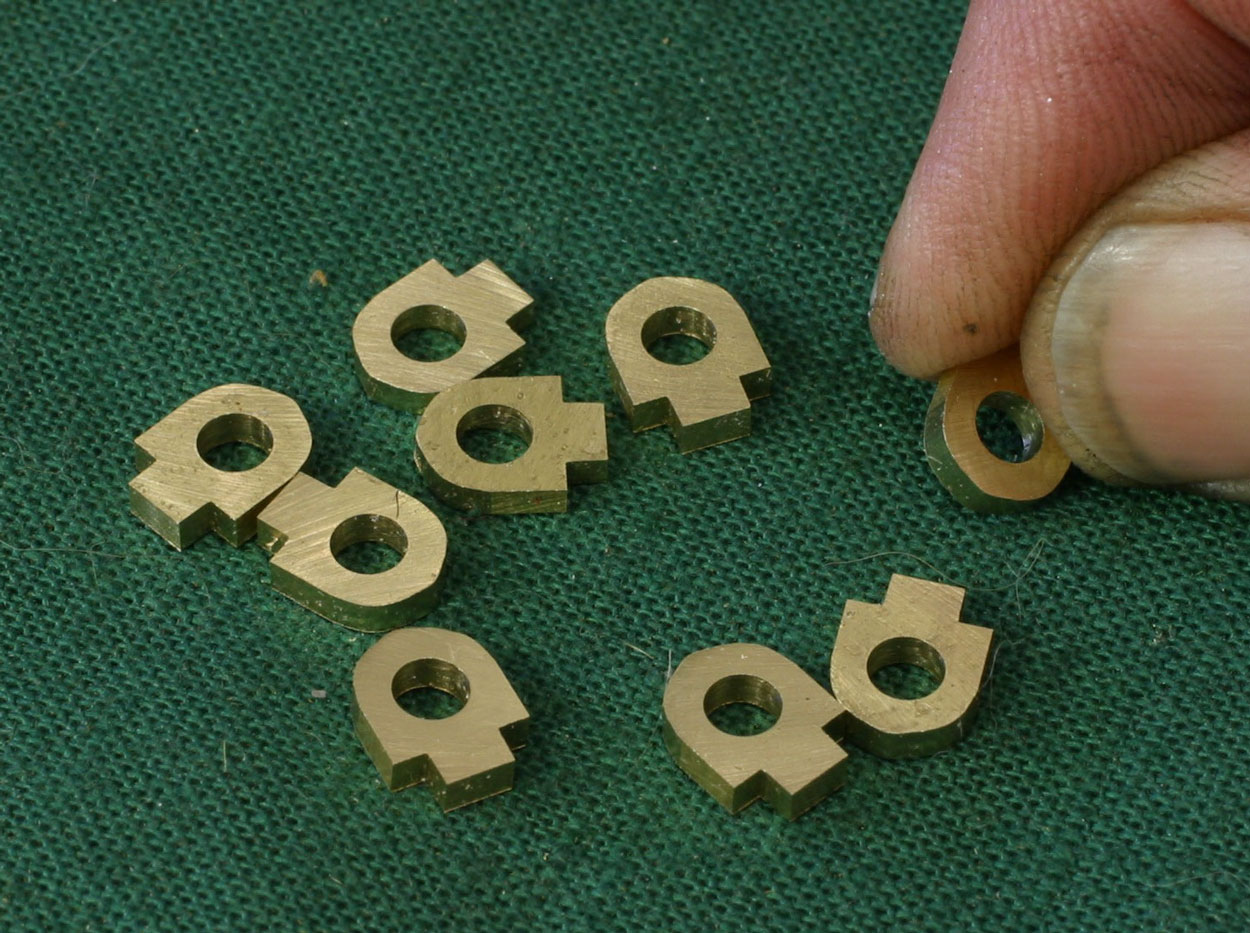
Here's my batch of little bearing blanks:
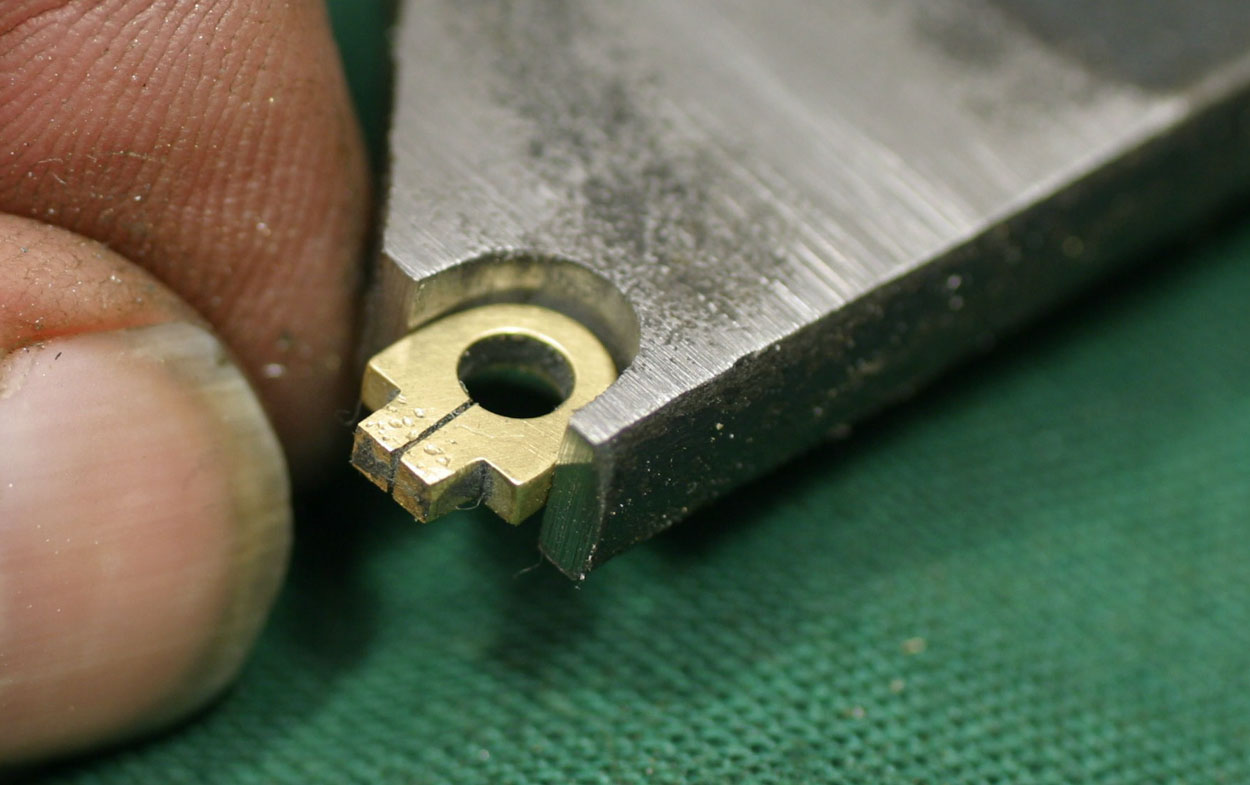
I sliced the foot of the bearing with that same slitting saw blade, splitting it right up to the hole:
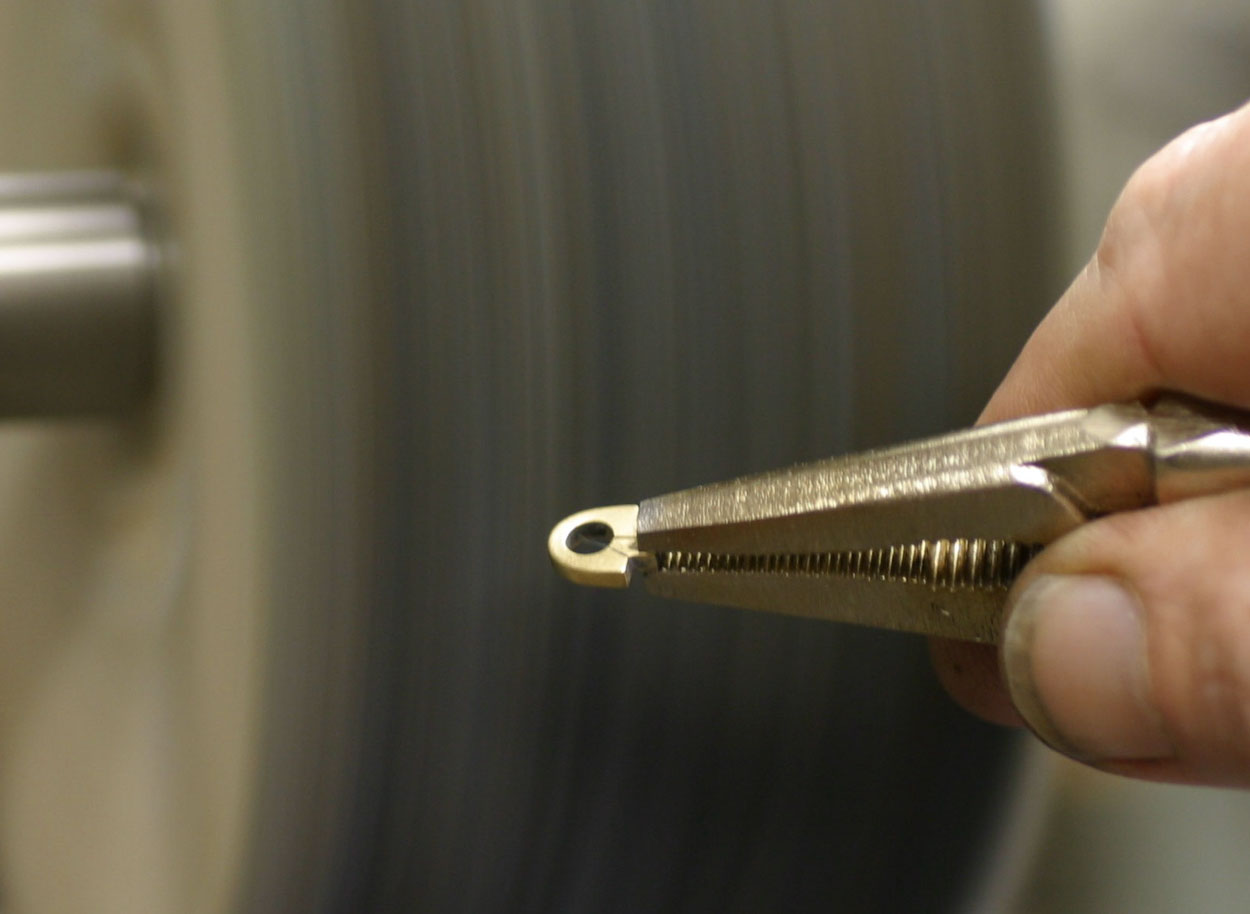
After improving the shape by filing, I finished the part with 600 grit abrasive paper and buffed it to a high shine:
I knew I'd have to hammer the little rectangular tab to rivet the bearing onto the plate, so I spent some time making a little anvil to support the part so it wouldn't distort from the hammer blows. I used a piece of 1/4" hot rolled steel scrap and filed the shape to match the bearing:
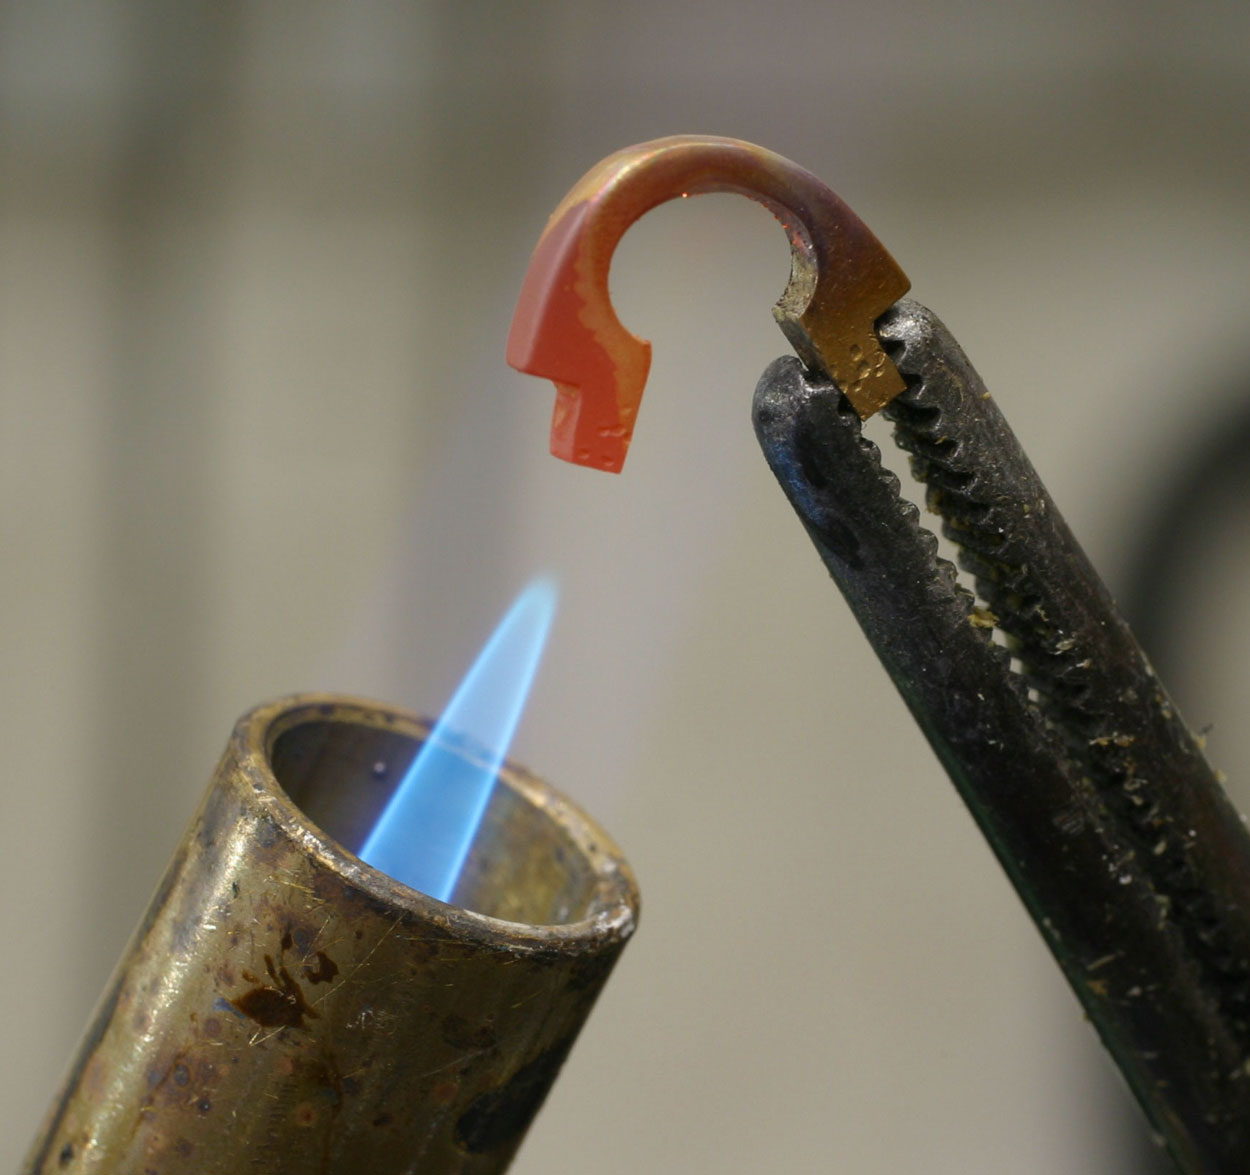
Bending the bearing "open" so I could wrap it around the shaft put a fair strain on that brass, so I annealed it with my propane torch. The heating process also gave the brass a bit of an oxidized patina:
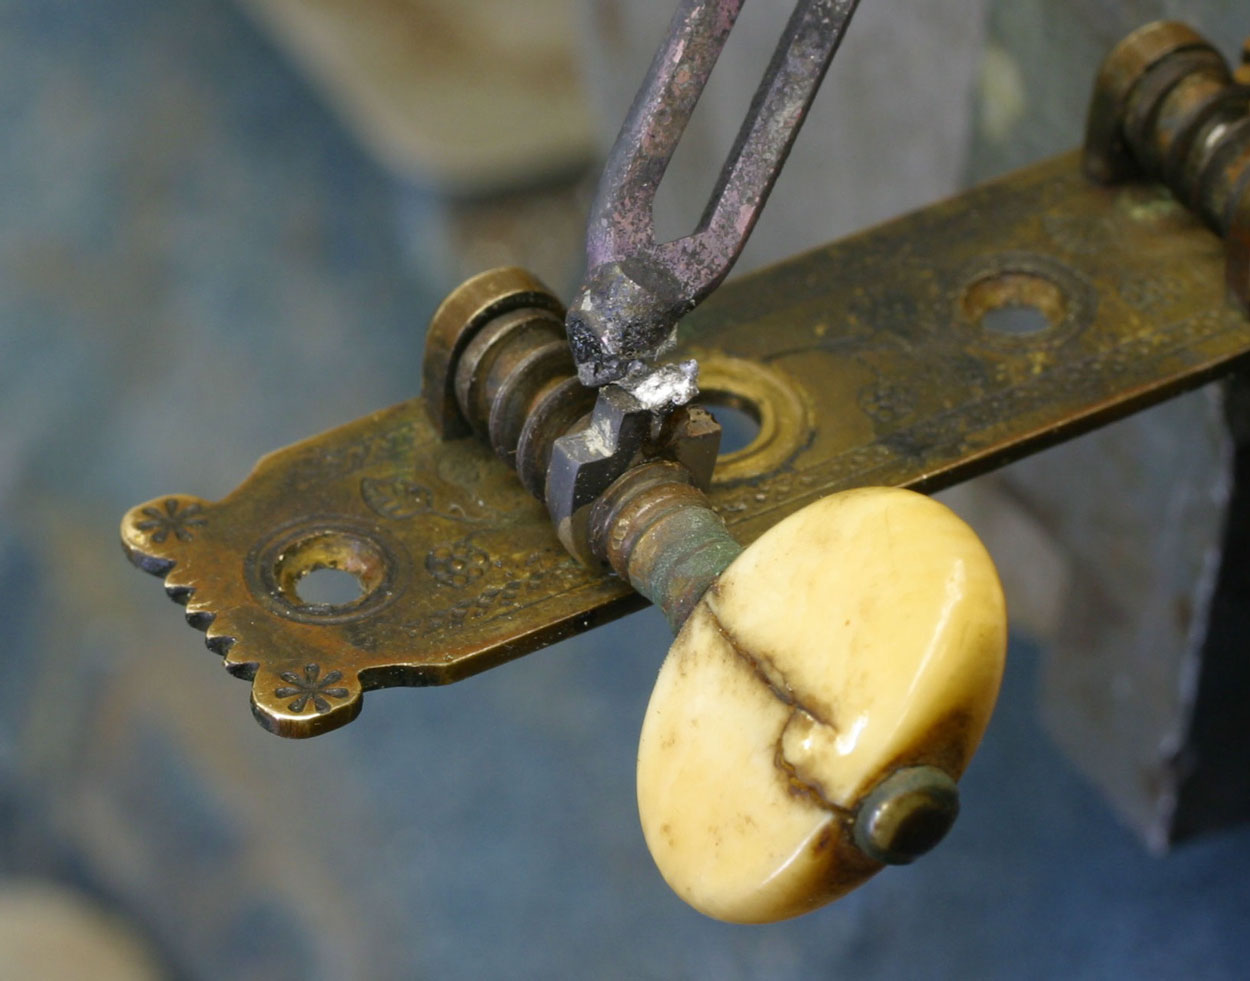
Once I had the bearing bent around the shaft and squeezed back into shape, I used regular soft solder to fill the saw kerf and solidify the piece:
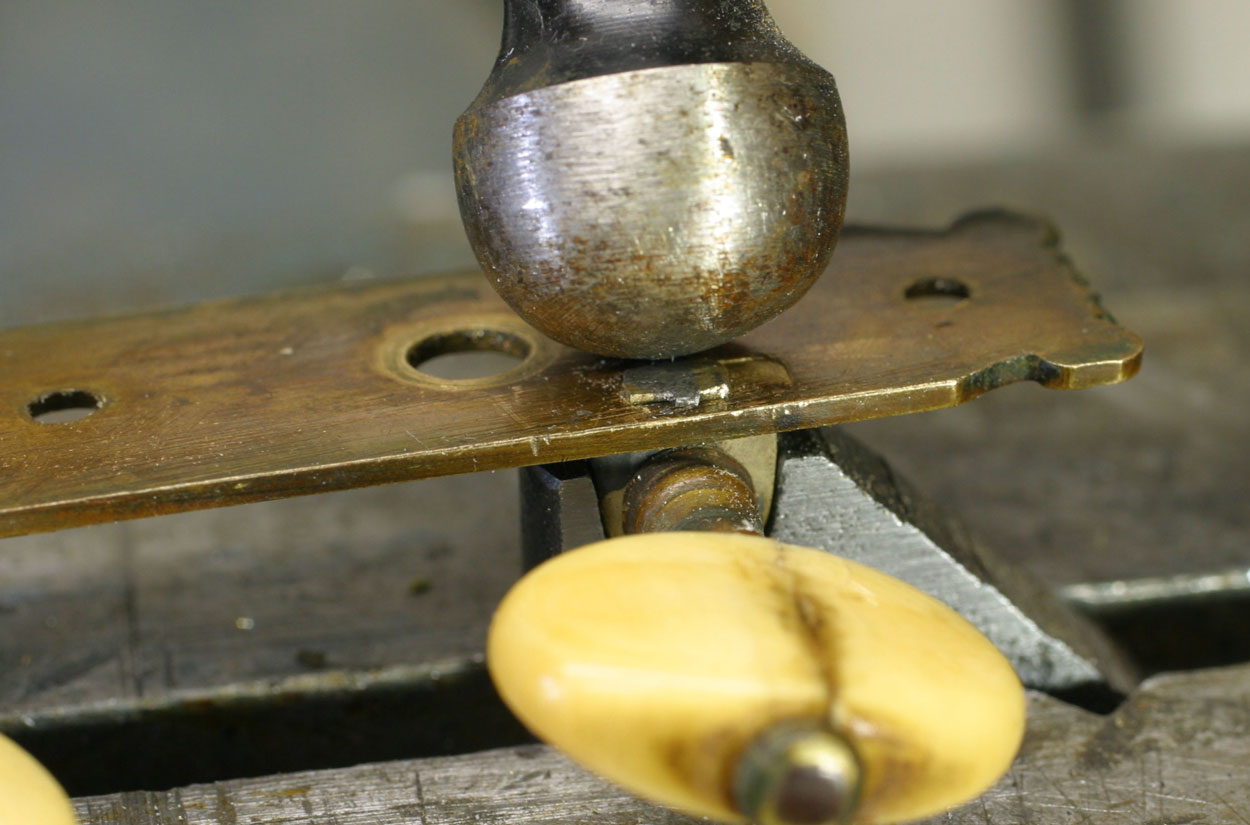
With the bearing in my little shaped anvil, I was able to hammer away with my small ball pein to form the backside rivet:
Here's the completed assembly:
Rummaging around the shop, I found an old bottle of "cold bluing" solution I'd used to blacken some steel tool parts. I mopped a bit of that stuff on the new bearing, which turned nicely brown to match the old parts of the gear plate.
Drilling through the bridge, I reproduced the holes through the top and reamed them to suit the taper of the bridge pins:
I use a heavy, rigid setup with a laminate trimmer to rout the slot for the bridge saddle. Now, while I could do this operation in the process of actually making the bridge, I prefer to work as I usually do - on the completed guitar. This is the kind of technique that's more suited to the repairer who must often work with the intact instrument, while the builder would be more likely to make fully finished parts:
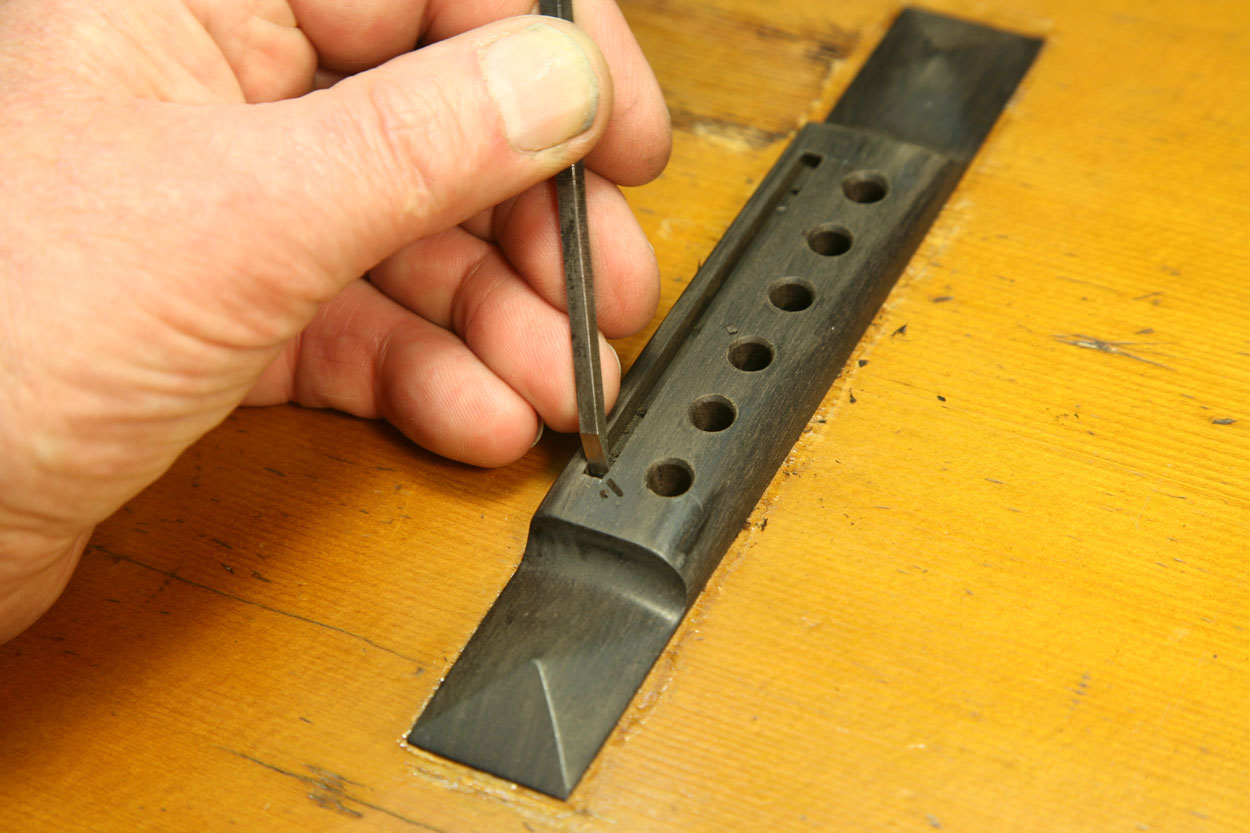
The router produced a slot with rounded ends, so I used a chisel to square them up as the original style:
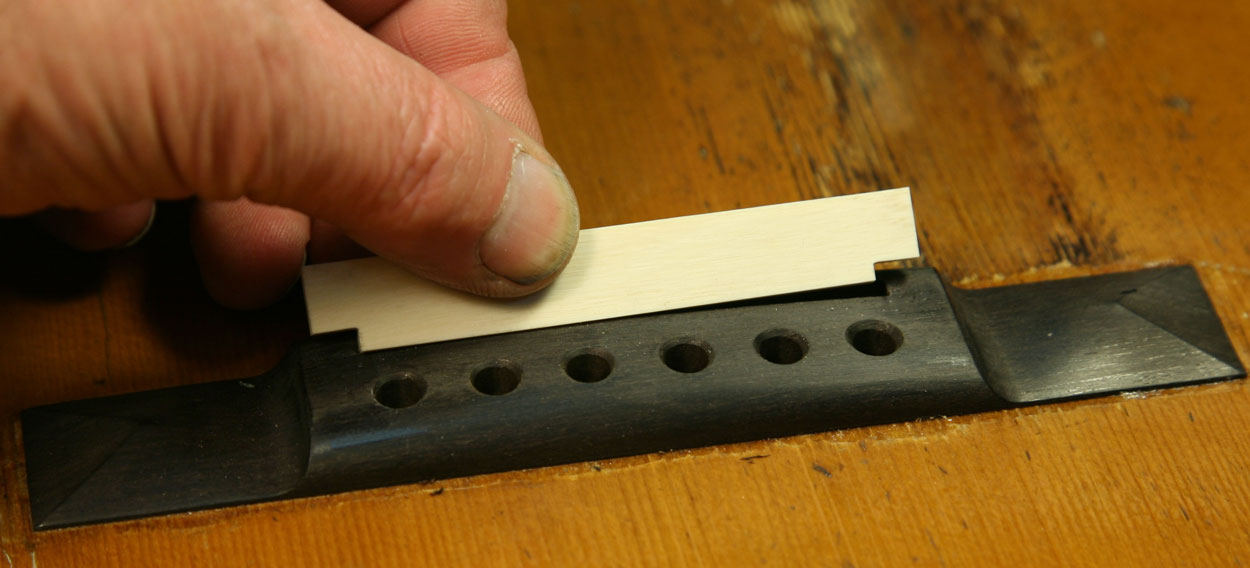
In the process of final setup, I made an oversize "blank" saddle from a piece of old "estate ivory" I reserve for antique work:
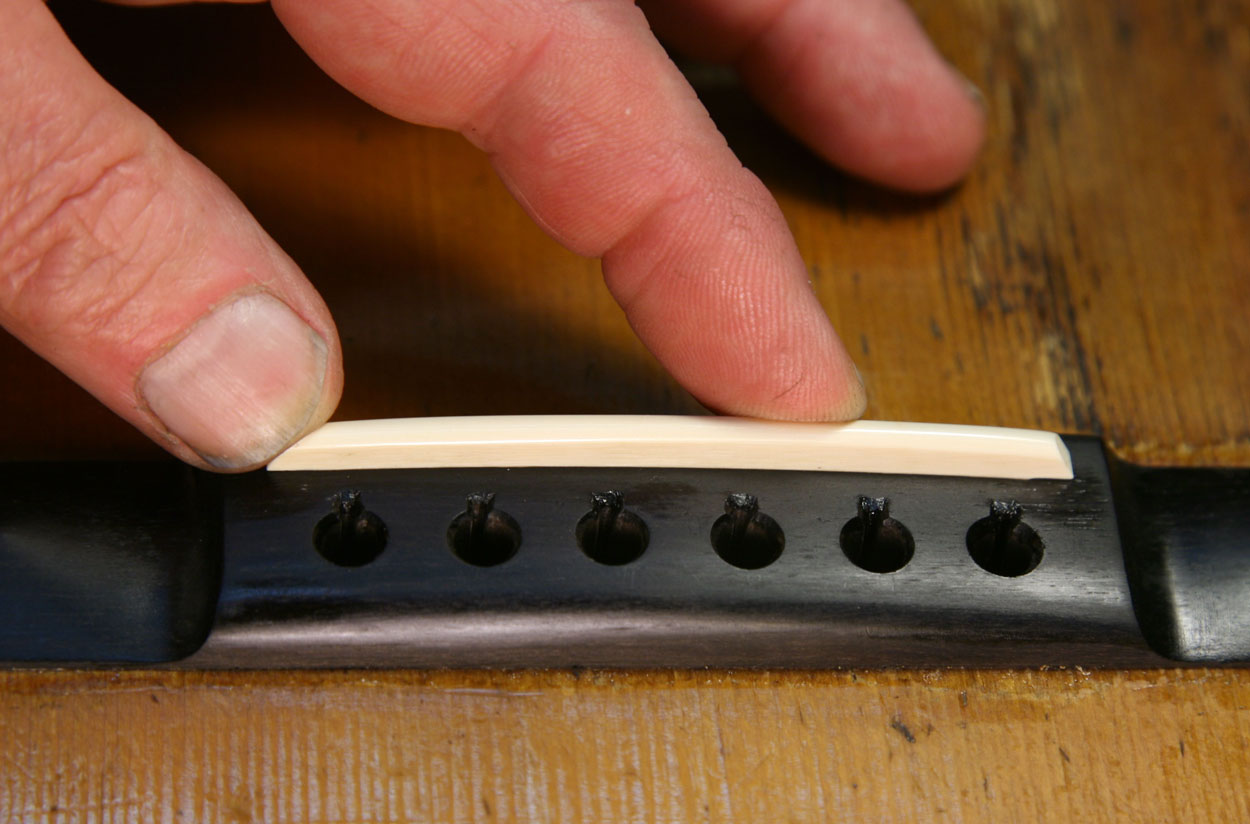
The finished saddle fits the square ended slots, and hangs over the top just a bit for a nice visual effect:
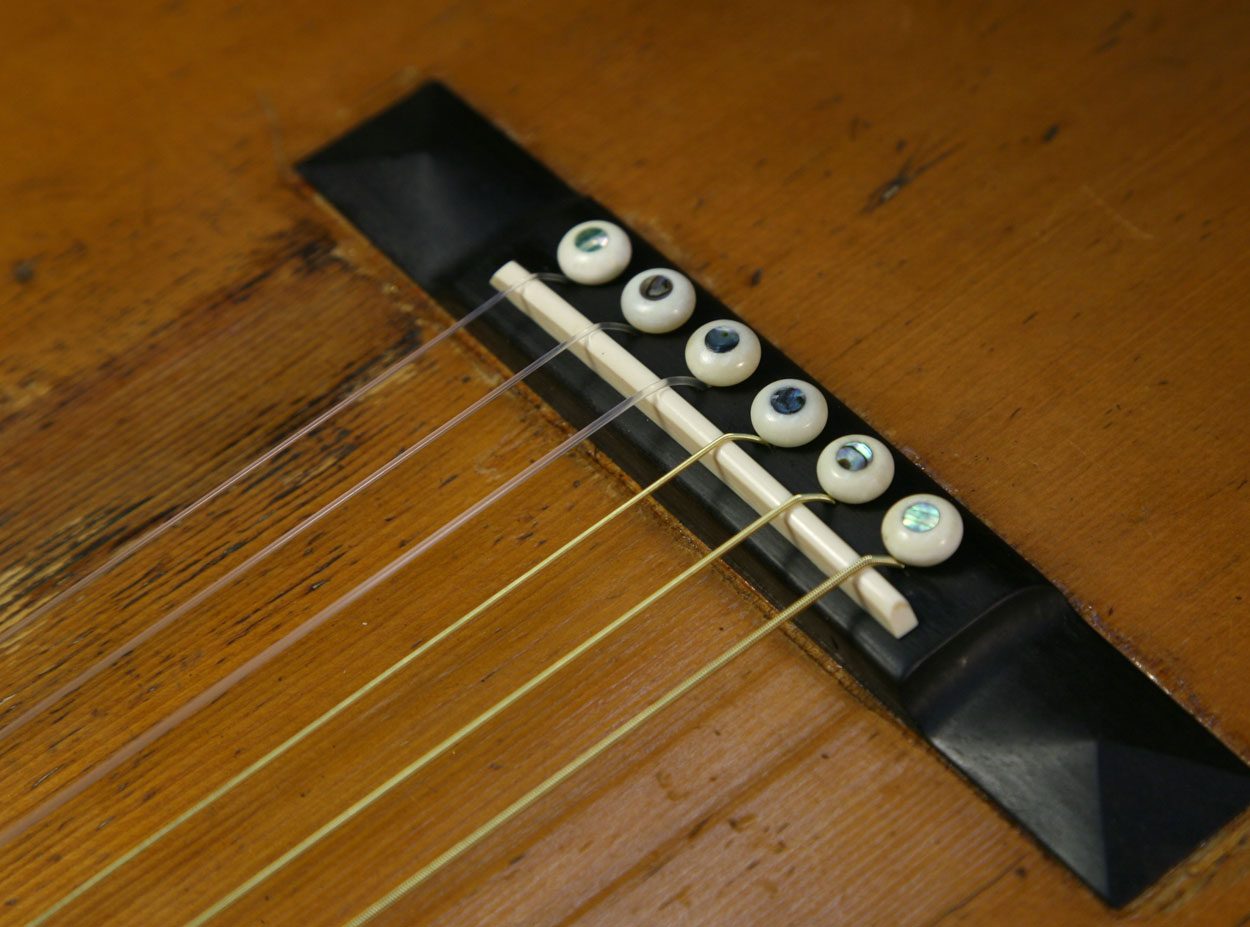
Here's the finished bridge, strung and ready to do its job:
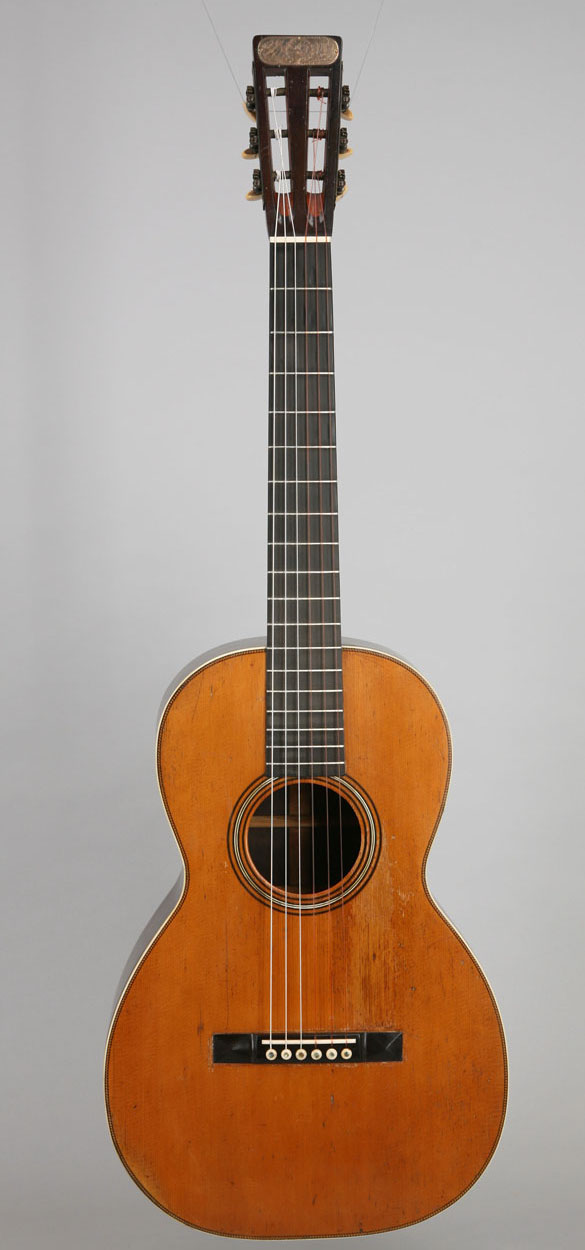
A final view of the completed project:
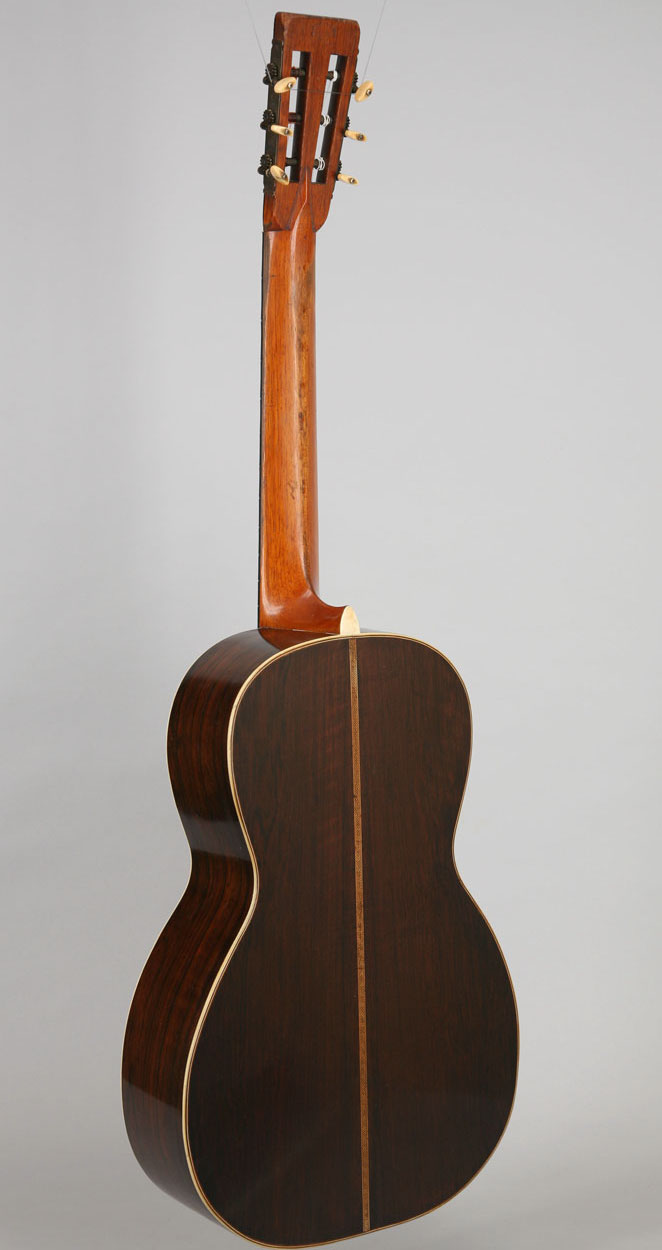
An oblique shot of the back:
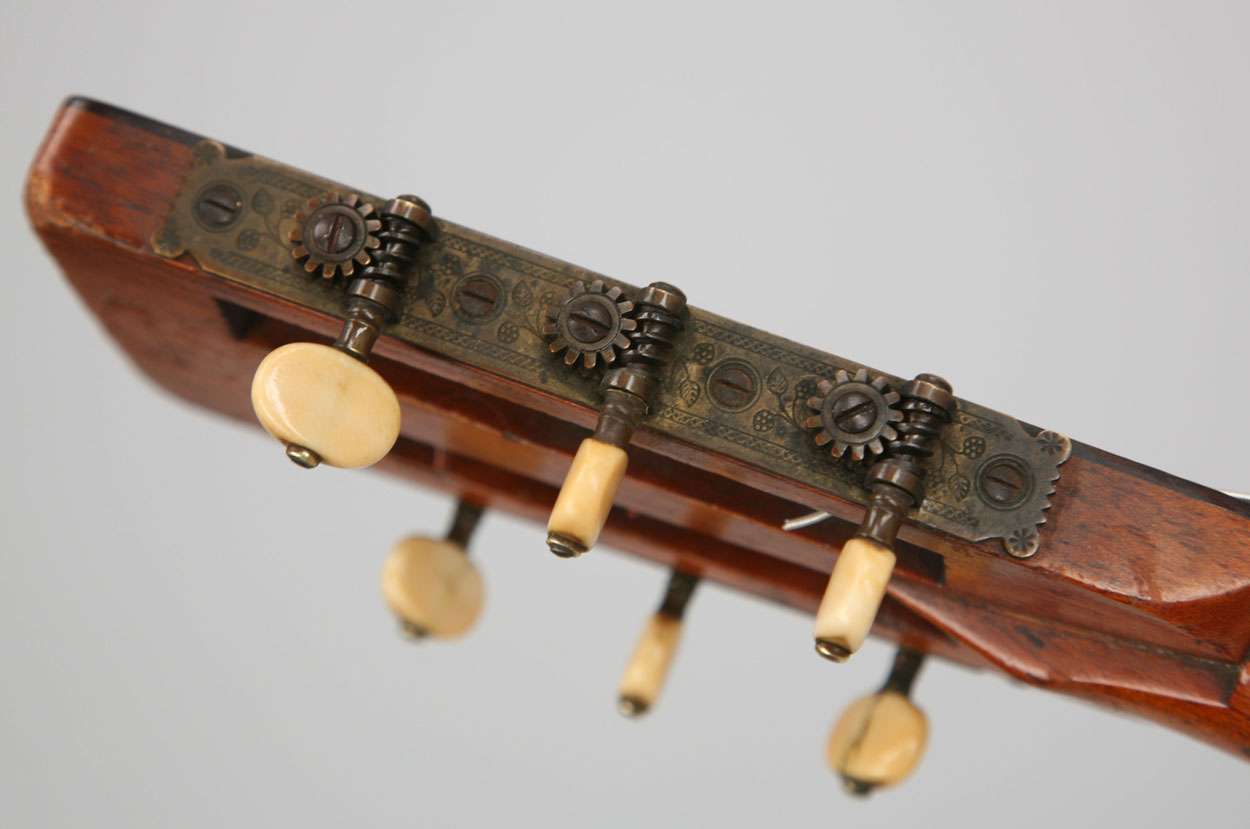
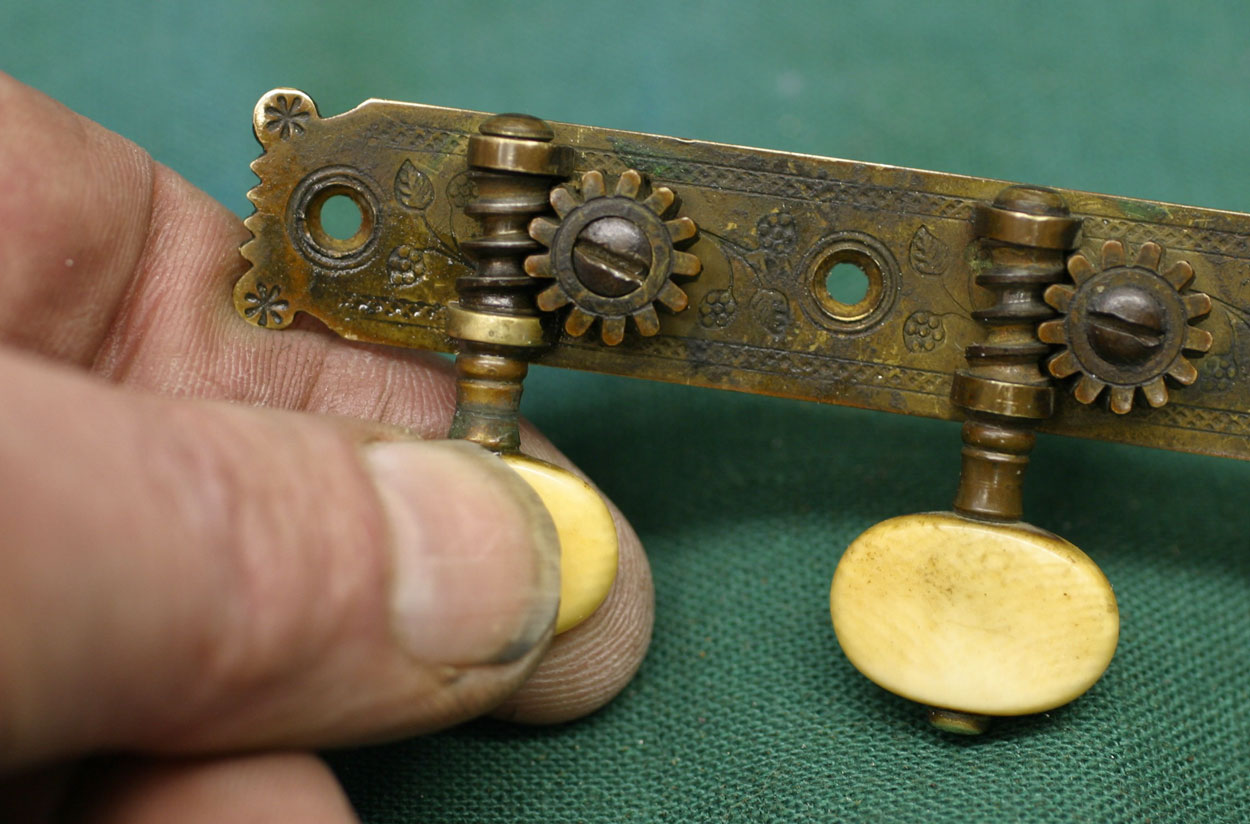
The tuners, rebuilt and working nicely: