
1937 Martin D-28
FRETS.COM Repair Blog, April - May, 2010
Some comprehensive maintenance on
1937 Martin D-28
The patient is a fine 1937 Martin D-28, an instrument that has had 73 years of experience being a guitar and holding the load of tension brought on by six steel strings tuned to pitch. At this stage of its life, the time has come for some serious regular maintenance. I'll be resetting the neck, leveling the fingerboard and refretting, replacing a broken bridge, replacing a cut-down nut, regluing the pickguard, and repairing some damage to the peghead, along with a few other small operations.
I thought it would be interesting to present this project in "blog style," taking the various steps as they occur. If this proves to be fun, I'll probably do more this way. The project days will be sequential but not contiguous, because I won't be able to work on this job every day.Here's a listing of the days, so you can jump to them quickly:
Day 1: Inspection
Day 2: Disassembly
Day 3: Reglue Pickguard
Day4: Pickguard Cleanup
Day 5: Fill Tuner Holes
Day 6: Fill Tuner Screw Holes
Day 7: Drill out Veneer Damage
Day 8: Tool Making
Day 9: Veneer Inlay
Day 10: Drilling Tuner Holes
Day 11: Finish Touchup
Day 12: Another Small Tool
Day 13:The Bridge Plate
Day 14: More Bridge Plate
Day 15: Top Crack Repair
Day 16: The New Bridge
Day 17: Resetting the Neck
Day 18: Refretting
Day 19: Setup
Day 20: Setup & Final Touches
Unfortunately, I did forget to take a comprehensive series of "before" photos because I hadn't thought of doing the blog until I'd started taking things apart. While this guitar is in fine condition for its age, there were a few features I did shoot for the record.
First the bridge, showing its obvious crack between the pin holes, and the not-so-obvious finish damage behind from previous regluing:
Additionally, the bridge had been cut lower than standard height to lower the action at some time in the past. So, there are a couple of good reasons for replacement.
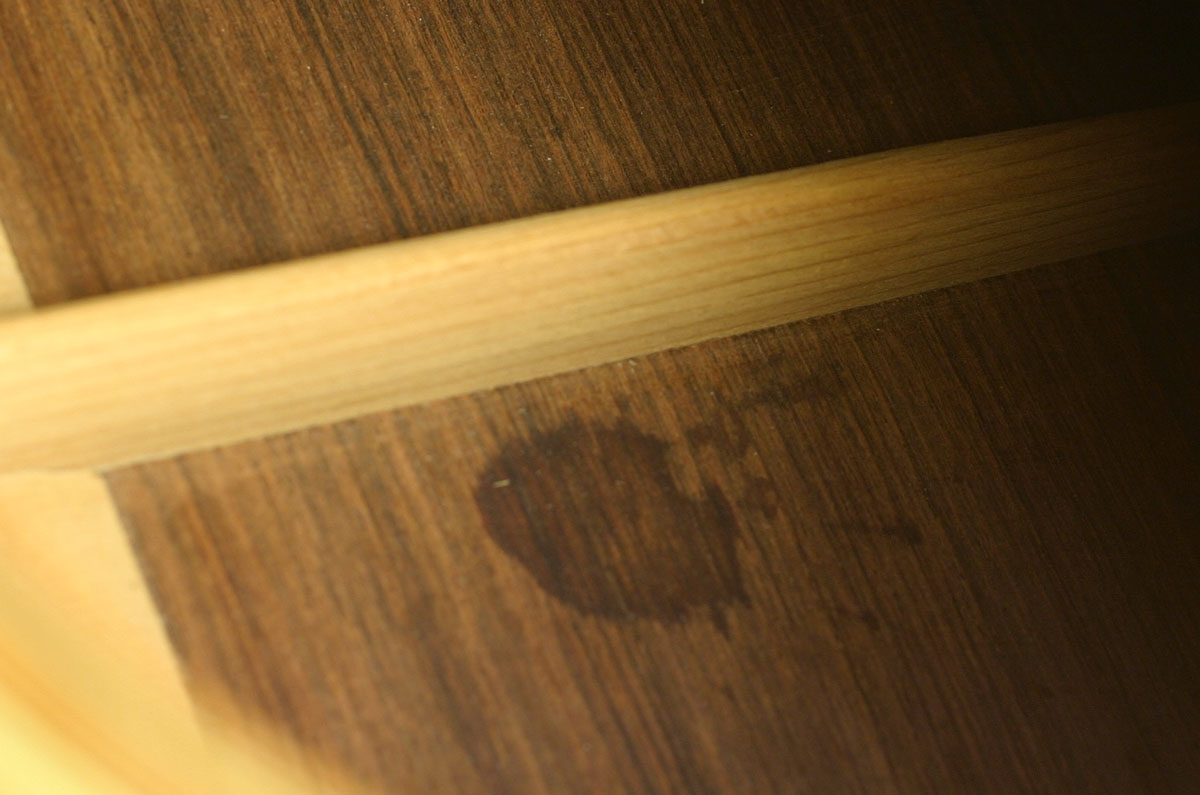
Inside, everything looks good, althugh there are a few stains here and there:
The bridge plate has enlarged slots that trap the string balls, allowing them to pull through the top and bear against the lower surface of the bridge, so those will need attention:
There's a small shrinkage crack in the top at the edge of the fingerboard:
I'll put some reinforcement there because this crack can pose a serious structural danger if it is allowed to spread. More on fingerboard top cracks.
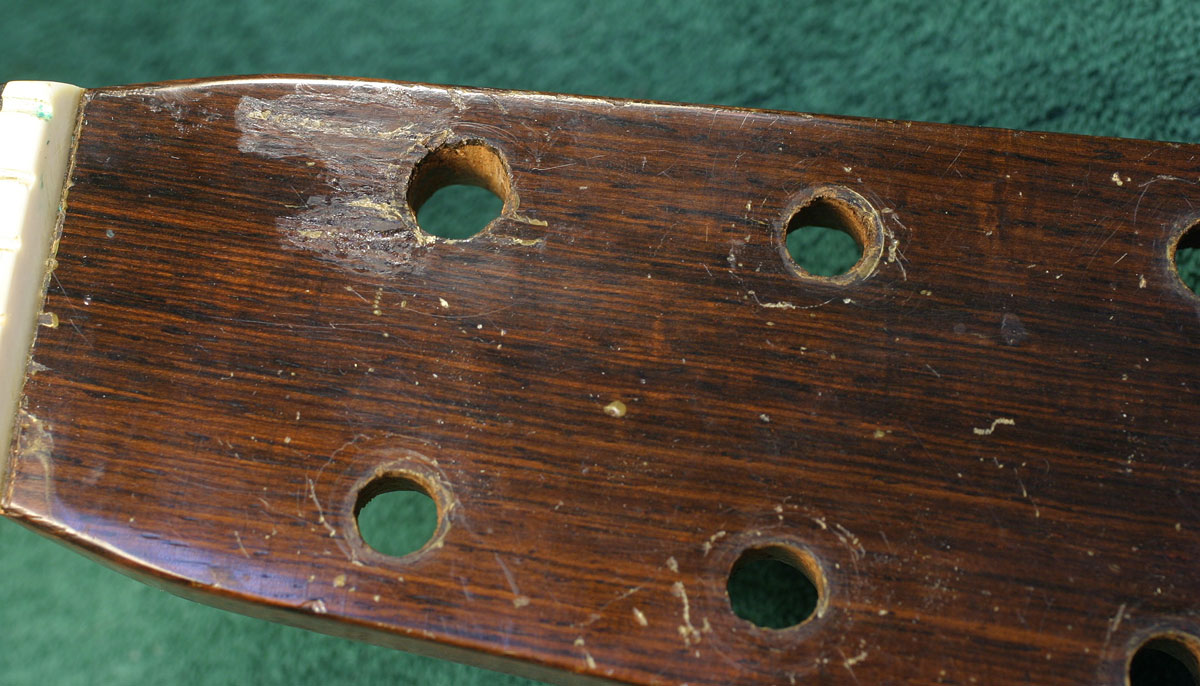
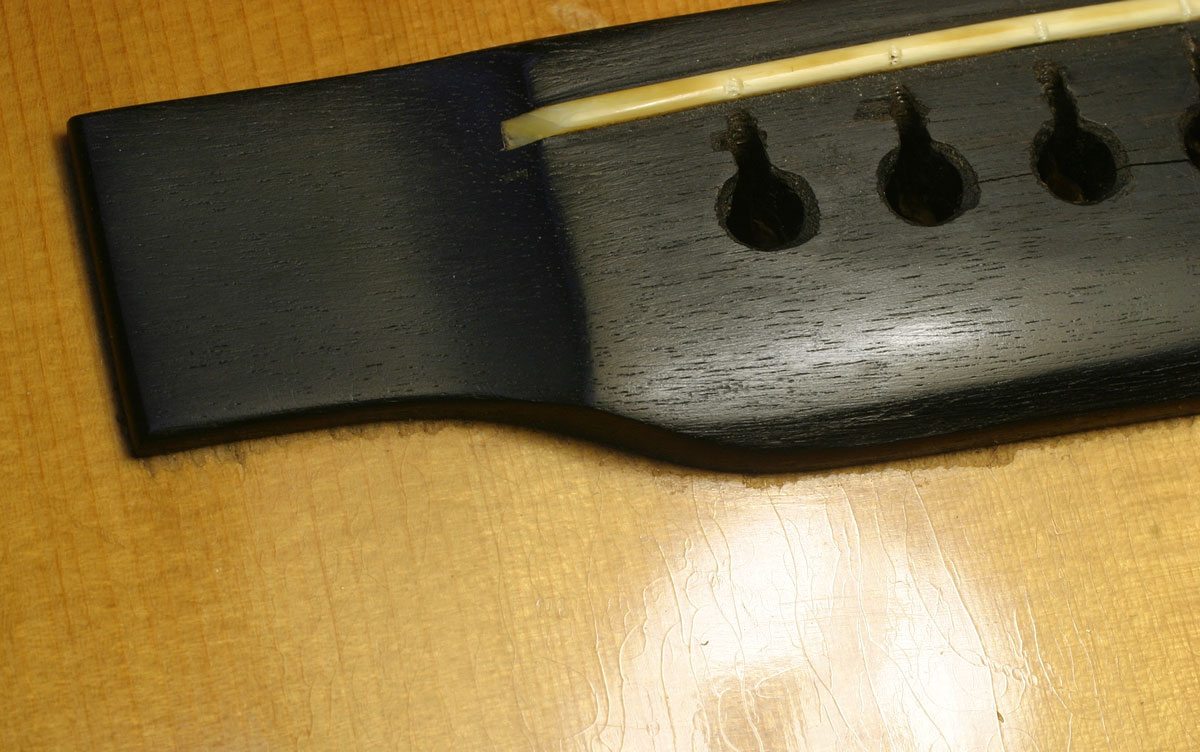
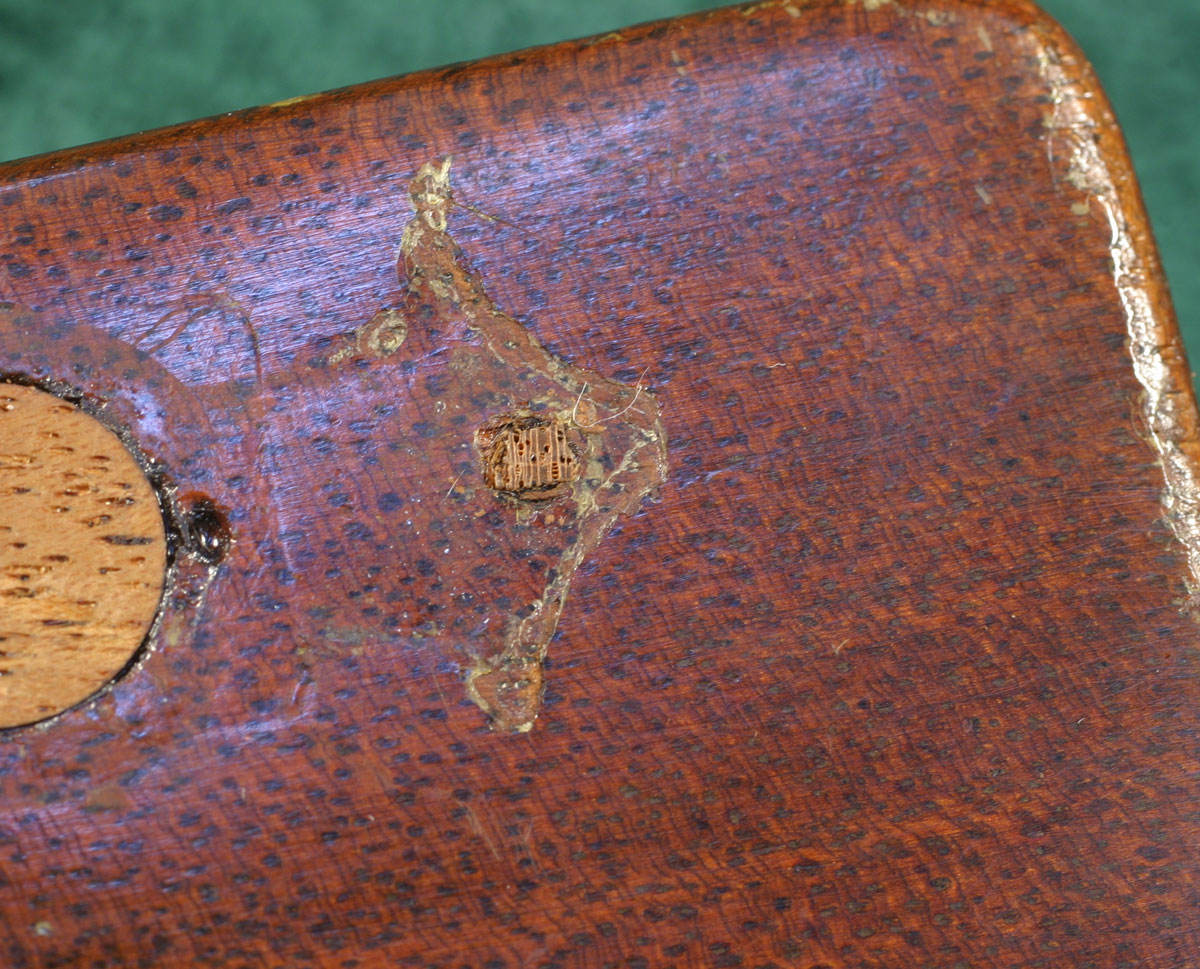
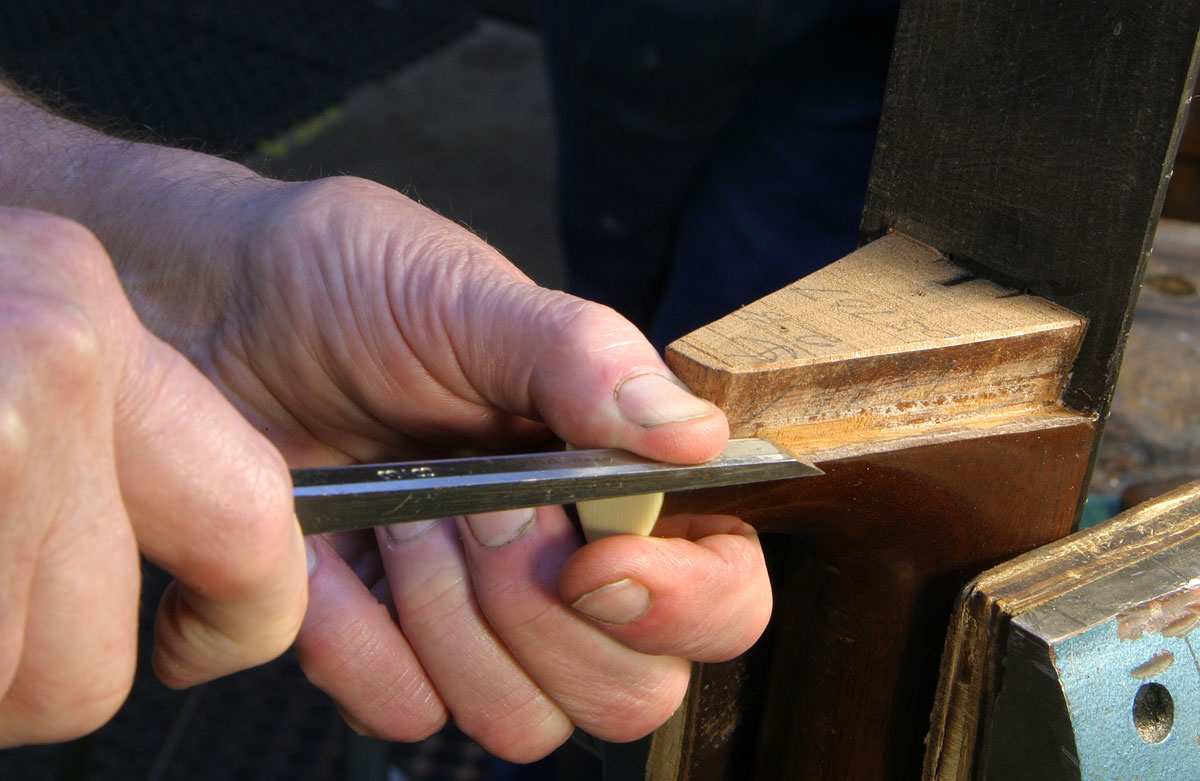
Sometime in the 1970s, the original Grover G-98 tuners were removed and replaced by modern (and superior) Grover Rotomatics. That operation required drilling the peghead tuner holes from 1/4" to 3/8" diameter. The luthier who did the job clearly had a difficulty on one hole, the low E. I guess the drill bit had caught and ripped a big hunk out of the pehead veneer, which was reglued at the time, without finish touch up:
Before you get to "How could they have DONE that?" or "Why replace the ORIGINAL tuners?" take a moment to remember that in those days the ethic was entirely different, as was the cash value of vintage Martin guitars.
Today, I'll be taking off the neck and bridge. I need to remove the neck to get full access to the dovetail joint so I can recut it and change the angle of the neck as I reglue it to the body. Preparatory to getting out the steam generator and actually attacking the dovetail itself, I first need to unglue the end of the fingerboard that sits on the top of the guitar.
Using an electric heat blanket that reaches a temperature of about 305 degrees Fahrenheit placed directly on the frets, I can keep the heat localized to the fingerboard itself:
From time to time I reach into the guitar and feel the temperature rise under the top in that area. When the top starts to feel as though it might be around 120 degrees, I remove the heat blanket and start to pry the fingerboard loose from the top, using a very smooth flexible putty knife with a blunt rounded edge:
This is one of those operations that's largely a matter of "feel," where experience contributes a good deal to success, as I try to sense whether the glue or the wood is giving way as I press the knife under the fingerboard.
Knowing that the fingerboard was glued to the top with hide glue, I listen for the telltale crackling sound as the heat-weakened glue line gives up under pressure from the knife. Had this been a modern guitar, assembled with aliphatic resin glue, I'd expect to hear a squeaking sound and feel the gummy resistance of the softened glue.
Back in the day when those tuners were replaced, it would have been fairly common for a luthier to saw the fingerboard all the way through at the fourteenth fret, and remove the end of the fingerboard as a separate piece to get visual access to the dovetail joint. As we've reset so many necks in the intervening decades, that practice has been abandoned in favor of not compromising any structural integrity. So, we work pretty much in reverse, taking the guitar apart in the same order it was originally assembled. That way, when the neck goes back on, we can say with confidence that it's good as new.
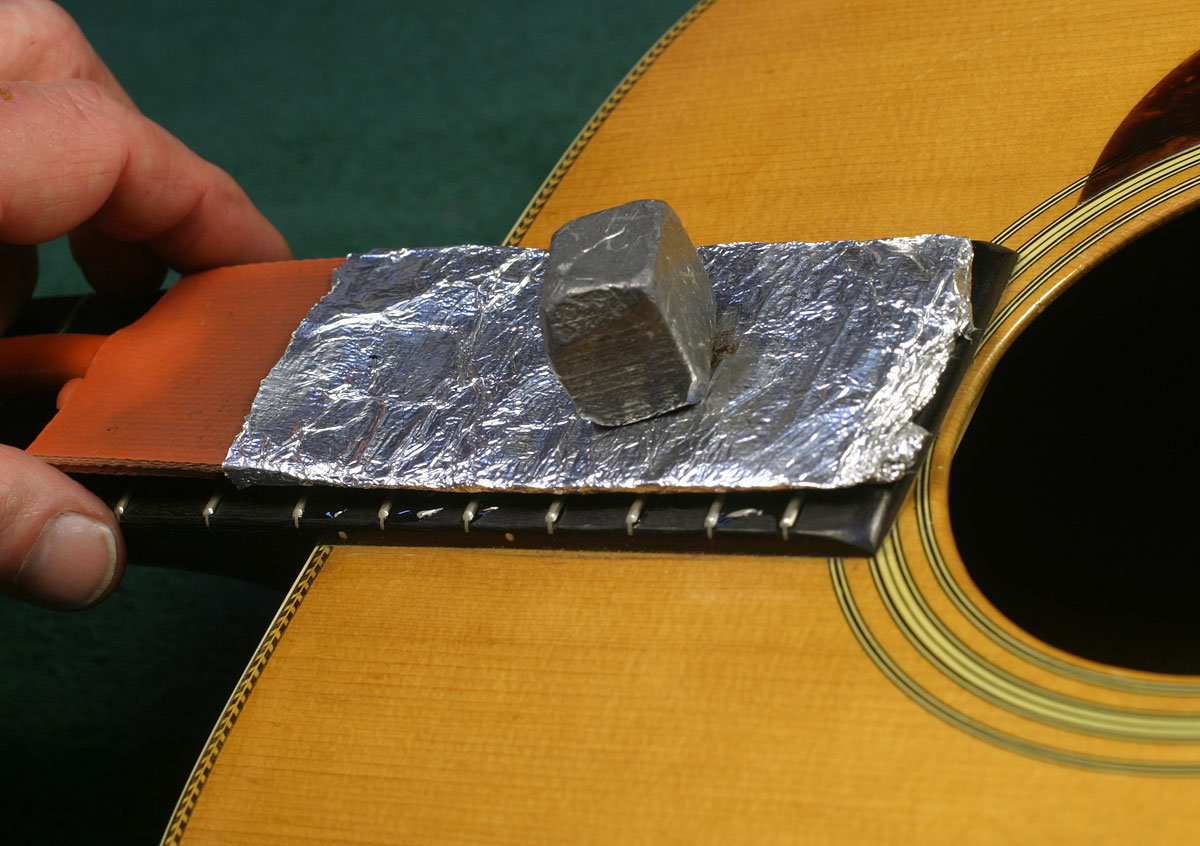
Since I still had my heat blanket controller on the bench, I switched over to the one that fits the bridge:
Notice that just as before, I have small lead weights to keep the blanket in place. I also have the blanket wrapped in aluminum foil, but I can't tell you for certain if that has any real benefit to the process. It does keep things a bit cleaner, and I think there's possibility that it may improve heat transfer, but that's about it.
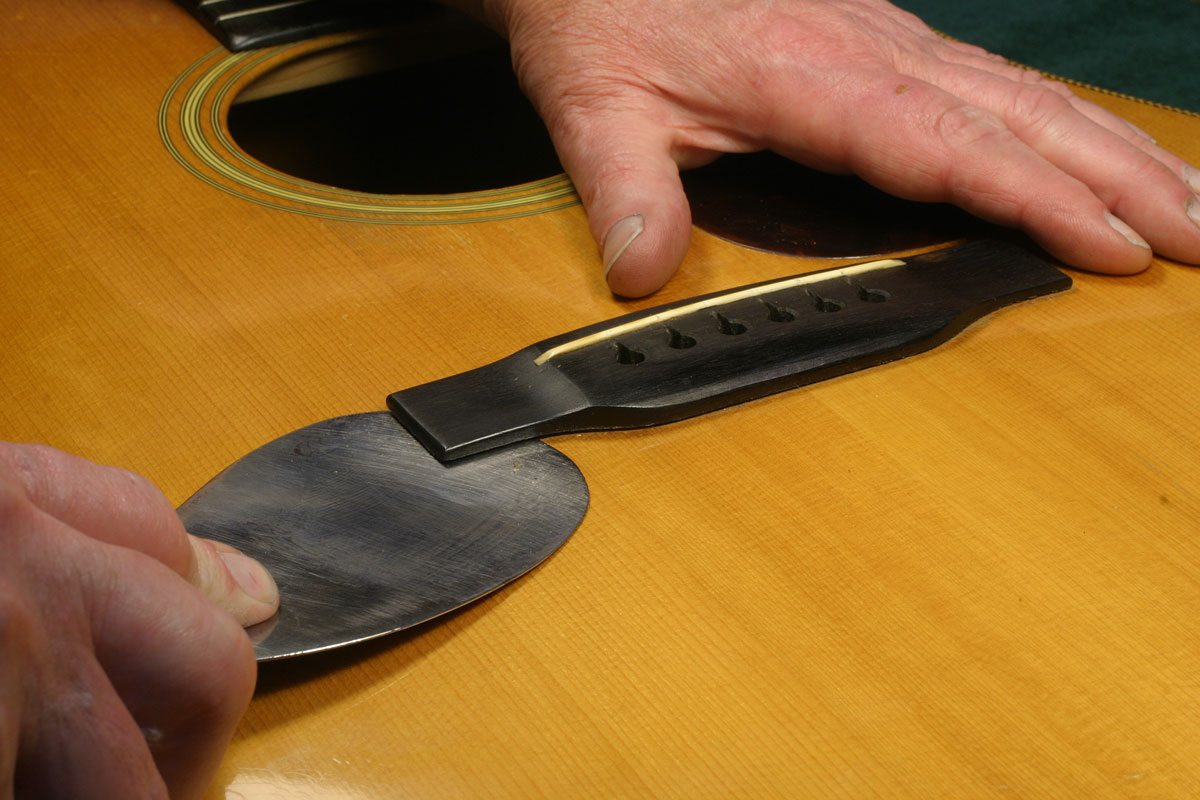
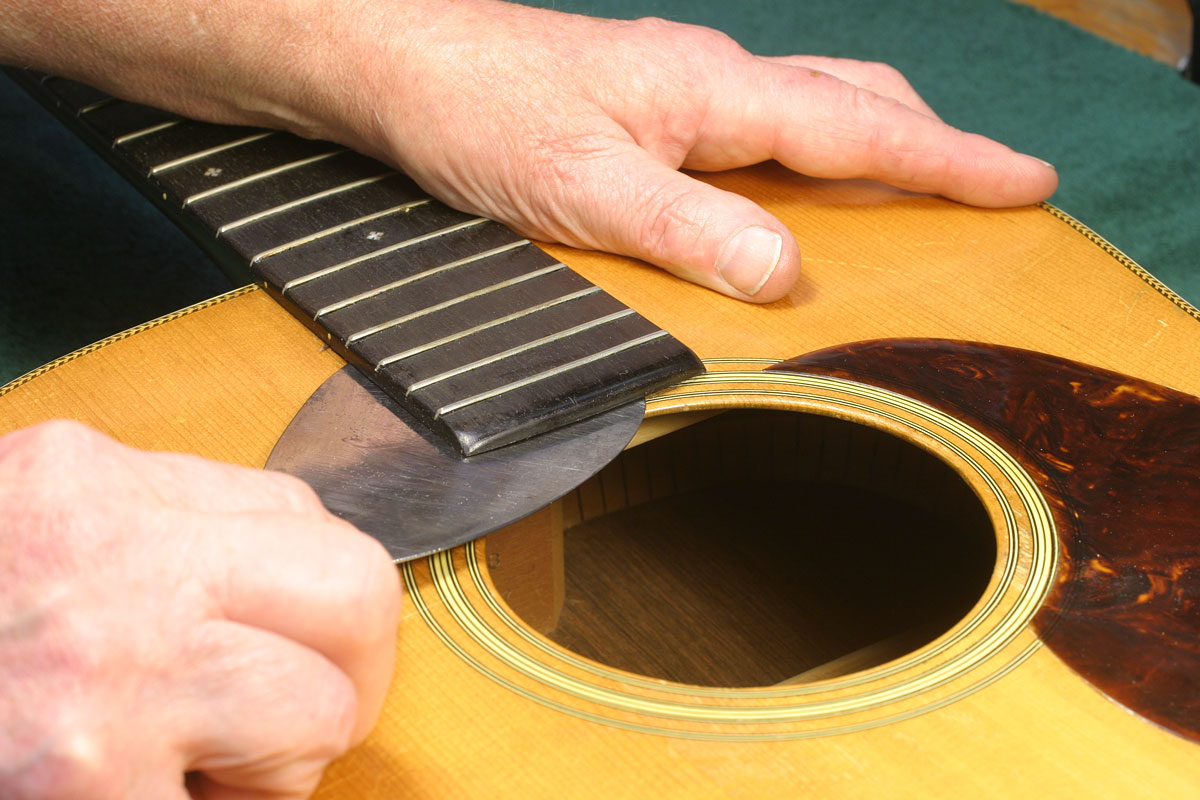
Same as before, I try to keep alert for the feel and sound as I lift the bridge from the spruce top:
As the knife penetrates the glue line, I try to be aware of the direction of any grain runout in the spruce. I don't wnat my knife to be carried downward into the top as it lifts a splinter of spruce. While I have a firm hand on the knife, I have to avoid slipping for fear of scarring the finish around the bridge, and each time I pull the knife out to reposition it, I check the underside for any traces of glue that might adhere there. Even the smallest bit of glue can dig into the finish when I'm pressing hard against the knife!
Now, this is the way the textbook whould show the job - bridge off neatly and cleanly, with only a few spruce fibers stuck to the bottom:
Doesn't get much better than this. The top is perfectly intact where I'll be gluing my new bridge, and I can proceed with confidence that my replacement bridge will be able to have the same footprint as the original without the need to patch either spruce or lacquer.
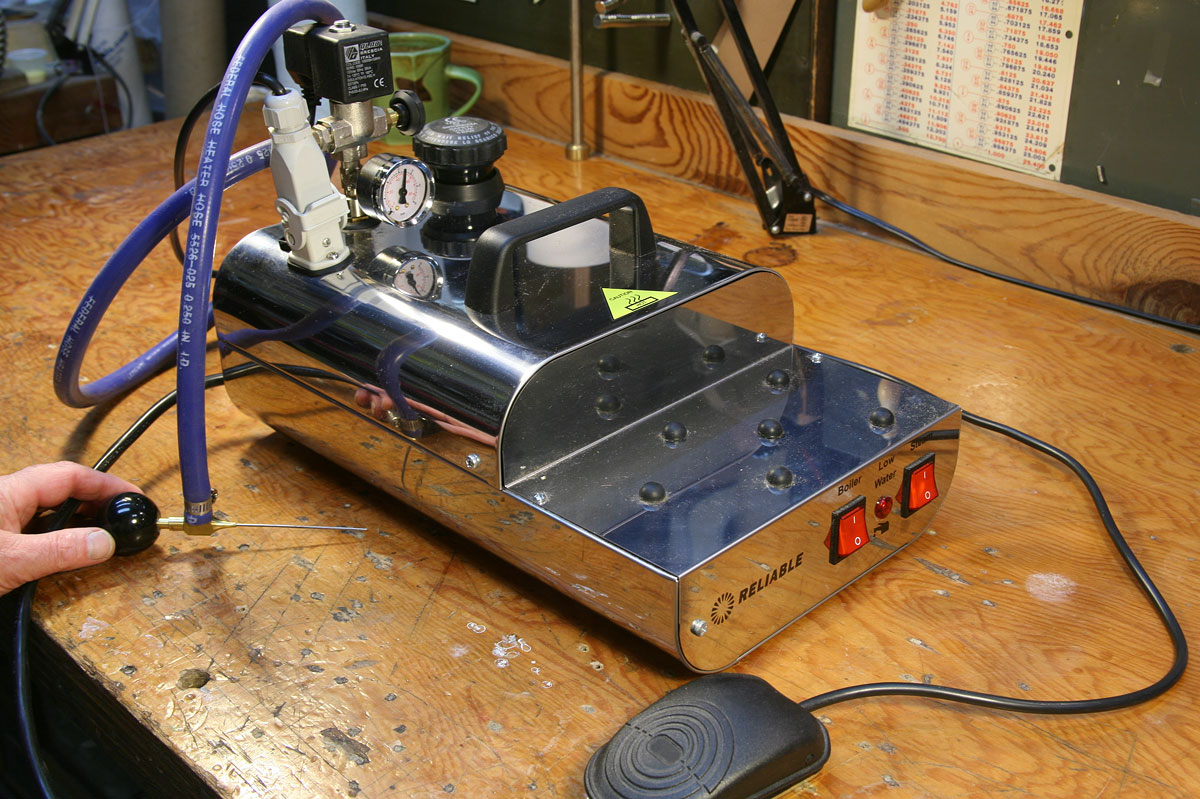
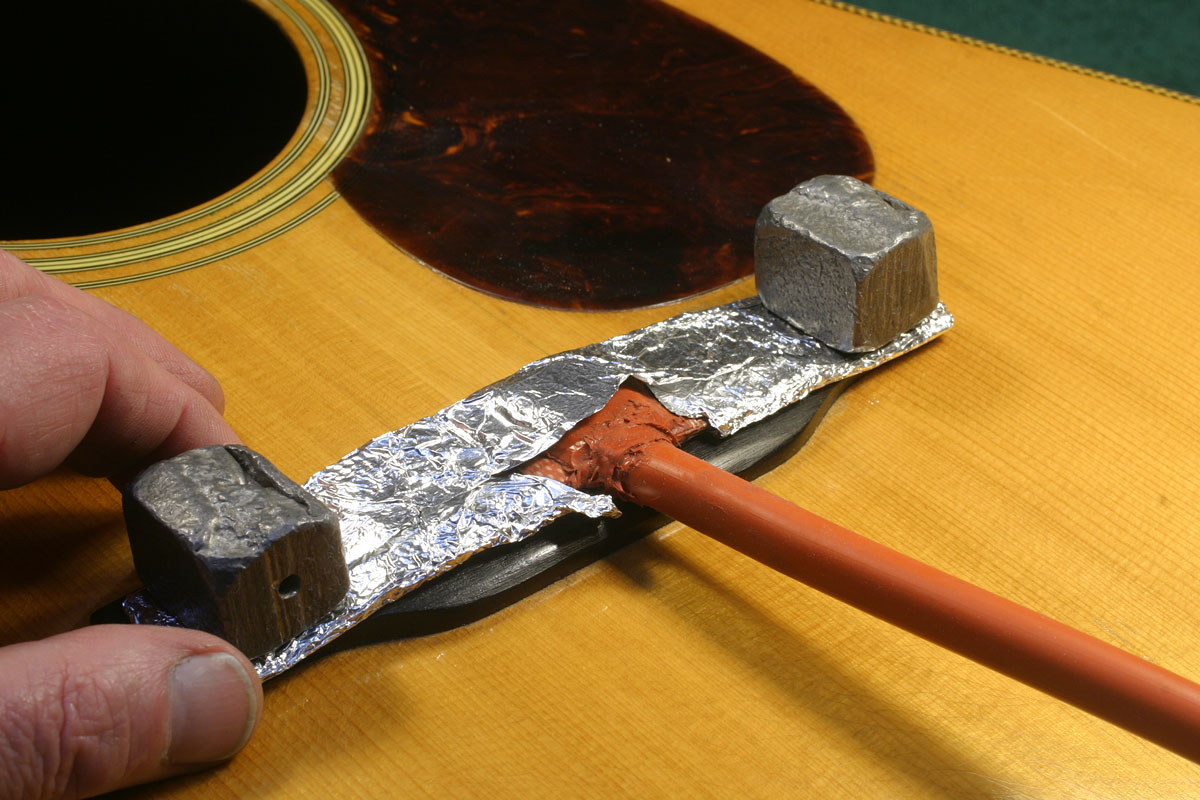
Now, I'd like to introduce a seriously cool new addition to Gryphon's repair shop - the steam generator. This unit is part of a professional steam ironing station, and the flat area on the stainless steel tank is where the iron would ordinarily rest:
I had not known of these rigs before I started looking through Internet sources for an upgrade to our old steam generator - the venerable Krups home expresso machine. This particular steamer is sold as a jeweler's steam cleaner, and comes without the iron. Instead, it has a simple hose coupling. In the picture above, I'm holding the end of the steam hose to which I've fitted my own shop-made steam needle assembly and handle.
That black item in the foreground is a foot switch, and, of course, is normally on the floor. You can see two lighted switches - one for the boiler, and the other to lockout the steam valve that's operated by the foot switch. Behind the handle, there's a pressure gauge mounted on the same pipe as the electric steam switch and a separate manual valve that controls the volume of flow. The boiler is set to maintain 50 PSI steam as long as the power is on, and it does so without any attention other than making sure there's water in the tank.
So, once it's up to pressure, I step on the valve, and out comes the steam - pretty neat, eh? And, because it's running at 50 PSI, the steam is HOT - 221 degrees - so less condensation comes through the needle.
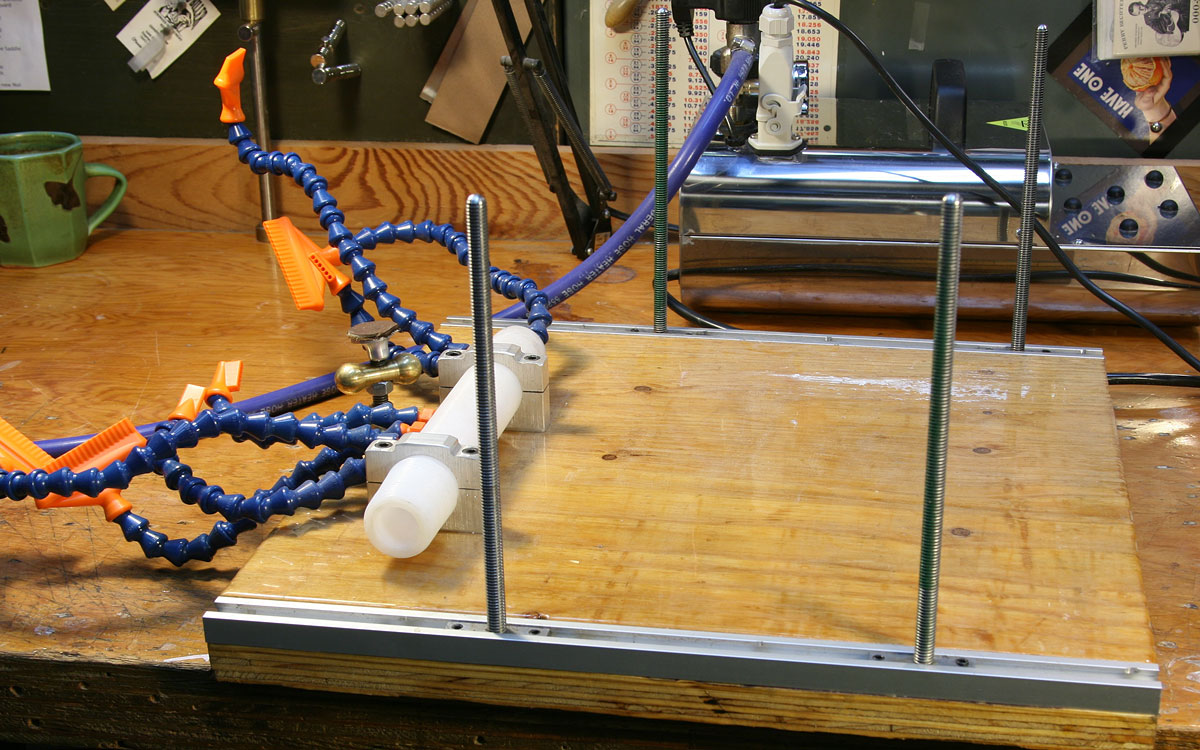
Now, steam is pretty nasty stuff if it contacts sensitive surfaces, say, like my hand. Or, possibly even more important, like a guitar's finish, which doesn't heal from a second degree burn. Recently I decided to upgrade my neck removal fixture, and have come up with this one, I'll call Mark III:
It's a heavy plywood base, with T-slot tracks at the edges and tall threaded rods for clamping the guitar down. Additionally, there's a polyethylene manifold and a tangle of "Loc-Line" flexible coolant hoses to direct streams of cold air wherever I think steam might excape to damage the finish.
Here's how it goes together. First, I set a pair of supports (you can't see 'em in the photo below) under the guitar body, and adjust this little built-in jack against the heel of the neck, to aid in pressing it upward as the glue is softened in the joint:

OK, now you can see those support blocks:
And, the padded bars I use to clamp the guitar body firmly in place. Also, at the front edge, you can see two orange clamps I use to hold the whole thing solid on the bench.
Once everything is clamped up securely, I can adjust the position of all those air squirters so they play cold air on all the areas where steam might escape:
And, finally, the air supply itself - the outflow hose from the shop vac:
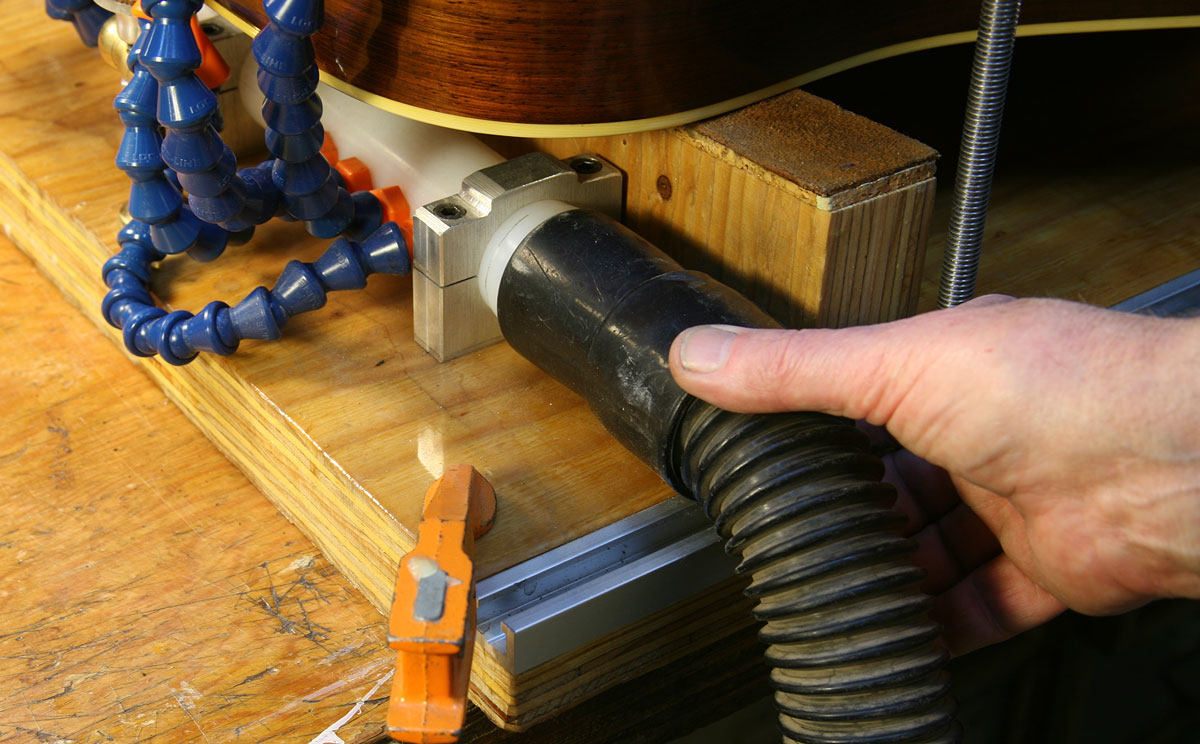
Not a lot of PSI here, but lots of CFM, and that's what I'm after.
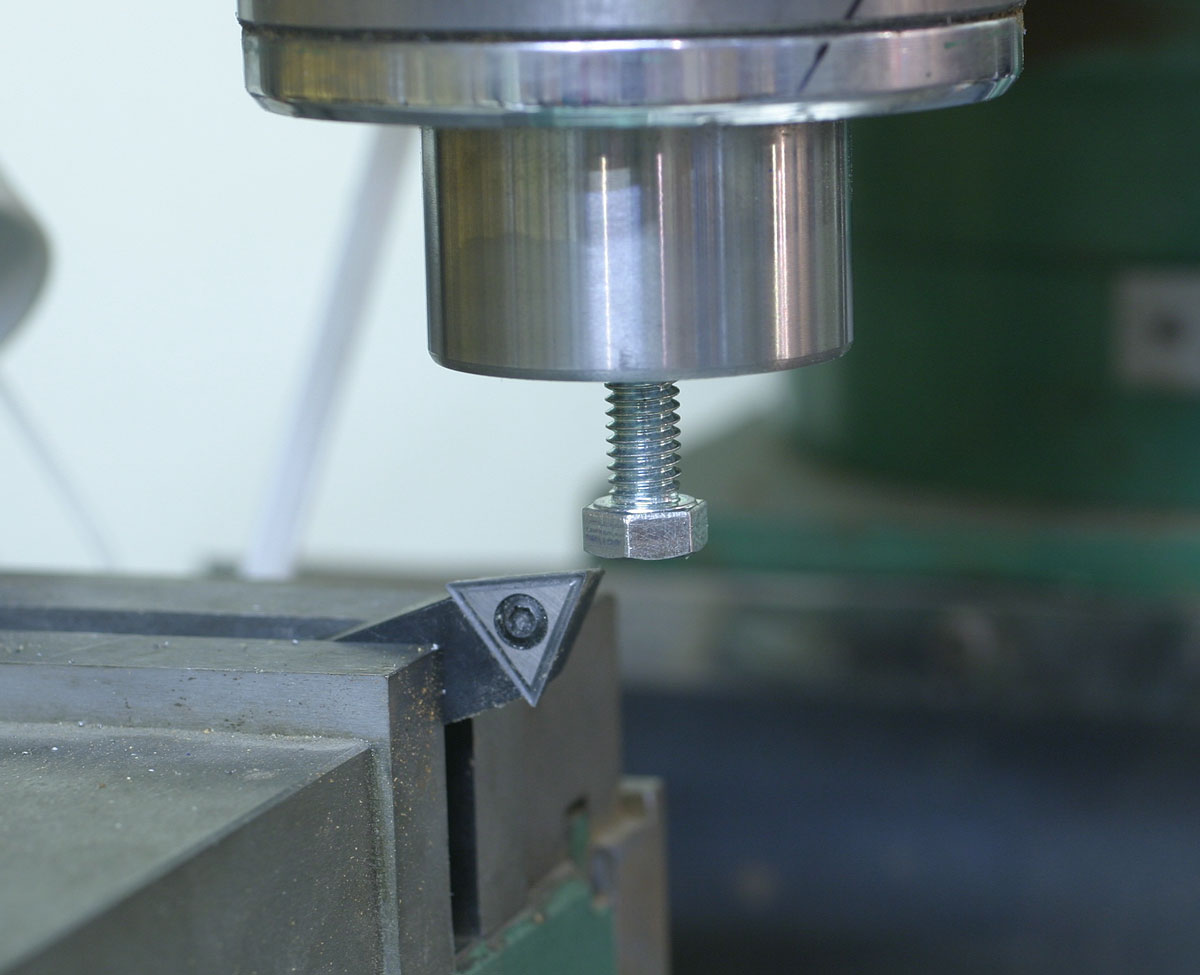
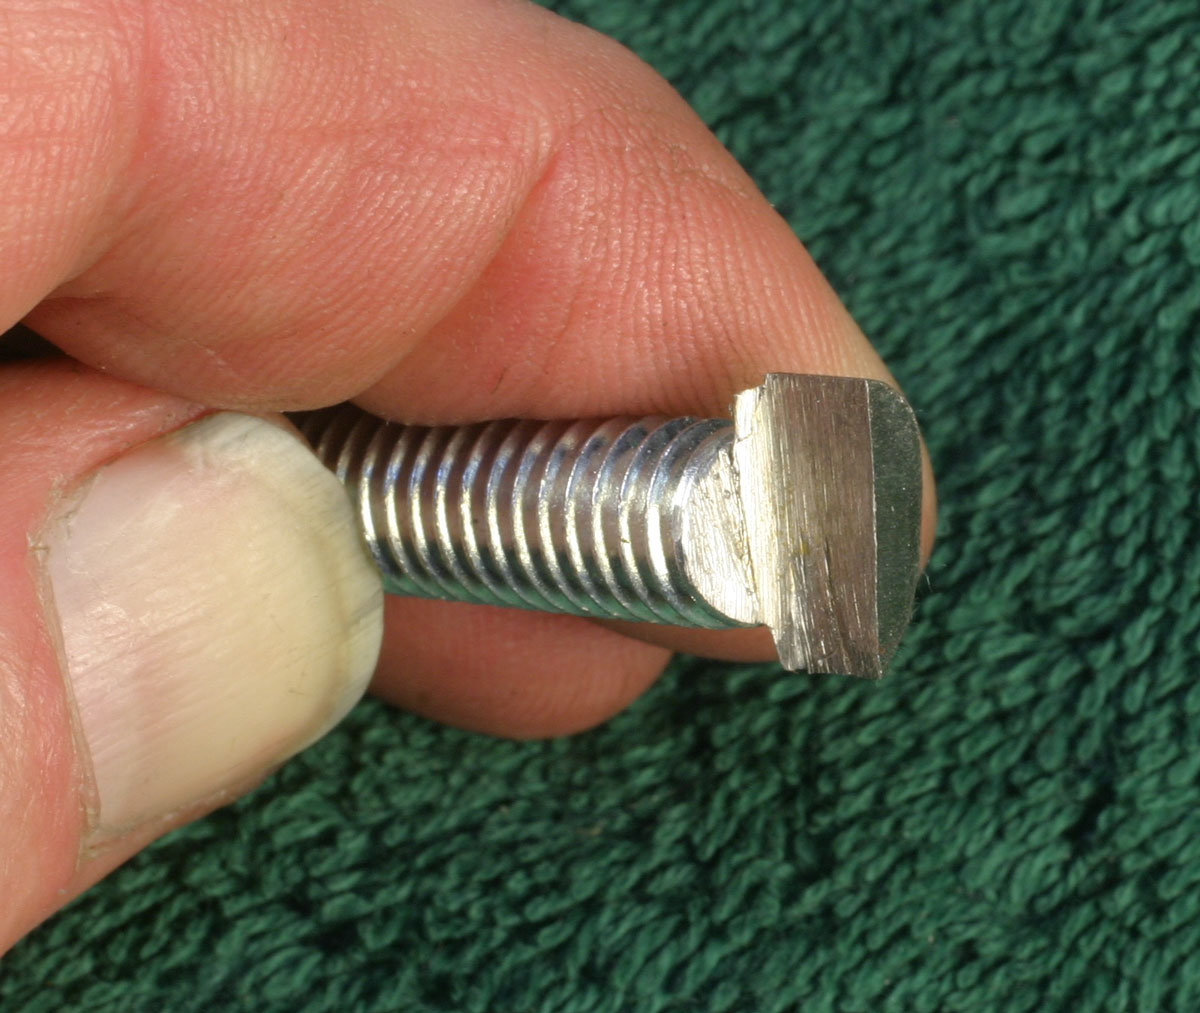
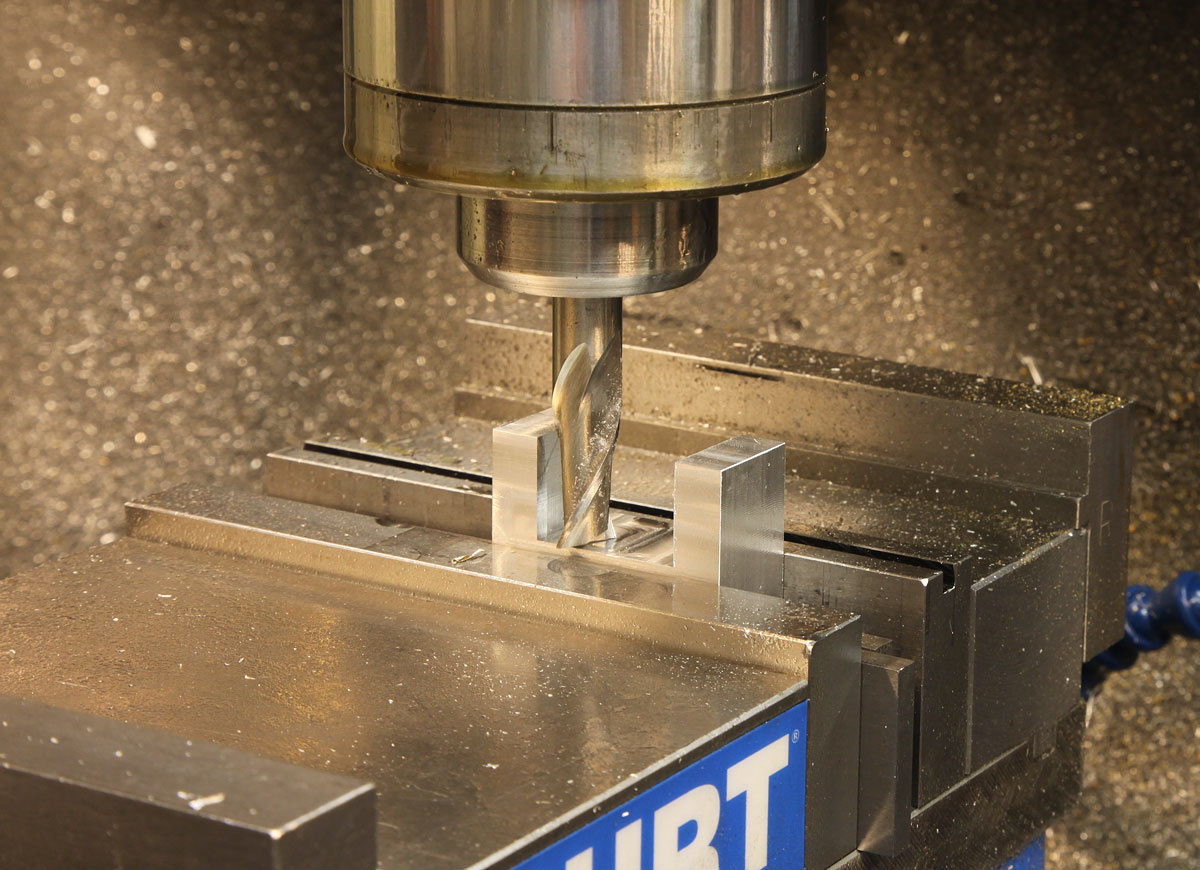
Time to get to work, yes? First order of operations is to remove the fifteenth fret, which happens to be located directly above the end of the dovetail in the neck block:
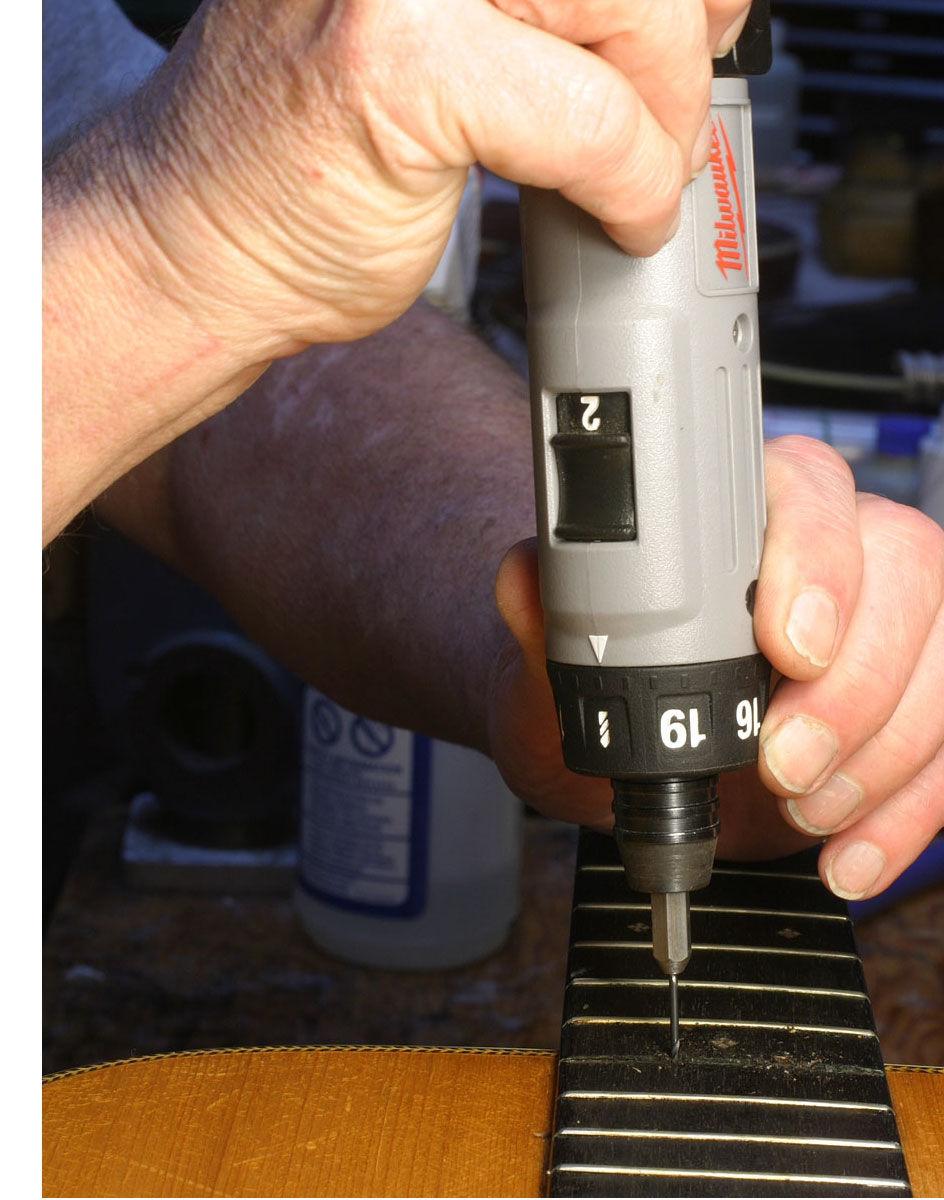
At that position, there's about a 1/8" gap, and I need to hit that gap as I drill a pair of 1/16" holes through the fingerboard:
One hole is for the steam needle that will poke way down into the joint to get steam all the way to the bottom. The other is a steam escape hole - yet another safeguard against damaging finish from escaping steam.
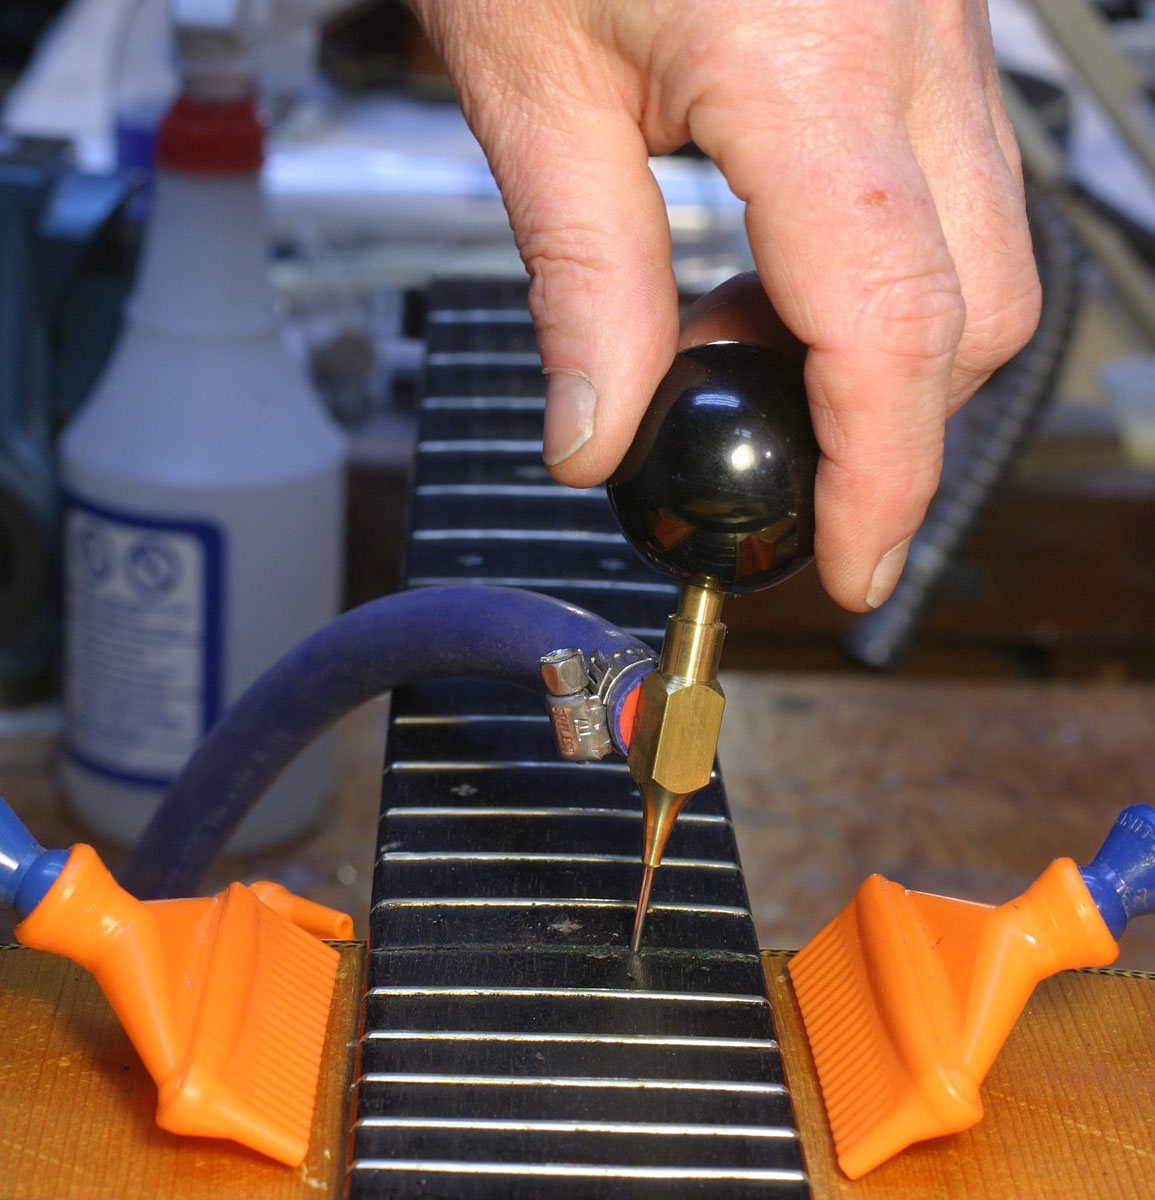
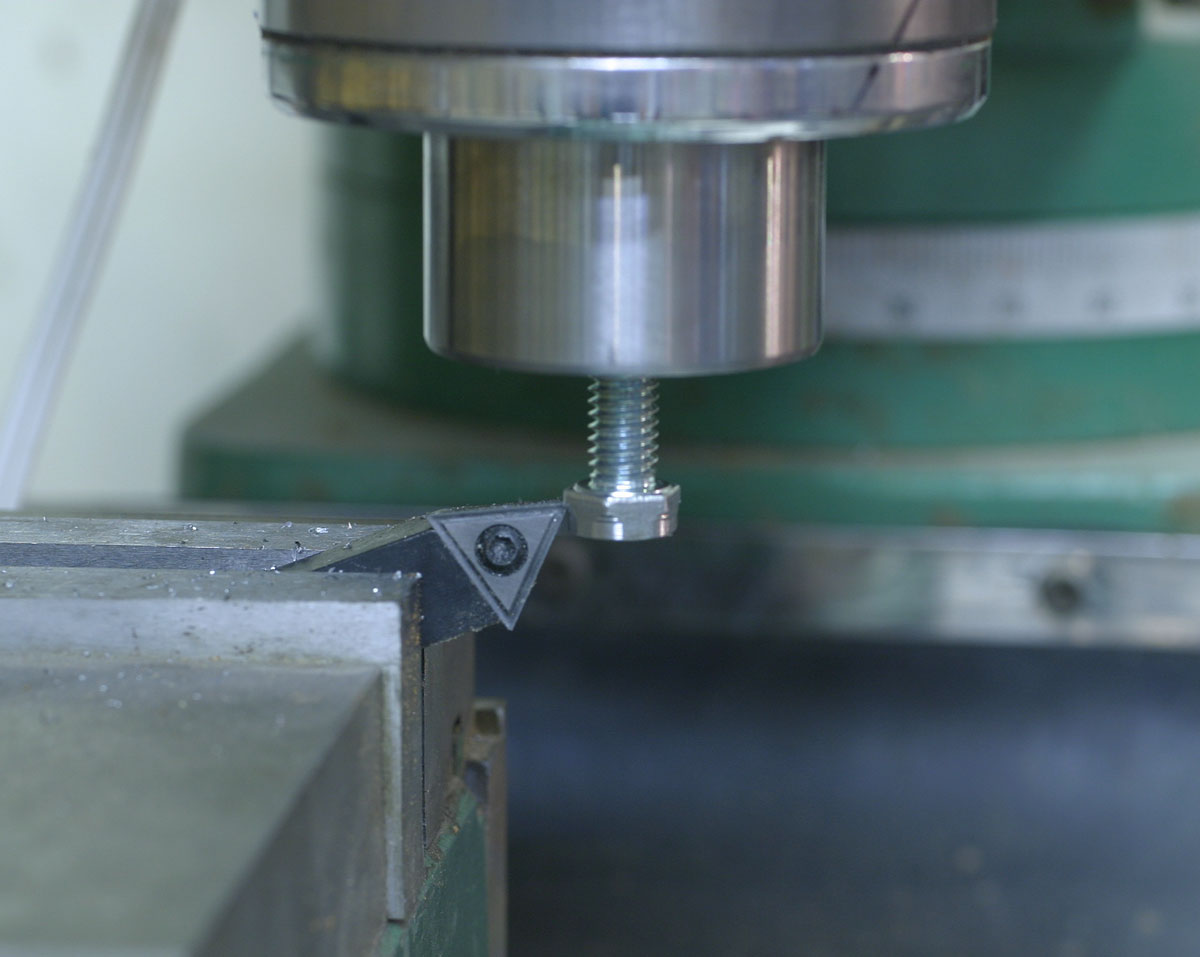
I took a whole bunch of shots as the steaming was progressing along, hoping to get one that showed the wisps of condensation coming up out of the escape hole, but none of them showed it. So use your Photoshop imagination, and pretend you see some, OK?
Here's the steam coming out of the hole:
The air blowers are operating full blast, and as steam escapes from under the fingerboard it is immediately converted to cold water, so there's no finish damage - whew!
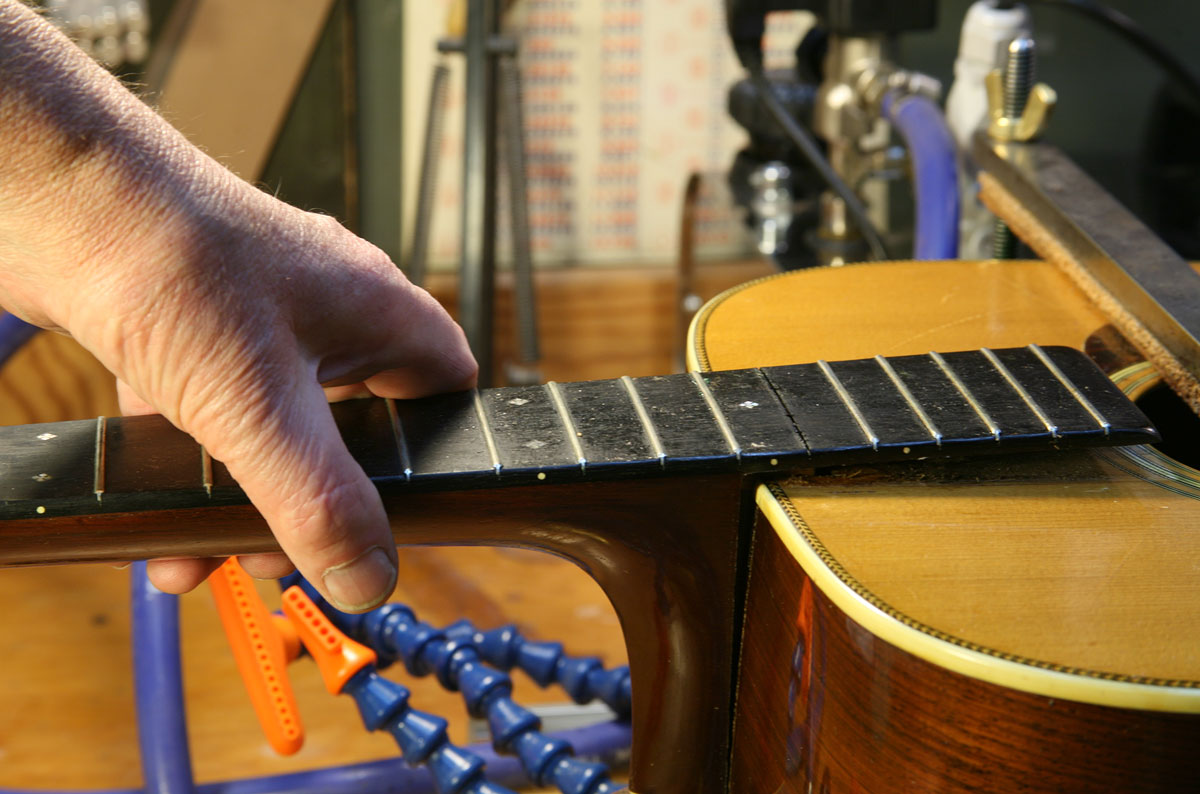
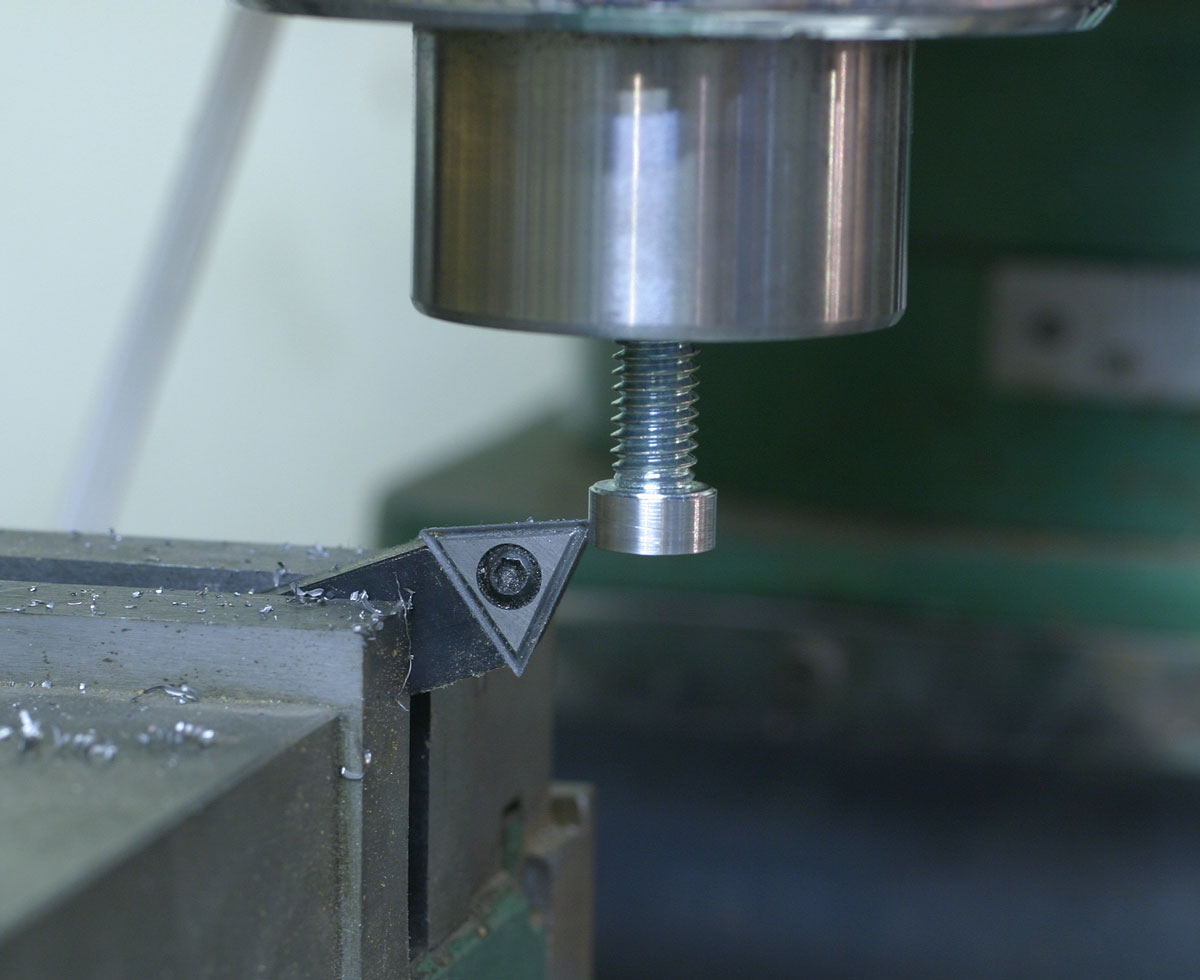
After a little while, the heat and moisture from steam have melted the glue sufficiently, and the neck rises up from the body a bit:
Once the neck moves upward about 1/8" it is completely released from the joint, and I can lift it free with ease.
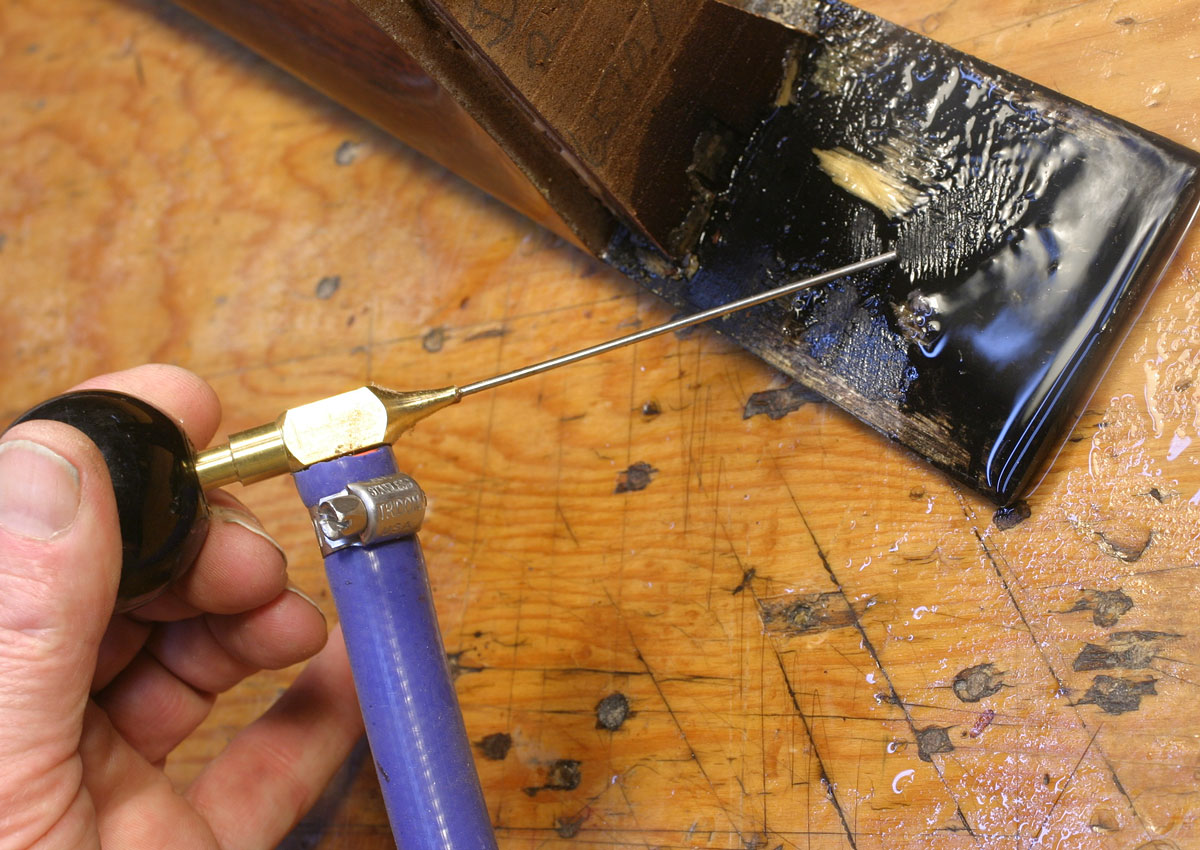
Well, the steam pot is still up to pressure, so I'll just take this opportunity to steam clean the glue off the end of the fingerboard to save scraping or more distructive processes later when it will have dried:
Well, here's another process I invented myself. However, like so many other ones I've developed, a bunch of other guys probably invented it for themselves as well.
I recall phoning my pal and veteran guitar repair guru, Dan Erlewine, about 15 years ago to tell him about some new techniques I was working on. I said, "You're really going to flip when you see some of the new things I'm up to right now. It's some pretty exciting stuff." Without missing a beat, he replied, "Oh, so you're getting into magnets, are you? I've talked to some other guys who are, too." Dang - I had not given him clue one, and he had it already. This business is like that. Seems lots of us come up with similar ideas at similar times. In the case of magnets, no doubt it was the recent availability of the super strong neodymium ones that pretty much captivated us all. Thus started a brief rivalry between me an Dan as to who could come up with the wildest and most creative uses. I'm still working on them, of course, but I think the magnetic spin sander will remain my best entry in the contest.
But, I digress. . .
With age, and accelerated by heat, celluloid pickguards shrink, but the actual amount of shrinkage varies from batch to batch of the plastic. So, it's not predictable whether a pickguard will shrink so much that it needs attention in the first few years of the guitar's life, or whether it will take a couple of generations for problems to arise, as it did with this one.
When the guitar was made, the pickguard was attached to the spruce top by "welding" the celluloid directly to the unfinished wood. The back of the pickguard was coated with solvent, making the celluloid tacky, and the pickguard was pressed down onto the spruce. A lead weight was placed on top, and the solvent was allowed to evaporate overnight, firmly bonding the celluloid to the spruce. Next day, the weight was removed, and the guitar went through the finishing process, with lacquer sprayed evenly over the spruce and the pickguard.
Today we refer to this style of pickguard as "under the finish," although it was the standard method of attachment until the development of the "self-adhesive" pickguards most makers use today. These have a very sticky adhesive - similar to the stuff on the back of packing tape - and a piece of protective releasing paper on the backside of the pickguards. The paper is removed, and the pickguard stuck down the way you'd apply a bumper sticker to your car. These new pickguards don't cause the same kind of trouble as the older style, and don't require tricky work to reglue them. If they fail, they can be replaced easily.
Well, I did it again. Let's get back to the business at hand.
As the pickguard shrinks with age, it either breaks loose from the wood, or it takes the wood with it. Most of the time, the early pickguards are so firmly bonded to the wood, they actually compress the top underneath. Sometimes that compression can be very serious indeed, causing severe cupping of the top and cracking of the top at the edges of the pickguard. Check out this example.
In previous decades, the "approved" repair was to laminate cross-grain spruce under the entire area of the pickguard to stabilize the top and prevent the spread of cracks. Unfortunately, the pickguard continued to shrink, and, while cracks didn't expand, the cupping of the top became even more extreme.
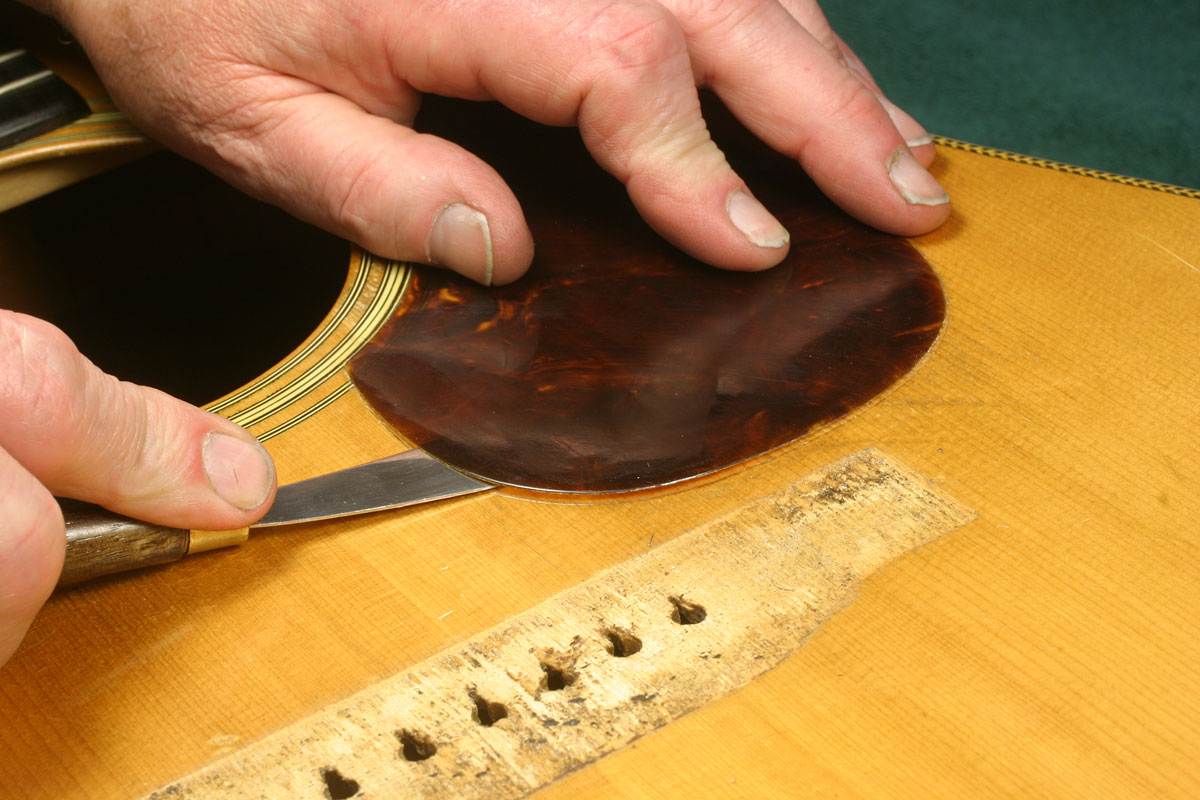
I prefer to release the tension on the top by carefully prying off the pickguard. Working slowly with a very thin palette knive, I can separate the spruce from the celluloid with minimal damage to the spruce:
I say "damage" because inevitably there are thousands of spruce fibers actually imbedded in the celluloid, and they tear free from the guitar top as I lift the pickguard. Once the pickguard is free from the top, it can then be reglued using regular wood glue, which takes advantage of the imbedded spruce fibers to reattach the pickguard firmly in place. Water soluble wood glue would never stick to celluloid; it would not be possible to reglue the pickguard using the original solvent technique because the solvent would destroy any finish it touches.
My process is to treat the pickguard just as though it were a wood veneer being laminated to the spruce guitar top.
Oh, yes, and I should mention that while I release the pickguard, I don't take it off completely. I leave it attached to a portion of the soundhole inlay, which, also being celluloid, is welded solid with the pickguard. That little bit will hold the pickguard in place so it won't shift when I squidge the slippery glue underneath and clamp it flat.
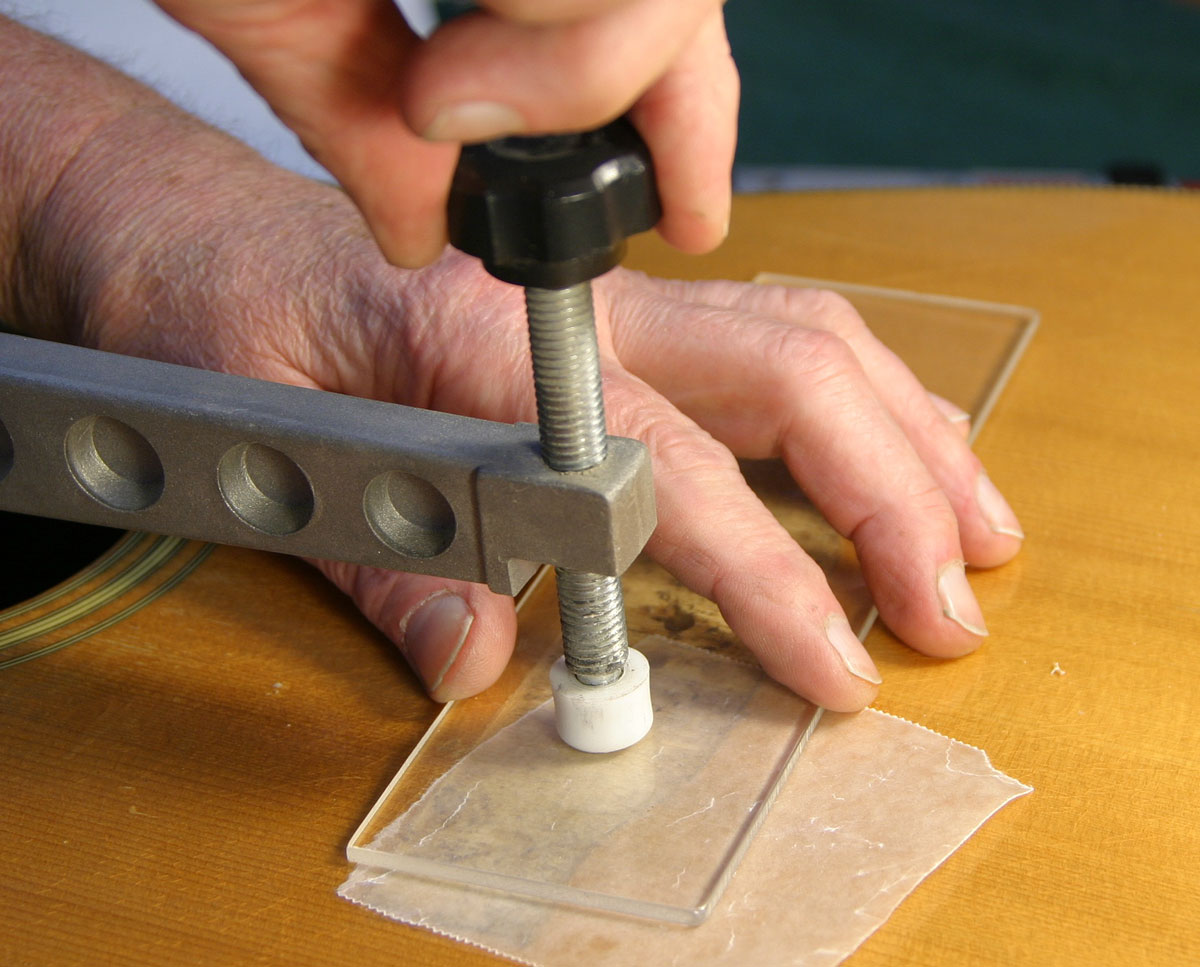
Speaking of clamping it flat - that's what I do, and with a vengence. Reglular wood glue can handle 100 PSI of clamping pressure, but the thin guitar top could not handle much at all without serious support above and below. I'll need heavy, flat clamping blocks, or "cauls" - one for the surface of the pickguard, and one to fit among the braces inside. Martin dreadnoughts all have about the same size pickguard, so I already have a regular acrylic-faced outside caul I use every few days on more modern guitars, but I don't have an inside caul for a 1937 D-38 - at least not yet.
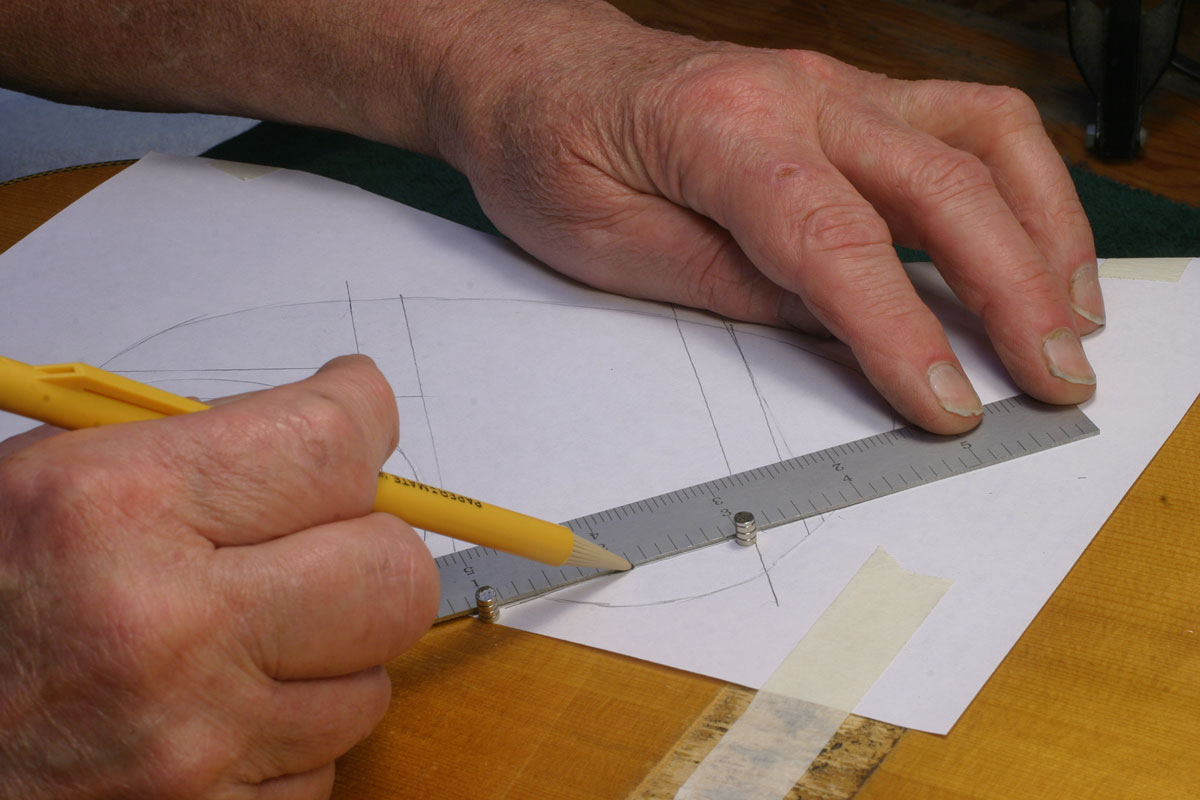
First, I'll make a drawing of the brace locations in the pickguard area:
I use little magnets, one on top and one inside, to mark the outer edges of each brace, and connect the dots to transfer the brace position to the paper on which I've traced the pickguard outline.
Then, after cutting and building up a very thick hunk of plywood to the general pickguard shape, I cut out sections to clear the braces:
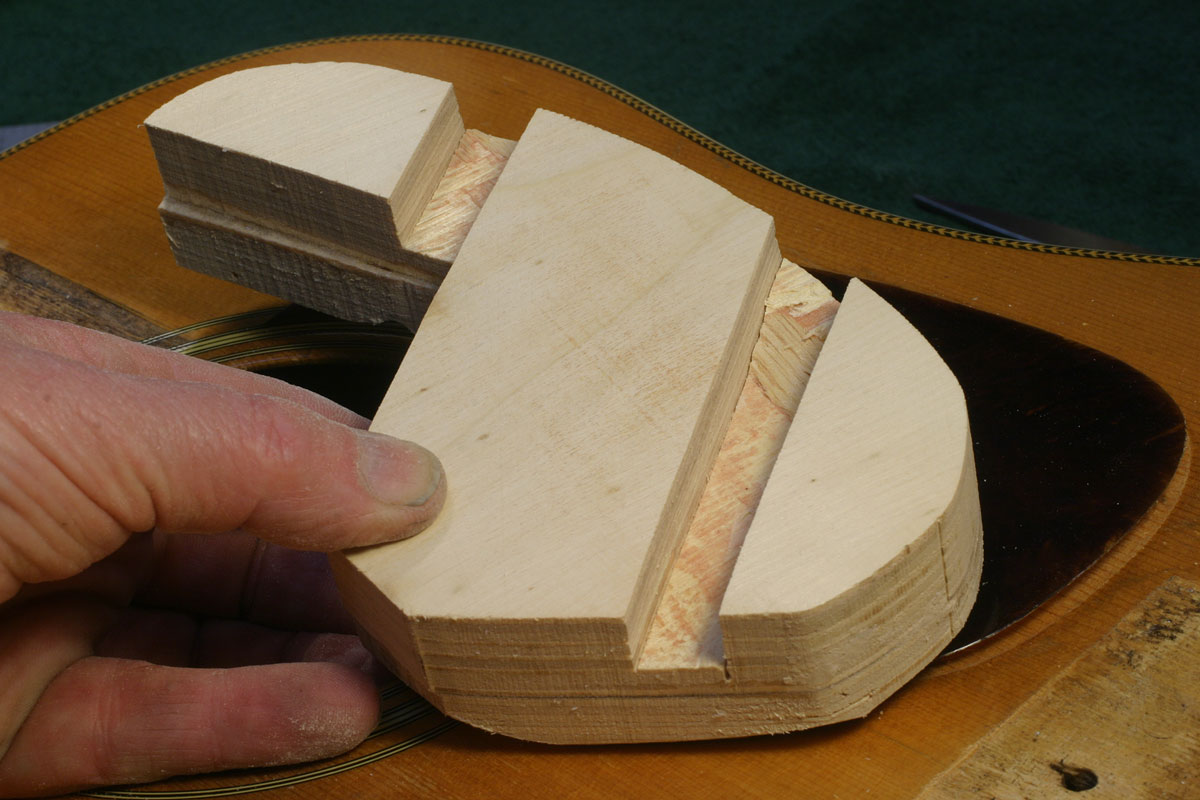
Here's the finished caul, after flat sanding the clamping surface:
The notches are probably twice as deep as they need to be, but I do that because in coming years, the caul is likely to get resurfaced any number of times to keep it flat and clean.
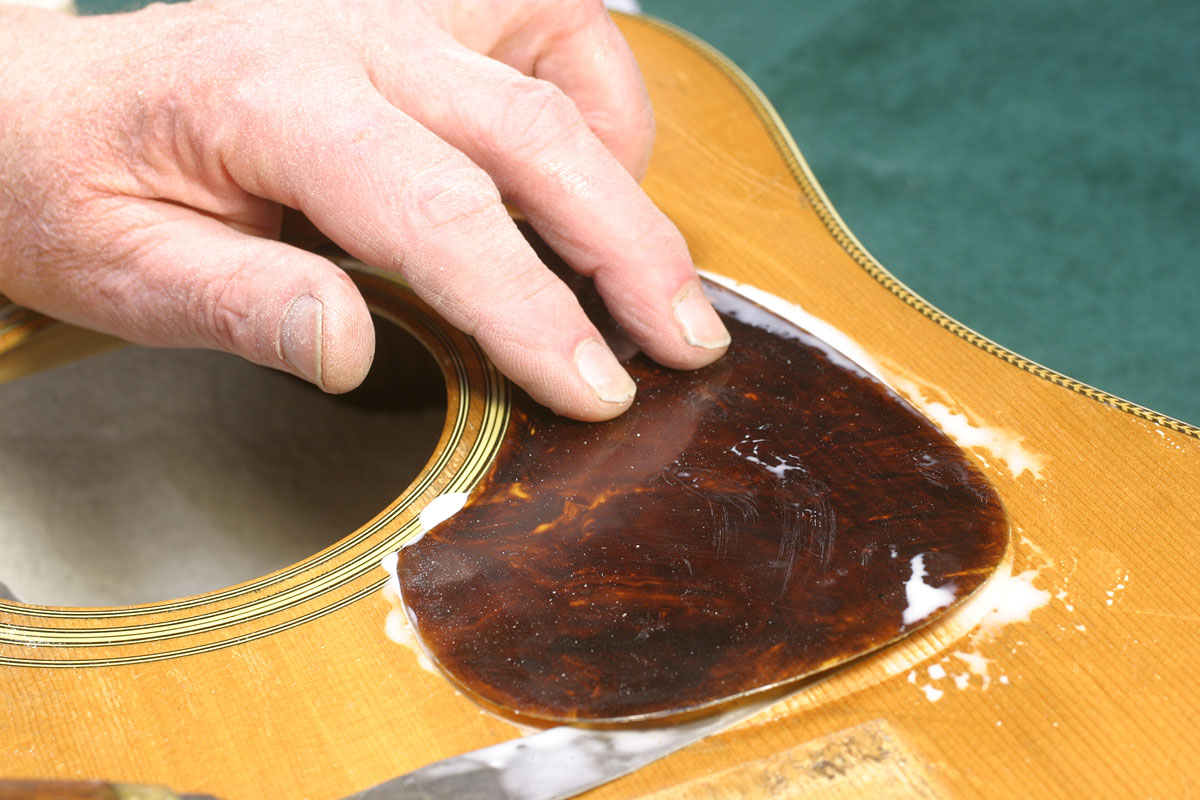
Enter the "Wizard of Ooze." I use a liberal amount of slightly thinned aliphatic resin (you know, regular yellow carpenter wood glue) and smear it all around under the pickguard. It gets pretty much everywhere, and most people chuckle a bit when they see me slather it on all over:
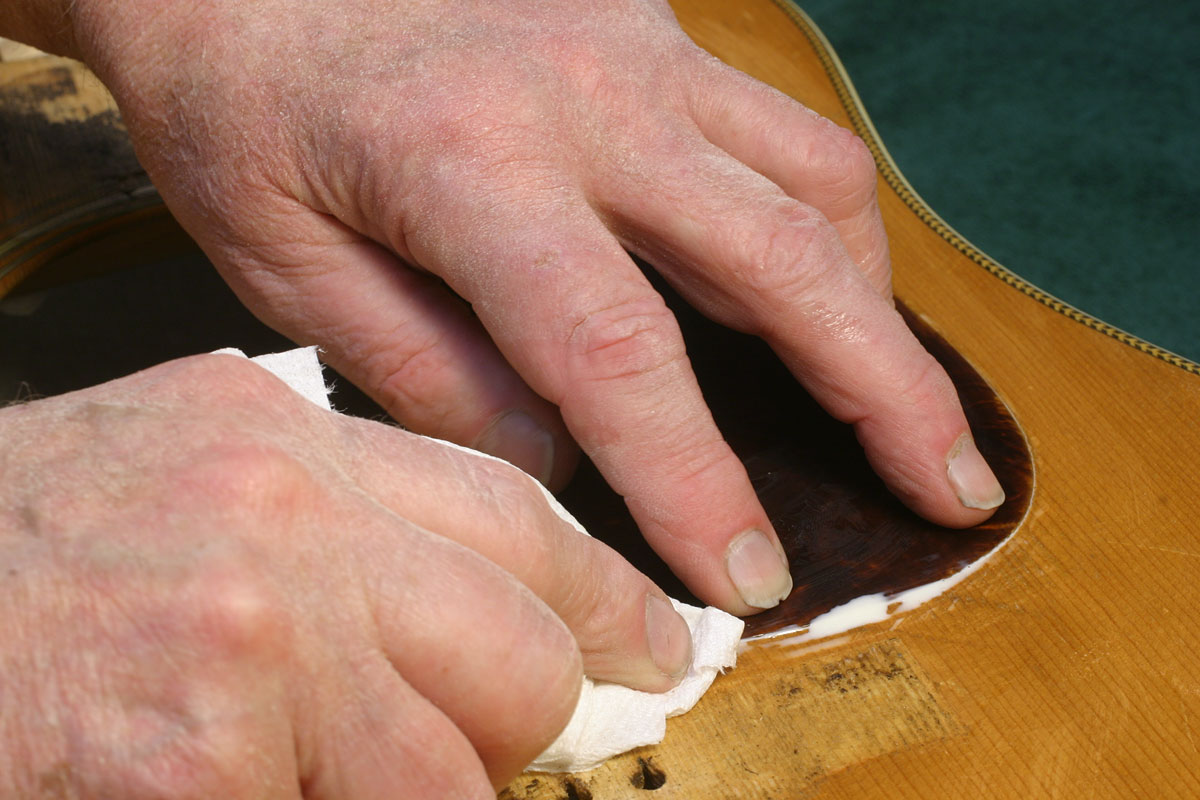
The glue wipes off easily enough, and does no damage to any wood or finished surfaces, so I press down and push out as much as I can, wiping the area clean with a damp rag or paper towel:
I lay down a piece of wax paper to resist the glue (I wouldn't want to create a 3/4" thick pickguard, you know.) and clamp it all up. I can usually fit in a heavy deep throat iron clamp and three of those orange "Pony" adjustable ones:
And, I'm not bashful about the clamping - I give it all a good hard squeeze before setting it aside to dry overnight.
Day 4: Cleaning up the Pickguard
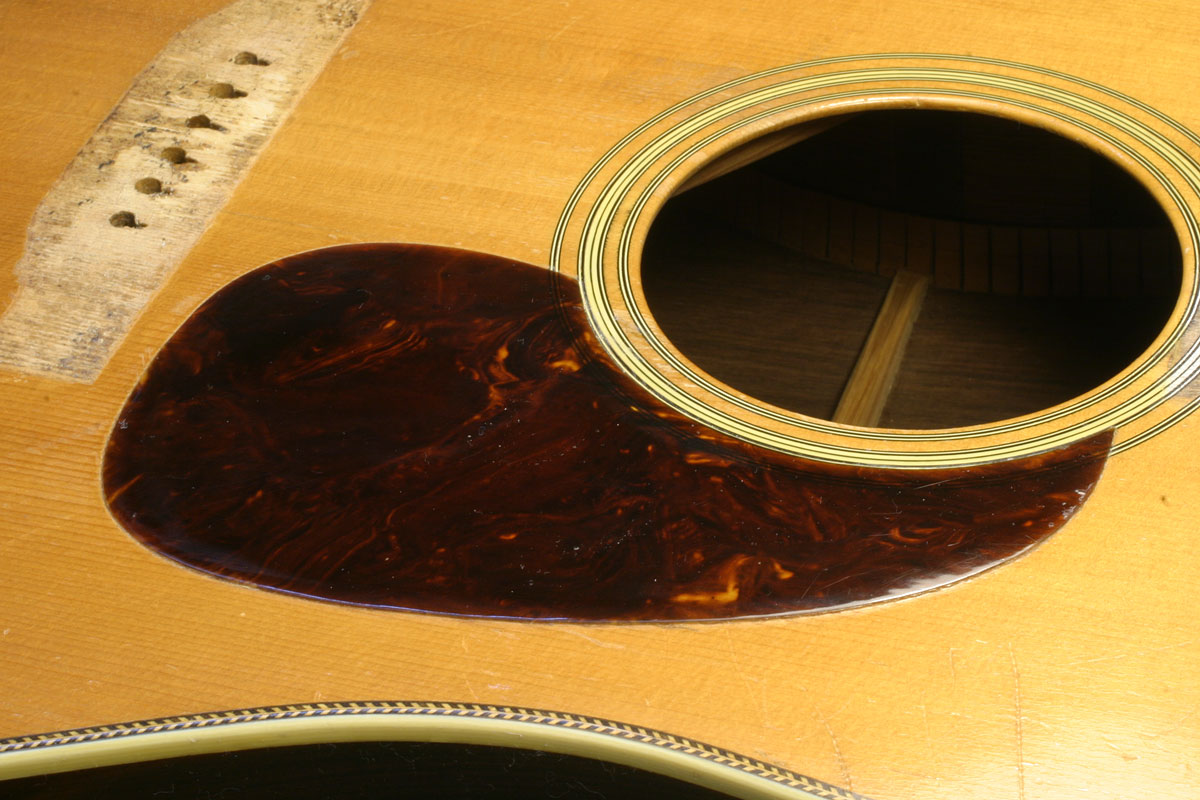
Not what you'd call a big day today. I did get the clamps off from yesterday's operation, and after cleaning up the residual glue , the pickguard looks just about as is it did when the guitar was new:
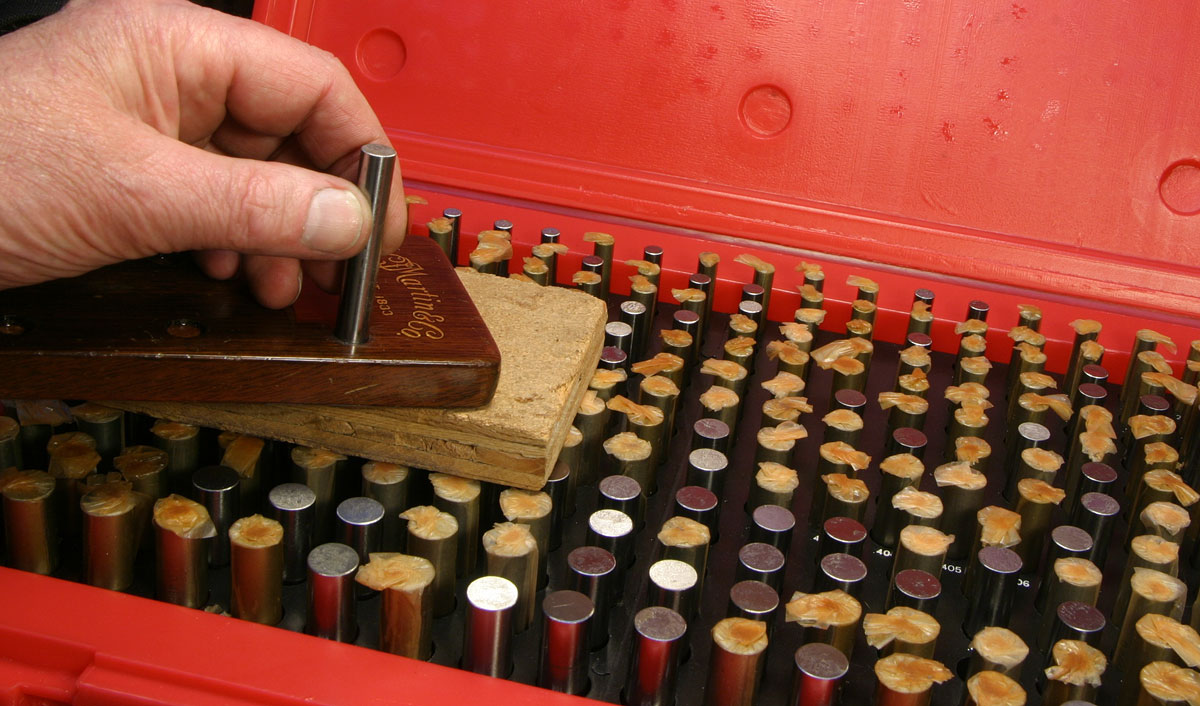
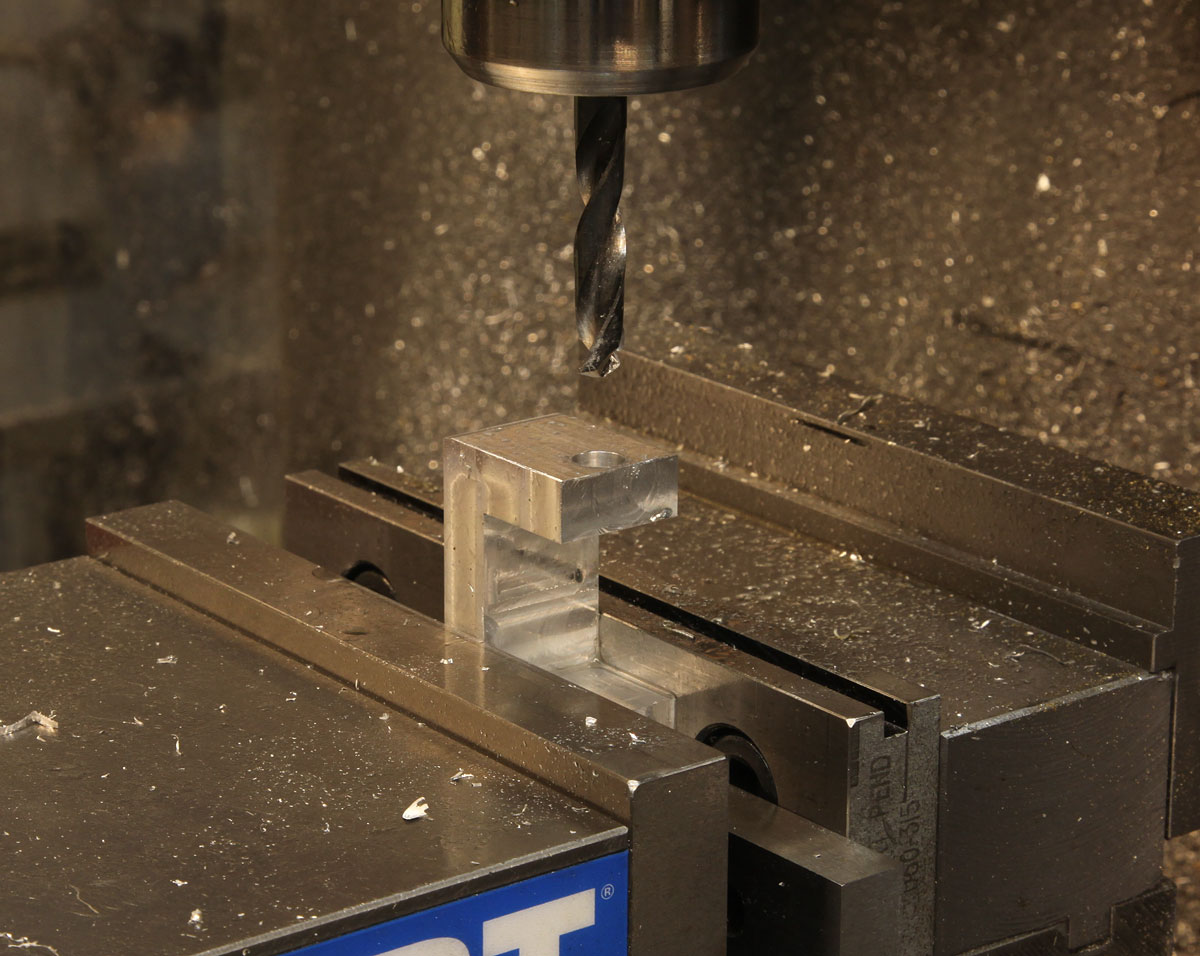
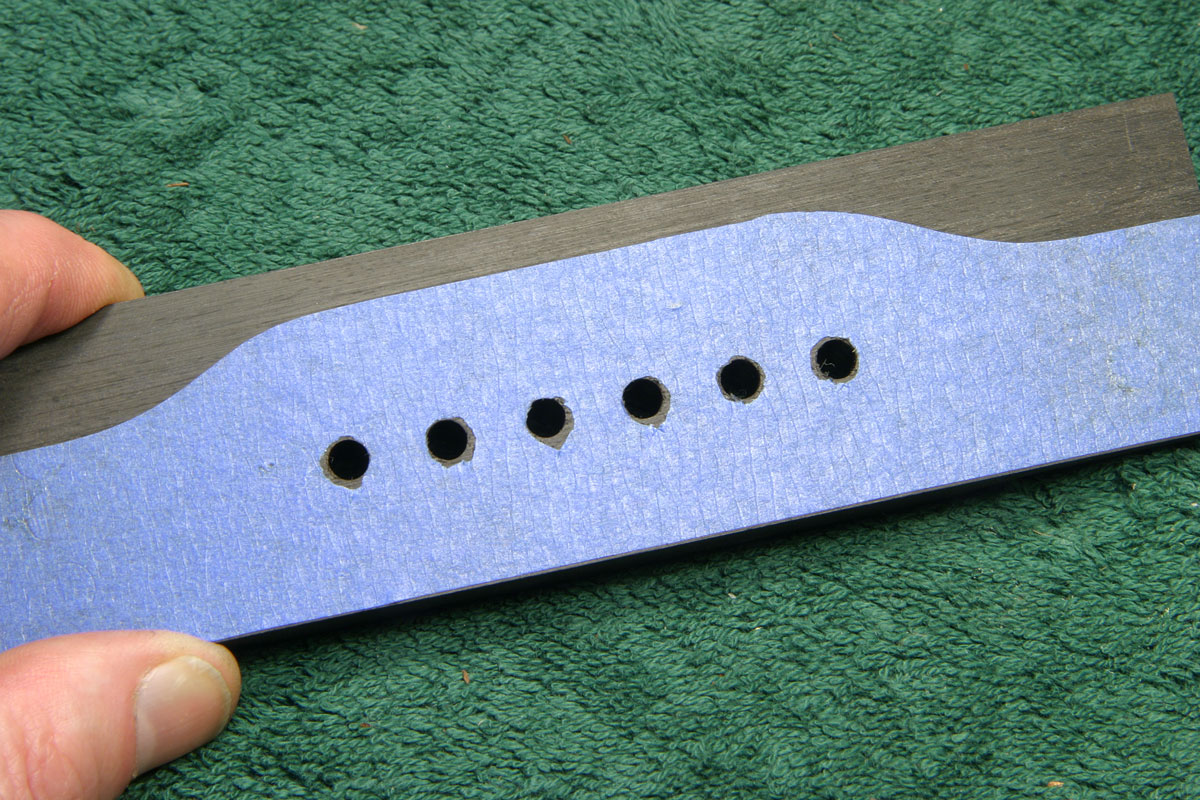
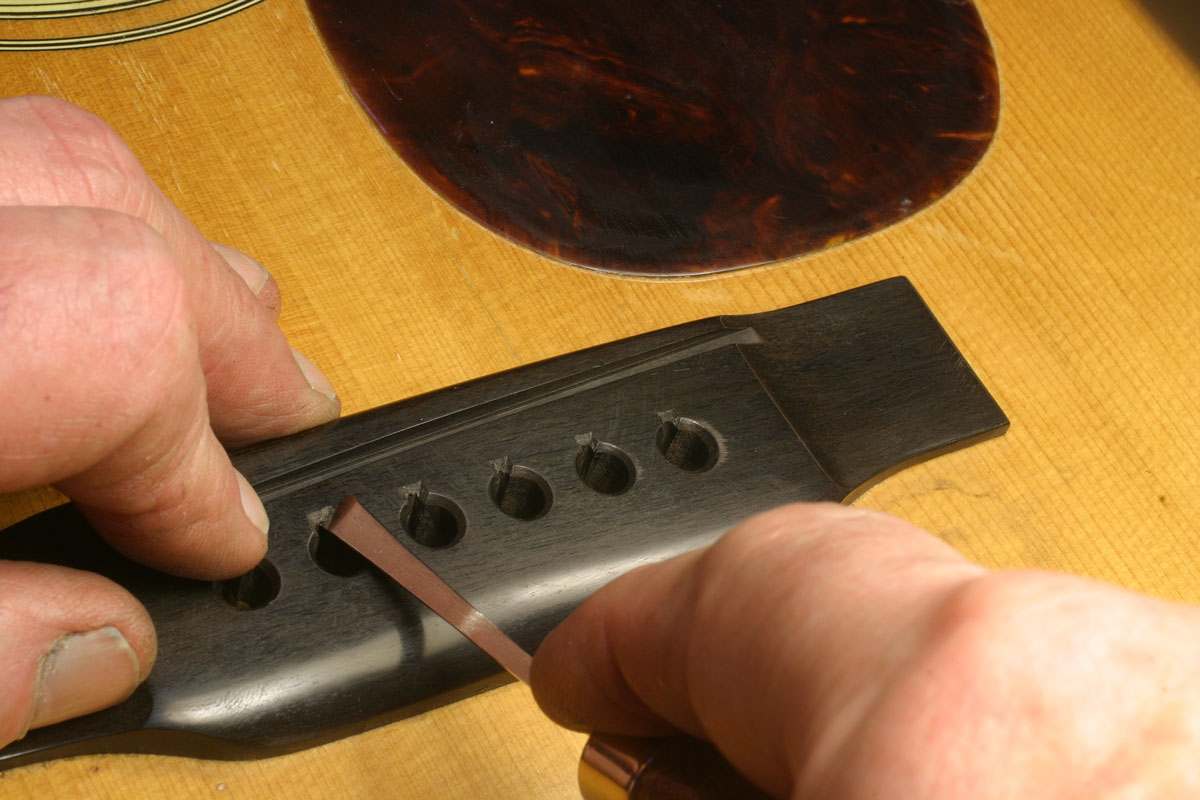
Ordinarily, I don't cotton to using epoxy on vintage instruments, but there are times when I believe it really is the best solution to a difficult problem. Today's problem is the need to fill roughly drilled holes to fit the 1/4" tuner shafts of the Waverly tuners I'll be installing. They are direct copies of the original Grover "G-98" tuners that were original equipment on the 1937 D-28, although they are made with superior materials and preision than the originals.
Just as the originals, these Waverly gears have a decorative trim bushing that presses into the hole in the peghead and is held in place by the friction of a tight fit. While I could save some time and simply glue dowels into the holes, the bushings would then be held by vertical grain, and much more likely to slip out than if they were pressed into the flat grain of an undamaged peghead. The forward thrust of the tuner bushing is generated by the string tension, and ideally, that thrust would be held by end grain that's far less compressible than side grain. My job, then, is to fill the holes with plugs that have the grain oriented the same as the surrounding wood.
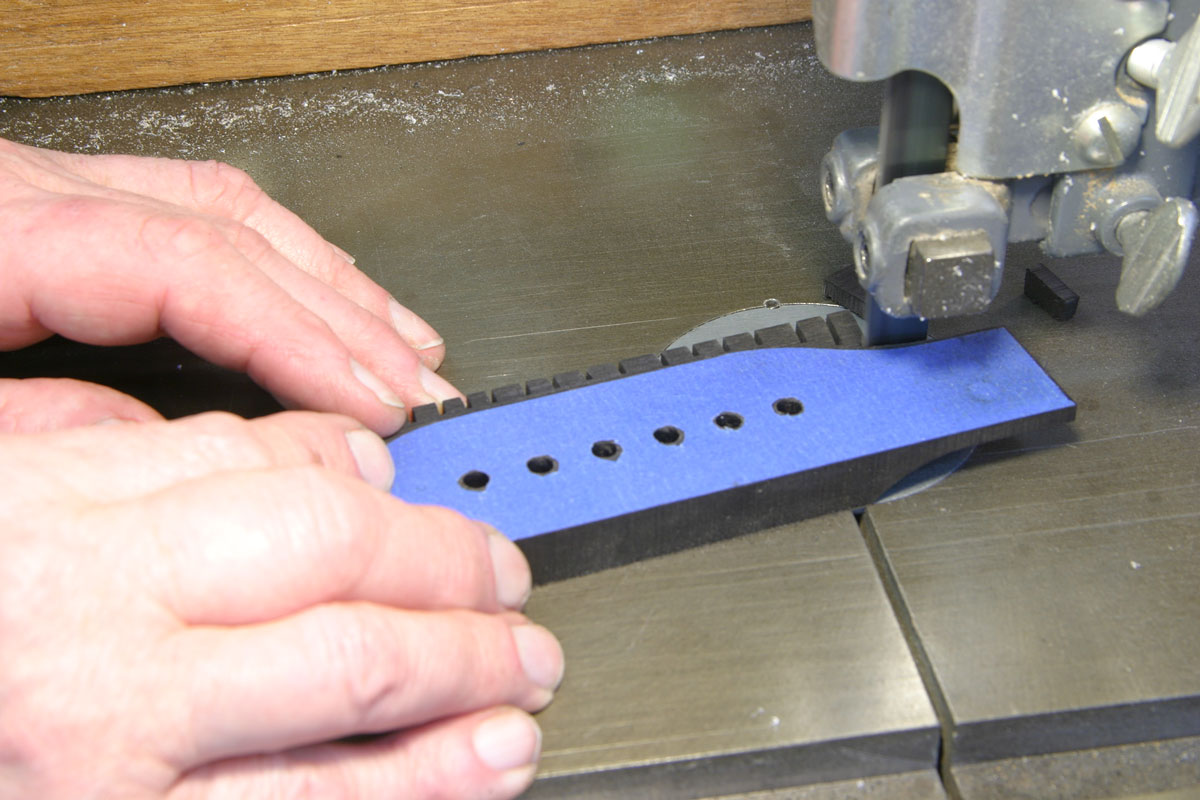
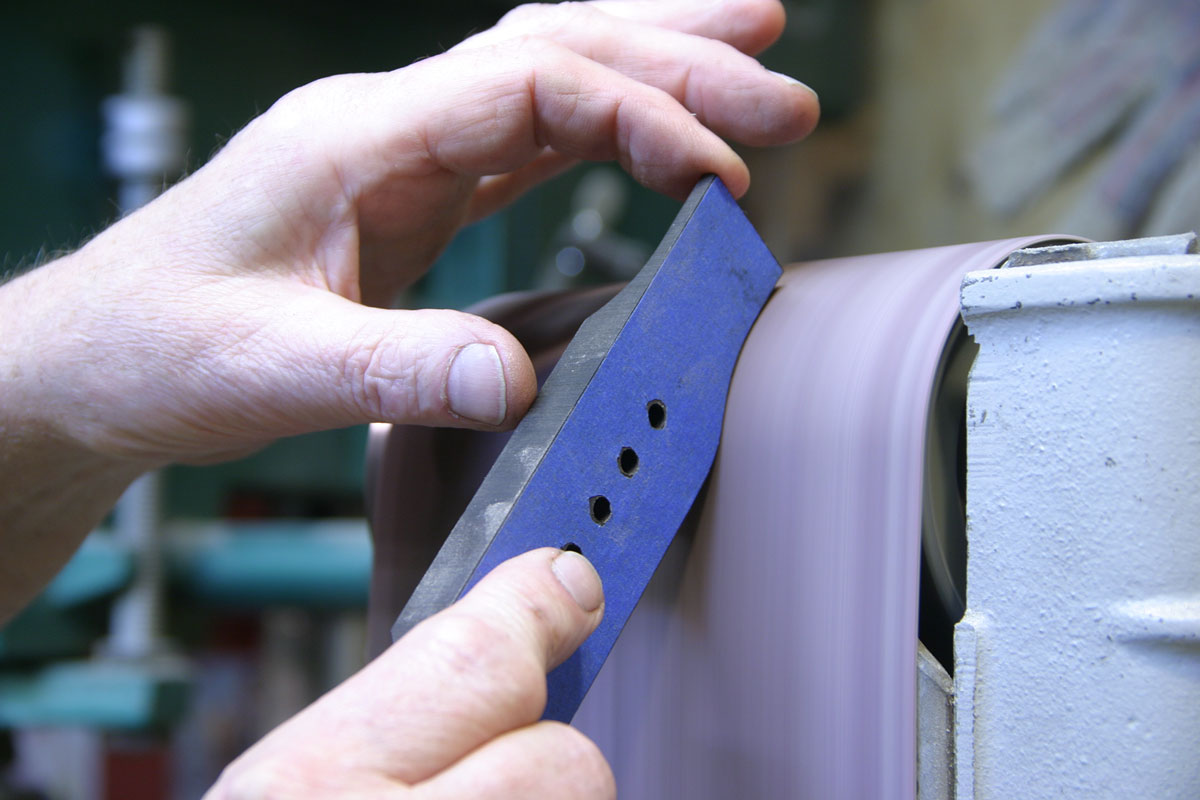
Since the holes were drilled roughly to 3/8" and I don't want to enlarge them for plugging, I make up some mahogany plugs using standard plug cutter:
Here's the epoxy part. Once the plugs are in place and drilled for the new tuners, there won't be a lot of solid mounting inside the walls of the hole between the original wood and the plug. So, I chose to use epoxy because it has tremendous cohesive strength and it fills gaps solidly. In addition, it works well to fill and hold the end grain between the plug and surrounding hole.
Because epoxy is there to hold the plug in place and fill the voids in the hole, I really don't have to clamp the plug in place. I do have a bit of a mess on my hands because I can't afford to have any of the epoxy setting up on that nice lacquer finish. For the next hour or so I watch for the epoxy to start to set, wiping off any excess with paper towels. No solvent that would dissolve epoxy can be used on lacquer, you know. Time to set it aside for the epoxy to cure tonight.

Day 6: Filling Tuner Screw Holes
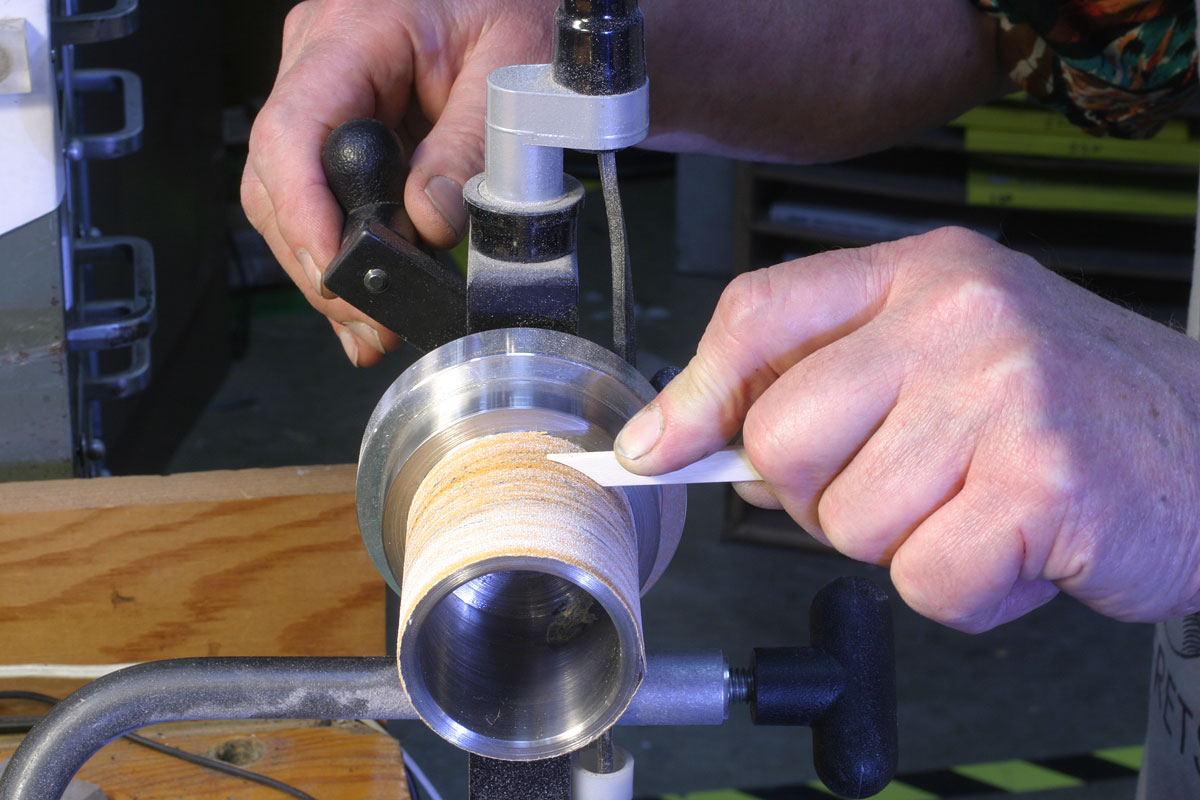
A few years ago we acquired a Grizzly "Wood Mill" and it has proven to be a valuable tool for guitar repair. Here I have the peghead clamped in the milling vise, and I can mill off the protruding mahogany plugs to within about .010" of the finished surface with ease and security:
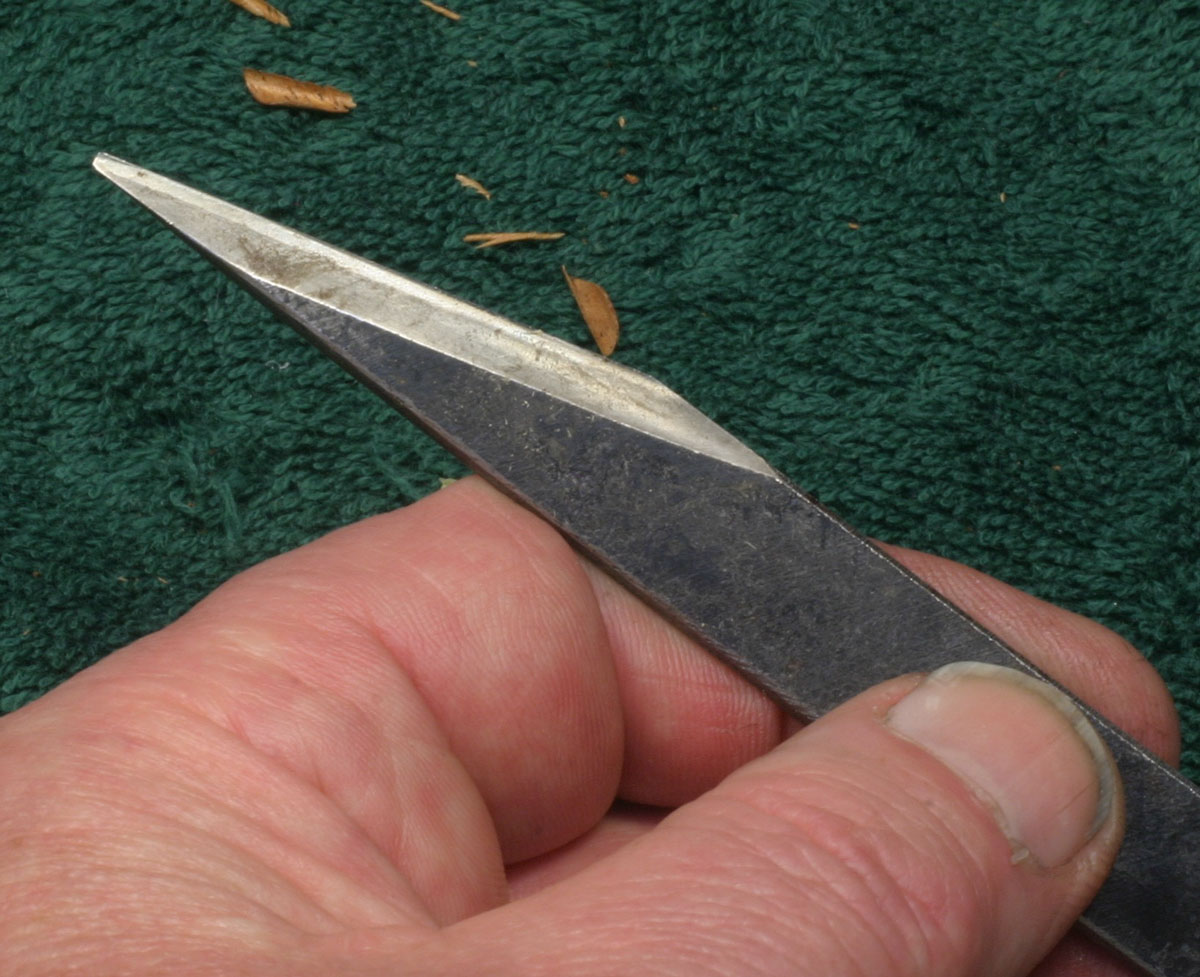
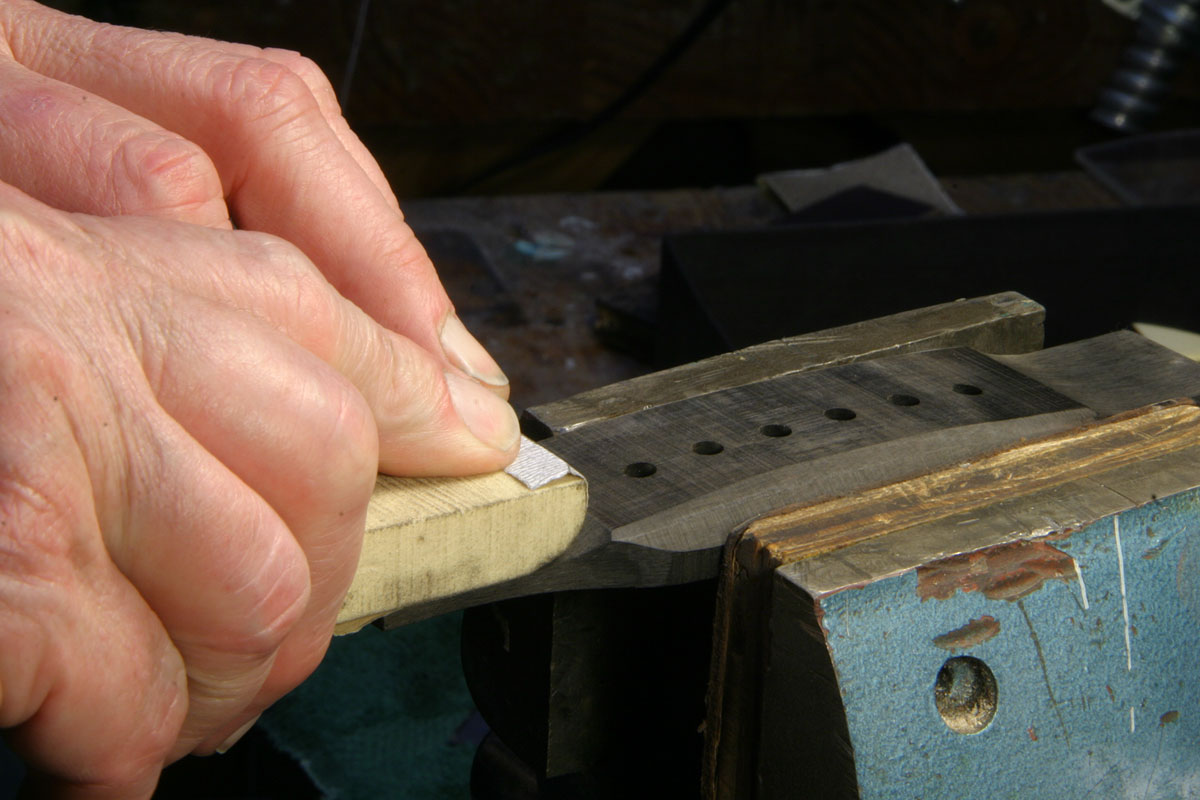
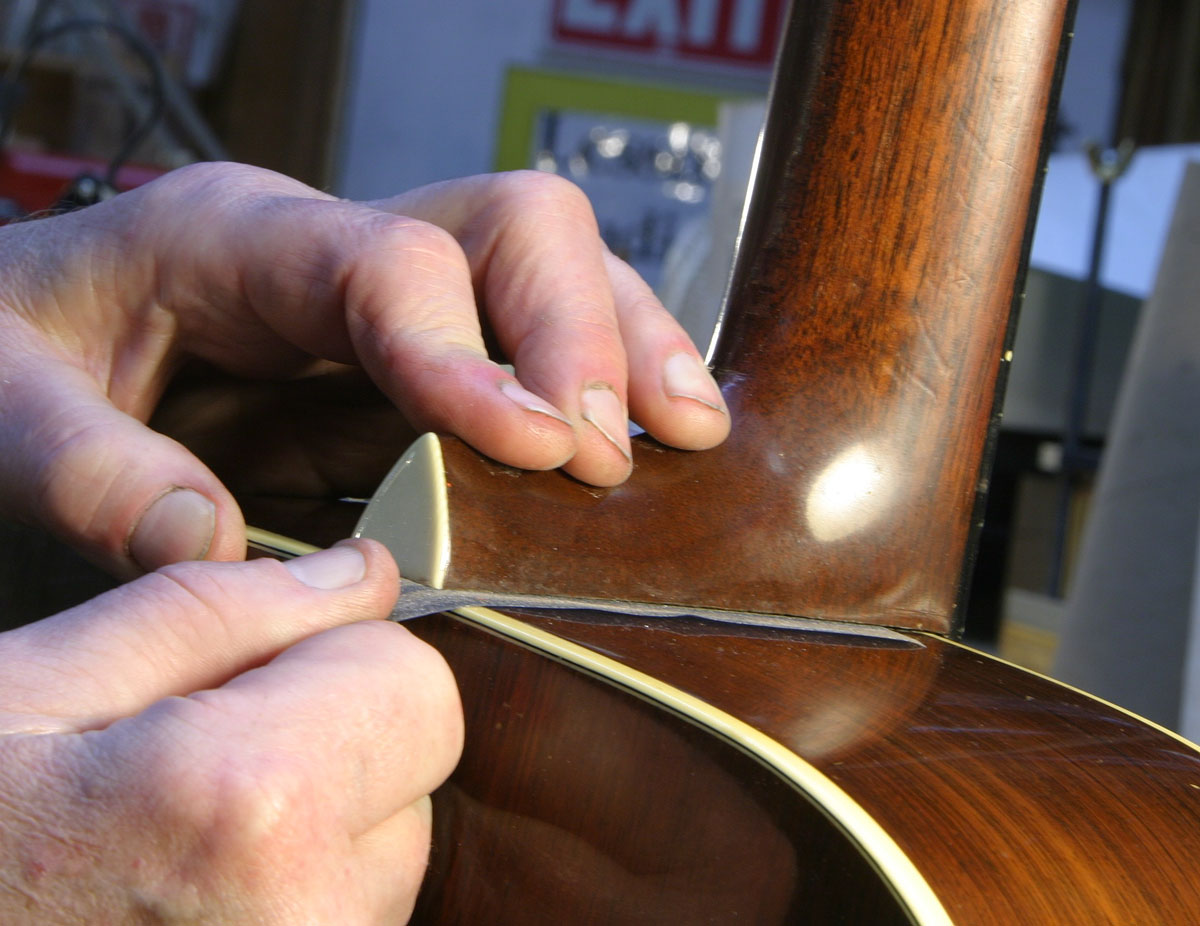
I'll trim them the rest of the way with this fine little Japanese single bevel knife:
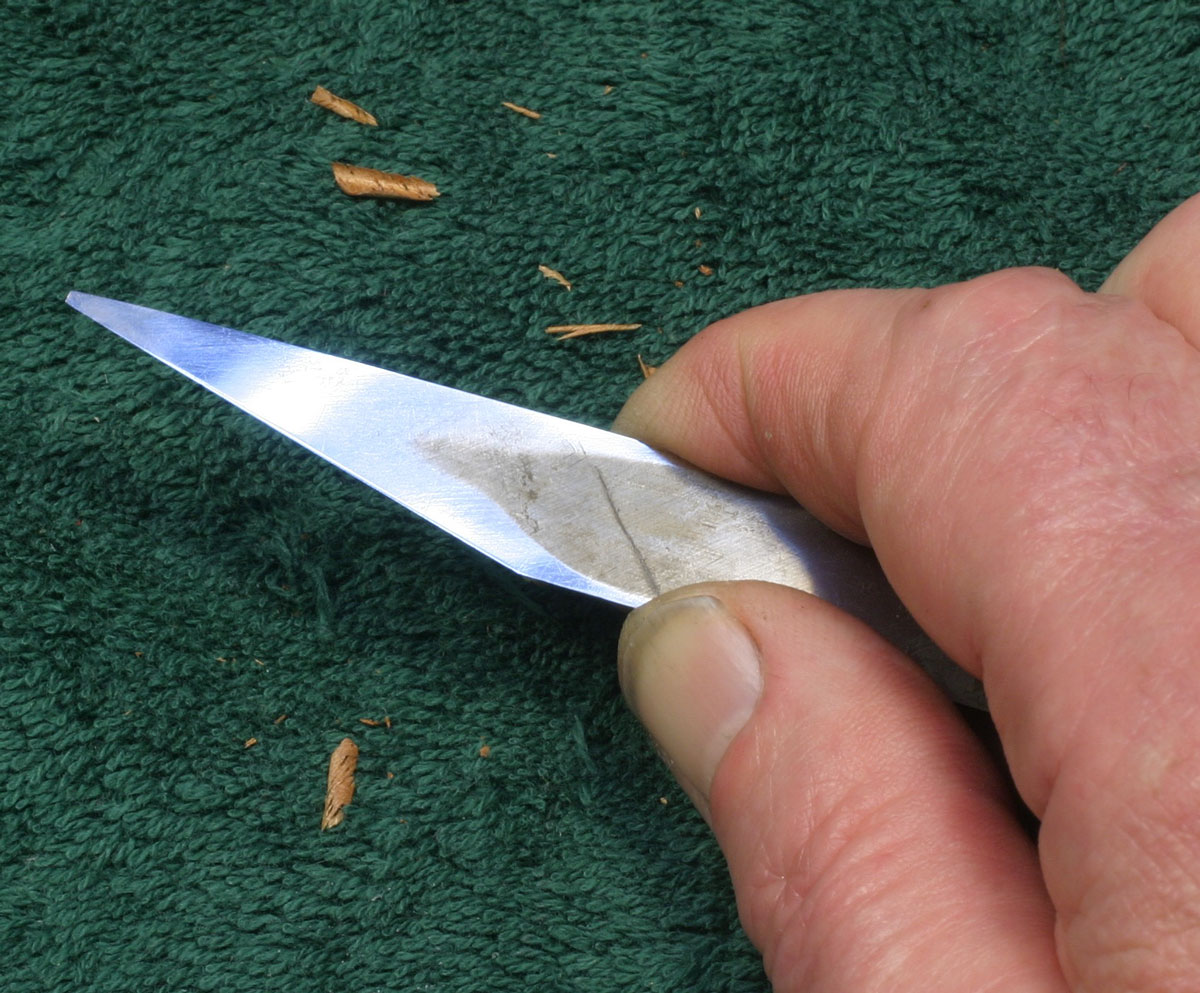
The back side of the knife is ground and polished very flat so it can skate along on the flat finished surface and slice off anything that sticks up - in this case, the remaining bits of the mahogany plugs:
It's delicate work, requiring a firm hand, strong pressure, and thanks to the flat surfaces, good control.
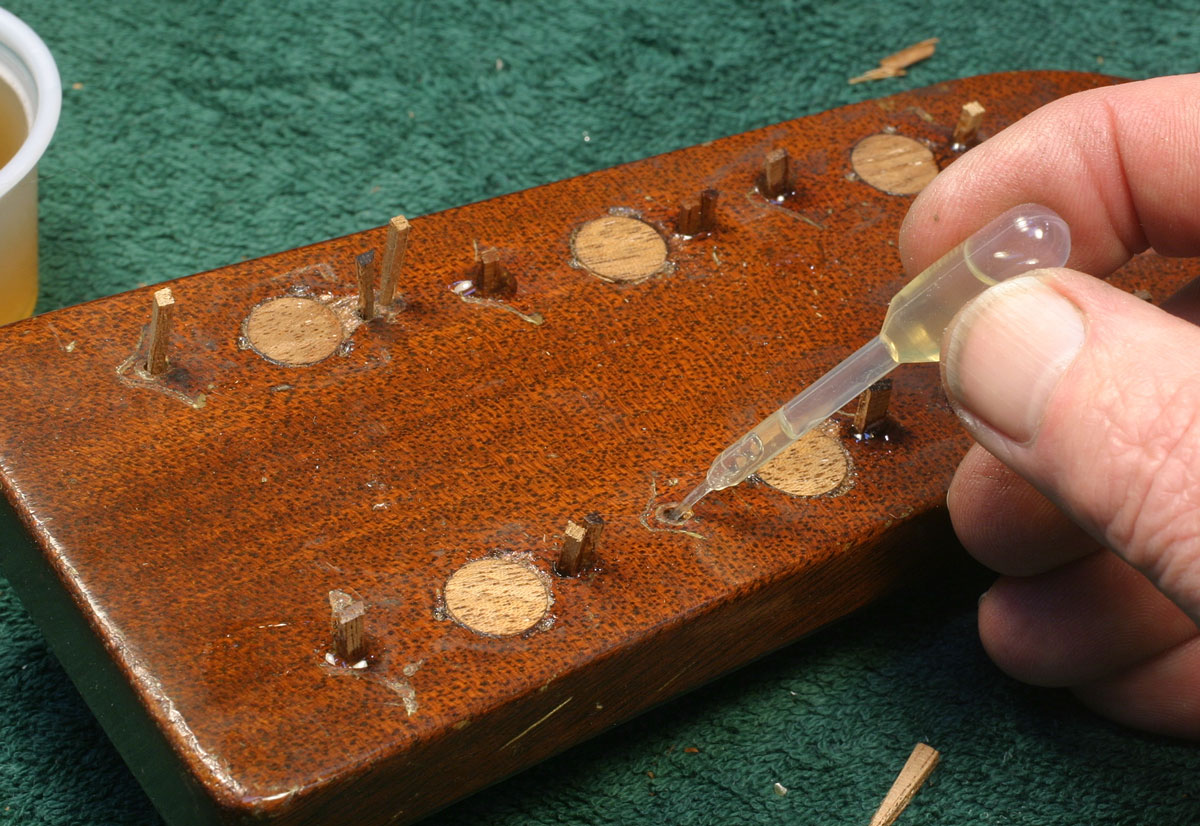
Hey everbody, come have a nice drink of fresh hot hide glue!
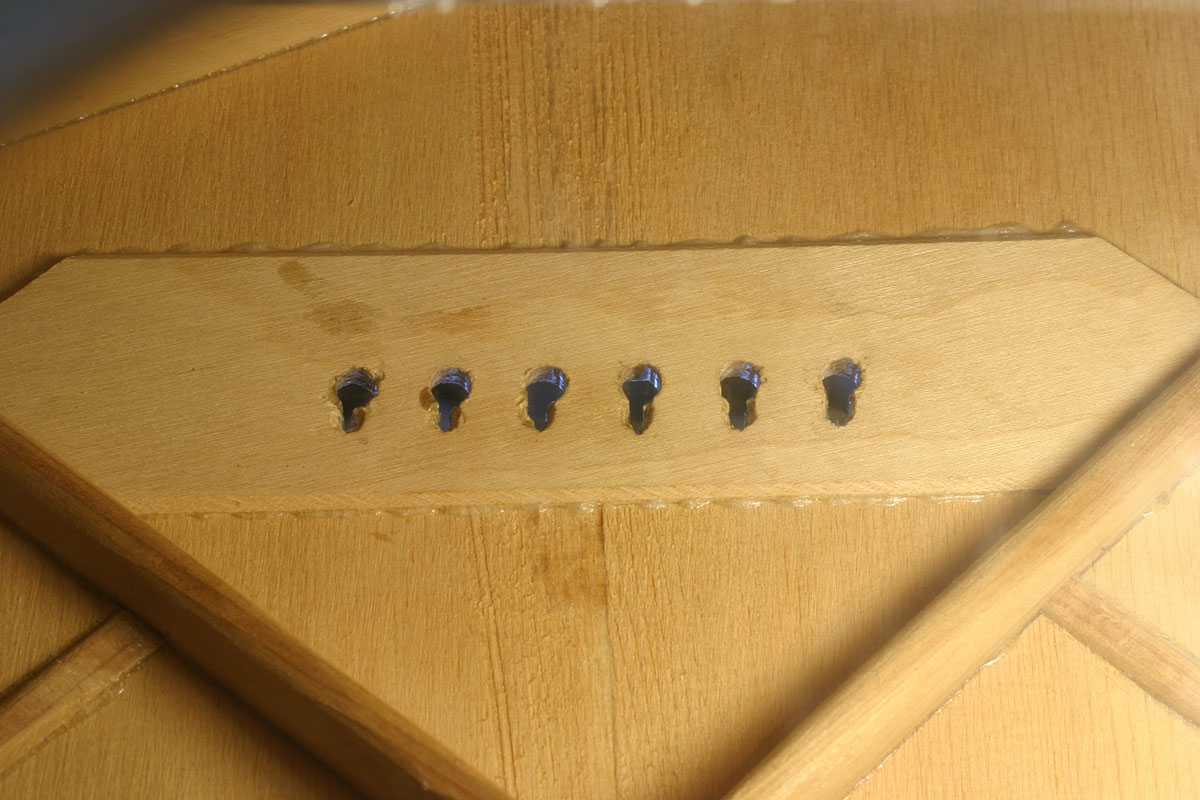
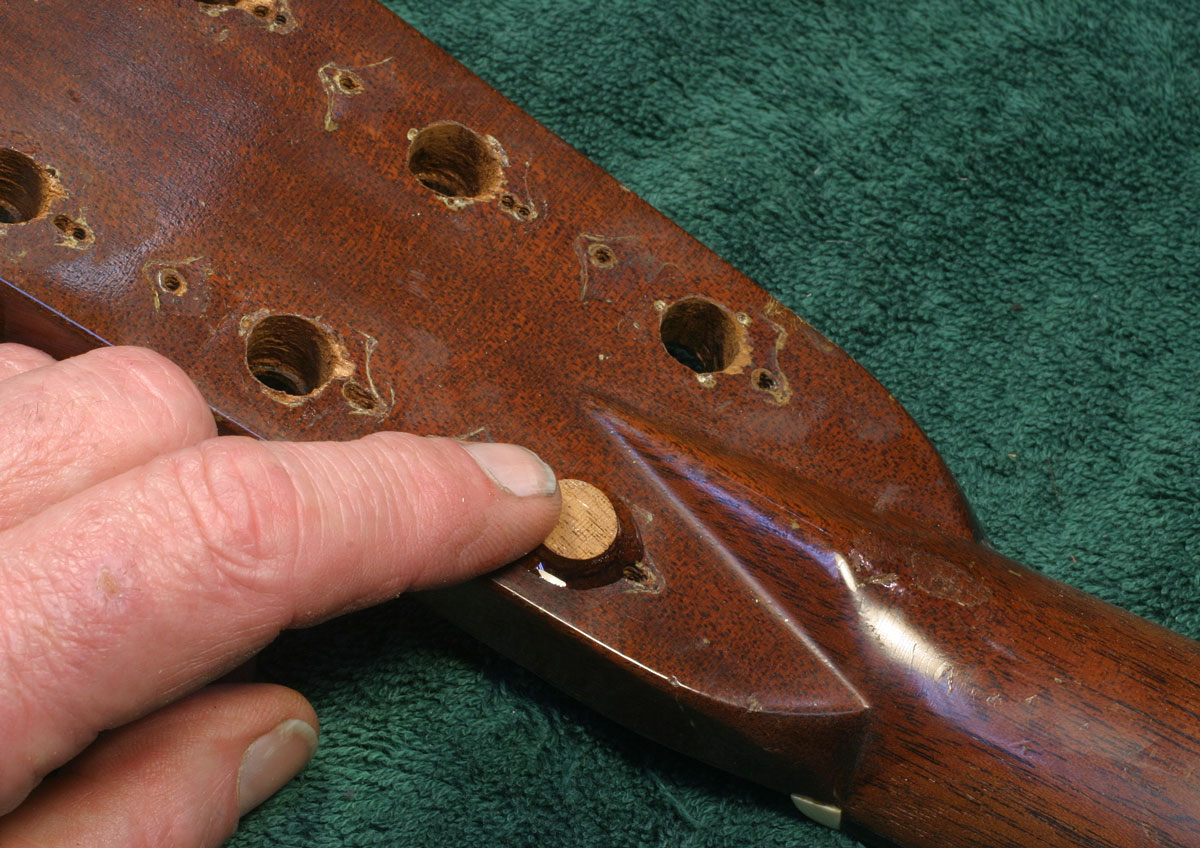
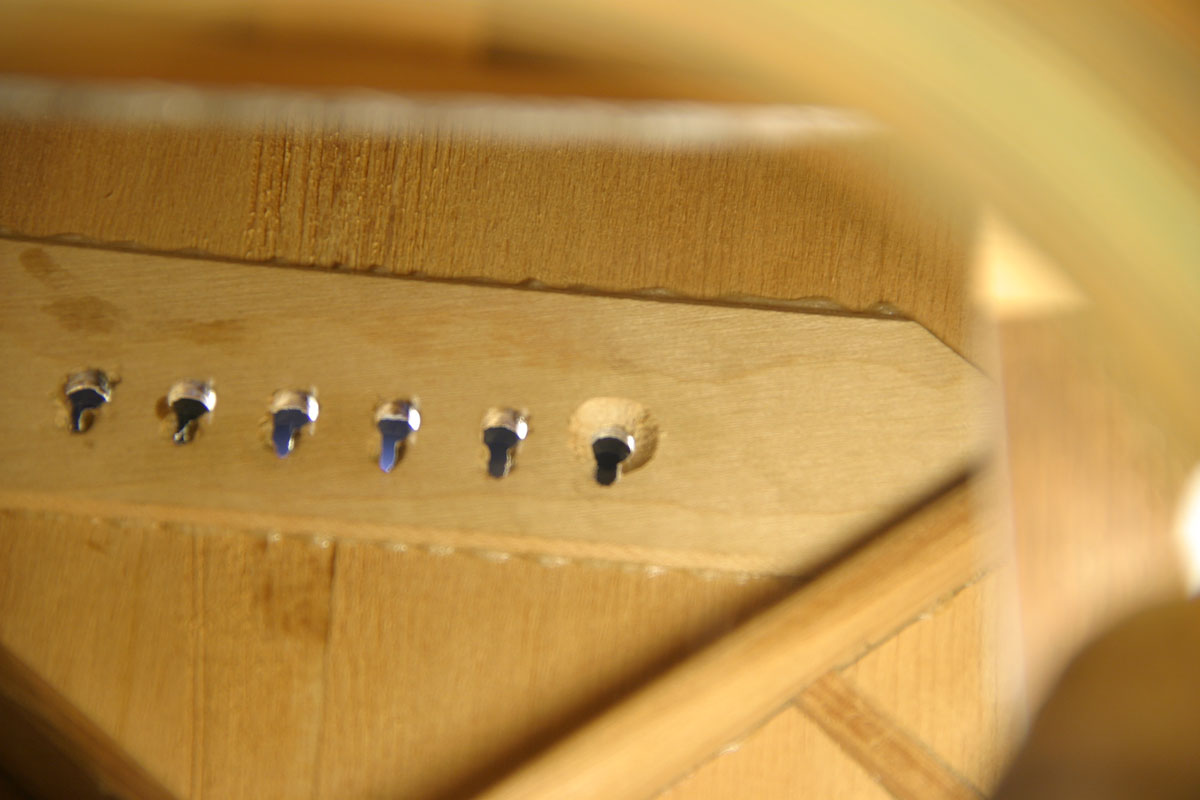
While there are only six extra tuner mounting holes, some of the originals are enlarged or stripped, so I figure on filling all the screw holes to get the best results when I mount the new tuners.
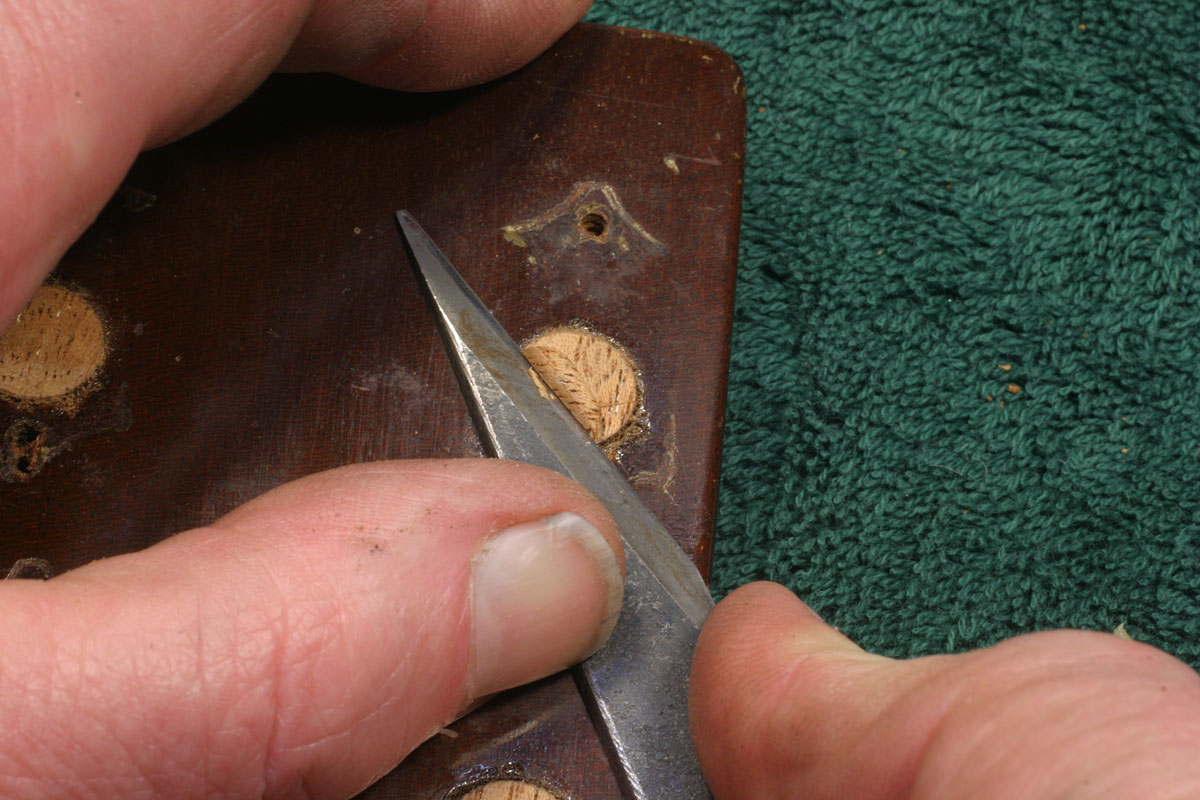
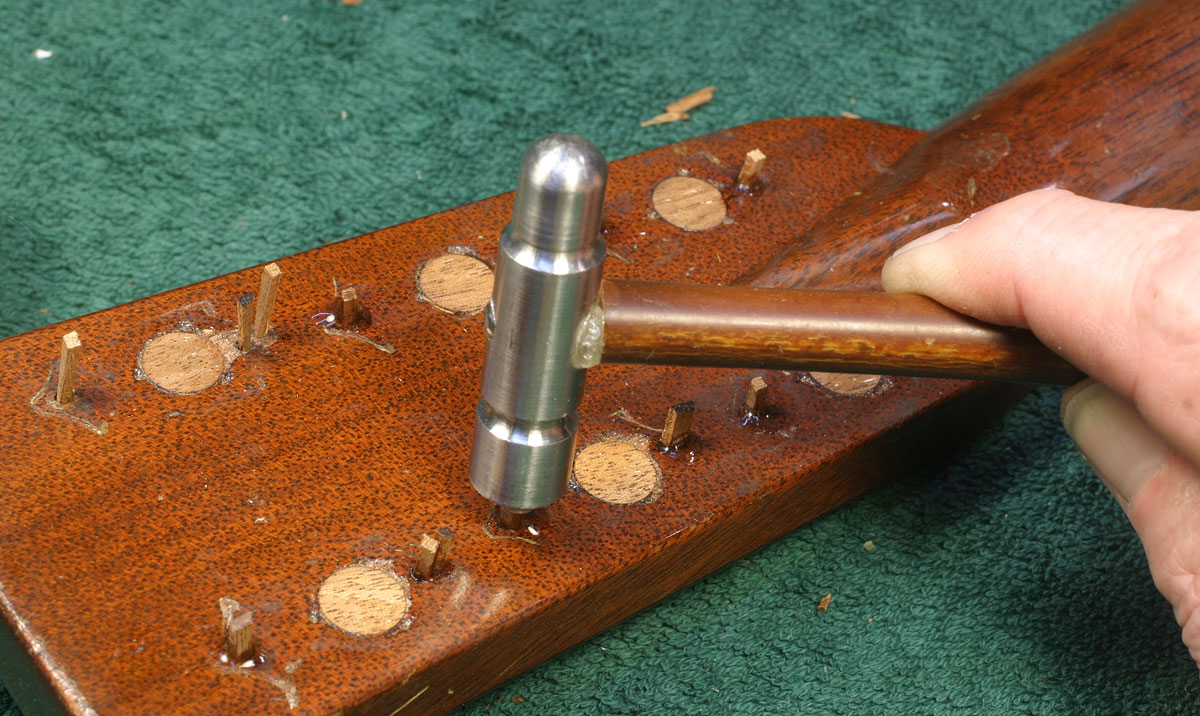
While there are only six extra tuner mounting holes, some of the originals are enlarged or stripped, so I figure on filling all the screw holes to get the best results when I mount the new tuners. You don't have to look closely to see that I've made mahogany pegs to fill the holes, and that I'm hammering them right in:
Square pegs in round holes?
Well yes, and I guess it's time for another little side trip:
Some 25 years ago I was visiting my old college roomie, Gary Stanton, who lived and studied in Bloomington, Indiana. He's a folklorist, and at the time, was involved in early local achitecture. He took me on a trip around the county and we stopped at an old house that was being systematically dismanted and studied. It was down to the framing - all hardwood with mortised and pegged joints.
When I remarked that the pegs were square an that it must have been terribly inefficient for the builders to make square holes for all those joints, he said that wasn't the way it worked. Turns out that if you drill a round hole in wood and hammer in a square peg, the corners of the peg really bite into the wood, making for solid construction that's less likely to come apart with time and shrinkage of the wood.
So I figure if it's good enough for those old houses, maybe it would be cool for this old guitar.
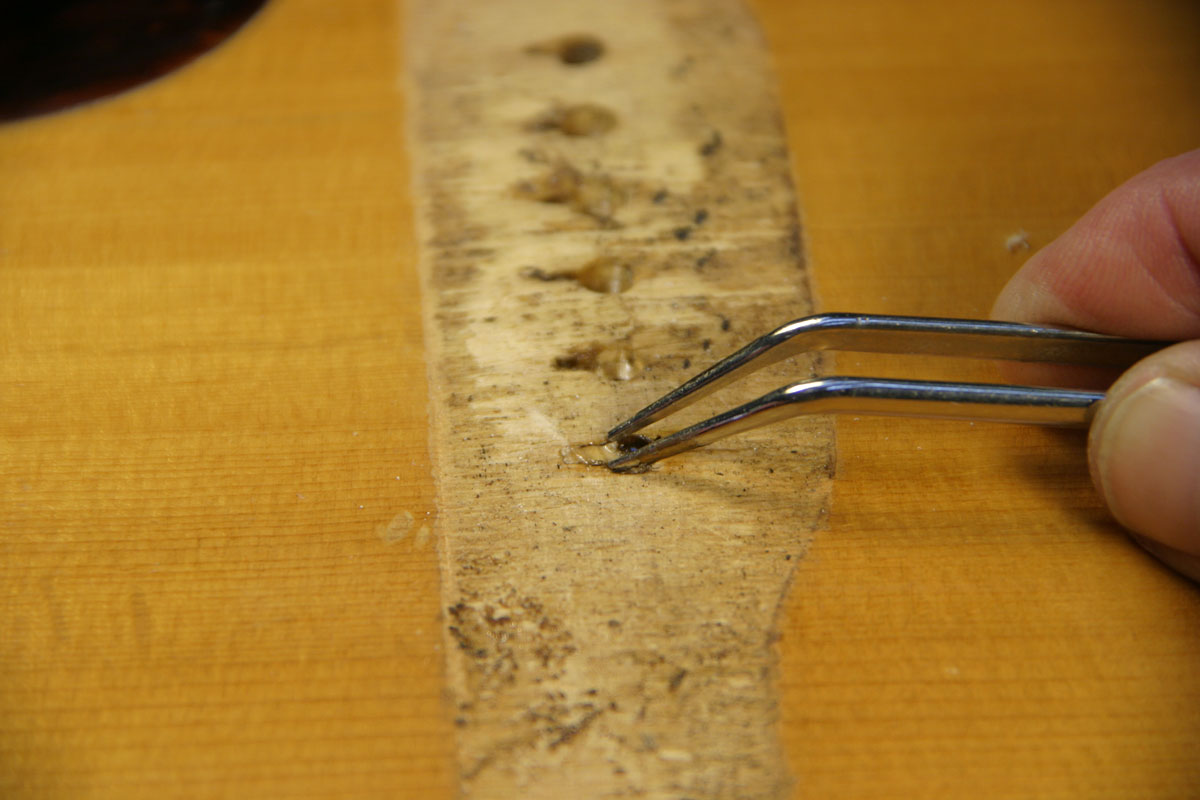
Anyhow, this kind of plug can make a good presentation - not that anybody will see it, particularly after I drill and drive screws into the holes. After wiping up the glue with some warm water and rags, I put the neck away again for a night's rest.
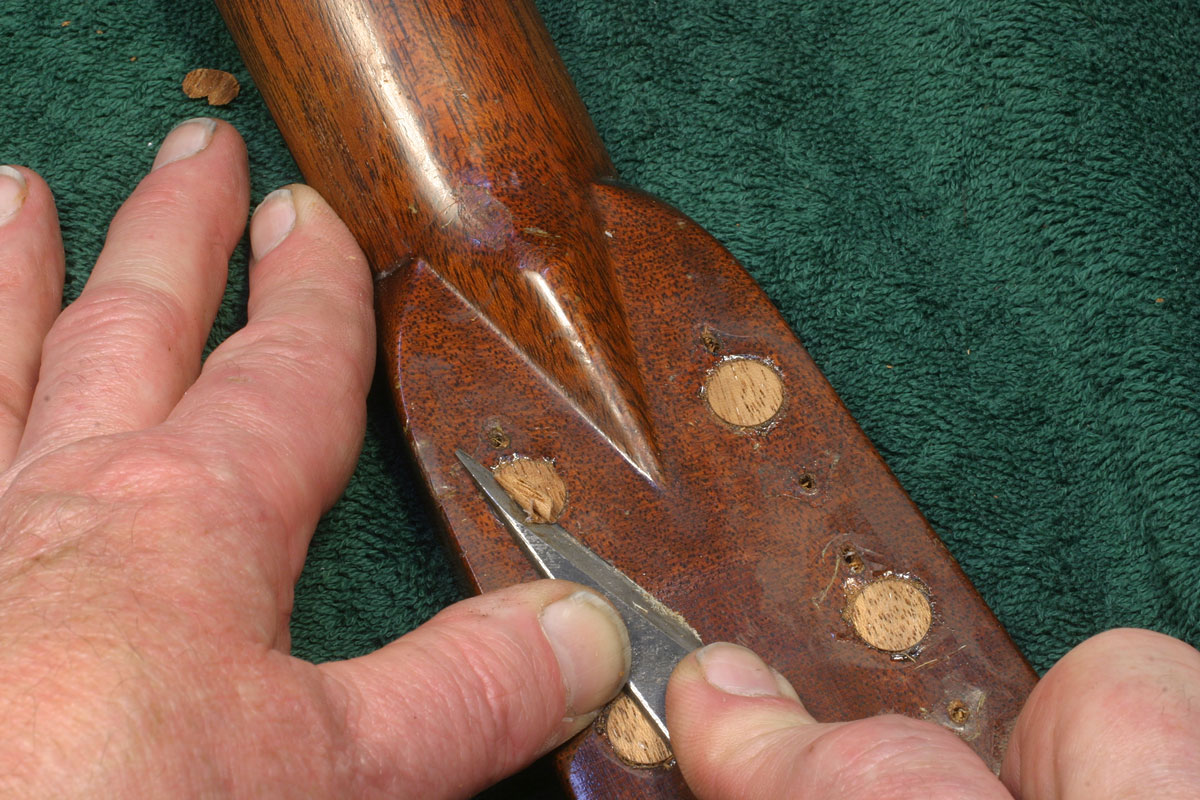
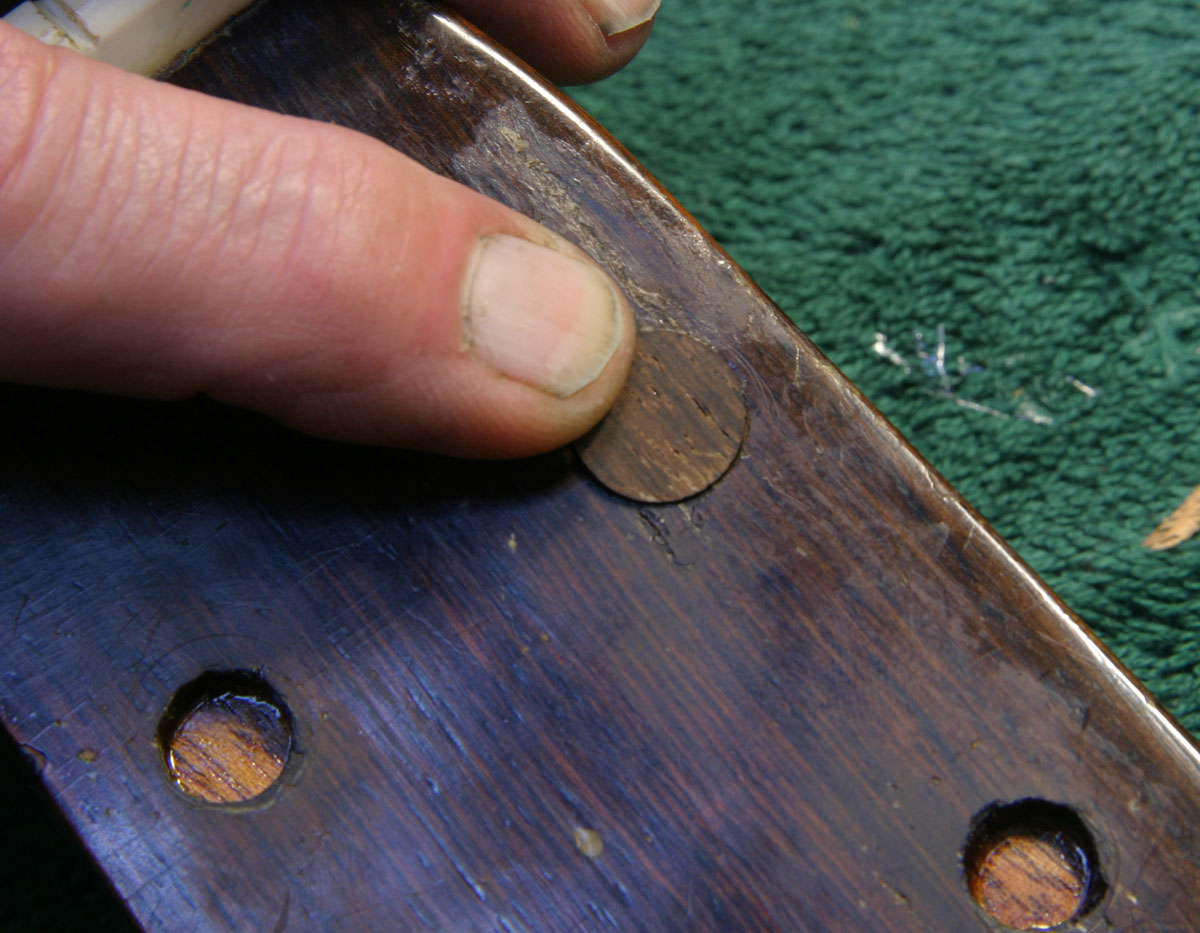
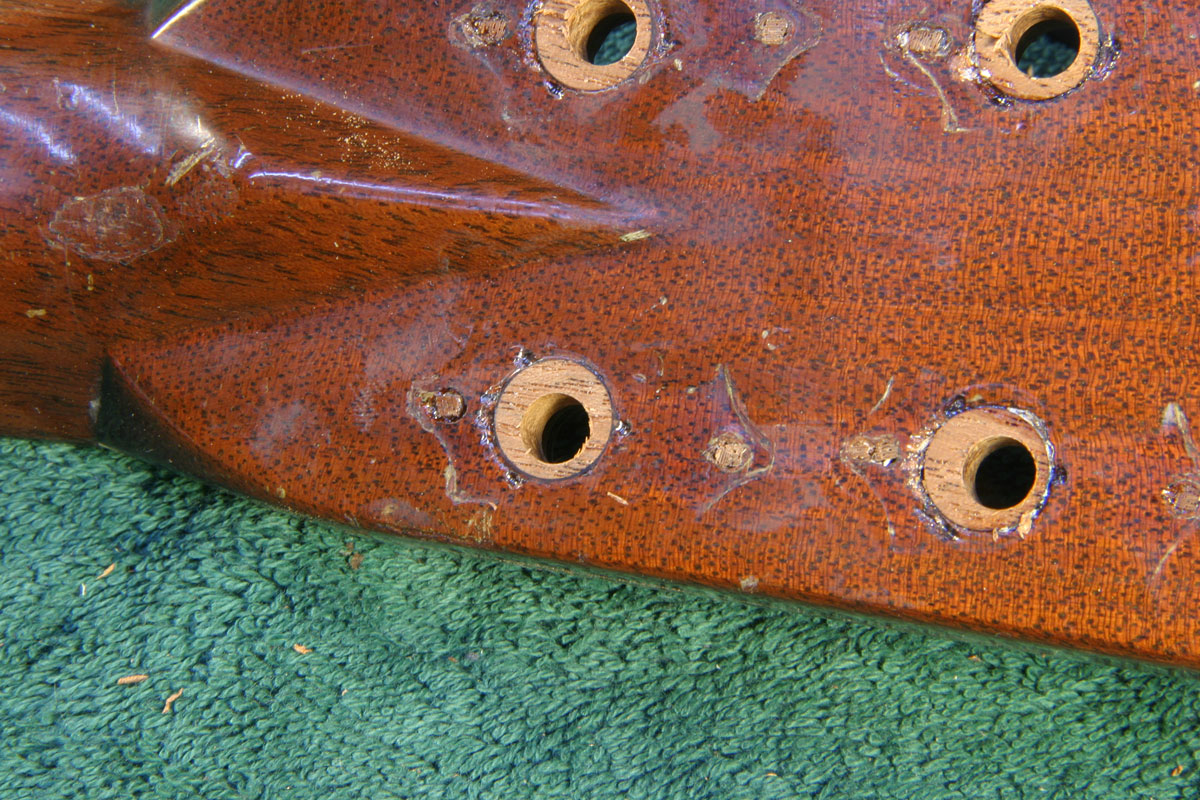
First, here's a quick look at a filled tuner screw hole from yesterday's work, after I trimmed the plugs with that thin knife:
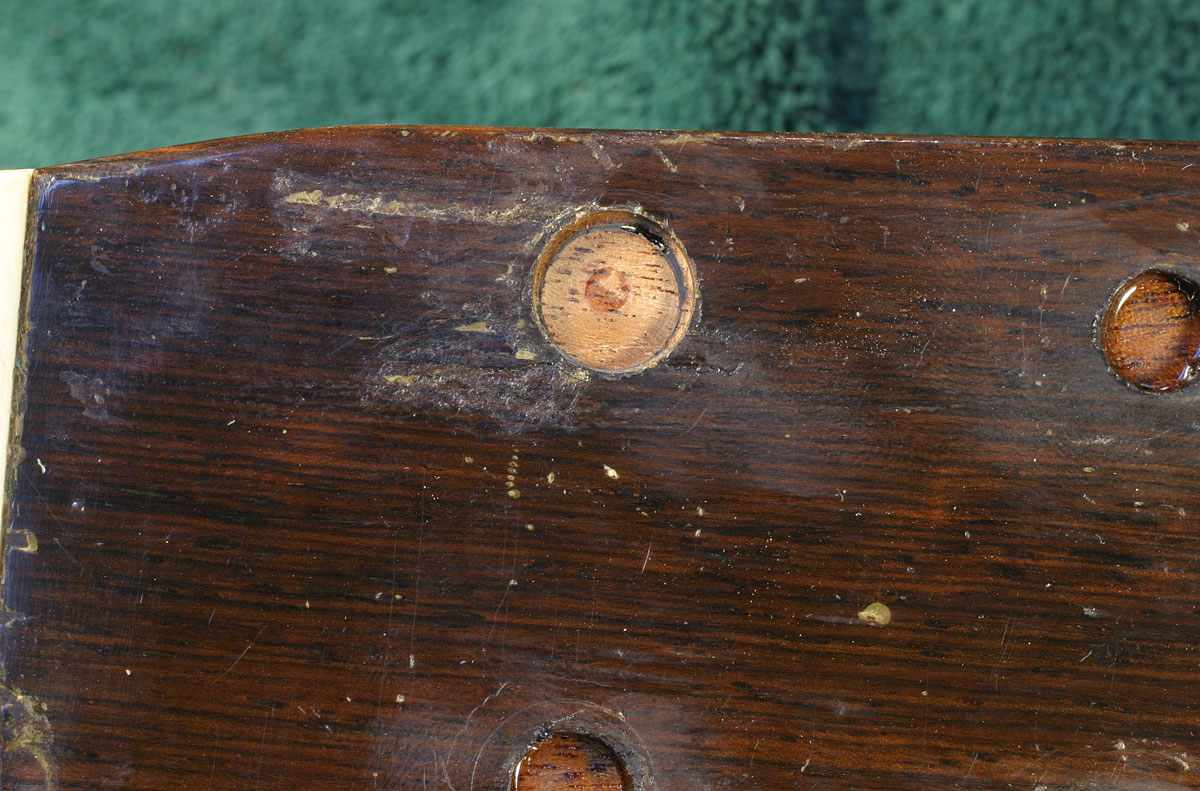
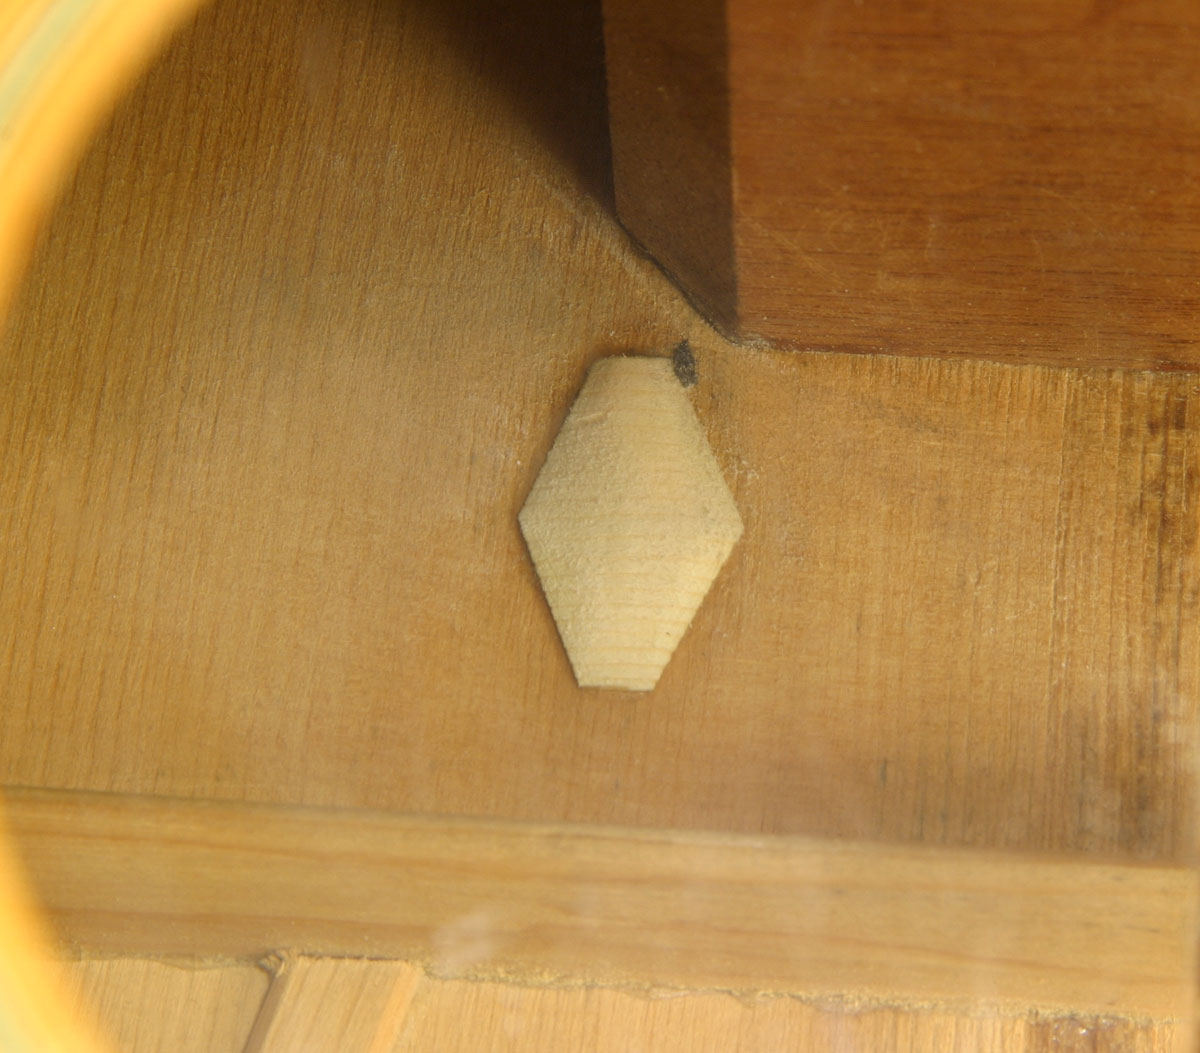
This next photo is just a reminder of the veneer damage at the sixth tuner hole:
All the holes have been filled from the back side but I need to clean up the front of the hole so I can inlay some new wood so I can redrill it for the small Waverly bushing that I'll press in place.
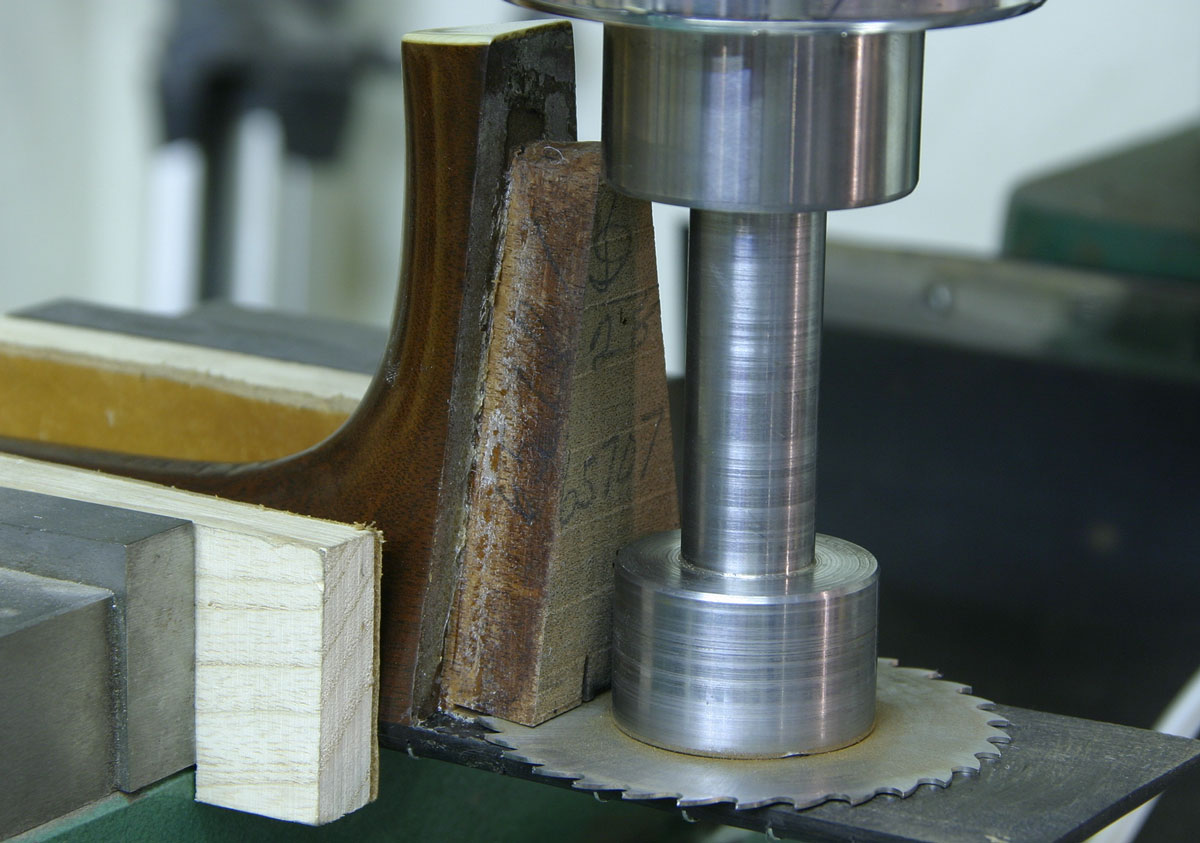
In our shop, we have a fair selection of end mills, and drill bits, reamers, and all the rest, but what I need for this job is a flat bottomed bit that will drill a hole exactly big enough to round it to a regular shape without enlarging any more than necessary. A quick bit of measuring with my digital caliper produced a maximum reading of .460" so that's the size bit I'll use to drill it out.
Except, we don't have such a bit, nor a lathe to make one, and we certainly don't want to wait to order a special tool. In fact, I really wanted to get this job done right away, so I set about making a single-use cutter. As I was doing this particular operation, the other guys in the shop noticed, and suggested I'd gone nuts, and was "showing off." Indeed, I guess I was, but we have to get some fun out of our work, don't we?
Looking through scrap hardware drawer, I couldn't find anything particularly well suited for the job, so I decided to get just a little crazy and selected a simple hex head bolt, which I mounted in a mill collet:
With a regular lathe tool clamped in the mill vise, I was able to manipulate the X-axis table screw and the quill down feed to turn the head to the .460" diameter I needed:
After some hack sawing, and filing, I had a really simple little cutter:
Now, this cutter is just mild steel, so it won't compare with the long term utility of a high speed steel drill, but it did the job very easily, and it went back into the drawer, labeled for whenever.
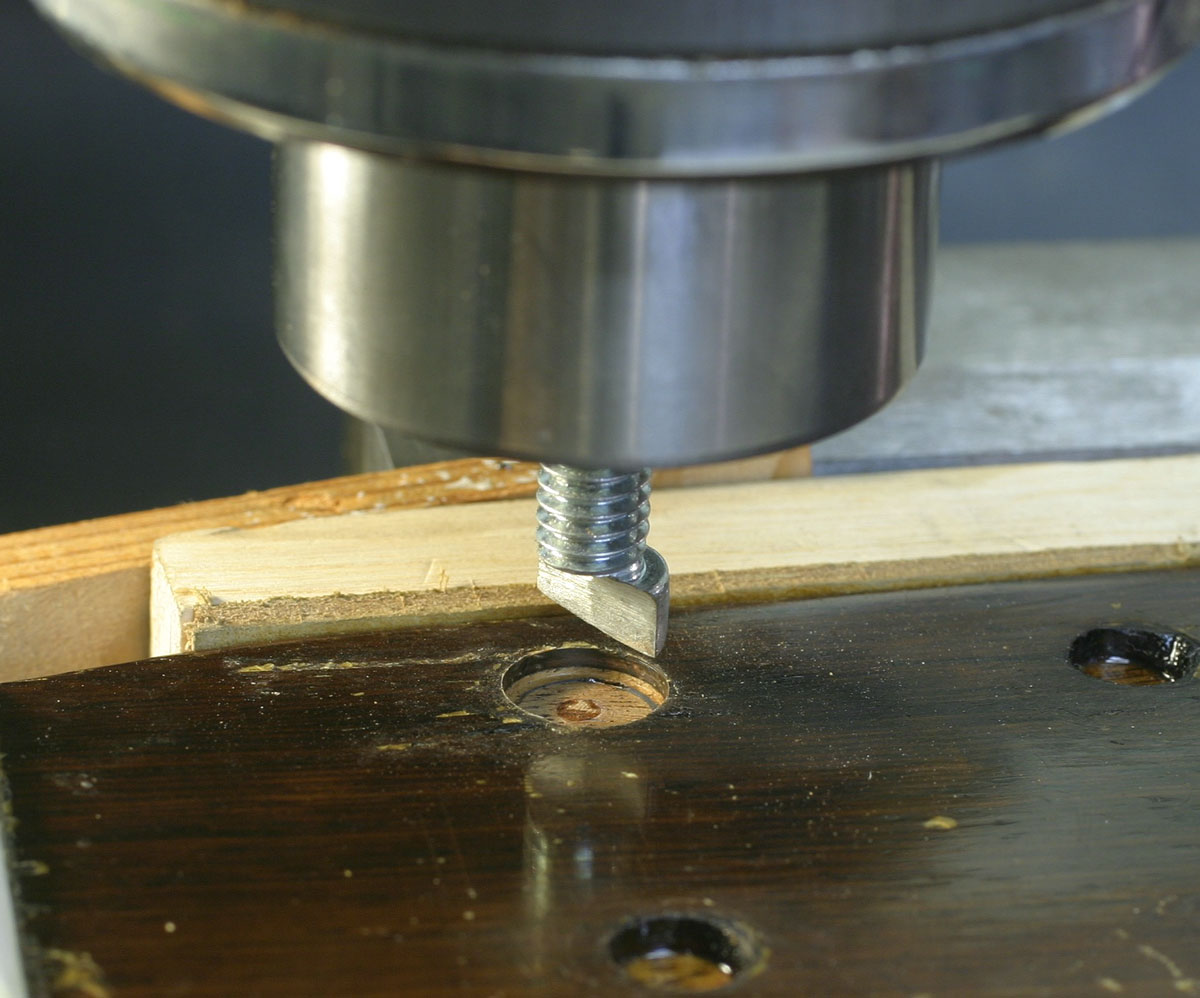
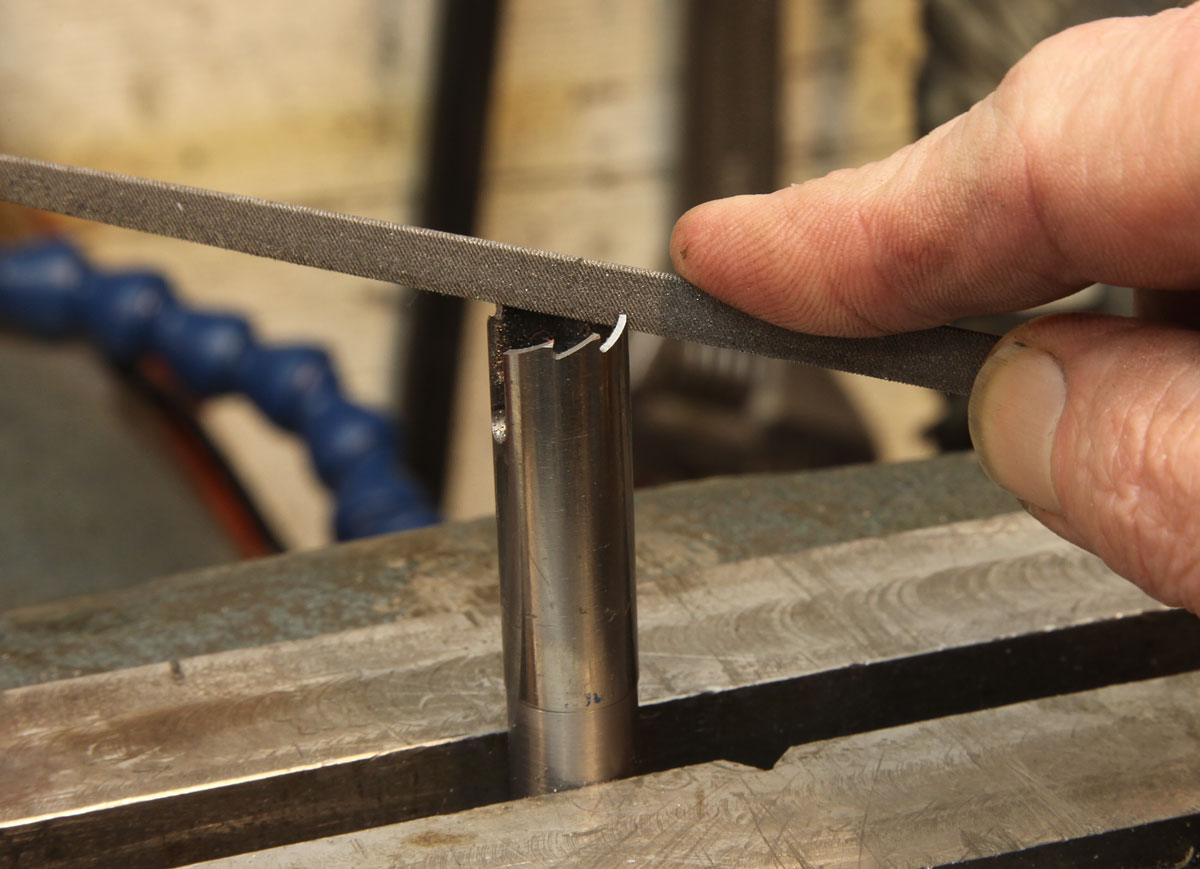
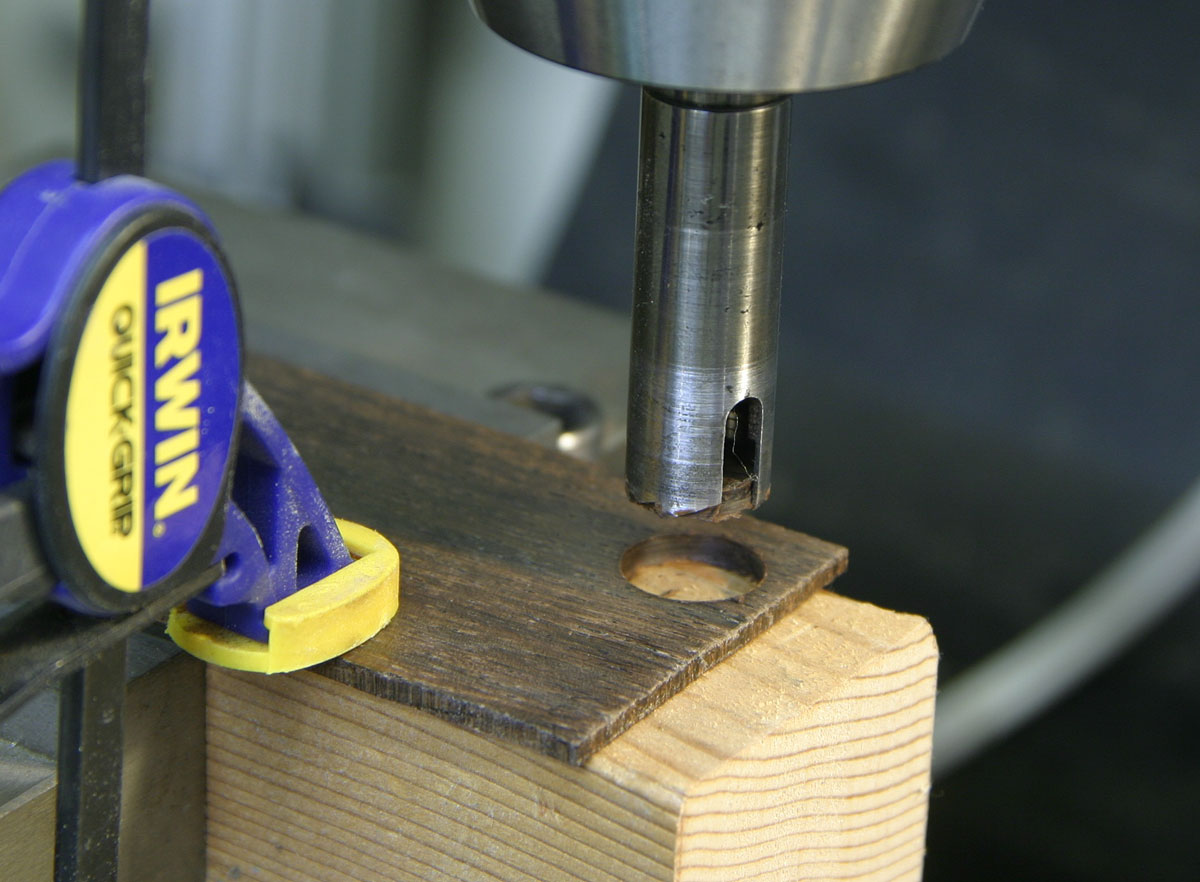
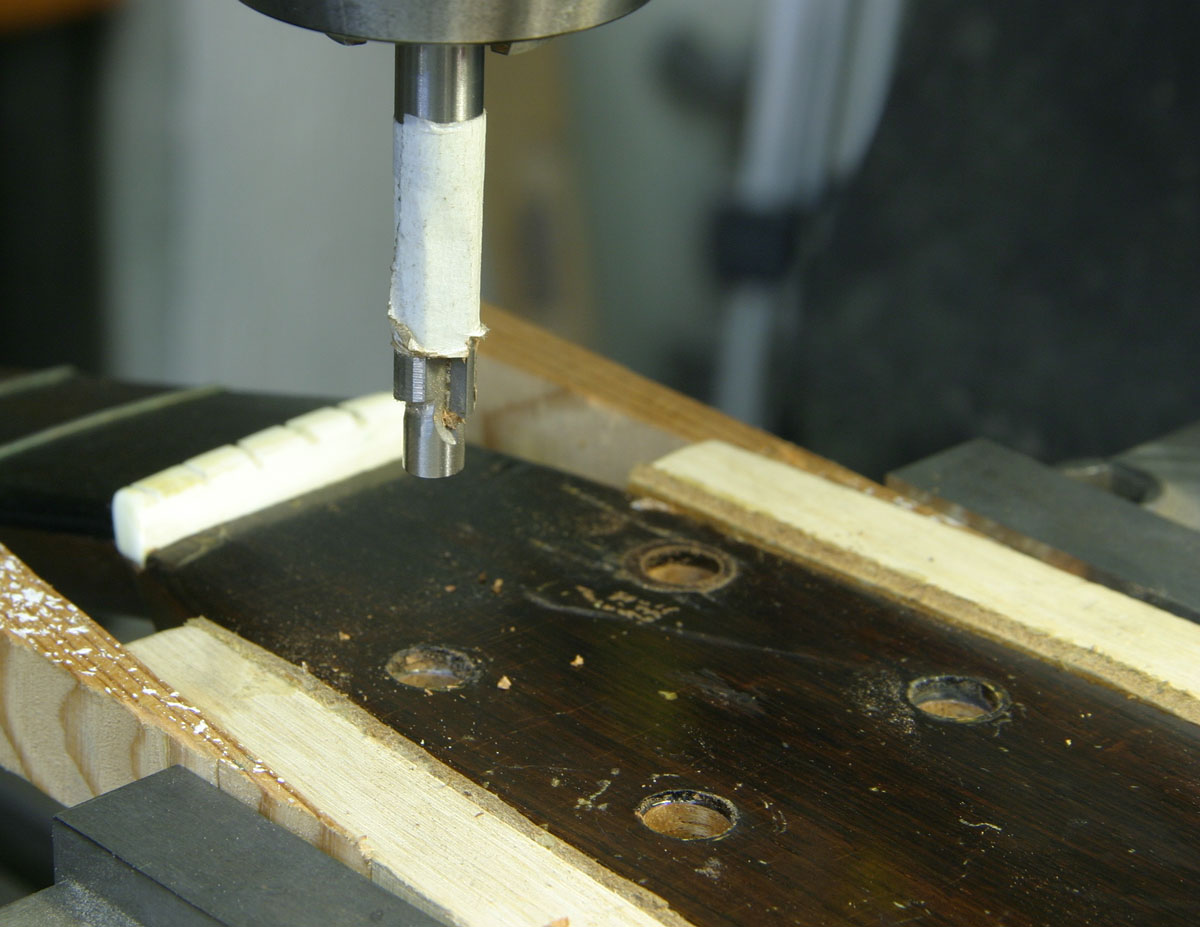
After taking pains to center the drill exactly over the damage, I plunged it very slowly, stopping my cut just after clearing out all the rosewood veneer:
Here's the result, a nice shallow flat-bottomed hole into which I can inlay a piece of matching rosewood:
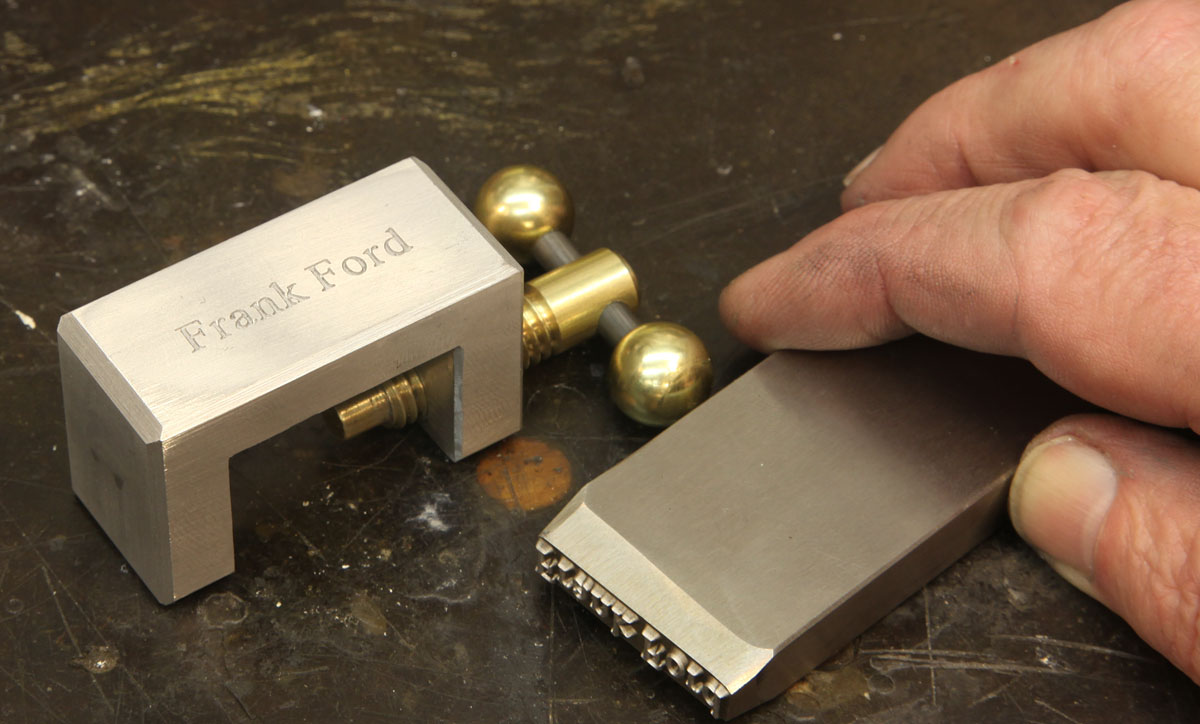
Day 8: Homework - Making a Plug Cutter
This is what I do on my "days off." I make tools and fixtures in the never ending process of learning to be a machinist.
Today's project is a plug cutter that will make a precise .460" diameter disc to inlay into the sixth string tuner hole I just cleaned up.
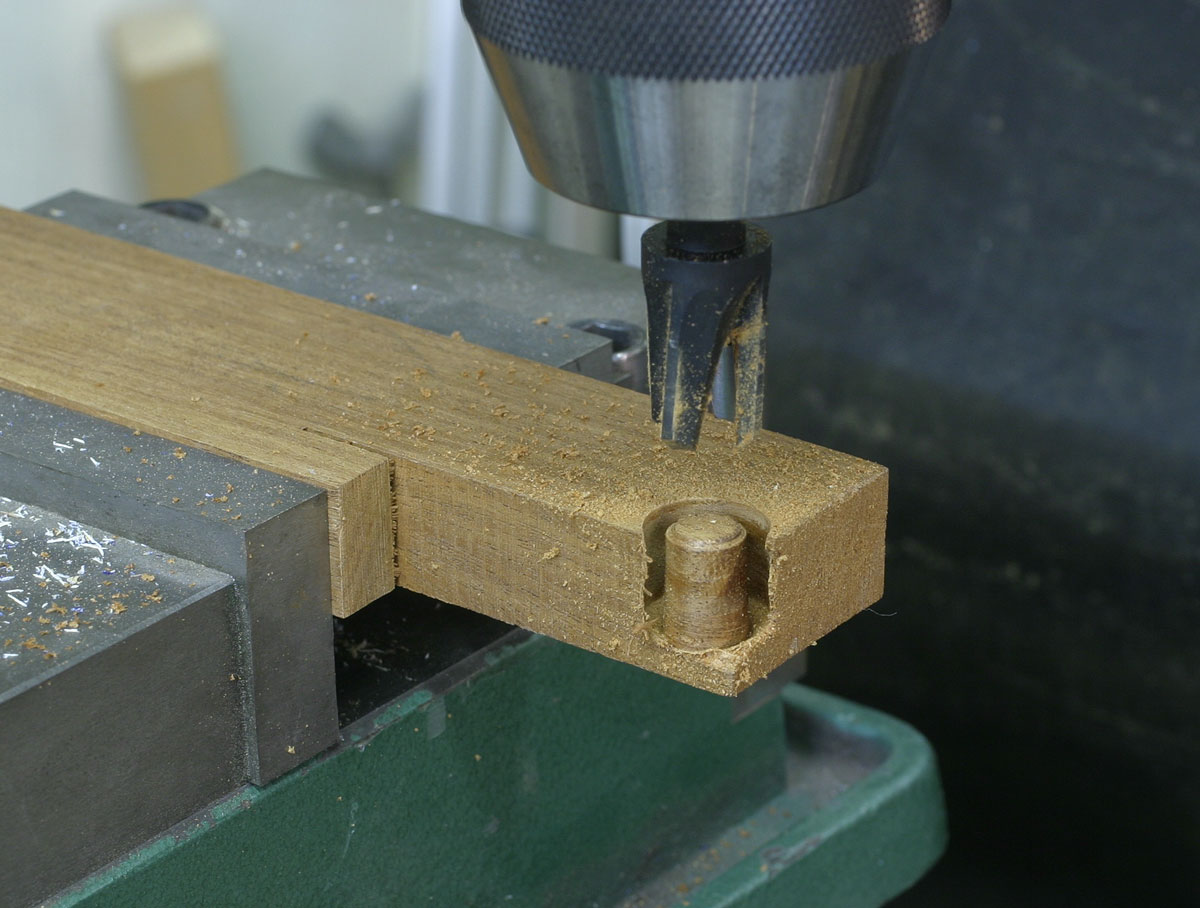
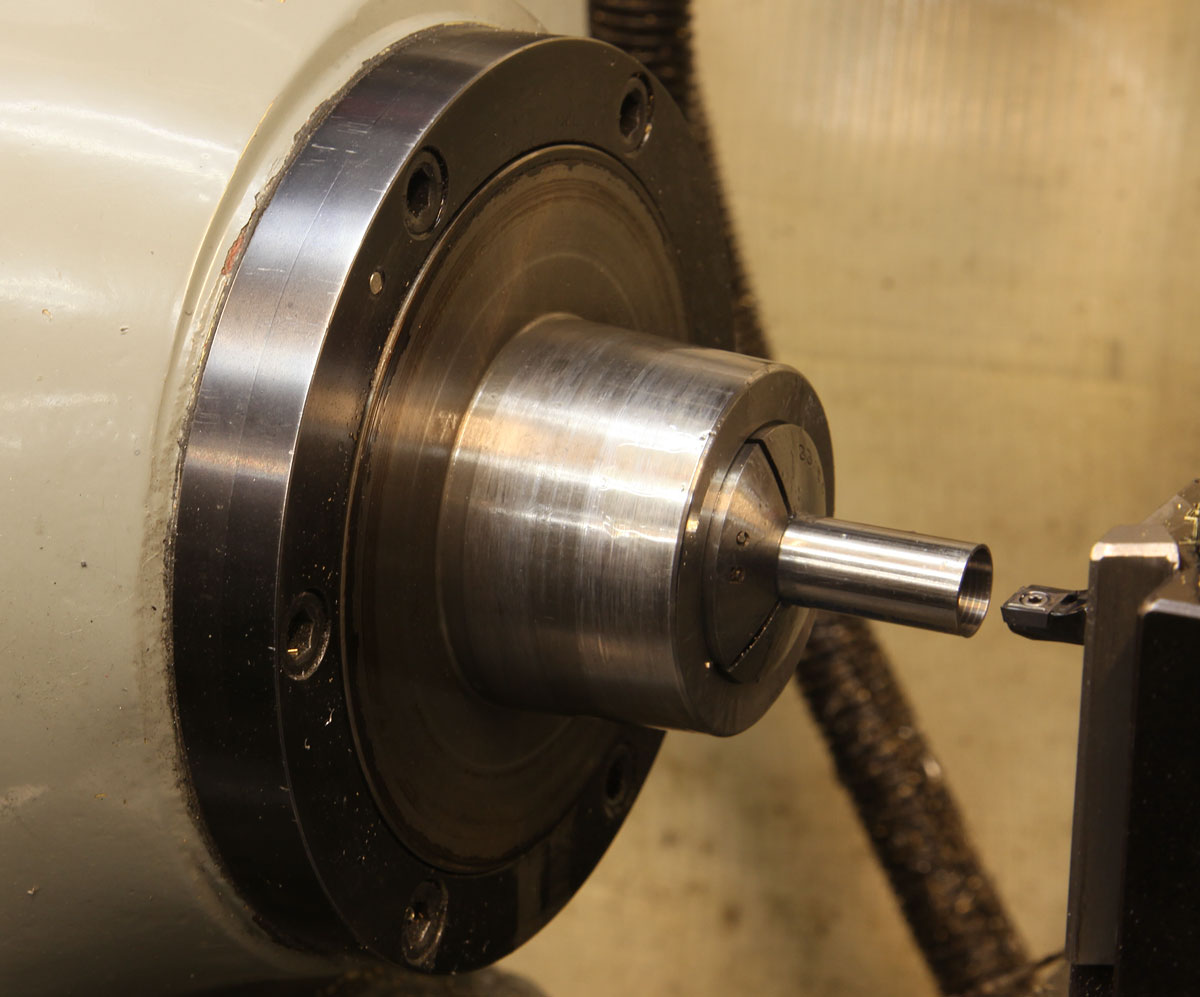
First, I drilled and bored the end of a short 1/2" diameter O-1 tool steel rod:
O-1 is a wonderful material for making woodworking tools. It machines nicely in its annealed state, and it can be hardened in a home shop easily to make long lasting cutting tools. I make some knives, chisels, drill bits and other cutters with it.
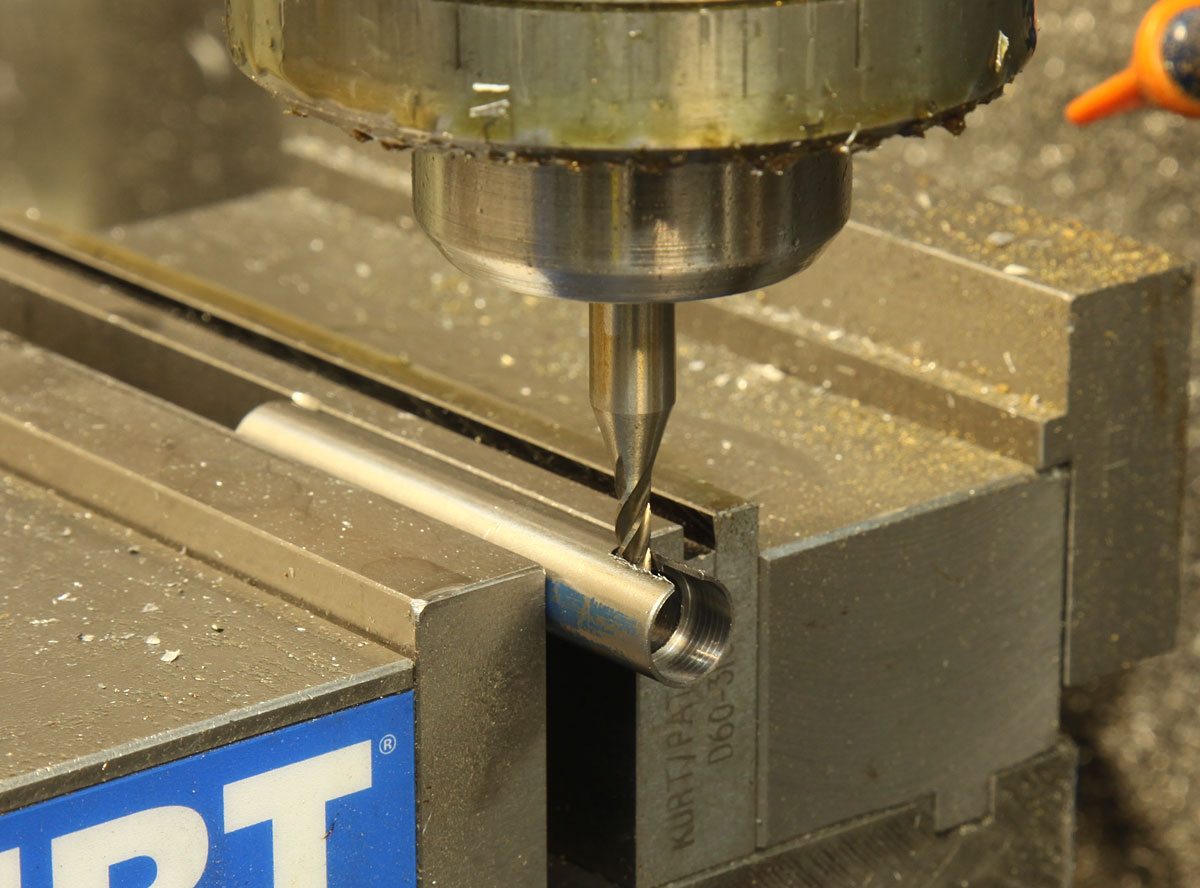
On the milling machine, I slotted the turned end of the rod so that when I got a disc cut, I could push it back out with a screwdriver or other blade>
Then, working strictly by eye and hand, I filed a series of sharp teeth in the end of my new little plug cutter:
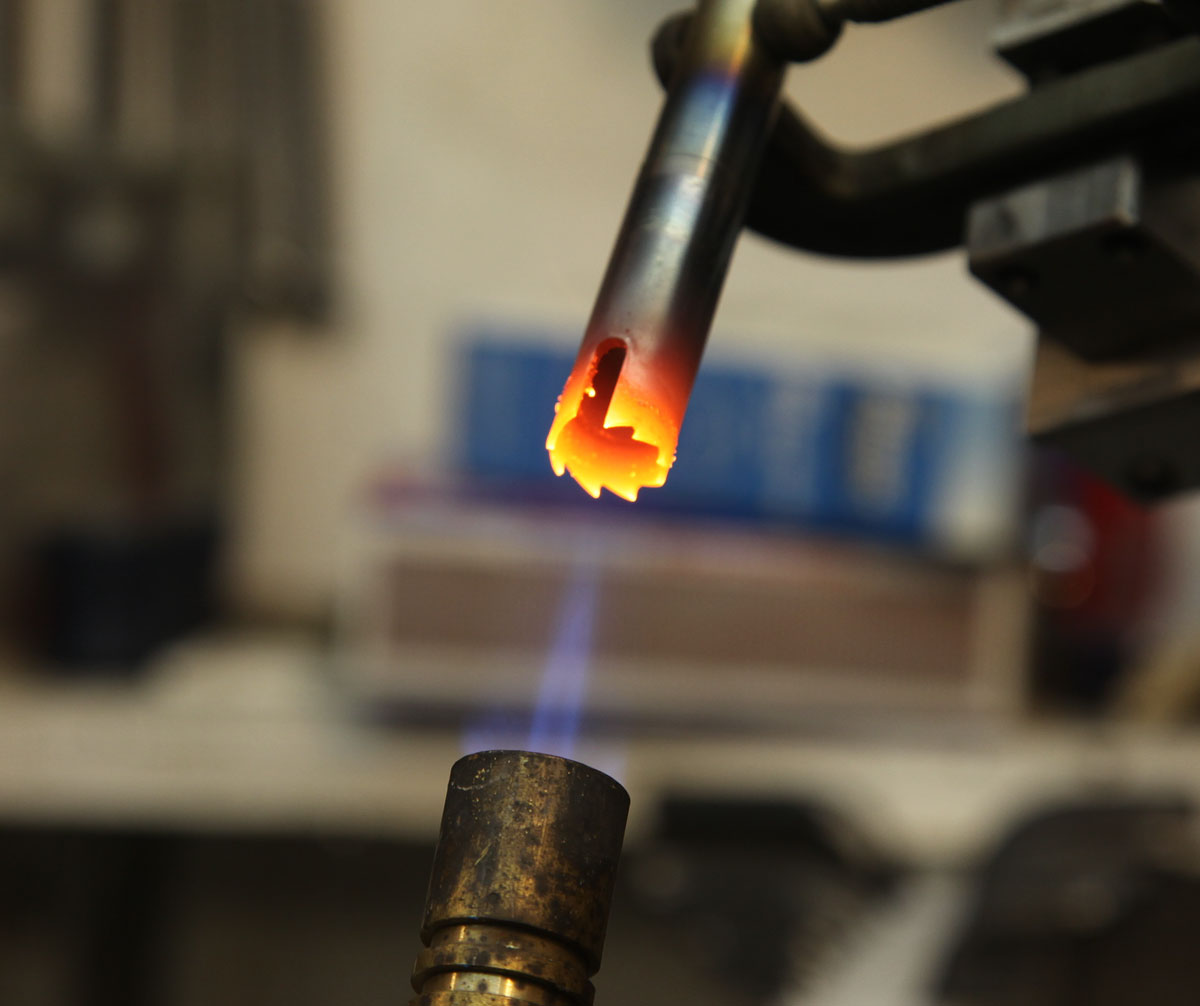
Here's the simple hardening process I use. I get the tool about as hot as I can with a regular propane torch:
If I'm unsure about the temperature, I test the heated section with a magnet. When this steel is at about the right temperature to harden, it suddenly becomes nonmagnetic. You'll notice that I'm only heating the business end of the cutter - there's no need for any part to be hardened except the teeth that do the actuall cutting.
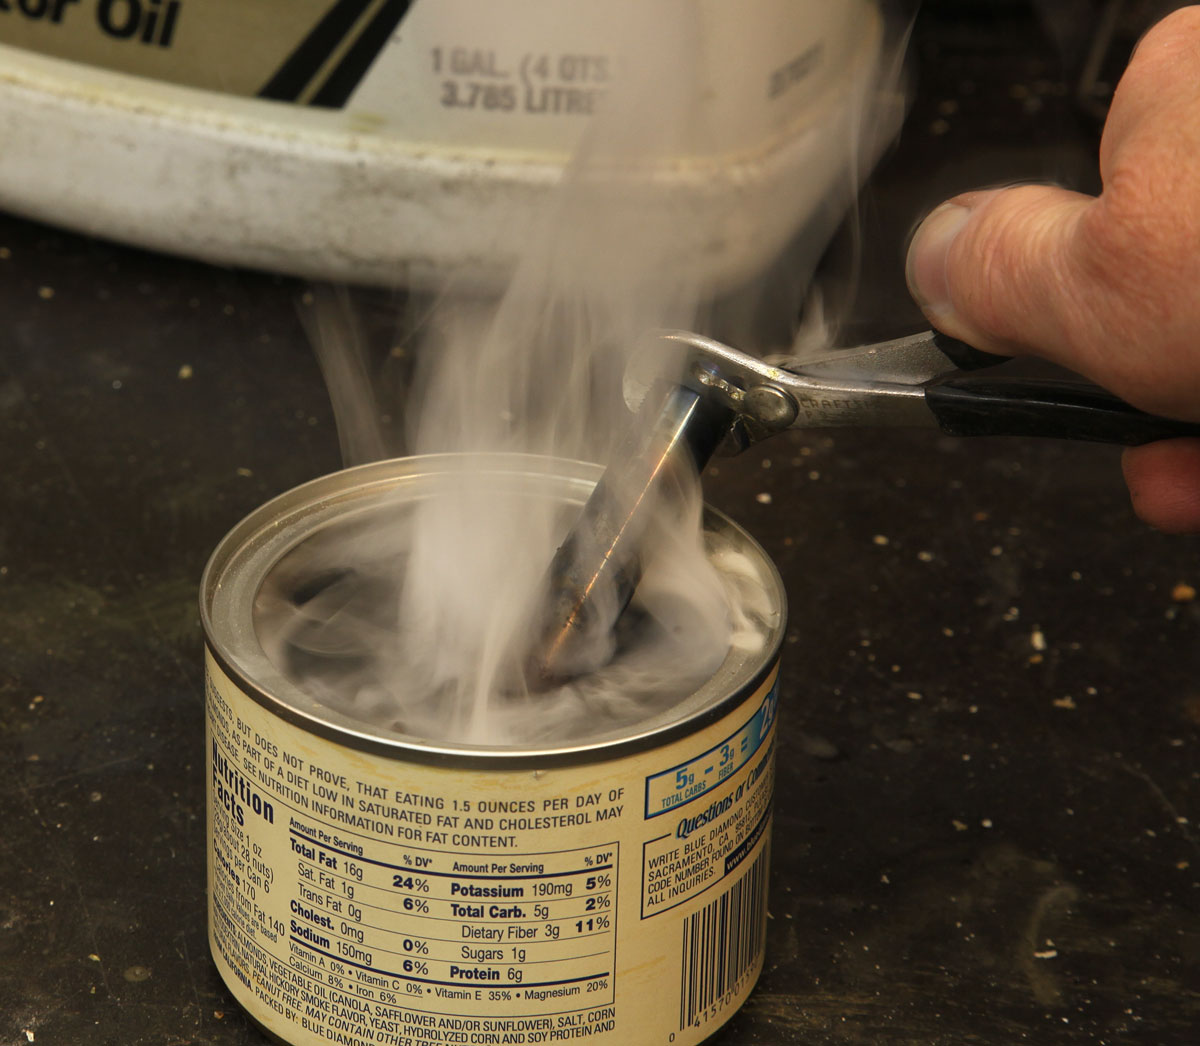
O-1 steel is so named because in the hardening process, the ideal quenching medium is oil. So, I dunk the red-hot piece into a can of used motor oil (stinky - you bet) and swish it around until it cools down some:
As it comes out of the oil bath, the steel is what's known as "file hard," meaning it's about as hard as it can ever get, like a file. I test it with a file, which won't even scratch the surface, so I know it's hard. Like a file, any steel in this condition is very brittle - too brittle for most uses because it could break if dropped, or even while it's cutting wood.
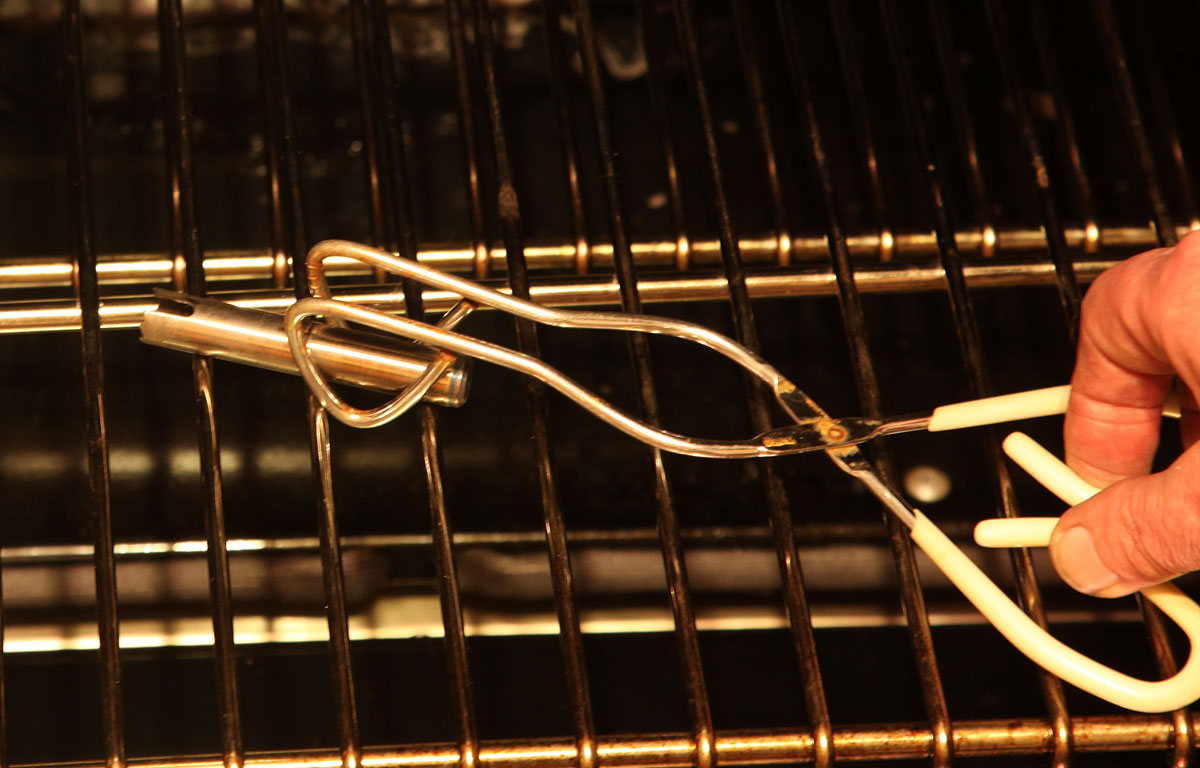
I need to temper most of the wood cutting tools, and my kitchen oven is just the place to do that:
An hour in the oven at 400 degrees Fahrenheit, and I've drawn the hardness back to a point where the tool is still hard for lots of repetitive use, yet tough enough to avoid cracking as it's used. From here, the cutter teeth get a little touch up honing with a carborundum slip or diamond pocket hone, and it's ready for tomorrow's adventure.
If it seems I'm going overboard with this effort, then I ask you, If a 1937 D-28 doesn't deserve the effort which guitar does?

Day 9: Inlaying the Oversize Hole
I spent a bit of time rummaging through my assortment of Brazilian rosewood scraps to find one that had similar grain and color as the original peghead veneer. To make sure I'd have a decent match, I applied a bit of finish to my piece to bring out the color:
Over on t he wood mill, I used my new little plug cutter to make a thin disc for the inlay:
With no set to the teeth, and precious little chip clearance, I made sure to "peck" lots of times as I drilled the veneer, stopping to clear the gummy rosewood dust out of the cutter teeth. Once the cutter broke through, I used the little access slot to push out the disc.
Into the hole went the disc, with a bit of glue:
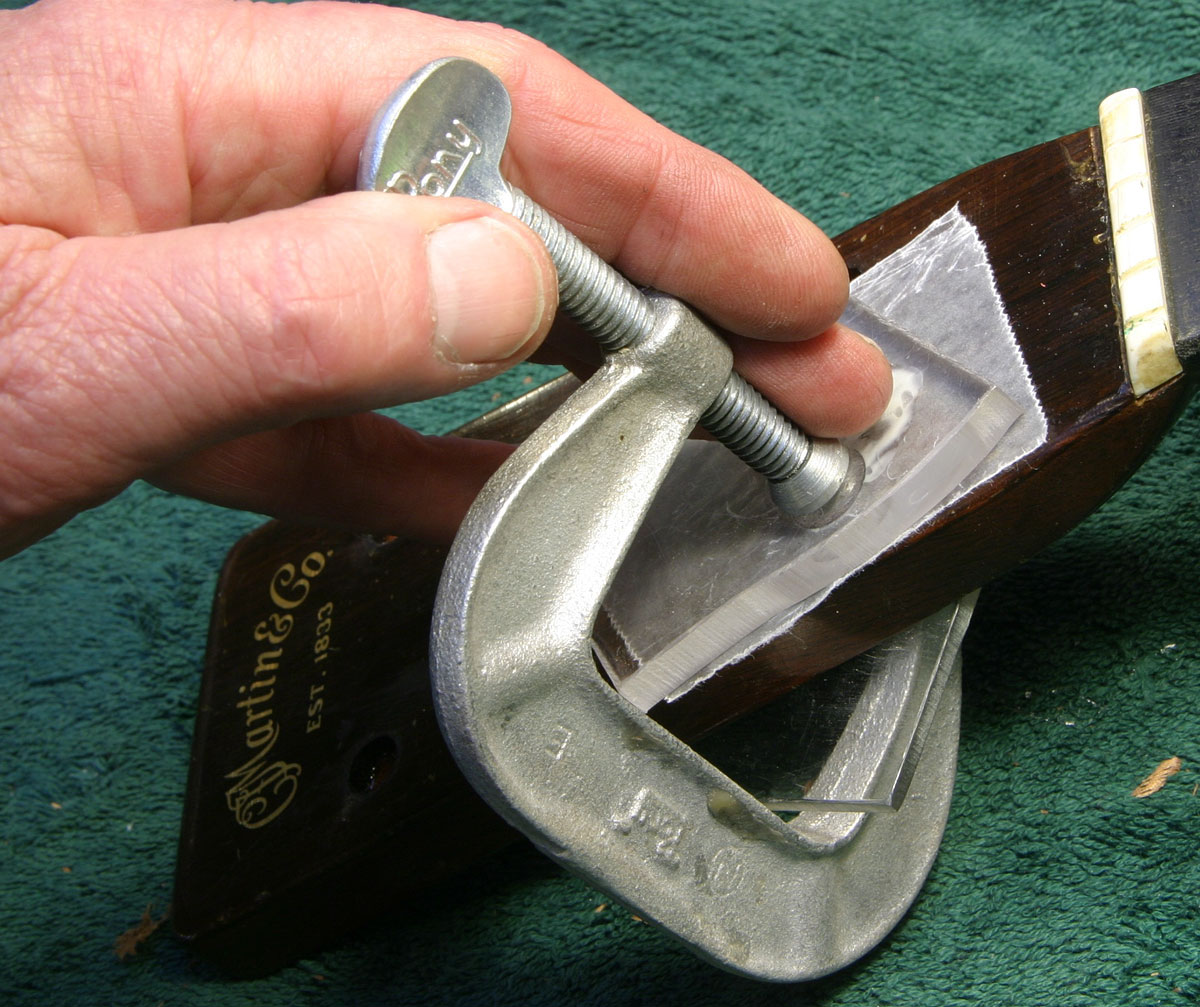
And, after clamping up with a flat plate and waxed paper on top, the neck was ready for another overnight nap:
Using steam to release the neck dovetail glue joint has its hazards. I've already talked about the obvious effects of steam on finish, but, as the steam fills the dovetail cavity, it often also separates the glue joint between the spruce top and the neck block. That's what happened with this guitar, so before I even think about doing more on the neck resetting process, I attend to that bit of business.

Fixing it was simple enough. After warming the wood with a hair dryer for a few minutes to raise its temperature to about 90 degrees, I worked some hot hide glue into the joint with a broad palette knife:
I mix my glue weeks in advance, and keep it in these little hot sauce cups - like Jell-O in the refrigerator. When I need to use hot hide glue, I nuke it in the microwave, float it in a cup of hot water, and I'm good to go. Heating the wood gives me a little extra time to clamp up the joint before the glue starts to return to its gel state.
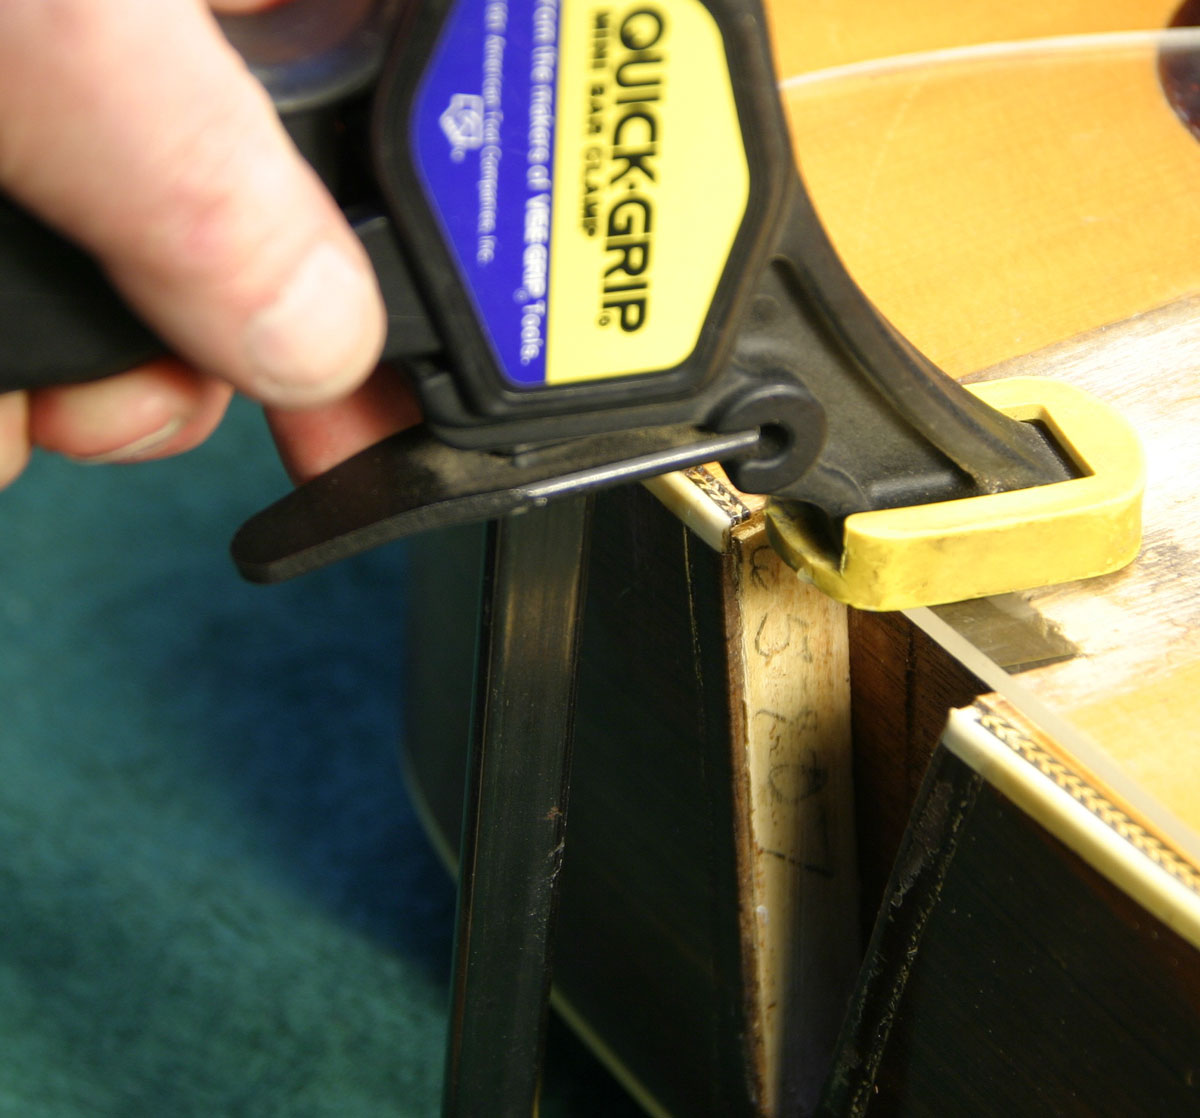
Clamps must be tight before the glue gels to get good adhesion and squeeze-out. One of these "Quick-Grip" clmaps is just the thing - fast and easy:
As always, I try to control the clamping pressure by using an appropriate block or pad over the joint - in this case a sheet of acrylic helps distribute the pressure and maintain flatness. With very few exceptions, I leave all wood gluing operation under clamps to dry for a minimum of 12 hours to make sure I get the strongest joint possible.
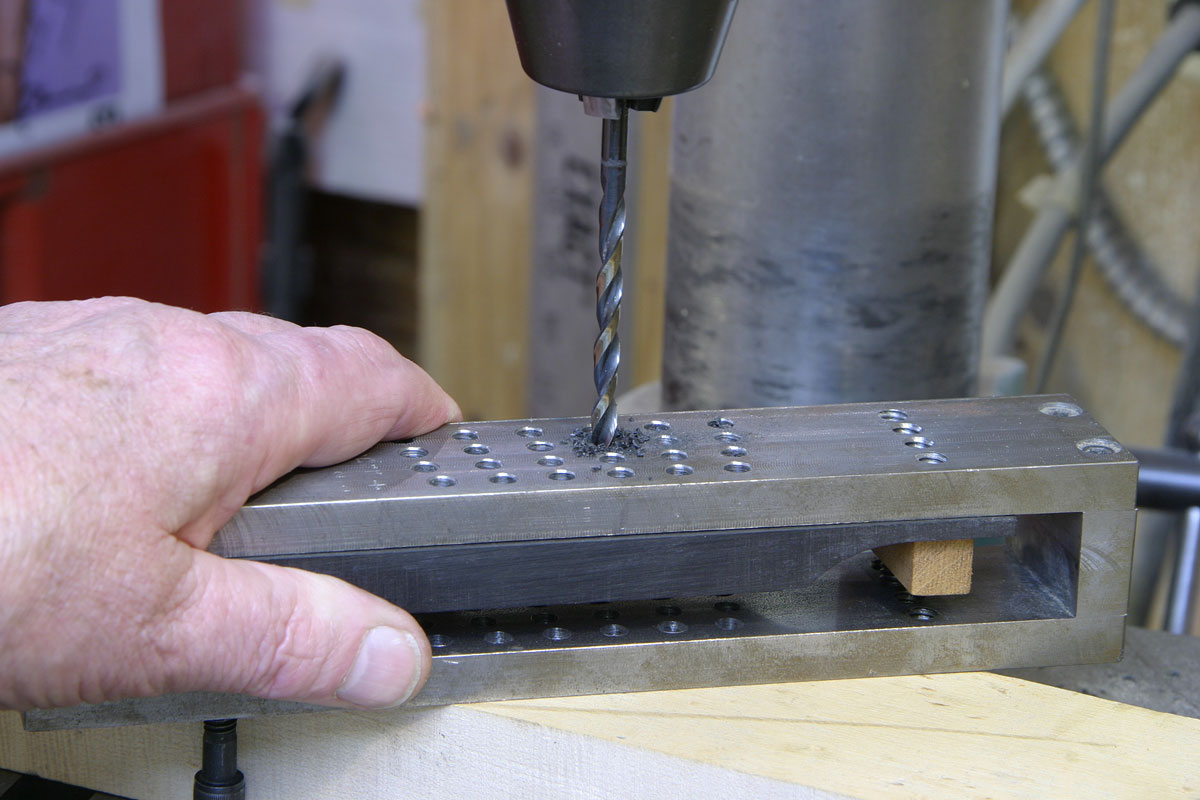
Day 10: Locating and drilling tuner holes
Today's little adventure involves a really swell set of precision machined steel rods, called "plug gages." (Lots of folks use "guage" but it seems that most machinists prefer "gage" when referring to sets like this.) These gage sets are used for measuring the diameter of small holes, and they are quite accurate - this set works from .251" to .500" in .001" increments.
Five of the original holes in the peghead veneer are still very close to their original diameters, and, after checking the peghead of another 1937 D-28 that's in the shop for repair, I determined that their locations are within spec. But, I wanted to be precise in redrilling through the plugged peghead as I could, so I set about being as accurate as I could. My new drill hole would be 1/4" - much smaller than the holes in the veneer - I couldn't count on locating the hole accurately by eyeball, so I got out the plug gages, and for each hole, I selected the rod that fit tightly:
All five holes were slightly different, so I used five different rods.
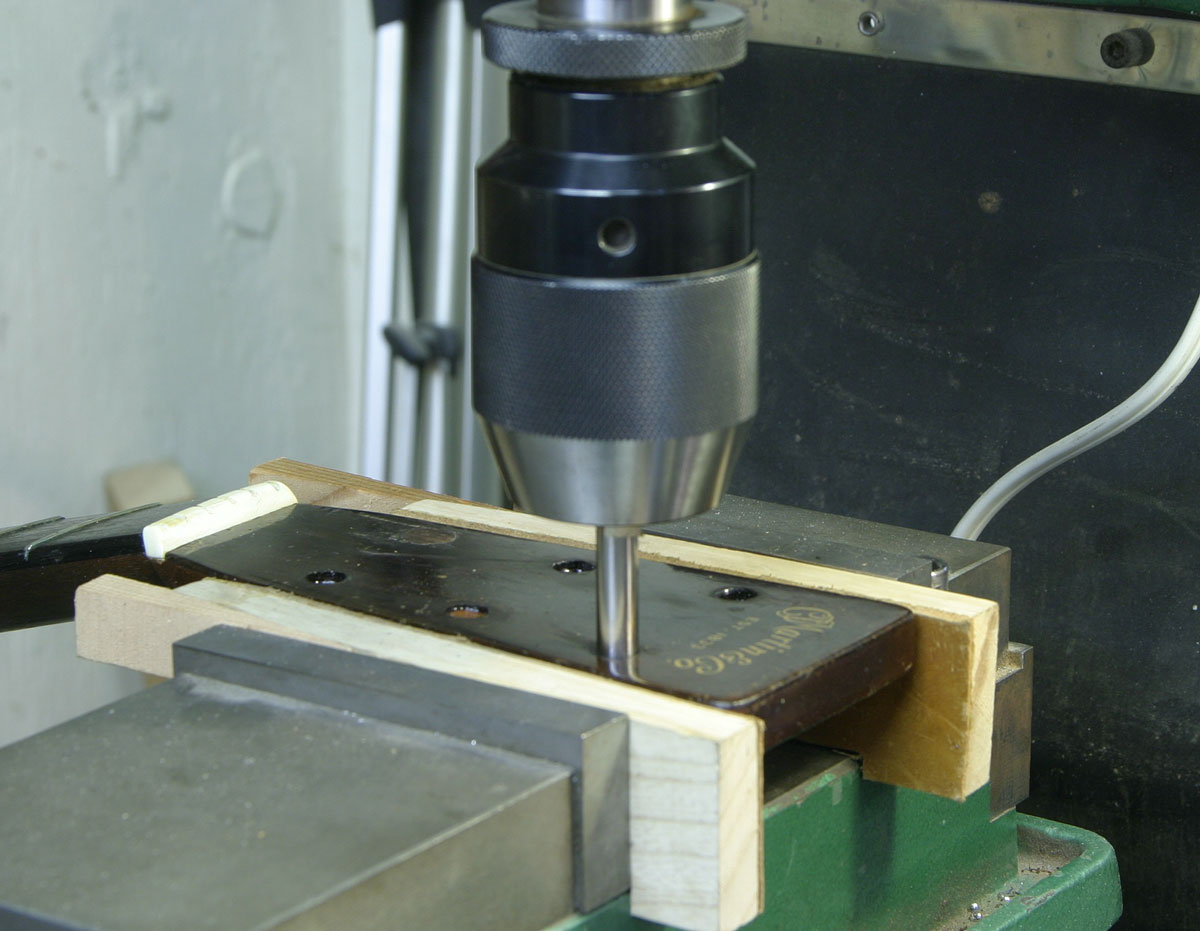
Back to the wood mill. After clamping the peghead parallel to the mill table, I locate each hole by using the appropriate plug gage, and moving the table X- and Y- axis cranks to get the plug centered so that I could bring the chuck downward, and the pin would press right into the hole with ease:
Then, leaving the table adjustments set, I raised the quill, exchanged the gage pin for a 1/4" drill bit, and drilled through the plugged peghead hole:
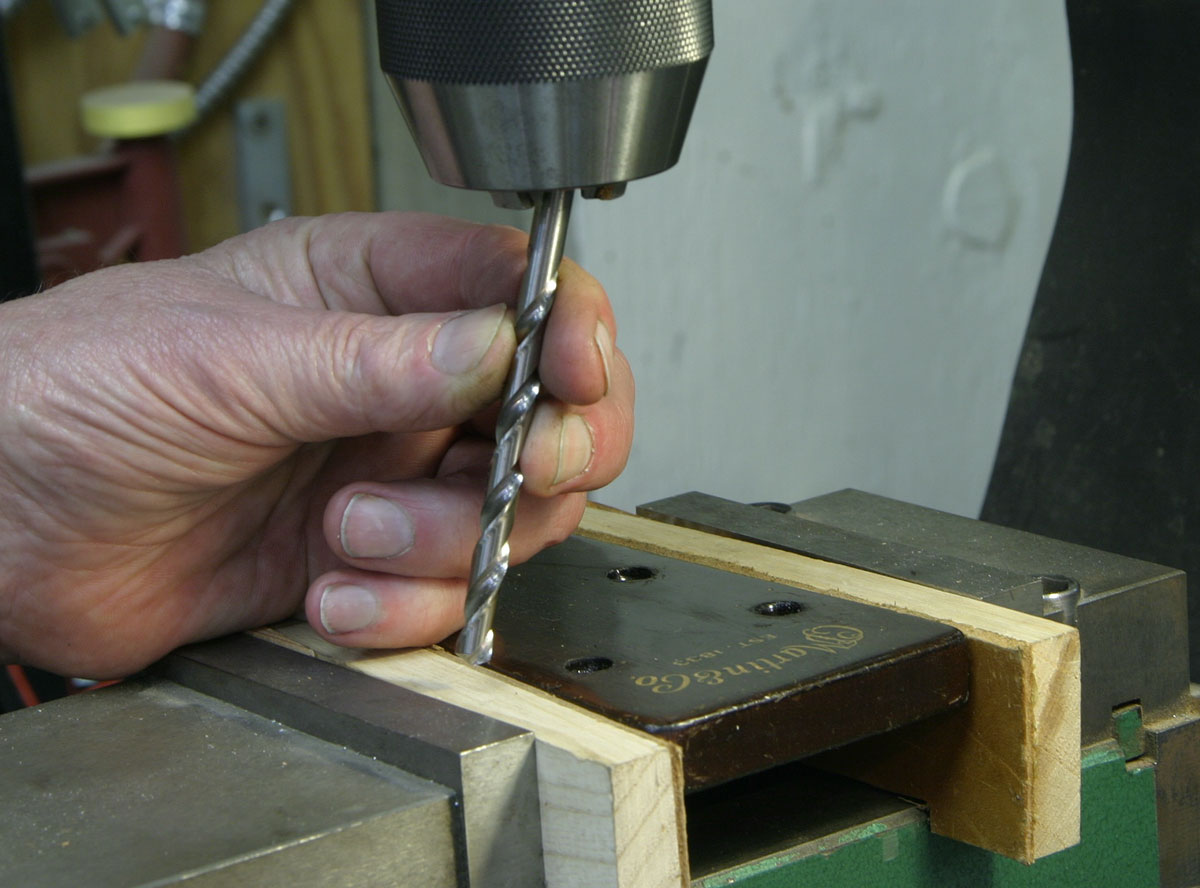
Here's the first one - dead center:
I did the remaining four holes the same way. When I got to the sixth string hole, I spent some time measuring and marking center, using the other holes as data points. Then I drilled through with the 1/4" bit.
After all the holes were drilled, I used the official Stewart MacDonald counterbore to drill for the Waverly tuner press-in bushings:
Check out my high-tech depth gauge - a turn of low-tack masking tape.
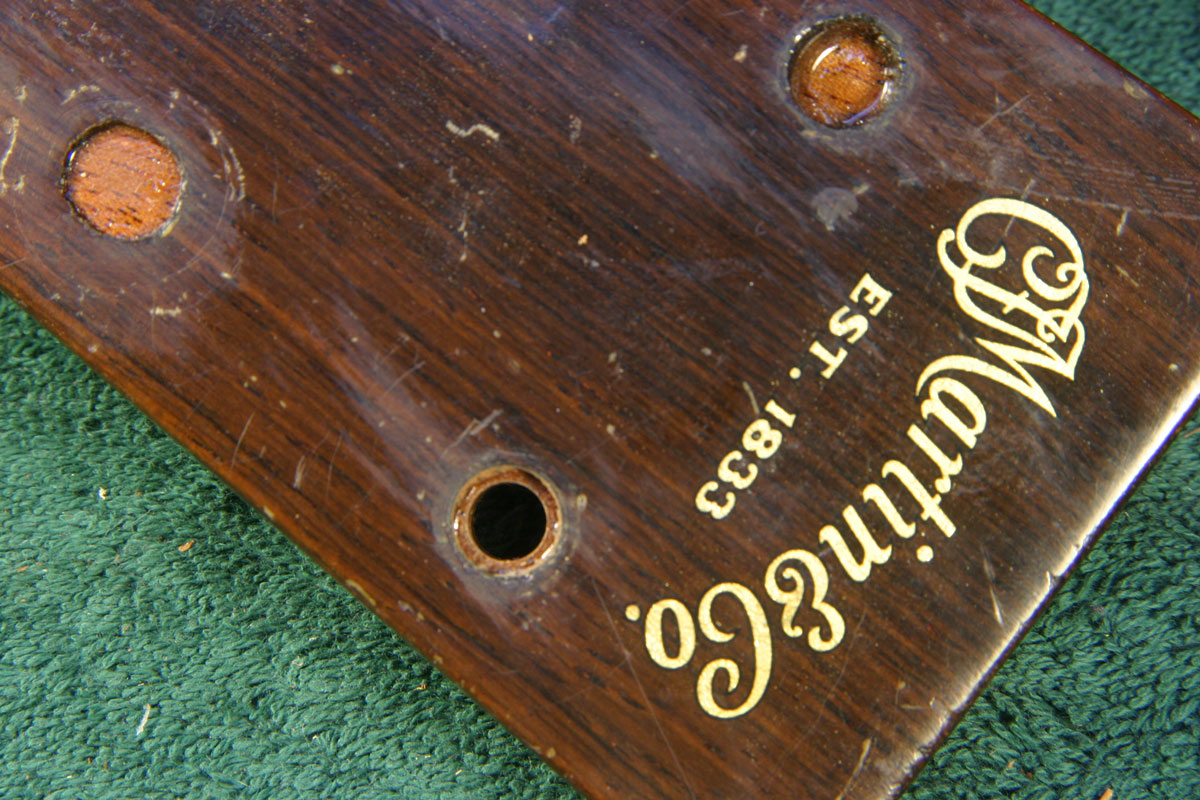
Now that the peghead is all set for its new gears, take a look at the back side:
Seems the oversize holes weren't exactly concentric with the originals. No matter - the back plates of the new tuners will cover that:
The footprint of the new Waverly tuners is just a tiny bit different from the original Grovers, but they are so close that nobody much complains:
Once the peghead drilling and counterboring were complete, it was time to start drop-filling the lacquer and touchining up the reaired damage at the sixth string tuner hole. My goal is to avoid changing the appearance of this fine old guitar, so I set about working only in that restricted area.
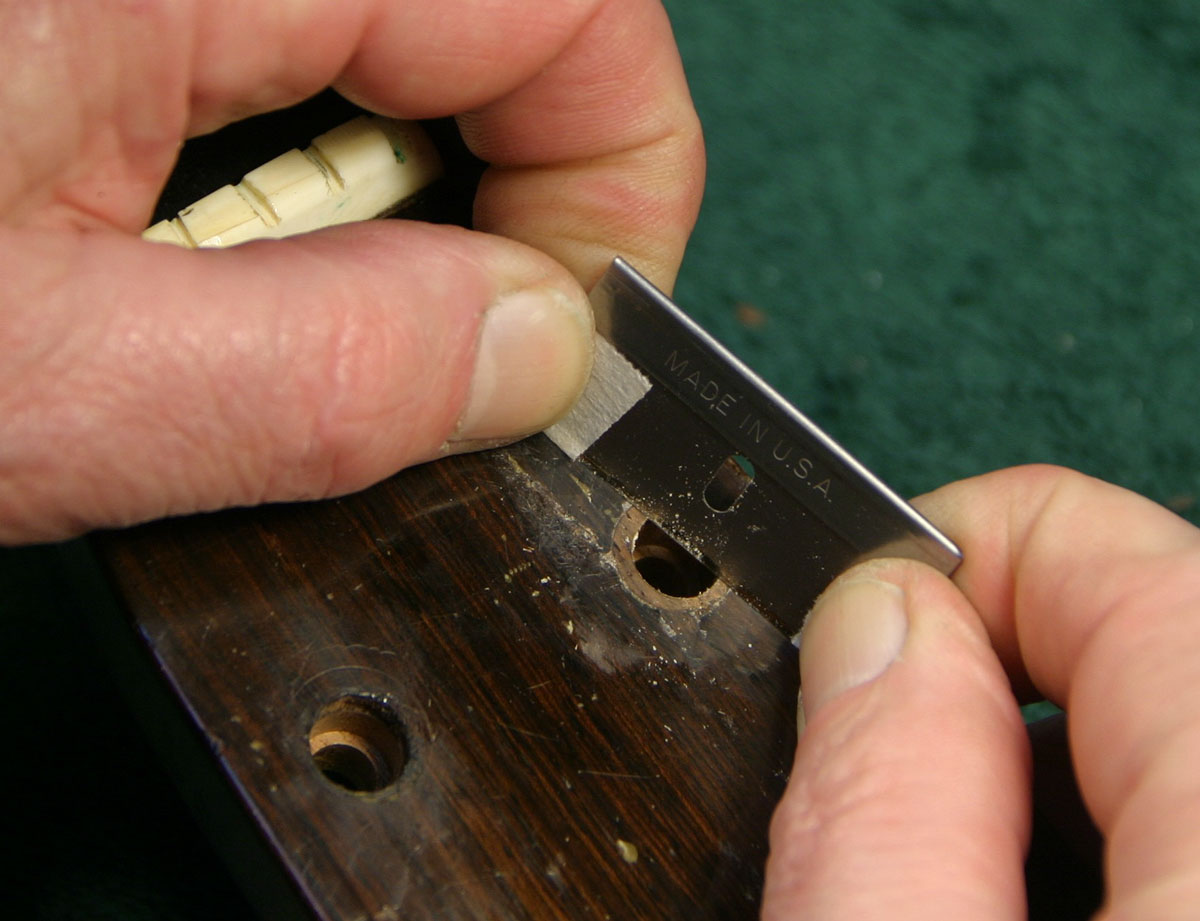
First, the final leveling of the rosewood plug. I used a single edge razor blade with the ends protected with masking tape to scrape the plug to the level of the surrounding lacquer:
I did scuff about halfway through the lacquer in the immediate area because I'd be adding new stain and lacquer and I didn't want to end up with a raised lump after it was all polished out.
Freshly sanded or scraped rosewood has a habit of turning very dark with the addition of shellac or lacquer because the solvents cause the natural dark oils in the wood to bleed across the surface. To avoid having that happen, I sealed the plug with a "sizing" coat of thin hide glue:
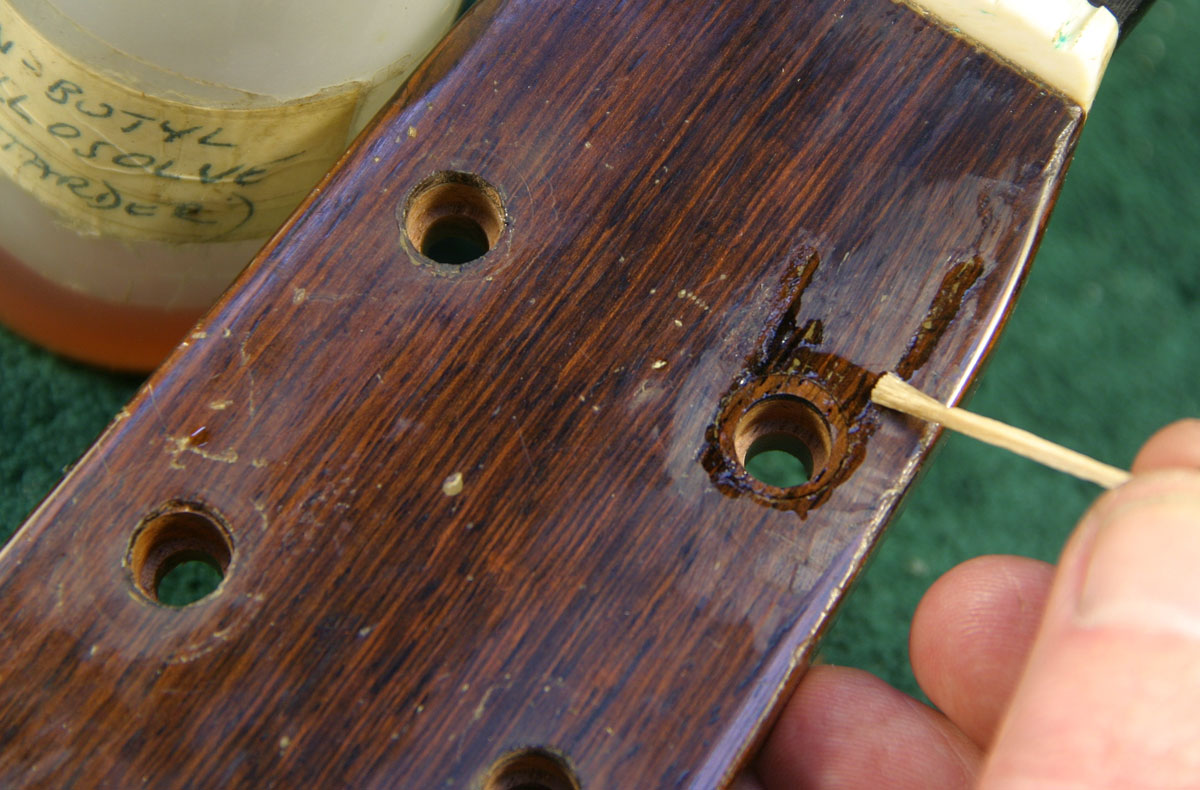
Once the water evaporated and the hide glue was fully dry, I used my toothpick brush to dab on some retarder thinner to soften and amalgamate the damaged finish and to prepare it for the drop filling to come:

After letting the amalgamator do its job, I brushed a heavy coat of clear lacquer on the area:
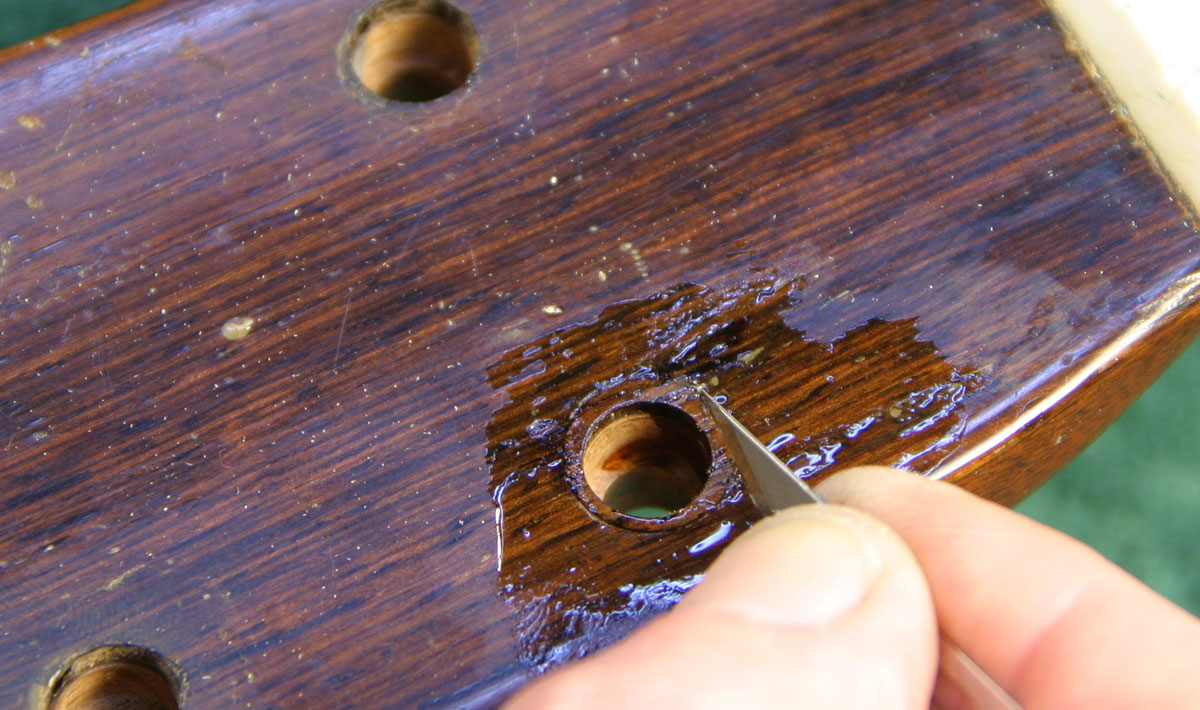
Now, here's a tricky little bit. Once the lacquer was on, and before it began to dry, I took a tiny sharp pointed knife blade and scarred through the lacquer, hide glue and all to make dark lines, taking advantage of the rosewood's tendency to darken with the application of solvent:
That way, I was able to improve the grain and color match of the plug a bit.
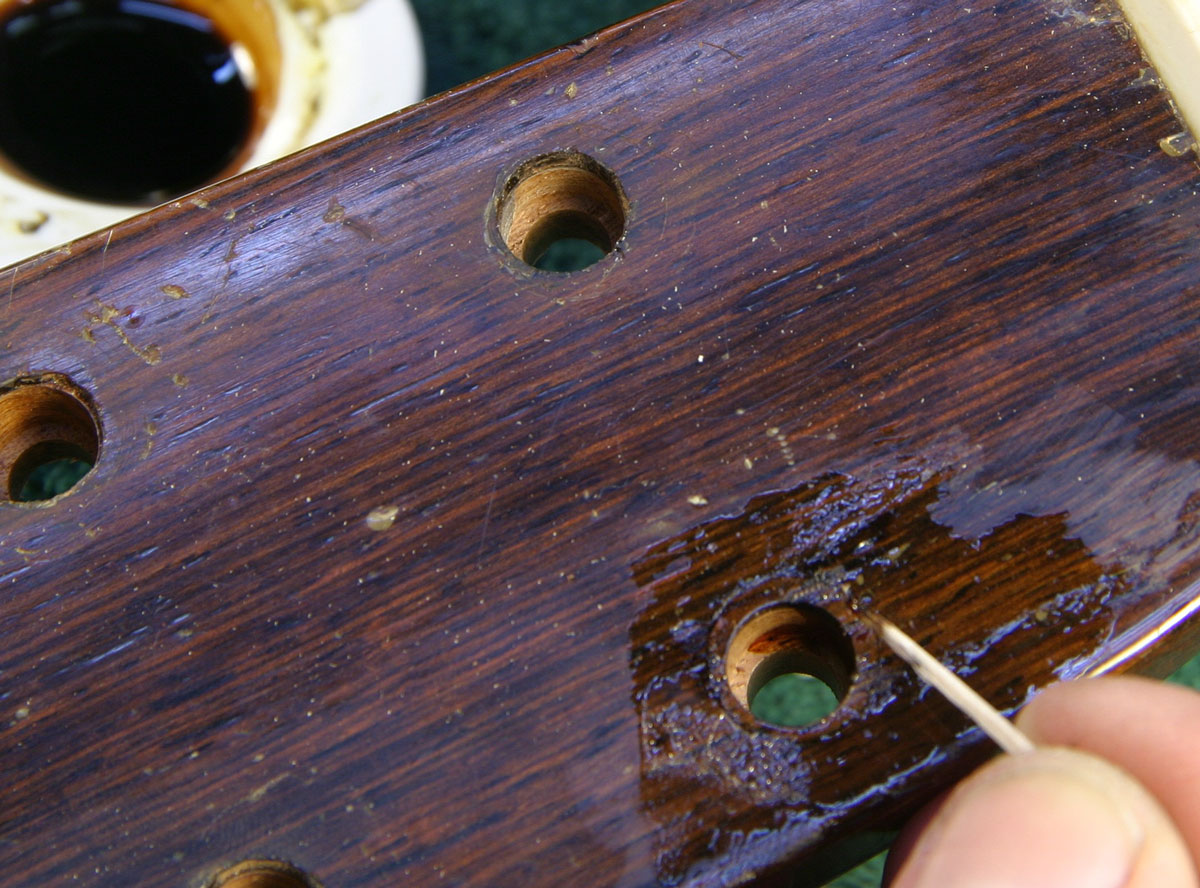
Still working while the lacquer was tacky, I used a toothpick to add a few little streaks of brown stain - again to help blend the color and pattern:
Now, the neck will get put aside for a while for the lacquer fill to dry, and over the next few days, I'll add a bit more clear lacquer to build thickness in the broken areas.
Day 12: Making Another Small Tool
This is more of a homework assignment. I did it in the evening in my home shop where I do most of my metal work and machining. It's another of those "someday" items - a little press for inserting the Waverly tuner bushings in the counterbored peghead holes.
After milling a chunk of aluminum into a "C" shape, I drilled the top and tapped it for a press screw:
I wanted to use a 3/8" diameter brass screw, but as I looked around the shop I couldn't find one, so I chucked up a short brass rod and single-point threaded it, and turned the end to 1/4" diameter to fit inside the bushings.
Here's my little C-clamp press:
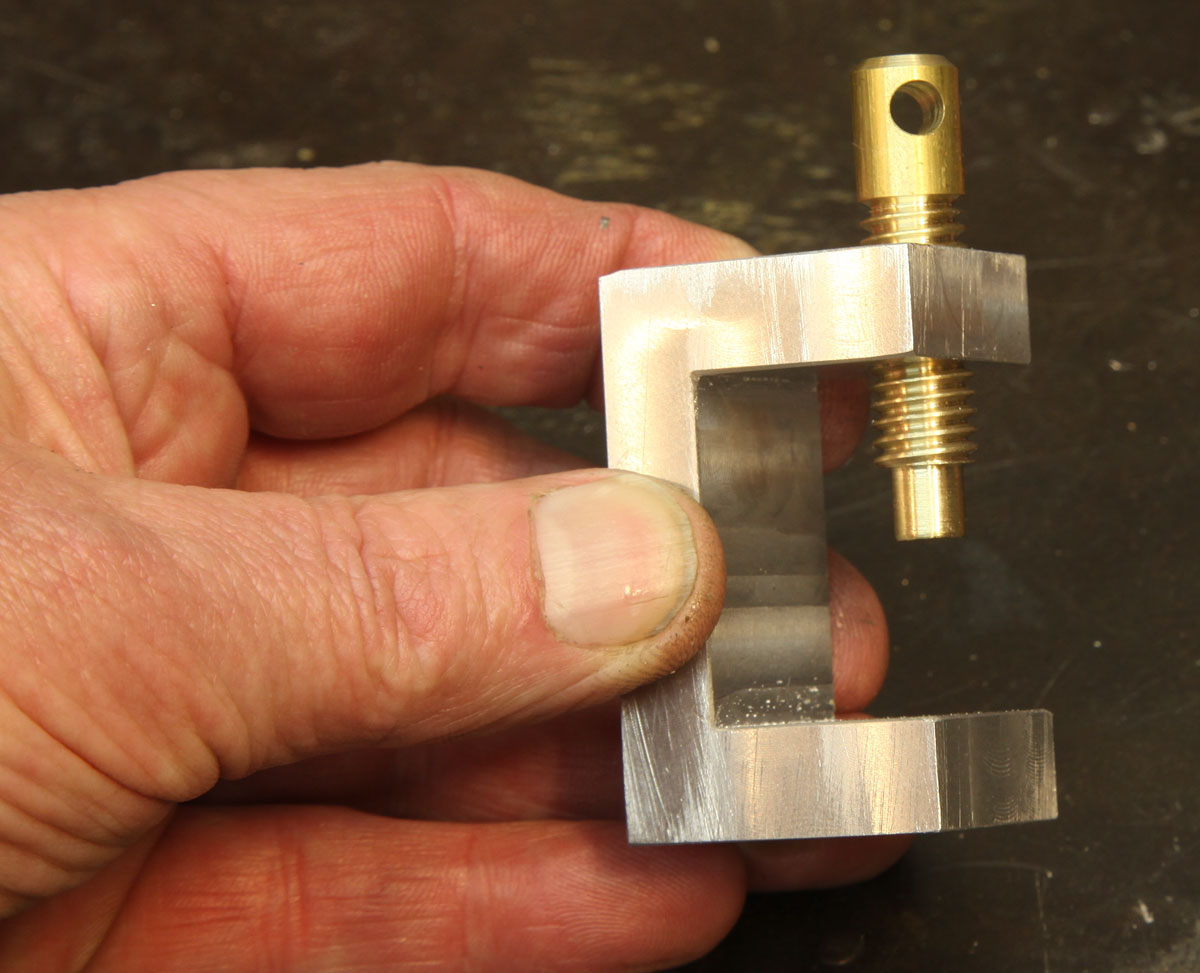
I got to thinking that if it's a tool that will be used around the shop often, it ought to have a built-in handle, so I looked around for an idea or two.
Then, I remembered I had brass balls (OK, calm down now). I used two of them, drilling 3/'16" holes and pressing them onto a 3/16" diameter steel rod stuck through the hole in the screw:
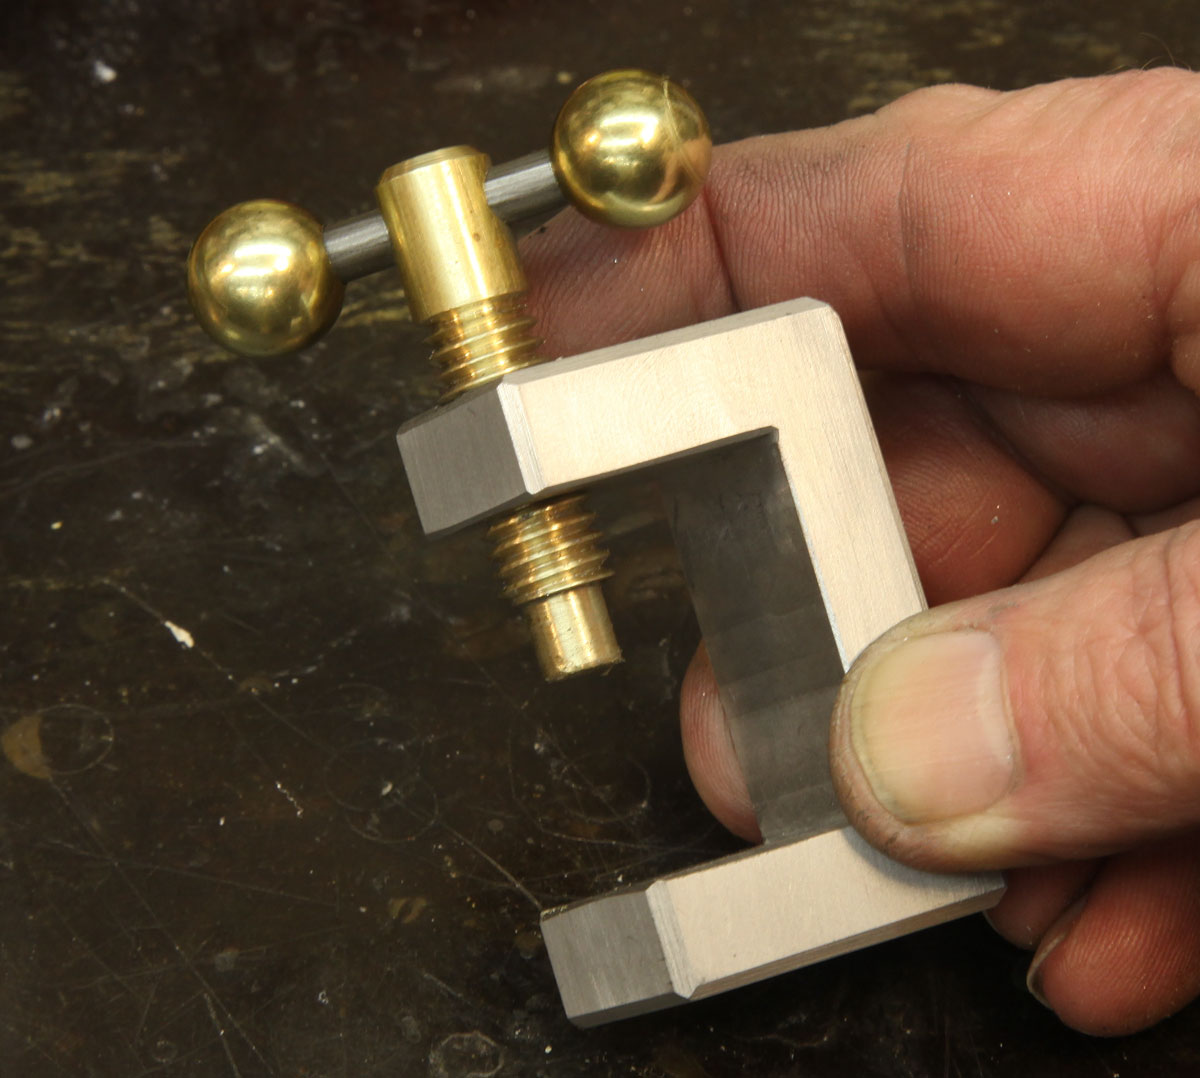
Done, and ready for the time when I install the tuners:
And, as always, "None Genuine Without This Brand" . . .
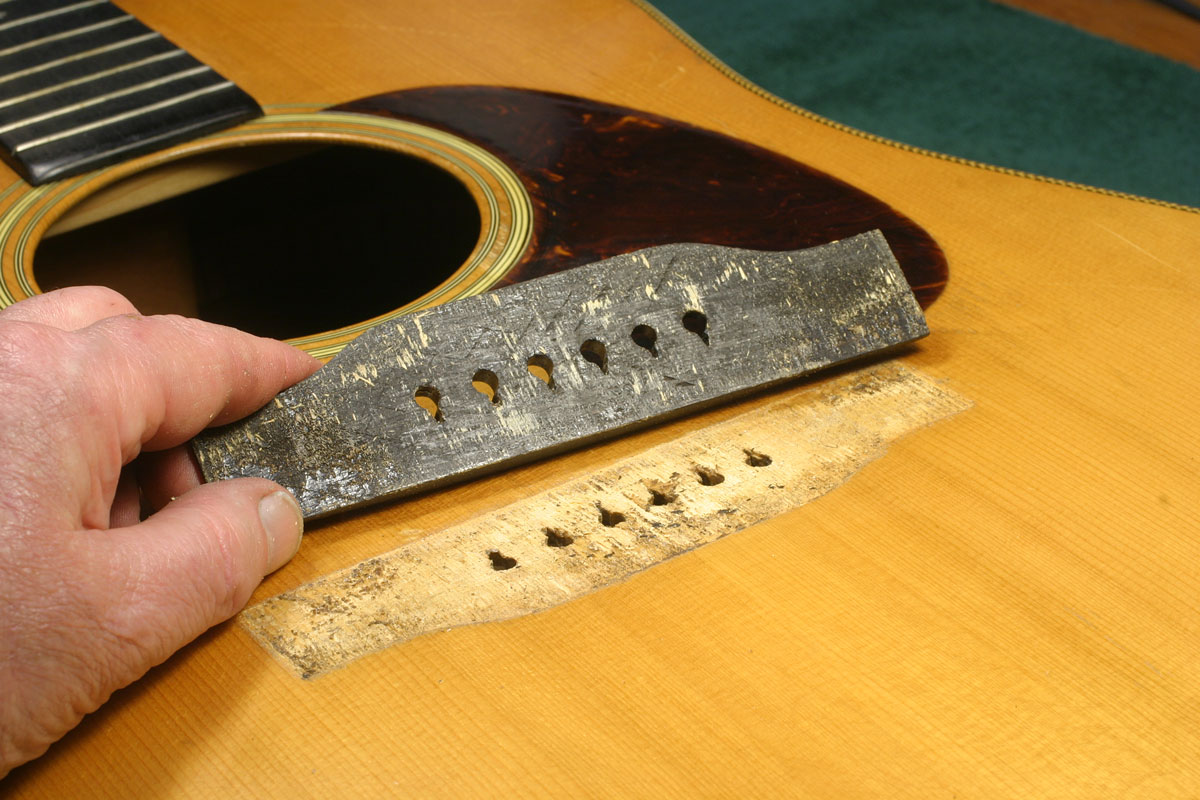
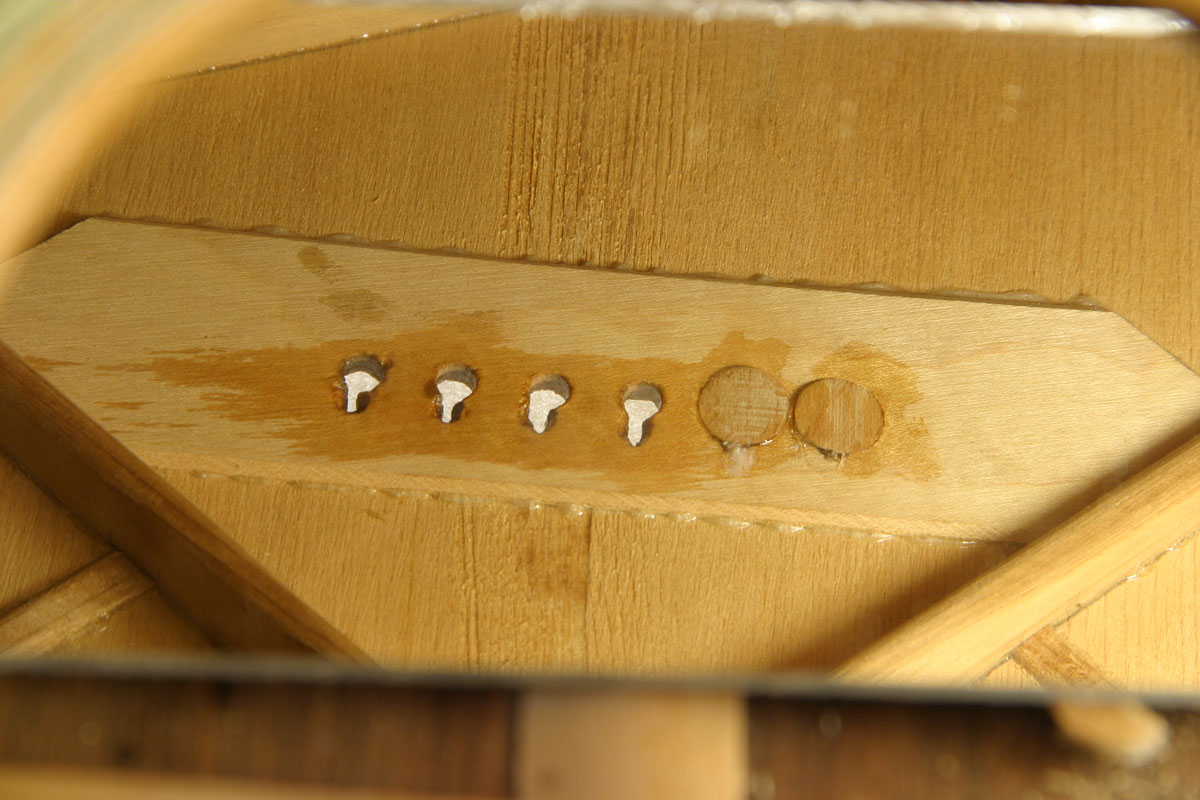
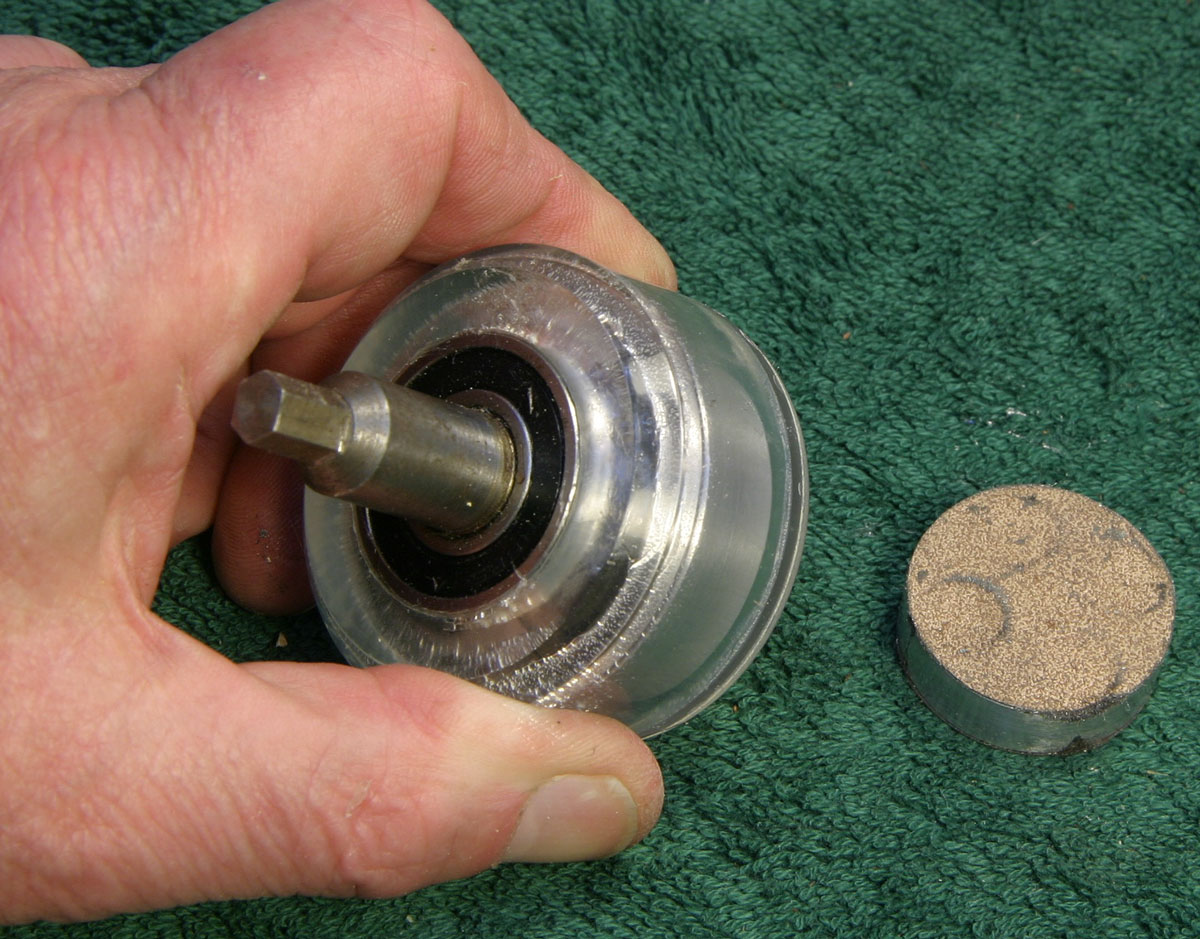
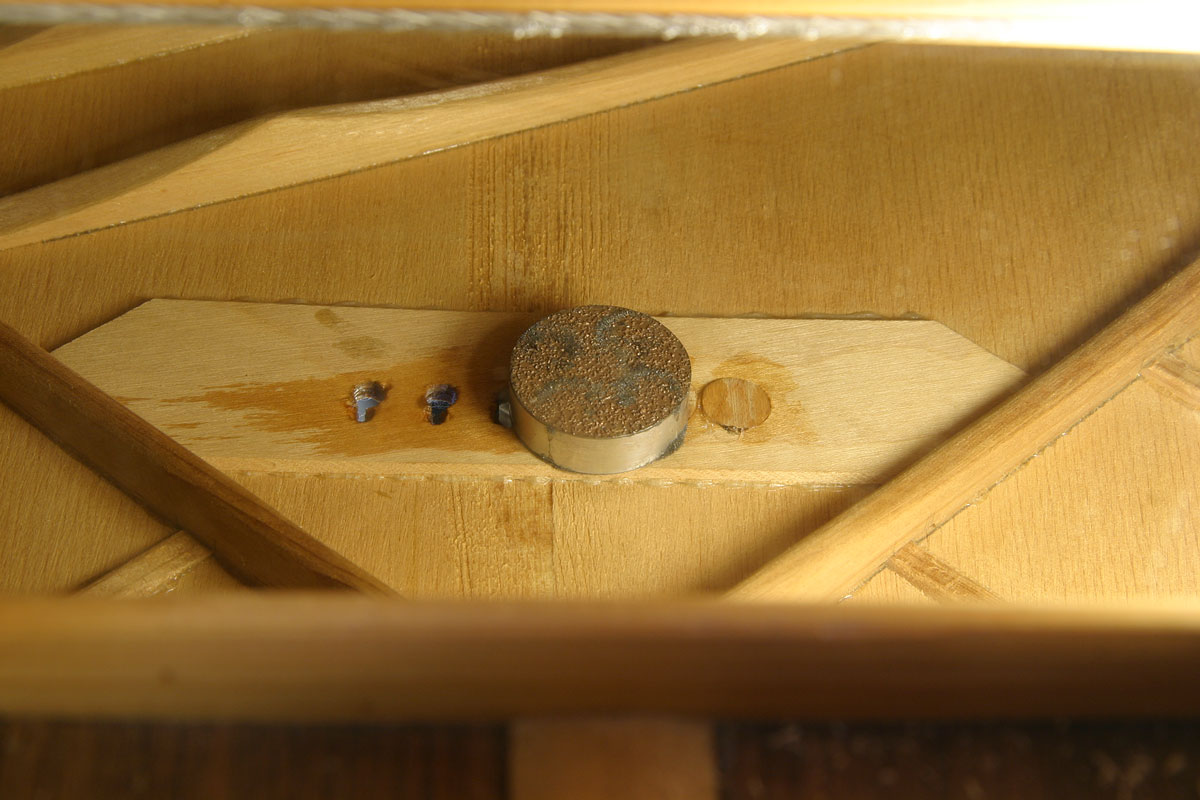
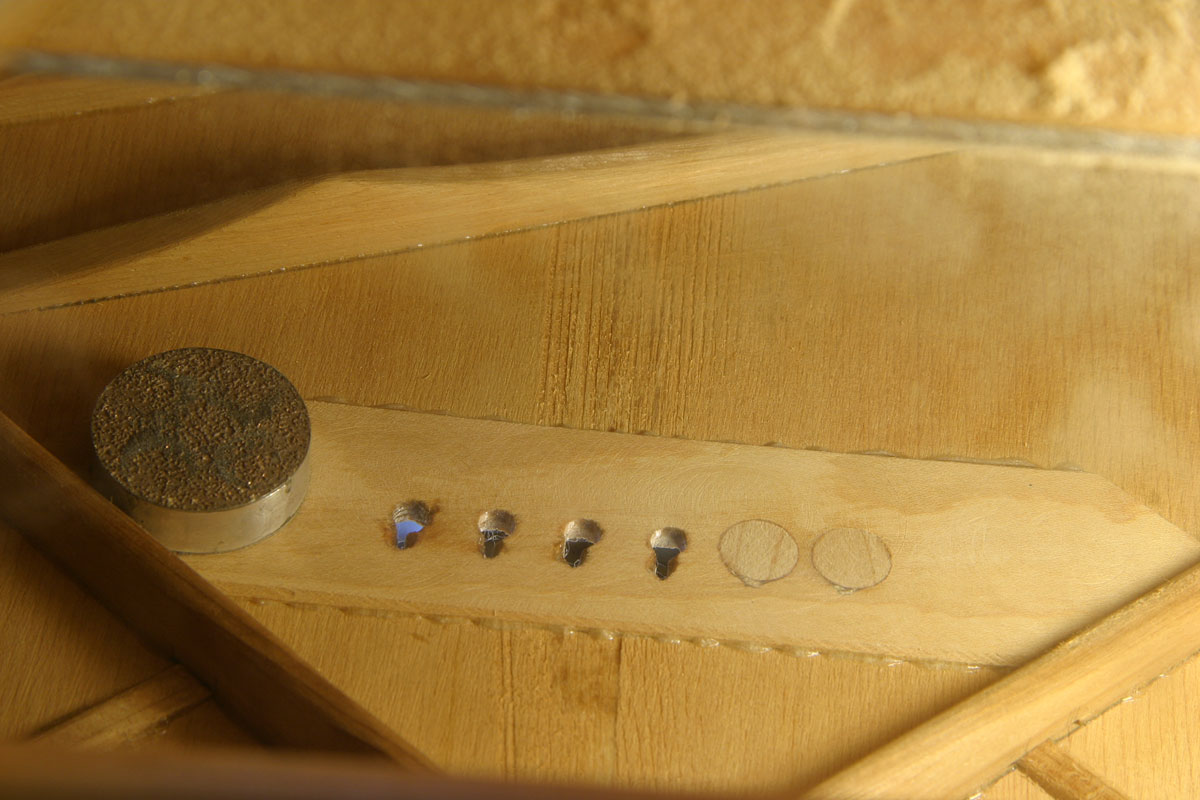
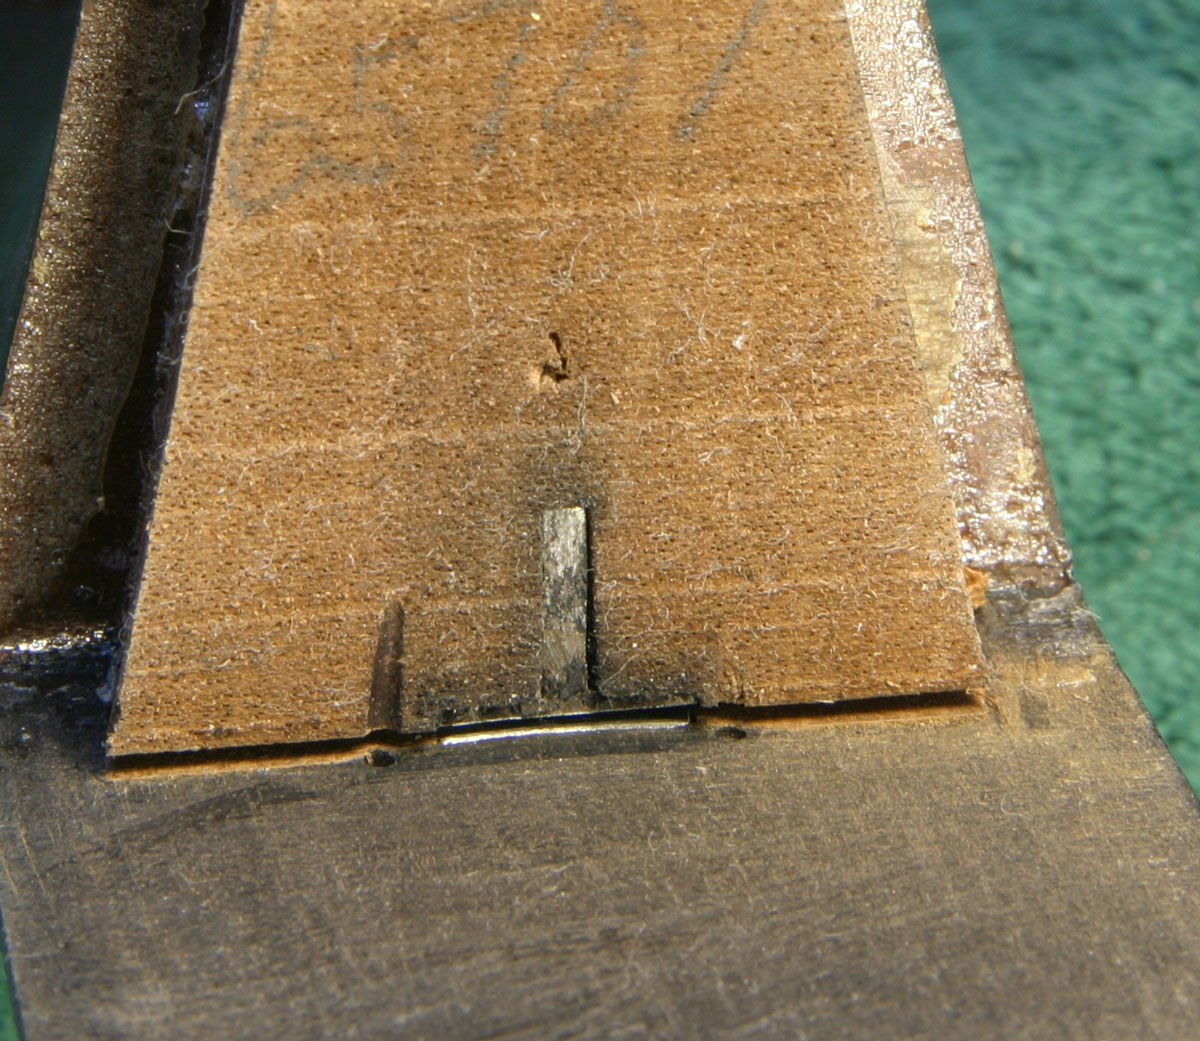
Here's a refresher look at the underside of the bridge plate. Notice the enlarged slots, particularly at the two bass string holes:
While it may look as though all six slots are munched out too much, four of them are only compressed a bit, and it's the shadows from the inside lighting that make it difficult to show that they are basically still OK.
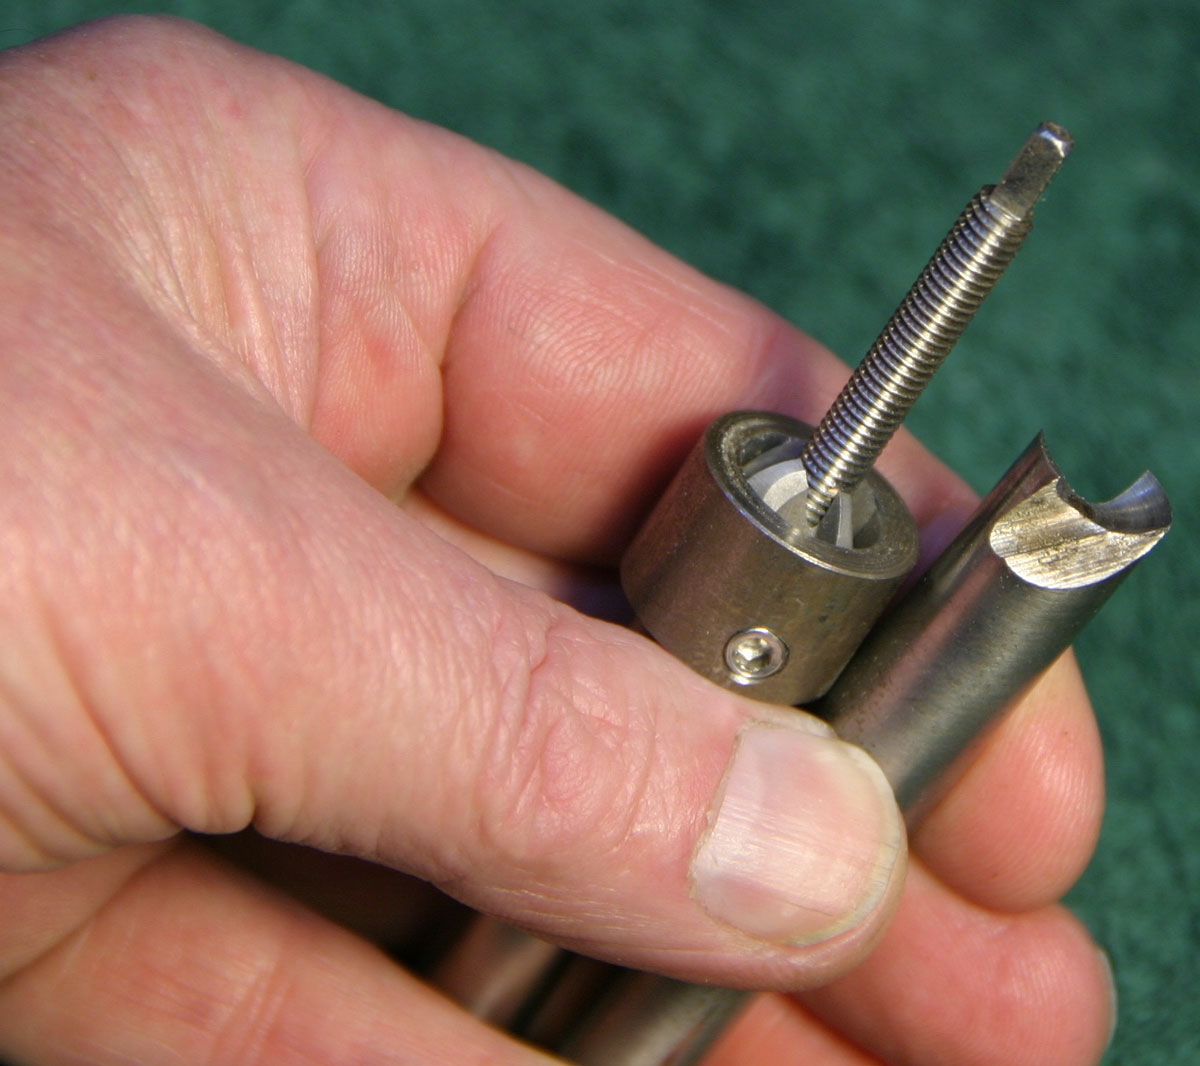
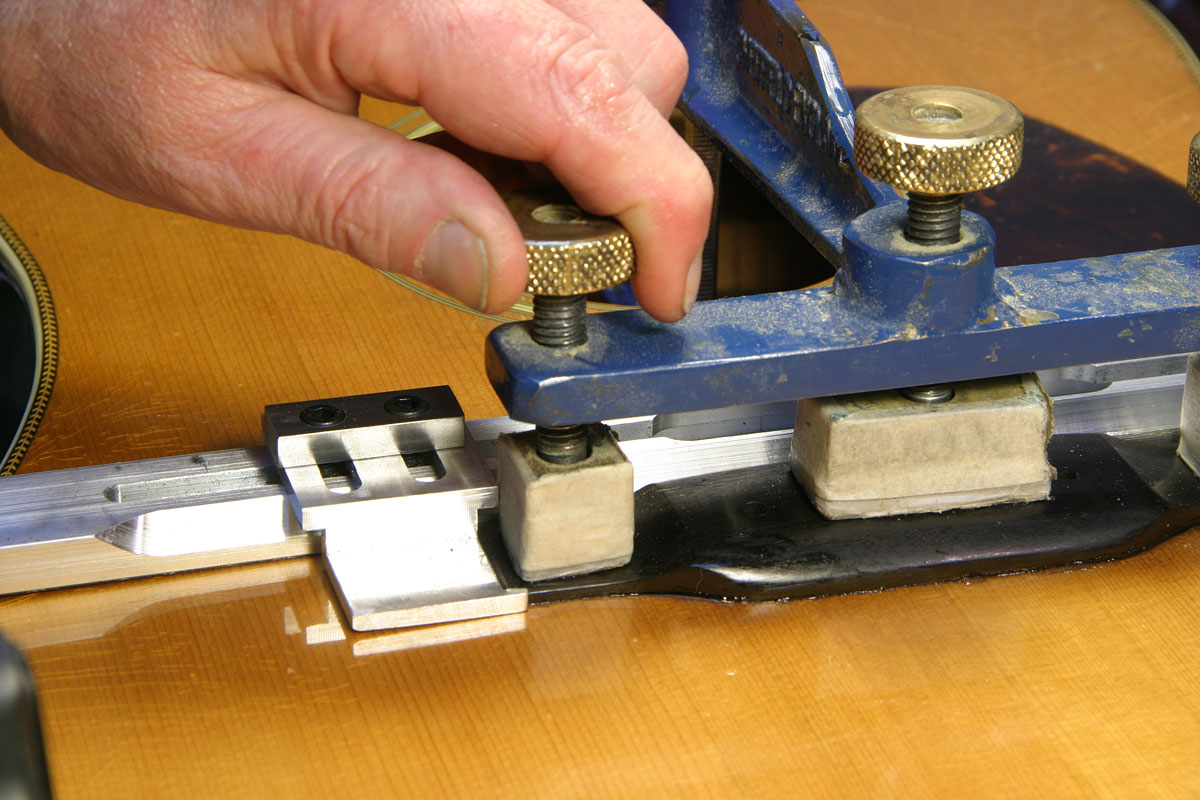
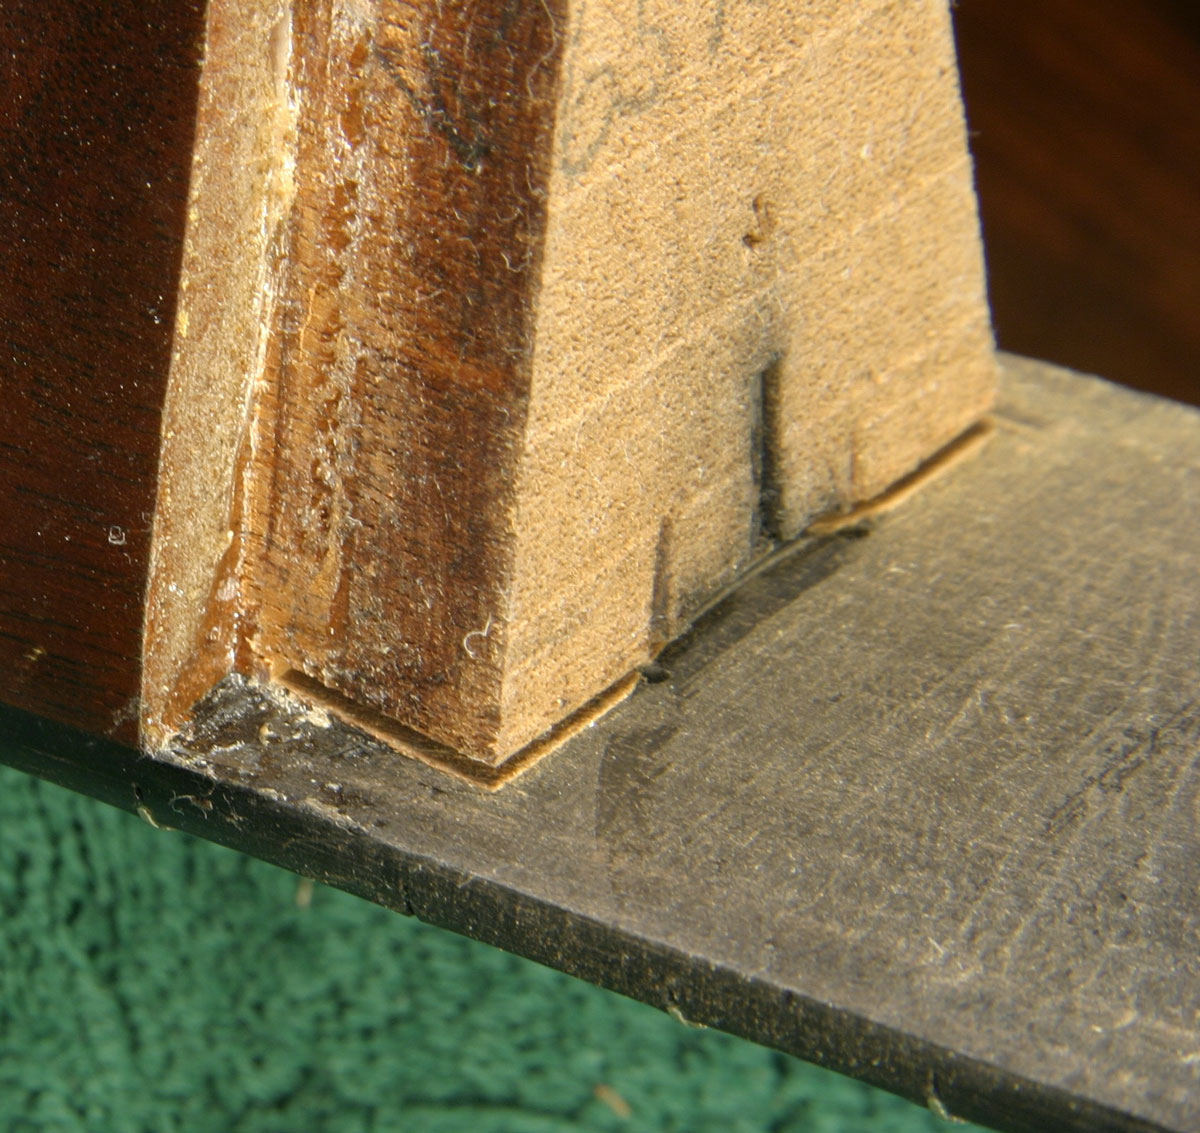
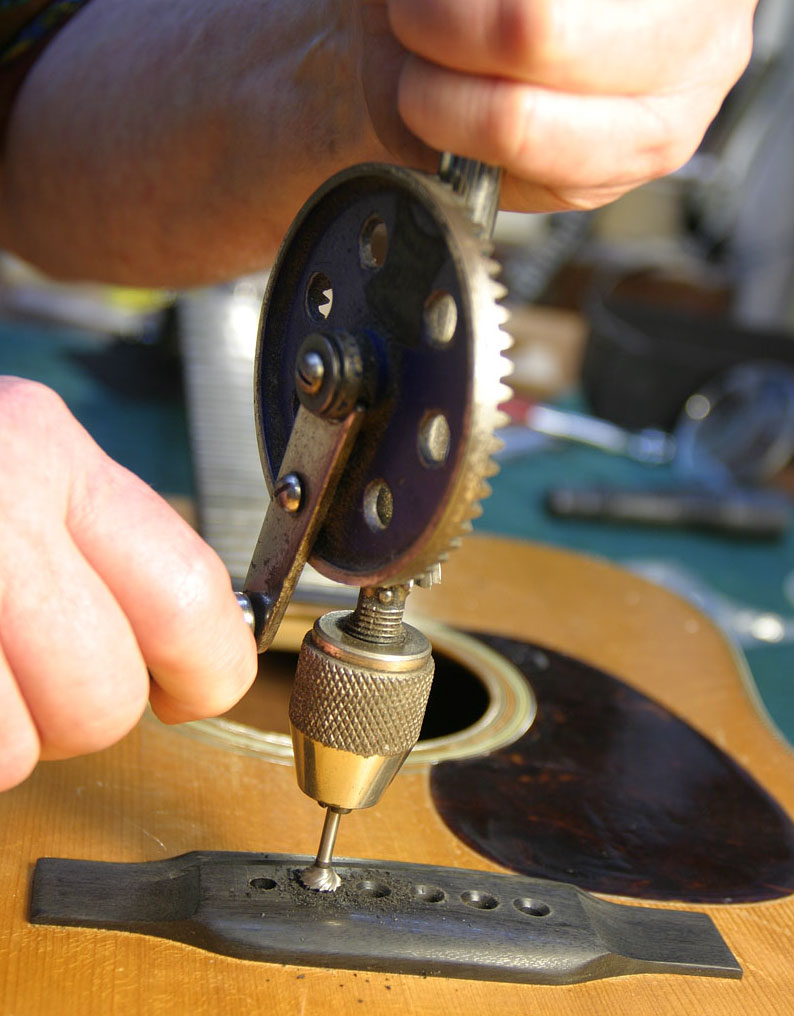
TIme to introduce another special tool and technique. It's Dan Erlewine's brainchild, and, not surprisingly, marketed by Stewart MacDonald - the "Bridge Plate Saver." Really, a pair of tools, one of which, working from the outside, cuts a dome-shaped recess in the bridge plate, and the other of which cuts a mating plug in the drill press:

First I made up some plugs, using a slip of maple approximately the same thickness as the bridge plate:
Then, using the threaded block on top of the guitar, I twisted the tool until it pulled upward and ate the appropriate hole in the bridge plate:
Here's the first one - nice and neat:
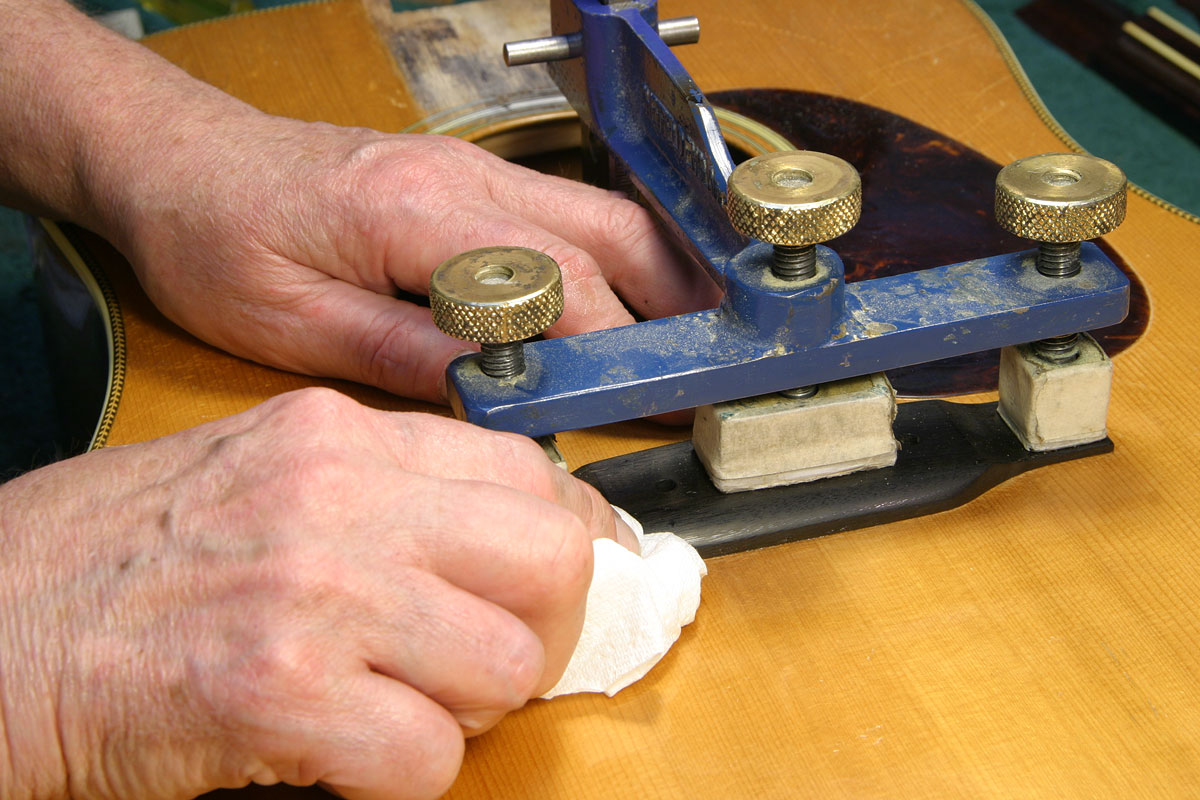
The second one went just as well, and I slathered up the two plugs with some nice hide glue, stuck them in place and got ready to clamp up. Before applying the clamp, I dropped in some small pieces of maple to finish filling the slot from above. Probably, it wasn't a necessary move, but it was convenient, so I went for it:
And, as usual, a hard flat plate on top, protected with waxed paper:
Day 14: The Bridge Plate, Continued
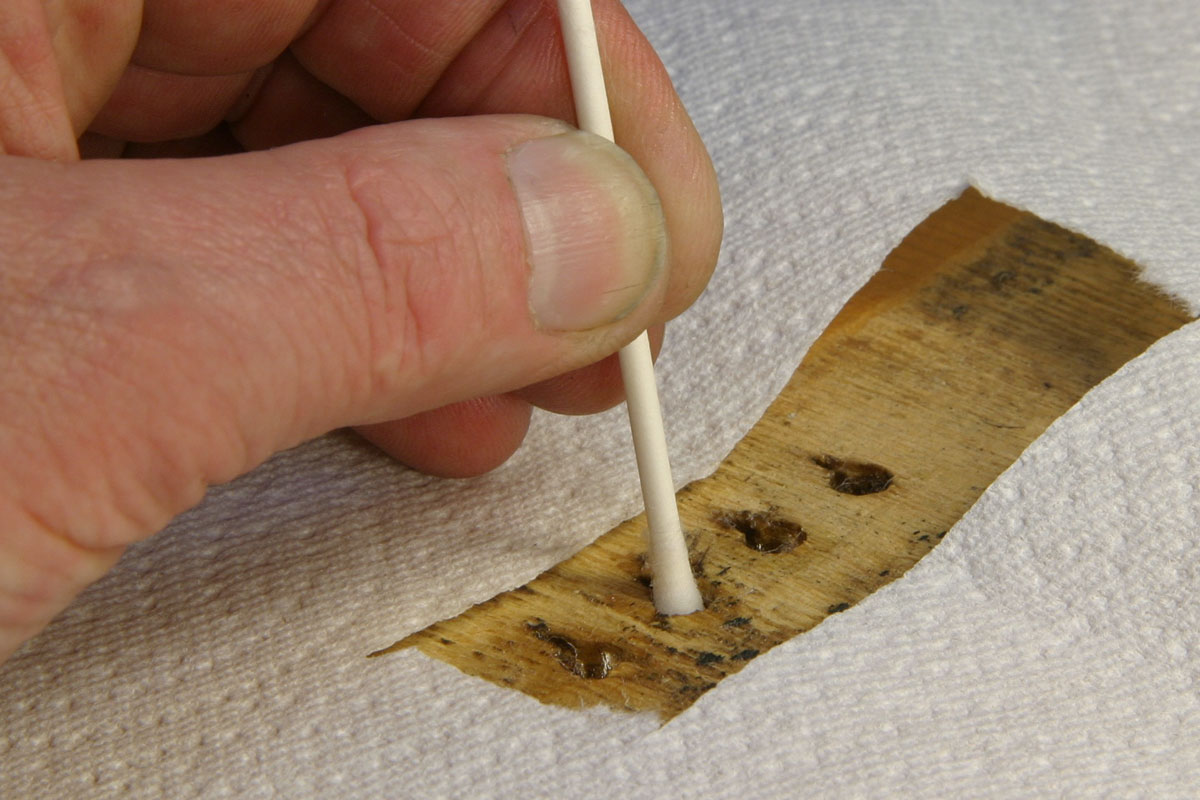
Next day when the glue was dry, I took off the clamps, and got out the bottle of thin viscosity cyanoacrylate. This modern adhesive can do some stuff that none of the old time glues can, so I don't forget I have it on hand when just the right job comes along. In this situation, I'm using it to reinforce the crushed wood fibers of the bridge plate against future string ball damage.
Simple enough, I simply mopped the iniside of holes, and the bridge plate beneath with a swab dunked in cyanoacrylate:
The thin viscosity super glue wicks in to all the exposed pores and micro cracks, filling the voids and catalyzing into a solid acrylic that's amazingly strong and tough. Just the thing to resist the pull of those nasty little string balls. The treatment will keep the slightly crushed slots in good shape for years to come. And, once I have the bridge in place, and drill and slot the remaining holes, I'll give them the same preventive treatment.
A look inside reveals the flow of cyanoacrylate, and the two patched bridge pin holes:
The glue looks a bit sloppy, and the repair patches are somewhat uneven in height.
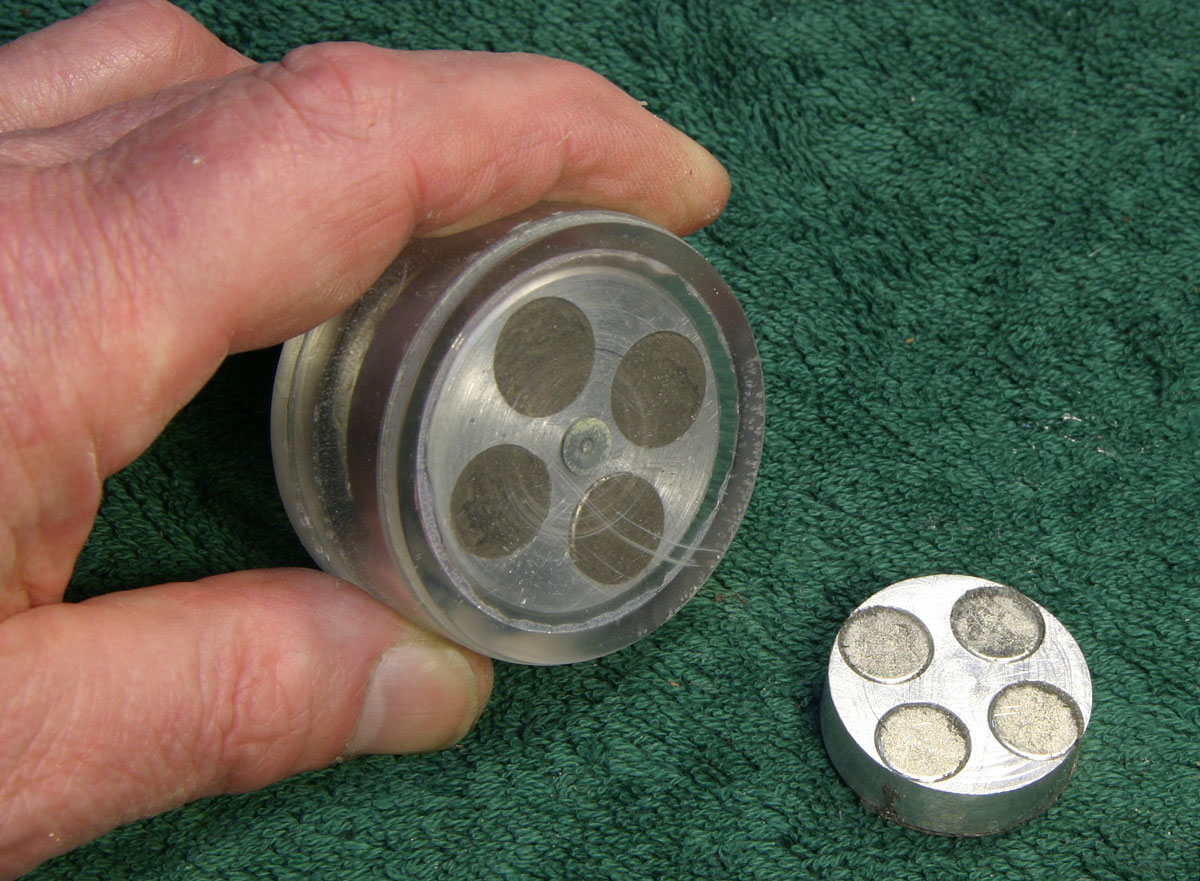
This one has a clear acrylic body, so you can see the working bits. It's a quartet of rare earth magnets mounted in an aluminum disc, supported on a shaft and ball bearing arrangement that's totally enclosed in acrylic. Outboard, there's a second unit with four magnets, and discs of "Dragon Skin" abrasive - steel sheets with carbide bits on one side.

Because the housing doesn't rotate at all, there's no chance of scratching delicate finishes as the inner disc rotates at 600 RPM on the high gear setting of my cordless screwdriver:
As I hold the outer unit up against the top of the guitar, the inner one is attracted to it, and it rotates in synch with the driven magnetic disc, sanding the bridge plate flat and level:
Now the bridge plate is basically good as new - without replacement. Thanks, Dan!
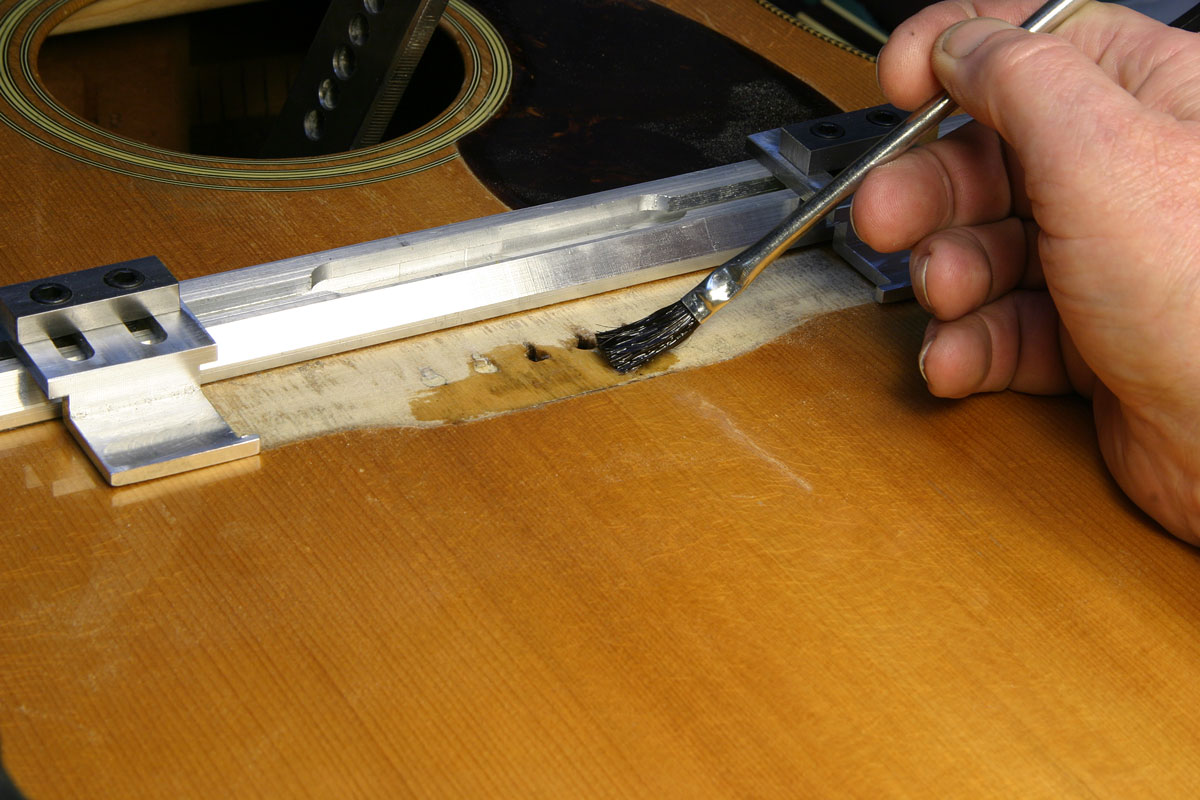
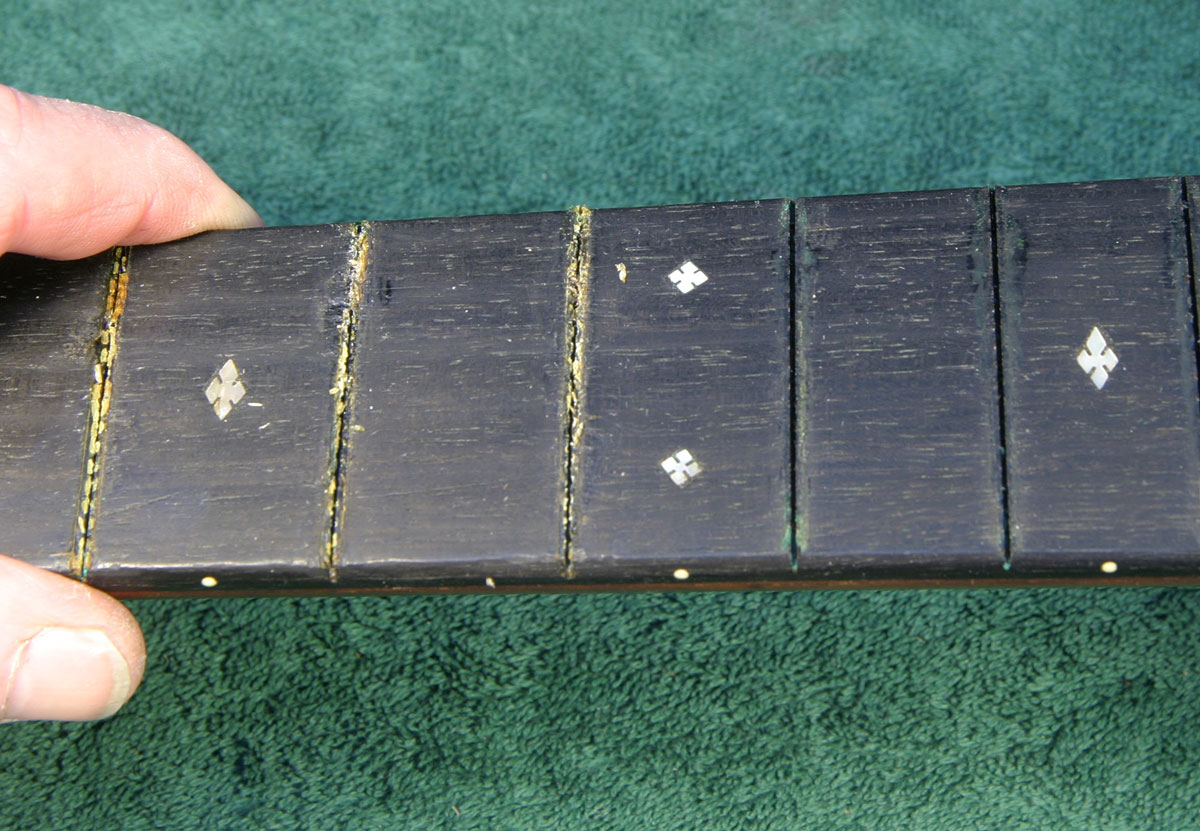
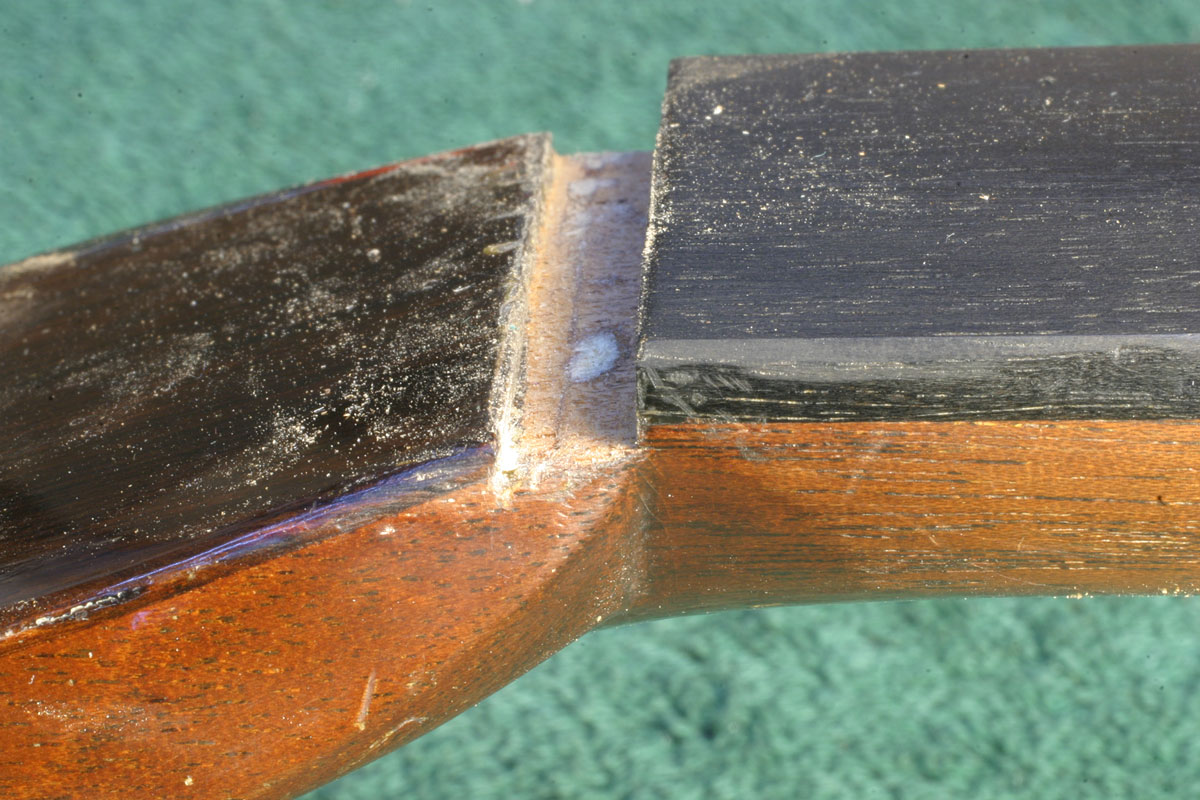
If you go back to Day 1, you can see that little crack by the edge of the fingerboard. Being as close to the board as it is, the crack isn't all that obvious when you take a casual look at the guitar. But, it is an old, dirty little crack, so I thought I'd try to clean it up a bit before gluing and reinforcing it.
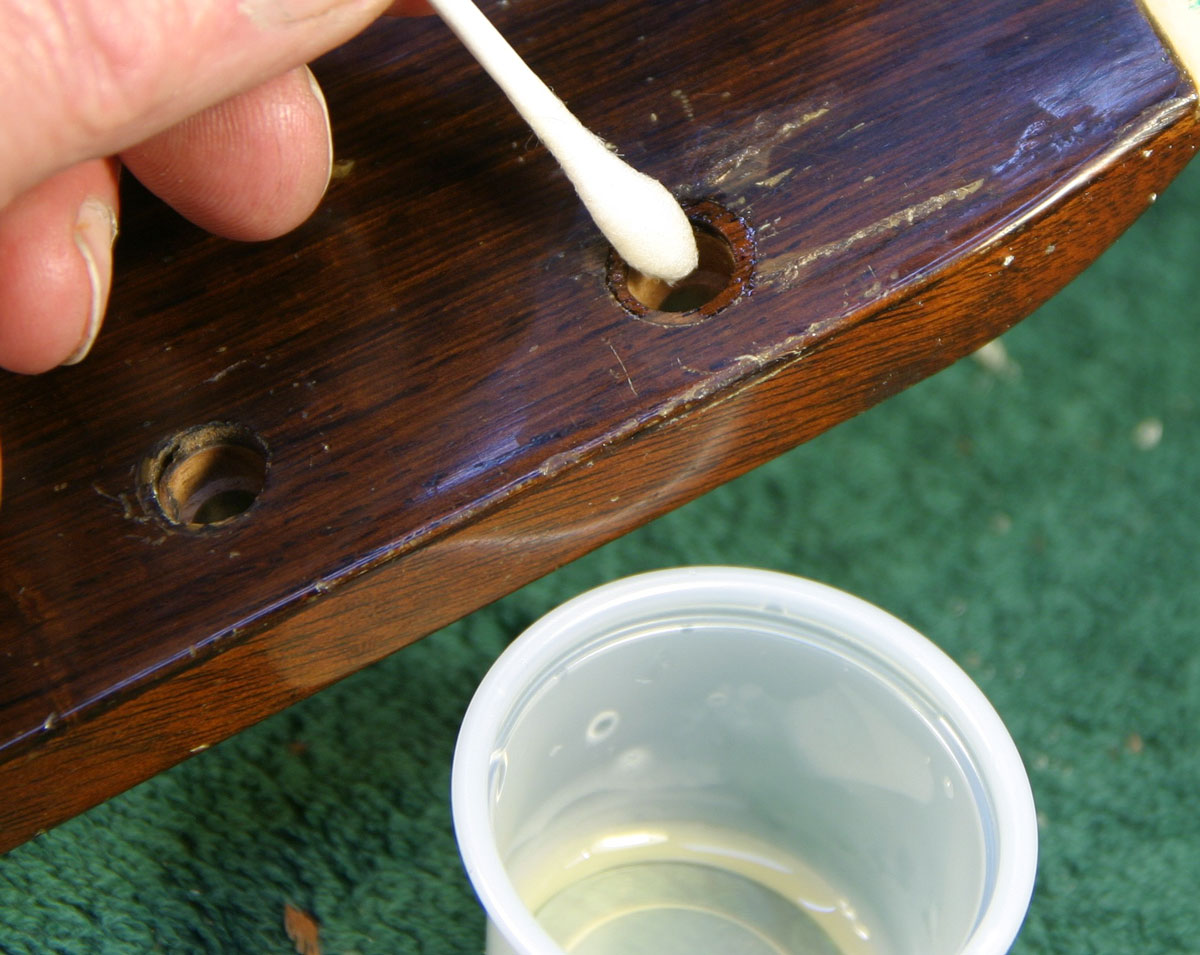
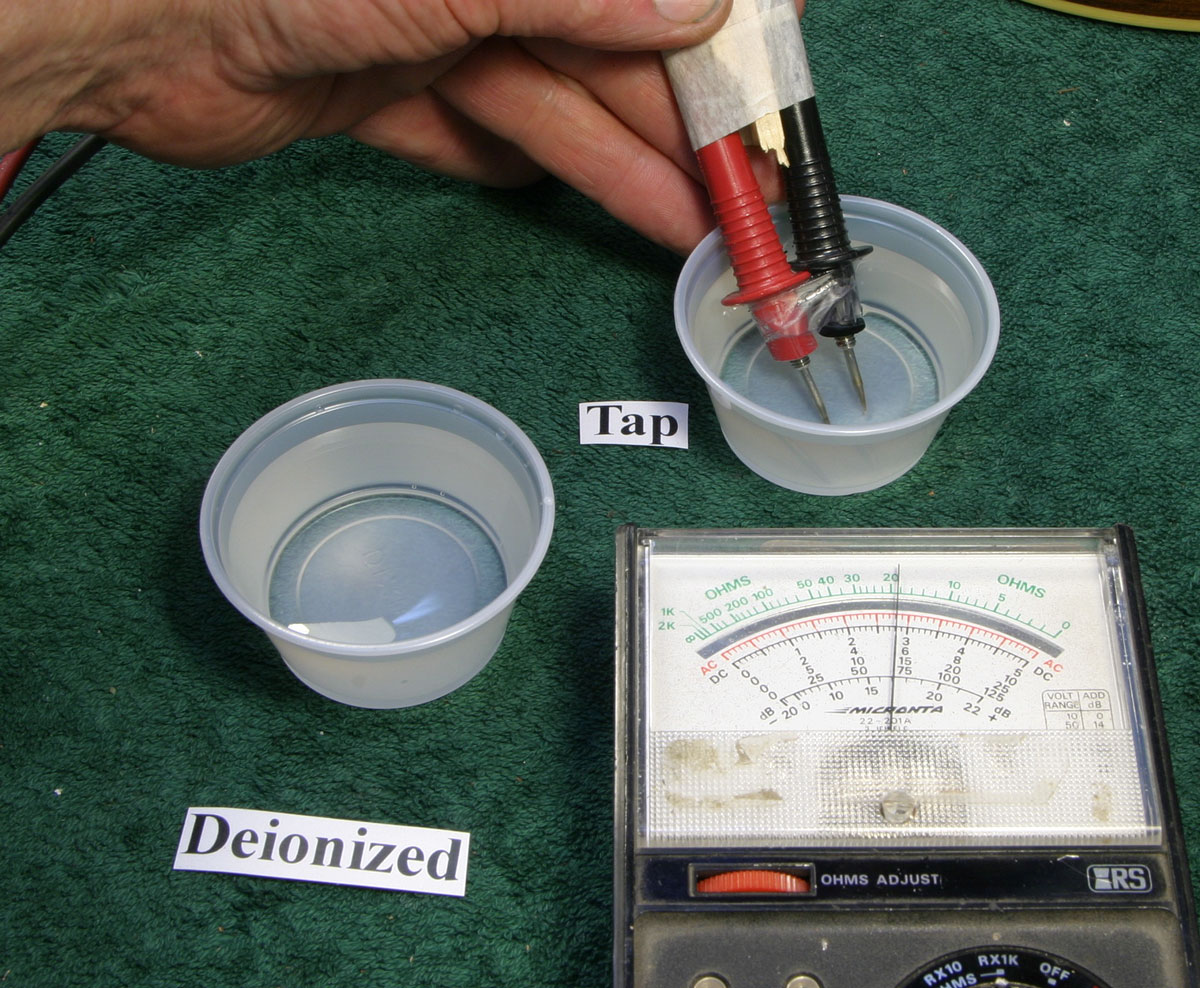
A number of years ago, I learned about the use of deionized water from Joe Grubaugh, a premier violin maker and restorer who's shop is in Petaluma, about an hour and a half from mine. He described the stuff as being so "hungry" for ions that it can attract and wash away stain and dirt without adding any detergent, bleach or other contaminant to an old crack like this one.
I called a chemical supply house that specializes in providing exotic water to local "clean" industry, and by luck, talked to a really down-to-earth expert who clued me in on an important bit. He said that if I bought their $50.00/gallon deionized water, I'd get a certified pure product, but it would stay deionized only a relatively short number of days after opening. He then went on to hand me a nice little surprise. He said that the deionized water I can get for 39 cents a gallon at the supermarket vending machine was really close to being as good for my use as the stuff he sells.
Well, after some consideration, I chose the local brew.
And, anytime I need good deionized water, I take a quick hike down the street with a jug, knowing that the stuff I'll be using is better than the industrial kind I'd have had sitting around the shop. . .
Pure water is a poor conductor of electricity because of the lack of ions. Regular tap water varies quite a bit, and local Palo Alto water comes from Sierra snow melt and is free enough of impurities that we use it in steam irons and car batteries.
Compared with our nice tap water, the supermarket deionized stuff is only about 10% as conductive:
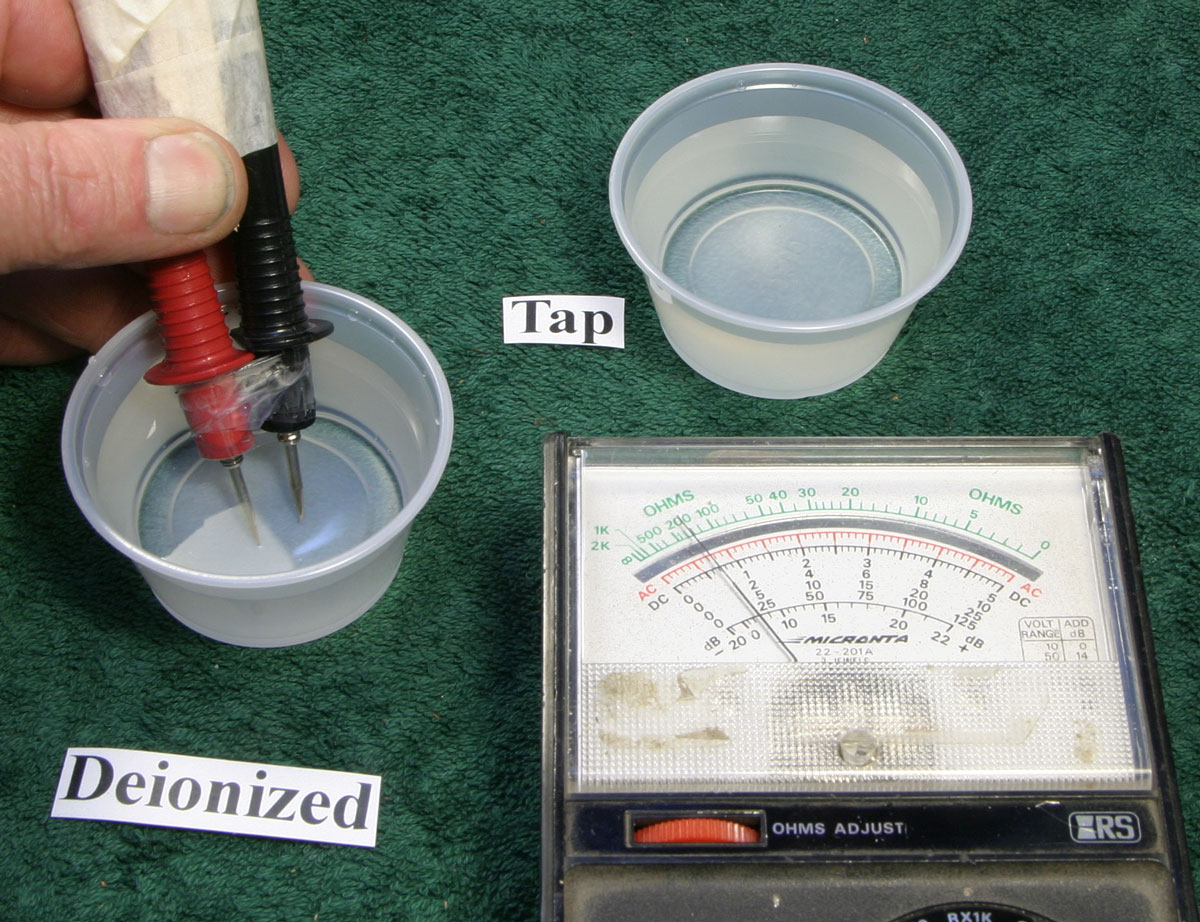
I taped the probes together to maintain the spacing and dunked both in to the water all the way so the readings would be reasonably comparative.
Time to wash up.
I filled a clean styro cup with deionized water and dispensed it with a polyethylene pipette, dripping it on the crack, and allowing it to run downhill toward the neck block. I had the guitar body supported at about a thirty degree angle from horizontal, so the water would run in a controllable stream and be soaked up by a wad of rags below:
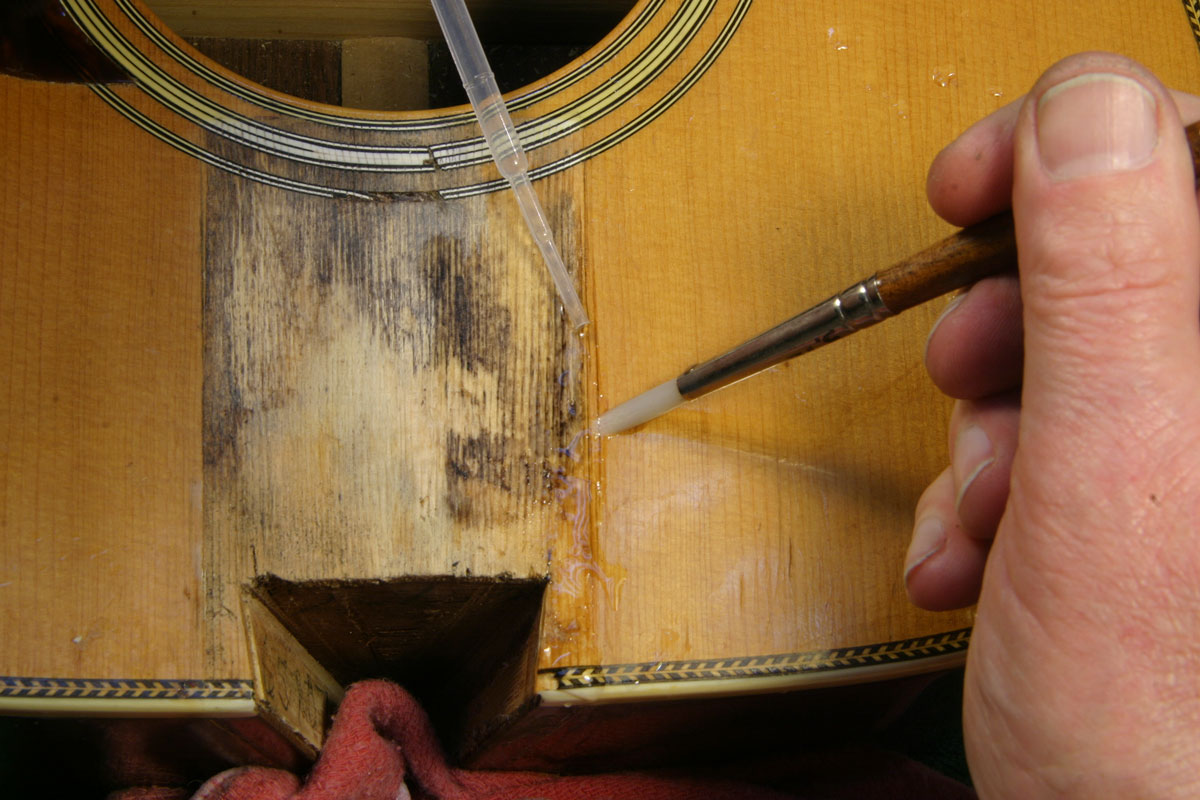
As the water ran along the crack, I scrubbed the crack with a really fine synthetic bristle artist brush. The bristles of this brush are slender and pointed, so they work really well without injuring the wood fibers.
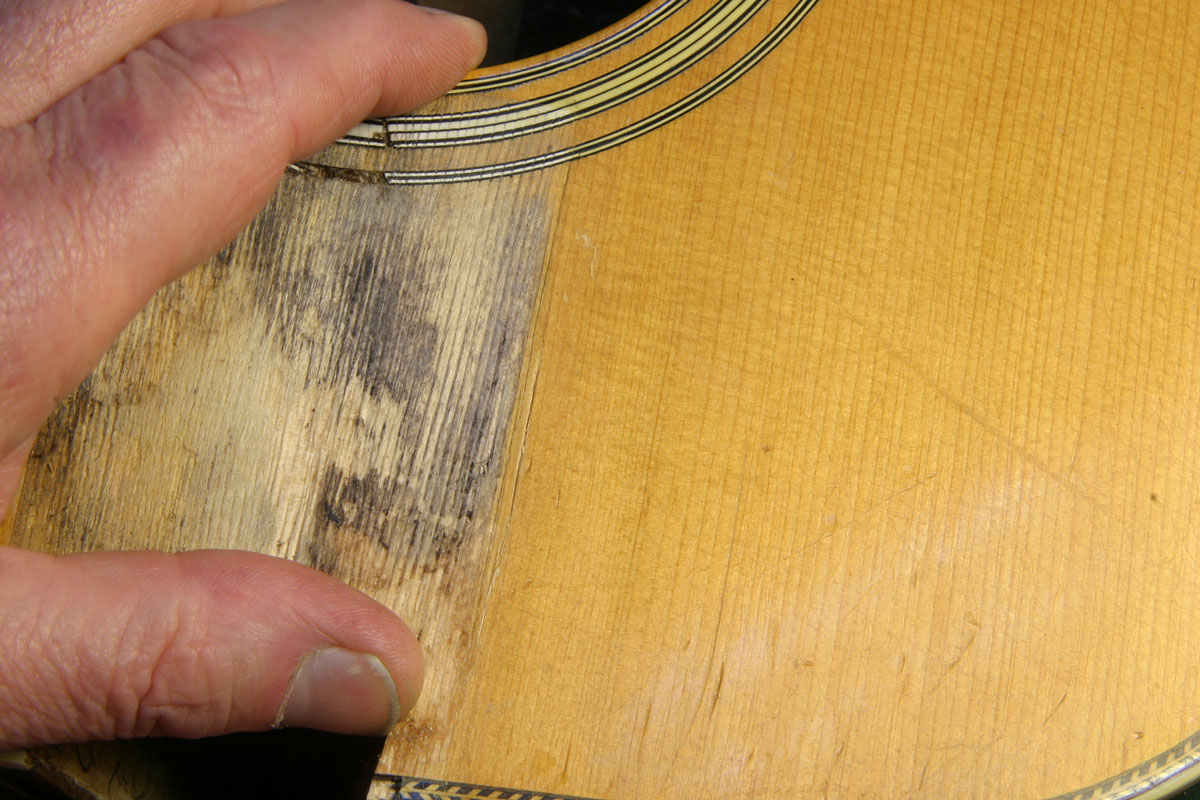
After about 45 minutes, I'd run through around a pint of water, and I could see the crack becoming a bit cleaner. And, after the water dried, it looked as though the dirt was basically all gone. The crack is still visible of course, because it has width and depth, so there are shadows:
I made up a small diamond shaped reinforcement cleat, clamped and glued it in place:
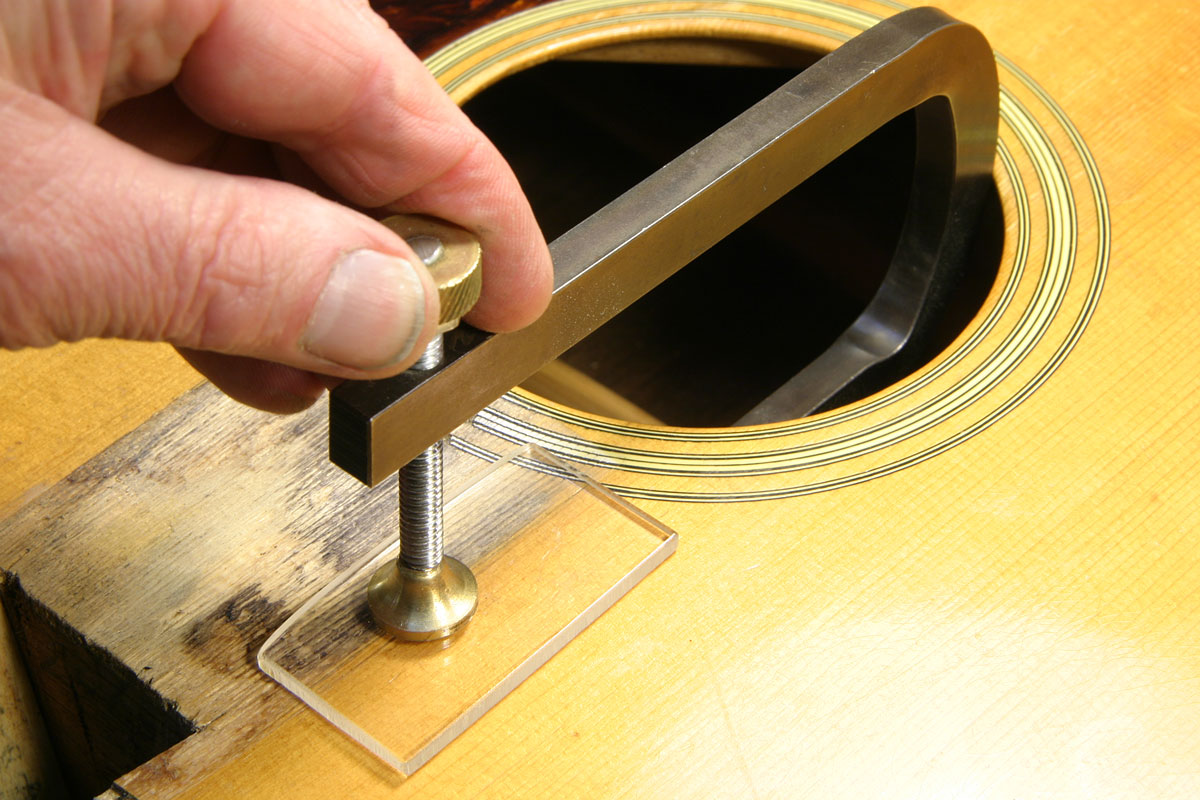
I also worked a bit of my most transparent hide glue into the crack before applying the clamp. I don't think there will be much if any touchup of the lacquer needed here.
Viewed from the inside, the patch is small and unobtrusive, but it will keep the crack from becoming nasty, I think:
Today's the day to make that much needed new bridge. Most of the time, I'd rather make and install the appropriate height bridge before setting the neck angle. Of course, it's a matter of geometry, so the neck angle would be the same in relation to the top of the guitar whether there was a bridge in place or not. But, most of my neck resetting work is on guitars that already have the appropriate height bridge, so I'd rather set the bridge first, and then adjust the neck. So, today's excercise is making and gluing the bridge.
Really good ebony is getting harder to find every year, and recently, we've been able to buy some fine African ebony that's as good as any I've seen. It's not cheap, but then what is these days?
Whenever possible, I try to get "bow frog quality" ebony. Violin bow makers are the most insanely picky about the quality of the ebony they use, mostly because they use such tiny pieces they can afford to get the best of the best of the best. They insist on absolutely black ebony with the virtually invisible pores, and those must be completely filled with resin. In fact, that stuff looks about like Bakelite or Micarta when it is polished. If you look closely at some of the venerable old Martin guitars, you see some of that quailty ebony there, too.
Last year I visited an importer and picked out enough for, I'd guess, five years' worth of bridges at the rate we make them these days. Those pieces went into our upstairs wood storage area, and we're likely to get to using it in about 2020 or so. I suppose that makes us ebony independent until 2025. That's the way we've always worked at Gryphon, trying to stay well ahead of need for supplies that might get cut off at any time without notice.
Later on, I'll be making an ivory nut and saddle for this guitar, and I'll be using ivory that I bought before there was any ban or restriction on elephant ivory. Since that time, we have kept our use of ivory to important restorations. For the record, I simply have no patience at all for those who might think or suggest that it has a benefit for tone over good hard bone. In fact, I prefer unbleached bone for longevity, appearance, and tone, both for nuts and saddles. But that's not the point when we're doing a serious restoration
For those looking for ivory, please understand that we don't have any at all to spare for any reason or project. That said, there is a good source of legal elephant ivory, and David Warther can serve your needs: http://www.ivorybuyer.com
Rant over, I hope. . .
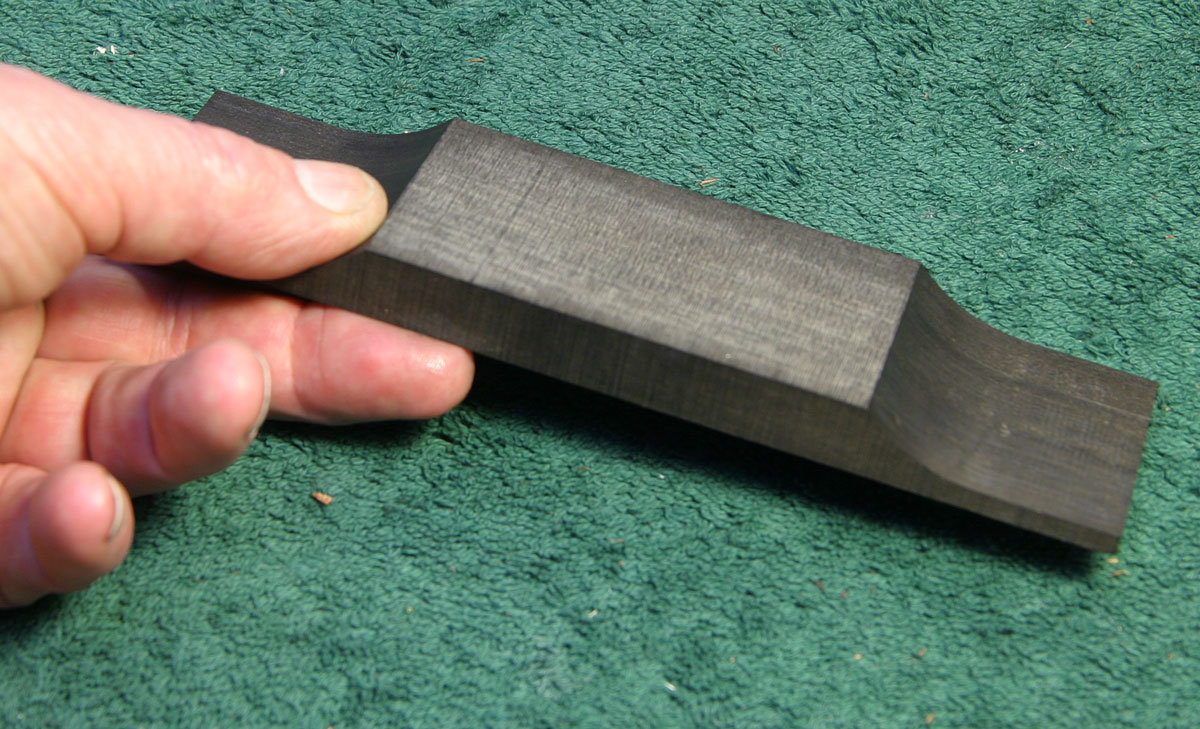
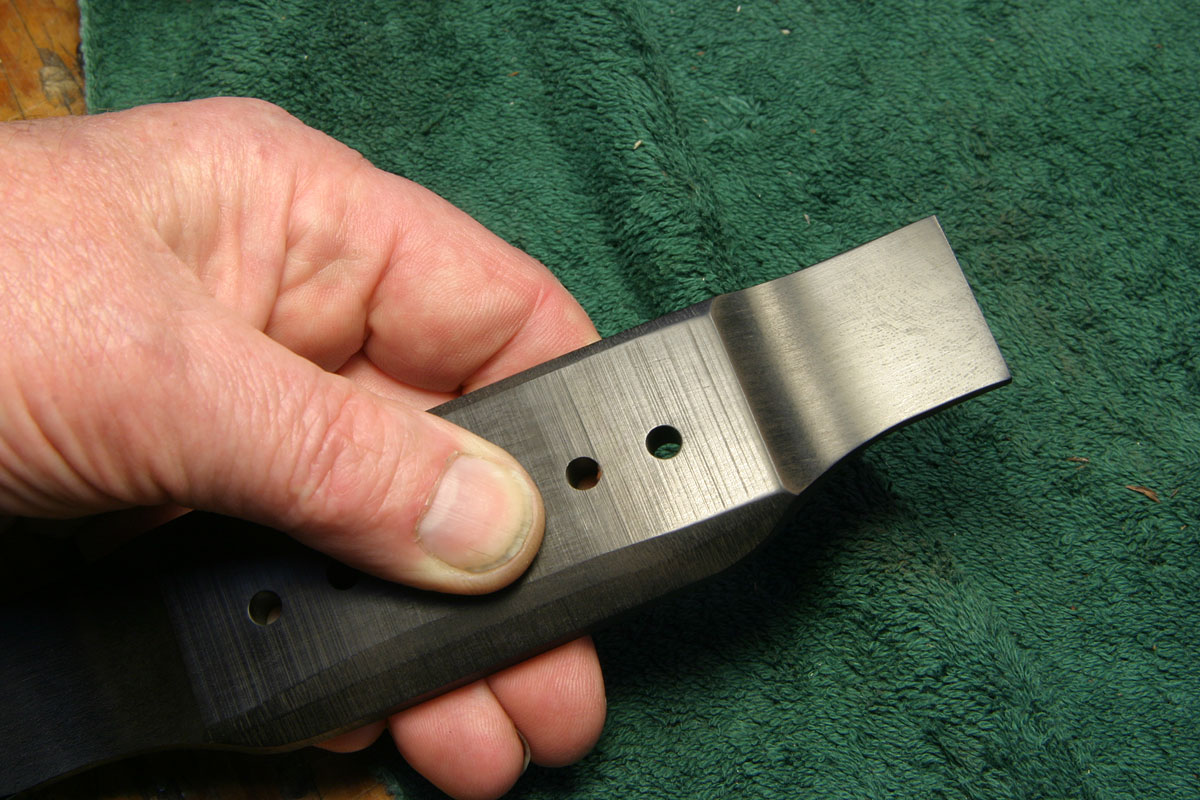
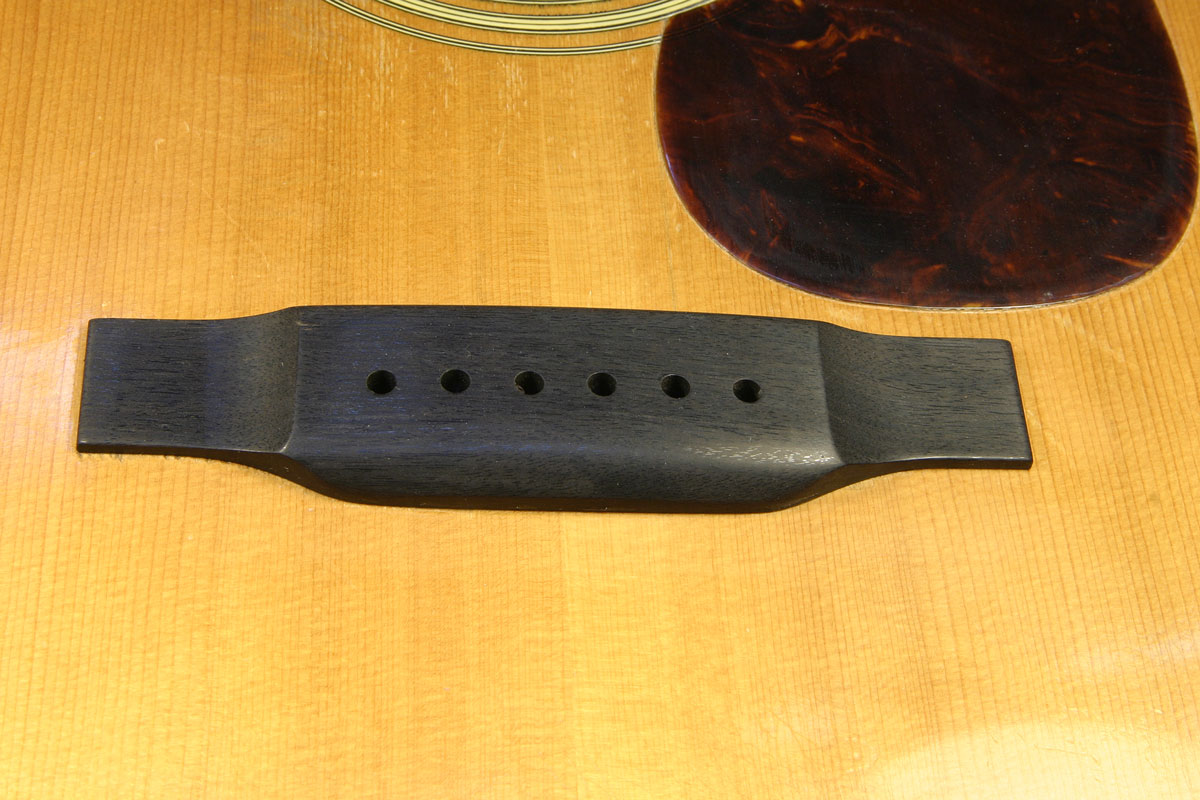
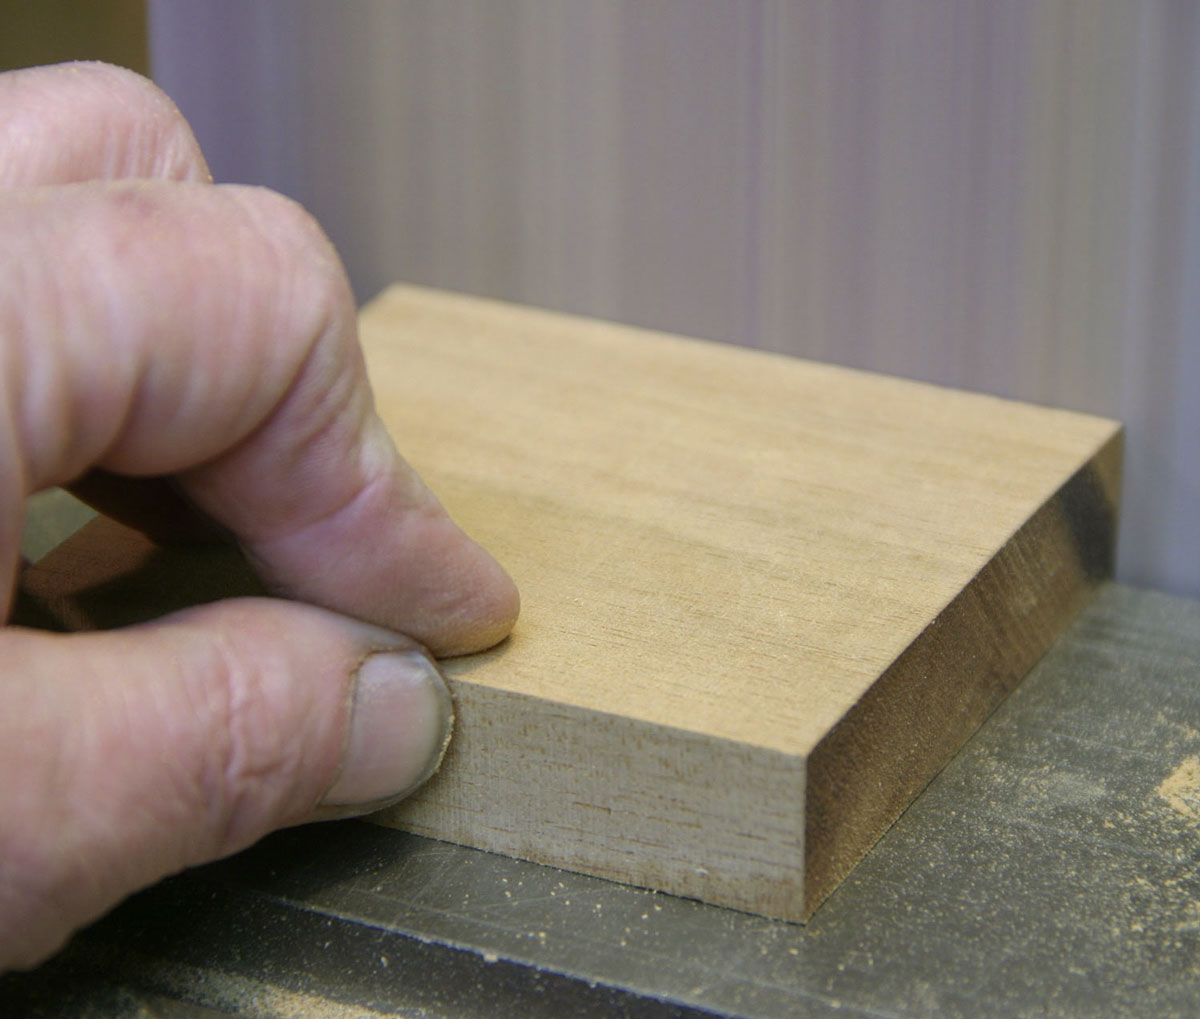
Here's the ebony bridge "blank" I'll use:
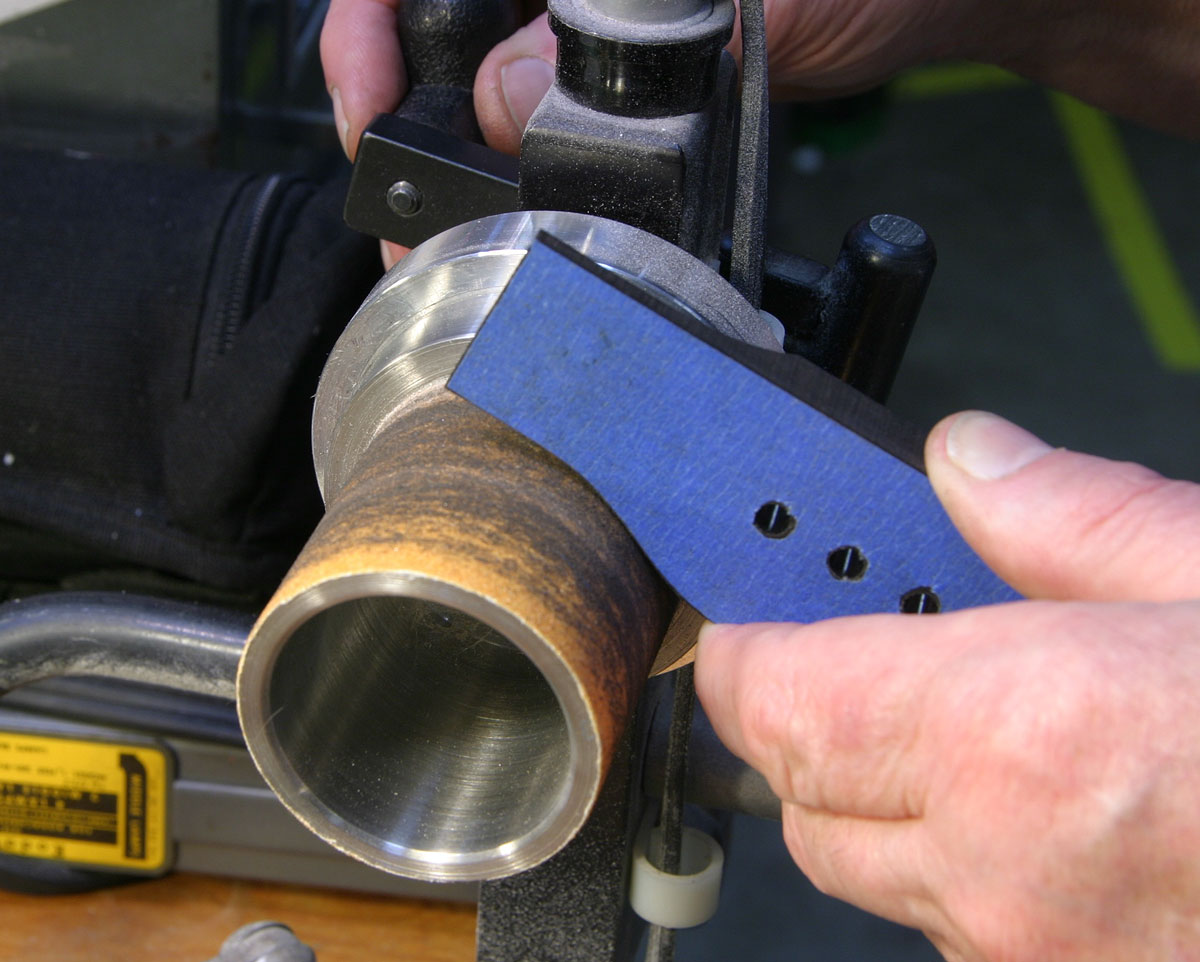
We make quite a few Martin style guitar bridges at Gryphon, and, since each one is slightly different, we like to start with an oversize rectangular piece so we can match the contours of the original as needed. I machine these blanks with the proper 1" radius scoop at the ends, to give us a head start in carving.

Because vintage Martin bridges were made by hand, they don't all have exactly the same footprint, and, in fact, they are not quite symmetrical, either. To get an exact pattern, I cover the bottom of the original bridge with tape, and use a razor blade to trim it:
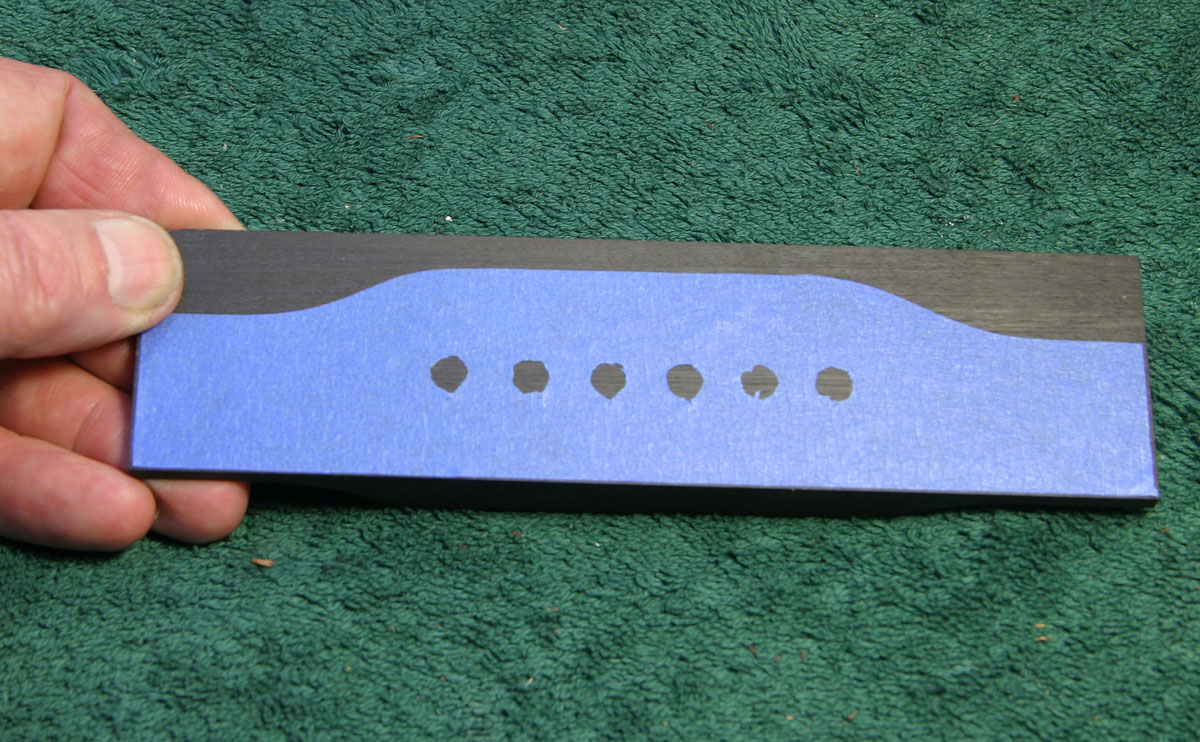
After cutting the holes as well, I have a nice pattern I can stick on the bottom of the new bridge blank, and thereby transfer the shape directly:
I try to work from the back side as much as possible to maintain hole alignment, so I'll actually set up and drill the bridge from the back.
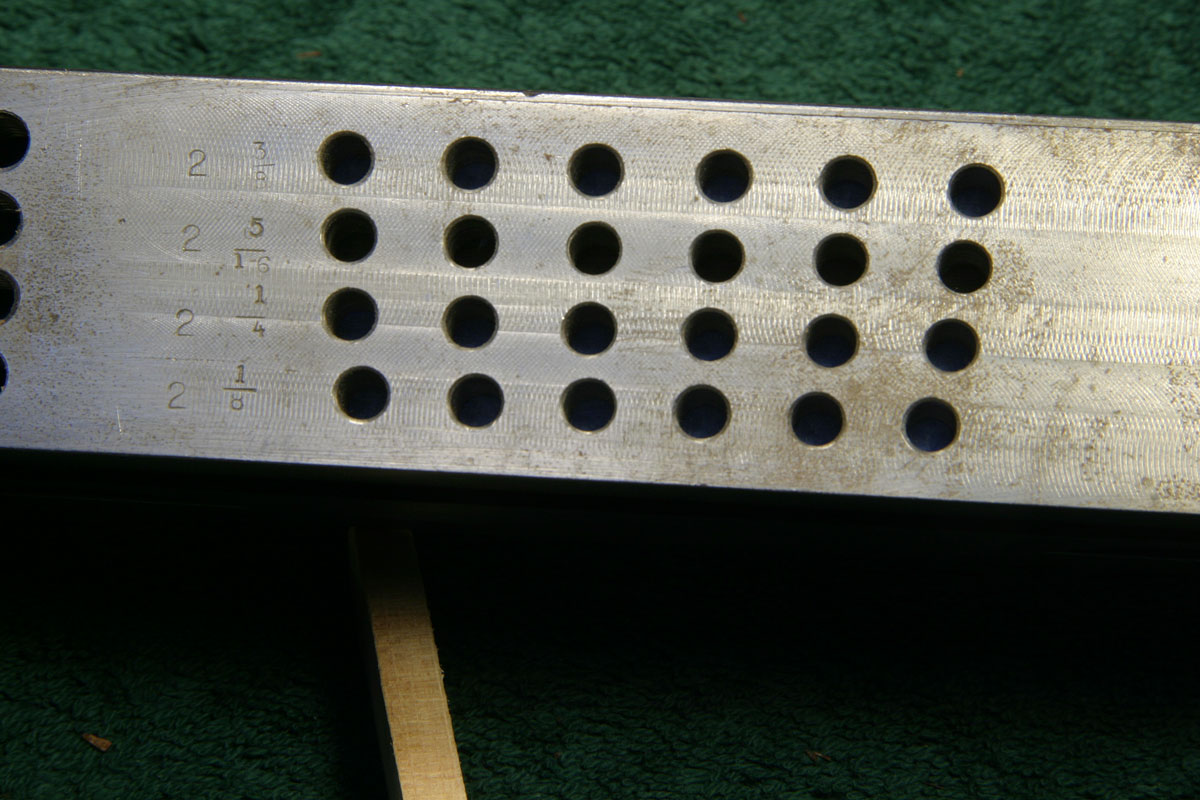
Here's a simple bridge drilling fixture I made up a few years ago:
There are four rows of holes for the four most common bridge pin spacing on Martin guitars. (LMI used this one as the prototype for the one they have in their catalog, by the way.)
With the bridge clamped into the fixture, aligned so the holes in the tape matched up with the 2-5/16" spacing of the jig, I drilled through the blank:
Because the blank was about 1/8" over the final thickness I didn't worry about tearout as the drill bit went through.
So far, so good:
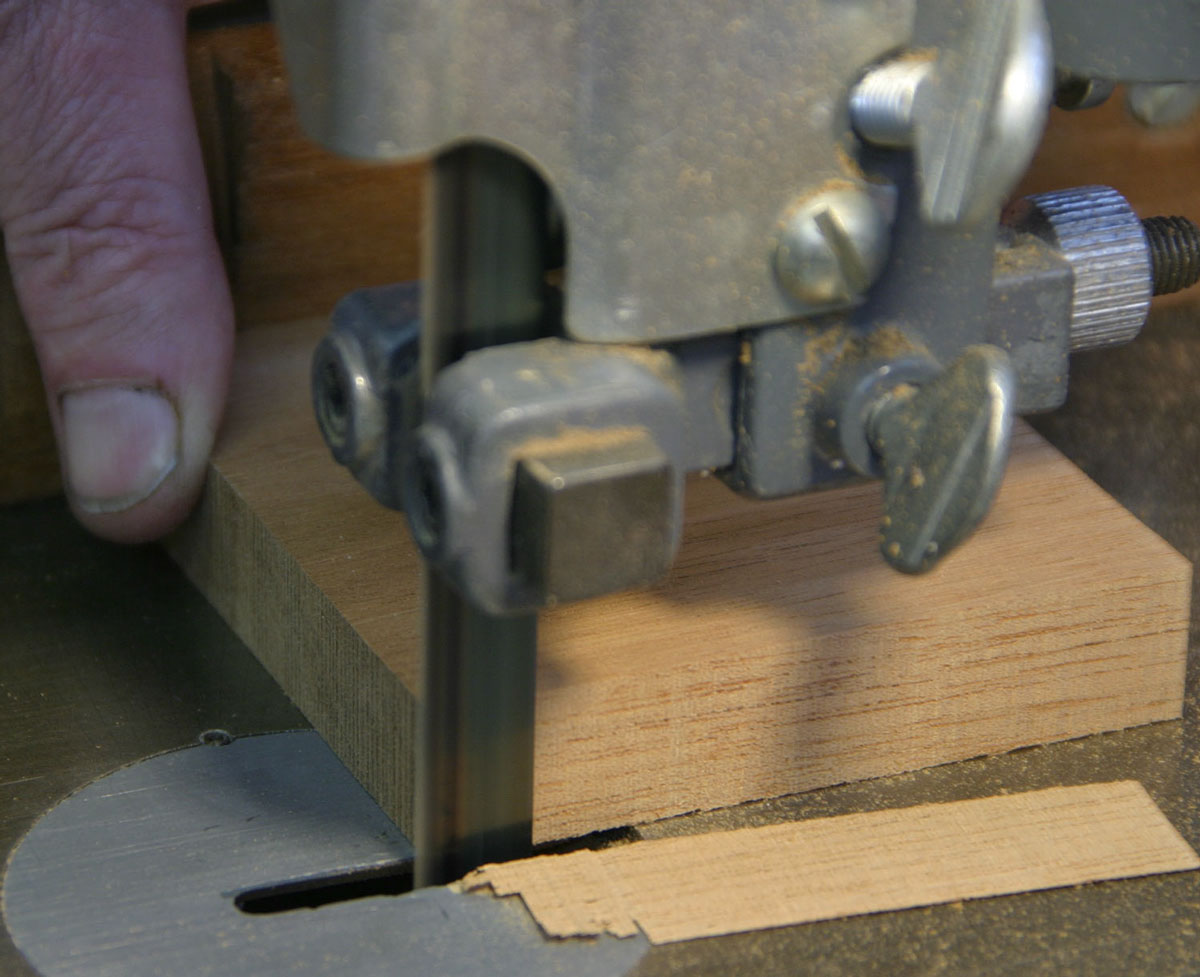
Rough cutting on the band saw, I tried to keep within about 1/16" of the tape pattern:
Then I was able to sand "offhand" on the upper roller of our 6" belt sander to establish the outline right up to the edge of the tape:
And, using a little hand crank sander, I was able get in close safely and run right up to the tape's edge:
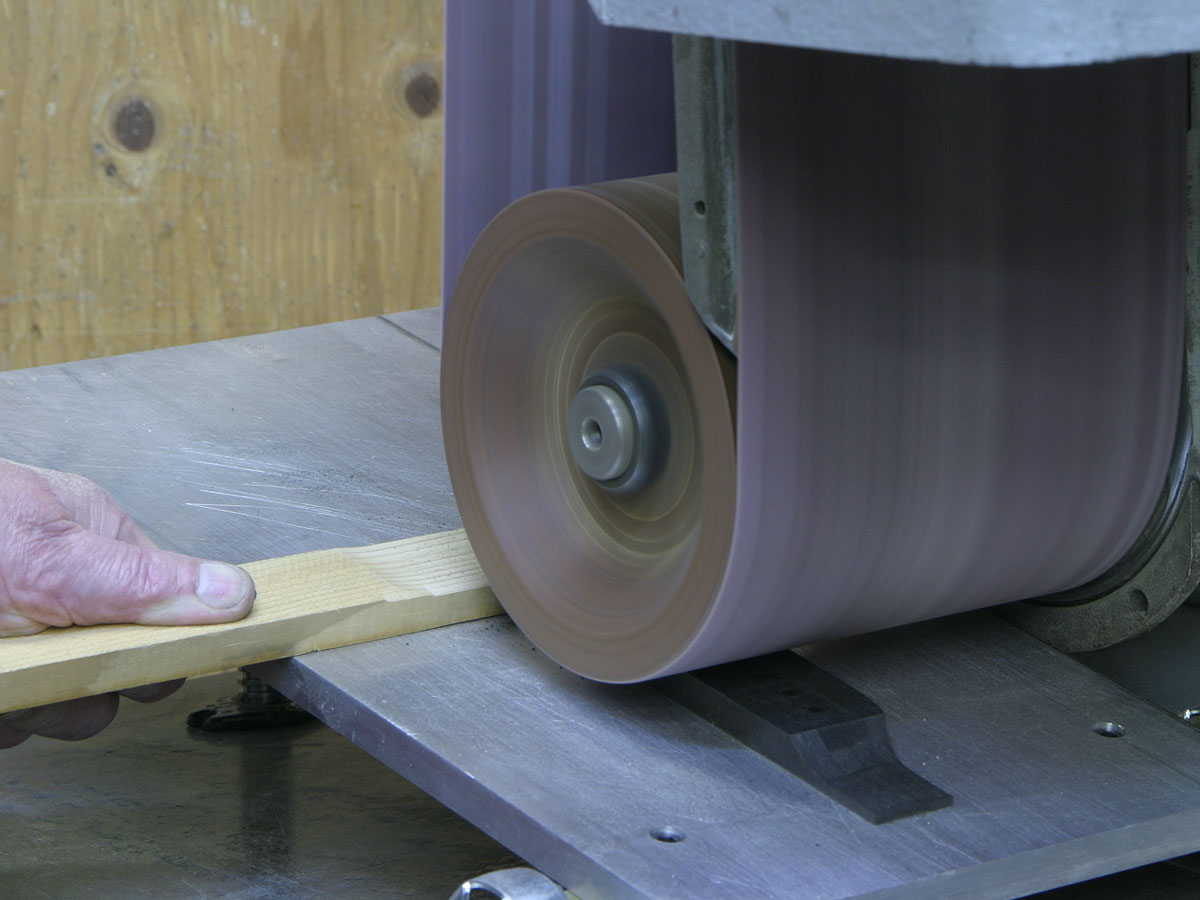
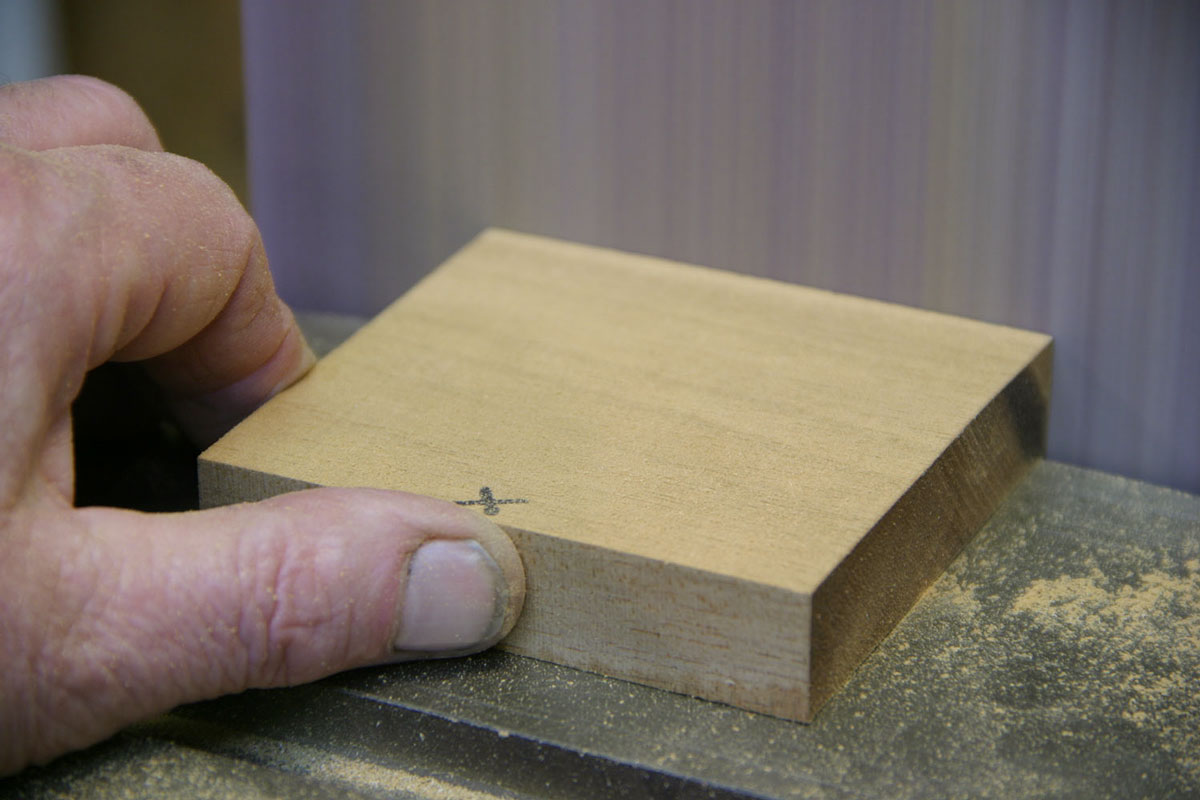
Both of our stationary belt sanders have adjustable tables beneath them for thicknessing small wood pieces. I used the big sander to bring the bridge down to .39" thick:
I'll get to the final thickness of 3/8" in the process of shaping and sanding the bridge.

By alternatly pressing on the ends of the bridge, I was able to create an appropriate curve for the top of the center section:
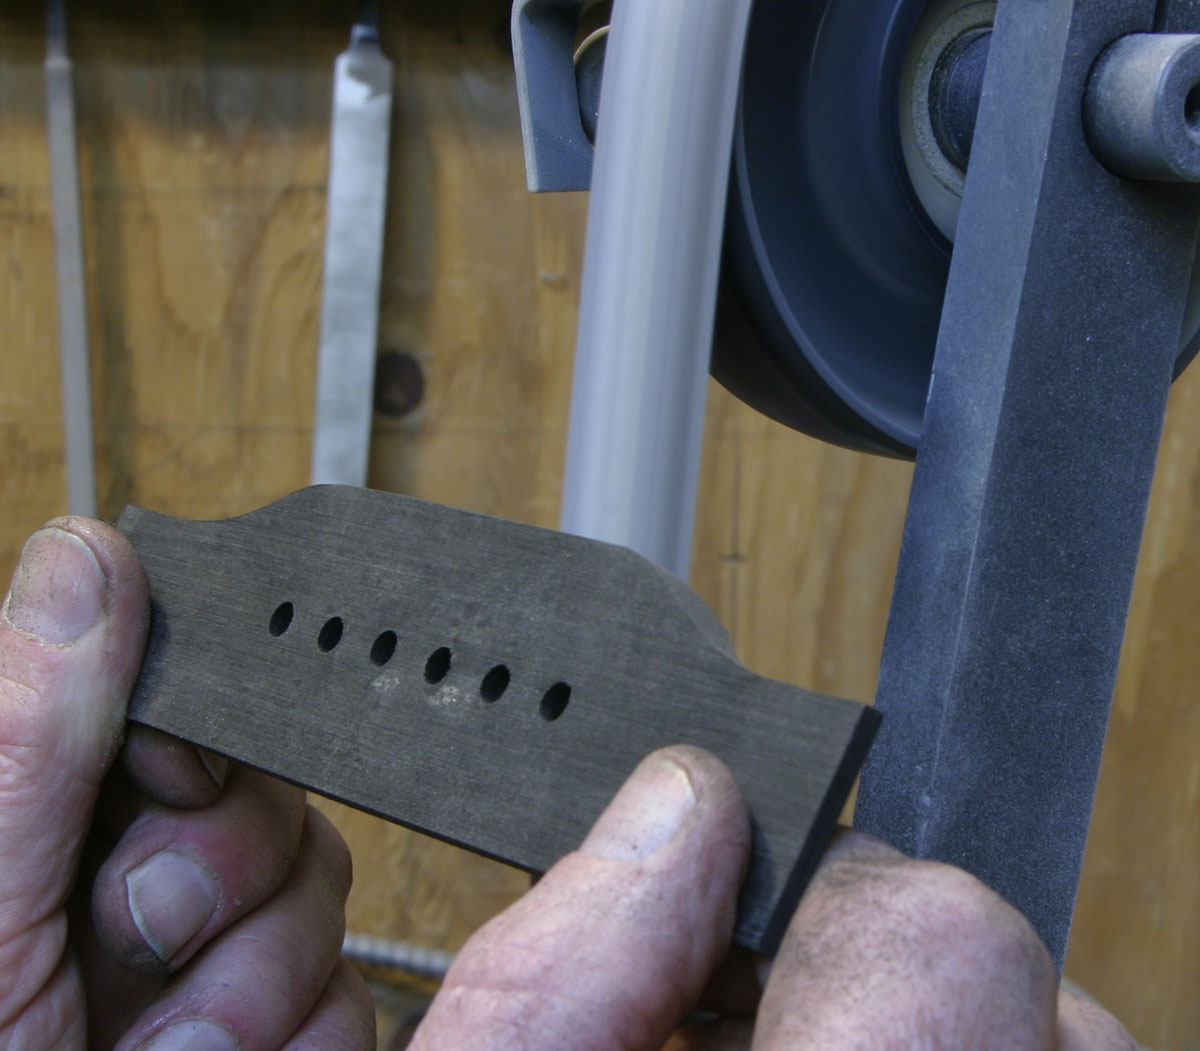
And, by offhand sanding on the 1 x 42 belt sander above the platen, I was able to take advantage of the flexibility of the running belt to establish the rough curved shape of the front and back of the center section:
This sander is set up with a variable speed DC motor drive, so I can slow it way down for special uses, such as this one.
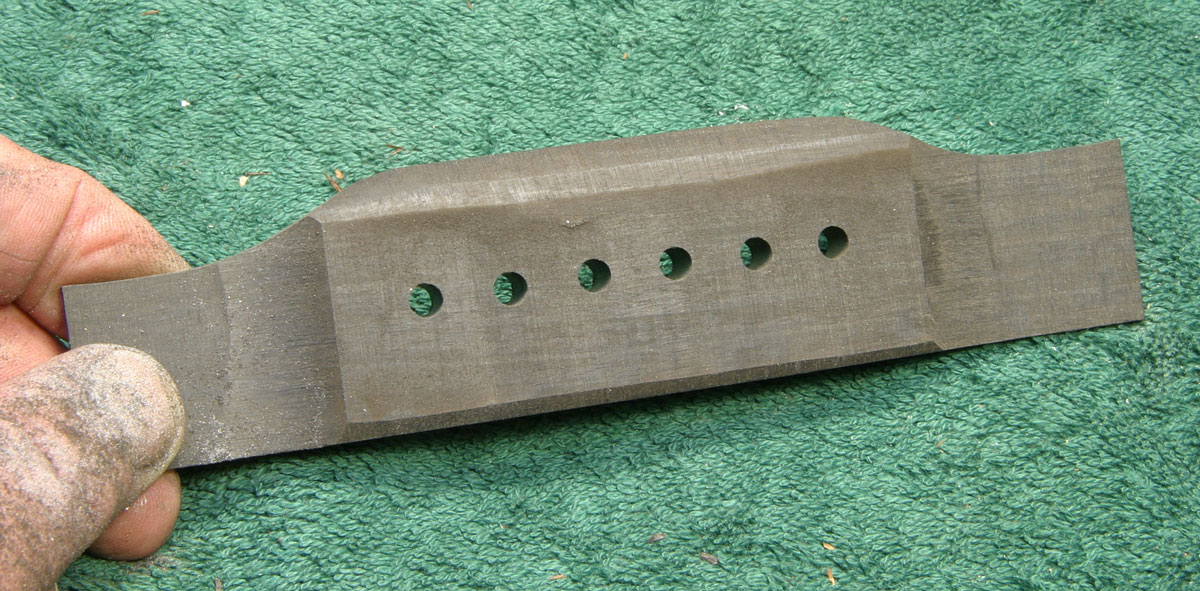
Here's the final "machined" bridge:
That's the end of my power tool use, and from here out, I used flat and shaped sanding blocks to smooth, round, and create the curves to make the bridge look as though it came out of Martin's workshop in 1937:
As I worked on the bridge held in the vise, I had a nice original 1937 bridge balanced on the anvil section of the vise:
That's one more reason why we keep so much old junk in the shop. That bridge was a cracked but otherwise fully original one we took off a 1937 000-28 when we made a new replacement one. I glued the crack up, labeled the bridge, and stuck it in the box labeled, "Old Bridges for Patterns." In the restoration business, there's nothing like having the real thing in front of you when you need to copy something!

As I sanded and shaped the bridge, I'd walk over to the buffer and run the bridge against the soft wheel with black plastic polishing compount to give it a high shine:
It's a trick I use to check my progress and to make sure I've eliminated any tool marks or sanding scratches. Below, you can see the heavy belt sanding scratches on the center section, and a completed, smooth end:
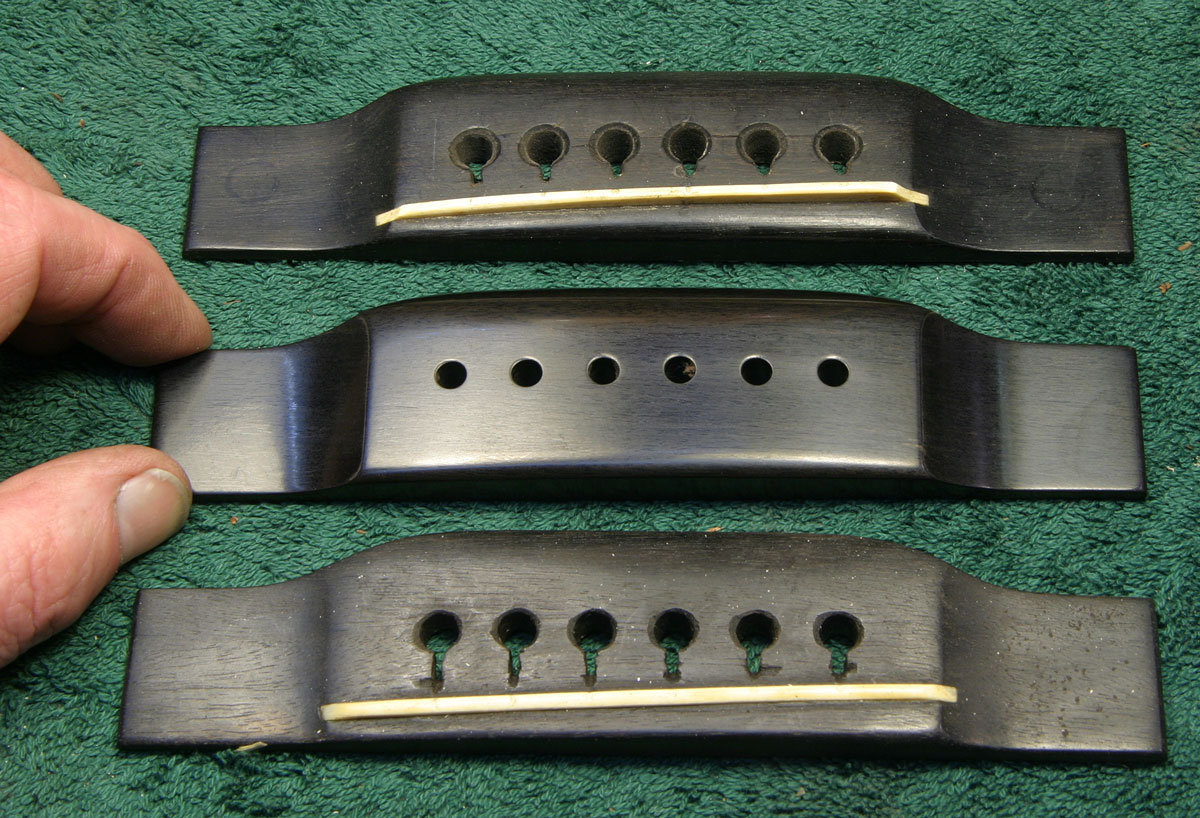
Well, my new bridge is finished, and here it is between the original 1937 000-28 pattern I used for copying the contours, and, below, the original D-28 bridge I used to copy the exact footprint:
Mine is a bit too shiny at this point, but it will loose a bit of that polish as I glue it to the guitar, and wash off the excess glue after the job is done.
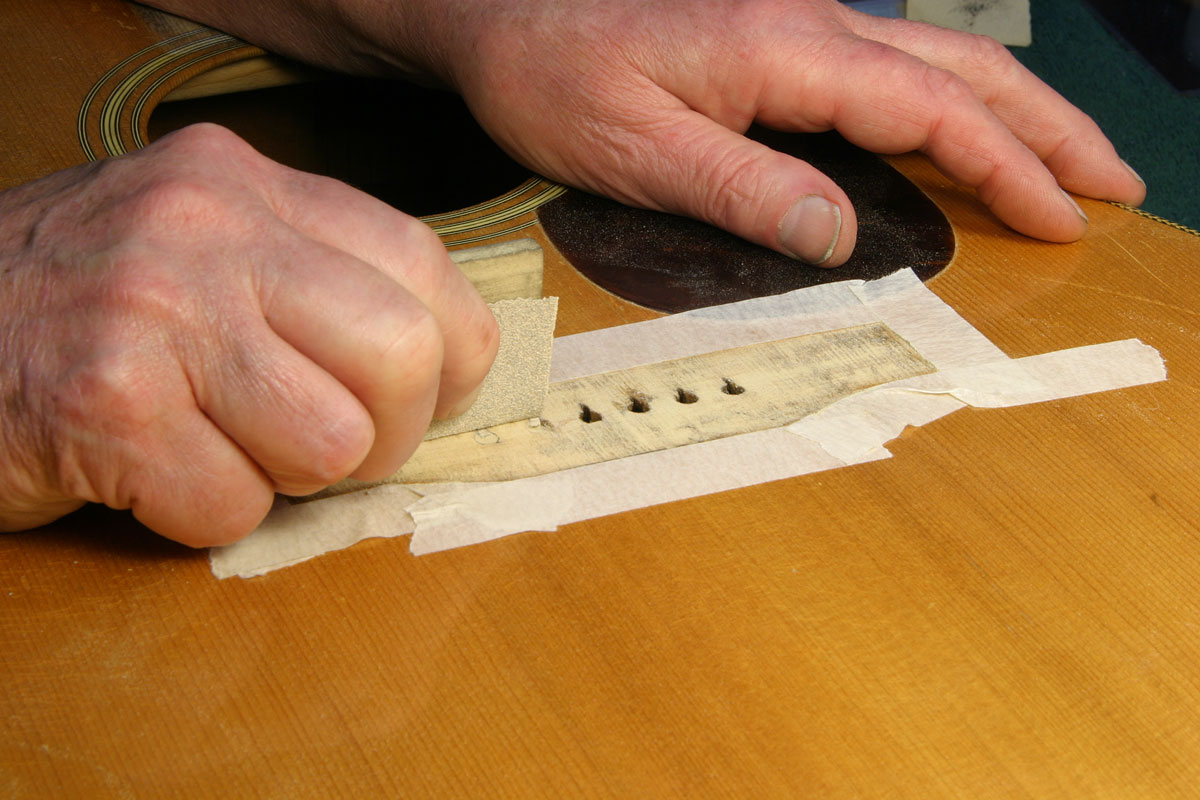
The guitar top was in fine shape, so I had only a little block sanding to do to level th surface, and remove oxidation that might impair glue adhesion:
I masked the top with some very low tack tape so I wouldn't scratch any of the finish if I dragged the sandpaper past the margin where the bridge will go.
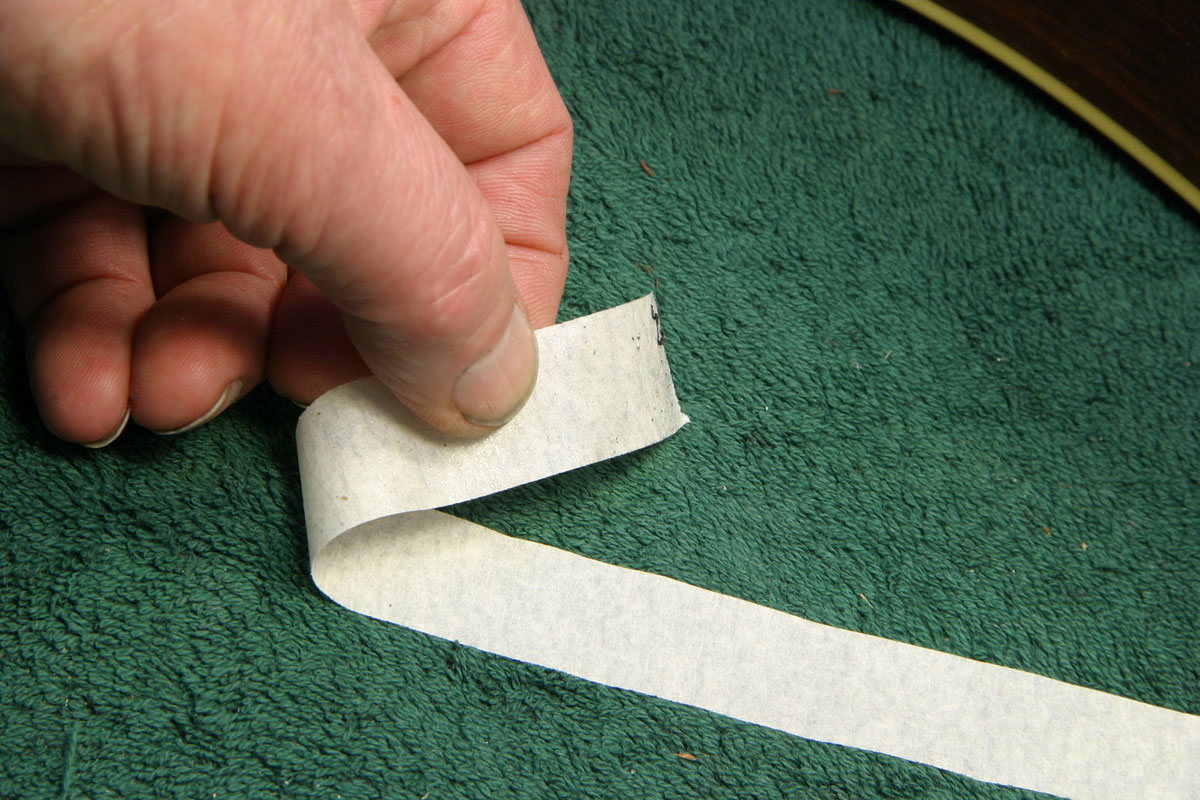
Incidentally, my favorite low tack tape is regular masking tape. I just stick it down to the towel pad on my bench, and it picks up enough dust to become low tack tape. Two stick-downs, and I have really low tack tape:
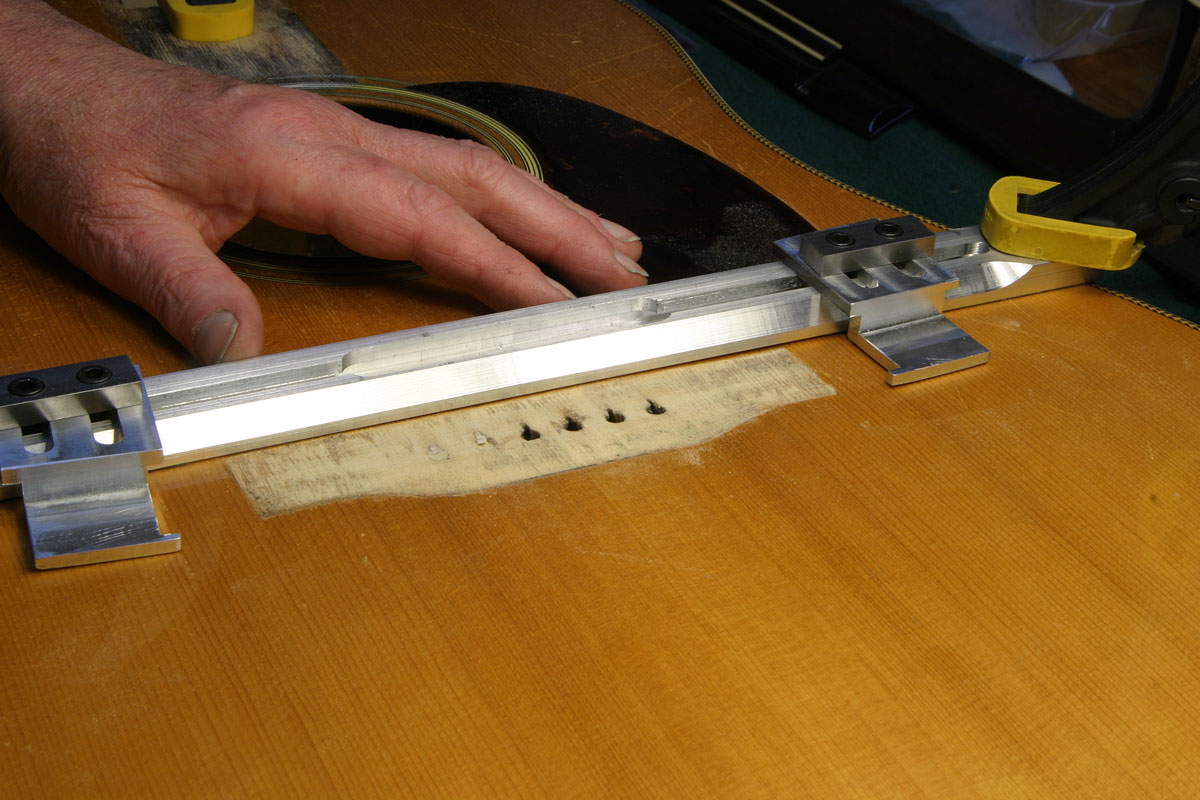
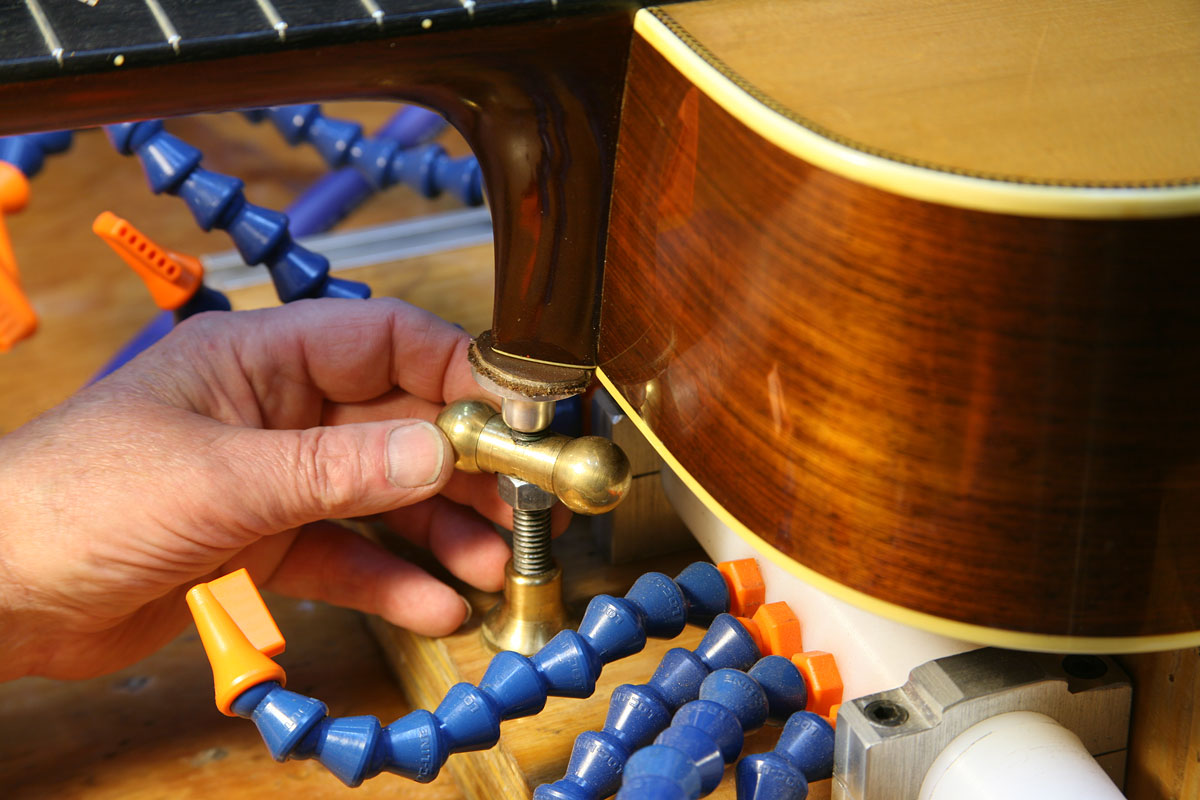
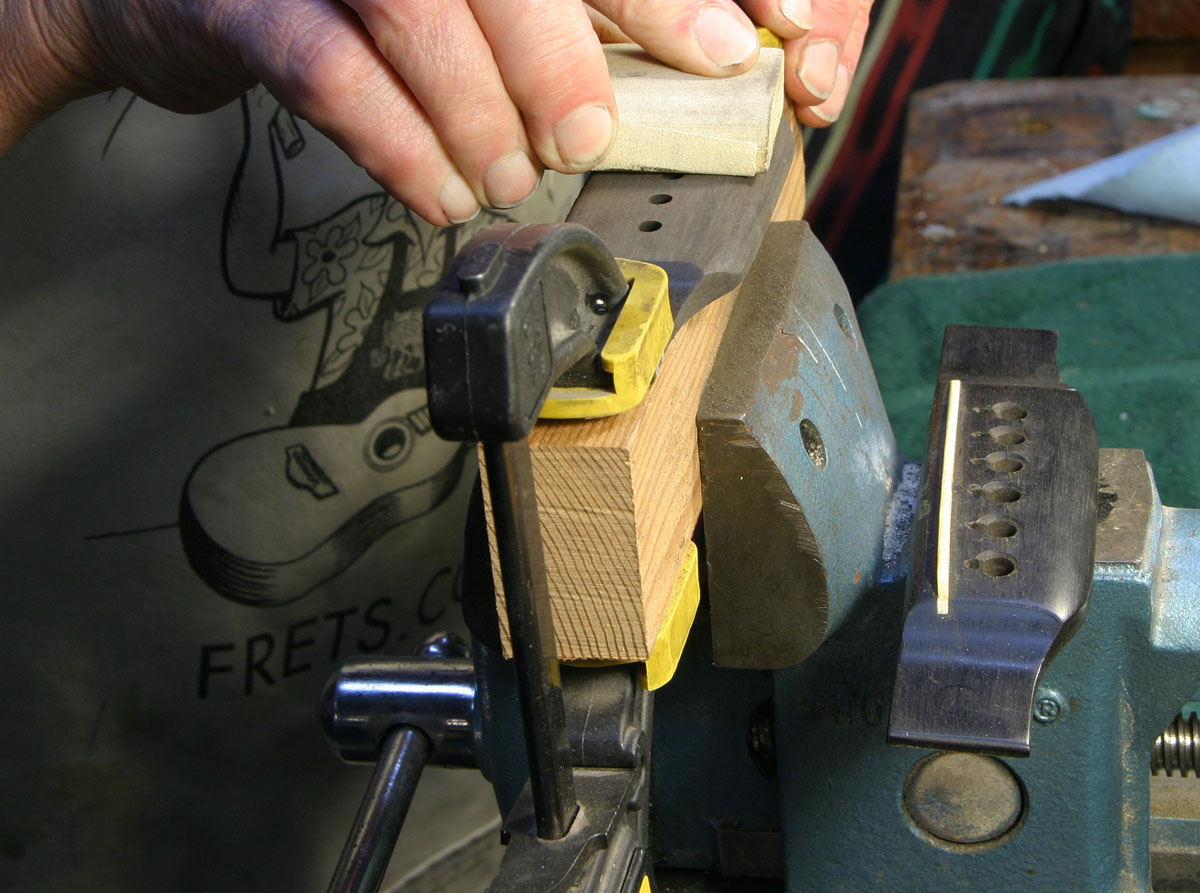
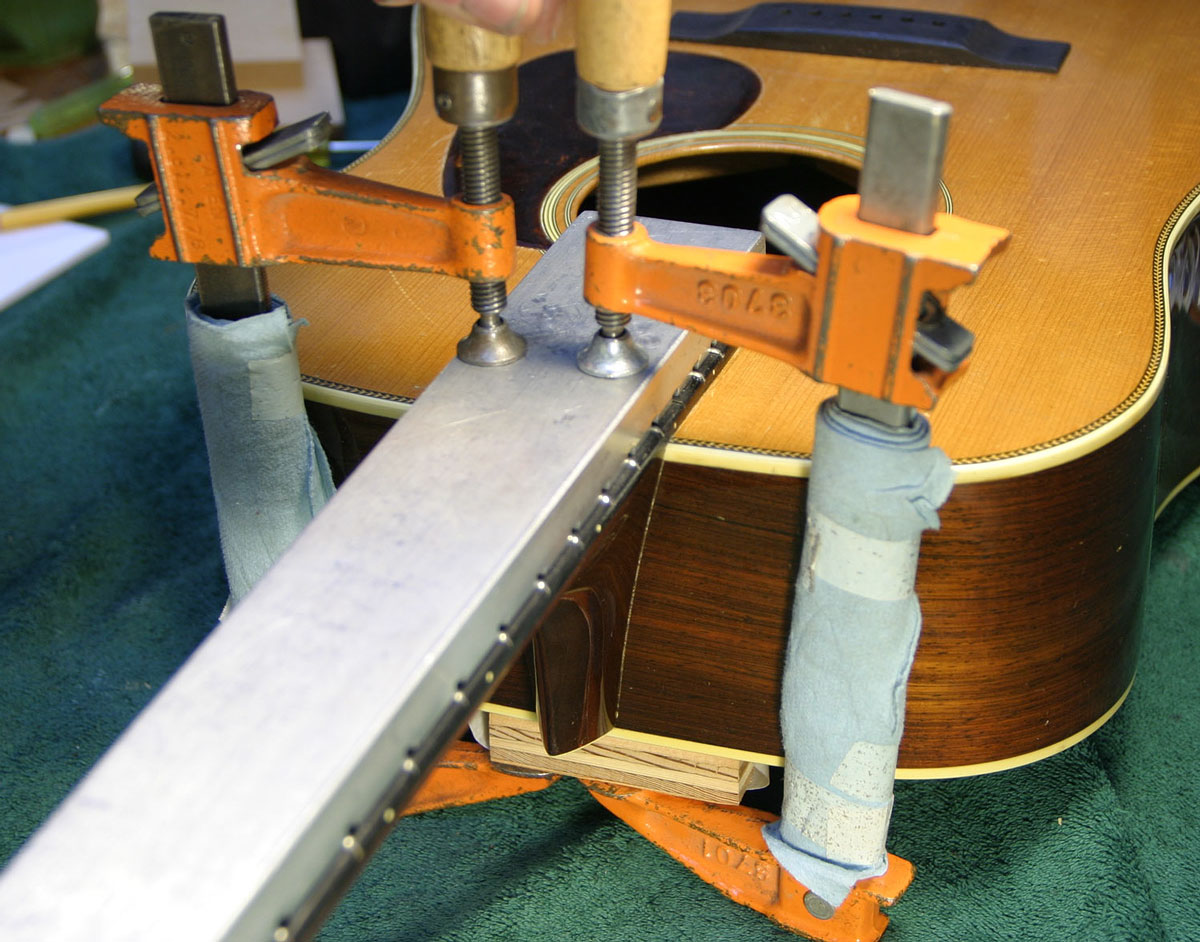
Here's anothe new fixture in the shop. I'm still working on the design, so I'll call this "Mark 1" for now. It's a bar with adjustable fingers I can use to capture the bridge precisely in position prior to gluing:
There are lots of ways to position bridges for gluing, including pins or bolts that go through the holes, but I've found that none of those are completely foolproof, so I set about figuring a really solid way to hold the bridge.
Once I've established the front edge and clamped the fixture to the guitar, I simply slide bridge into exact position, bring in the fingers, tighten them up, and I'm certain that the bridge won't move at all when I'm applying clamping pressure:
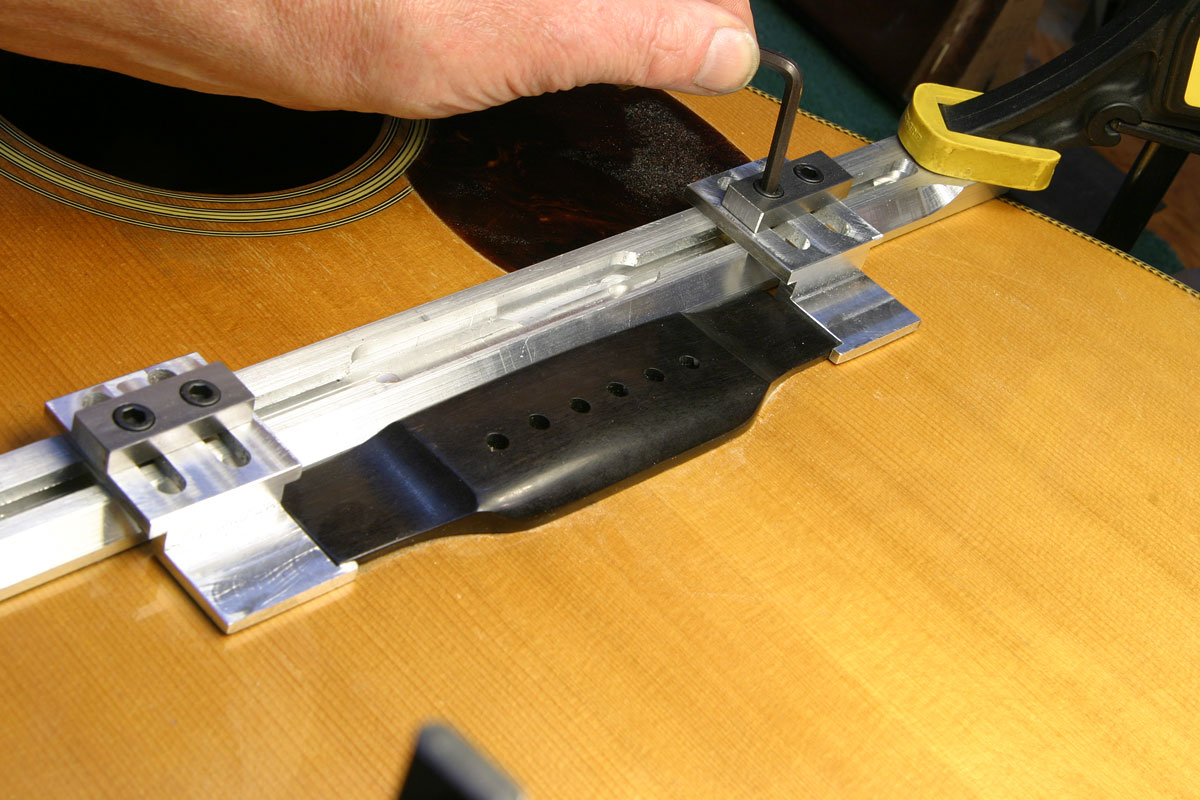
Here we go - a mop of fresh hot hide glue:
Plop the bridge into the fixture, tighten the clamps, and that's it:
Once the bridge is clamped, off comes the locating fixture, and I can easily clean up the squeeze-out with a bit of warm water and paper towel:
After the usual overnight clamping and cleanup, here's the bridge, awaiting further work - after the neck is set into the body:
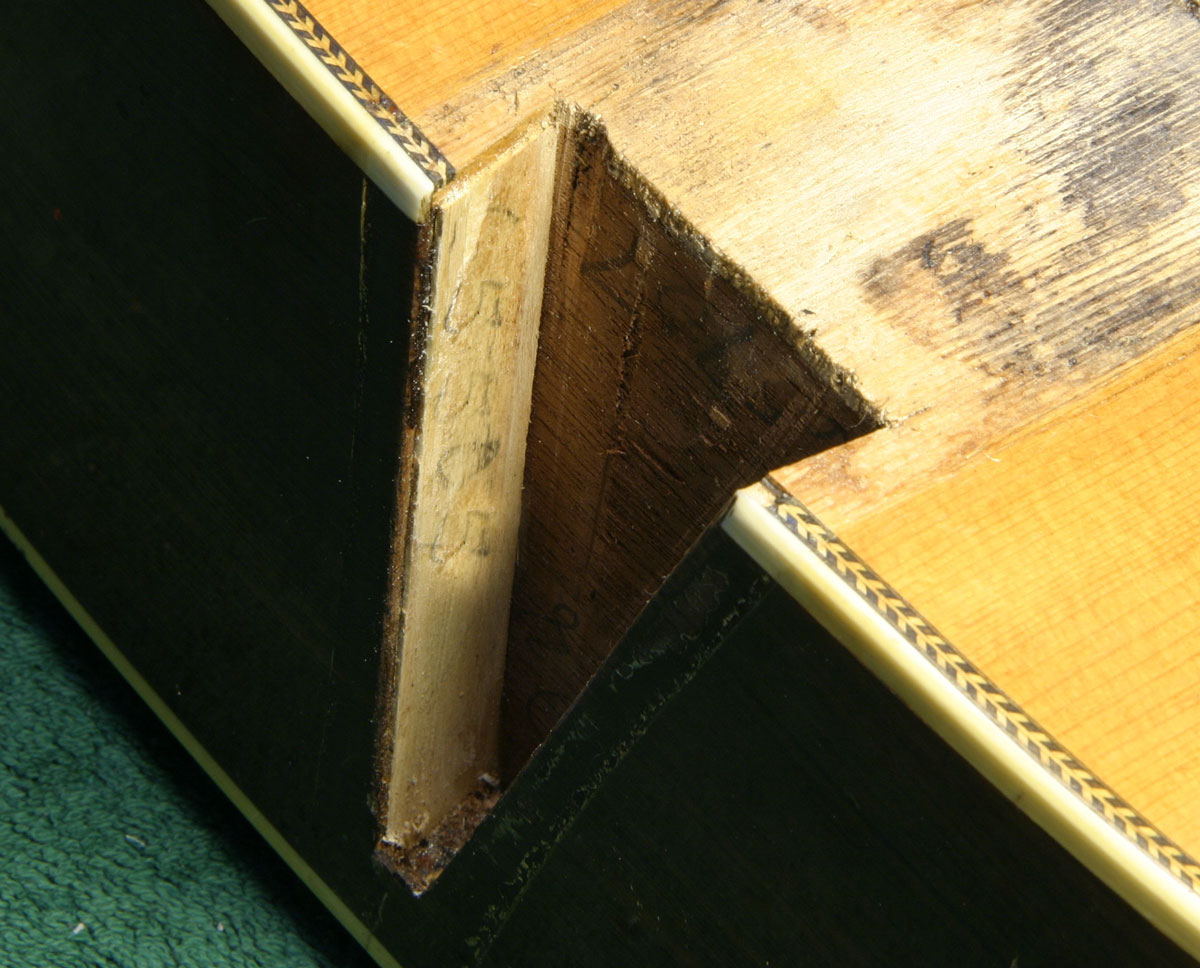
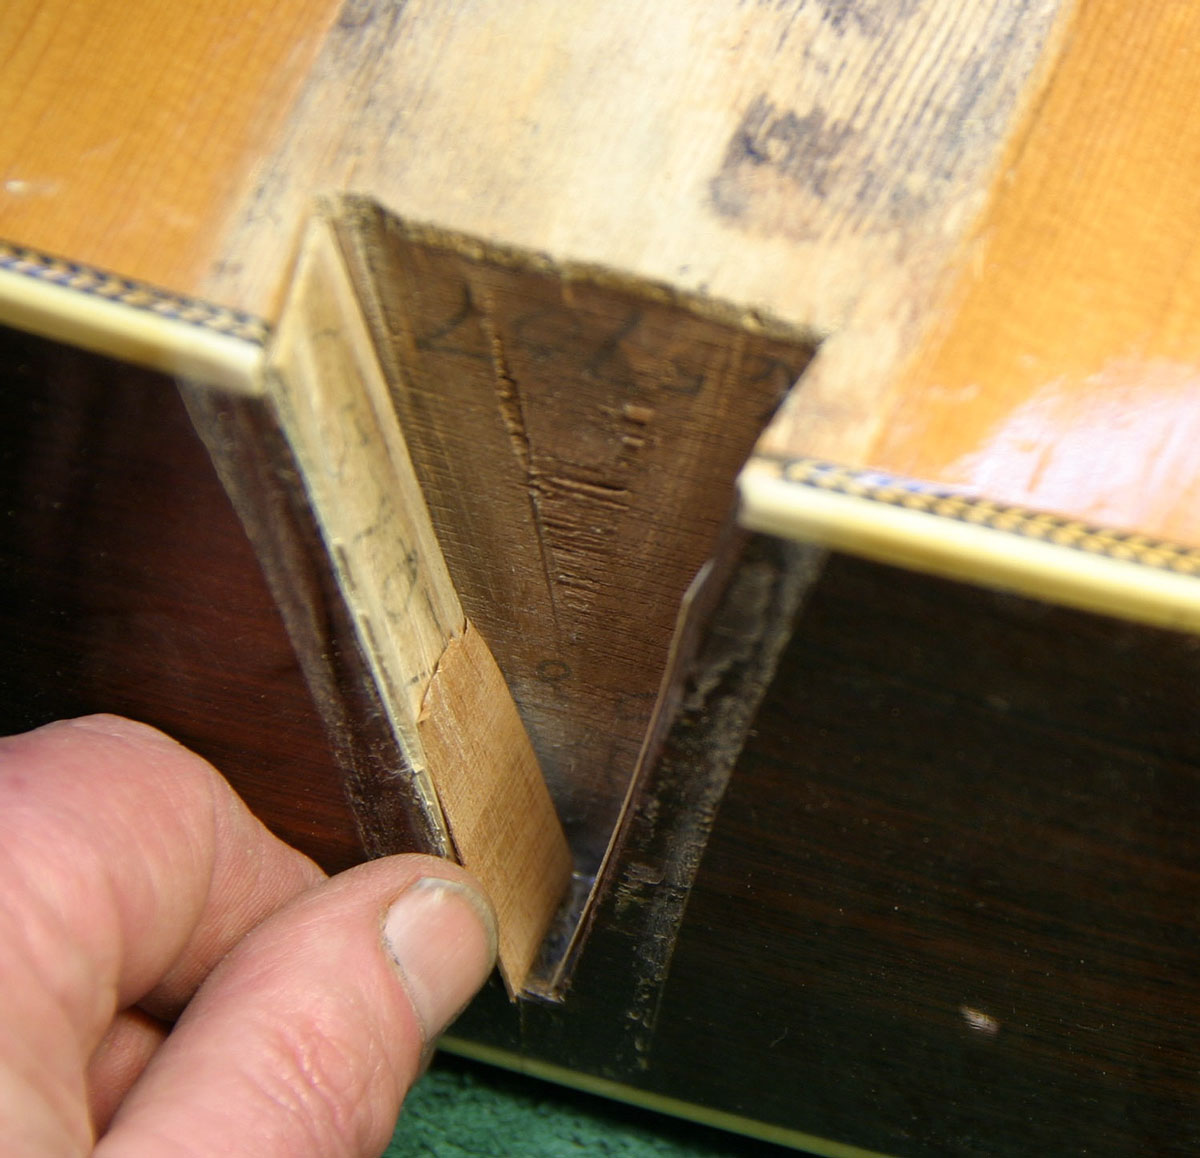
There is a single original maple veneer shim inside the dovetail pocket, and you can see that it has the guitar's serial number written in pencil:
(I've obscured a few digits as a courtesy to the owner of this fine instrument.)
Because the shim is still tightly glued in place, I chose to leave it there rather than remove and replace it.

Another special tool I made up, this is a flush cutting saw that mounts in the milling machine:
I countersunk three flathead screws in the blade to secure it to the arbor, and because there's no set in the teeth, they hardly scratch the fingerboard as I use it to cut into the dovetail:
The reason for slotting the top of the dovetail is so that when the neck is tilted back and reglued in place, the end of the dovetail won't force the fifteenth fret area of the fingerboard to rise, creating a little hump there. Before I made this tool, I used a hacksaw blade, and struggled to avoid damaging the fingerboard. This method is not only much easier, but it gives a cleaner result.
Notice how the blade cuts neatly without damaging the fingerboard as it slices through the top of the steel truss rod and the dovetail itself:
This little gap will fill with glue as the neck is reset and reglued, and it will create no structural weakness in the area.
Most of the rest of the process of resetting is a matter of slowly cutting the dovetail joint - in particular the face of the end of the neck that contacts the body. I started with a bit of chisel work to rough cut the angle, and to undercut the area just a bit:
I did the final angle adjustment by drawing slips of abrasive paper through the joint as I held the neck against the body:
Since I wanted to bring the neck backward, the natural cutting action of the abrasive was more concentrated at the base of the heel. As I pulled the paper through, the entire length cut uniformly in a taper because the abrasive left the area at the top of the joint right away, while the bottom of the joint saw the full length of abrasive come through.
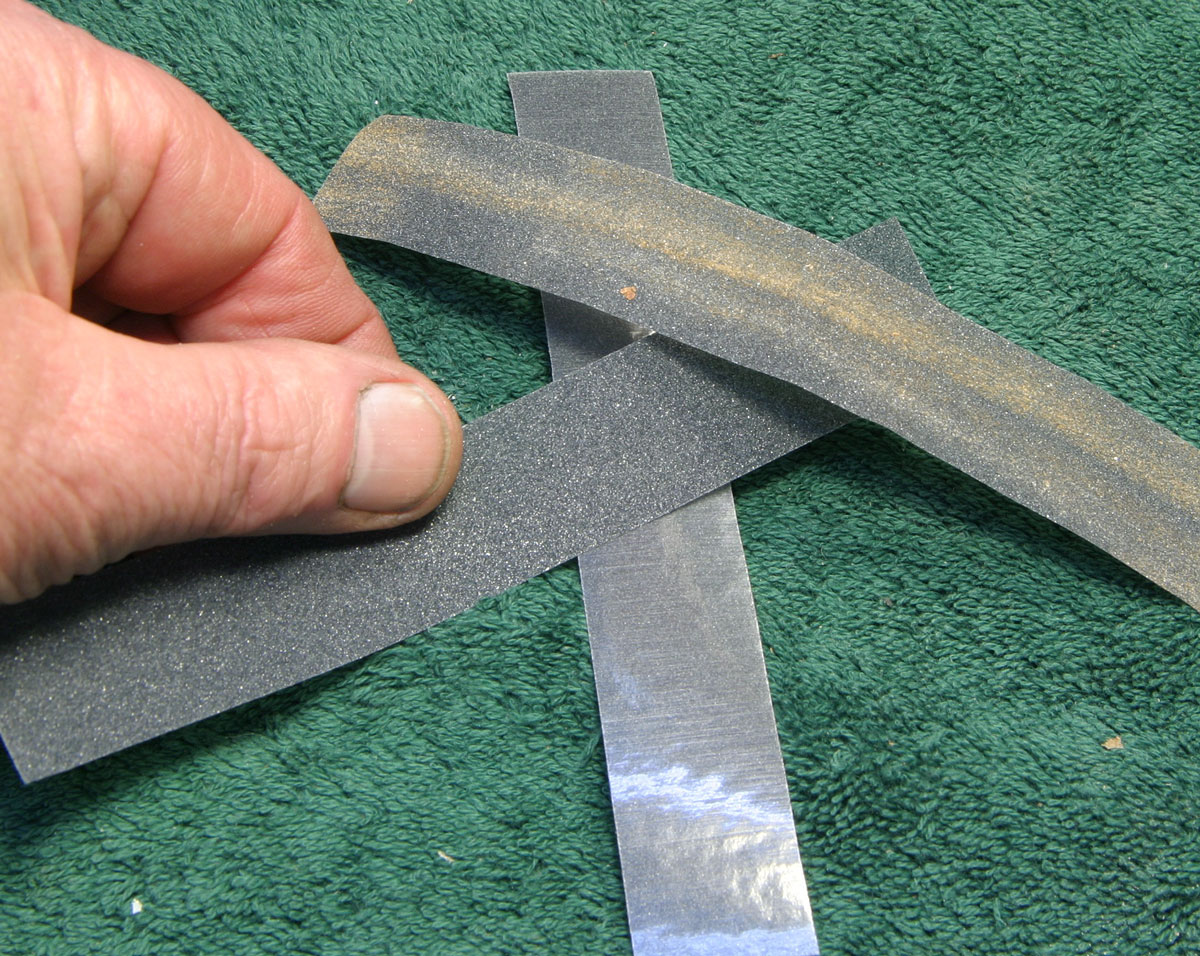
My abrasive paper isn't really paper, but Mylar film with 150 grit silicon carbide bonded to one side:
It's much stronger than paper, and the smooth Mylar surface is nice and slippery, so it's ideal for this job.
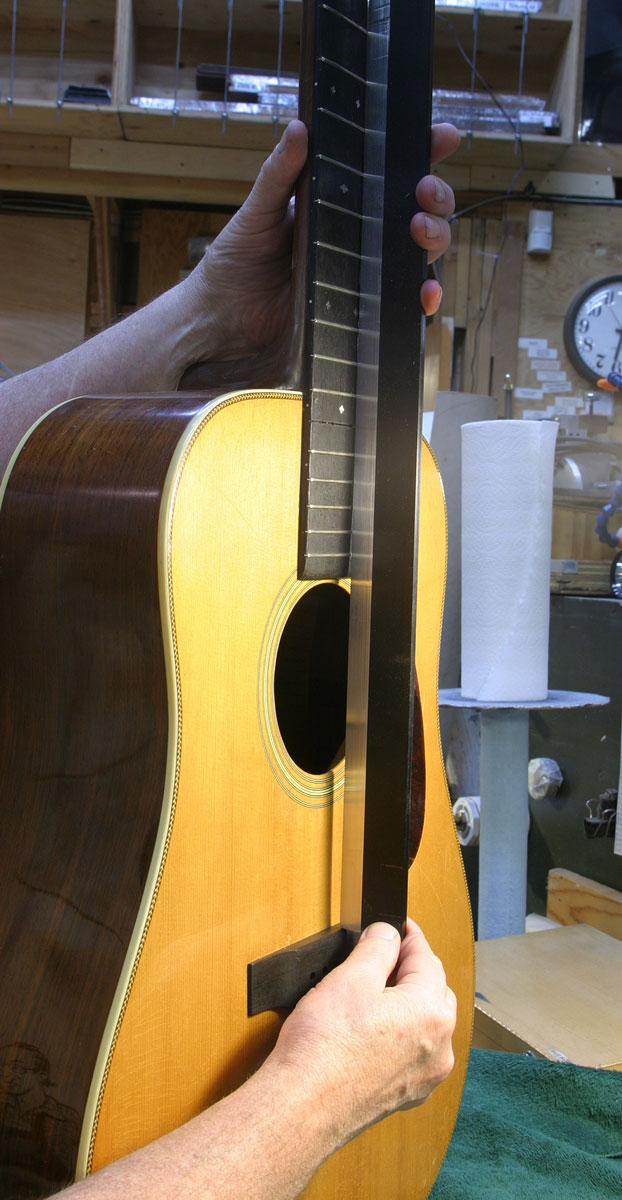
Each time I used up a couple of strips, I'd stop and check the angle with my straightedge, being sure to hold the neck firmly in the joint:
Rinse, repeat. . .
After a number of sandpaper pulling sessions, and constant checking with straightedge, I had the neck set at what I determined would be an appropriate angle in relation to the top of the bridge. In addition, I constantly checked for side-to-string alignment as well.
All this joint fitting would require some additional shims to tighten the dovetail, which now fit deeper into the pocket at the base of the heel, allowing the neck to tilt backward appropriately.

Trial fitting various shims, I decided on a thin maple shim on the bass side of the joint, and a tapered mahogany one on the treble. The two shims made the dovetail lock nice and tight as it was pressed downward into position:
Just for general interest, here's how I make those super thin tapered shims:
First, I true up a block of hardwood, either by hand planing or belt sanding one edge:
That edge will bear against the band saw fence, so I mark it so I don't forget which edge I've trued up. Then, I cut a bit of the other edge, so the block will have parallel edges:
Then, I take the freshly cut edge to the belt sander, and sand a slight angle into the block:
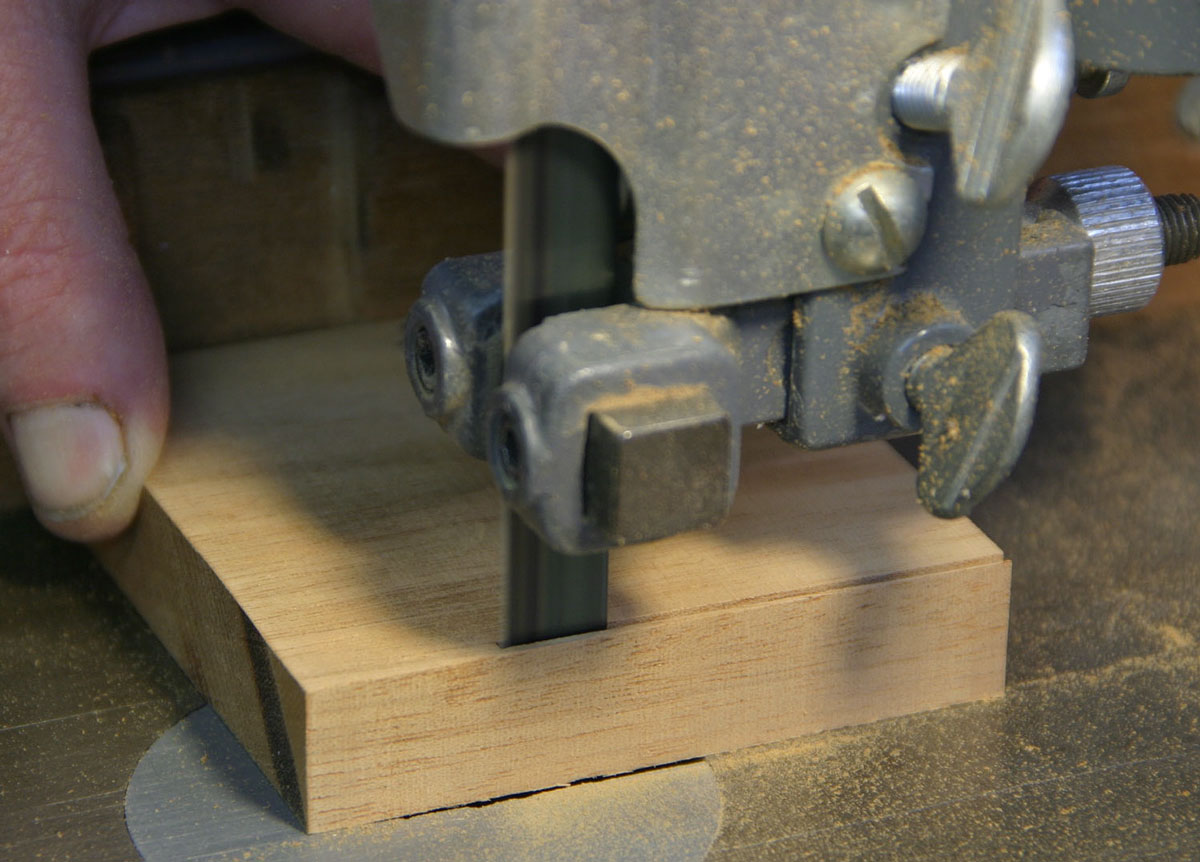
Back at the band saw, I reset the fence to start a cut as shallow as possible at the narrow end of the piece, and, riding on the fence, I can cut a nice slice off the tapered edge of the board:
The result is a nice tapered piece, paper thin at one end, and thicker at the other:
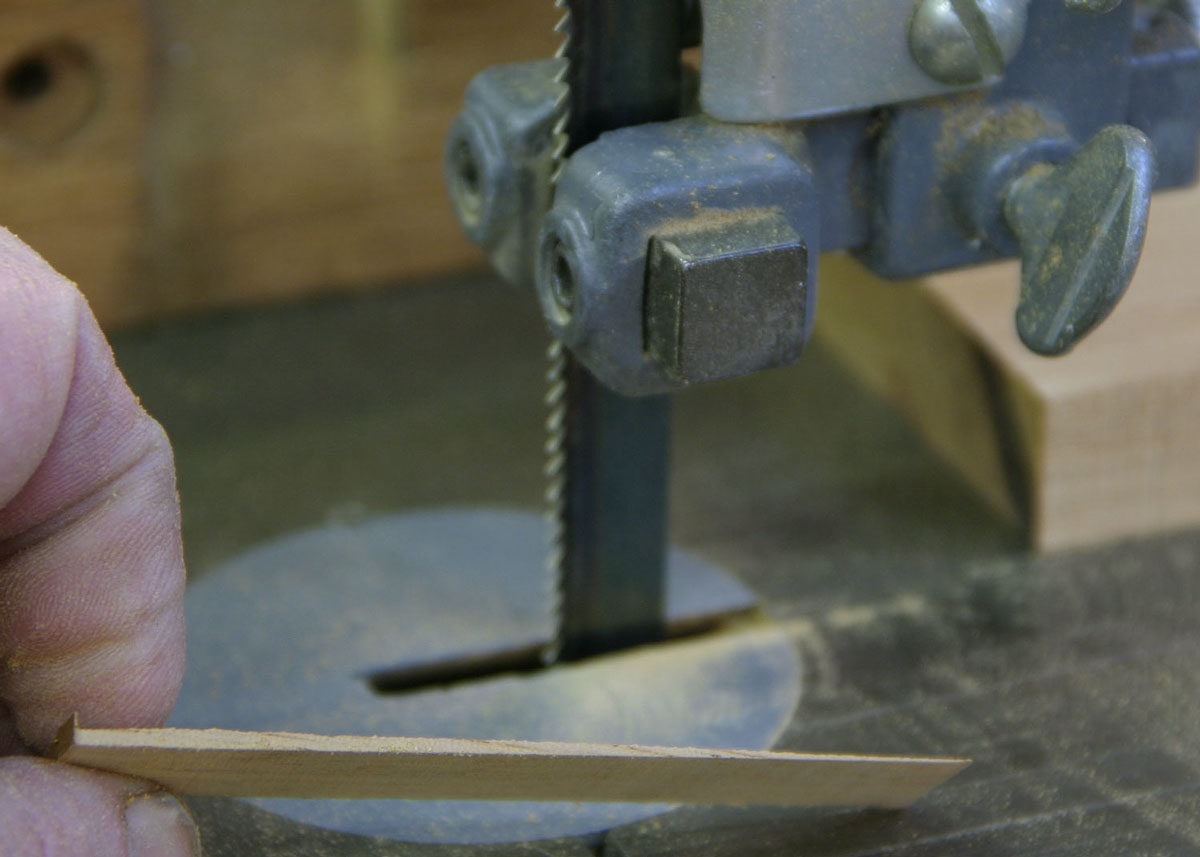
I make these shims ahead of need. They are so quick and easy to produce that I can have dozens of them with varying thickness and angles on hand when I'm looking to shim a joint.

A quick pass on some sandpaper gives the rough cut surface a nice truing up:

That's a band of masking tape, sticky side out, to improve my grip on the little slip of wood.
Now, just in case the photos above make it look like I might cut my thumb off with the band saw, here's how I like to handle pieces if my hand is to be between the blade and the fence. With my fingers wrapped around the other side of the fence, there's no possibility that my hand might slip toward the blade:
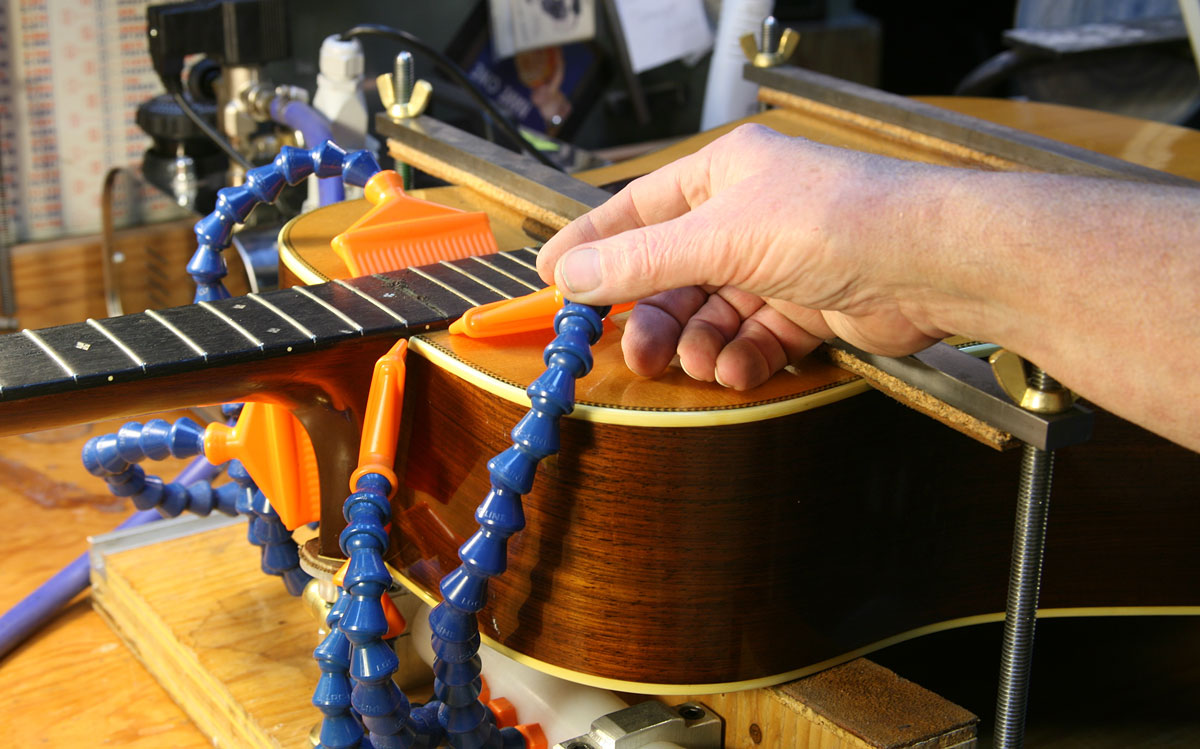
Painting some hide glue on the joint surfaces and shims, I put the neck joint and shims back together and clamped up with a caul on top to protect the fingerboard while allowing it to seat against the top of the guitar without flexing:
I used two clamps, not for the extra pressure, but so I'd have good clearance between the clamps and the neck so I could do one final check of the neck angle and side-to-side string alignment before setting it aside overnight for the glue to dry.

Here's s shot of that fingerboard clamping caul - it has two rails to press at the outward edges of the board, and is relieved to avoid pressing on frets:
This is anothe tool I made up in my home machine shop, and I use it for gluing on fingerboards as well as for neck resetting.
Another overnight drying episode before starting out on
As with the neck resetting portion of this article, I'm not going to present each and every step. For that kind of detail, you can turn to any of the several articles on refretting listed in the /Things For Luthiers/Repair Technique/Guitar/Frets/.
I will illustrate some of the job, though - mostly the stuff that's unique to this guitar.
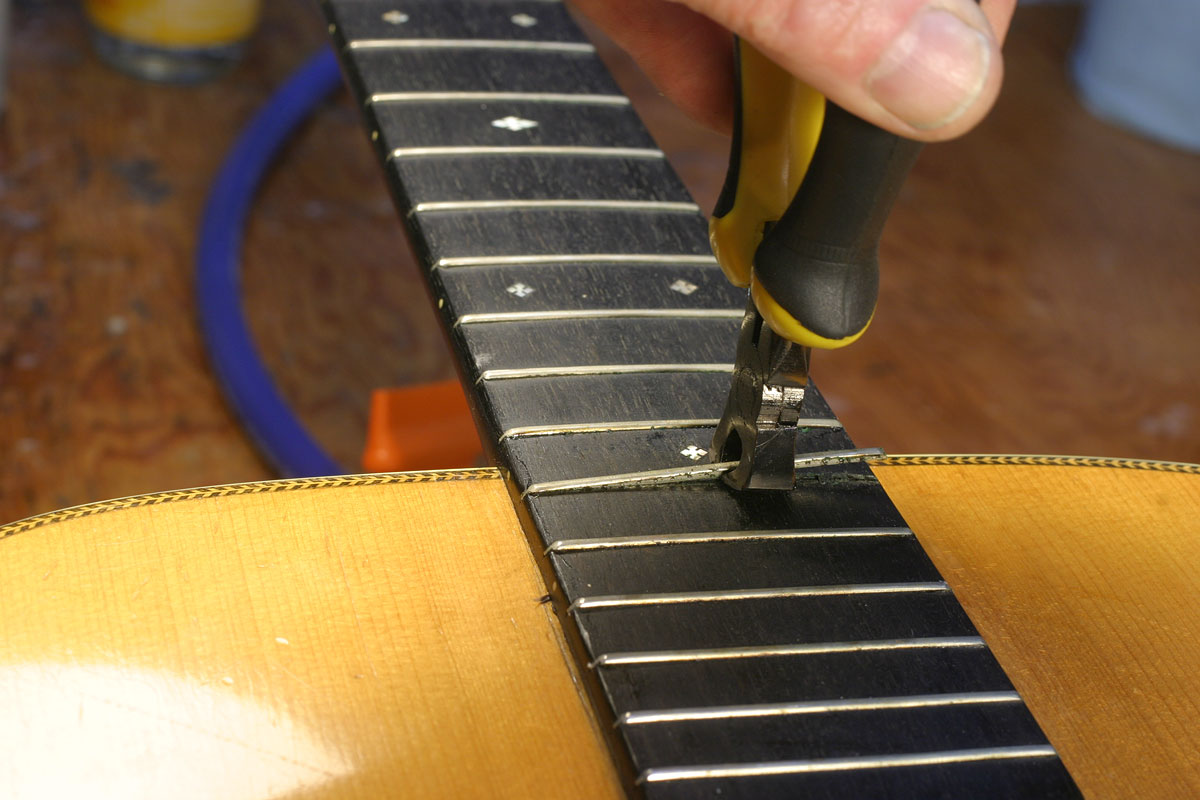
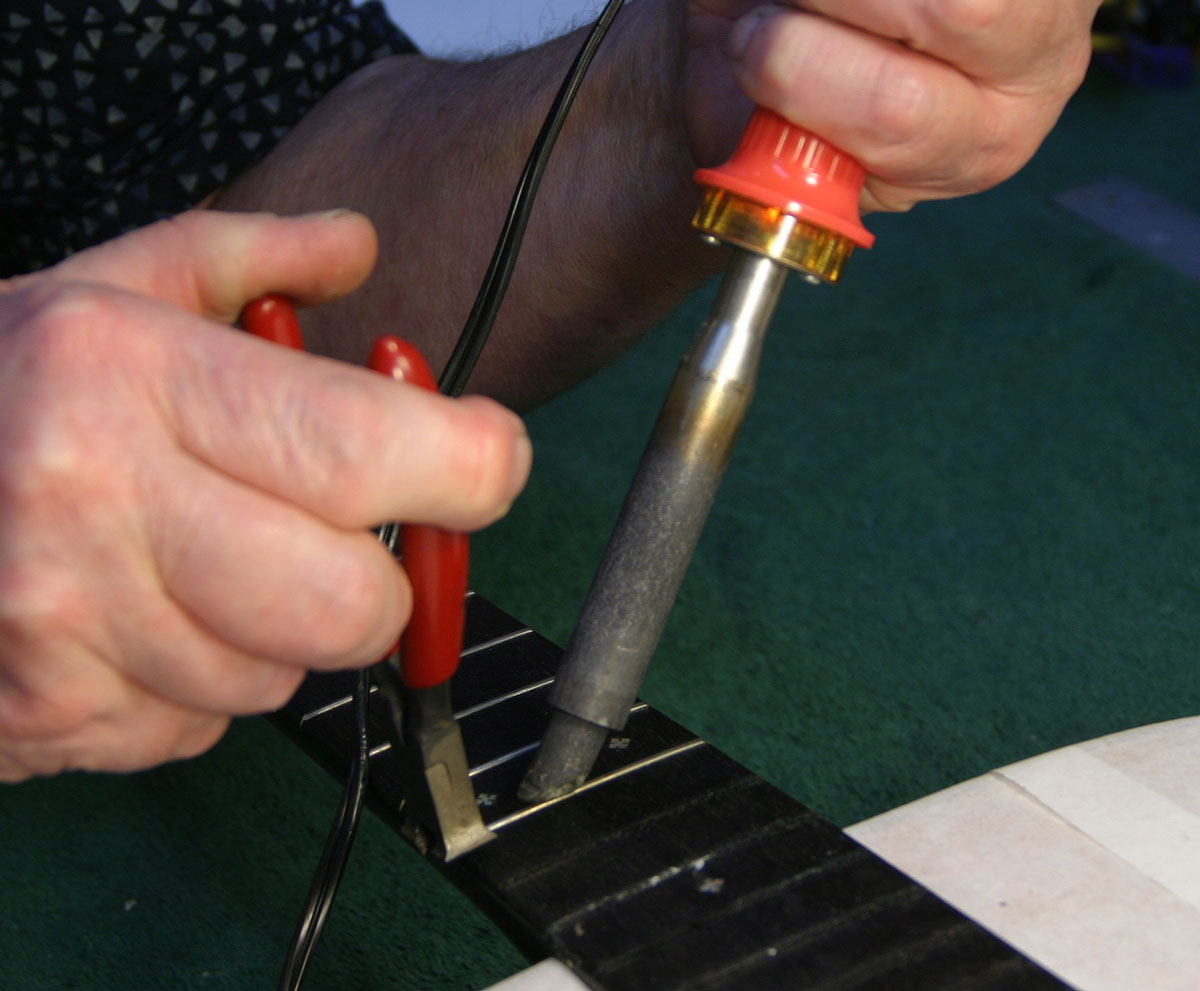
I always use a fair amout of heat when removing frets. The heat of this 80-watt Weller soldering iron is usually sufficient to get the frets hot enough that they sear their way out of the slots without causing chips in the surface of the fingerboard. As each fret got hot enough, I pulled it out with my flush cutting end nipper:
The frets came out nicely, even the first six which had been set in with hide glue:
I'd say that in addition to the entire fingerboard having been refretted at one time, the first six frets were subsequently replaced by a different luthier.
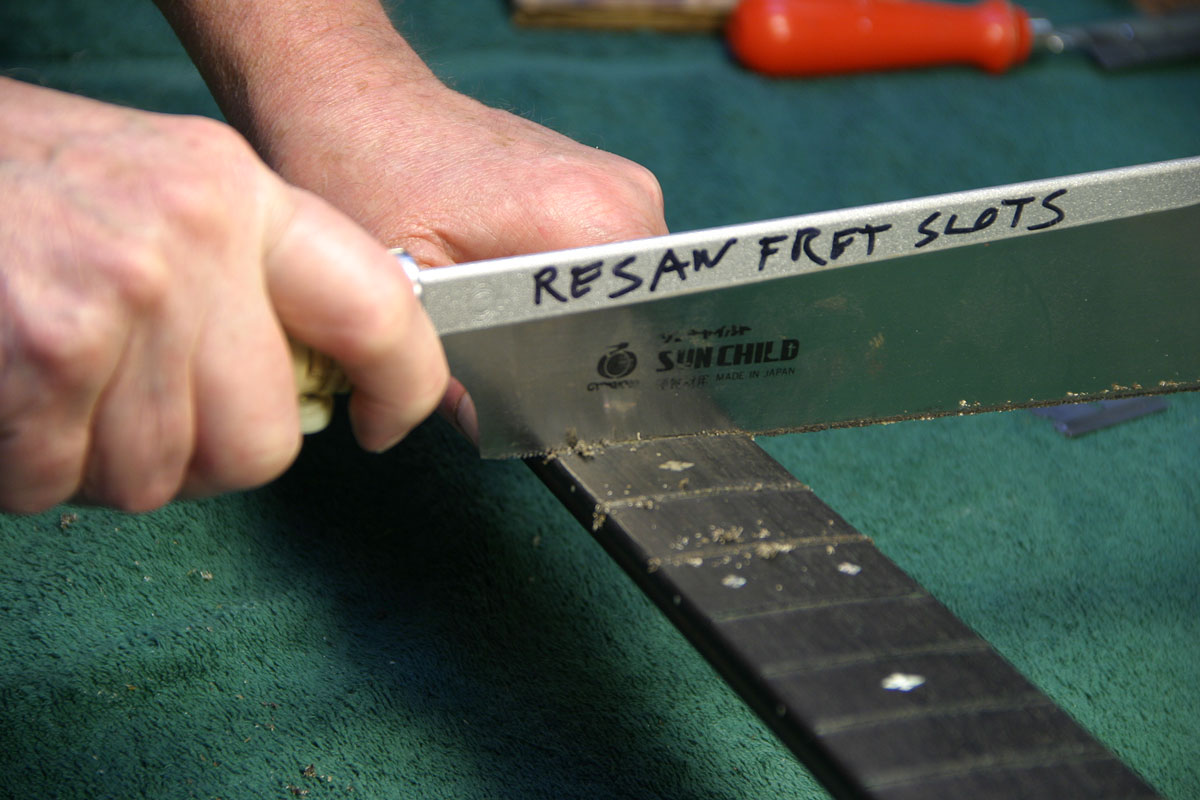
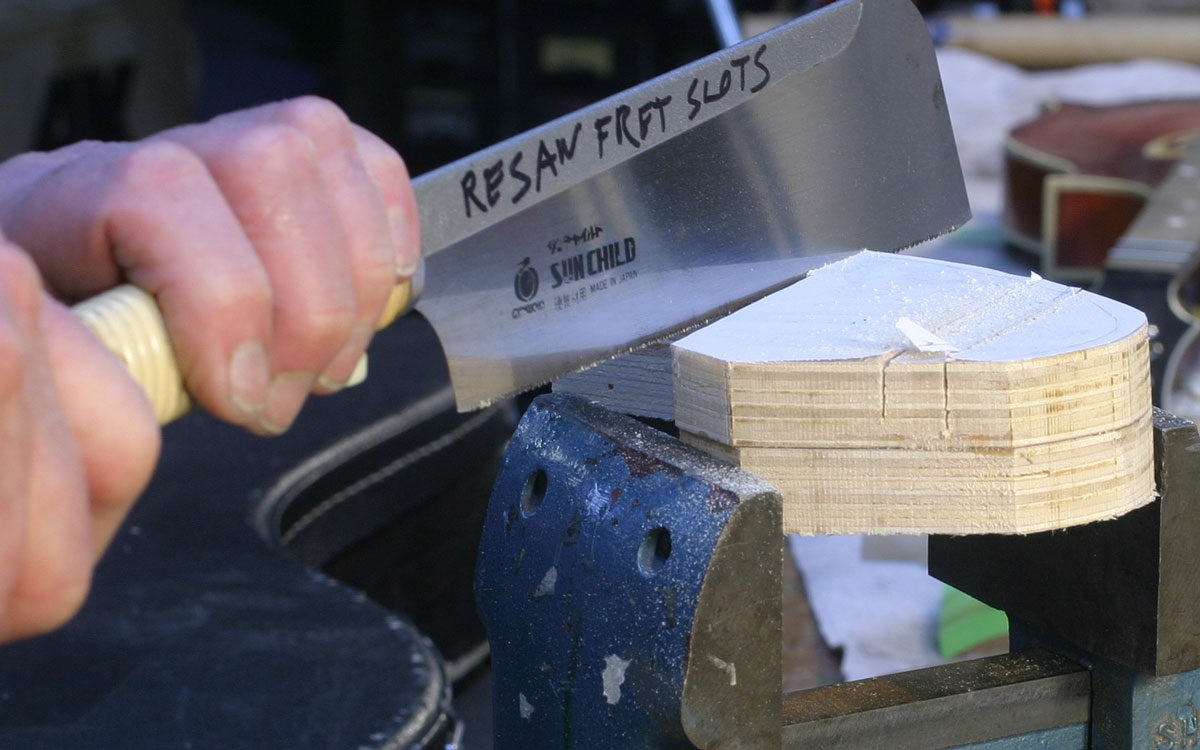
My first job was to clear out all that glue, and clean up all the other fret slots - a fairly simple task requiring a nice sharp, think kerf saw - this is the one we use at Gryphon for only this job:

Now it seemed obvious that the person who replaced the first six frets did not use sufficient heat to remove the frets, because unlike all the other slots from which I pulled frets, these slots all had chips and filled divots:
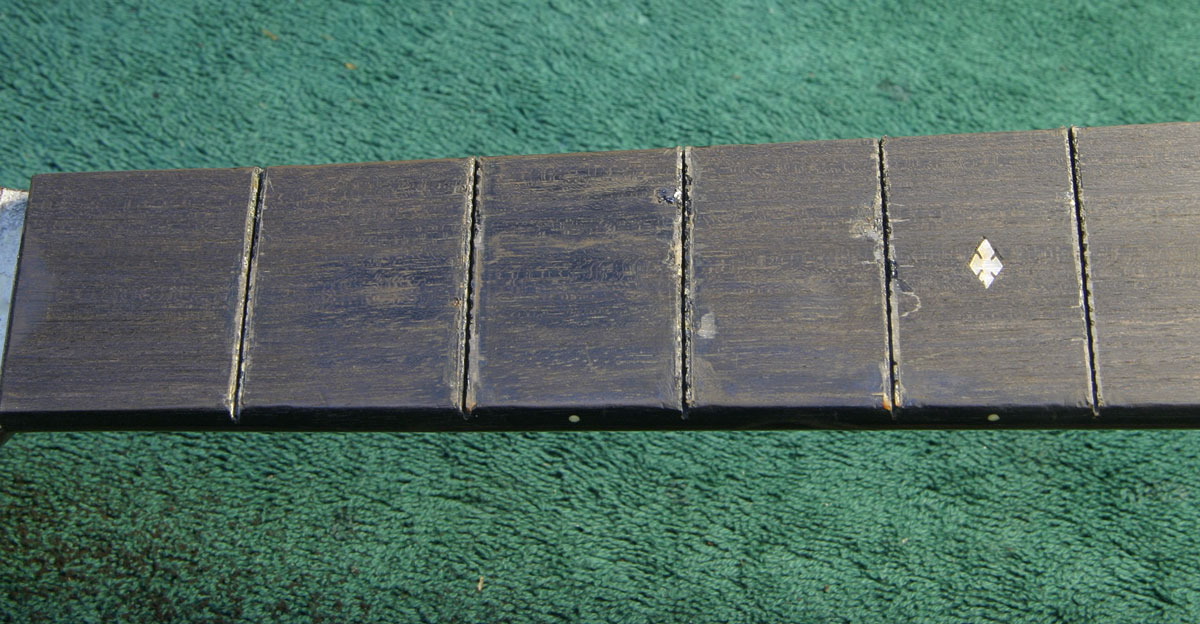
A very light preliminary sanding outlined those difficulties nicely:
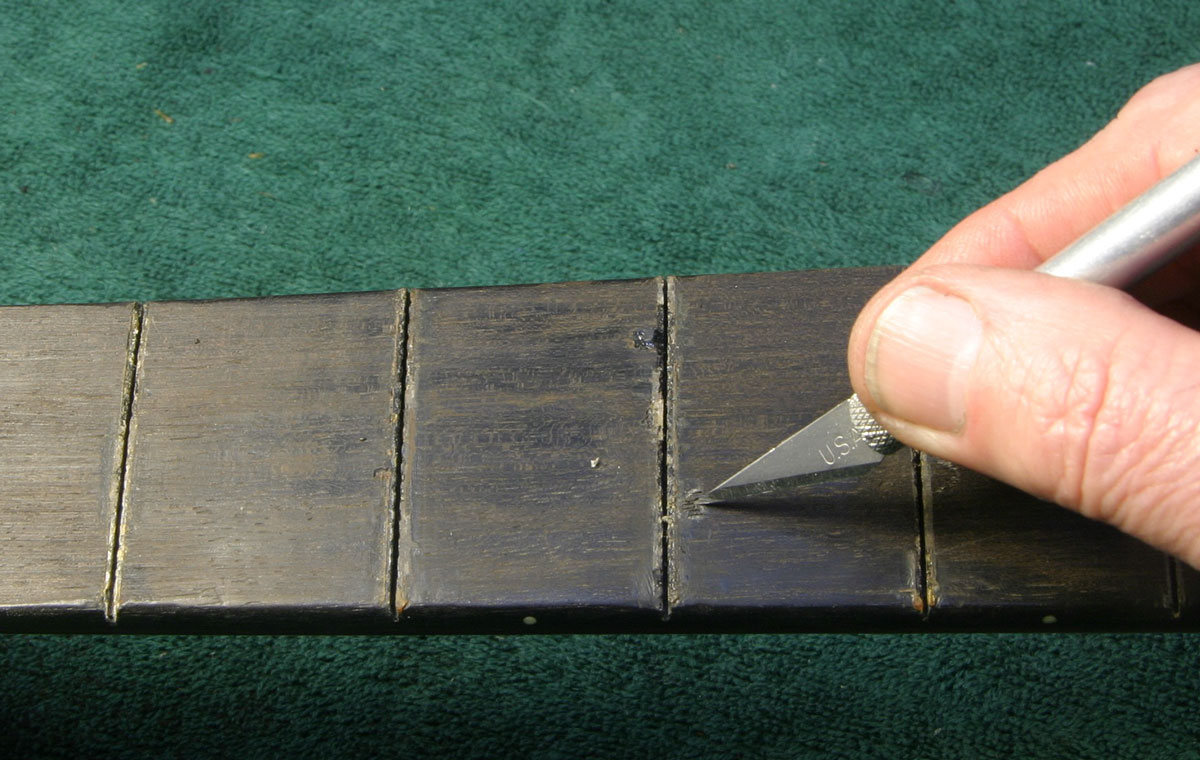
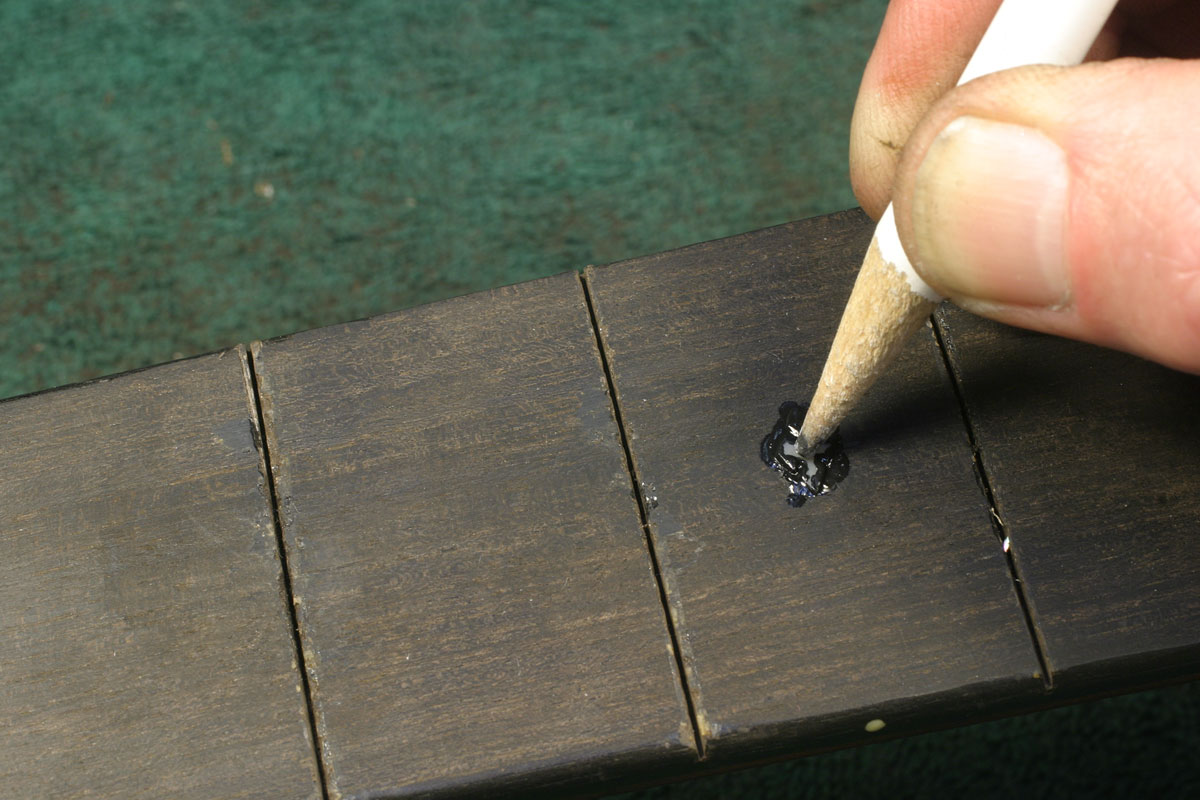
I set about gluing back the old chips and filling the divots, first scarring the shallow craters with a thin blade to improve adhesion:
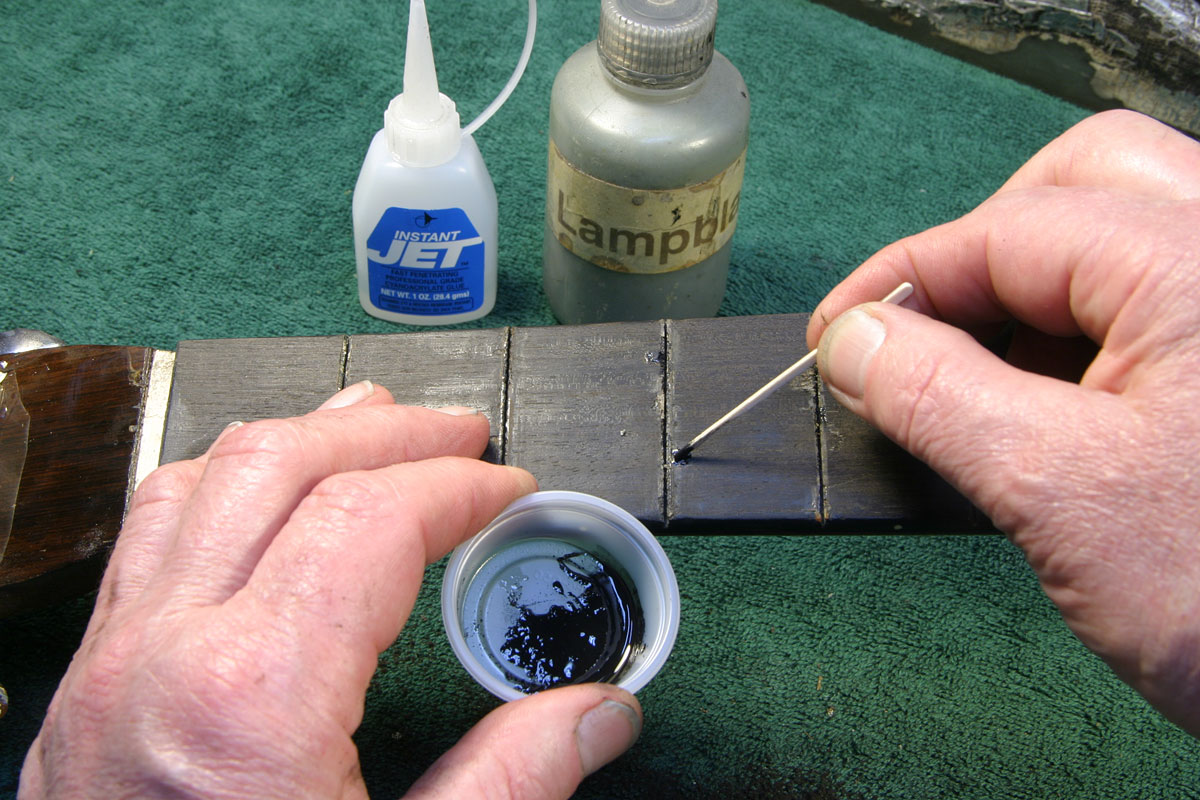
Then a bit of cyanoacrylate and lampblack made a nice filler for the little chips:
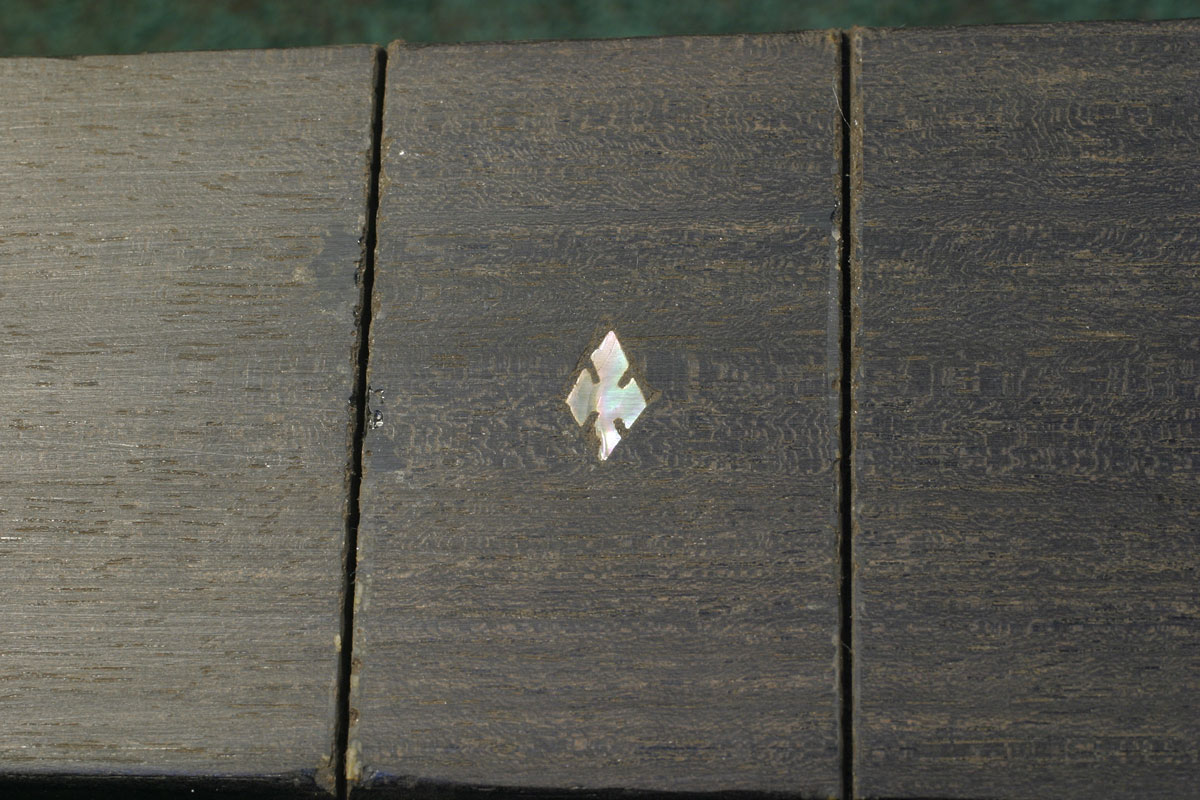
While those old chips filled nicely, a bit of leveling with 220 grit sandpaper revealed that the fifth fret inlay had a problem - a little void started to appear at one point of the diamond:
Looks as though the inlay had a small defect in its bottom, and when it was leveled, the defect started to show through to the top.
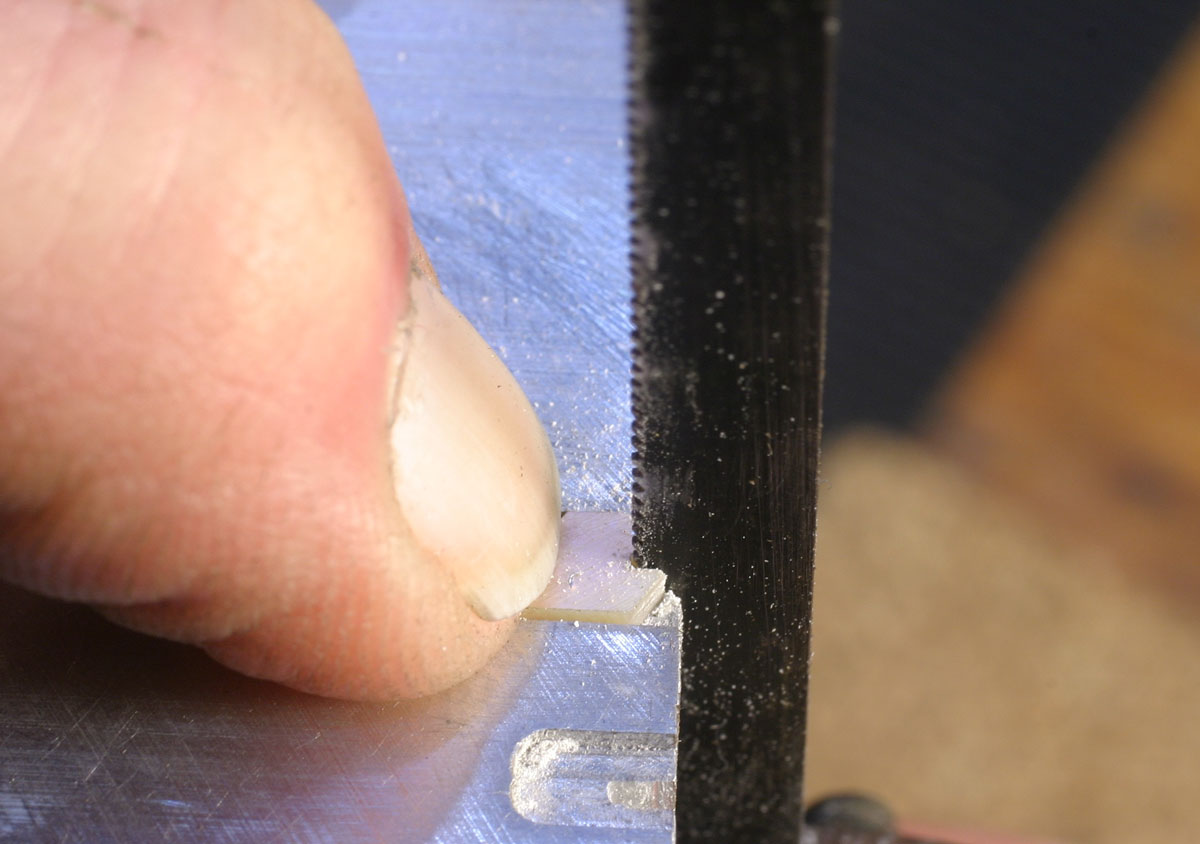
I cut a new diamond from the same kind of pale abalone shell used in the original inlays. It's important to make the cuts with the same size blade used originally so the inlay would look as though it had not been replaced. Luckily, they were originally hand curt and a bit irregular, so it made sense to cut the new inlay the same way:

It took a stout blade to make those cuts, and, because I do this job from time to time, I have a little fixture I made up to hold the diamond and square pieces for Martin fingerboard inlays. It's a simple block of aluminum with little recesses that just fit the diamond or square shapes:
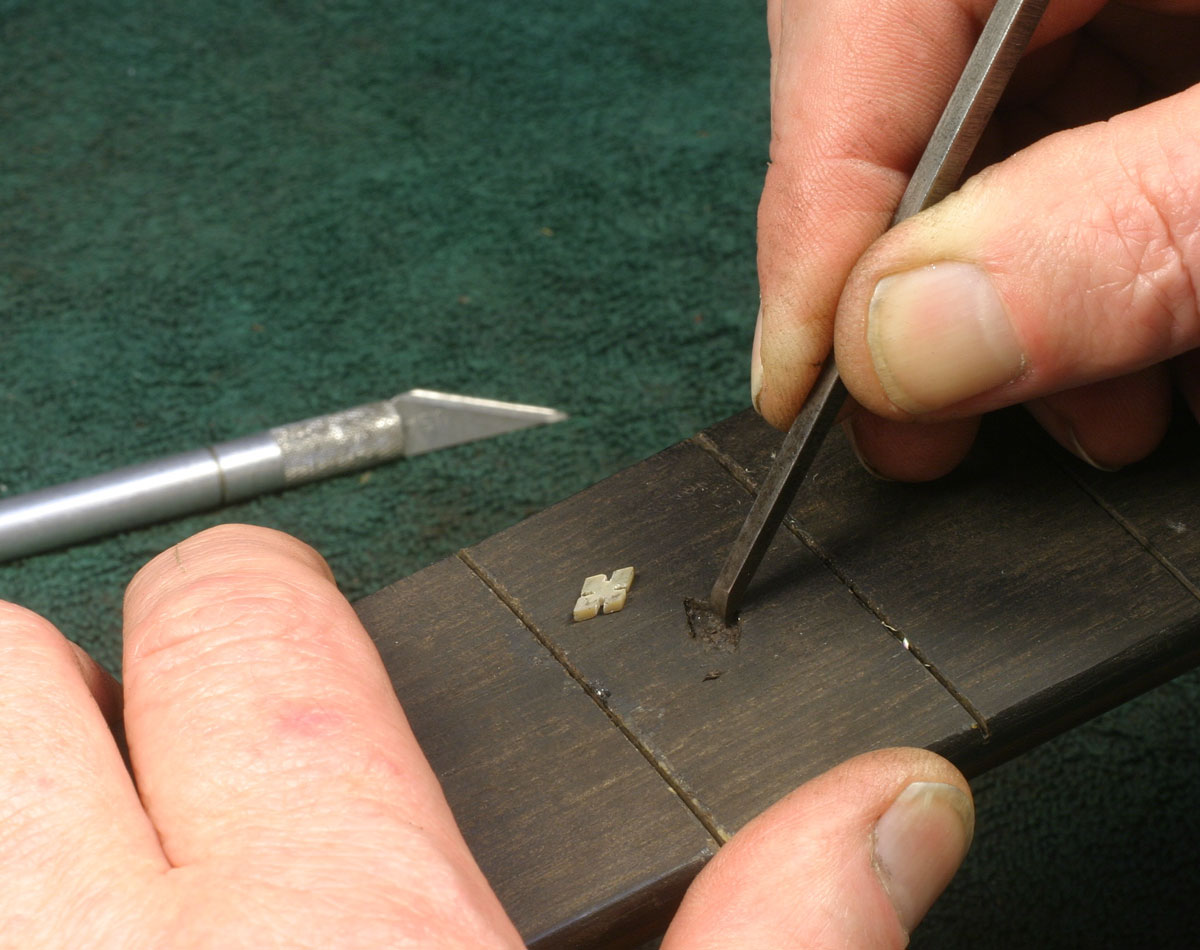
I used a small chisel to chop out the old inlay and prepare to insert the new one, which I pressed in place with more of the cyanoacrylate/lampblack mixure:
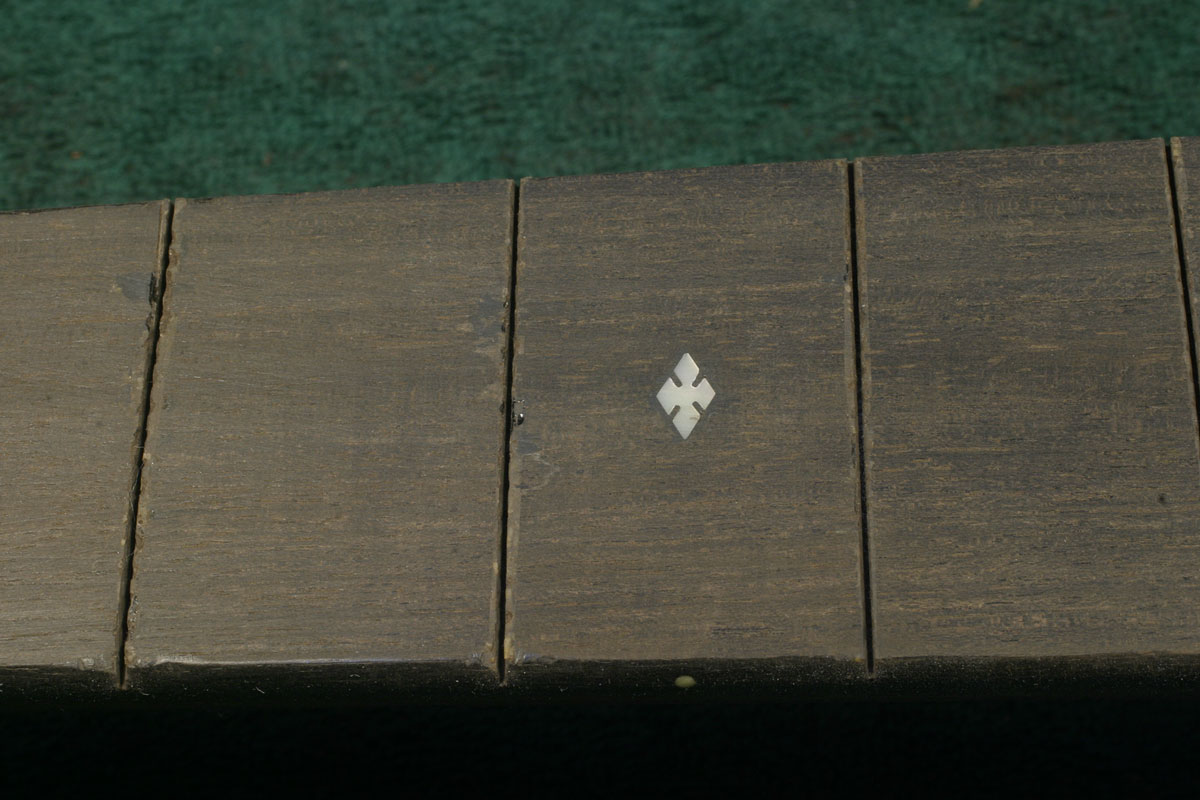
Now, that's more like it:
The inlay complete, I sanded a bit more with 220 grit and my long sanding block to level the entire fingerboard preparatory to installing new frets.
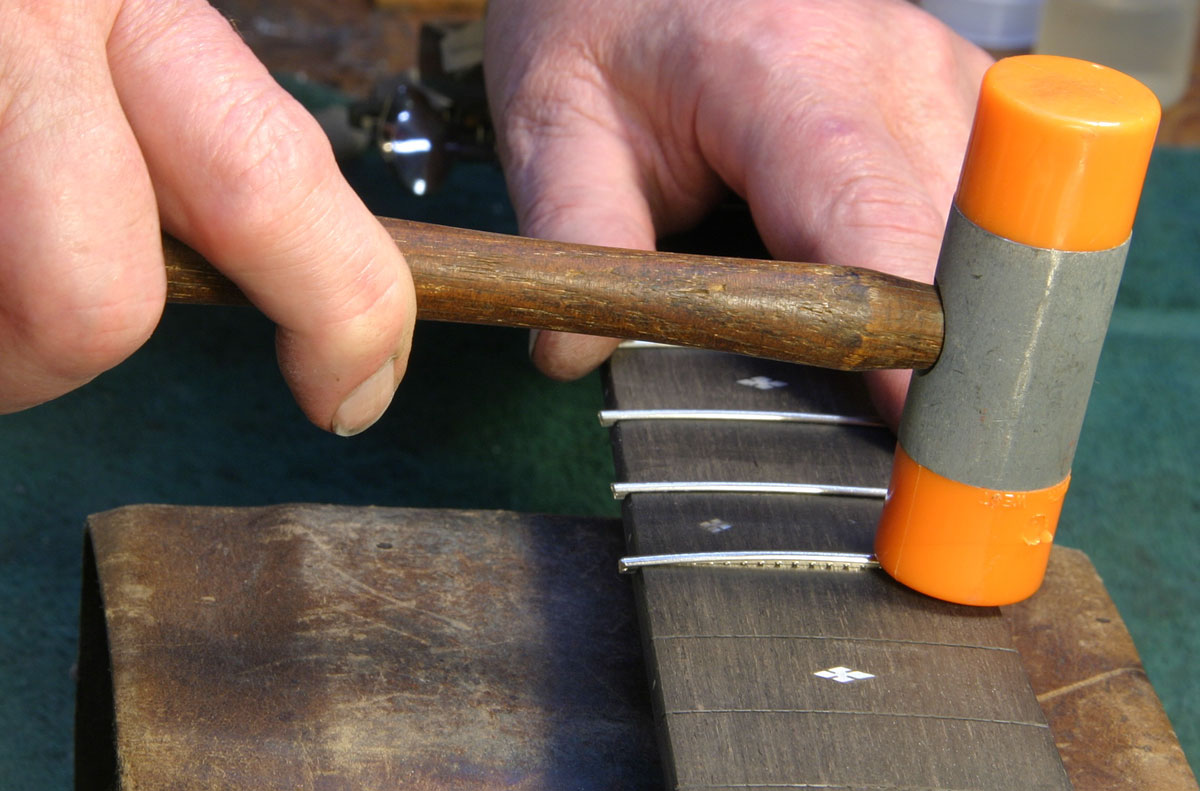
Without exception, I use this little plastic faced mallet to install frets:
It's the one that's typically sold with one brass head and one plastic. I find the brass adds too much weight, so I replaced it with another, identical plastic head. That gives me the same feel and balance I used to get with my old Stanley plastic hammer, now long out of production.
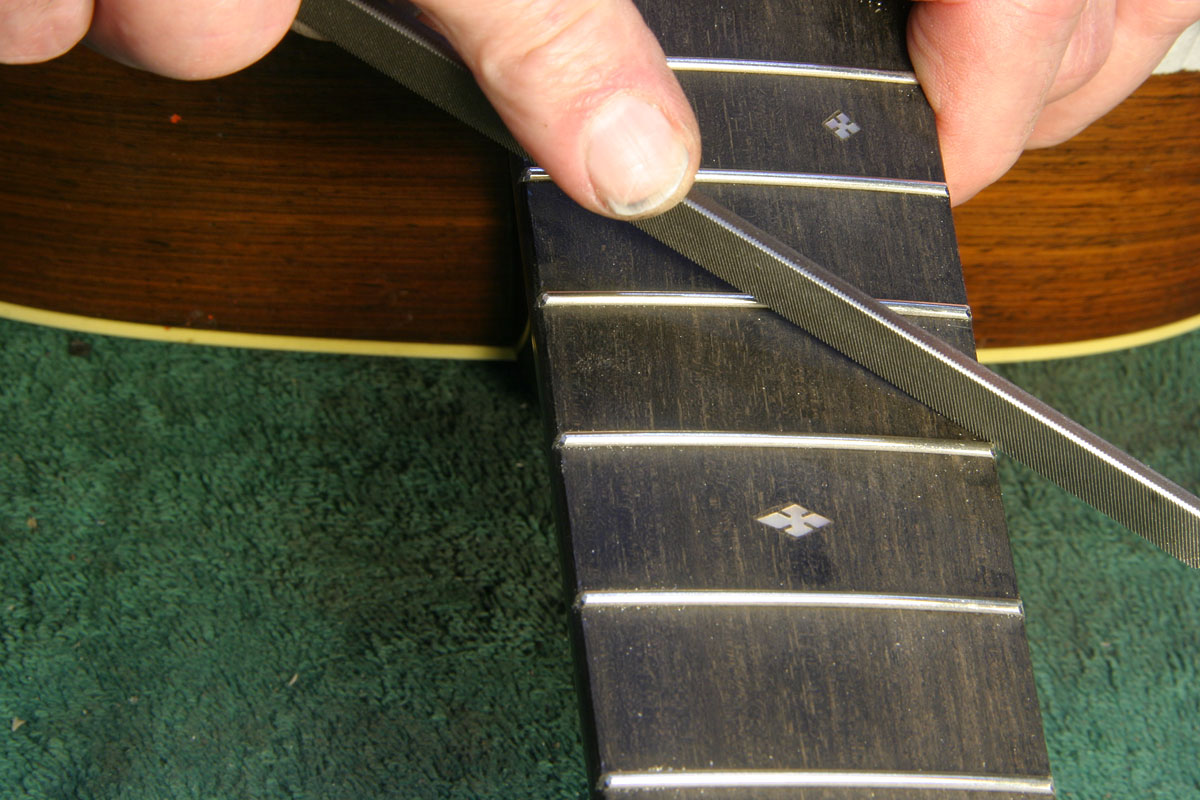
When I first signed on to do warranty service for Martin about 35 years ago, I spent quite a bit of time staring at the fret ends on new Martin guitars. I was looking at the file marks made when they rounded over the ends so that I could simulate the same treatment with my fret work. Times have changed of course, and the Factory now uses a different method. I continue trying to make them look like the vintage instruments, being consistent with the angles at which I hold my files:
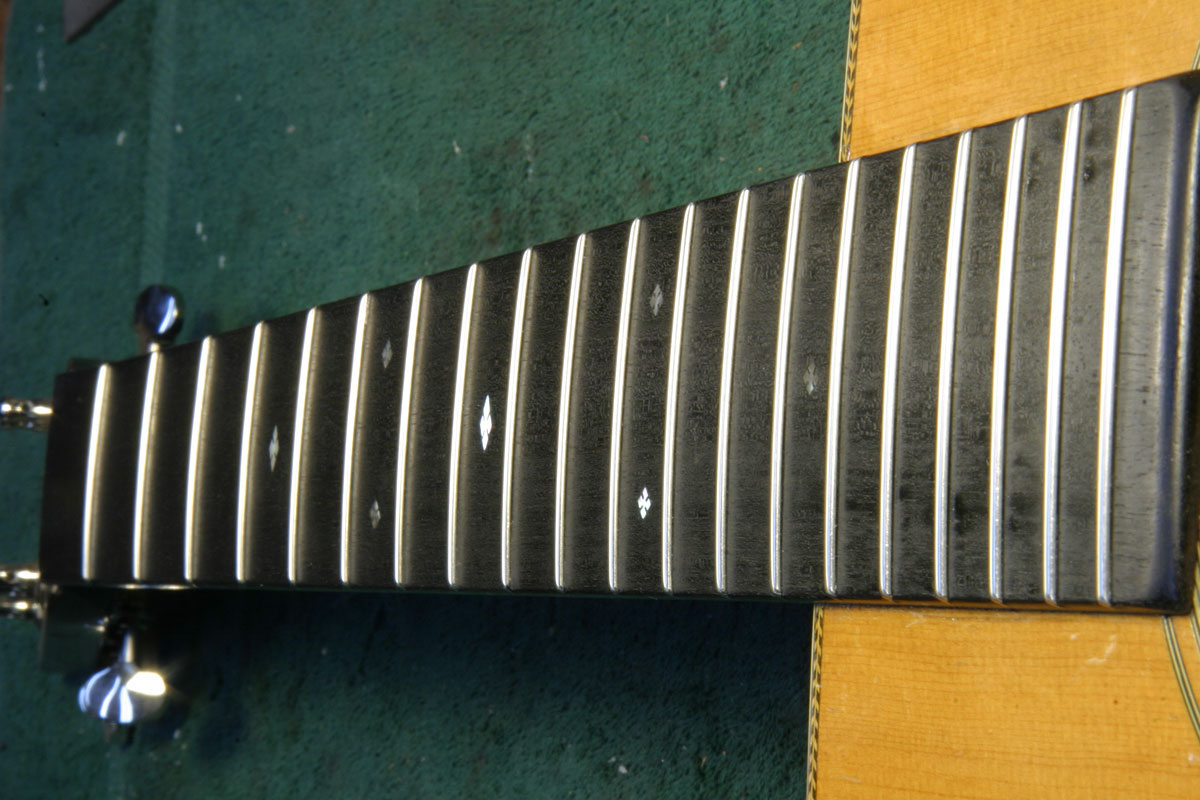
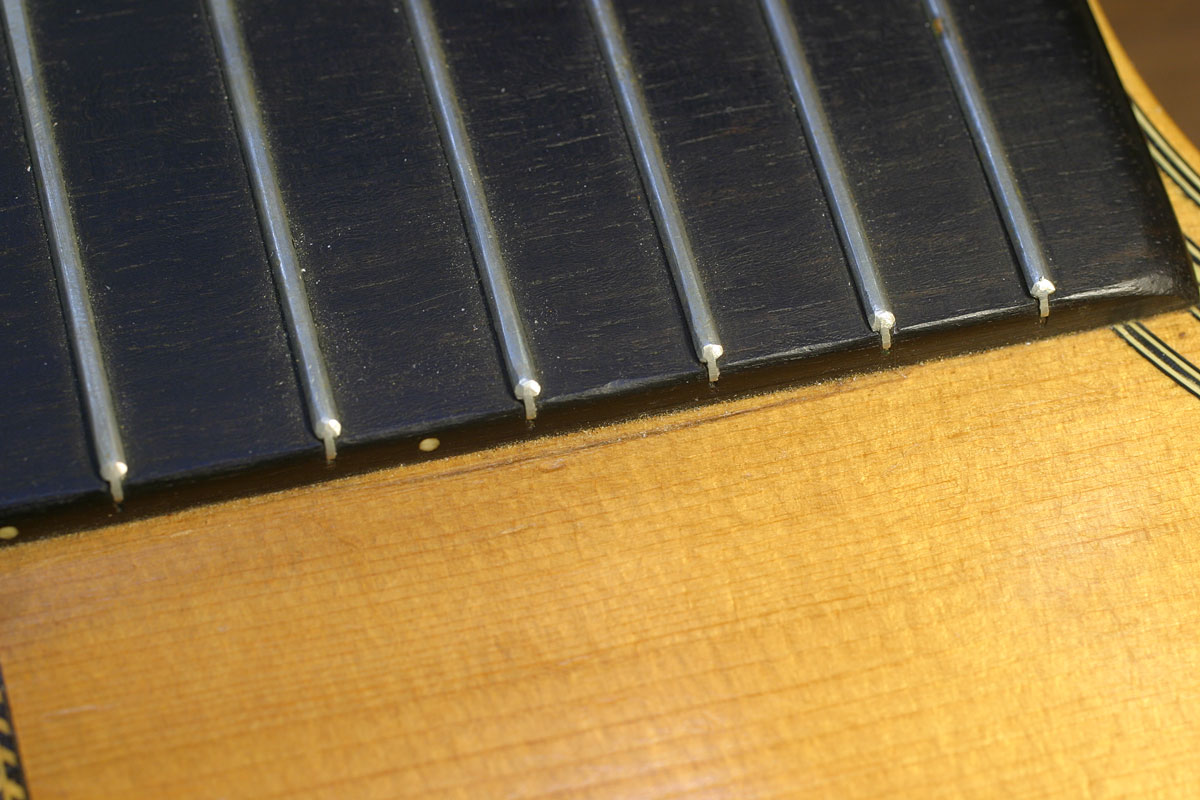
After dozens of identical operations and a bit of fret leveling and polishing, the fret job was complete, and this old critter is starting to look like a guitar again:
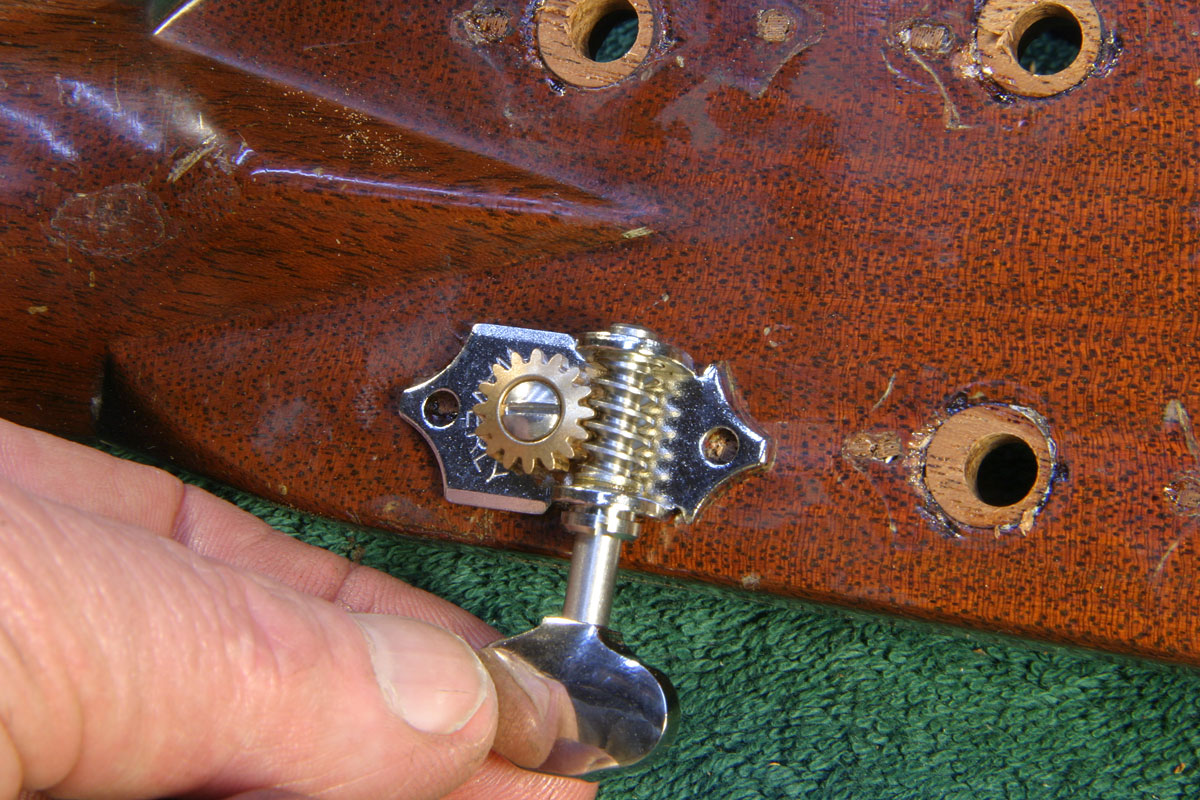
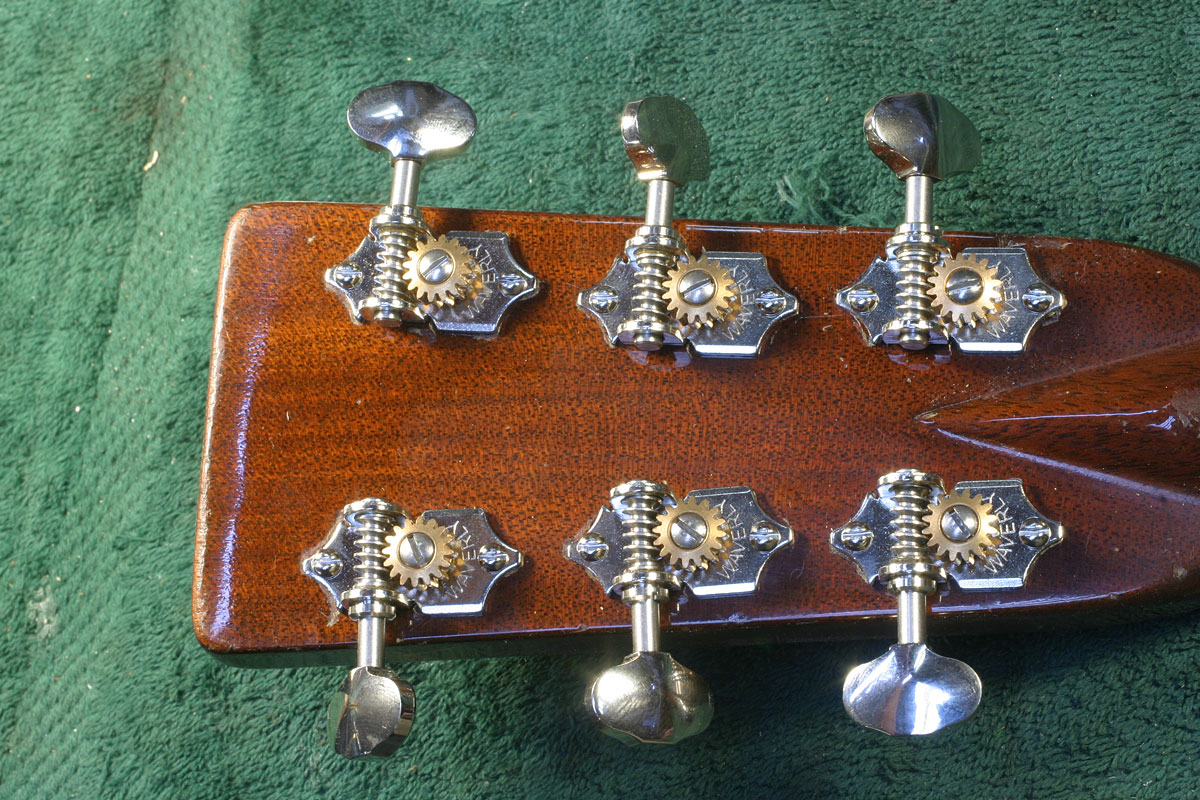
Speaking of which, you may notice that the tuners are in place. Before refretting I installed a set of new Waverly 4060 tuners - the direct replica of the Grover "G-98" tuners that would have been original on this instrument. While the value of the guitar is such that it would be reasonable to hunt up and pay for an original set, these new Waverly gears work so much more smootly and positively that the owner of the D-28 chose to use them for the sake of playability.

I used the little press I'd made on Day 12 to insert the bushings:
The bushings are a reasonably tight press fit, and this little press makes it possible to have really good control to avoid injuring the finish by pressing too hard. The rest of the tuner installation was a simple matter of screwing the plates to the back of the peghead, so I didn't shoot any pictures of that.
Down to the final stages - time to finish off all the details that have to do with playability and action.
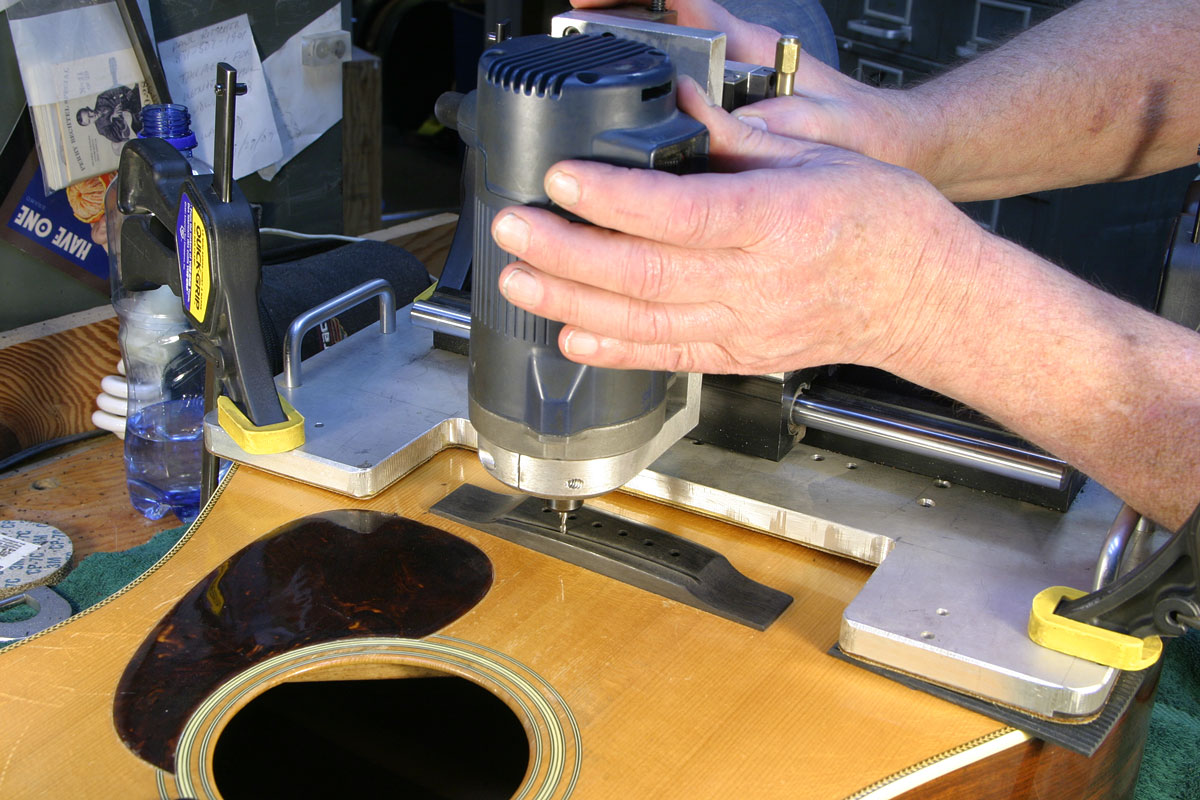
I started with the bridge. Once the neck was in place, I calculated and measured the saddle location for best intonation, and set up my bridge routing mill to cut the saddle slot:

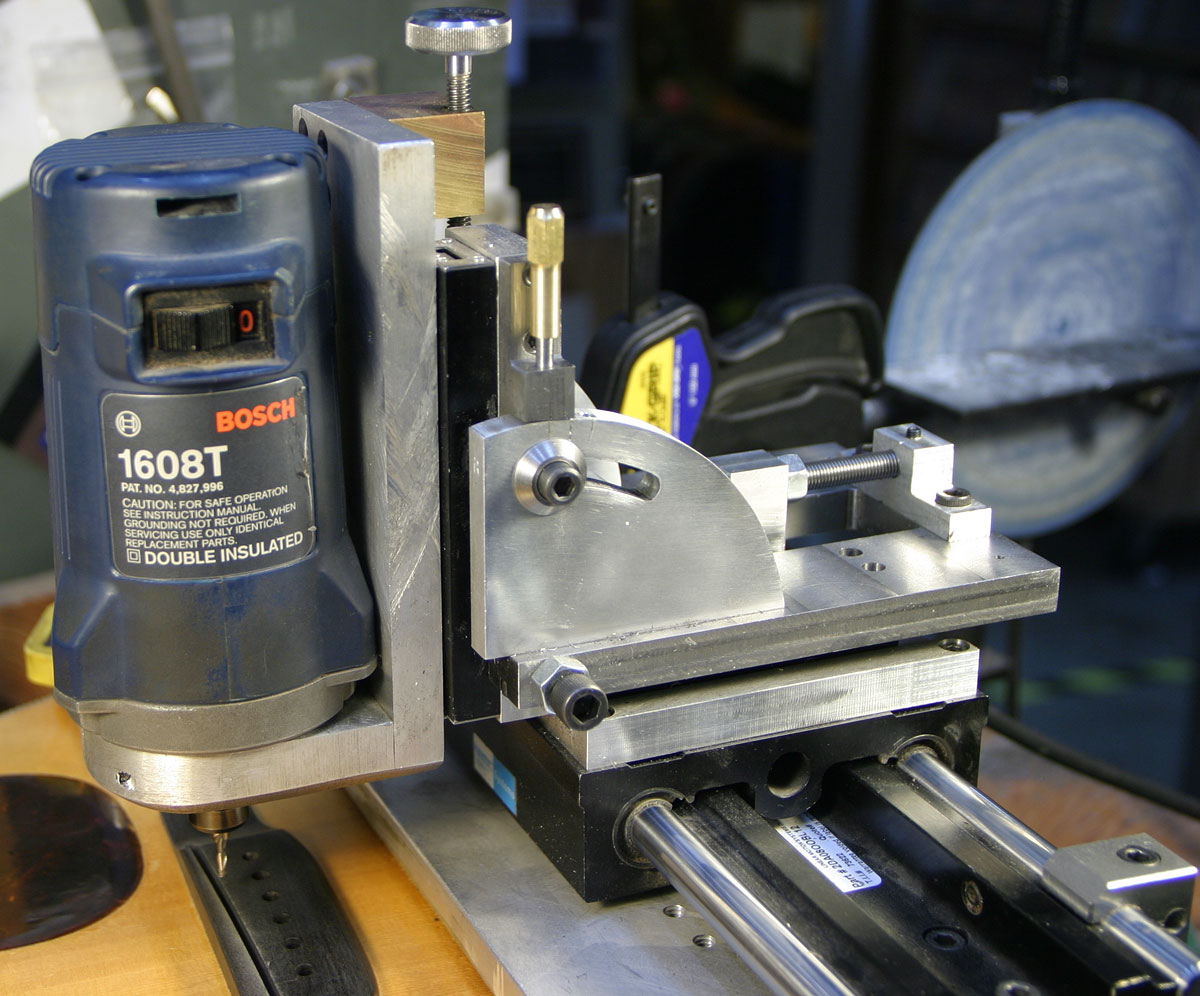
Here's a better view of that rig:
This machine runs a Bosch laminate trimmer on friction-free linear bearings in all dimensions. The fore-and-aft slide is locked for saddle use, of course. I recently modified the vertical slide mounting so it can tilt backward at any angle from zero to 20 degrees to accommodate the growing use of tilted saddle slots. Even though I think the backward tilted saddle is a more structurally sound design, I still follow the maker's original style, particularly when working on vintage instruments.
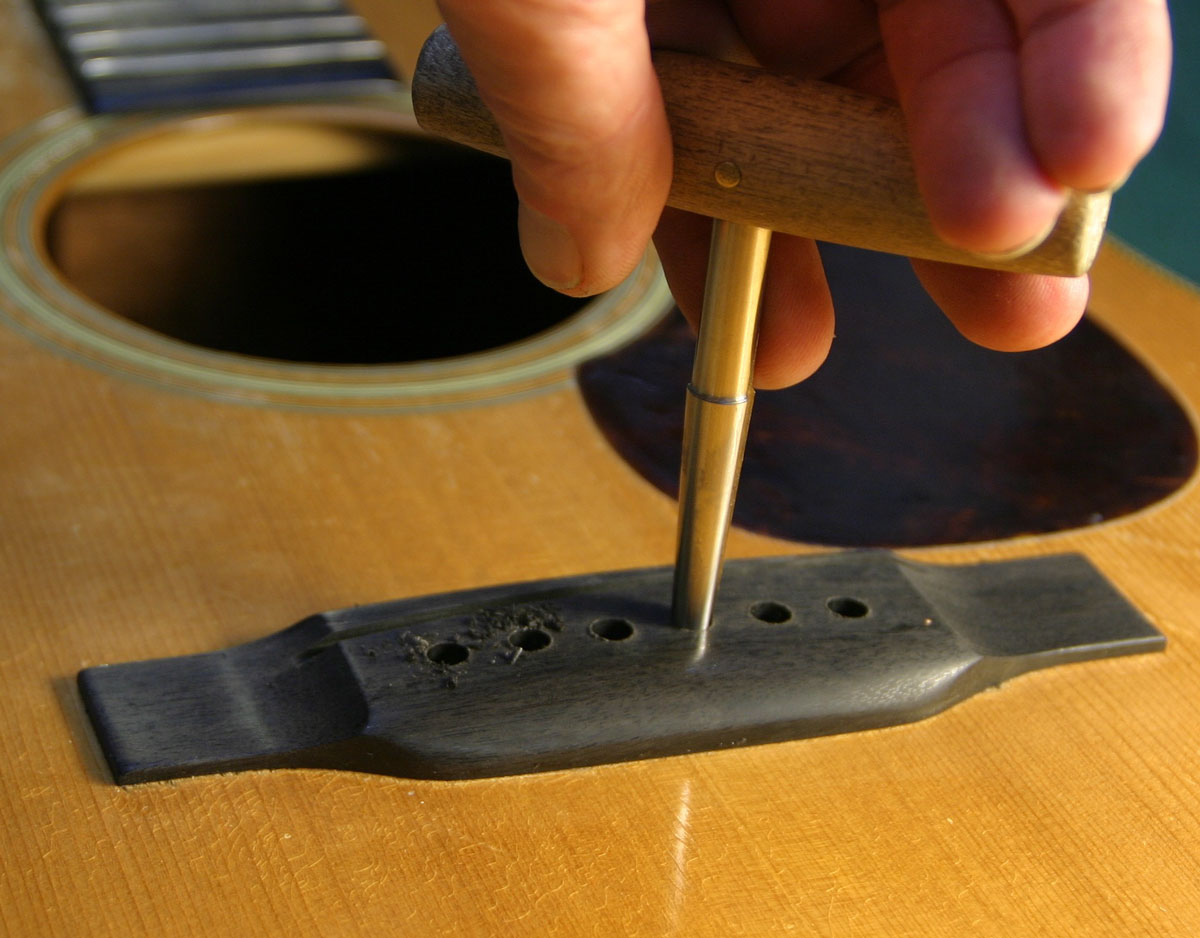
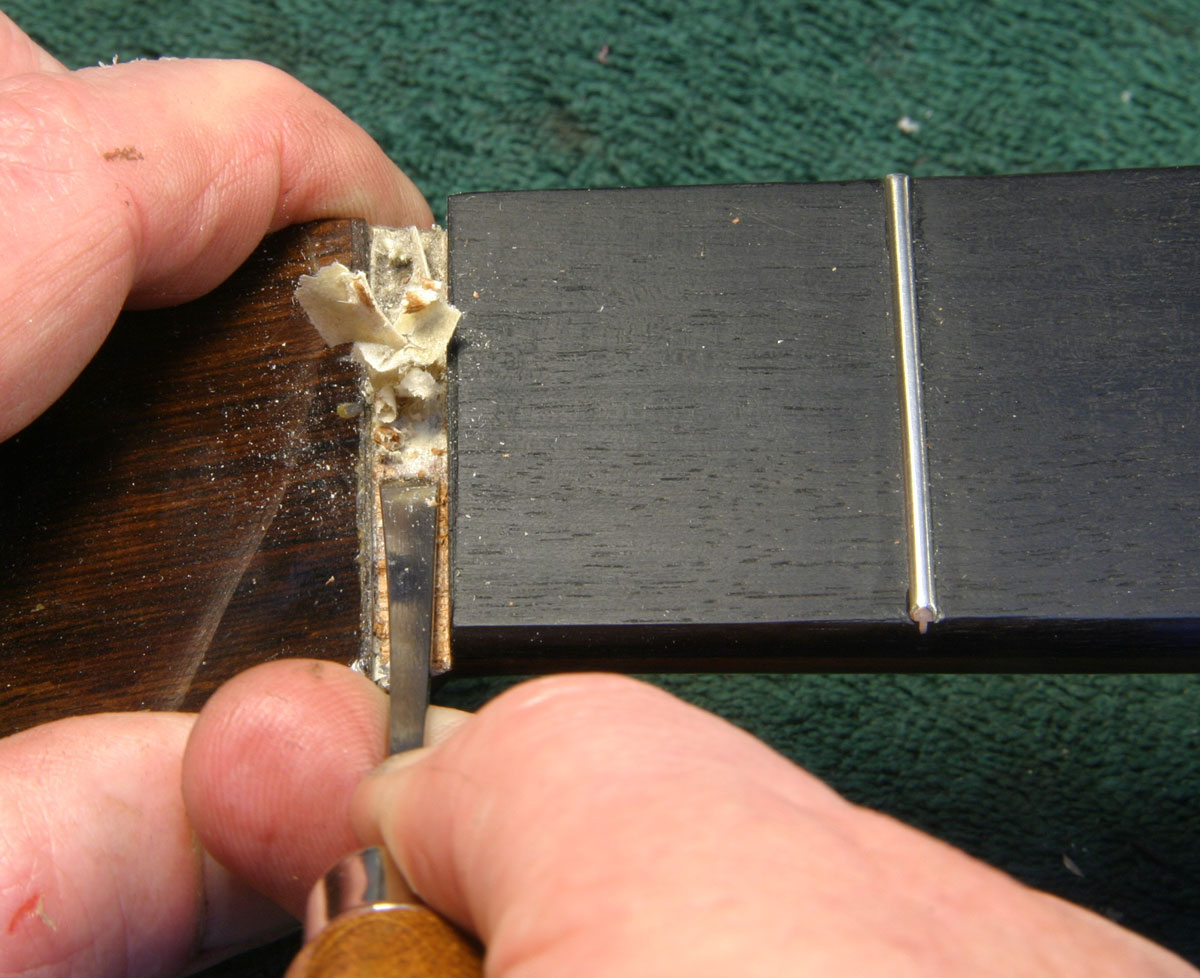
I reamed the holes to fit the original bridge pins,
and, using this high-tech device, I countersunk them with a nice chamfer:
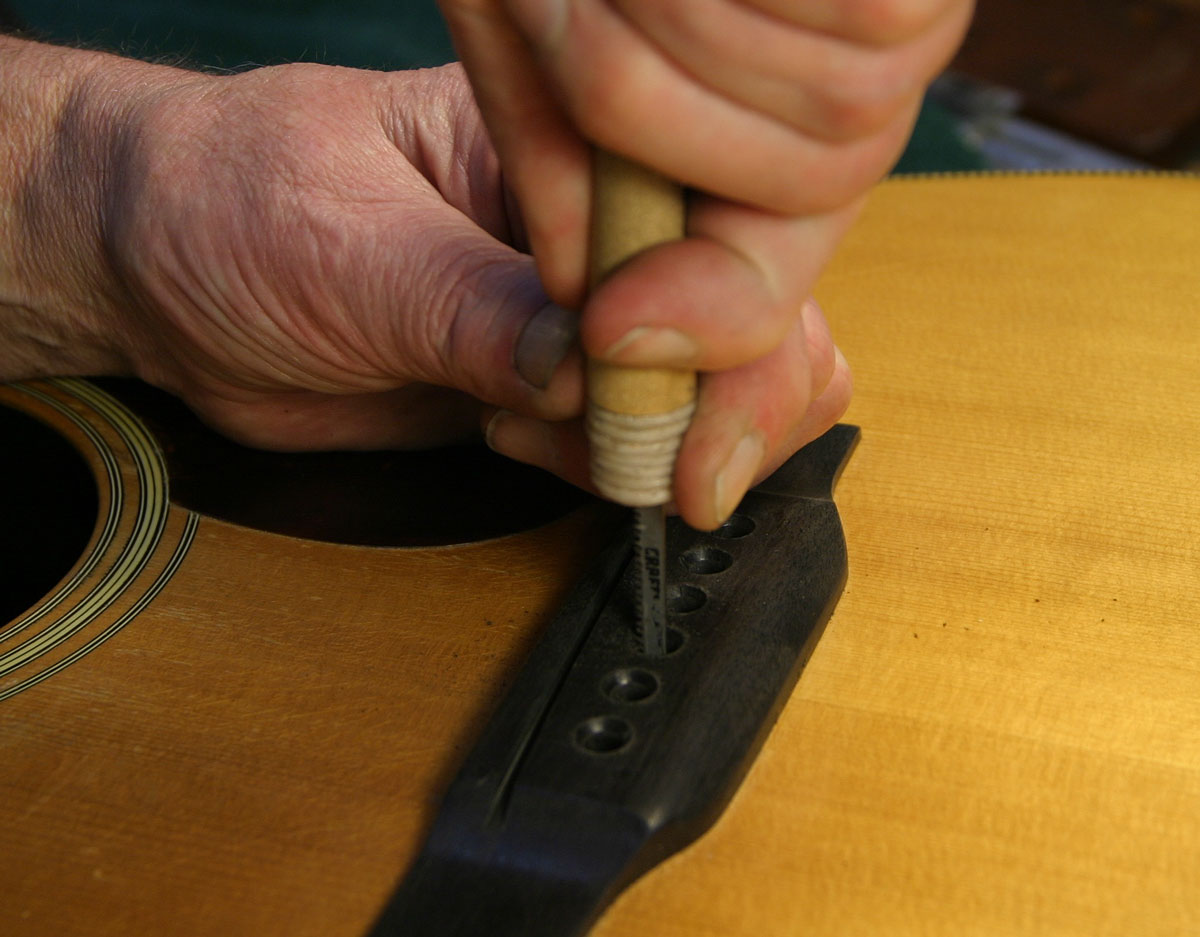
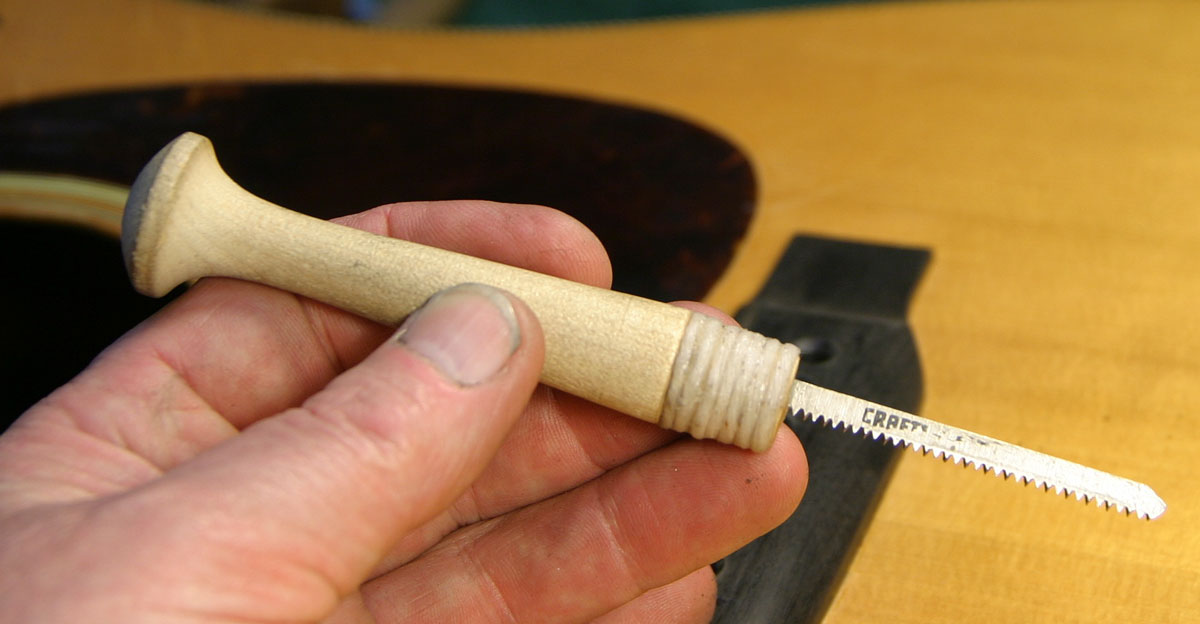
The original bridge pins are solid, with no slots, so I slotted the bridge to accommodate the strings in the holes, notching for each string separately by trial fitting as I went. My tool of choice is a jigsaw blade I mounted in an old Shaker peg handle:
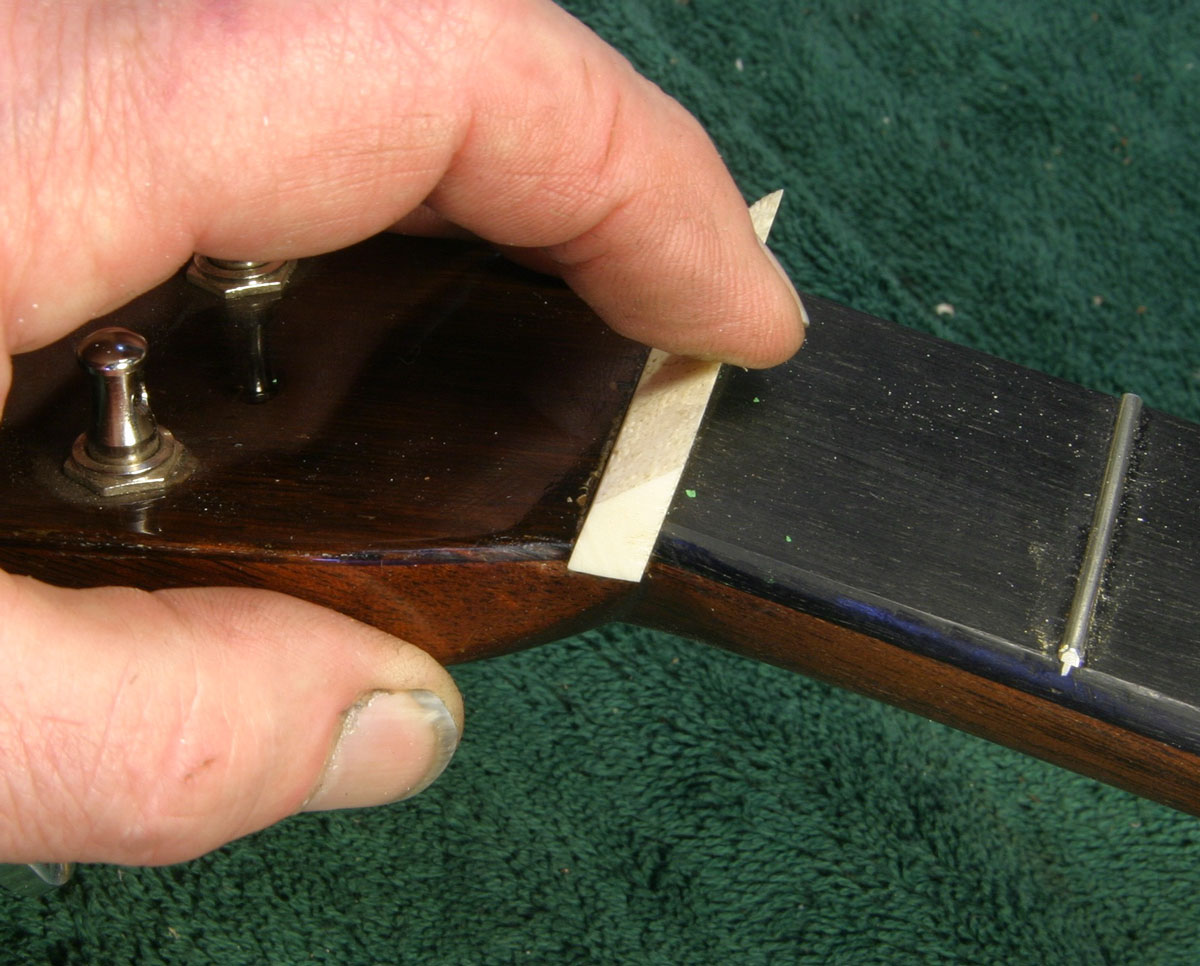
Over at the other end of the neck, I started to clean out the recess where the nut fits, only to find it had way more stuff glued in there than I first noticed:
It was only after I dug out a small mountain of paper and glue that I noticed that the nut slot had been cut about 1/16" below the level of the fingerboard. Rather than making a new nut that would look oversize and call attention to this unfortunate modification, I decided to make a mahogany filler so the nut could bed down normally:
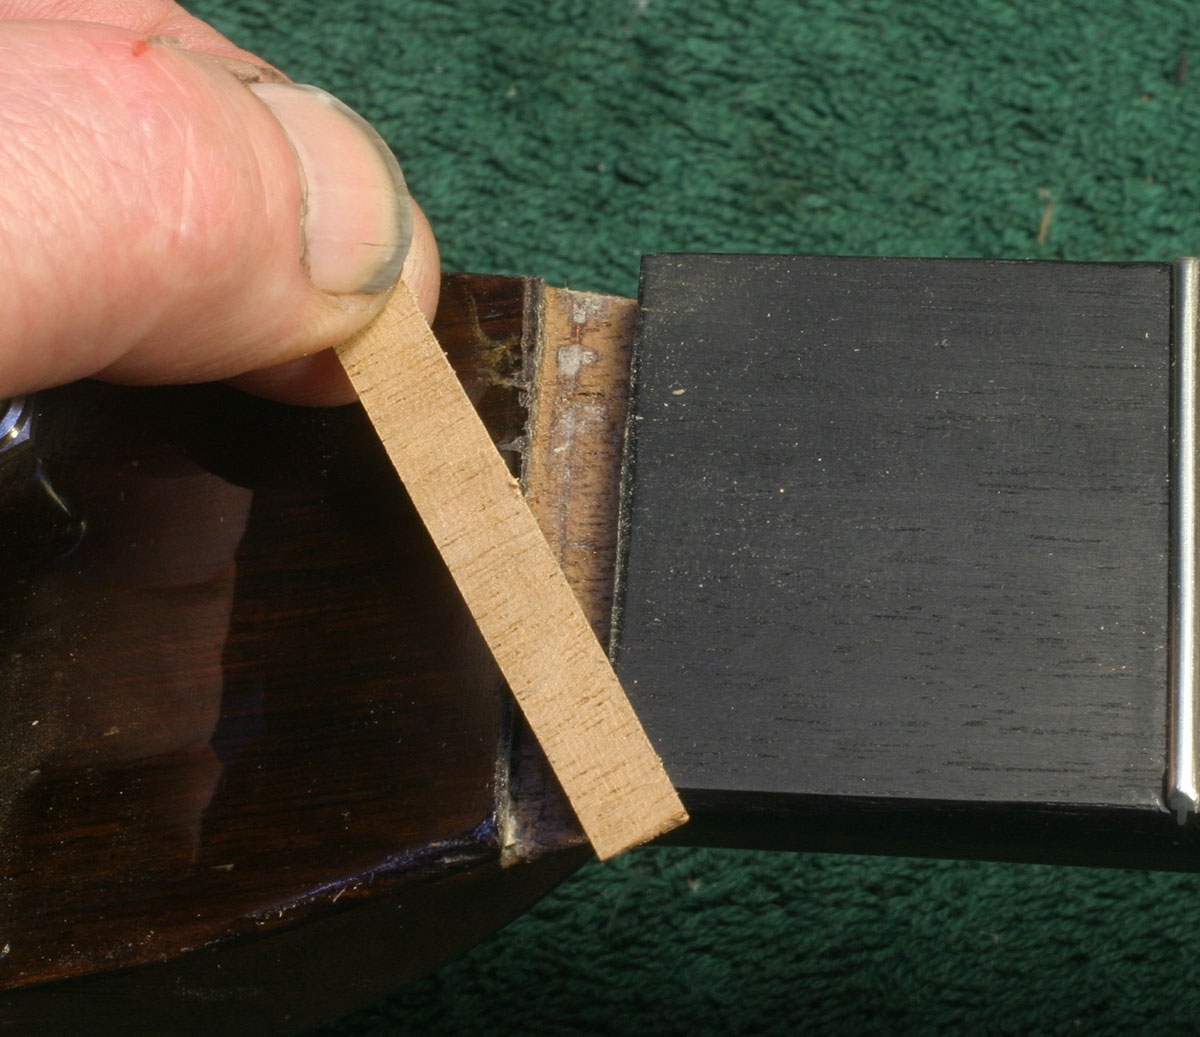
As you can see, I ran the grain direction the same as the neck, so the filler would present well when viewed from the edge. I used a guitar capo to clamp the shim with a cork pad on top to distribute the pressure evenly. Enough for today - gotta wait for glue to dry.
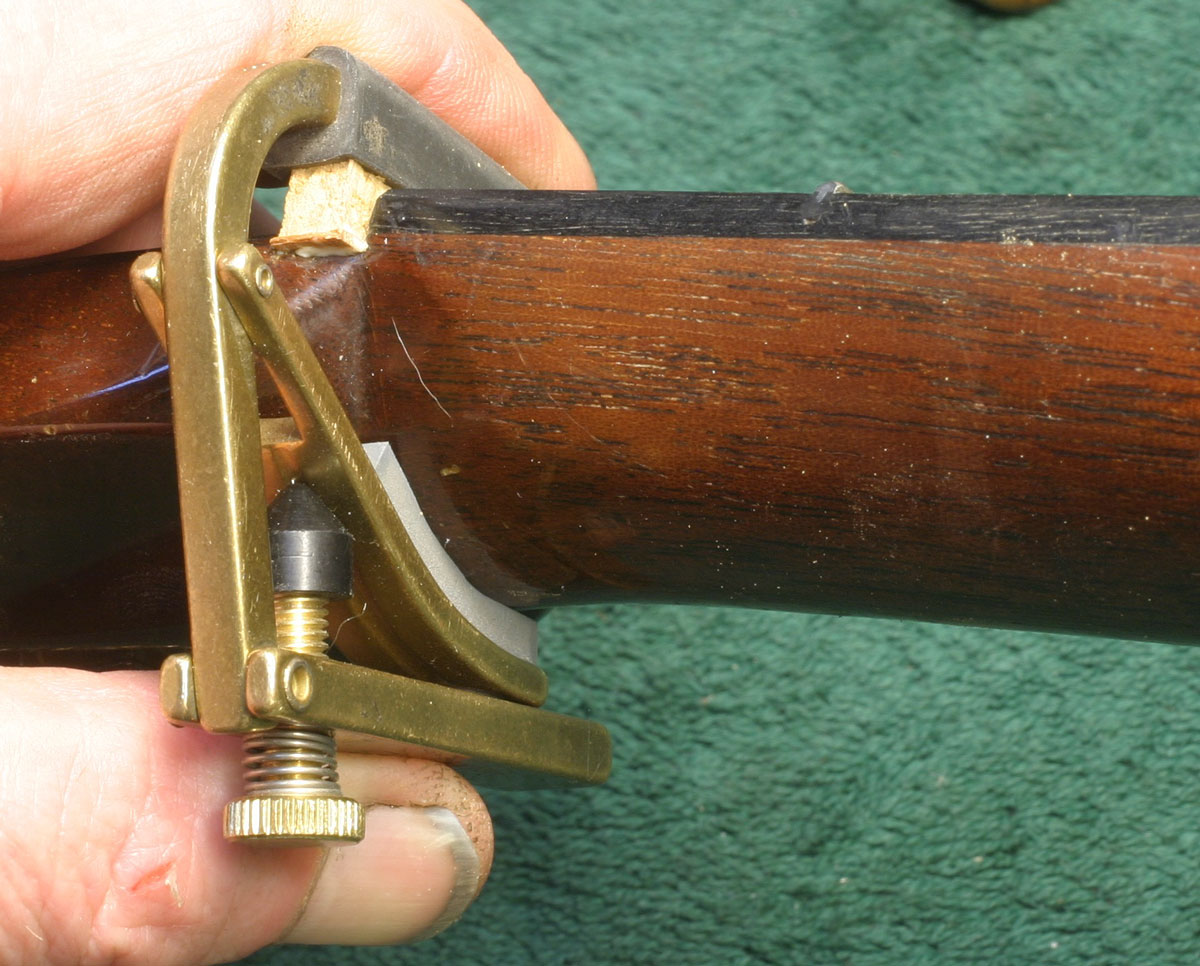
Maybe I should tell Rick Shubb to think about another potential market for his capos. . .
Day 20: Setup and Final Touches
Rummaging around my collection of ancient ivory scraps, I found one that would do nicely for the new nut. First I ftted the bottom of the piece to the recess at the end of the fingerboard:
Then I roughed out the shape to nearly the final dimension and contour, and glued it lightly in place:
I then slotted for the strings and adjusted the action at the nut before removing the nut to polish it nicely before reinstalling it. Most all of the final setup was pretty routine, trial fitting, setting action, and all that, and I didn't photograph that stuff in detail.
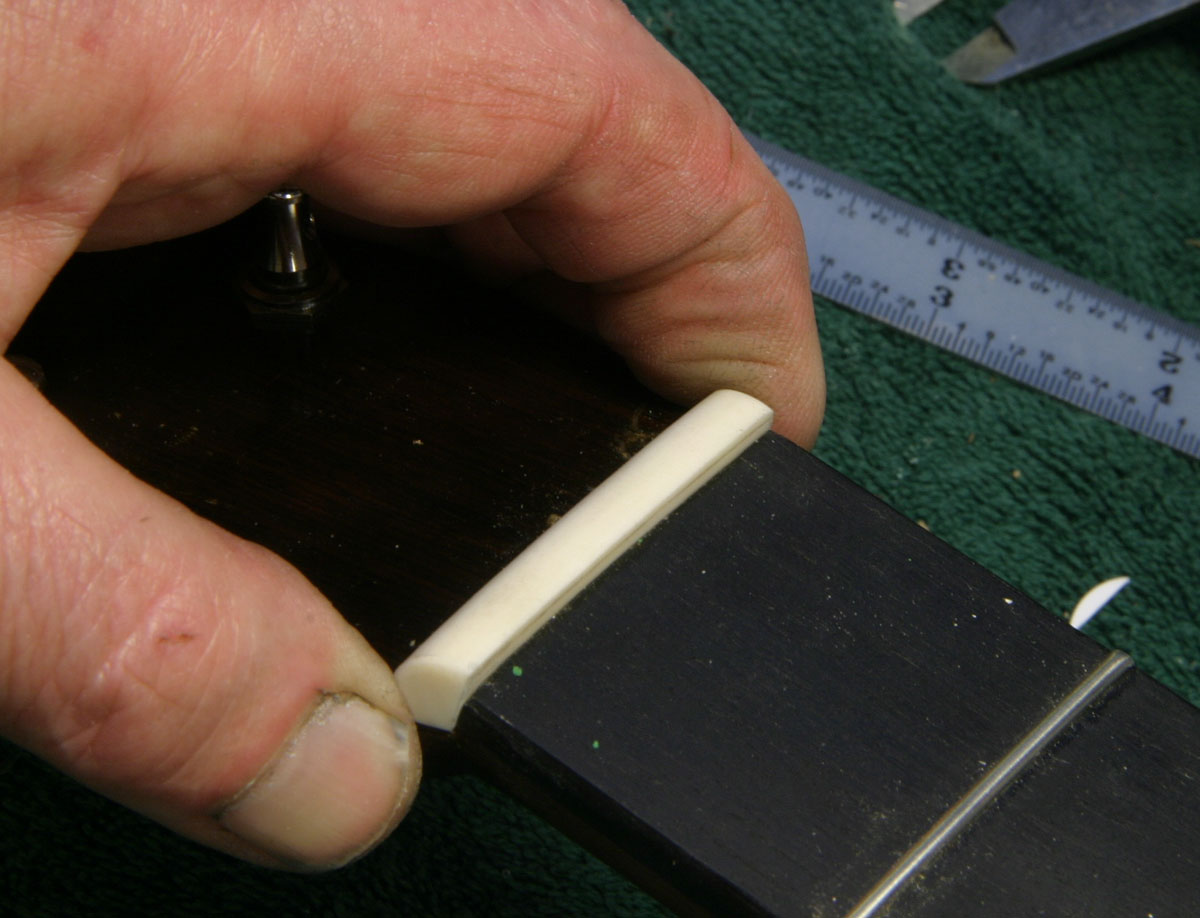
Here's some interesting stuff about setting up the nut I thought was worth some discussion. It's a system for proportional spacing of the strings I learned from that eminent guitar maker, Julius Borges.
The idea is to have equal spaces between the strings rather than spacing them evenly, on centers.
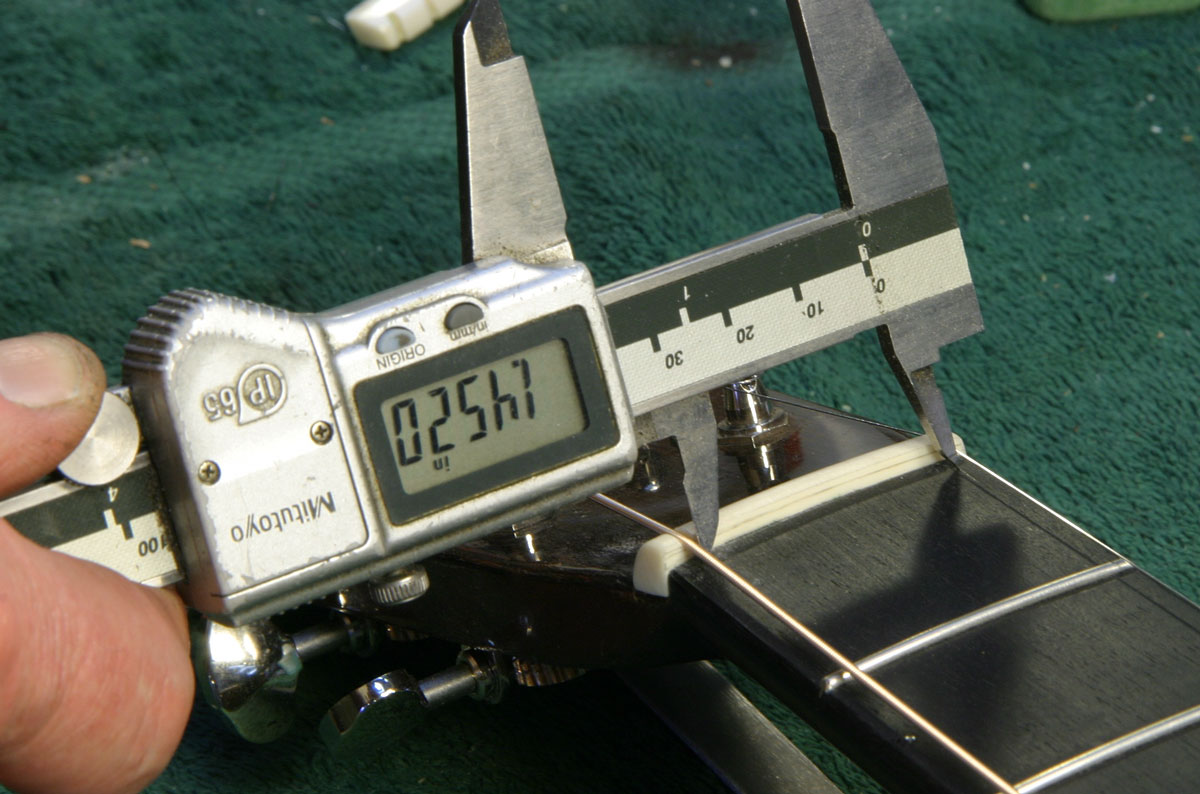
First, I set the outer two strings in position, notched the nut and set the action for both of them. Once the first and sixth string positions were fixed, I measured the distance between them:
A simple bit of calculation gave me the spacing I'd need to establish between each of the other strings:
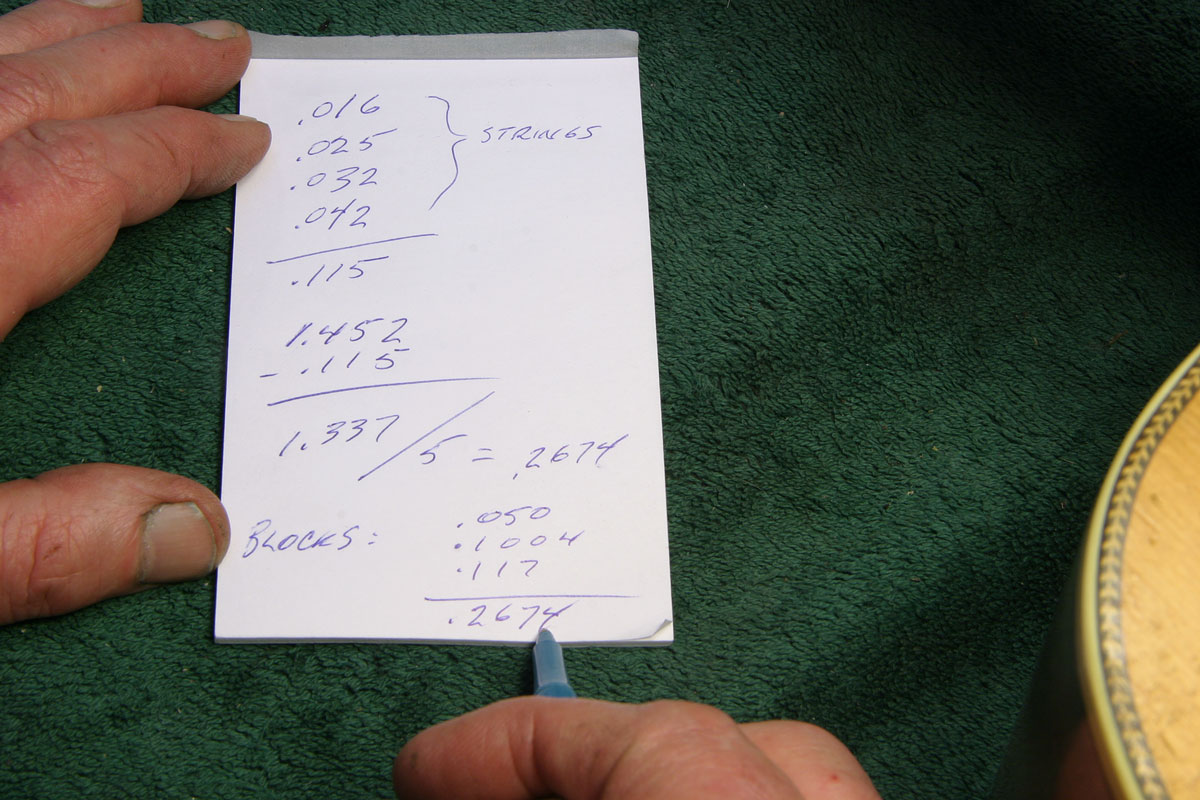
Taking the total of the diameters of the inner four strings and subtracting it from the space between the outer strings, I found the amount of space I'd need to divide up between them all. Five spaces between six strings gave me a figure of .2674. Naturally, the final digit is way beyond any level of accuracy needed here, but I thought I'd include it just for fun. My caliper only resolves to the nearest .0005, and I never count on it for greater than .001 accuracy.
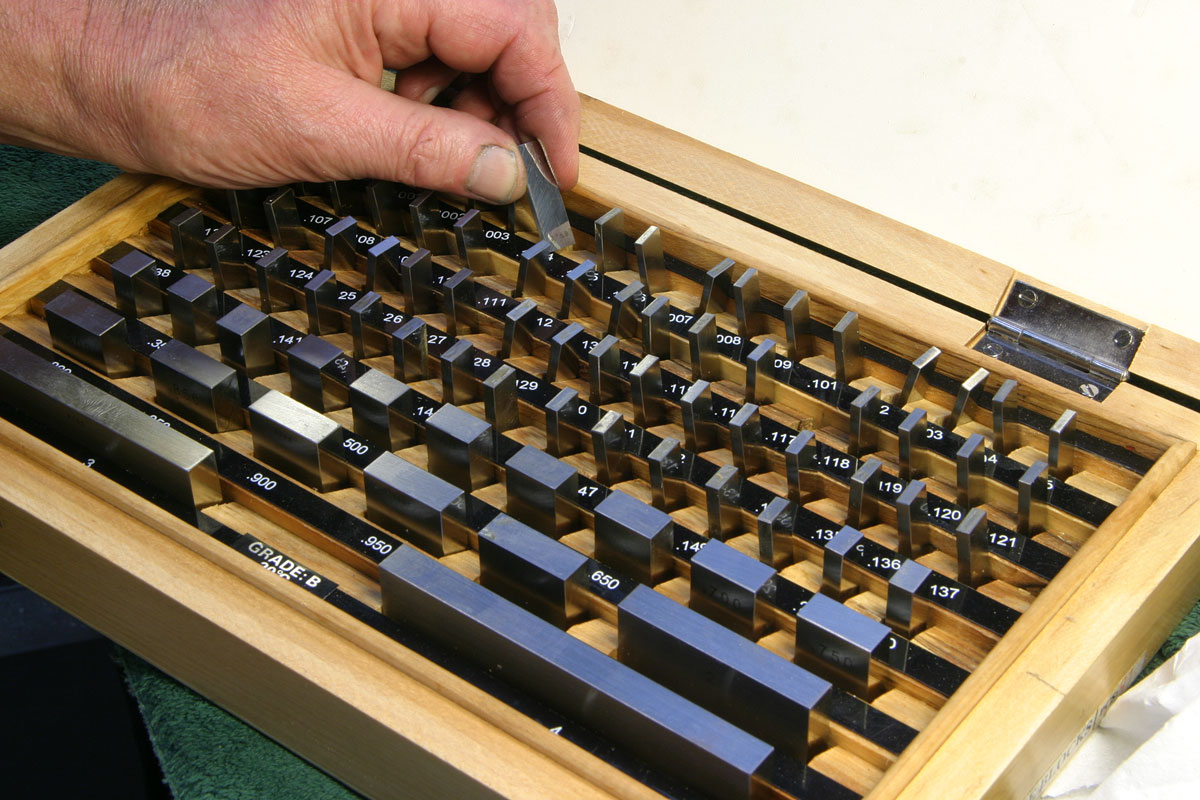
This is a set of gage blocks ( or "Jo-blocks," named after C.E.Johansson, a swedish engineer who devised this method of precision measurement about 100 years ago) and it contains just the right assortment of precision spacers necessary to generate stacks for measuring from about a tenth of an inch to several inches with accuracy to one ten-thousandth of an inch:
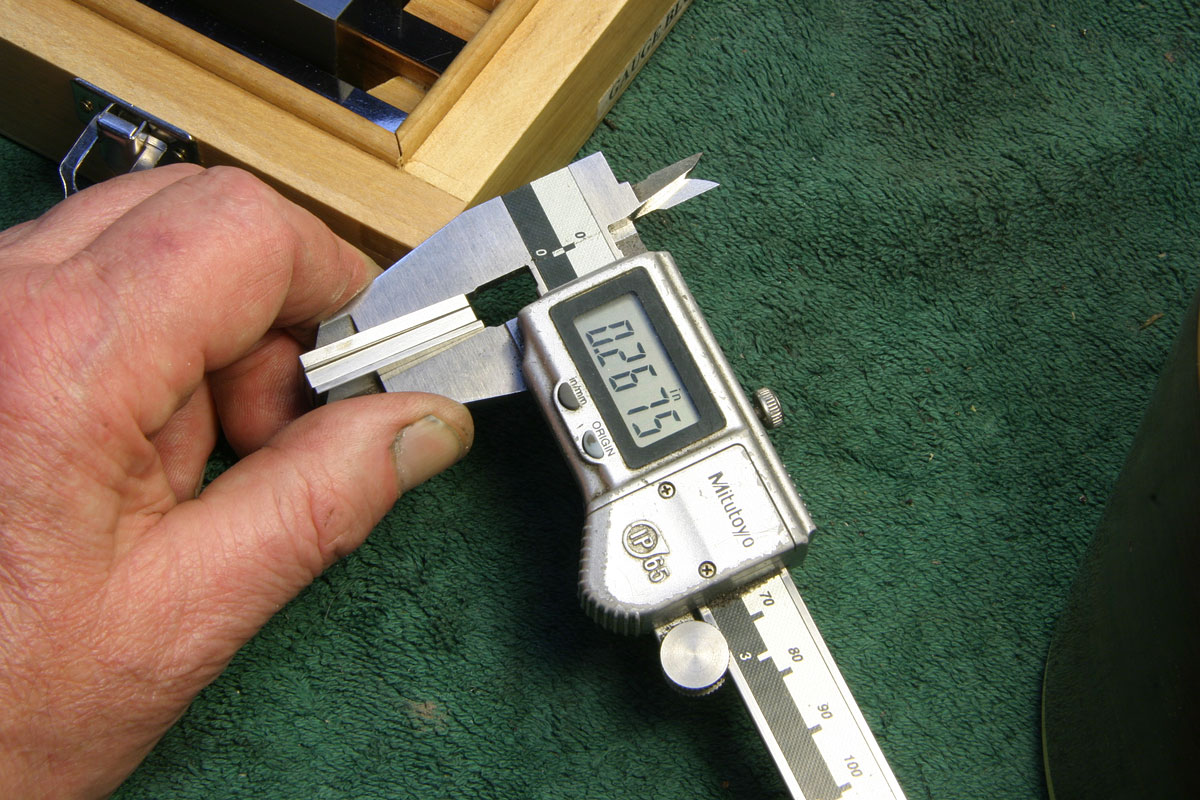
So, I got out the appropriate ones, and made up the necessary stack:
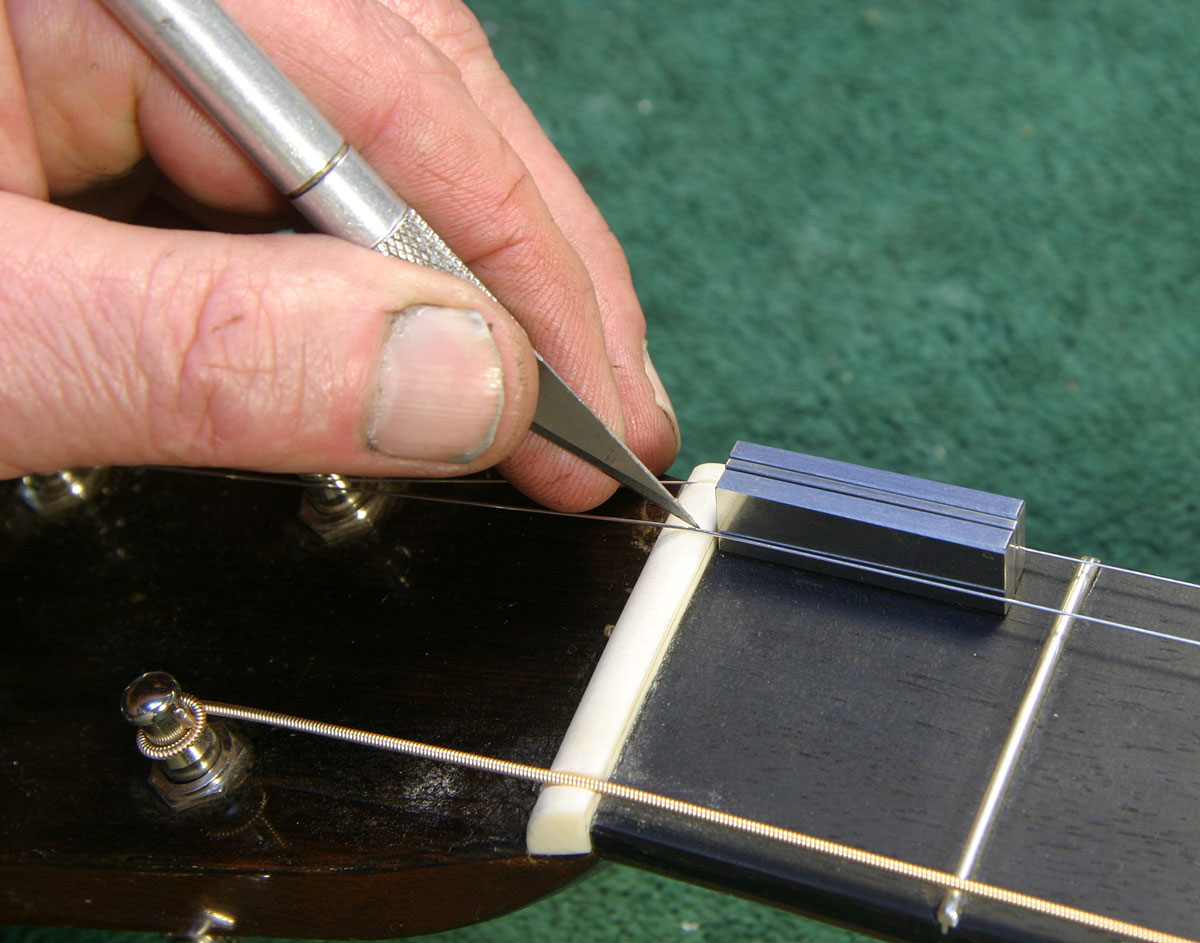
Now, with the first string in place, I installed the second string, spacing it over by simply placing the stack of blocks between the two:
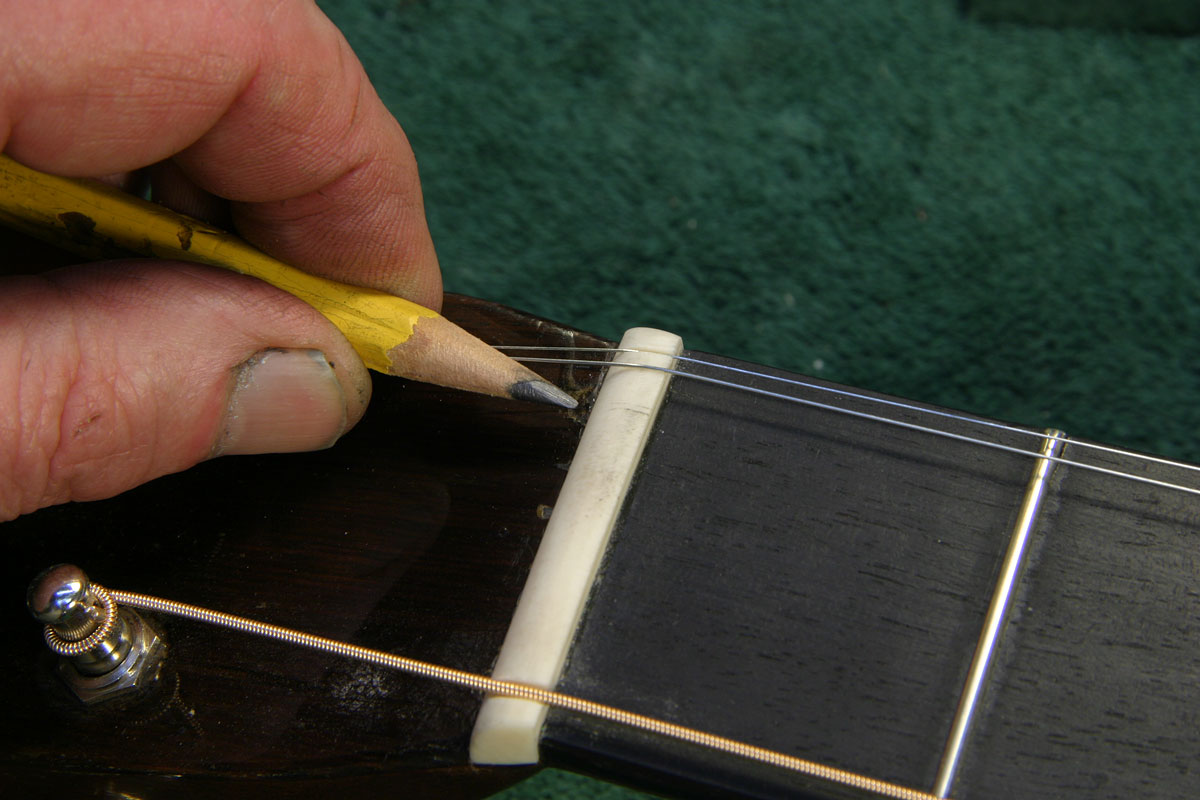
I marked the both edges of the string with a sharp blade, and then rubbed a bit of pencil graphite into the scratches:
That gave me the perfect location for the second string. Once it was in place, I located the third the same way, and finished up the job by repeating the process starting from the sixth string and working inward.
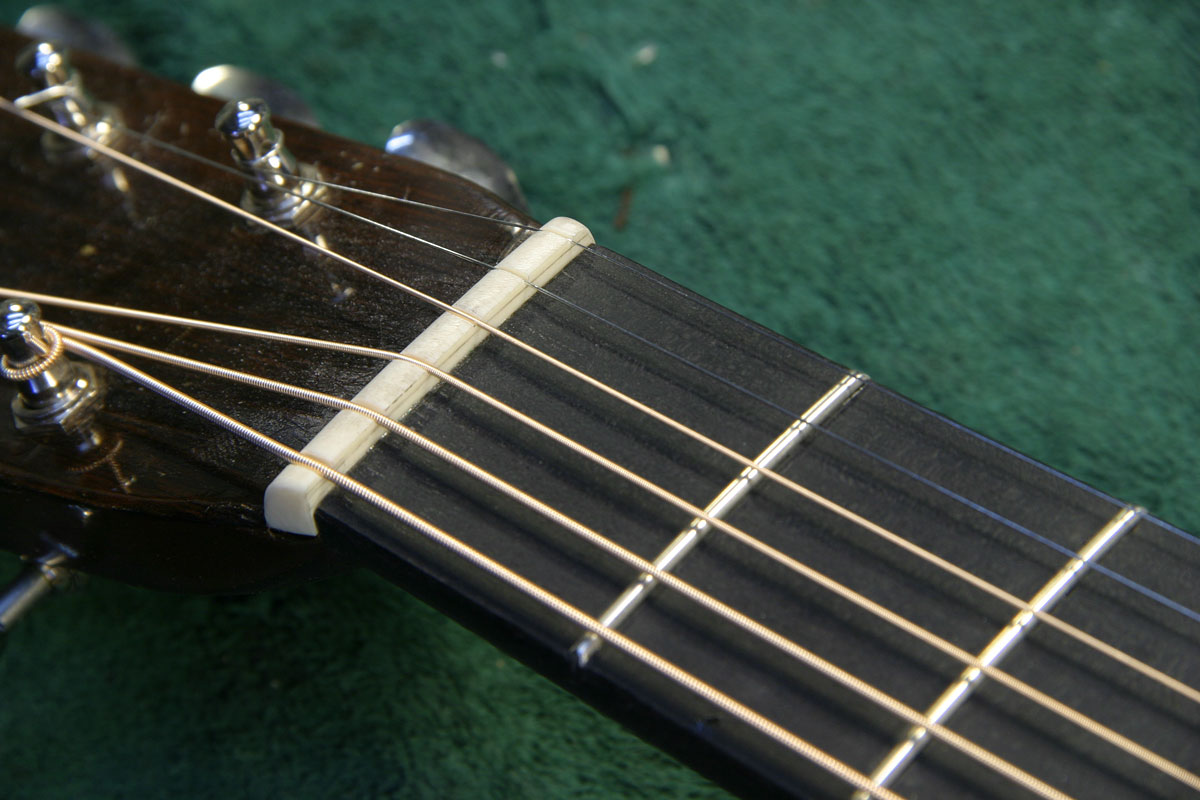
Here's the final nut, before I removed and polished it:
Back at the bridge, I added a little tradiditional detail to the tops of the string notches:
And, I made up a new saddle, trila fitting it as I went. Here, I'm using a little hand-crank drum sander to shape the curved ends of the saddle:
Oh, and here's another little old time traditional touch:
When I installed the new Waverly tuners, I lined up all the mounting screws - just for looks.
Well, that's about it - the guitar is back to its old playability, and ready for some tunes.
Next up - a 1940 D-28 with "issues". . .