Things For Luthiers
  Repair Technique
    Setup
    Inlay
    Frets
    Tool Use
    High Tech Department
    Finish
    Structural
    Glue
    Guitar
      Structural
      Frets
      Pickguards
      Bridges
      Pickups
    Banjo
    Mandolin
    Ukulele
    Harp
    Case Repair
  Tools
My WorkBench
Making a Fluorescent Inspection Light
Proportional Nut Spacing Rule
Fret Tang Tools
Kenny Hill's Spring Go-Bars
A one-use Molding Plane
Fret Heater
Modified Soldering Gun for Pulling Frets
Upgrading Loose Dremel Bearings
A Slo-Mo Stationary Belt Sander
Dry Pigment Storage Box
Selecting String Cutters
Fret Height Gauge
A Simple Magnetic Tool Fence
Taylor's Super Driver
Bent Tools
Shot Bag Neck Support
Half a Pencil
Bridge Carving Machine
Shop-built Semiautomatic Lining Kerfer
Gryphon's Fret Saw
Joint Knife
A Two Bit Finger Saver
Long Probes
Articulated 'Take-Apart' Crack Clamp
Clamp Points for easy positioning
Bench Clamps
Adjustable saddle routing base
Special & Modified Clamps
Refret Saw Guide
Roy Noble's Dremel Router Base
Bob Gleason's Nut Handle
Folding Inspection Mirror
Dan Erlewine's Rockin' Pin Puller
Steve Crisp's Classical Guitar Tuning Stand
Bridge Pin Hole Slot Saw
Making Ergonomic Tool Handles
Tim's Saddle Pal
Making My Fret Expander Pliers
My Favorite Power Tool
My Weirdest Power Tool
Dovetail Neck Removal Fixture
Neck Removal Air Harness
Some of My Favorite Stock Tools
Check out the Spy Cam
Taper Thickness Gauge
  Shop Tips
  Data
  Product Reviews
Things For Musicians
  Accessories
My Field Trips
Tom Ellis Precision Pearl Inlay - Austin, Texas
Shubb Capos - Valley Ford, CA
Rick Davis, Running Dog Guitars - Richmond, VT
Ted Megas Guitars - San Francisco
Collings Guitars - Austin, Texas
Hideo Kamimoto's Shop - San Jose, CA
1999 Northern California Ukulele Festival
Taylor Guitars - El Cajon, CA
Northwoods Guitar Repair Seminar 1998 - Big Rapids, MI
Northwoods Seminar 2000
1998 Acoustic Guitar Festival - San Rafael, CA
Guild of American Luthiers Convention, 1998
Mario Martello - It's Super Mario!
Mario's San Franciscan
Bills ABC Music - San Bruno, CA
Joe Grubaugh & Sigurn Seifert, Violin Makers - Petaluma, CA
Down in Brian's Basement - Palo Alto, CA
Roberto-Venn School of Luthiery- Phoenix, AZ
Special Features
C. F. Martin & Co., Nazareth, PA
Collings Guitars- Austin, TX
Gibson's Acoustic Instrument Division, Nashville
Guitar Building with Jeff Traugott
CFox Guitars - Healdsburg, CA
Vogel Guitars - Quito, Ecuador
Kamaka Ukuleles - Honolulu
Tacoma Guitar Co.
U.S.A. Custom Guitars
Repair/Restoration Blogs
1867 Martin 1-26
1940 Martin D-28
1937 Martin D-28
1920 Gibson K-2 Mandocello
Gryphon
A Quick Tour of Gryphon
Gryphon's 30th Birthday Party
Hey, it's Ramblin' Jack Elliot!
Cats and Jammers
Book Reviews
About the Reviews
Guitar Finishing, Step by Step - by Dan Erlewine
Martin Guitars- by Richard Johnston & Jim Washburn
Gallery of New Instruments
Caution!
New Instrument Gallery
  Guitars
Fun Stuff
What They're Saying About Us
The Luthier's Kitchen
Yowl-A-Lele
Alice's Gryphon Page
Cool Plates
Washburn Made a Lot of Everything
Father & Daughter United after 32 Years!
Gryphon's Famous Free Picks
Folk Art Gallery
Fine Art Instruments by Robert Armstrong
Every Circus Needs a SIDESHOW
The ORIGINAL Dreadnought!
Nothing Like Those Old Master Finishes
The Foldo
Holiday Tie-Dye Peeps
Nancy's Dessert Cake Bites
Ditson Dreadnought
Mashed Potatoes
Split Pea Soup
Potato Peeler
Café Foldo
Papa Schnooger
Mod, oh yeah!
Dunn Dreadnought
Coffee Gangs
dreadnought guitar.
my floor lamp.
Quick and Easy Caesar
The Waybacks
Instrument History and Lore
Looking Backward at the 20th Century
The Way We Were... "obsolete" repair styles
Origins of the 12-string Guitar
The World's Oldest Guitar
Washburn Banjo
Museum
FRETS.COM Museum
About The Museum
  Guitars
    Gibson
    Epiphone
    Washburn
    Selmer
    Gryphon
    Kay
  Banjos
    Gibson
    Weymann
    Paramount
    Bacon
    Fairbanks
    Vega
    Gryphon
    Misc.
  Mandolins
  Ukuleles
Home Shop Tech
HOME SHOP TECH Articles
#1 Sock Handle
#2 CD Paint Brush Can Cover
#3 Japanese Hand Saws
#4 Wax for Lubricating Saw Blades
#5 Pocket Knife
#6 Diamond Pocket Hone
#7 Air Blow Gun
#8 File Cleaning Trick
#9 Drilling Perfectly Clean Holes
#10 Clock Marker
#11 Disc Sander Cover
#12 Glue Thermometer
#13 Magnetic Fence
#14 Salad Tong Finger Saver
#15 Old Kitchen Knives
#16 Cutting Sandpaper
#17 Soundhole String Retainer
#18 Epoxy Leftovers
#19 Small File Handles
#20 String Crank
#21 Stain Palette
#22 Cotton Swab
#23 Portion Cups
#24 File Scraper
#25 Palette Knife Extension
#26 Saddle Contour
#27 Touch Up Lacquer Bottle
#28 Recycle Beverage Can
#29 Micrometer
#30 Toothbrushes
#31 Sander Safety
#32 Hemostats
#33 Compressed Air Lines
#34 Wine Cork Knife Point Protector
#35 Chisel Drawer Dividers
#36 Bent File Chisel
#37 Screwdriver Chisel
#38 Acetone Finish Test
#39 Bevel Fret Slot
#40 Solvent Cap Dispensing Cup
#41 Packing for Travel
#42 Pickup Brace Damage
#43 Coloring Glue
#44 Cutting Paper on Band Saw
#45 Quick Grip Brace Jack
#46 Wedge F-hole Clamp
#47 Guitar Wall Hanger
#48 Half Pencil
#49 Straw Pipette Extender
#50 X-brace Top Wrinkle
#51 Paper Pad Mixing Palette
#52 Fluorescent Replacement Bulbs
#53 Swing Arm Lamps
#54 Packing Pegheads
#55 Pyramid Bridge Clamping Caul - External
#56 Threaded Clamp Foot
#57 Masking Tape for Indexing Bridge
#58 Rubber Band Tuner Grommet Retainer
#59 Belt Sanding Celluloid
#60 Sharp Nut
#61 Side Crack Reinforcement
#62 Dry Pigment Sorting Block
#63 Paper Grain Direction
#64 Modify Drill Bit for Cutting Wood
#65 Fret Pullers Pull Other Things
#66 Heavy Duty Push Sticks
#67 Single Edge Razor Blades
#68 Acid Brushes
#69 Plastic Stretch Wrap for Tool Protection
#70 Bit Holder Blocks
#71 Cross Grain Sanding
#72 Truth in Labeling
#73 Plastic Wrap Glue Resist
#74 Cut Acid Brush
#75 Stretch Wrap Masking
#76 Spray Can Cap
#77 Spray Can Nozzle
#78 Kitchen Paring Knife for Shop Utility
#79 Powerless Belt Sanding
#80 Drill Index
#81 Grinder Support
#82 Leather Pliers Grip
#83 Paper Towel Holder
#84 Newspaper Drawer Liner
#85 File Handle
#86 Recycle Condiment Bottle
#87 Diagonal Cutter Selection
#88 Fatigue Mat
#89 Credit Cards
#90 PVC Shop Vacuum Tool
#91 String Retainer String
#92 Hex Wrench Rack Improvement
#93 Power Tool Casters
#94 Eyes and Ears
#95 Soft Vise Jaw Pads
#96 String
#97 Layout on Metal
#98 Storing Long Electrical Cords
#99 Hanging Coil Hoses
#100 Cutting Aluminum
#101 "Candling" Guitar Tops to See Brace Locations
#102 Locating and Tracing Braces with Magnets
#103 Foil Protection for Reamers
#104 Dry Sandpaper Lube
#105 Mixing Epoxy without Bubbles
#106 Spray Lube Siphon Tube Reinforcement
#107 Paper Towel Half Sheets
#108 Dusting Brush Modification
#109 Cutting Screws and Bolts
#110 Catalog Sale Flyers
#111 Gluing Bin Boxes
#112 Hacksaw
#113 Link Belt
#114 Freehand Band Saw Technique
#115 The Key Hole
#116 Ceiling Posters
#117 Magnetic Screwdriver
#118 Wide Disposable Brush
#119 Veneer Cutting on Band Saw
#120 Finding Center by Balance
#121 Hacksaw Duplicate Parts
#122 Chuck Key Magnet
#123 File Card for Cleaning Saw Blade
#124 Calculator Bag
#125 Door Storage
#126 Magnetic Pocket Screw Holder
#127 Paint Can Lid
#128 Quick Tape Strap for Sensitive Items
#129 Shop Vac Hose Strain Relief
#130 Coiling a Band Saw Blade
#131 Oil Spill Cleanup
#132 Wood Parallels
#133 Masking Tape Handles
#134 Wedges
#135 Tethered Door Stop Wedges
#136 Long Air Hoses
#137 Soda Straw Parts Storage
#138 Hanging Holes for Tools
#139 High Item Picker
#140 Tool Index Wood Infill
#141 Cardboard Drawer Liner
#142 Waste Basket Bungee
#143 Tool Covers
#144 Bungee
#145 Magnetic Bit Storage Drawer
#146 Platform Ladder
#147 Magnetic Tool Pickup
#148 Kitchen Hero - Cutting Board
#149 Kitchen Hero - Diamond Hone
#150 Photographs for insurance
#151 Unscrew Container Safely
#152 Little Boxes - Get Rid of Lid
#153 Swivel Casters for Tool Cabinets
#154 "Temporary" tool stands
#155 Tool Drawer Dividers
#156 Rope Trick: Cutting
#157 Broom Handle
#158 Hand Drill Countersink
#159 Using Digital Calipers
#160 Identifying Metric Hex Keys
#161 Dremel Carbide Cutoff Wheel
#162 Fence Hand Safety
#163 Empty Bin Boxes
#164 Cutting Bin Boxes
#165 Camphor
#166 Decant Epoxy to Avoid Quick Reaction
#167 Epoxy Mixing on File Folder "Palette"
#168 Wood Screw Pilot Drill Size
#169 Reverse Switch Safety Bolt
#170 Keyless Chucks
#171 Work Glove Storage Rack
#172 Cutting Spring on Grinder
#173 Stacking Tool Cabinet Bottoms
#174 Label Those Drawers
#175 Extra Drill Chuck
#176 Sauce Pan
#177 Ball End Hex Wrench
#178 Poly Bottle Bottom for Parts Washing Basin
#179 Square Bottle Bottom for Parts Drawer Bins
#180 Screws in Jars
#181 Salvage Hardware Drawer
#182 Cutting Long Cardboard Tubes
#183 Repetitive Length Cutting on Band Saw
#184 Mark Up Your Ruler
#185 Plastic Containers and Solvents
#186 Mobile Bin for Wood Scraps
#187 Scrap Bin Cover
#188 Scrap Bin Triage
#189 Ball Peen Hammers
#190 Old Rags to Prevent Under Bench Hunting
#191 Storing Magetic pickup tools
#192 Duct Tape Mallet
#193 Cut Down Old Paint Brush
#194 Plastic Bag Makes Emergency Glove
#195 Break a File to Make Short Ones
#196 Magnets to Hold V-Block
#197 Steel Rules May Have Poorly Cut Ends
#198 Buy Files by the Box
#199 Battery Charger Maintenance
#200 Extending Cable Ties
#201 Miter Gauge Alignment
#202 Recycle Paint Thinner
#203 Spray Can Freshness Reminder
#204 Pipette Sealing Trick
#205 Cookie Sheet Chip Pan
#206 Extension Cord Strain Relief
#207 Super Glue "String Needle"
#208 Heavy Duty Extension Cords
#209 Magnetic Book Hangup
#210 Paint Special Tool Handles for Identification
#211 Hang up those brooms
#212 Wood V-Blocks
#213 Miter Gauge Rip Fence
#214 Writing on Saw Table
#215 Saw Table Wax Lube
#216 Toilet Paper
#217 Dispensing Paint
#218 Cutting Short Pieces on Band Saw
#219 Recyled Cardboard Box Tote
#220 Phonograph Needle Scriber
#221 Wall Mounted Tin Can Tool Holders
#222 Dental Floss Sewing Thread
#223 Cut Paper Towel Roll
#224 Hand Tool Oiler for Rust Protection
#225 Tool Instructions Taped Inside Drawers
#226 Forstner Bits in Aluminum
#227 No-Mess Spill Wiping
#228 Roll Wrapper as Spill Wiper
#229 Shop Rags from Bed Sheets
#230 Cutting Shop Rags on the Band Saw
#231 Rubber and Vinyl Mats on Concrete Floors
#232 Tape for Removing Splinters
#233 Cutting Steel Wool Pads
#234 Paint Can Lid Installation
#235 Pouring from Gallon Cans
#236 Cutting Clear Plastic on the Band Saw
#237 Masking Tape Dispenser
#238 Toothpick Brush
#239 Bailing Wire Spool Retainer
#240 Twisting Wire
#241 Penetrating Epoxy Sealer
#242 Remove that Acrylic Plastic Protective Sheet
#243 Hex Key Cheater Bar
#244 Sand Bags
#245 Label Special Tools and Fixtures
#246 Masking Tape Storage
#247 Paraffin lube for Band Sawing Aluminum
#248 Special Push Sticks
#249 Paper Towel Core for Cord Storage
#250 Skinny "Paintbrush Broom"
#251 Blow out Shop Apron Pockets
#252 Buy Good Hacksaw Blades
#253 Grind the "Set" from Blades to Get Narrow Kerf
#254 Convertible Step Stool
#255 Photograph Your Work
#256 Sweep the Floor
#257 Tool Cabinet "Breadboard" Shelf
#258 Hang Goggles Near Tools
#259 Mark Edges to be Cut
#260 Garbage Can Table Top
#261 Magnetic Spray Can Holder
#262 Removing Box Labels
#263 Simple Dolly and Hoist to Move Heavy Items
#264 Recording Lent Tools
#265 Abrasive Paper for Sharpening Chisels
#266 Close the Gap on Grinding Wheel Tool Support
#267 Keep Band Saw Blade Guide Low
#268 Used Engine Oil for Shop Duty
#269 Shop Vac Hose Hanger
#270 Grinding Center Punch Point
#271 Pilot Drill Size for Large Drill Bit
#272 Reverse Drilling to Enlarge Hole
#273 Drill Clamp Feet for Accessories
#274 Glass Microscope Slide Scraper
#275 Bubble Wrap Packing Trick
#276 Cold Chisel Safety Tip
#277 A Really Simple Drill Guide
#278 Drill Press Center Finder
#279 Split Point Drill Bits
#280 Variable Pitch Band Saw Blade
#281 Guitar Strings for Other Uses
#282 Cyanoacrylate Catalyst Bottle
#283 Mangetic Holder for Small Parts
#284 Drilling Cotton Buffs
#285 Diamond Grinding Wheel Dresser
#286 Heat to Remove Sticky Labels
#287 Paint Metric Wrenches
#288 Stackable Cottage Cheese Containers
#289 Aligning Wood Screw Slots
#290 Drilling Round Things
#291 Screw Machine Length Drills
#292 Relief Cuts on Bandsaw
#293 Cross Cutting Long Board on Band Saw
#294 Glue Quick Grip Pads
#295 Resealing Caulk Cartridges
#296 Cyanoacrylate as Wood Sealer
#297 Messy Milling Project
#298 Drill Press Can Cut You When it's Turned Off
#299 Get a Big Vise
#300 Friendly Plastic Ergonomic Handles
#301 Mount Stuff on Cabinet Doors
#302 Wall Bumper Near Electrical Plugs
#303 Keep Dustpan in Trash Can
#304 Ice for Cooling at the Grinder
#305 Making Heavy Twine from Thin
#306 Ice Cube Tray Parts Storage
#307 Cable Ties for Hanging Tools
#308 Cleaning Measuring Tapes
#309 CD-ROM Canister for Adhesive Tape Storage
#310 Split Rivets
#311 Impact Driver
#312 Repetitive Bandsaw Cuts
#313 Old Shower Curtain as Tarp
#314 Replace Thumbscrews on Machines
#315 Have a Little Fun
#316 Magnetic Wrench Holders for Power Tools
#317 Measuring Centers on Uneven Sizes
#318 Reconditioning Sharpening Stones
#319 Magnetic Tool Holders for Drawers
#320 Improvised Masking Tape Bandage
#321 Lok-Line as Flexible Support
#322 Clamping with Drill Press
#323 Camera Tripod Stabilizing Weights
#324 Computer Labels for Drawers and Boxes
#325 Extra Casters for Welding Cart
#326 Use Long Screwdrivers
#327 Soaking Parts in Solvent
#328 Making Safe Edge Files
#329 Cut Cans for Shop Use
#330 Magnets for Bending in Vise
#331 Non Matching Handles are Best
#332 Steel Strap Shim Stock
#333 Stretch Wrap to Secure Solvent Labels on Cans
#334 Mark Pipette Graduations
#335 Keep a Shopping List
#336 Label Unusual leftover Hardware
#337 Magnet to Hold Abrasive Strips on Lathe
#338 Handle to Replace Thumb Screw
#339 Magnet Holds Water Bath on Grinder
#340 Magnets Hold Drill Index on Drill Press Table
#341 Label Grit on Sanding Belts
#342 Mouse Pads for Drawer Liners
#343 Cutting Shallow Notches on Band Saw
#344 Clearing Dispenser Bottle Opening
#345 Faucet Washer as Tool Foot
#346 1-2-3 Clamp It
#347 Tubing for Grinder Support of Thin Pieces
#348 Ring Testing Grinding Wheels
#349 Support Thin Stock for Drilling
#350 Digital Caliper as Tweezer
#351 High Speed Steel Taps
#352 Plastic Bag Thread Protection for Jars
#353 Shop Vac Sock
#354 Bandsaw Thin Stock on Edge
#355 Shop Towel Identification
#356 Pennies are Worth Having
#357 Bag Loose Wires and Cables
#358 Pizza Boxes
#359 Timer for Heat and Fan
#360 Cardboard Floor Mats
#361 Chip Curtain
#362 Cigarette Papers
#363 Age Date Glue Containers
#364 Don't Crumple Old Notes
#365 T-Shirt Tool Cover
$366 Liquid Hand Cleaner
#367 Shop Shelving
#368 Foot Control for Bench Vise
#369 Adjustable Wrench as Caliper
#370 Milk Carton Drawer Bins
#371 Long Bin Boxes on Narrow Shelves
#372 Pencil Sander
#373 Garage Sale Items Can Have Interesting Uses
#374 Hanging Rag Storage
#375 Note Holder at the Door
#376 Simple Upgrade for Quick Grip Clamps
#377 Keep Project Inspirations Handy
#378 Mark Source and Cost on Stock
#379 Label the Size of Staples in Your Staple Gun
#380 Easy Handle for Small Heavy Stock
#381 Check Steel Before Filing
#382 Paint with Your Socks
#383 Centering a Drill on Round Stock
#384 Impromptu Large Hex Key
#385 Cutting "Half a Kerf" on the Band Saw
#386 Squeeze the Last Bit out of a Glue Tube
#387 Use a Copier for Quick "Drawings"
#388 Measuring Over a Ledge
#389 Clean up "Spun" Drill Bit Shanks
#390 Changing the Zero Point on Graduated Dials
#391 Dispensing Small Amounts from Spray Can
#392 Paint Can Opener
#393 Broken Files are Handy in Close Quarters
#394 Buy Small Containers of Some Stuff to Save Money
#395 Kitchen Towels Have Four Lives
#396 Solvent "Recycling" Trick
#397 Still Hung Up on Rags
#398 Simple Leather Finger Saver
#399 Missing Stud
#400 How Much is Left in That Paint Can?
#401 Storing Spare Parts for Machines
#402 Label Adjustment of tools or Gauges
#403 Simple Grinder Safety
#404 Lubricate Wood Screws
#405 Break the Corner for a Tight Fit
#406 Weak Thread Locking Compound
#407 Rope Burn Trick
Glossary
An Illustrated Glossary
Archtop
Armrest
Backstrip
Ball End Strings
Bar Frets
Bearclaw
Belly Bridge
Binding
Birdseye Maple
Biscuit
Blind Saddle
Block Inlay
Book Matched
Bottleneck
Bout
Bowl Back
Box
Break Angle
Bridge
Bridge Pins
Bridge Plate
Button
Cantilevered Fingerboard
Capo
Celluloid
Check
Chipboard Case
Classical Guitar
Clown Barf
CNC Computer Numerical Control
Compensation
Cutaway
Dot Neck
Dovetail
Dreadnought
Ears
Edge Dots
End Block
End Piece
Endpin
Endpin Jack
f-Holes
Fan Bracing
Fiddleback Maple
Fifth String
Fifth String Capo
Figure
Fingerboard or Fretboard
Fingerpick
Fingerrest
Fingerstyle
First Position
First String
Flamed Maple
Flamenco Guitar
Flat Top
Flatpick
Flight Case
Frets
Gig Bag
Grain Runout
Hardshell Case Anatomy
Hawaiian Guitar
Hawaiian Nut
Heel
Heel Cap
Herringbone
High/Low Position
Hollow Body Electric Guitar
Ivoroid
Ladder Bracing
Lap Steel
Lining
Loop End String
Mitered Purfling
Mother-of-Pearl
Neck Block
Nut
Pearl Border
Peghead or Headstock?
Pegs
Pickguard
Pickup
Pin Bridge
Pinless Bridge
Purfling
Pyramid Bridge
Quilted Maple
Relief
Resonator
Resophonic
Ribbon Grain
Ribs
Rosette
Saddle
Scale Length
Scroll
Silk
Slack Key
Snakehead
Solid Body Electric Guitar
Spanish Heel
Steel
Steel Guitar
String Ramps
T-Bar
Tailpiece
Three Piece Back
Through Saddle
Thumbpick
Tie Block
Truss Rod
Truss Rod Cover
Volute
Waist
Which way is up?
X-Brace
General Stuff
About Me
What is FRETS.COM?
I'm on the cover!
Why FRETS.COM?
About the photographs. . .
Help!
Photo Studio
Contributors
my home shop this morning
Mario Martello 1924-2006
OOPS!
Resume
Links
FRETS Links
/Things For Luthiers/Repair Technique/Guitar/Neck Resetting/

Martin Neck Resetting

This was converted from the original Frets.com site.
To view the original page click here

1931 000-45 12-fret

About the instrument

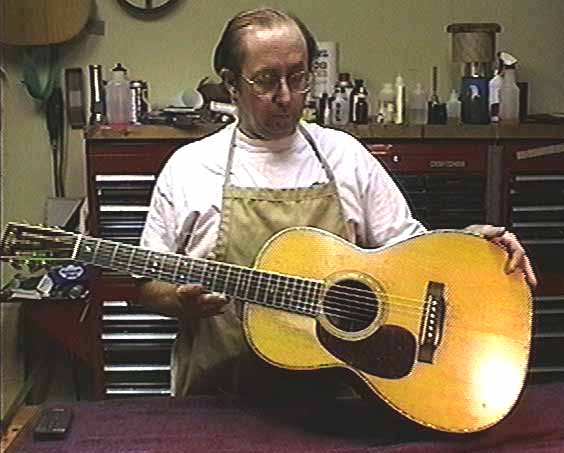
This 1931 Martin 000-45 was obviously made as a special order. In fact, Richard Johnston looked up the original factory record when he was researching his book, "Martin Guitars - An Illustrated Celebration of America's Premier Guitarmaker." He's had full access to the company archives and has turned up the most amazing stuff.

The 12-fret 000 size guitar had been "upgraded" a couple of years earlier, so this one is a late example. In addition, it was originally ordered as a left handed seven-string guitar, for a Montana cowboy musician named Horace J. Ingram. Old Horace probably doubled-up the first string, as did many of the cowboy and western musicians of the time.

The patient:

The conversion from 7-string had been done very neatly and the owner of this guitar wants it to be playable, so he's leaving it as a 6-string. Apart from the 7-to-6 string conversion it's all original and in fine condition. The only real finish damage is on the face.

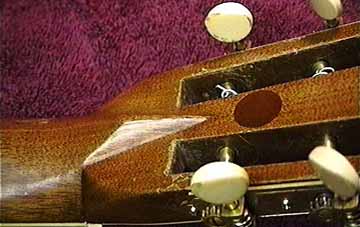
Here's a shot of the back of the peghead showing the plug that covers the old tuner hole and scar from the back side:

I took this picture to show the 3/4" plug most clearly. From other angles the wood grain is more favorable and it is a very neat repair, hardly noticeable. The repaired hole in the front is 3/8" in diameter and goes right through the torch inlay.

It seems that most factories didn't change peghead inlays if they were adding strings, they just punched right through them. The hole is consistent with a Grover 4:1 banjo peg, which would have been a logical choice for an additional tuner.

We had an original 9-string D-28 in the shop a few years ago. The additional three pegs were regular 90-degree guitar gears mounted crookedly on the end of the peghead with the tuner posts drilled through the Martin decal.

Inside the original seven holes are evident in the bridge plate, which was neatly inlaid and redrilled with six holes.

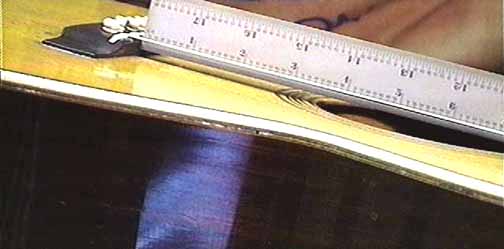
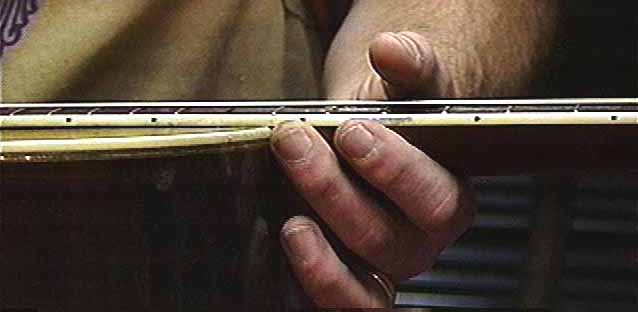
The neck has pulled forward with time and the action is really high. If I lay a straightedge on top of the frets, I'd like it to just touch the TOP of the ebony bridge (providing that the bridge is of normal 5/16-3/8" height. That way with a saddle projecting 3/16' above the bridge, I'll have 3/32" action at the twelfth fret. You can see this one is no where near the mark:

By this measurement, I can tell the neck has pulled forward almost 1/4" at the nut.

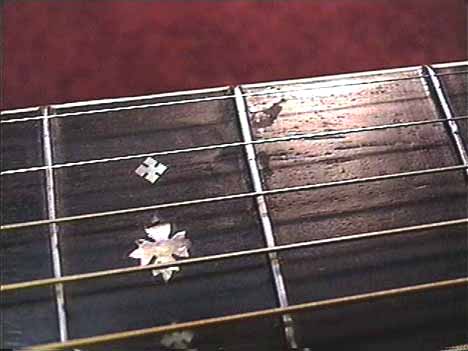
Unfortunately, someone had pulled out all the bar frets and shimmed them higher to compensate for lousy action and fret wear. I wish that person had been a little more careful:

Every fret has chips and file marks around it! After resetting the neck, I'll have the fretjob from Hell.

Lets get on with it. . .


The Operation

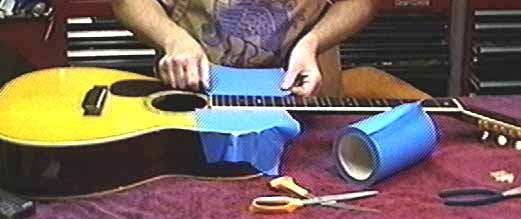
Wide, very low tack masking tap will protect the top from radiant heat and scratches as I loosen the end of the fingerboard:

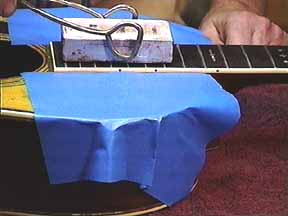
My heat source is a block of aluminum heated in the oven at 400 degrees Fahrenheit. I frequently use the electric heat blankets, but for this job I wanted the most precise control. I know that whatever happens there'll be a limit to how hot the wood gets!

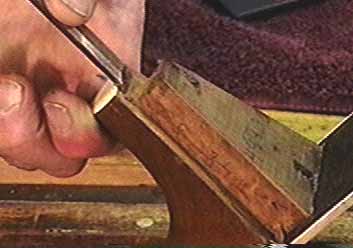
I'll feel underneath to monitor the heat penetration, and when it's quite warm to the touch, I'll start testing with my knife. My knife is a regular flexible putty knife I've carefully ground to an extremely fine tapered tip. I ground it by simply rubbing it on flat surface covered by 320 grit silicon carbide waterproof paper. It took about 2 hours to get the blade to just the right flexibility, so that when I press it down to a flat surface it makes a smooth contact all the way out to the very edge. I keep the blade sharp and polished by buffing it with emery compound on my buffer at least once a week.

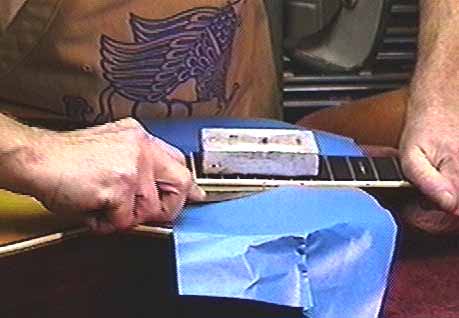
With the block still in place, I'll start lifting the fingerboard. Once I'm confident that the glue joint is parting cleanly, I'll remove the block and loosen the fingerboard right up to the 13th fret.

Once the fingerboard is loose, I'll pull the 13th fret and drill a 1/16" hole through the fret slot and into the pocket at the end of the dovetail joint:

Now I have an access hole for my steam needle

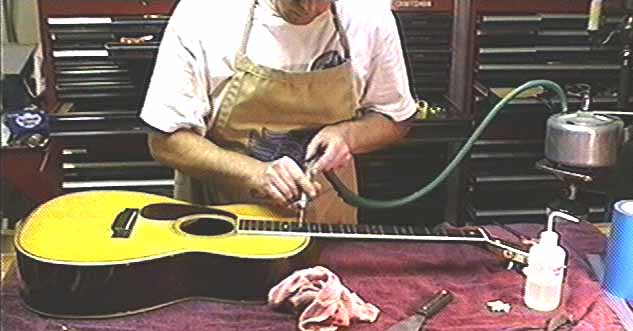
My steam generator is a small pressure cooker to which I've added a hose fitting. That way I still have the pressure relief safety valve in place. When the pressure gets too high, the valve lets off some steam and my hose won't blow out. Although I'm steaming the joint from the top, I get good penetration of heat and moisture immediately through the joint, thanks to the 1/8" gap at the end of the fingerboard.

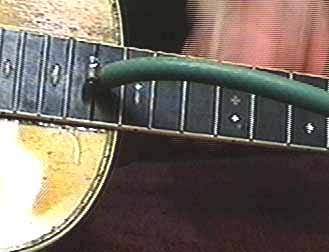
Look below the fingerboard, and you can see the cloud of condensed steam emerging from the edge of the fingerboard from frets 12 to 16. The steam is shooting out almost all the way across the top and condensing on the finish. The steam is HOT as it comes out, so I'm wiping furiously with clean cotton rags to keep the heat and moisture from damaging the finish.

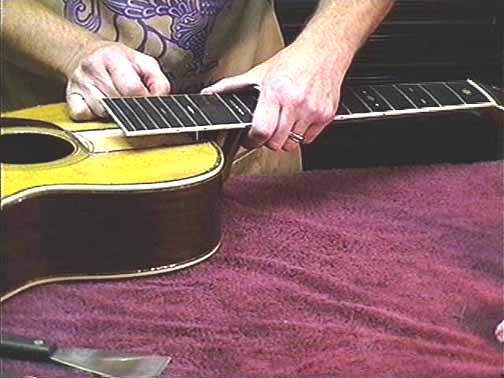
For more modern instruments I have a fixture to press the neck out while I'm steaming. This guitar is a very valuable and delicate one, so I'm taking my time, steaming more slowly and removing it without using my clamping fixture, which gets in the way of the view and wiping effort.


By waiting for the steam to do its work, I'm able to remove the neck without any finish damage:

It's time to cut the heel of the neck to change the angle. I can make a pretty good estimate of the amount of material I must remove from the neck by a simple calculation. Remembering that the neck had pulled forward nearly 1/4" I can make a simple calculation:

Essentially, the neck had pivoted at the 12th fret where it joins the body. If I want to pivot the neck backward 1/4" all I have to do is divide the distance from the 12th fret to the nut by the distance from the bottom of the fingerboard to the heel cap. If I then divide 1/4" by that amount I get a result of a little less than 1/16" of material I must remove at the bottom of the heel to allow the neck to pivot backward the right amount.

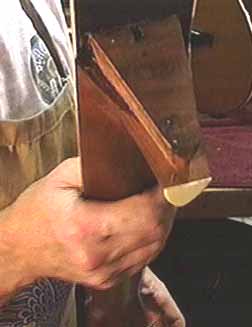
I'll then scribe a little line on the heel cap to indicate the depth of cut and I'll place the neck in my special fixture. (I only use this fixture on rare occasions when I'm working on a neck that needs to have a substantial cut made, and which has a delicate finish.)

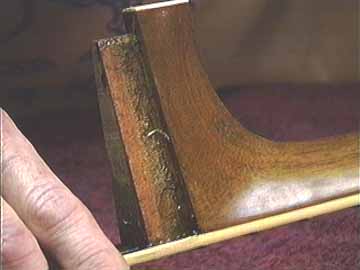
I can adjust the table of this fixture so that the neck protrudes exactly the amount I need, namely 1/16" at the heel and zero at the fingerboard. I have a flat chisel with an extremely fine acute cutting angle. I use this chisel in a diagonal slicing motion to slice off the end of the neck where it touches the body:

You can see the light area where my chisel sliced off the neck, and the dark where the original undercut surface still remains:

Now, I'll undercut the area from the finished edges to the dovetail, so I won't have to fit too broad a surface when I'm making my final adjustments:

I'll make my final neck angle adjustments by slipping fine sandpaper (180 grit) between the body and neck, holding the neck in place, and drawing out the sandpaper. That way I'll get the neck to fit exactly, even if the body edges are not perfectly straight (they never are.)

After each pull of the sandpaper, I'll check the neck angle and "string line" (side-to-side alignment) with a straightedge.

Now that I'm confident that I've set the correct neck alignment, it's time to refit the neck. I'll prepare a couple of mahogany shims and sand them to a taper by holding them on my coarse sanding plate and block sanding from above with finer sandpaper:

I'll slip the shims into the dovetail pocket and jam the neck in on top of them.

When I take the shims back out, there'll be shiny pressure marks where they fit against the sides of the joint.

I can also use carbon paper, chalk, or dentist's articulating paper to highlight these areas, but here the shiny spots are very clear. I'll scrape and block sand the shiny areas and try the joint again. By repeating the process I'll eventually get the shims to fit very tightly with the neck sitting correctly in the joint. At this point I'll recheck with my straightedges and if everything's all right, then I'll glue and clamp the neck with cauls to protect the fingerboard and body.

I used hide glue to reassemble this vintage Martin because that's the glue they used when it was built, and that's the glue a future repair tech would expect to encounter.

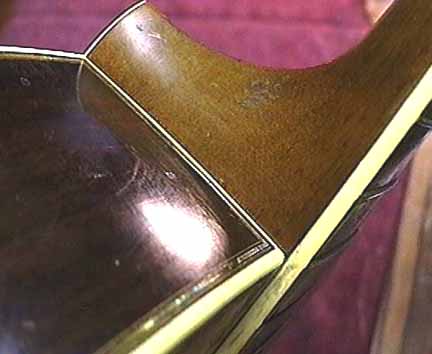
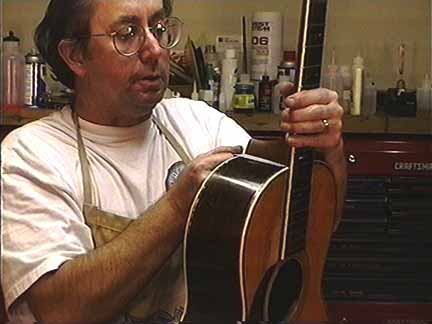
Here's the finished product.

The heel shows no signs of removal and fits just like it did from the factory.

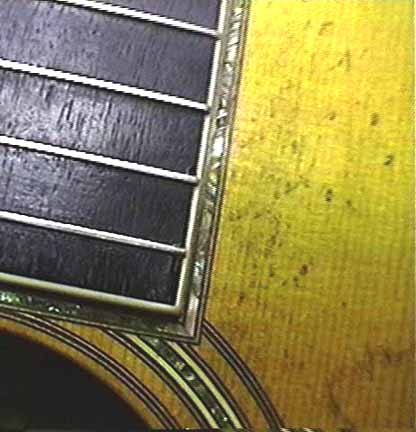
I was very careful to preserve the alignment over the body because of the pearl trim around the end of the fingerboard:

After restringing with light gauge steel strings I can tell the original bridge and saddle combination is way too low! If I make a new saddle to rise 3/16" above the bridge, this guitar should have ideal action.

The neck reset is completed, the angle is set correctly and if the frets were in good shape, all I'd have left to do would be to level the frets a little and make a new saddle. This guitar would play like new.

And it will, after refretting. . .

Unless otherwise credited, all content on Frets.com is
Copyright © 1969 - 2023 Frank Ford
All rights reserved.