Things For Luthiers
  Repair Technique
    Setup
    Inlay
    Frets
    Tool Use
    High Tech Department
    Finish
    Structural
    Glue
    Guitar
      Structural
      Frets
      Pickguards
      Bridges
      Pickups
    Banjo
    Mandolin
    Ukulele
    Harp
    Case Repair
  Tools
My WorkBench
Making a Fluorescent Inspection Light
Proportional Nut Spacing Rule
Fret Tang Tools
Kenny Hill's Spring Go-Bars
A one-use Molding Plane
Fret Heater
Modified Soldering Gun for Pulling Frets
Upgrading Loose Dremel Bearings
A Slo-Mo Stationary Belt Sander
Dry Pigment Storage Box
Selecting String Cutters
Fret Height Gauge
A Simple Magnetic Tool Fence
Taylor's Super Driver
Bent Tools
Shot Bag Neck Support
Half a Pencil
Bridge Carving Machine
Shop-built Semiautomatic Lining Kerfer
Gryphon's Fret Saw
Joint Knife
A Two Bit Finger Saver
Long Probes
Articulated 'Take-Apart' Crack Clamp
Clamp Points for easy positioning
Bench Clamps
Adjustable saddle routing base
Special & Modified Clamps
Refret Saw Guide
Roy Noble's Dremel Router Base
Bob Gleason's Nut Handle
Folding Inspection Mirror
Dan Erlewine's Rockin' Pin Puller
Steve Crisp's Classical Guitar Tuning Stand
Bridge Pin Hole Slot Saw
Making Ergonomic Tool Handles
Tim's Saddle Pal
Making My Fret Expander Pliers
My Favorite Power Tool
My Weirdest Power Tool
Dovetail Neck Removal Fixture
Neck Removal Air Harness
Some of My Favorite Stock Tools
Check out the Spy Cam
Taper Thickness Gauge
  Shop Tips
  Data
  Product Reviews
Things For Musicians
  Accessories
My Field Trips
Tom Ellis Precision Pearl Inlay - Austin, Texas
Shubb Capos - Valley Ford, CA
Rick Davis, Running Dog Guitars - Richmond, VT
Ted Megas Guitars - San Francisco
Collings Guitars - Austin, Texas
Hideo Kamimoto's Shop - San Jose, CA
1999 Northern California Ukulele Festival
Taylor Guitars - El Cajon, CA
Northwoods Guitar Repair Seminar 1998 - Big Rapids, MI
Northwoods Seminar 2000
1998 Acoustic Guitar Festival - San Rafael, CA
Guild of American Luthiers Convention, 1998
Mario Martello - It's Super Mario!
Mario's San Franciscan
Bills ABC Music - San Bruno, CA
Joe Grubaugh & Sigurn Seifert, Violin Makers - Petaluma, CA
Down in Brian's Basement - Palo Alto, CA
Roberto-Venn School of Luthiery- Phoenix, AZ
Special Features
C. F. Martin & Co., Nazareth, PA
Collings Guitars- Austin, TX
Gibson's Acoustic Instrument Division, Nashville
Guitar Building with Jeff Traugott
CFox Guitars - Healdsburg, CA
Vogel Guitars - Quito, Ecuador
Kamaka Ukuleles - Honolulu
Tacoma Guitar Co.
U.S.A. Custom Guitars
Repair/Restoration Blogs
1867 Martin 1-26
1940 Martin D-28
1937 Martin D-28
1920 Gibson K-2 Mandocello
Gryphon
A Quick Tour of Gryphon
Gryphon's 30th Birthday Party
Hey, it's Ramblin' Jack Elliot!
Cats and Jammers
Book Reviews
About the Reviews
Guitar Finishing, Step by Step - by Dan Erlewine
Martin Guitars- by Richard Johnston & Jim Washburn
Gallery of New Instruments
Caution!
New Instrument Gallery
  Guitars
Fun Stuff
What They're Saying About Us
The Luthier's Kitchen
Yowl-A-Lele
Alice's Gryphon Page
Cool Plates
Washburn Made a Lot of Everything
Father & Daughter United after 32 Years!
Gryphon's Famous Free Picks
Folk Art Gallery
Fine Art Instruments by Robert Armstrong
Every Circus Needs a SIDESHOW
The ORIGINAL Dreadnought!
Nothing Like Those Old Master Finishes
The Foldo
Holiday Tie-Dye Peeps
Nancy's Dessert Cake Bites
Ditson Dreadnought
Mashed Potatoes
Split Pea Soup
Potato Peeler
Café Foldo
Papa Schnooger
Mod, oh yeah!
Dunn Dreadnought
Coffee Gangs
dreadnought guitar.
my floor lamp.
Quick and Easy Caesar
The Waybacks
Instrument History and Lore
Looking Backward at the 20th Century
The Way We Were... "obsolete" repair styles
Origins of the 12-string Guitar
The World's Oldest Guitar
Washburn Banjo
Museum
FRETS.COM Museum
About The Museum
  Guitars
    Gibson
    Epiphone
    Washburn
    Selmer
    Gryphon
    Kay
  Banjos
    Gibson
    Weymann
    Paramount
    Bacon
    Fairbanks
    Vega
    Gryphon
    Misc.
  Mandolins
  Ukuleles
Home Shop Tech
HOME SHOP TECH Articles
#1 Sock Handle
#2 CD Paint Brush Can Cover
#3 Japanese Hand Saws
#4 Wax for Lubricating Saw Blades
#5 Pocket Knife
#6 Diamond Pocket Hone
#7 Air Blow Gun
#8 File Cleaning Trick
#9 Drilling Perfectly Clean Holes
#10 Clock Marker
#11 Disc Sander Cover
#12 Glue Thermometer
#13 Magnetic Fence
#14 Salad Tong Finger Saver
#15 Old Kitchen Knives
#16 Cutting Sandpaper
#17 Soundhole String Retainer
#18 Epoxy Leftovers
#19 Small File Handles
#20 String Crank
#21 Stain Palette
#22 Cotton Swab
#23 Portion Cups
#24 File Scraper
#25 Palette Knife Extension
#26 Saddle Contour
#27 Touch Up Lacquer Bottle
#28 Recycle Beverage Can
#29 Micrometer
#30 Toothbrushes
#31 Sander Safety
#32 Hemostats
#33 Compressed Air Lines
#34 Wine Cork Knife Point Protector
#35 Chisel Drawer Dividers
#36 Bent File Chisel
#37 Screwdriver Chisel
#38 Acetone Finish Test
#39 Bevel Fret Slot
#40 Solvent Cap Dispensing Cup
#41 Packing for Travel
#42 Pickup Brace Damage
#43 Coloring Glue
#44 Cutting Paper on Band Saw
#45 Quick Grip Brace Jack
#46 Wedge F-hole Clamp
#47 Guitar Wall Hanger
#48 Half Pencil
#49 Straw Pipette Extender
#50 X-brace Top Wrinkle
#51 Paper Pad Mixing Palette
#52 Fluorescent Replacement Bulbs
#53 Swing Arm Lamps
#54 Packing Pegheads
#55 Pyramid Bridge Clamping Caul - External
#56 Threaded Clamp Foot
#57 Masking Tape for Indexing Bridge
#58 Rubber Band Tuner Grommet Retainer
#59 Belt Sanding Celluloid
#60 Sharp Nut
#61 Side Crack Reinforcement
#62 Dry Pigment Sorting Block
#63 Paper Grain Direction
#64 Modify Drill Bit for Cutting Wood
#65 Fret Pullers Pull Other Things
#66 Heavy Duty Push Sticks
#67 Single Edge Razor Blades
#68 Acid Brushes
#69 Plastic Stretch Wrap for Tool Protection
#70 Bit Holder Blocks
#71 Cross Grain Sanding
#72 Truth in Labeling
#73 Plastic Wrap Glue Resist
#74 Cut Acid Brush
#75 Stretch Wrap Masking
#76 Spray Can Cap
#77 Spray Can Nozzle
#78 Kitchen Paring Knife for Shop Utility
#79 Powerless Belt Sanding
#80 Drill Index
#81 Grinder Support
#82 Leather Pliers Grip
#83 Paper Towel Holder
#84 Newspaper Drawer Liner
#85 File Handle
#86 Recycle Condiment Bottle
#87 Diagonal Cutter Selection
#88 Fatigue Mat
#89 Credit Cards
#90 PVC Shop Vacuum Tool
#91 String Retainer String
#92 Hex Wrench Rack Improvement
#93 Power Tool Casters
#94 Eyes and Ears
#95 Soft Vise Jaw Pads
#96 String
#97 Layout on Metal
#98 Storing Long Electrical Cords
#99 Hanging Coil Hoses
#100 Cutting Aluminum
#101 "Candling" Guitar Tops to See Brace Locations
#102 Locating and Tracing Braces with Magnets
#103 Foil Protection for Reamers
#104 Dry Sandpaper Lube
#105 Mixing Epoxy without Bubbles
#106 Spray Lube Siphon Tube Reinforcement
#107 Paper Towel Half Sheets
#108 Dusting Brush Modification
#109 Cutting Screws and Bolts
#110 Catalog Sale Flyers
#111 Gluing Bin Boxes
#112 Hacksaw
#113 Link Belt
#114 Freehand Band Saw Technique
#115 The Key Hole
#116 Ceiling Posters
#117 Magnetic Screwdriver
#118 Wide Disposable Brush
#119 Veneer Cutting on Band Saw
#120 Finding Center by Balance
#121 Hacksaw Duplicate Parts
#122 Chuck Key Magnet
#123 File Card for Cleaning Saw Blade
#124 Calculator Bag
#125 Door Storage
#126 Magnetic Pocket Screw Holder
#127 Paint Can Lid
#128 Quick Tape Strap for Sensitive Items
#129 Shop Vac Hose Strain Relief
#130 Coiling a Band Saw Blade
#131 Oil Spill Cleanup
#132 Wood Parallels
#133 Masking Tape Handles
#134 Wedges
#135 Tethered Door Stop Wedges
#136 Long Air Hoses
#137 Soda Straw Parts Storage
#138 Hanging Holes for Tools
#139 High Item Picker
#140 Tool Index Wood Infill
#141 Cardboard Drawer Liner
#142 Waste Basket Bungee
#143 Tool Covers
#144 Bungee
#145 Magnetic Bit Storage Drawer
#146 Platform Ladder
#147 Magnetic Tool Pickup
#148 Kitchen Hero - Cutting Board
#149 Kitchen Hero - Diamond Hone
#150 Photographs for insurance
#151 Unscrew Container Safely
#152 Little Boxes - Get Rid of Lid
#153 Swivel Casters for Tool Cabinets
#154 "Temporary" tool stands
#155 Tool Drawer Dividers
#156 Rope Trick: Cutting
#157 Broom Handle
#158 Hand Drill Countersink
#159 Using Digital Calipers
#160 Identifying Metric Hex Keys
#161 Dremel Carbide Cutoff Wheel
#162 Fence Hand Safety
#163 Empty Bin Boxes
#164 Cutting Bin Boxes
#165 Camphor
#166 Decant Epoxy to Avoid Quick Reaction
#167 Epoxy Mixing on File Folder "Palette"
#168 Wood Screw Pilot Drill Size
#169 Reverse Switch Safety Bolt
#170 Keyless Chucks
#171 Work Glove Storage Rack
#172 Cutting Spring on Grinder
#173 Stacking Tool Cabinet Bottoms
#174 Label Those Drawers
#175 Extra Drill Chuck
#176 Sauce Pan
#177 Ball End Hex Wrench
#178 Poly Bottle Bottom for Parts Washing Basin
#179 Square Bottle Bottom for Parts Drawer Bins
#180 Screws in Jars
#181 Salvage Hardware Drawer
#182 Cutting Long Cardboard Tubes
#183 Repetitive Length Cutting on Band Saw
#184 Mark Up Your Ruler
#185 Plastic Containers and Solvents
#186 Mobile Bin for Wood Scraps
#187 Scrap Bin Cover
#188 Scrap Bin Triage
#189 Ball Peen Hammers
#190 Old Rags to Prevent Under Bench Hunting
#191 Storing Magetic pickup tools
#192 Duct Tape Mallet
#193 Cut Down Old Paint Brush
#194 Plastic Bag Makes Emergency Glove
#195 Break a File to Make Short Ones
#196 Magnets to Hold V-Block
#197 Steel Rules May Have Poorly Cut Ends
#198 Buy Files by the Box
#199 Battery Charger Maintenance
#200 Extending Cable Ties
#201 Miter Gauge Alignment
#202 Recycle Paint Thinner
#203 Spray Can Freshness Reminder
#204 Pipette Sealing Trick
#205 Cookie Sheet Chip Pan
#206 Extension Cord Strain Relief
#207 Super Glue "String Needle"
#208 Heavy Duty Extension Cords
#209 Magnetic Book Hangup
#210 Paint Special Tool Handles for Identification
#211 Hang up those brooms
#212 Wood V-Blocks
#213 Miter Gauge Rip Fence
#214 Writing on Saw Table
#215 Saw Table Wax Lube
#216 Toilet Paper
#217 Dispensing Paint
#218 Cutting Short Pieces on Band Saw
#219 Recyled Cardboard Box Tote
#220 Phonograph Needle Scriber
#221 Wall Mounted Tin Can Tool Holders
#222 Dental Floss Sewing Thread
#223 Cut Paper Towel Roll
#224 Hand Tool Oiler for Rust Protection
#225 Tool Instructions Taped Inside Drawers
#226 Forstner Bits in Aluminum
#227 No-Mess Spill Wiping
#228 Roll Wrapper as Spill Wiper
#229 Shop Rags from Bed Sheets
#230 Cutting Shop Rags on the Band Saw
#231 Rubber and Vinyl Mats on Concrete Floors
#232 Tape for Removing Splinters
#233 Cutting Steel Wool Pads
#234 Paint Can Lid Installation
#235 Pouring from Gallon Cans
#236 Cutting Clear Plastic on the Band Saw
#237 Masking Tape Dispenser
#238 Toothpick Brush
#239 Bailing Wire Spool Retainer
#240 Twisting Wire
#241 Penetrating Epoxy Sealer
#242 Remove that Acrylic Plastic Protective Sheet
#243 Hex Key Cheater Bar
#244 Sand Bags
#245 Label Special Tools and Fixtures
#246 Masking Tape Storage
#247 Paraffin lube for Band Sawing Aluminum
#248 Special Push Sticks
#249 Paper Towel Core for Cord Storage
#250 Skinny "Paintbrush Broom"
#251 Blow out Shop Apron Pockets
#252 Buy Good Hacksaw Blades
#253 Grind the "Set" from Blades to Get Narrow Kerf
#254 Convertible Step Stool
#255 Photograph Your Work
#256 Sweep the Floor
#257 Tool Cabinet "Breadboard" Shelf
#258 Hang Goggles Near Tools
#259 Mark Edges to be Cut
#260 Garbage Can Table Top
#261 Magnetic Spray Can Holder
#262 Removing Box Labels
#263 Simple Dolly and Hoist to Move Heavy Items
#264 Recording Lent Tools
#265 Abrasive Paper for Sharpening Chisels
#266 Close the Gap on Grinding Wheel Tool Support
#267 Keep Band Saw Blade Guide Low
#268 Used Engine Oil for Shop Duty
#269 Shop Vac Hose Hanger
#270 Grinding Center Punch Point
#271 Pilot Drill Size for Large Drill Bit
#272 Reverse Drilling to Enlarge Hole
#273 Drill Clamp Feet for Accessories
#274 Glass Microscope Slide Scraper
#275 Bubble Wrap Packing Trick
#276 Cold Chisel Safety Tip
#277 A Really Simple Drill Guide
#278 Drill Press Center Finder
#279 Split Point Drill Bits
#280 Variable Pitch Band Saw Blade
#281 Guitar Strings for Other Uses
#282 Cyanoacrylate Catalyst Bottle
#283 Mangetic Holder for Small Parts
#284 Drilling Cotton Buffs
#285 Diamond Grinding Wheel Dresser
#286 Heat to Remove Sticky Labels
#287 Paint Metric Wrenches
#288 Stackable Cottage Cheese Containers
#289 Aligning Wood Screw Slots
#290 Drilling Round Things
#291 Screw Machine Length Drills
#292 Relief Cuts on Bandsaw
#293 Cross Cutting Long Board on Band Saw
#294 Glue Quick Grip Pads
#295 Resealing Caulk Cartridges
#296 Cyanoacrylate as Wood Sealer
#297 Messy Milling Project
#298 Drill Press Can Cut You When it's Turned Off
#299 Get a Big Vise
#300 Friendly Plastic Ergonomic Handles
#301 Mount Stuff on Cabinet Doors
#302 Wall Bumper Near Electrical Plugs
#303 Keep Dustpan in Trash Can
#304 Ice for Cooling at the Grinder
#305 Making Heavy Twine from Thin
#306 Ice Cube Tray Parts Storage
#307 Cable Ties for Hanging Tools
#308 Cleaning Measuring Tapes
#309 CD-ROM Canister for Adhesive Tape Storage
#310 Split Rivets
#311 Impact Driver
#312 Repetitive Bandsaw Cuts
#313 Old Shower Curtain as Tarp
#314 Replace Thumbscrews on Machines
#315 Have a Little Fun
#316 Magnetic Wrench Holders for Power Tools
#317 Measuring Centers on Uneven Sizes
#318 Reconditioning Sharpening Stones
#319 Magnetic Tool Holders for Drawers
#320 Improvised Masking Tape Bandage
#321 Lok-Line as Flexible Support
#322 Clamping with Drill Press
#323 Camera Tripod Stabilizing Weights
#324 Computer Labels for Drawers and Boxes
#325 Extra Casters for Welding Cart
#326 Use Long Screwdrivers
#327 Soaking Parts in Solvent
#328 Making Safe Edge Files
#329 Cut Cans for Shop Use
#330 Magnets for Bending in Vise
#331 Non Matching Handles are Best
#332 Steel Strap Shim Stock
#333 Stretch Wrap to Secure Solvent Labels on Cans
#334 Mark Pipette Graduations
#335 Keep a Shopping List
#336 Label Unusual leftover Hardware
#337 Magnet to Hold Abrasive Strips on Lathe
#338 Handle to Replace Thumb Screw
#339 Magnet Holds Water Bath on Grinder
#340 Magnets Hold Drill Index on Drill Press Table
#341 Label Grit on Sanding Belts
#342 Mouse Pads for Drawer Liners
#343 Cutting Shallow Notches on Band Saw
#344 Clearing Dispenser Bottle Opening
#345 Faucet Washer as Tool Foot
#346 1-2-3 Clamp It
#347 Tubing for Grinder Support of Thin Pieces
#348 Ring Testing Grinding Wheels
#349 Support Thin Stock for Drilling
#350 Digital Caliper as Tweezer
#351 High Speed Steel Taps
#352 Plastic Bag Thread Protection for Jars
#353 Shop Vac Sock
#354 Bandsaw Thin Stock on Edge
#355 Shop Towel Identification
#356 Pennies are Worth Having
#357 Bag Loose Wires and Cables
#358 Pizza Boxes
#359 Timer for Heat and Fan
#360 Cardboard Floor Mats
#361 Chip Curtain
#362 Cigarette Papers
#363 Age Date Glue Containers
#364 Don't Crumple Old Notes
#365 T-Shirt Tool Cover
$366 Liquid Hand Cleaner
#367 Shop Shelving
#368 Foot Control for Bench Vise
#369 Adjustable Wrench as Caliper
#370 Milk Carton Drawer Bins
#371 Long Bin Boxes on Narrow Shelves
#372 Pencil Sander
#373 Garage Sale Items Can Have Interesting Uses
#374 Hanging Rag Storage
#375 Note Holder at the Door
#376 Simple Upgrade for Quick Grip Clamps
#377 Keep Project Inspirations Handy
#378 Mark Source and Cost on Stock
#379 Label the Size of Staples in Your Staple Gun
#380 Easy Handle for Small Heavy Stock
#381 Check Steel Before Filing
#382 Paint with Your Socks
#383 Centering a Drill on Round Stock
#384 Impromptu Large Hex Key
#385 Cutting "Half a Kerf" on the Band Saw
#386 Squeeze the Last Bit out of a Glue Tube
#387 Use a Copier for Quick "Drawings"
#388 Measuring Over a Ledge
#389 Clean up "Spun" Drill Bit Shanks
#390 Changing the Zero Point on Graduated Dials
#391 Dispensing Small Amounts from Spray Can
#392 Paint Can Opener
#393 Broken Files are Handy in Close Quarters
#394 Buy Small Containers of Some Stuff to Save Money
#395 Kitchen Towels Have Four Lives
#396 Solvent "Recycling" Trick
#397 Still Hung Up on Rags
#398 Simple Leather Finger Saver
#399 Missing Stud
#400 How Much is Left in That Paint Can?
#401 Storing Spare Parts for Machines
#402 Label Adjustment of tools or Gauges
#403 Simple Grinder Safety
#404 Lubricate Wood Screws
#405 Break the Corner for a Tight Fit
#406 Weak Thread Locking Compound
#407 Rope Burn Trick
Glossary
An Illustrated Glossary
Archtop
Armrest
Backstrip
Ball End Strings
Bar Frets
Bearclaw
Belly Bridge
Binding
Birdseye Maple
Biscuit
Blind Saddle
Block Inlay
Book Matched
Bottleneck
Bout
Bowl Back
Box
Break Angle
Bridge
Bridge Pins
Bridge Plate
Button
Cantilevered Fingerboard
Capo
Celluloid
Check
Chipboard Case
Classical Guitar
Clown Barf
CNC Computer Numerical Control
Compensation
Cutaway
Dot Neck
Dovetail
Dreadnought
Ears
Edge Dots
End Block
End Piece
Endpin
Endpin Jack
f-Holes
Fan Bracing
Fiddleback Maple
Fifth String
Fifth String Capo
Figure
Fingerboard or Fretboard
Fingerpick
Fingerrest
Fingerstyle
First Position
First String
Flamed Maple
Flamenco Guitar
Flat Top
Flatpick
Flight Case
Frets
Gig Bag
Grain Runout
Hardshell Case Anatomy
Hawaiian Guitar
Hawaiian Nut
Heel
Heel Cap
Herringbone
High/Low Position
Hollow Body Electric Guitar
Ivoroid
Ladder Bracing
Lap Steel
Lining
Loop End String
Mitered Purfling
Mother-of-Pearl
Neck Block
Nut
Pearl Border
Peghead or Headstock?
Pegs
Pickguard
Pickup
Pin Bridge
Pinless Bridge
Purfling
Pyramid Bridge
Quilted Maple
Relief
Resonator
Resophonic
Ribbon Grain
Ribs
Rosette
Saddle
Scale Length
Scroll
Silk
Slack Key
Snakehead
Solid Body Electric Guitar
Spanish Heel
Steel
Steel Guitar
String Ramps
T-Bar
Tailpiece
Three Piece Back
Through Saddle
Thumbpick
Tie Block
Truss Rod
Truss Rod Cover
Volute
Waist
Which way is up?
X-Brace
General Stuff
About Me
What is FRETS.COM?
I'm on the cover!
Why FRETS.COM?
About the photographs. . .
Help!
Photo Studio
Contributors
my home shop this morning
Mario Martello 1924-2006
OOPS!
Resume
Links
FRETS Links
/Things For Luthiers/Repair Technique/Mandolin/Structural/

Truss Rod Replacement

This was converted from the original Frets.com site.
To view the original page click here

A big job. . .

This fine mandolin was made in 1977, and, apart from a seriously warped neck, it's in great shape after 25 years.In a misguided attempt to straighten the neck, the fingerboard had been planed quite thin at the nut as the instrument was refretted. While it did probably result in a straight, level fingerboard and frets, the process left the neck with significantly less rigidity. That, combined with a truss rod that was seriously damaged from over tightening, resulted in more forward bend, rendering the mandolin very difficult to play.

The fingerboard had been thinned to a point where the neck became very flexible and the truss rod had no effect at all, no matter how tightly the nut was adjusted. In fact, the peghead veneer had buckled at the end of the truss rod nut pocket from the compression of the maple neck wood. This baby had been tightened REALLY hard!

It's hard to say what caused the neck to bend forward in the first place. I think it was most likely a result of heat exposure that allowed the fingerboard glue joint to slip a bit under the immense tension of eight strings tuned to pitch. The fingerboard had originally been glued with aliphatic resin, and that glue can creep even at relatively low temperatures, and slip like crazy above 150 degrees Fahrenheit in the heat of a parked car.

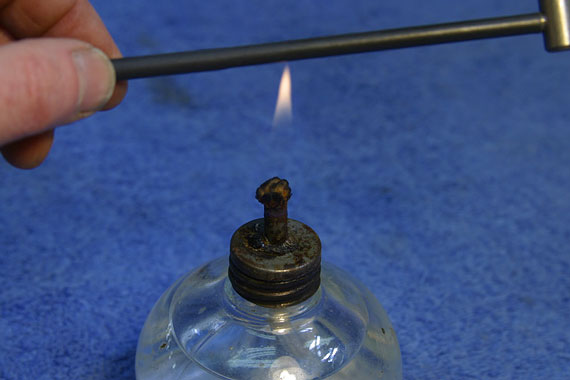
My job was clear. I needed to remove and replace the fingerboard, excavate and remove the truss rod, and replace it with one set a bit deeper in the neck so it would be more positive in its action. A few years ago, Don MacRostie gave me this neat little notched aluminum caul for removing mandolin fingerboards. Here was my first chance to put it in action.

I stuck the aluminum on my hot plate and got it up to temperature, and placed it on the fingerboard.

I used a second heated aluminum block on top to keep the temperature up a bit longer. You can see my contact thermometer reads 400 degrees, and that's about as hot as I'd care to go. Immediately the rig starts to drop in temperature, so if I get distracted and forget the whole business, it will simply cool off safely without starting a fire. . .

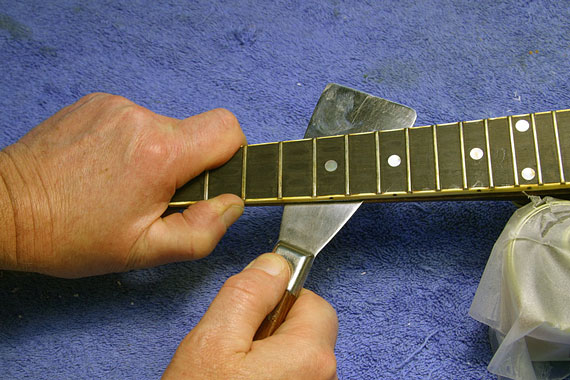
Testing the joint from time to time, I waited until my putty knife would slip right in there. I was able to lift the fingerboard off without damage.

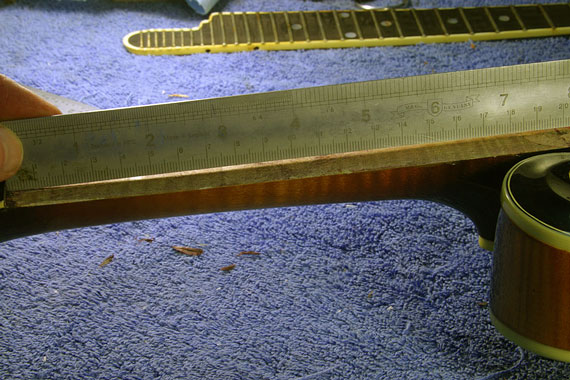
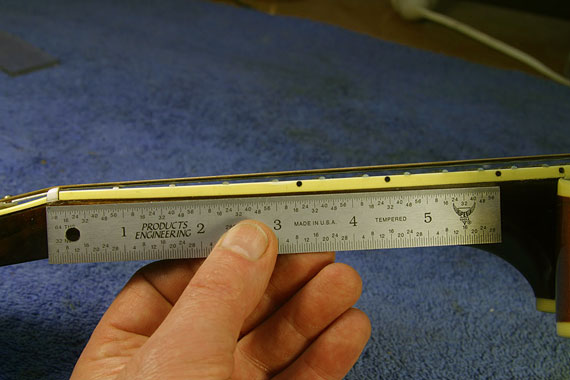
Now you can see what a "set" the neck had taken. I don't want to plane it for fear of losing thickness and uniformity. I'll clamp it to the new fingerboard to straighten and glue it in position.

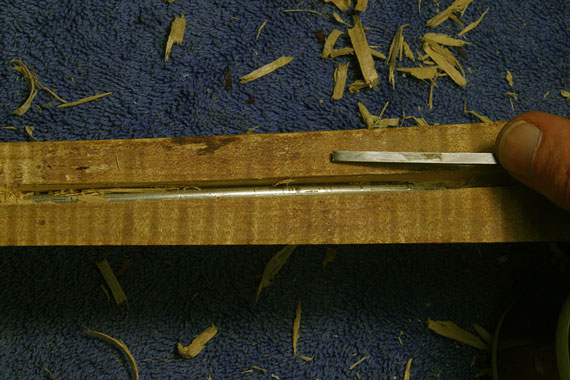
Using my funny little homemade circular backsaw, I cut along the glue joints of the truss rod filler strip.

Then I was able to chip the maple strip out with a narrow chisel.

Here, you can see where the truss rod sat a bit high in the neck near the 5th fret. This is the position Gibson used for truss rods in the 1920s but these days we tend to set them lower for a more positive action. For more on how truss rods work, take a look at the truss rod article.

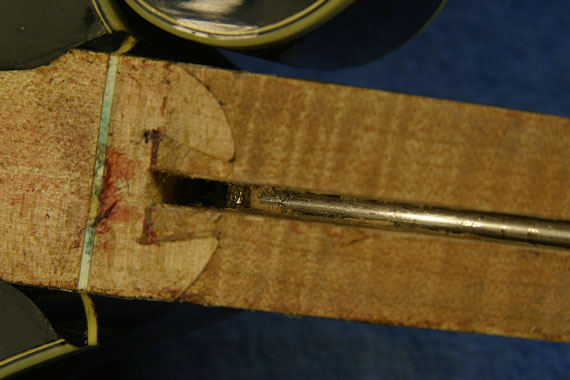
The original rod was buried very deep at the other end, and terminated at the end of the dovetail. Clearly, it was installed before the neck was glued in place. I had no hope of getting that terminal nut out without messing up the dovetail joint, so I decided to leave it in place.

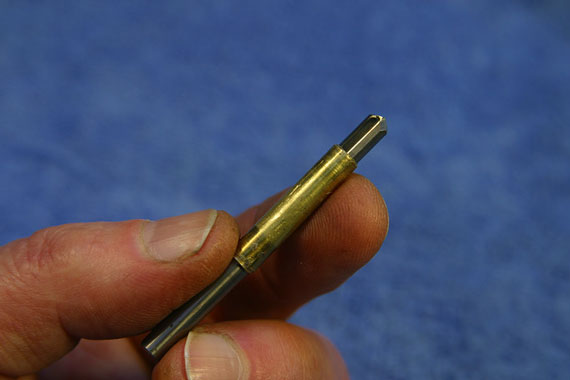
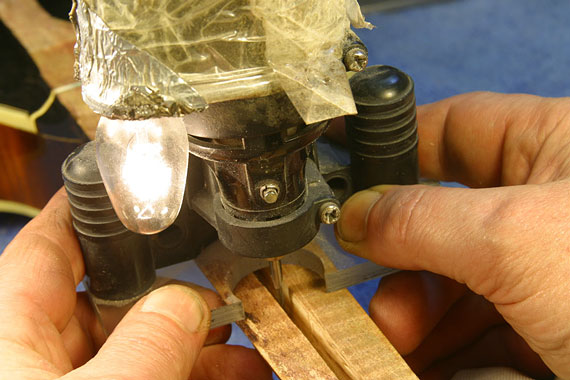
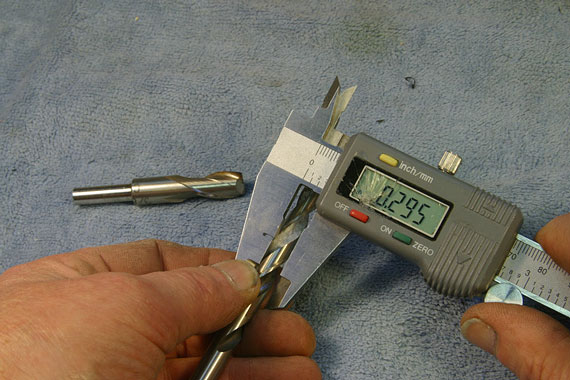
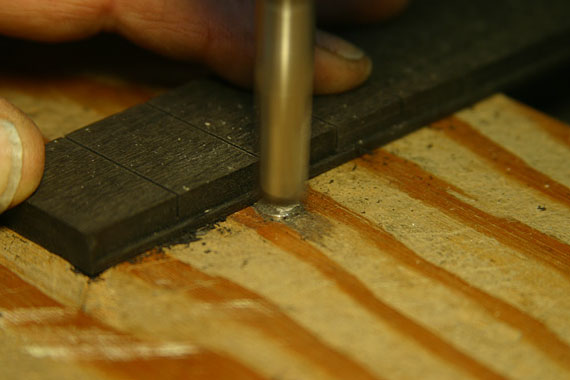
The truss rod was stainless steel which is pretty tough stuff, so I chose a solid carbide straight flute drill (3/16" diameter, the same as the truss rod) to cut through the rod at its end. I made a little sleeve of brass tubing to keep the drill from wandering and cutting on the edges.

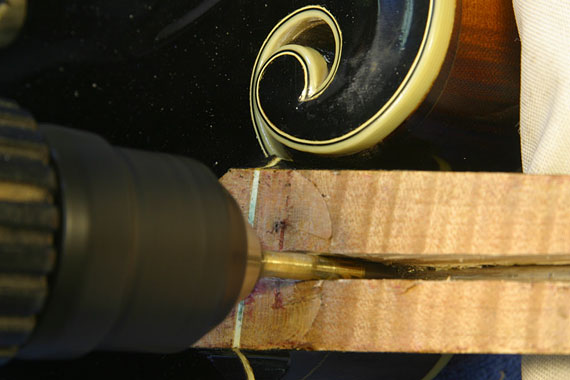
Then, I was able to chuck it up in my Makita and drill straight through the rod

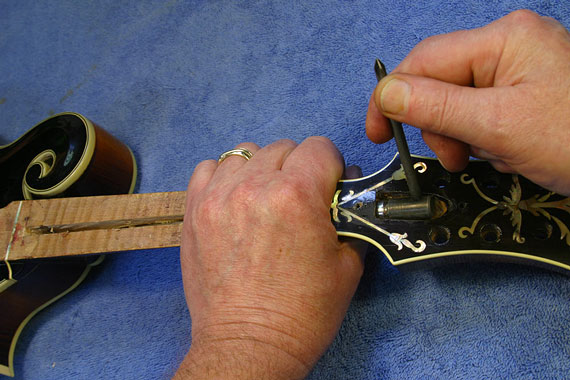
After I had severed the rod, I could tighten the truss rod nut to withdraw the rod a short ways.

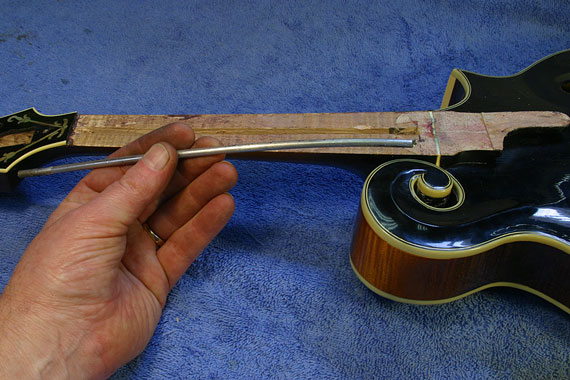
Once the end was free, I slipped the rod out through the nut adjusting pocket.

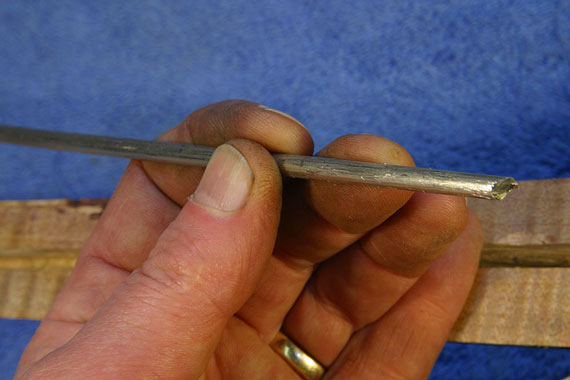
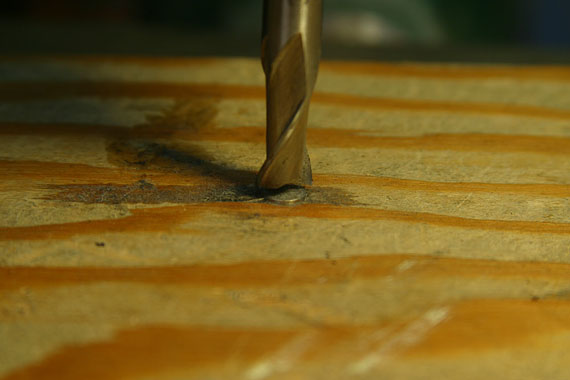
Here's that cut end.

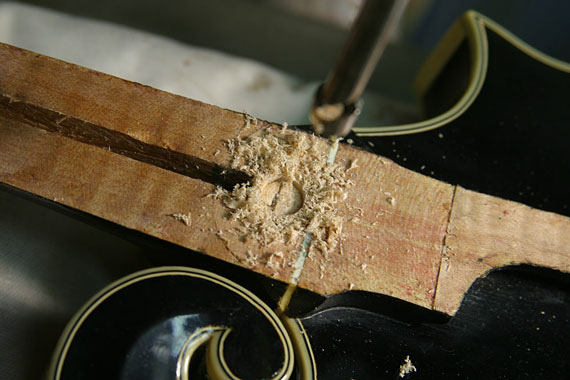
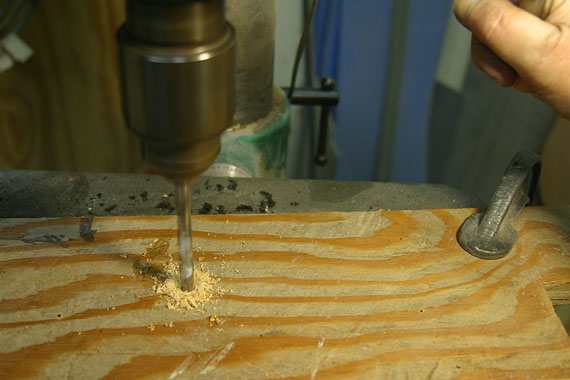
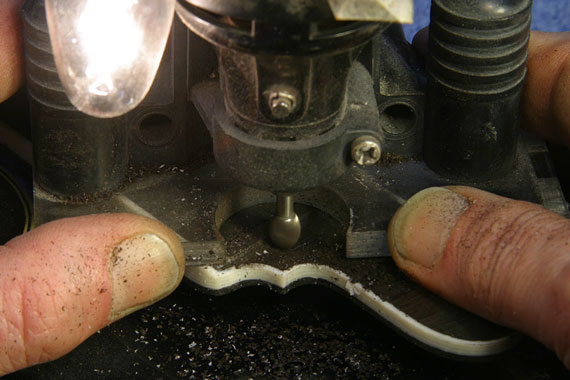
I set up my old Dremel with its router base and a 1/8" router bit to deepen the truss rod channel.

Since I would never be able to get out the original end nut and since it was buried very deep in the heel, I simply filled the space above it with some new maple.

Cutting the maple plug flush with the neck surface.

My new rod has a 3/8" cylindrical anchor, so I used a Forstner bit and drilled a hole for the anchor to the appropriate depth.

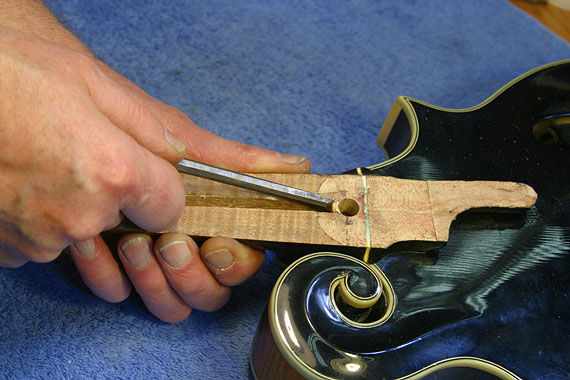
The hole was far enough toward the end of the dovetail to avoid weakening the joint, and I chipped out the rest of my little filler plug.

The rod itself is a simple compression rod of 3/16" diameter steel. All that excavation had left the truss rod channel a bit worn and slightly wider than the original 3/16" so I took advantage of the extra width by adding some heat shrink tubing to the truss rod. The resilient tubing would keep the rod from rattling, and would keep any glue from causing it to seize.

I gave the rod a bend to conform to the bottom of the truss rod channel.

The rod slipped in under the peghead veneer and I was able to plug the anchor into its hole.

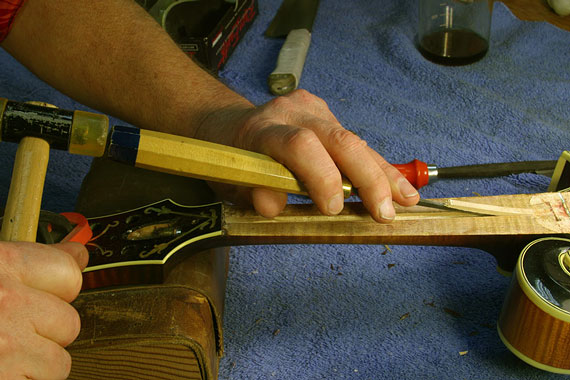
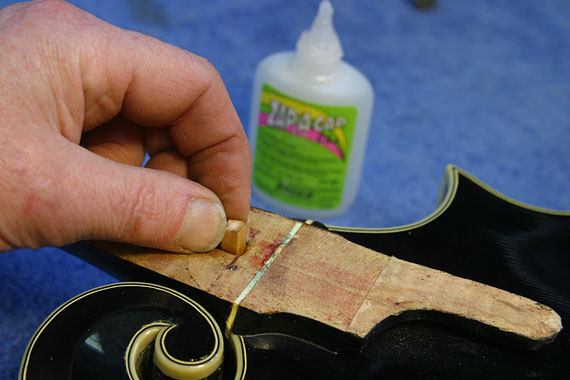
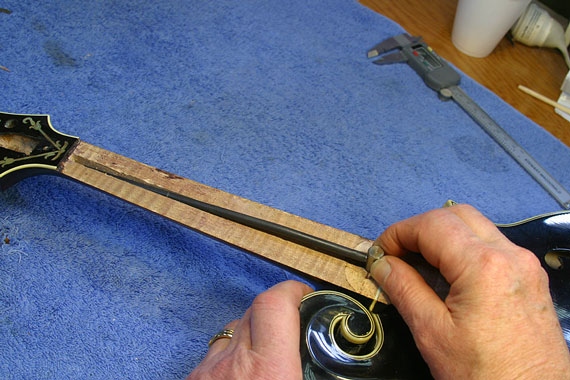
I made up a little torture rack so I could stress the neck backward when I glued the rod in place. Clamping the peghead and end block, I was able to bend the neck quit straight.

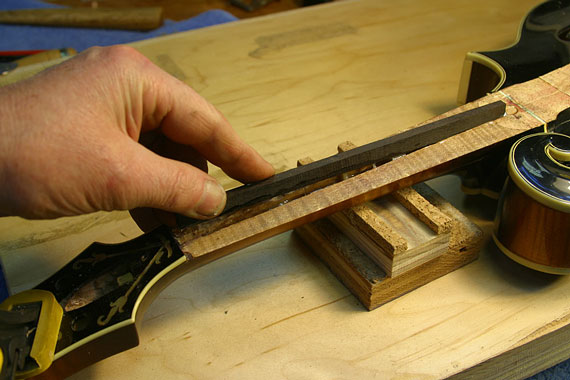
Then, my new ebony filler strip would help hold the neck in the correct shape after the glue set.
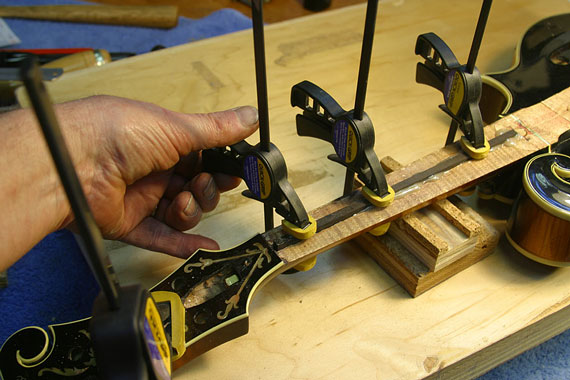
All trussed up.

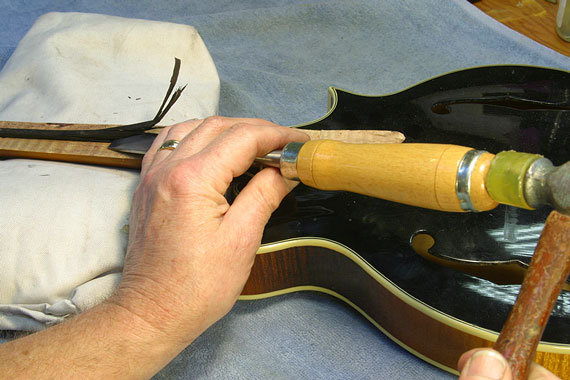
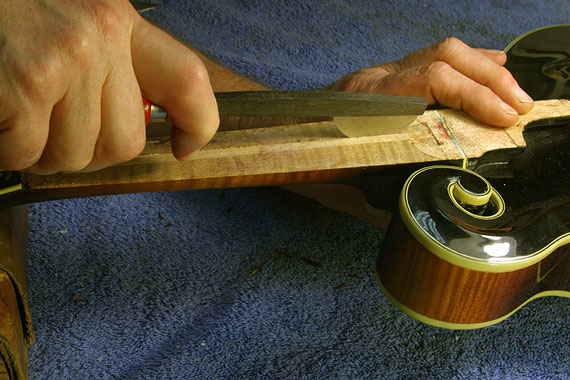
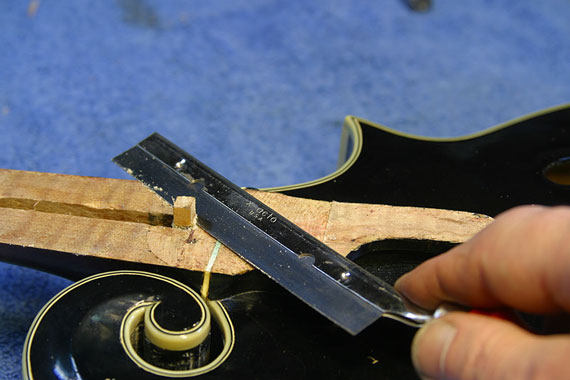
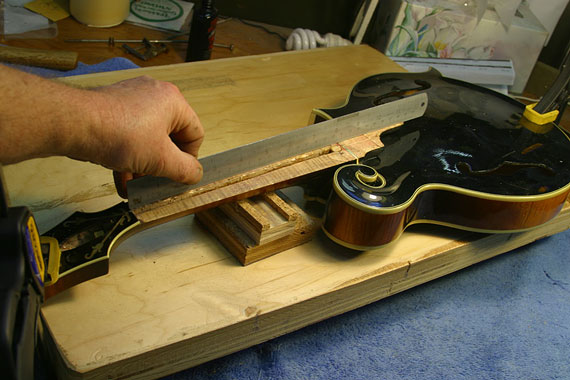
After the glue dried, I chiseled off the excess filler strip,

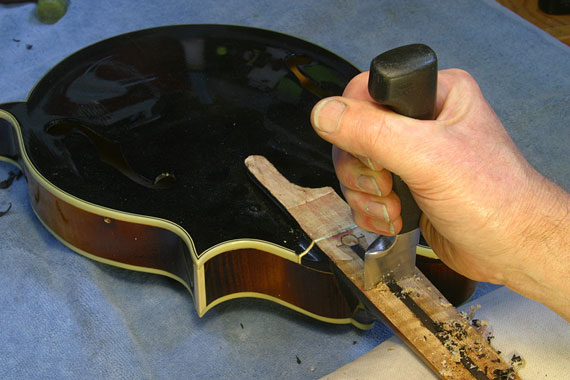
and scraped the neck gluing surface very clean to prepare it for the new fingerboard. I used hide glue for this job, so it was important for me to remove any traces of contamination or oxidation so the glue would stick as well as possible.

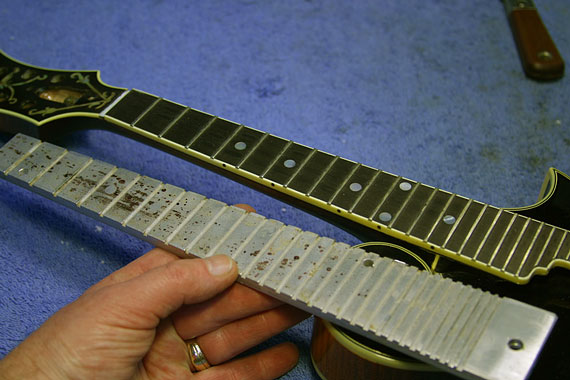
Using the old board as a template, I traced out the profile and cut my new 3/16" thick fingerboard to the same outline.

Now I wished I had a pin router in the shop, but, as usual, it was time to improvise. In order to cut the binding recess around the fingerboard, I chose a 3/8" spiral cut end mill. Subtracting double the thickness of the binding, I picked the appropriate drill bit to use as a guide.

I clamped a piece of scrap plywood to my drill press table, and used that drill bit to punch a hole. If I didn't move the plywood, my hole would remain centered under the drill press chuck, of course.

I took the drill from the chuck, and pushed it right down through the hole until only a tiny part of the end of the shank stuck out. I'd previously ground that end flat for a little extra clearance. A drop of cyanoacrylate held the bit in place.

Now, with the end mill chucked and lowered, I had a perfect little over arm router.

Cranked up to full speed, the bit cut a nice little rabbet all along and around the fingerboard.

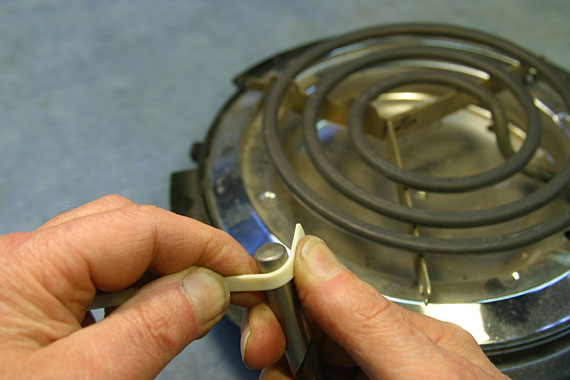
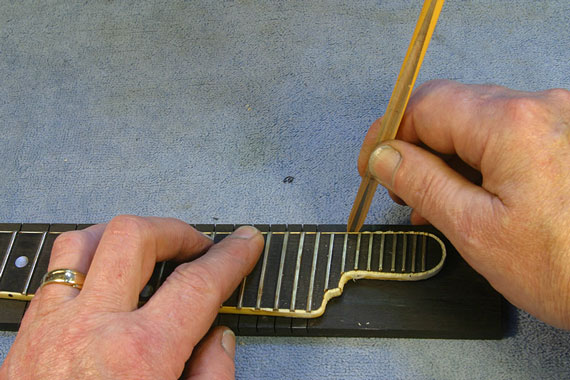
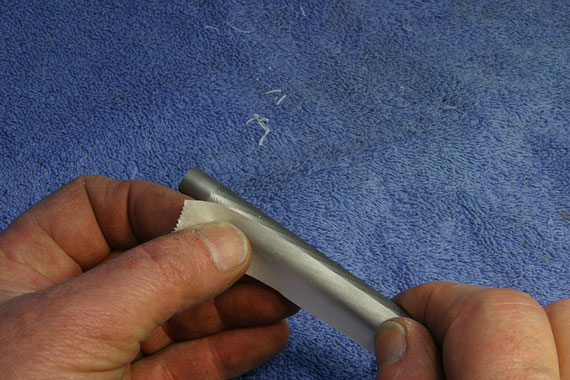
Heated over the electric element of my hotplate, I bent the new ivoroid binding to conform to the end of the fingerboard.

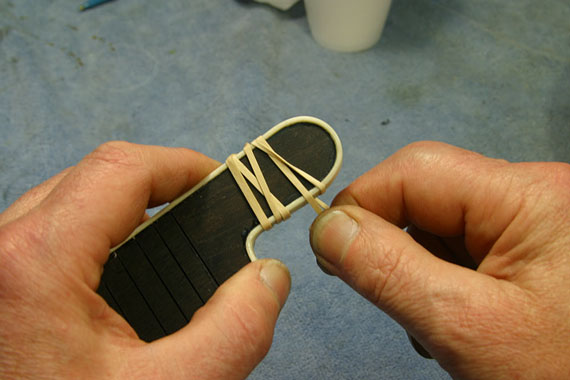
I used Weld-On #16 to glue the binding in place and wound up rubber bands to hold it overnight.

Celluloid edge dots completed the binding operation.

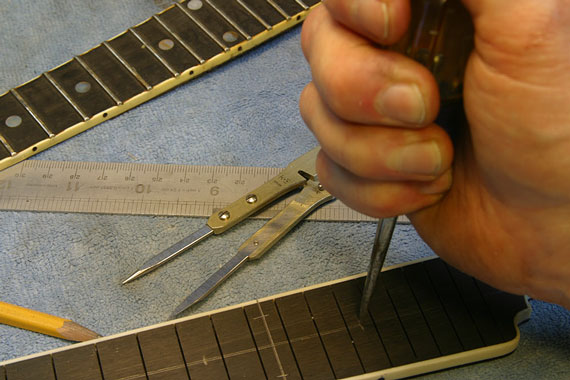
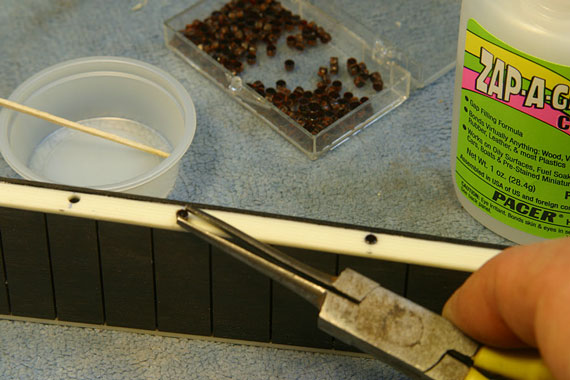
I center marked the inlay dot positions,

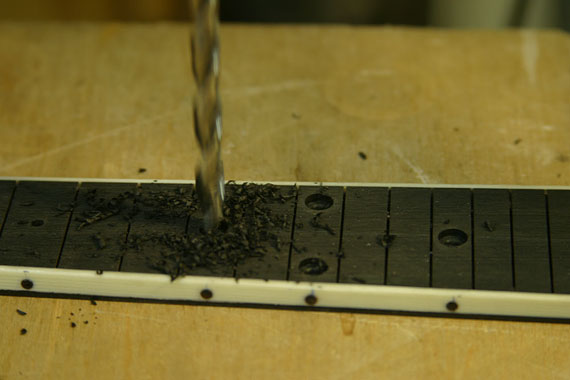
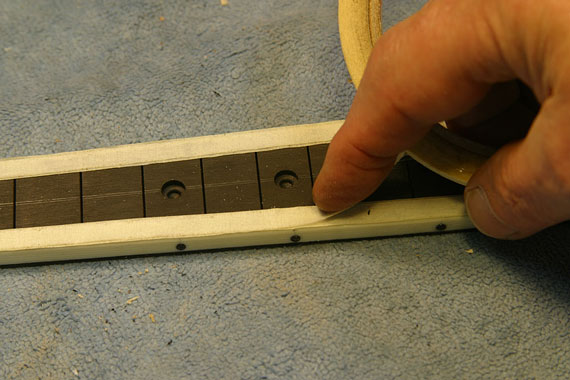
and drilled 1/4" flat bottom holes with a brad point drill. I'd inlay the dots after the fingerboard was installed and leveled.

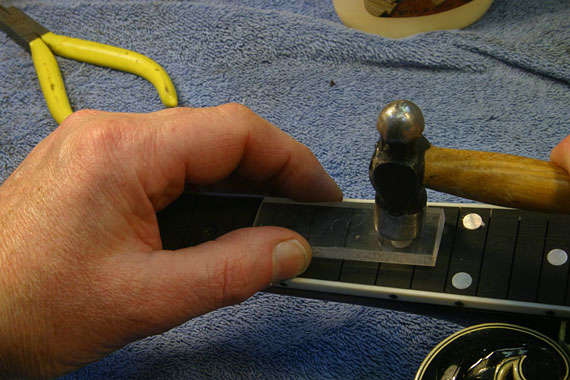
A few strips of 1/4" wide masking tape gave me confidence that the clamping pressure would be extra strong at the edges of the fingerboard. Hide glue contains a lot of water, so it's important to realize that a fingerboard will tend to curl at the edges. Clamping only at the edges gives plenty of pressure for the whole job and takes advantage of that curling action as the center presses downward on its own.

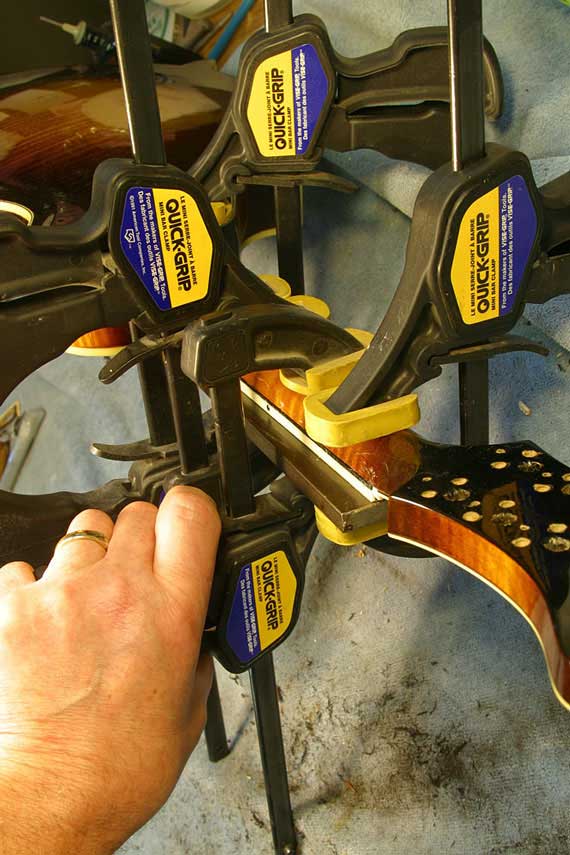
I have a heavy piece of very straight cold rolled steel that makes a great clamping caul for fingerboards. It's entirely rigid, so when I clamped the mandolin neck to it, everything was straight and solid. Hide glue has the most amazing "quick grab" when parts are clamped together, so there was no need for any kind of locating pins or fixtures. Just feeling with my fingers, I was able to align the fingerboard on the neck accurately.

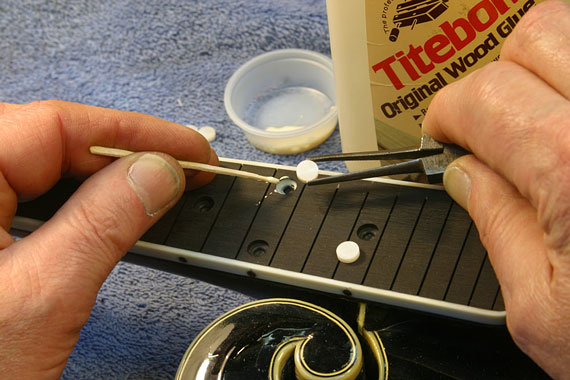
After leveling the fingerboard preparatory to fretting, I inlaid the round dots with some regular Titebond

Using an acrylic caul, I drove the dots in tight and flush with the surface. Since they will not have been heavily sanded, it's unlikely that the dots will become thinned out in future refrettings.

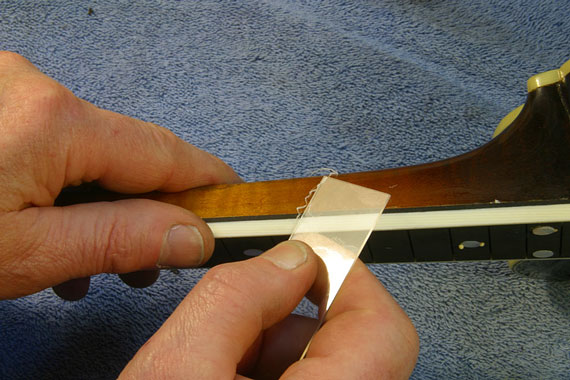
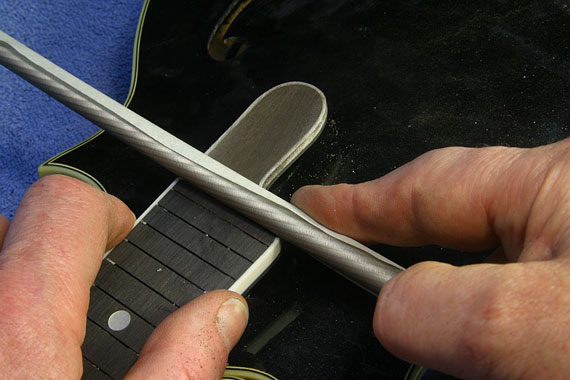
A few passes with a glass slide scraper cleaned up the edge and leveled the binding to the neighboring original finish. Aided by a bit of extra luck, I was able to mate both surfaces without scratching through the colored stain on the neck.

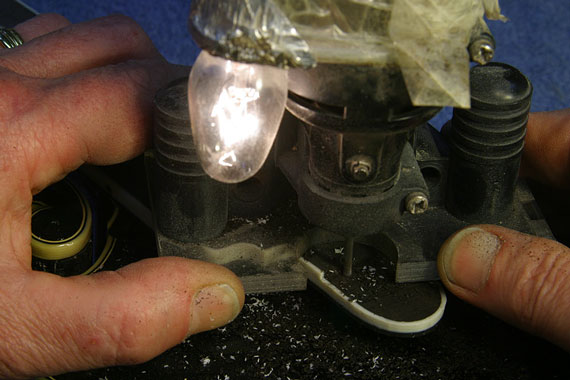
I'd put the fingerboard on full thickness along its entire length, even though the owner of the mandolin wanted to have the tongue "scooped" and left without any frets. I cranked up my old Dremel once again, and used that same router bit to lower the surface of the fingerboard in that area.

After roughing off the majority of the area, I switched to a round bur to give a more gentle transition to the last fret position.

Here's a favorite trick. I covered half of a 3/8" diameter chainsaw file with masking tape.

Then, sliding the tape against the new lowered surface, I was able to round into the end of the higher level without scratching the new flat area.

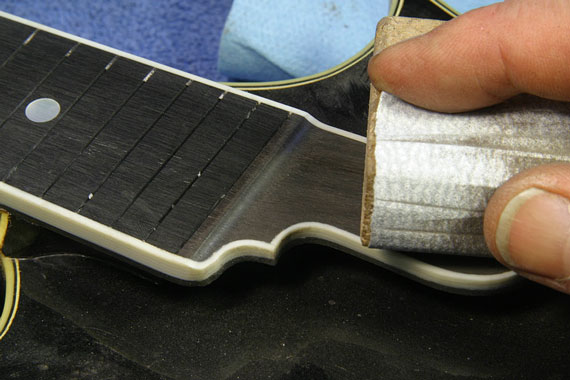
A bit of block sanding gave the scooped end a nice look. And, since I started with a fingerboard that had no frets in that area, it didn't look "modified.


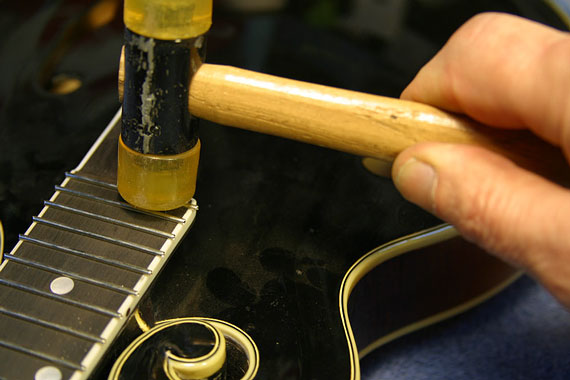
Installing the frets, I was nearing the end of the job, but it would be a while before I could send this baby home.

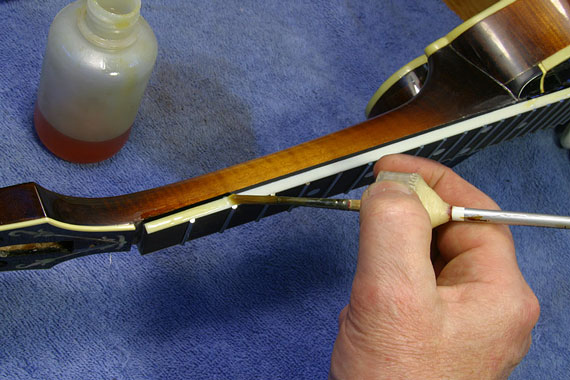
I brushed new aged amber lacquer all along the fingerboard binding to match the original aged look of the body and peghead binding. I allowed some of the lacquer to flow onto the neck finish to fill and blend the area where I'd been working all this time.

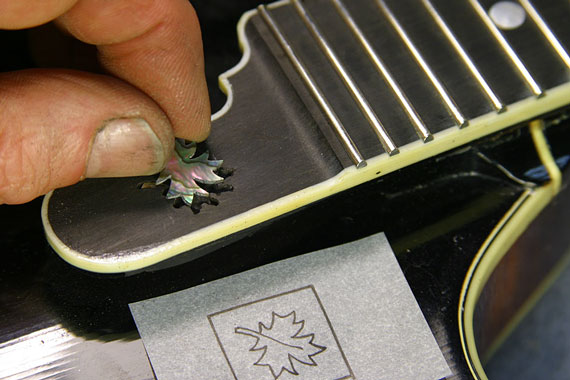
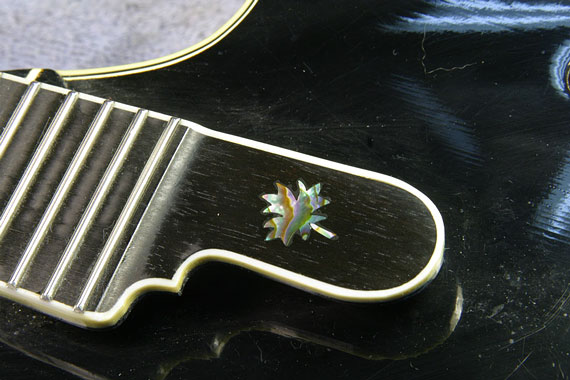
The owner of this instrument is an expatriate Canadian, and he asked me if it would be possible to inlay a maple leaf in the bare tongue of the fingerboard. So, I called up my old friend, Judy Threet, a recently naturalized Canadian expatriate Californian, and asked her for a bit of help. Instead of simply sending me the drawing of a maple leaf I'd asked her for, she cut and sent me this wonderful green abalone inlay. What a pal!

I used my trusty Stanley #5 sanding block to level the frets with some 600 grit waterproof sandpaper.

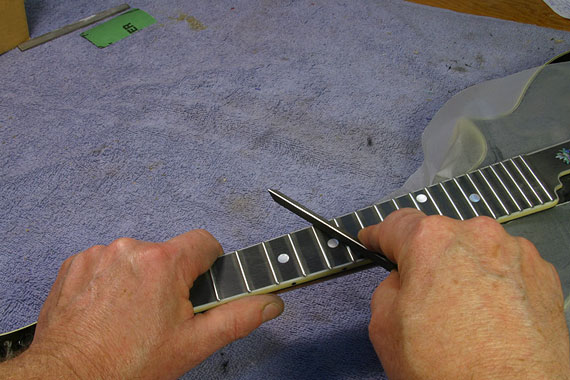
And, I rounded the ends with my trusty cant saw file.

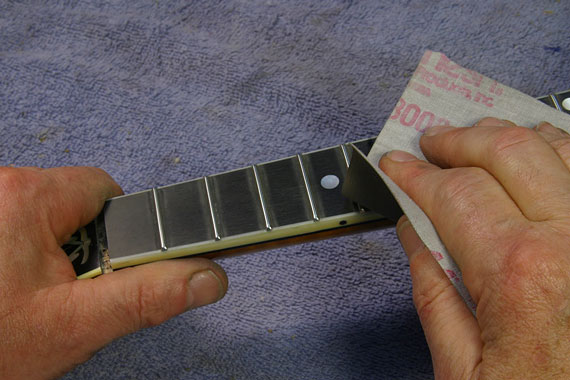
A final polishing with Micro Mesh, and the fret job was complete.

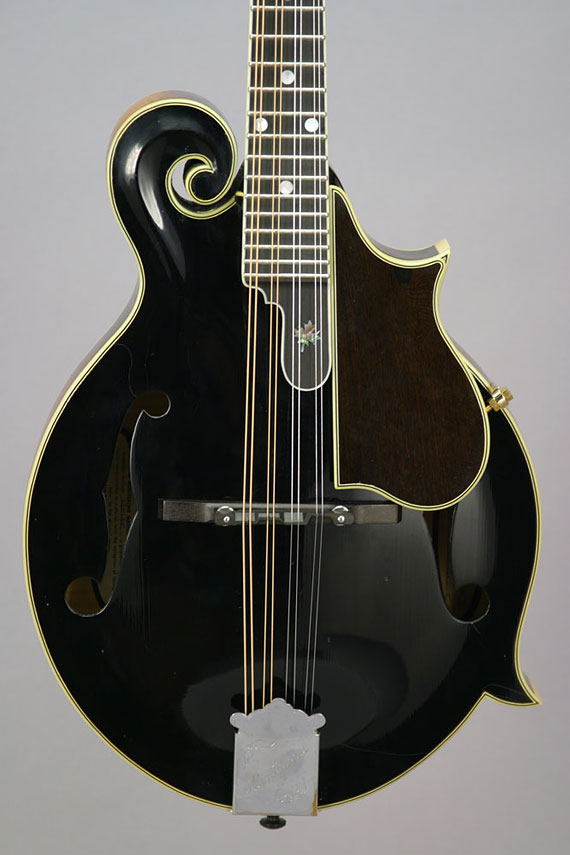
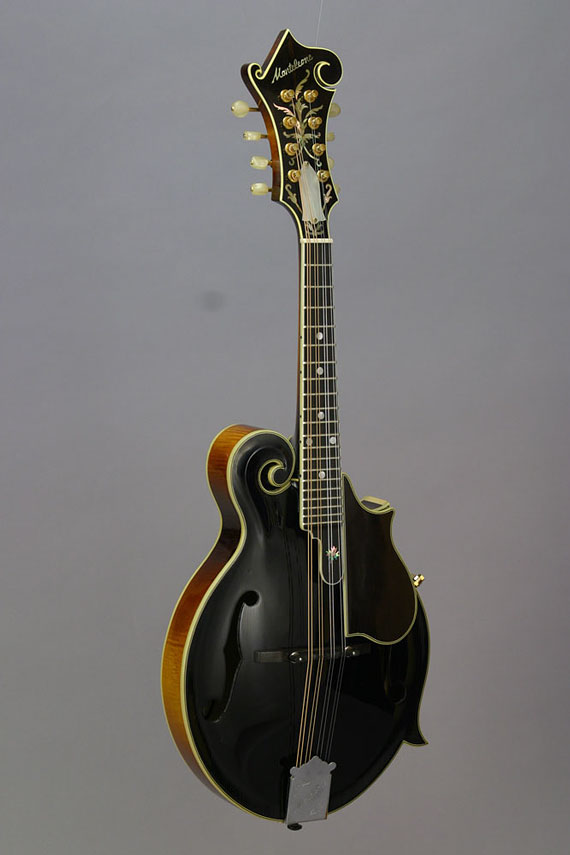
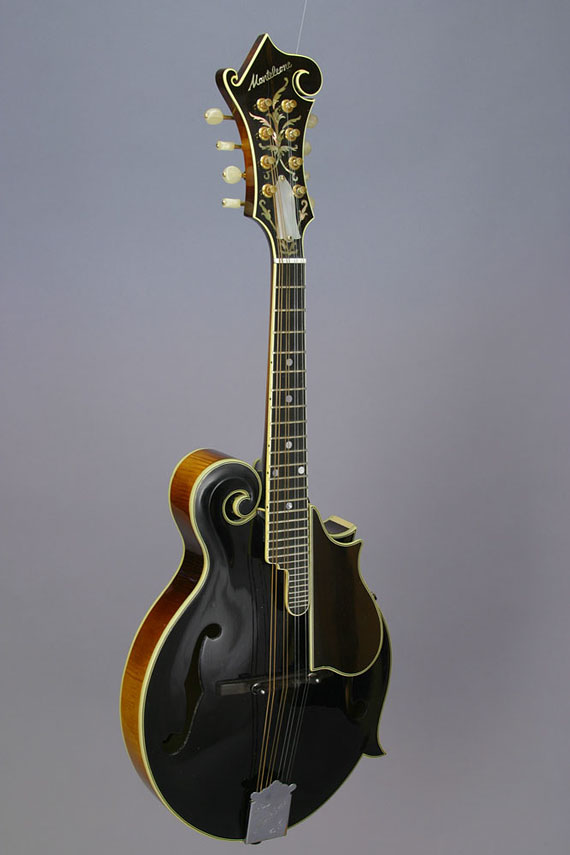
Here are a few shots of the final product, set up and playing well again:


Unless otherwise credited, all content on Frets.com is
Copyright © 1969 - 2023 Frank Ford
All rights reserved.