
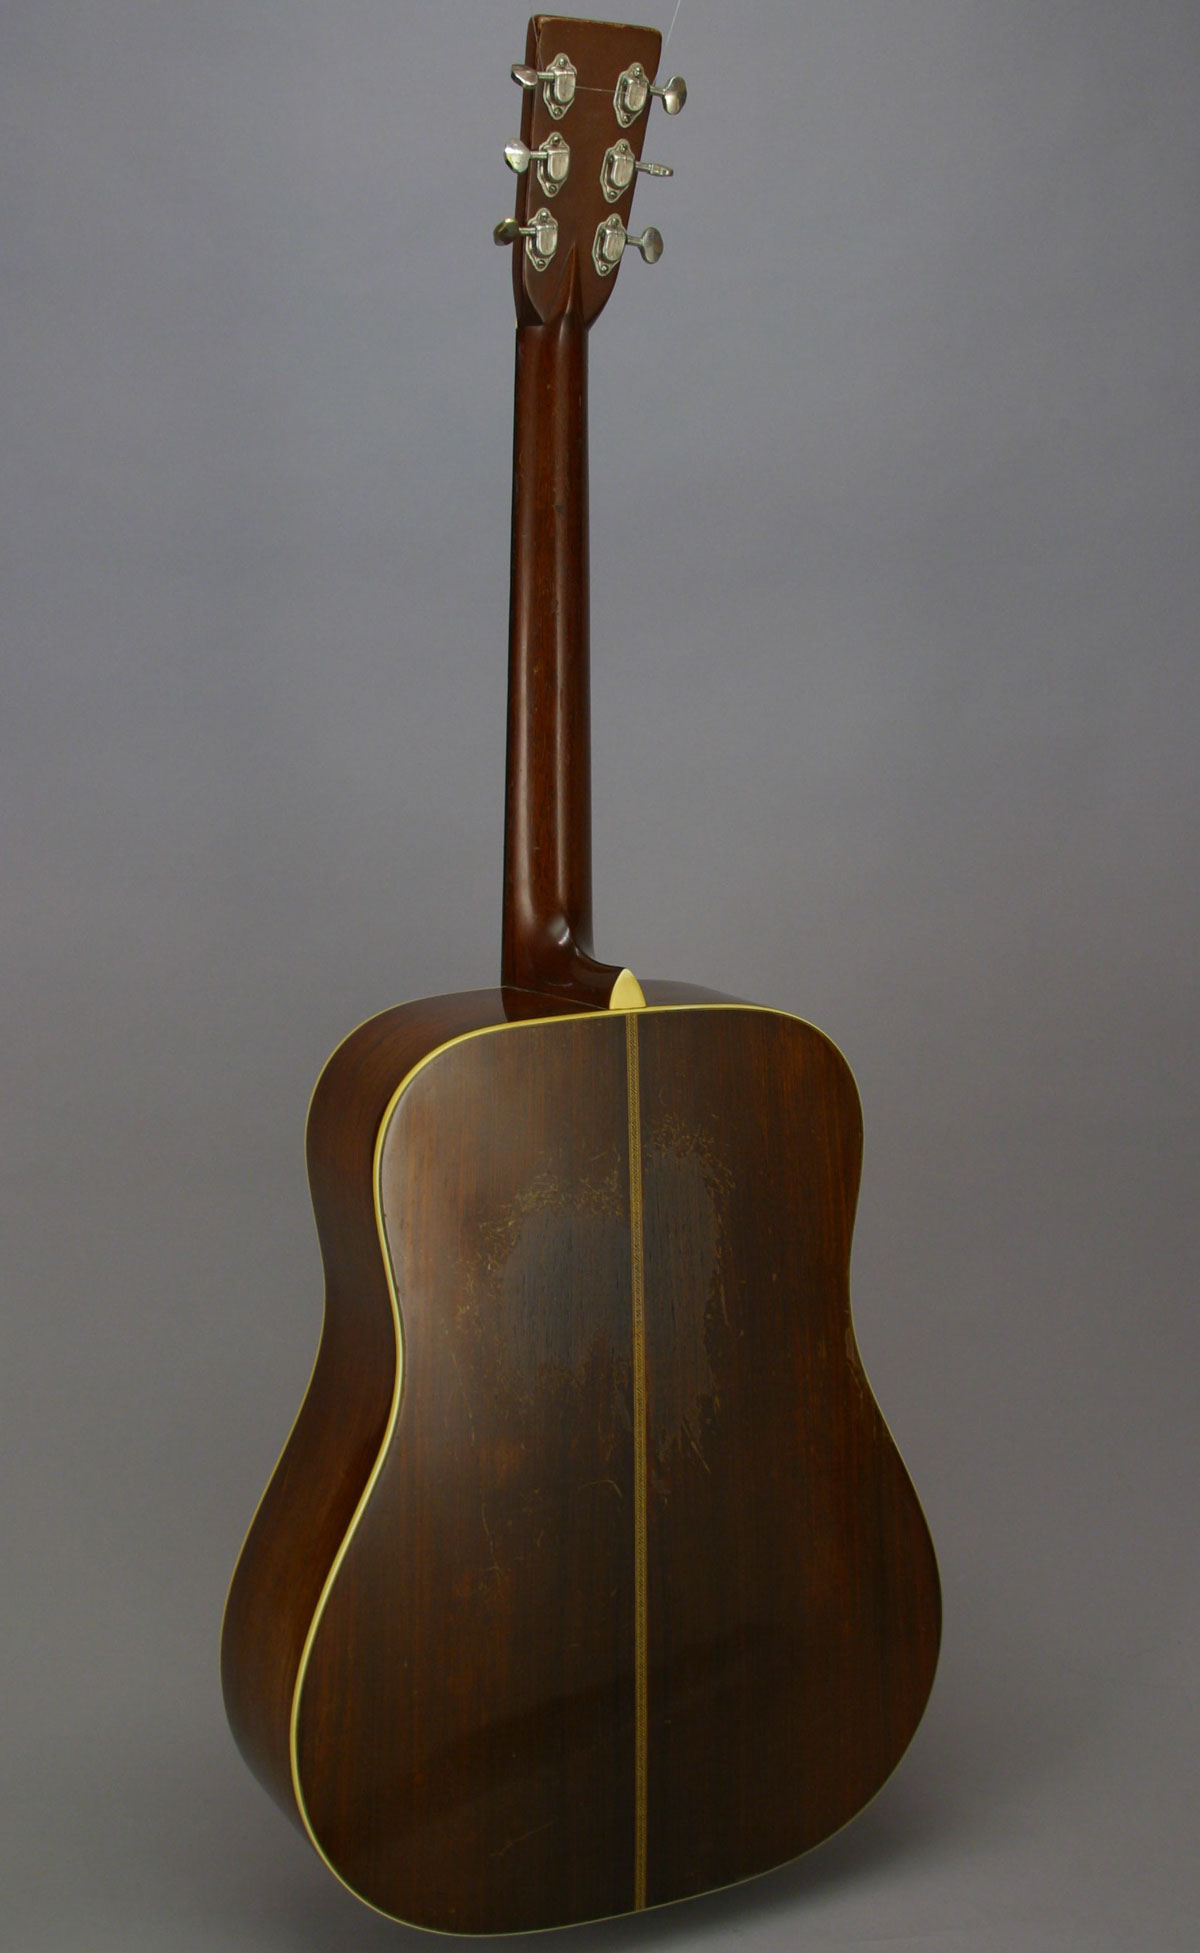
1940 Martin D-28
FRETS.COM Repair Blog, June, 2010
Serious damage at the bridge area, and epoxy mess to an otherwise fine 1940 Martin D-28
Day 1: Inspection
Day 2: Getting Underway
Day 3: Epoxy, Epoxy
Day 4: X-brace Mortise
Day 5: Bridge & Plate
Day 6: Filling the Hole
Day 7: Spruce Upgrade
Day 8:Touchup Begins
Day 9: Frets, Cracks
Day 10: More Crack Reinforcement
Day 11: Final Setup
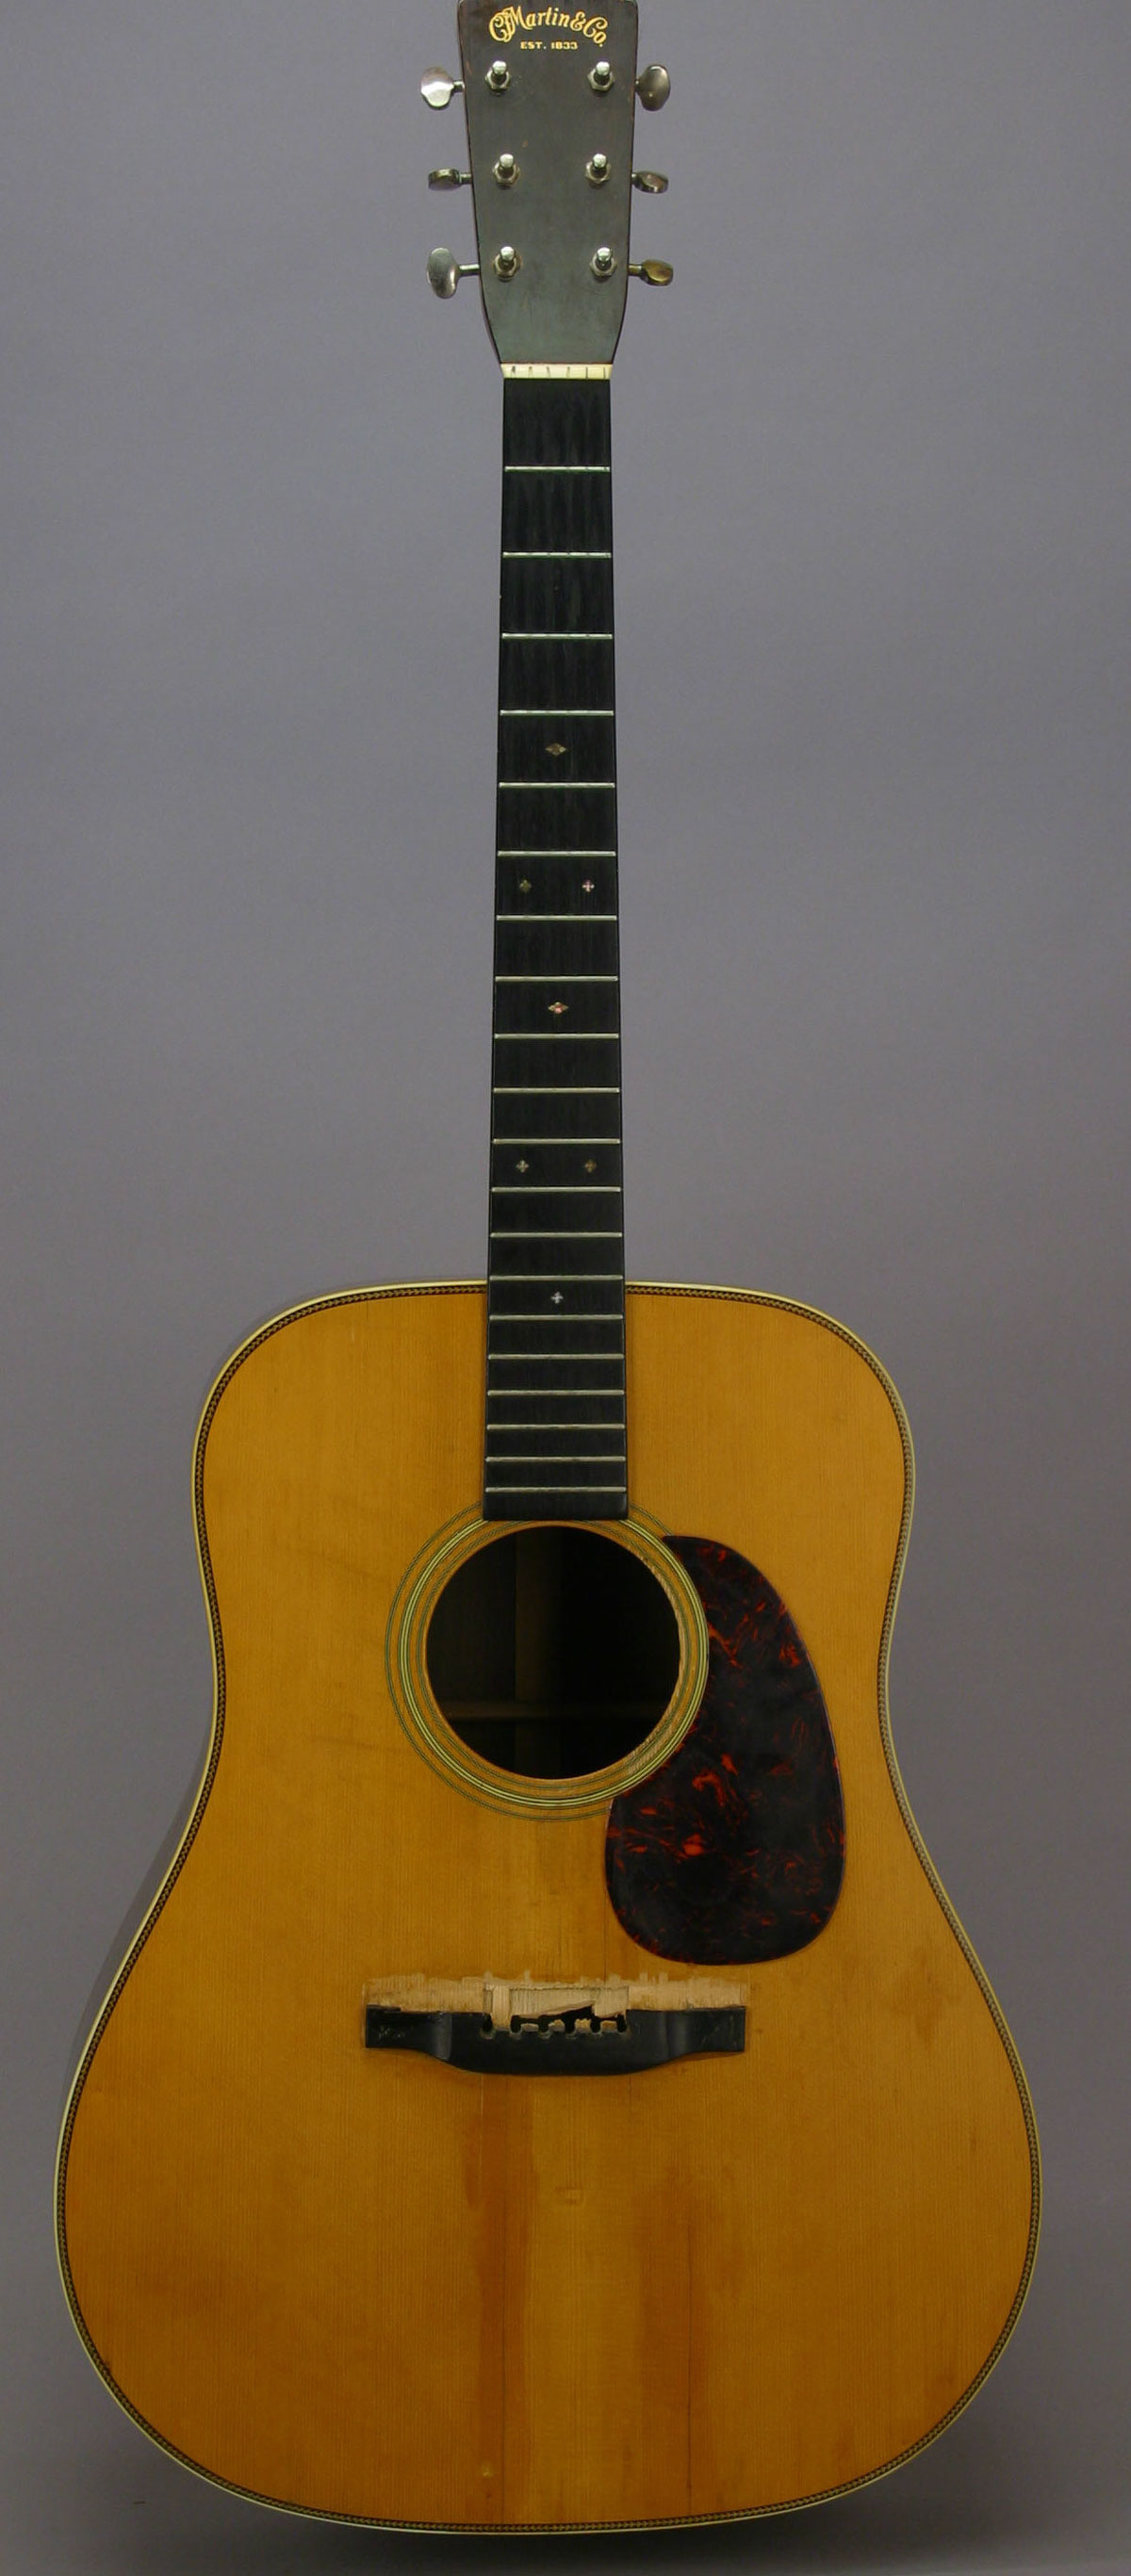
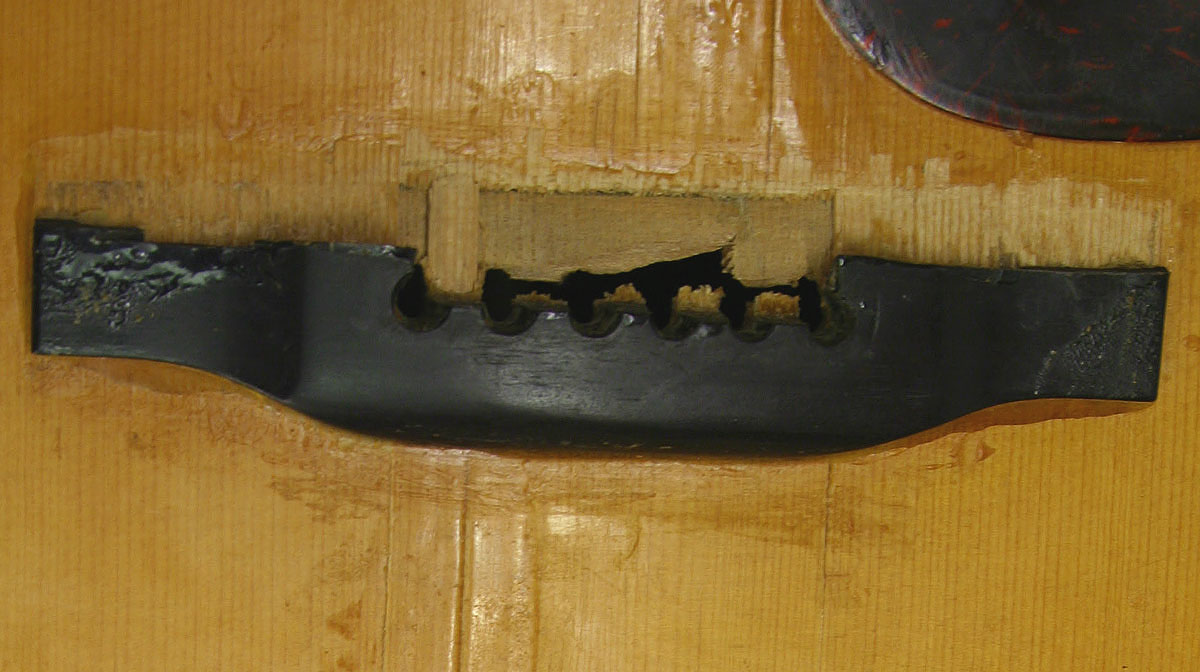
Actually, it's a fine original D-28 with no real problems, except for the top - just look at the bridge, or what's left of it:
There's a nice trapdoor view of the broken bridge plate where a big section of the top came off with the front half of the bridge. Somebody, probably a past owner, did quite a number with epoxy. The bridge had obviously been broken and separated from the top, so what could you do? Well, maybe something other than slather epoxy all over everything. Clearly, it didn't hold the bridge together, so when the front part let go, it took a big hunk of the top with it. No doubt about it - a new, slightly larger bridge plate would be needed to reinforce the cross grain break, and new spruce will have to be added to fill the hole. Both the front half of the bridge and the missing piece of the top were discarded some time ago.
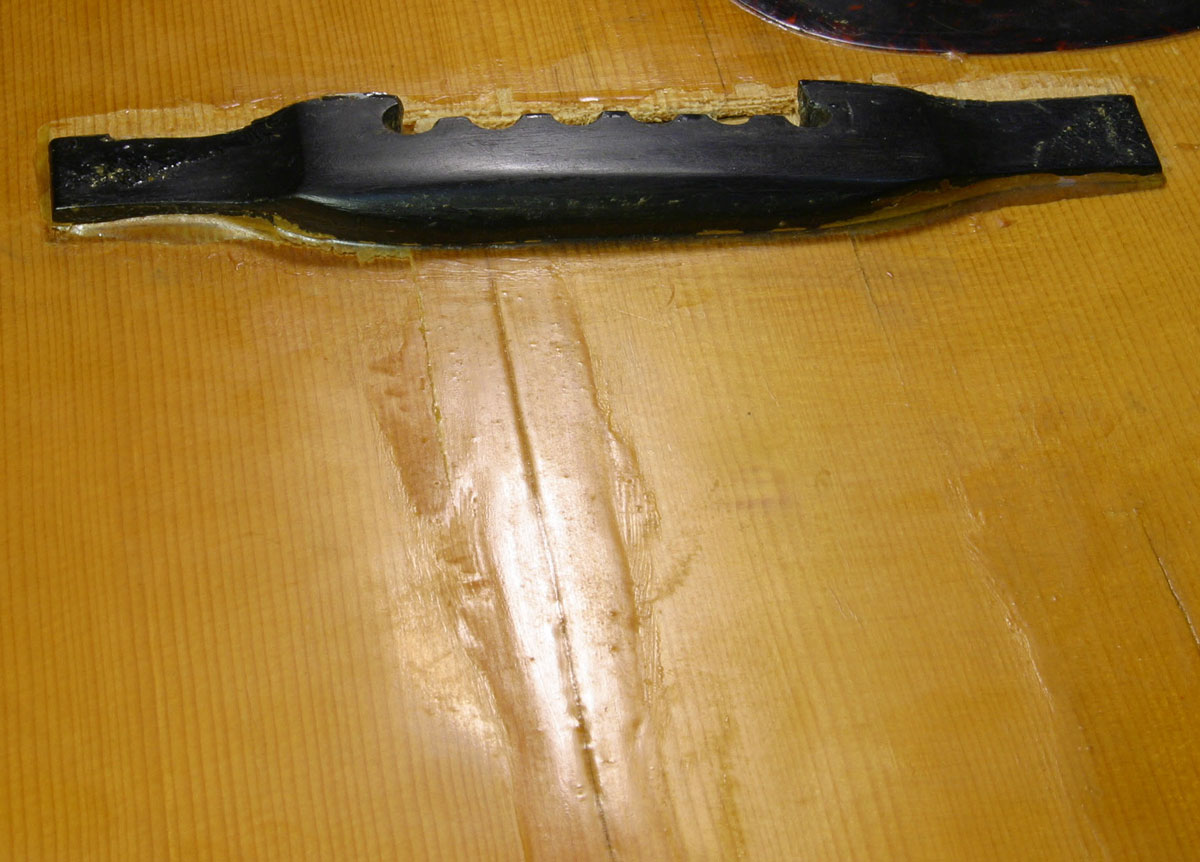
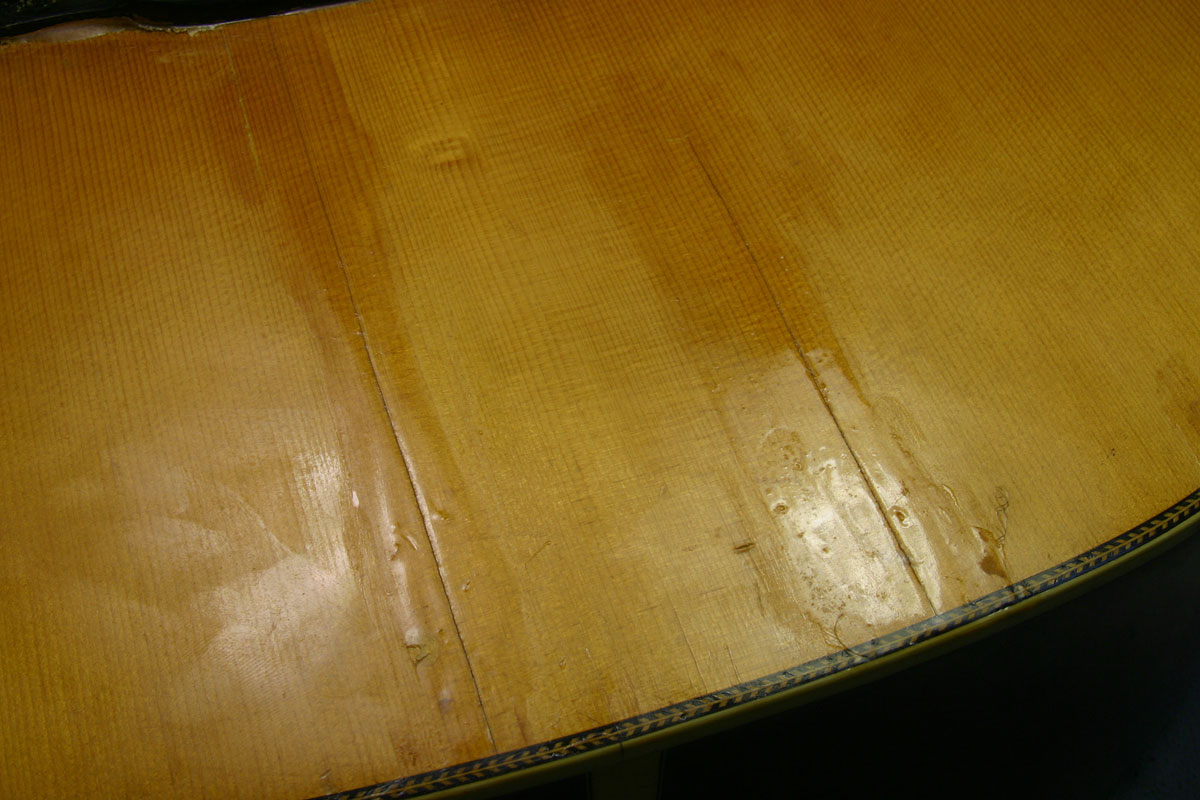
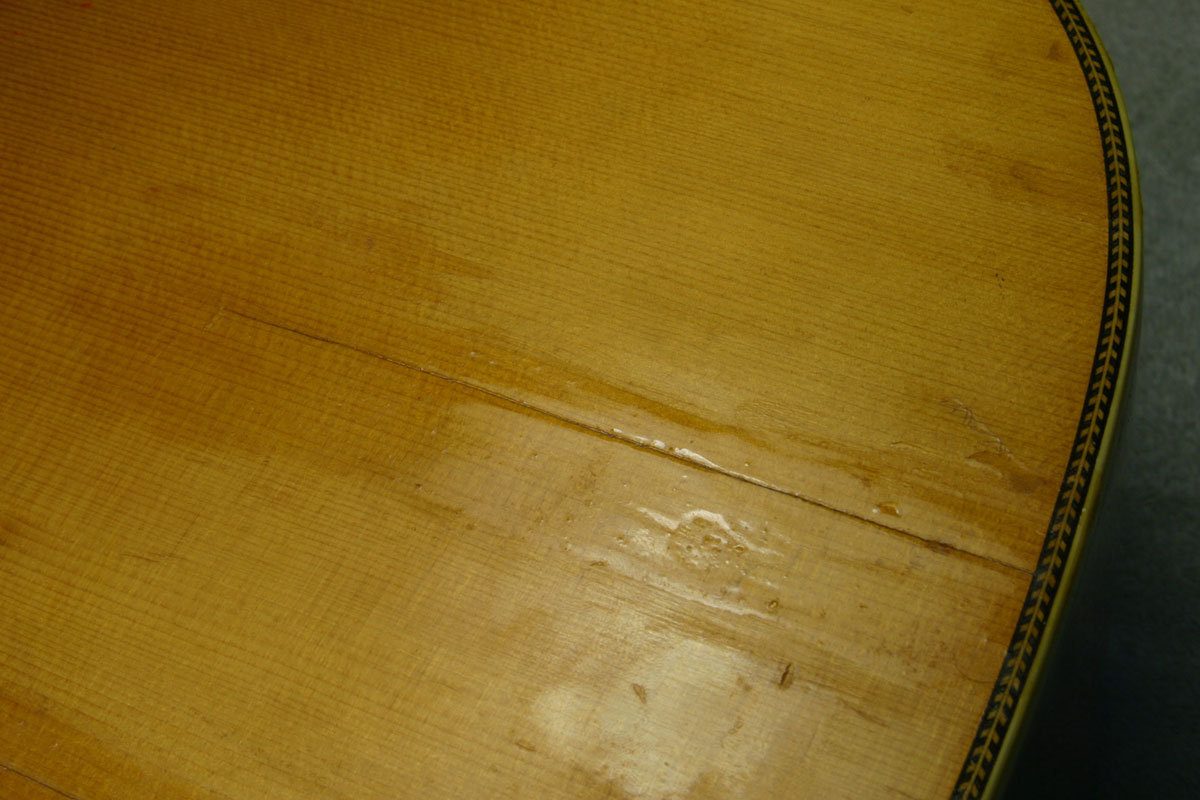
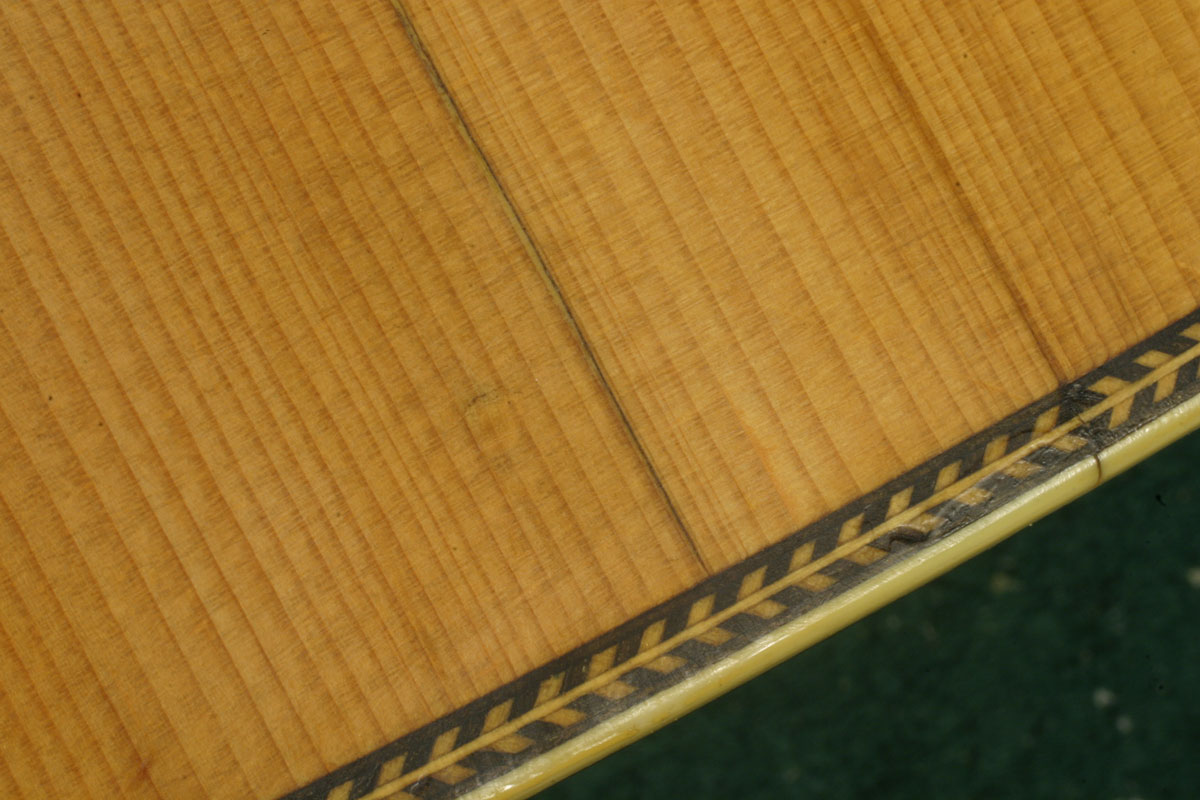
That's quite a pond of epoxy behind the bridge, but nothing compared to the rivers of the stuff that flowed along the crack "repair" all the way to the end of the guitar:
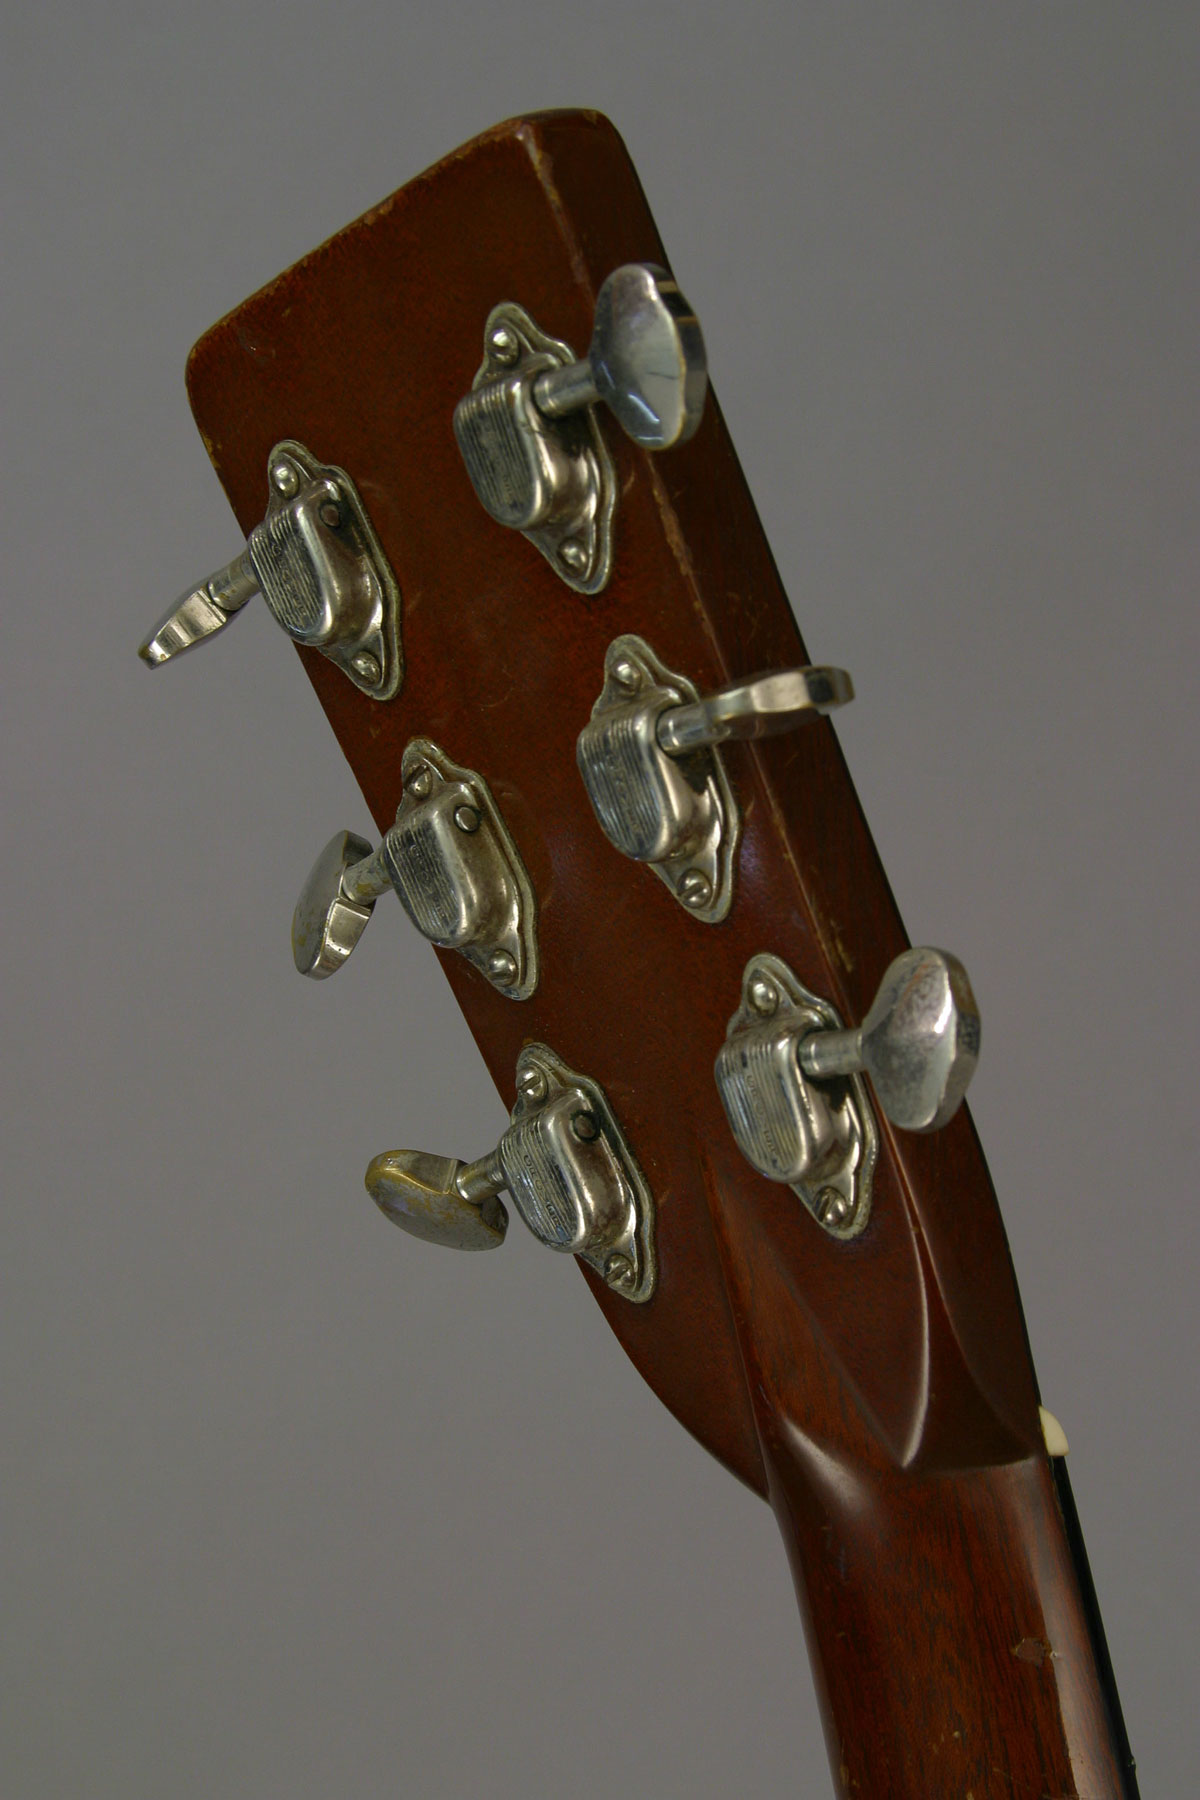
Despite the misguided work on the top, this is a really nice original guitar - check the original covered Grover tuners:
Like so many other 70-year old guitars, this D-28 was in serious need of action work, having never had its neck reset. Now, the neck reset, refretting and setup technique is so thoroughly documented, I'll basically just mention it in this blog.
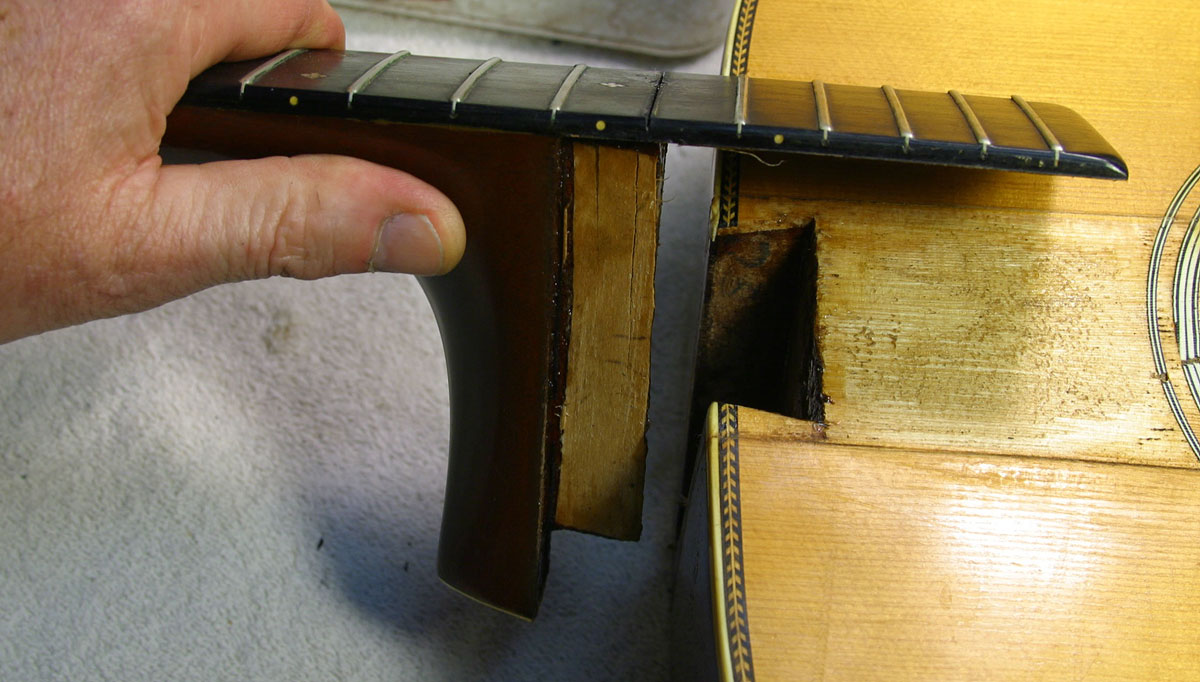
To wit - off comes the neck, both in preparation for changing the neck angle, and also to make the repair to the body a bit more convenient:

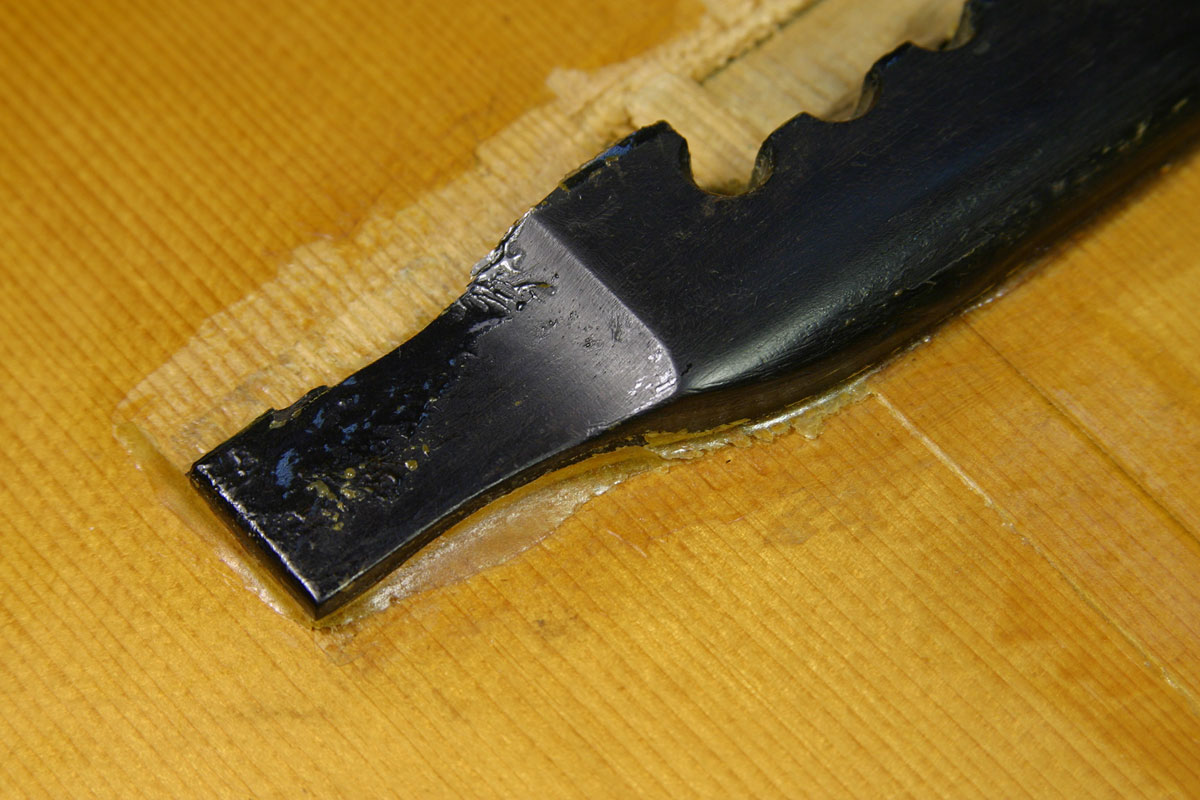
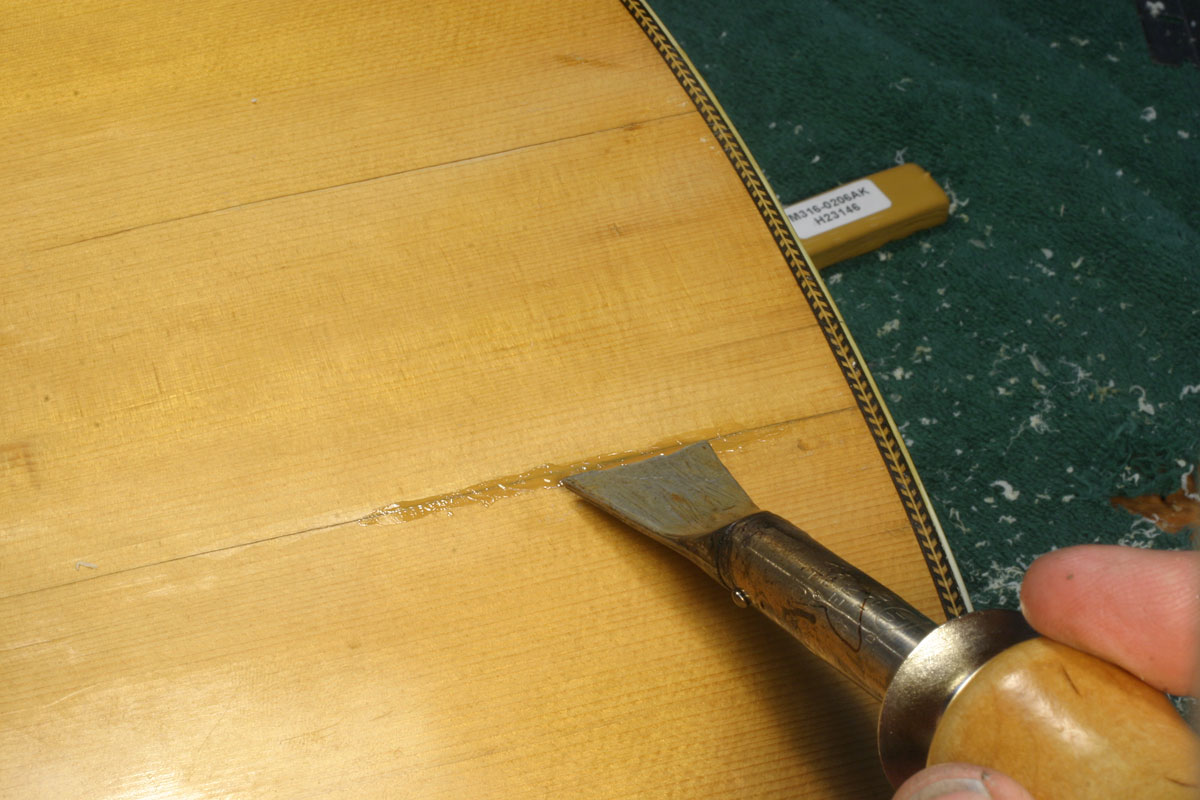
Now to the real job. Prying off the bridge was not difficult at all, but there was no way to escape the massive damage caused by the flood of epoxy:
Behind the bridge, the epoxy stuck to the finish and then lifted upward sometime in the past, tearing the finish off the top underneath. So I simply slipped my thinnest putty knife under there and the bridge came off in seconds.
This is my favorite hooked chisel for removing bridge plates:
It's an old ten inch file I heated, bent, and ground to a chisel edge. I can reach behind the plate, and separate it from the top.
Again, this job went easily because of the massive damage to the bridge plate. I didn't need to heat it to break the glue joint. Taking my time, I picked the plate out in pieces:
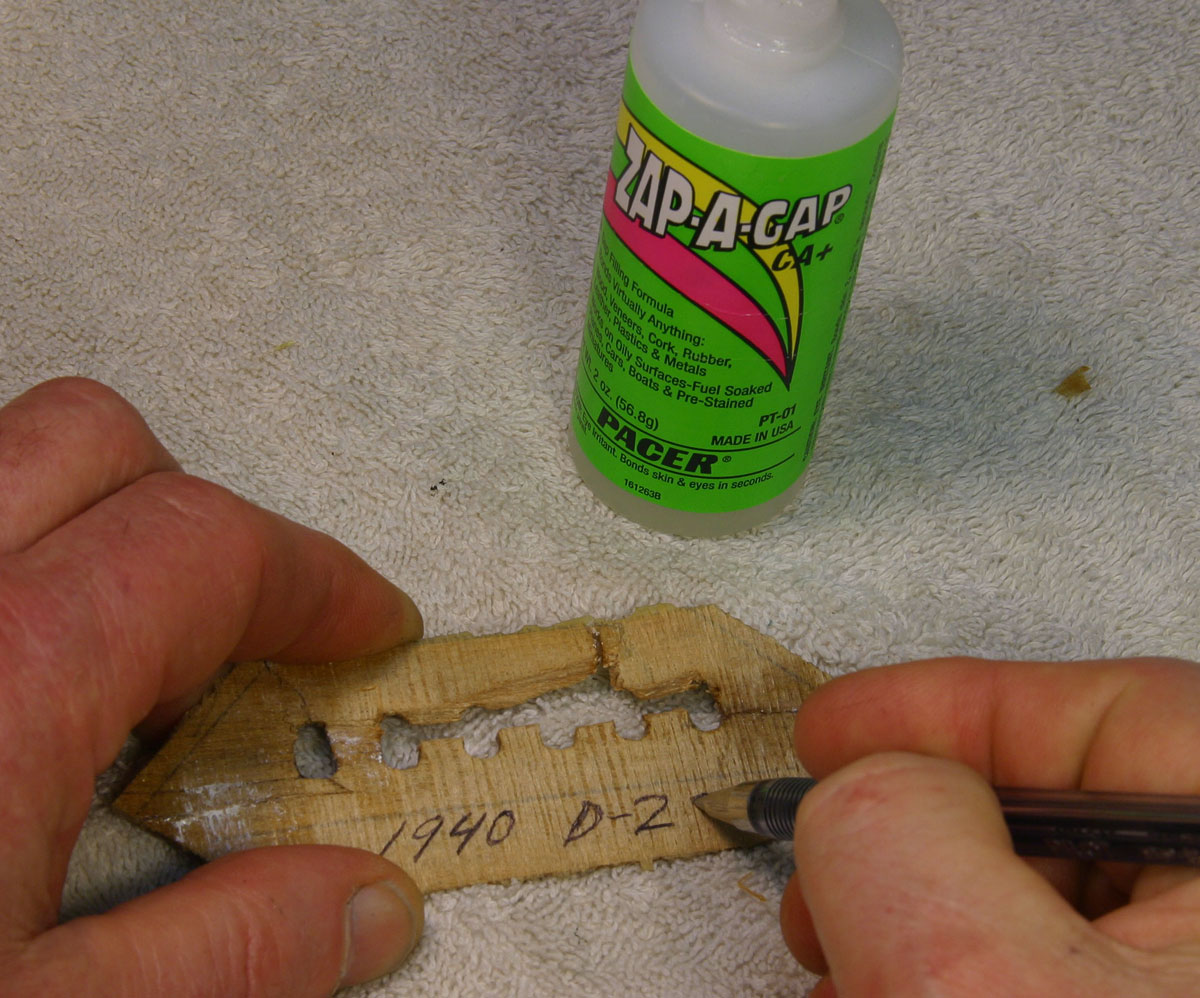
I have a collection of vintage bridge plates I use for patterns, and when I get a broken one like this, I paste it together, and label it:
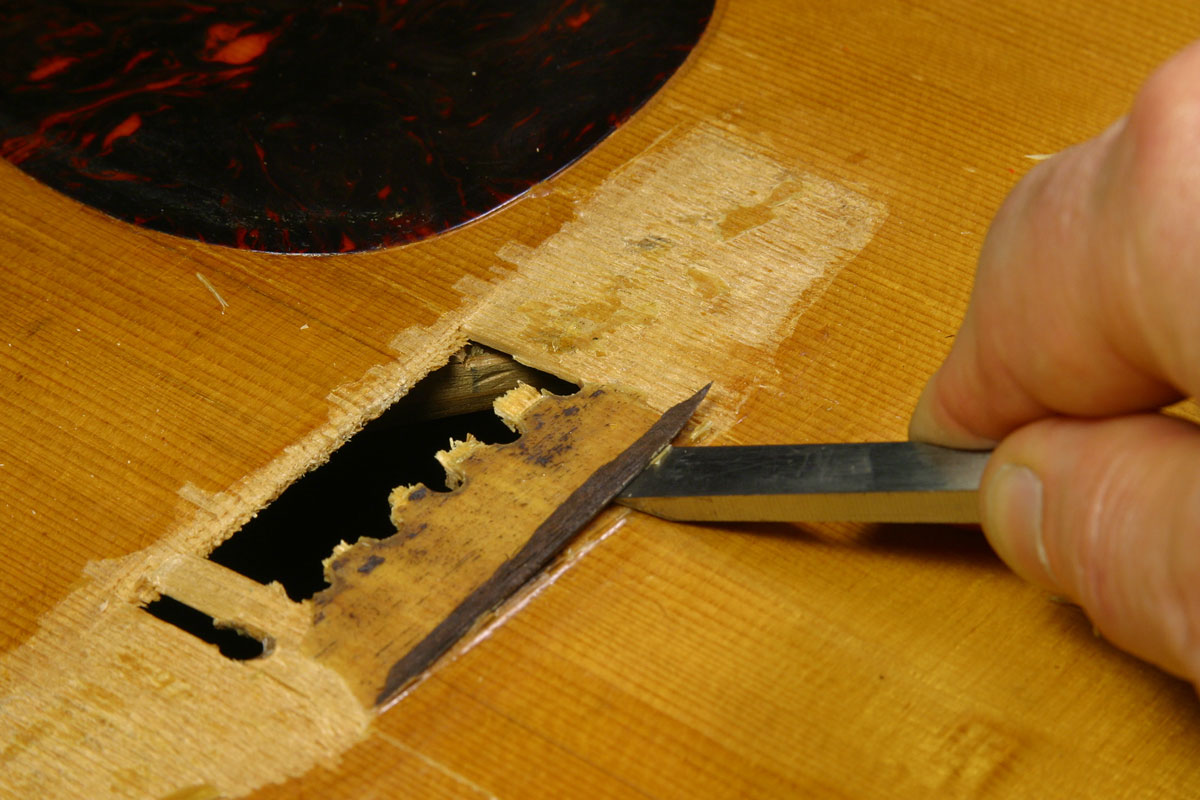
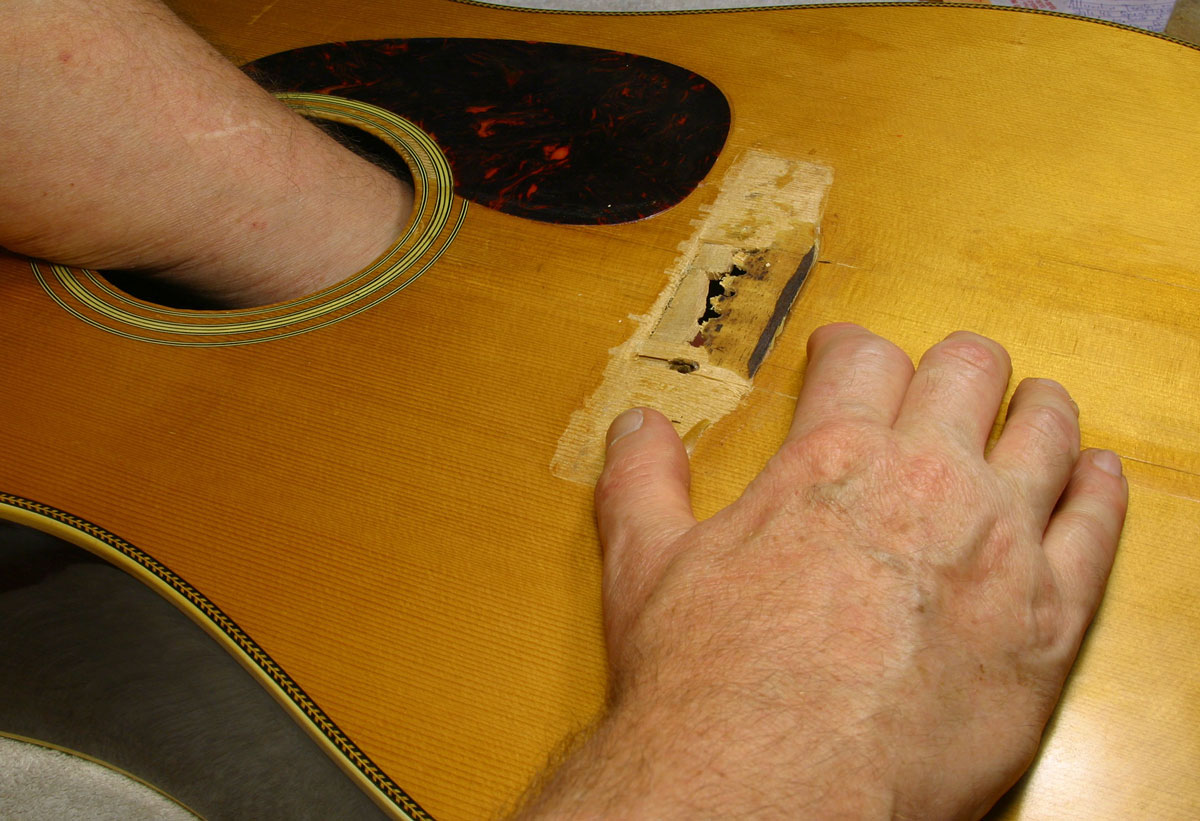
Back on top of the guitar, I picked off the remaining bit of bridge. Notice the sea of epoxy in the middle - the stuff hadn't even stuck to the bridge in that area:
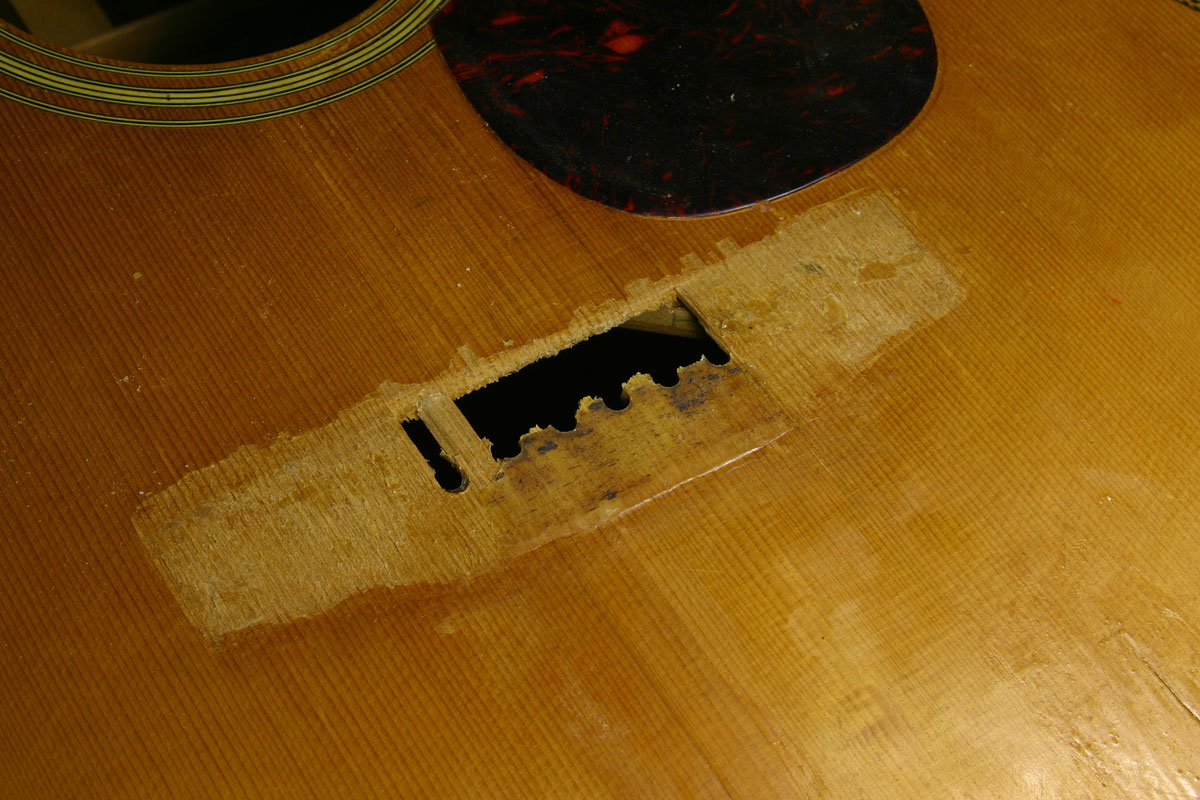
And, here's the delightful result of time, tension and inadequate repair:
A big hole in the top and a long cross-grain break right in front of the bridge. That area will need to be reinforced with a wider bridge plate that can carry the load across the break, so the top won't fold there under the tension of medium gauge strings.
Last thing for today is a bit of reinforcement under the top cracks - some simple little spruce cleats glued and clamped:
Ready for some overnight rest for the glue to dry.
Epoxy is tough stuff. Really tough. Lacquer is delicate. Epoxy stuck to lacquer presents this lovely problem - how do you get it off the lacquer? Even if there were a handy solvent for epoxy, it would also eat right through the lacquer. Heat softens epoxy, but it softens lacquer much more quickly. So, that pretty much leaves "mechanical removal."
Clearly I had a long day of scraping ahead.
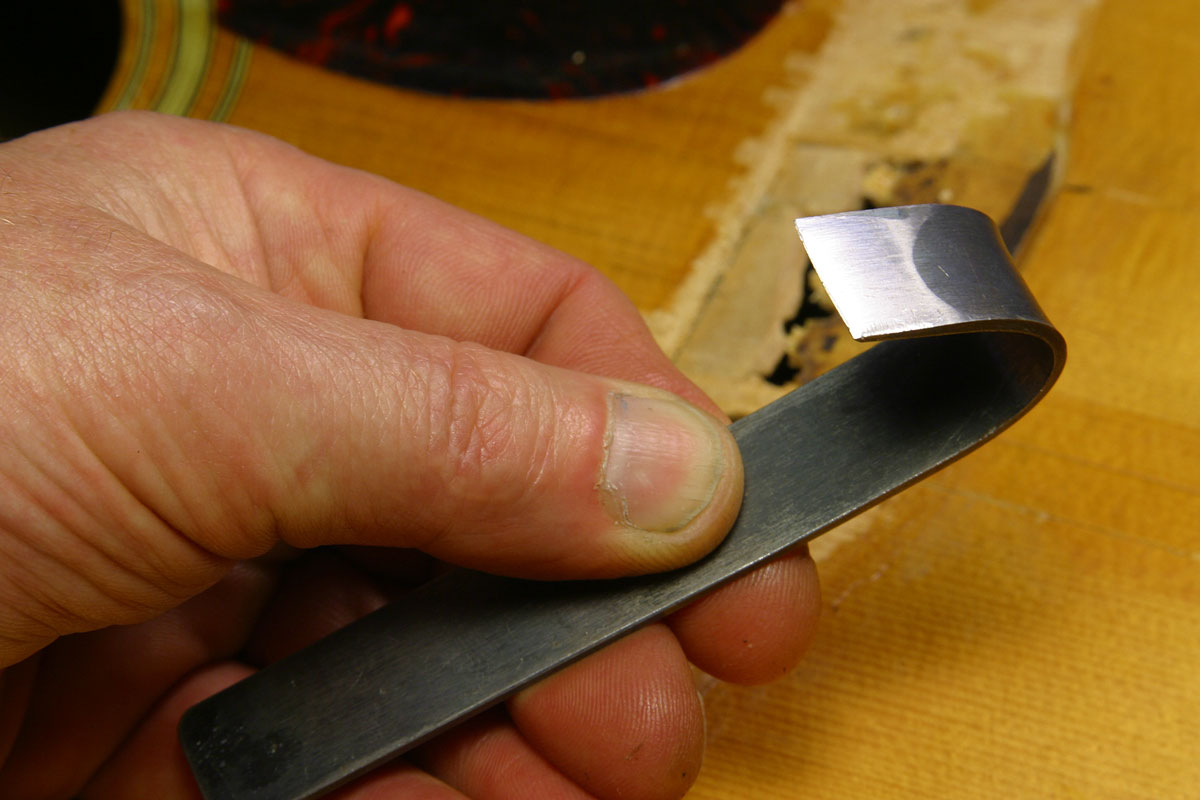
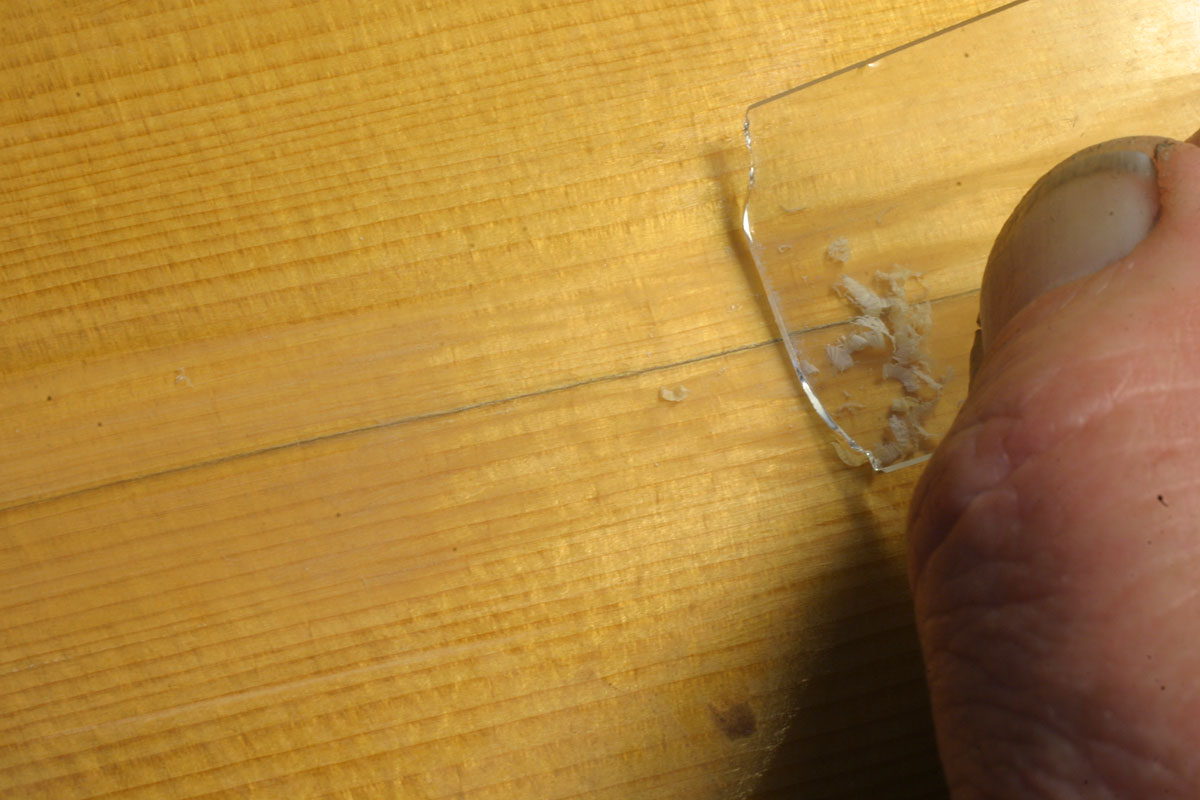
After trying a variety of different scraping methods, I went with the classic broken glass technique.
When I first became interested in working on stringed instruments, I read or heard that violin makers in Stradivari's day managed to level the wood and finish without the use of sandpaper, which was some centuries in the distant future. They were said to use "broken glass." At first, I had this vision of them somehow rubbing tiny sharp shards around on the surface, and couldn't imagine how it might work. Soon, though, I found some better descriptions, and realized that they were using glass in much the same way as they (or we) might use a steel scraper.
Why use broken glass rather than steel scrapers? Well, it's a matter of sharpness, hardness, technique, preference, convenience and all that. I wouldn't use glass to scrape wood where I needed to remove much quantity, because the delicate glass edge would crumble. I do like glass (and razor blades) for scraping finishes because the action is very precise although the edge doesn't hold up for long.
Here's how I go about working with broken glass. First the glass - I get boxes of really cheap microscope slides. Now, some slides have really sharp ground and polished edges and are ready for use right out of the box. Those tend to be expensive by comparison to the cheapie cheesy ones I buy. And, a broken glass edge is just about as sharp as anything gets in this business, so I use the cheap ones and break them.
Breaking a glass slide ensures that I won't get a perfectly straight edge, and most of the time that's the way I like it. Often enough I'd rather have a curved edge for better control of my scraping area.
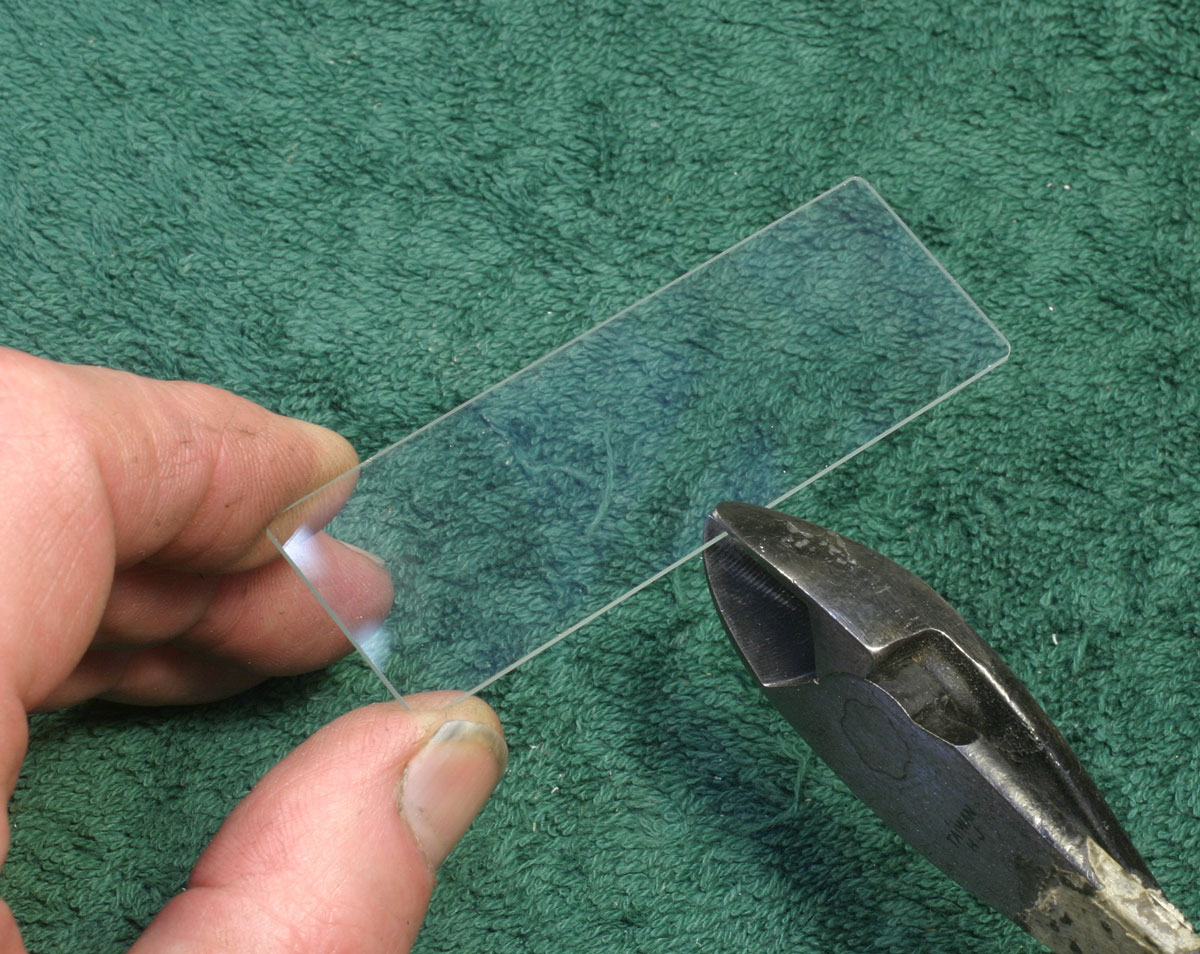
This is me breaking glass:
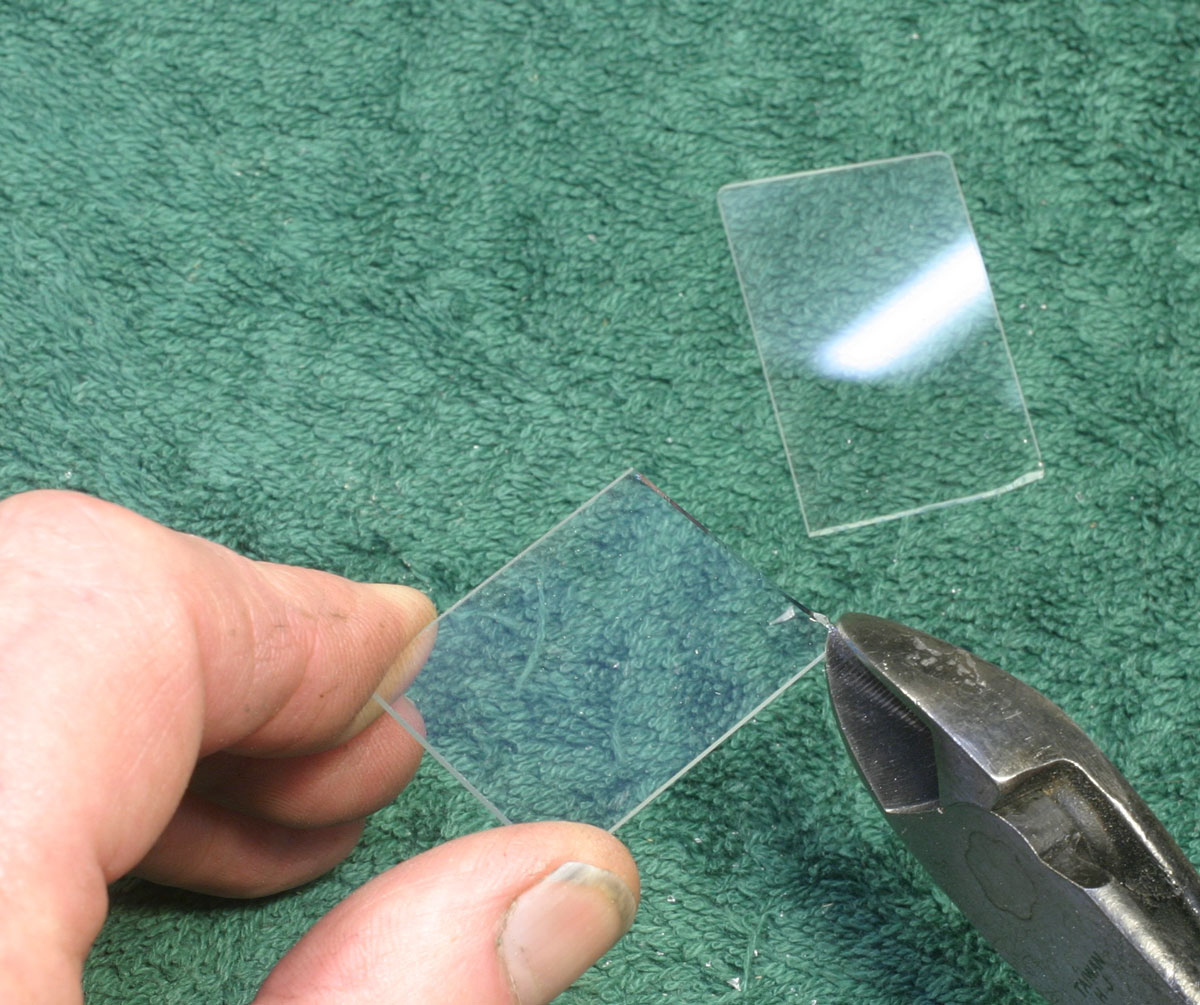
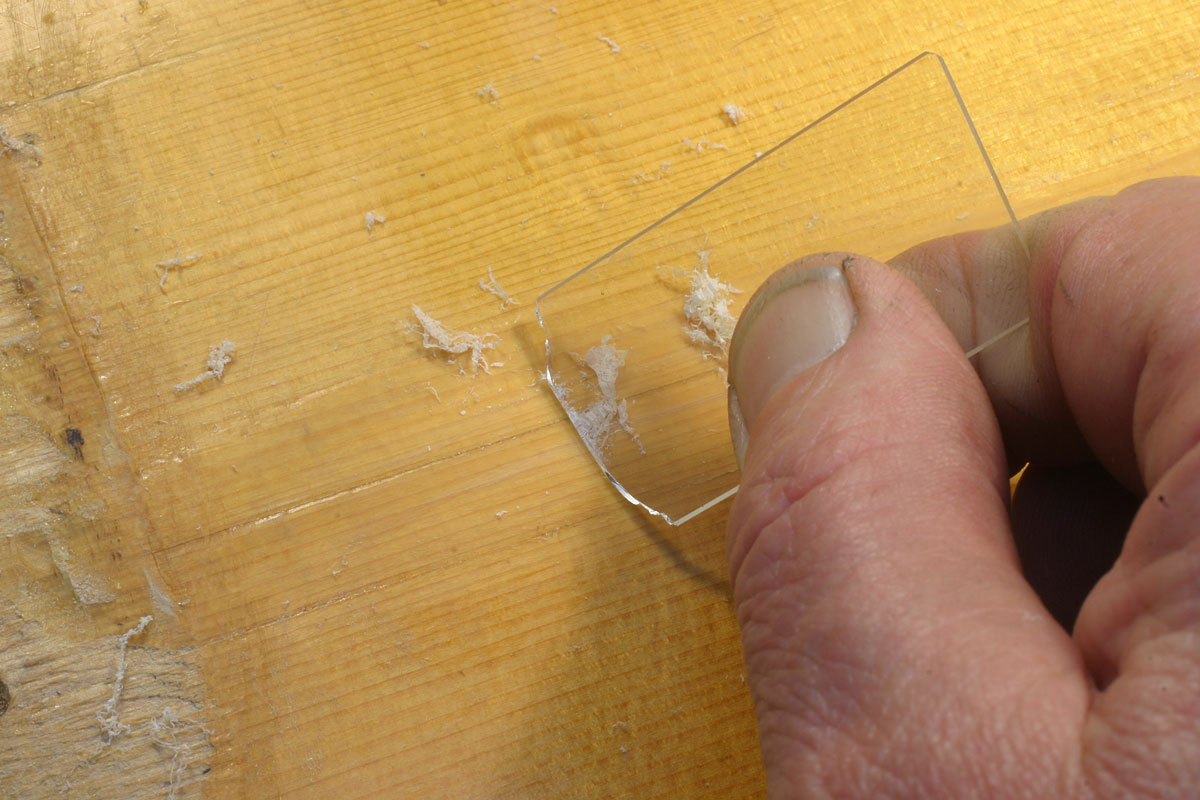
A quick nip at the edge with my diagonal cutter gives me an instant choice of two curved shapes. For this extensive job, I used a couple dozen slides, and broke them into as many as four pieces each to get the kind of curves I wanted. Each edge was good for a few minutes of scraping, and I tossed each piece as soon as it showed even the slightest sign of dulling.
To work, to work -
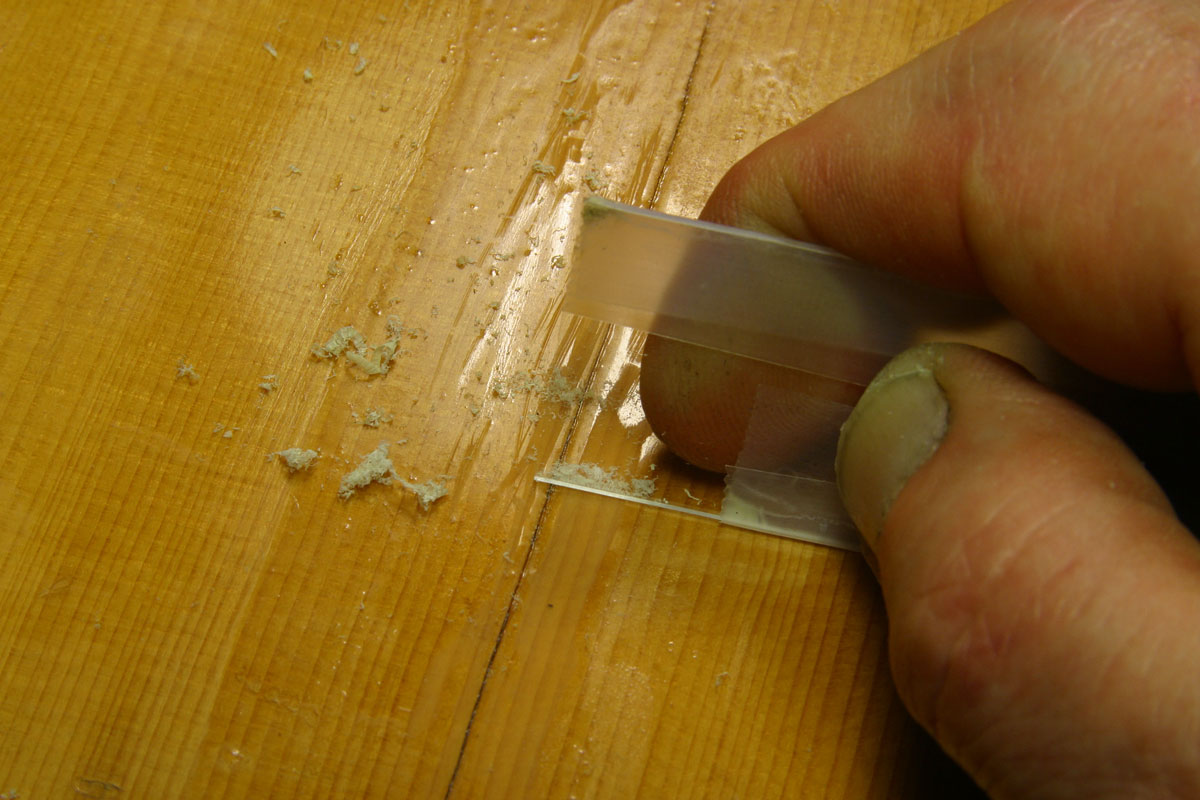
In the picture, you can see that I'm using the original straight edge of the slide. While it's not as sharp as my broken pieces, it does hold up well for preliminary rough scraping. Notice, too, that I have the edges of the slide covered with tape. The bottom edge is taped to avoid scraping the surrounding finish as I lay into the thick epoxy layer, and allow the rest of the slide along to guide it. The top edge has tape because I'm leaning pretty hard on the slide and sometimes they break. . .
Rough scraping occupied the first hour, more or less. If the top were truly flat, I could scrape that way until I went through just the epoxy layer, but no old flat top guitar top is flat enough for that.
The next four or five hours saw me bent way over, myopically focused on the the fluorescent light reflecting off the surface as I pecked away ever so slowly at that @&!*%# epoxy.
The trick was to try to see the exact moment when I scraped through the epoxy layer and encountered the original nitrocellulose lacquer beneath. That lacquer is on the order of .004" thick, so it can't handle many strokes of a scraper before it simply disappears. In the big versions of the two photos below, I hope you can see that transition:
As it is scraped, the epoxy develops a milky or frosty appearance, and as soon as the scraper breaks through the epoxy layer, the lacquer shines brilliantly clear and reflective.
DId I get off all the epoxy without going through any of the lacquer. Well, no I'm not Superman. I did get most of it off without going through, and the spots I gouged out were small and shallow enough I didn't lose that wonderful amber color that's developed on this guitar top over the last seven decades. And, yes, I'll be doing a bit of finish filling along the trails of epoxy, and some heavy duty finish and spruce filling around that sad mess where a bridge used to be.
Well, time to call it a day.
Tomorrow, I'm off to Phoenix for my semiannual two day "stand and deliver" for the guitar making class at the Roberto-Venn School of Luthiery.
Day 4: Mortise and More Cracks
A short day today.
This guitar was made during the period when Martin laid up the top X-bracing right over the bridge plate, so the bridge plate was actually mortised halfway under the X-brace where it passes beneath the bridge. I suppose it could go without saying that the practice makes bridge plate removal all that much more difficult and destructive, but certainly the Factory never expected us to be clawing bridge plates out for replacement.

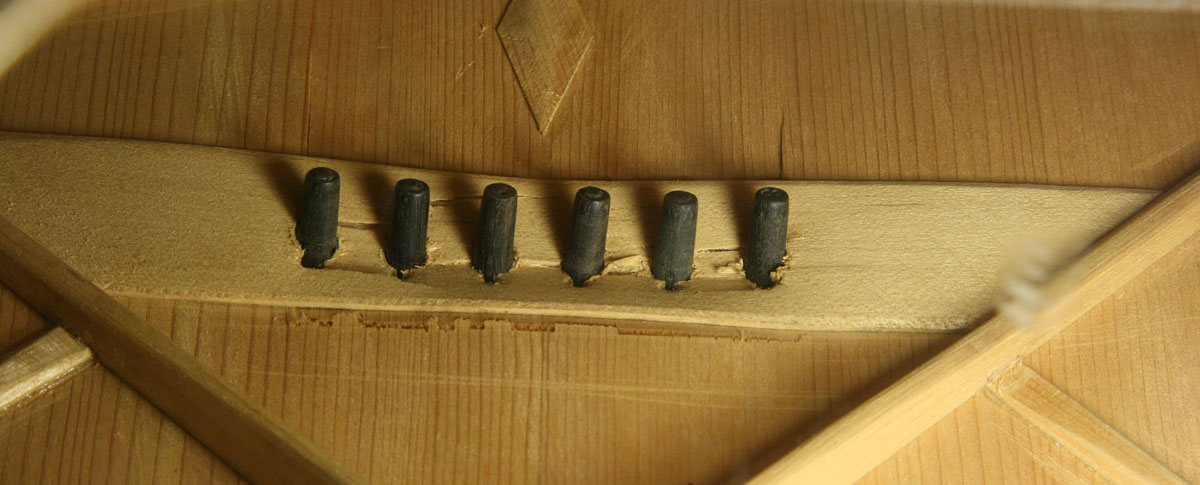
Here's the old bridge plate, along with an original pencil line that shows how far it was inserted under the bridge plate:
Because I wouldn't be able to tuck my new bridge plate into that old mortise and fit it tightly enough to restore the strength in that area, I made a little filler piece to glue into the mortise cavity. I don't think that there's any benefit to mortising the bridge plate under the X-brace, but leaving that hole empty definitely does reduce the gluing area for one of the most stressed joints on the guitar - the bracing right under the bridge.
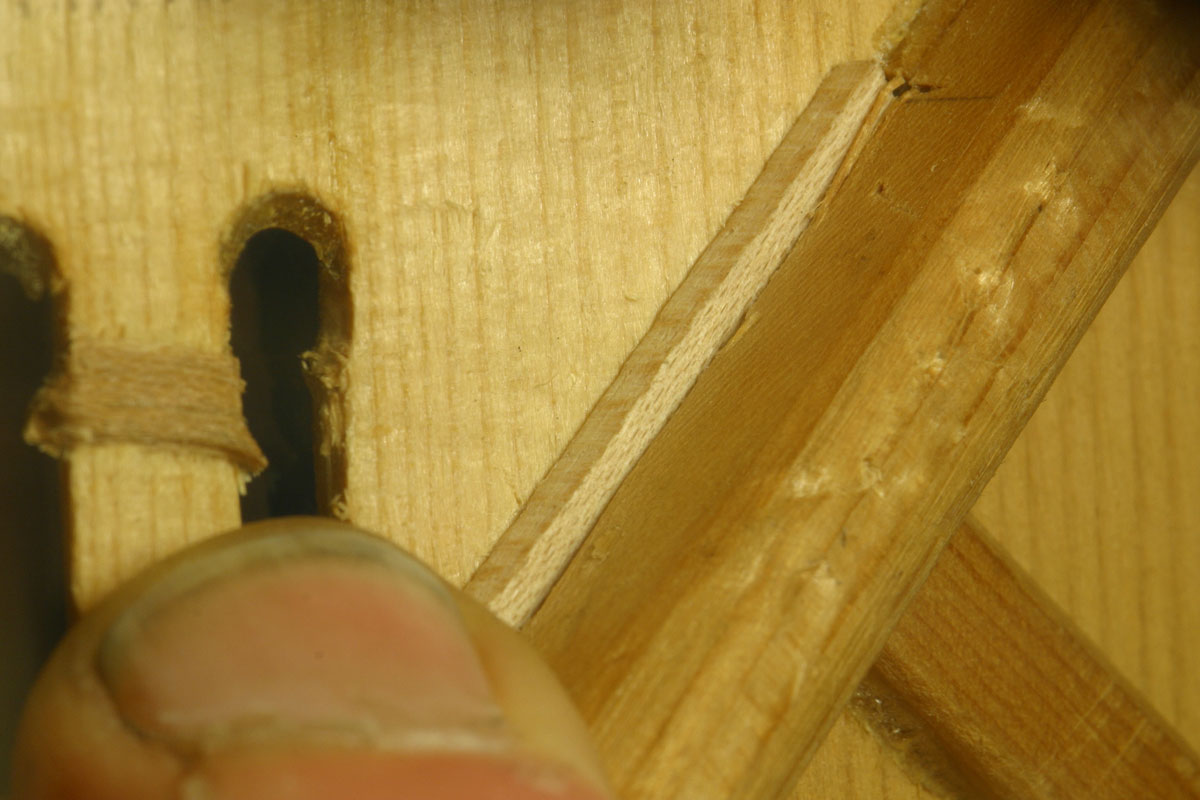
My new pieces fit well into the old holes, so I buttered them up with hide glue and mashed them into position:
Time to carry the guitar upstairs to let the glue dry overnight.
I thought I'd give you a quick reminder that the damage to the top of the D-28 is not unique. We see it from time to time on instruments where the bridge has cracked or come completely loose. In that circumstance the entire load of the strings is held by the bridge plate and top. Since the grain of the bridge plate runs laterally, across the line of tension, the bridge plate is prone to break through the line of bridge pin holes. WIthout the support of the bridge above, both the top and bridge plate fold upward, often cracking the top in front or behind the plate, or in both places. A 1915 Martin 0-28 with this classic bit of damage:
Decades ago, after having seen enough of these destroyed bridge plate areas, I came to the conclusion that the best maple bridge plate design would have the grain running parallel to the top and line of string tension for maximum resistance to bending. It could not split between the holes, and would be far less likely to fold upward, causing such serious top damage. A multi-ply plate would not crack, but it would not be as stiff in that most important direction.
But, some folks get upset when they see a vintage instrument where such a design element has been changed in restoration, so I made a slightly deceptive looking plate for this D-28. Before you ask, I don't believe for one second that the grain direction of the bridge plate could have the slightest effect on tone or volume!
The original bridge plate covered just the area directly under the bridge:
My new plate would have to be wider in front, to carry the load of string tension past the break in the top, just in front of the bridge. Without the new plate spanning that area, there would be a likelihood of the top folding downward and breaking right there under the load of medium gauge strings tuned to pitch in years to come.
The new bridge plate isn't all that much more massive than the original - just enough to reinforce the top in front of the bridge:
Note the grain direction of the new plate. Here's what it really looks like from the edge - it really has the grain running parallel to the top, with a whisper thin layer of cross grain maple on the top:
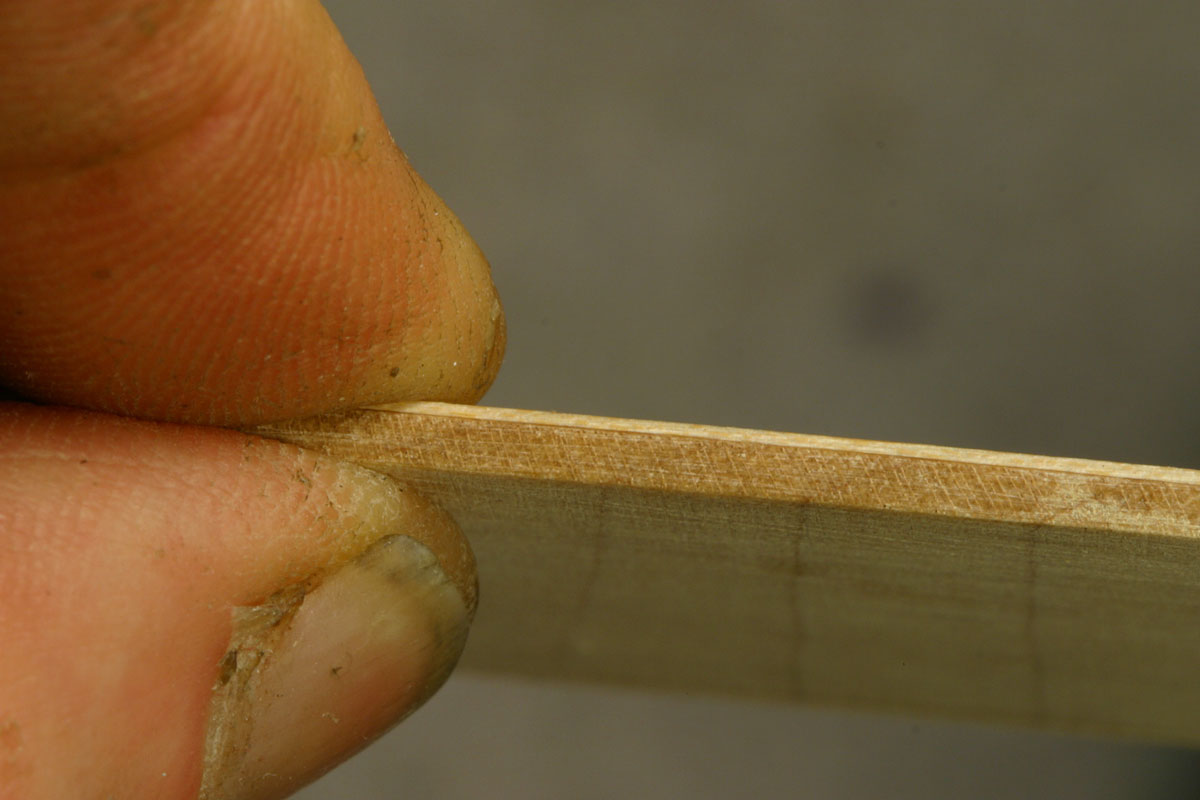
In all, the plate is the same thickness as the original, but it is far stiffer in the direction of the string tension. So, it satisfies my need for stiffness, and, I hope, it won't upset those who spend time looking at bridge plates.
Gluing in the bridge plate, clamped with a heavy flat plate outside and inside to flatten the area in the process:
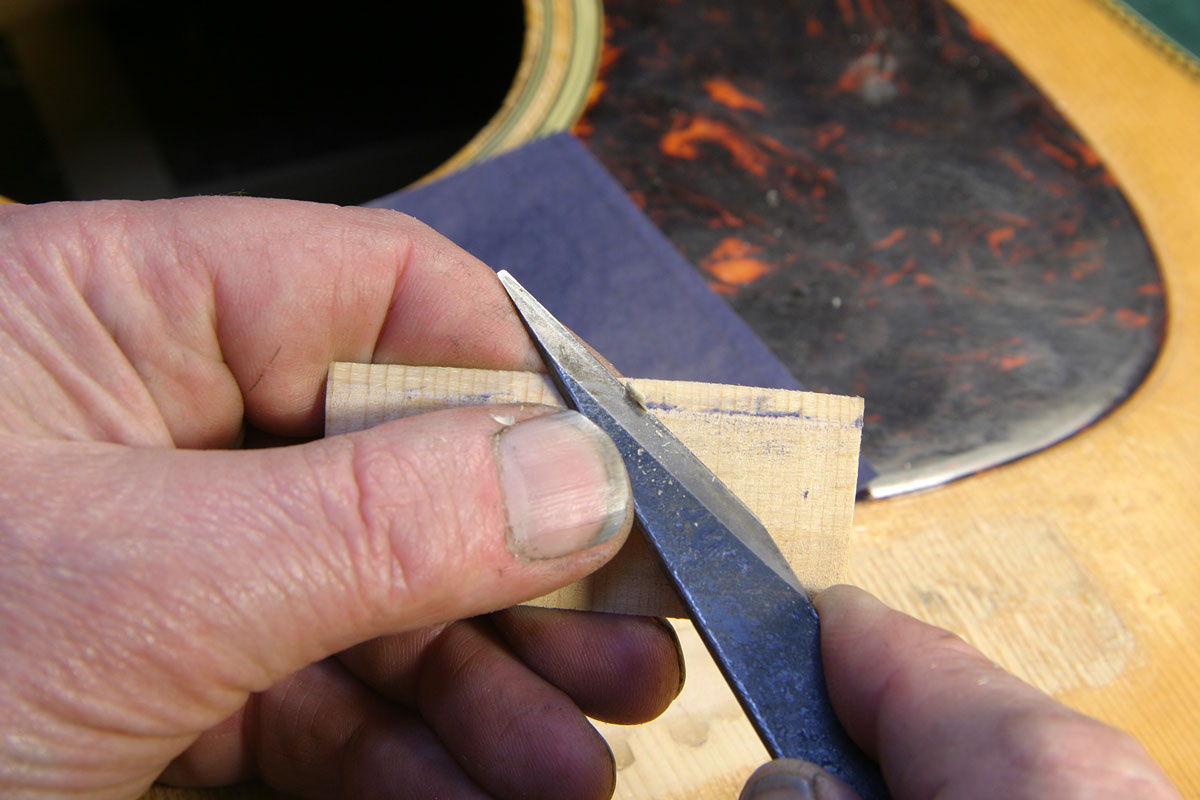
No reason not to start making the bridge, so I'll get into that now. It's not possible to buy "period-correct" vintage replica bridges from any source, so I always make the ones I use for replacements on old guitars.
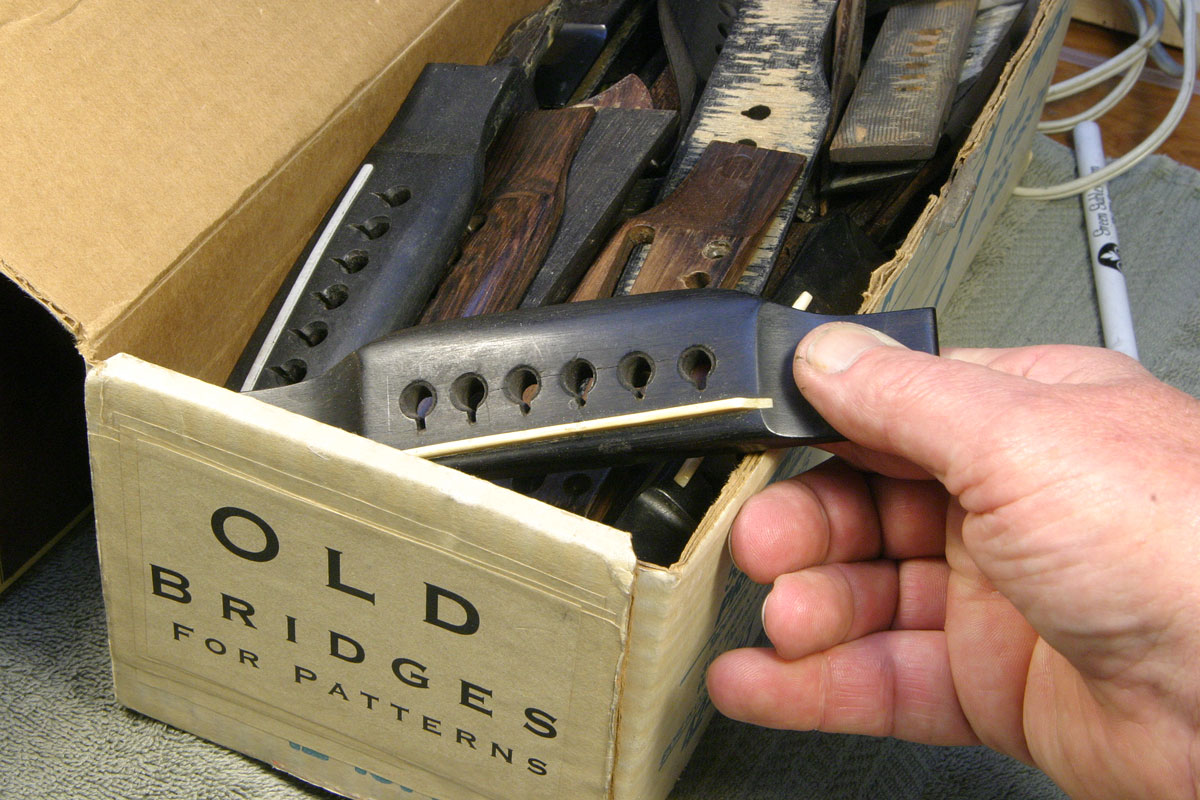
The original bridge was so destroyed it would not make a very good model for carving a new one, so my first step was to rummage through Gryphon's collection of old broken bridges for a likely pattern. I found this nice cracked 1938 000-28 bridge, so I settled on it, first transferring the location of the centers of the outer two bridge pin holes to my blank:
By the way, I make up Martin bridge blanks in batches, cutting them oversize and rectangular, and forming only the curved "wing" sections using a shaper and/or drum sander. Some years ago I got this really great Sri Lankan ebony - 1t's "bow frog quality," the highest grade, blackest stuff.
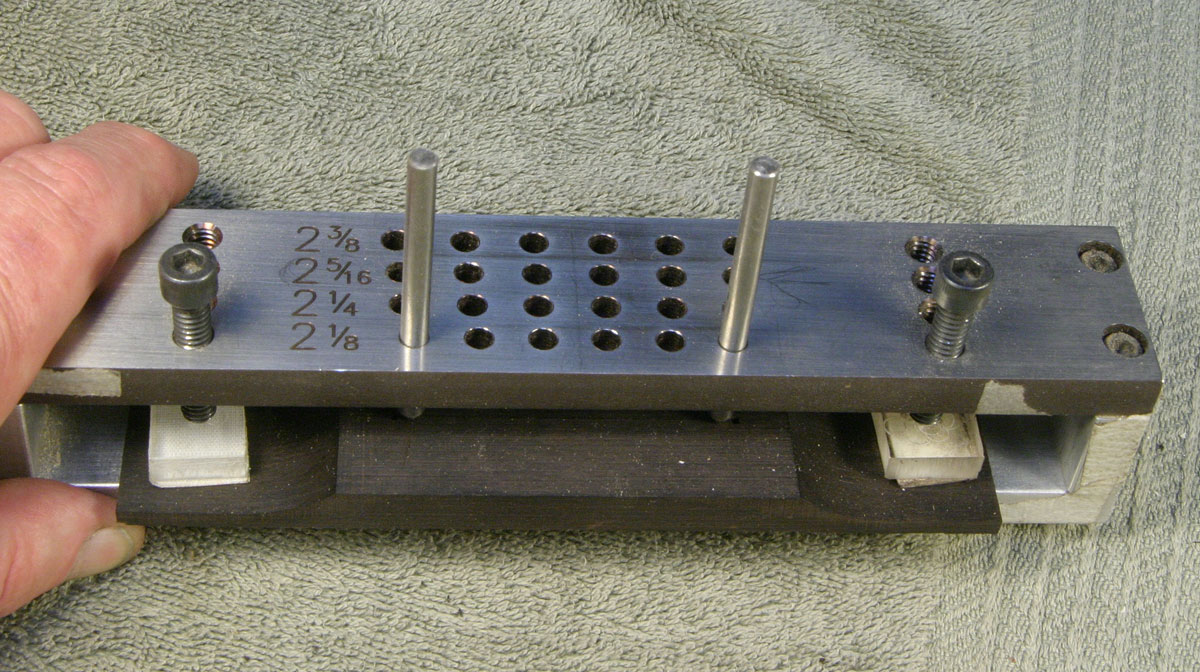
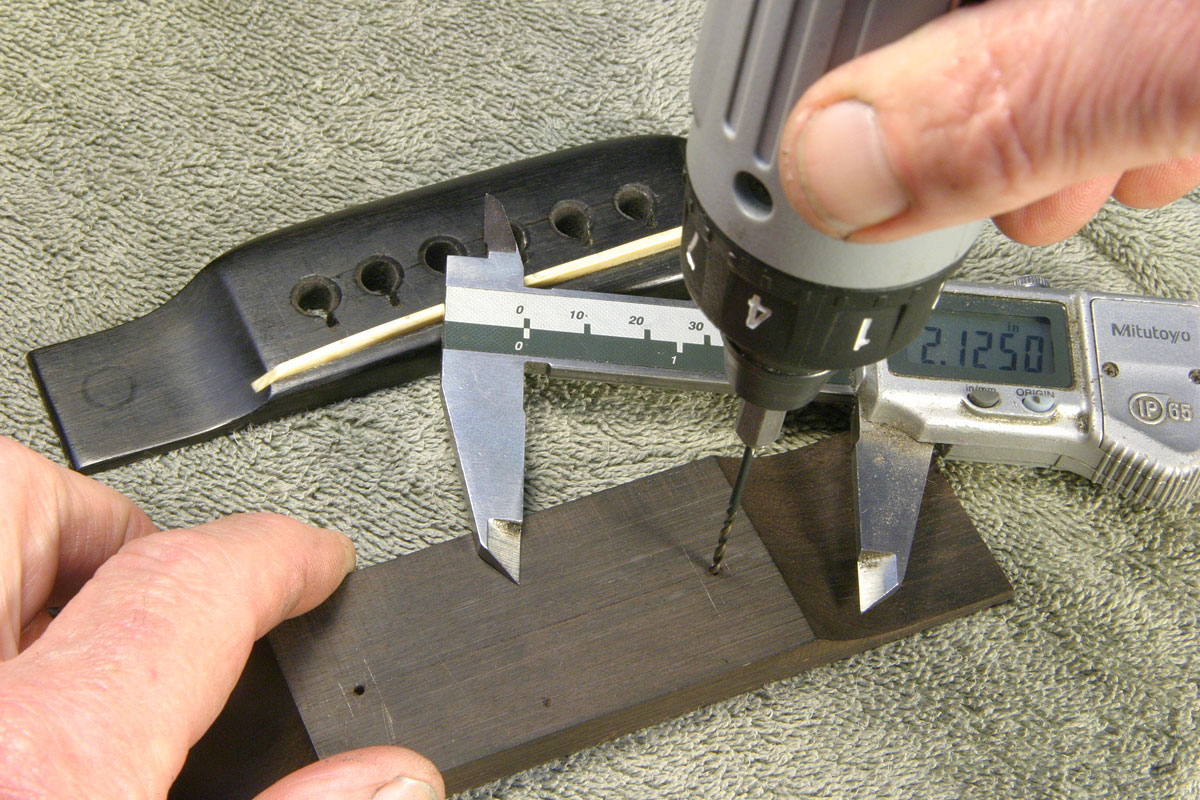
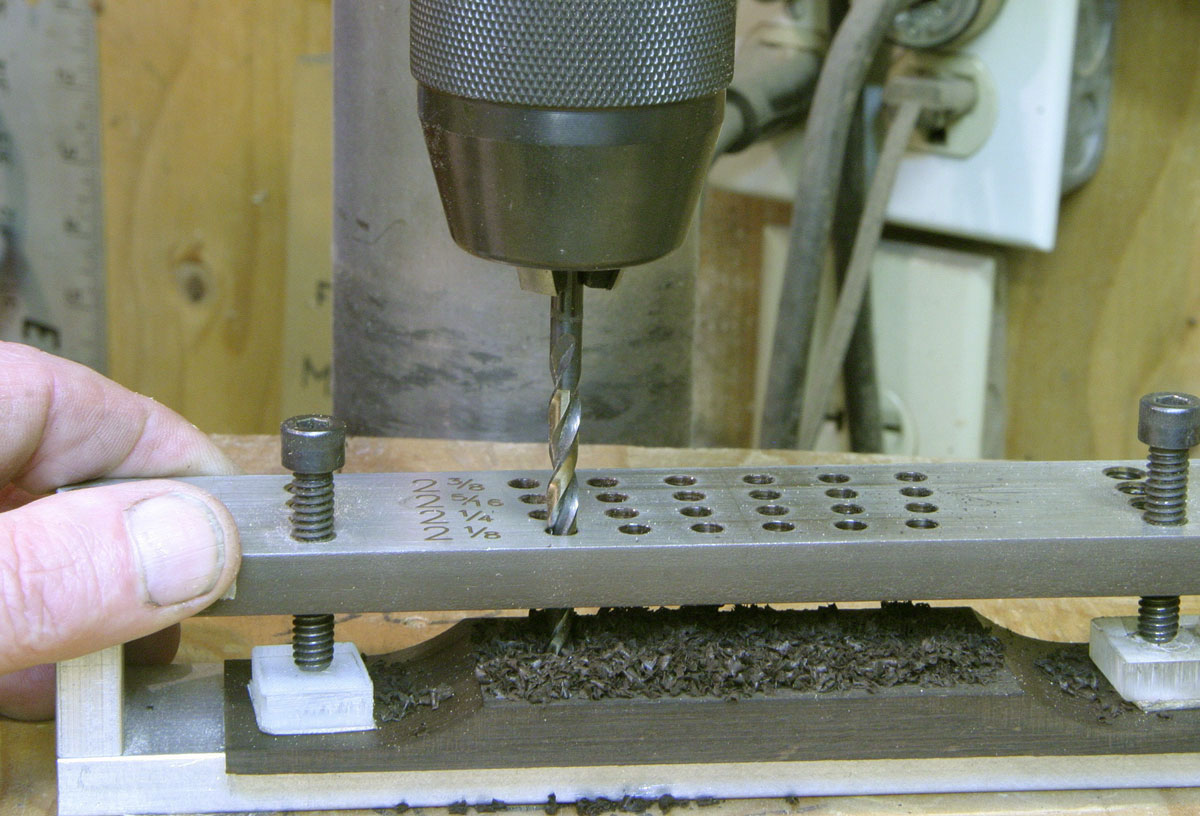
Once I had the two outer hole positions marked, I used them to locate the bridge in this little drill jig I designed for LMI a few years back, clamped it in place, and drilled the holes neatly on the drill press:

After tracing the outline, I worked freehand on my small belt sander, "bulking off" a fair bit of the ebony, and had the blank looking like this with the contour of the top roughly where I wanted it:
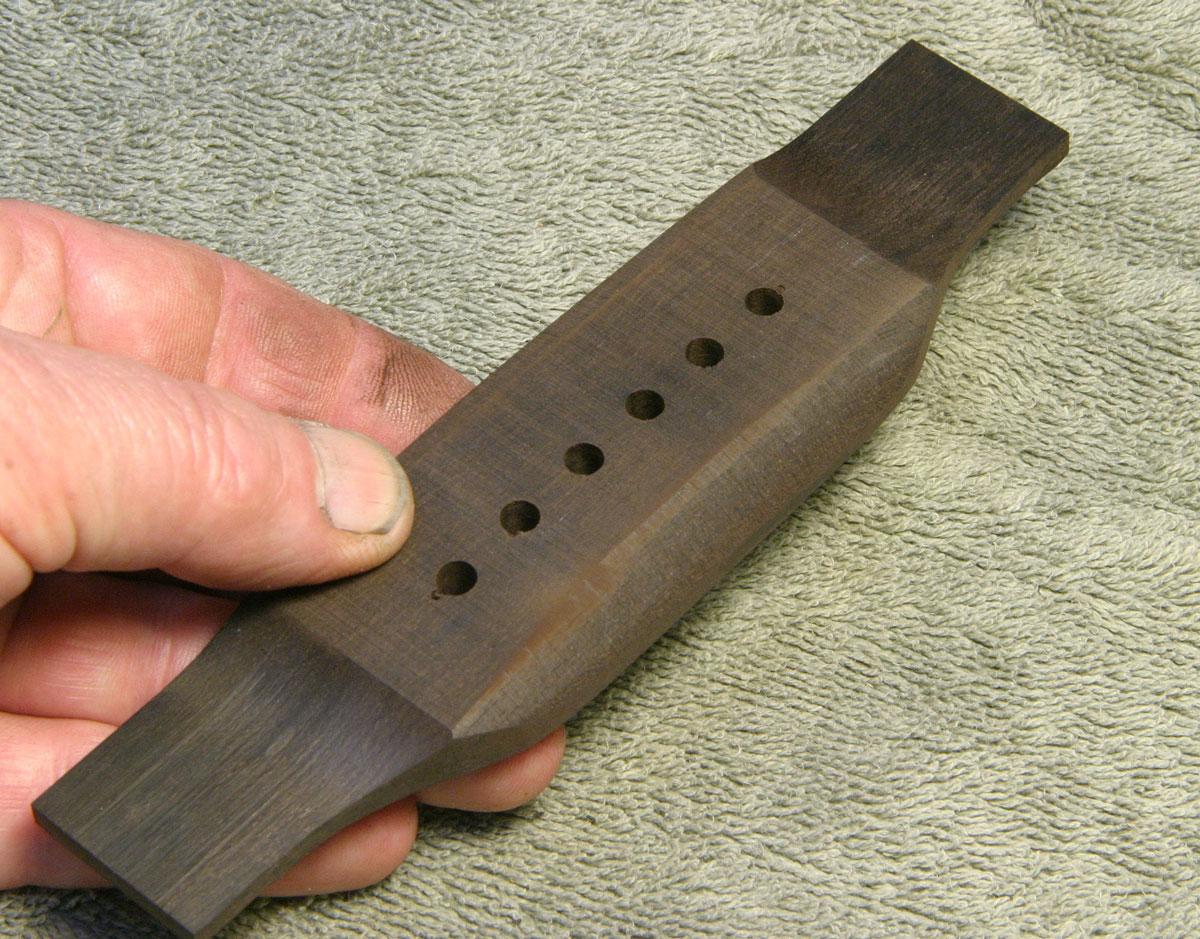
From there it would be hand work, with rasps, files, sanding blocks and a bit of freehand sanding and polishing to get the bridge looking like an original.
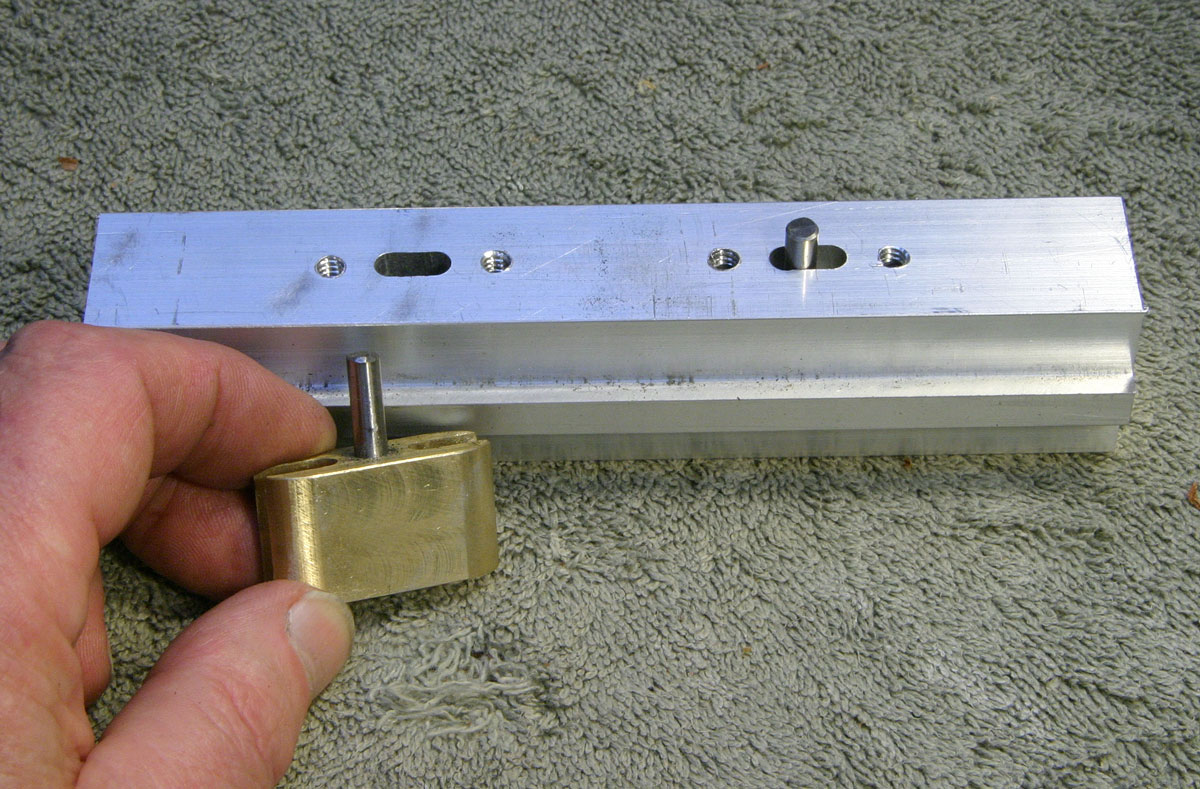
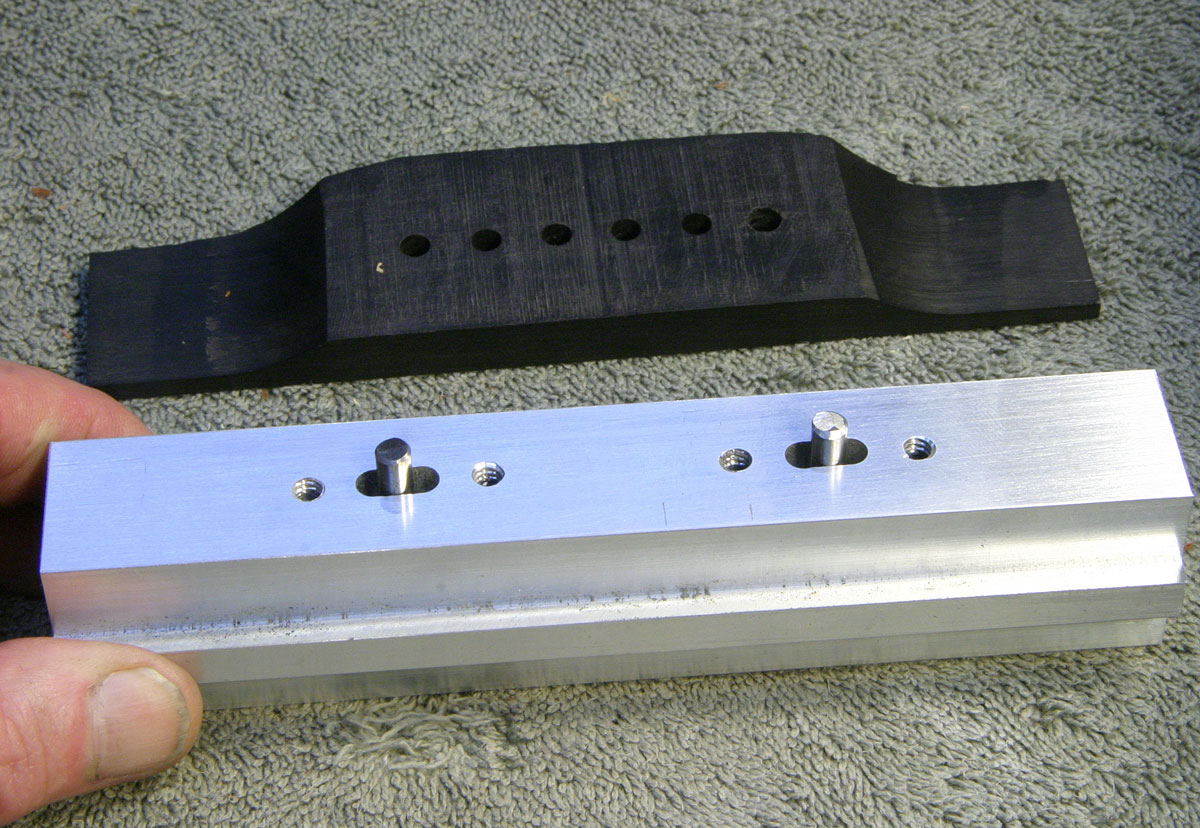
I have this little fixture I made for holding bridges while I work on them - it's an aluminum block with adjustable pins that stick into the first and sixth string holes:
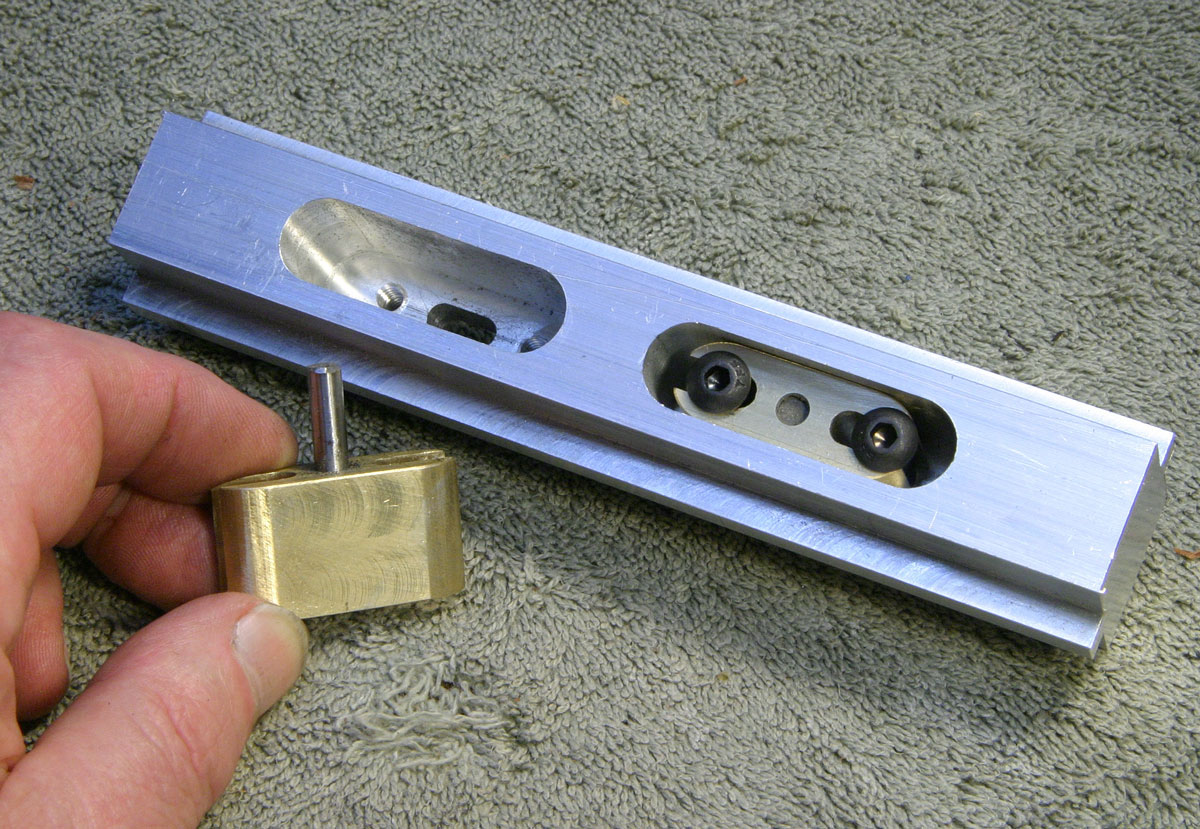
I can grip the holder in my vise, and work around all sides of the bridge:
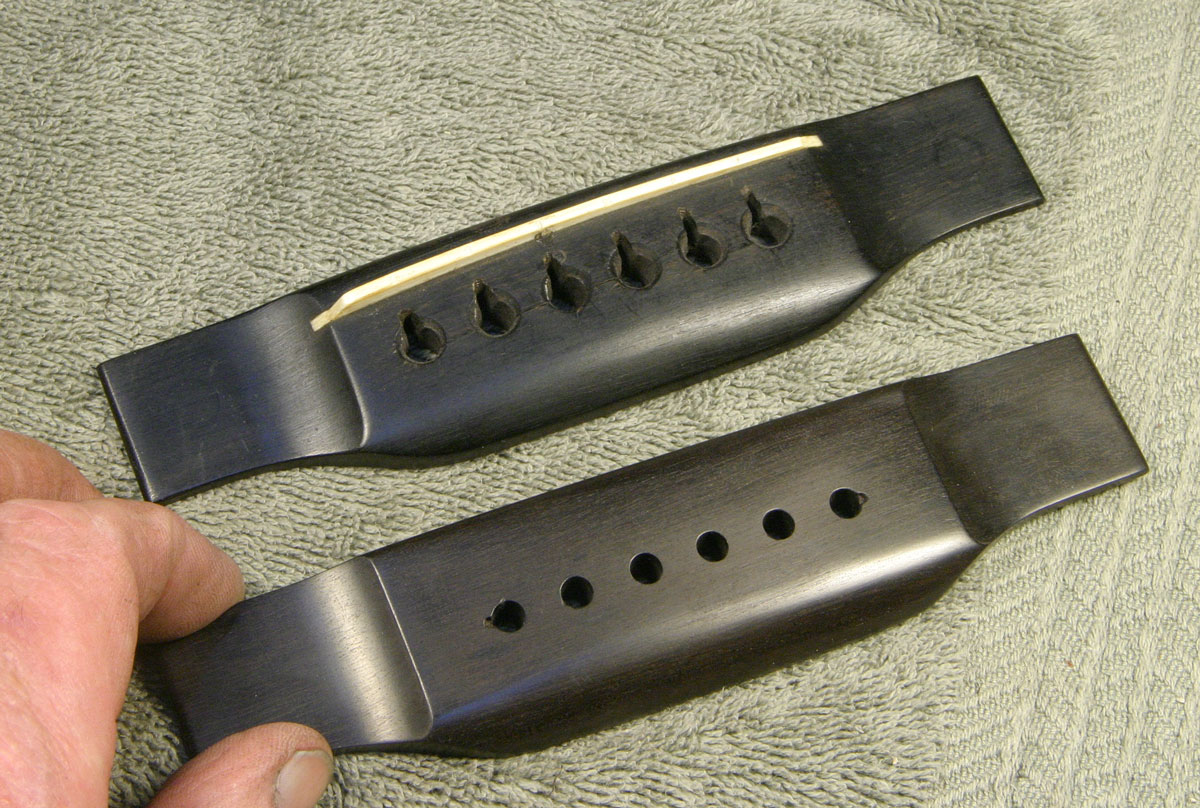
Now that the bridge is made, I'll have it ready for use when I get that mess fixed up where it's supposed to be glued:
I always drill bridge pin holes to 3/16" diameter - the smallest through which a string ball can pass. After the bridge is in place on the guitar, it will get the holes reamed and slotted to fit the pins.
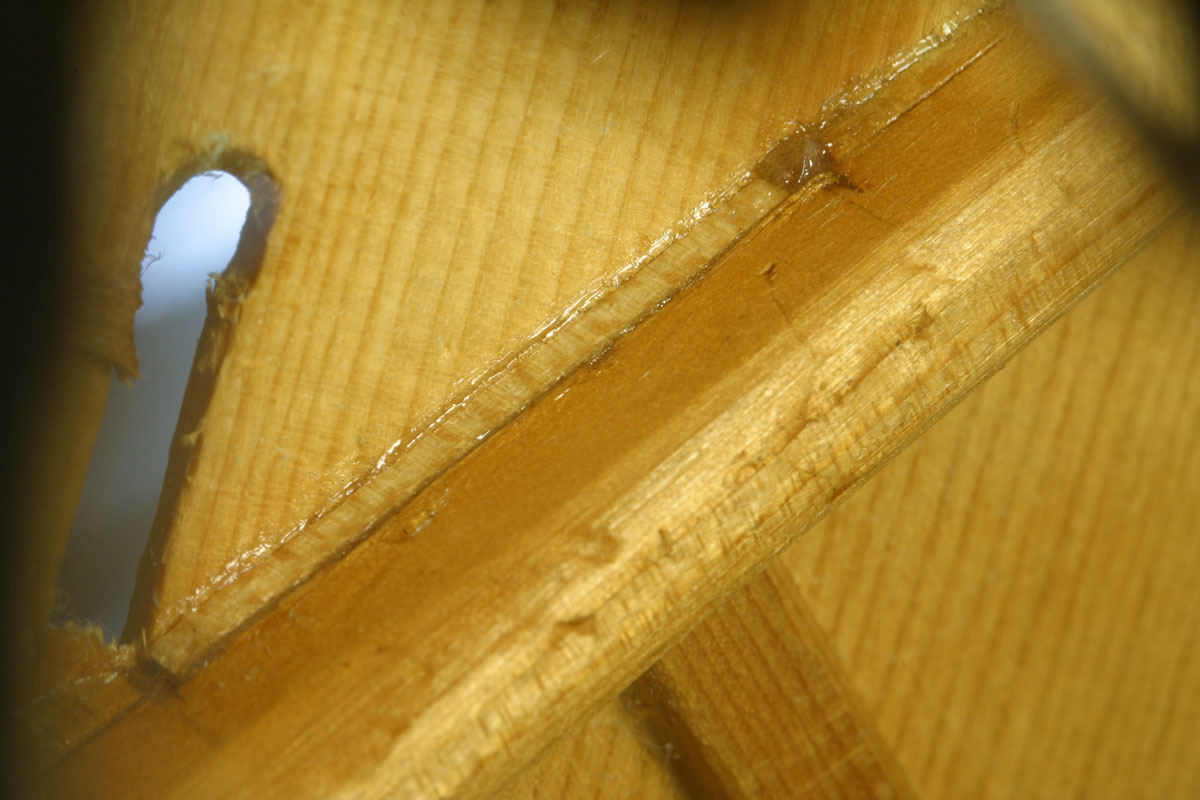
Now the inside looks good and healthy, with a new bridge plate that's not significantly bigger than the original:
In particular, the only extra plate width is in front of the bridge near where the X-braces intersect, where the top is naturally stiffer because of the proximity of those braces.
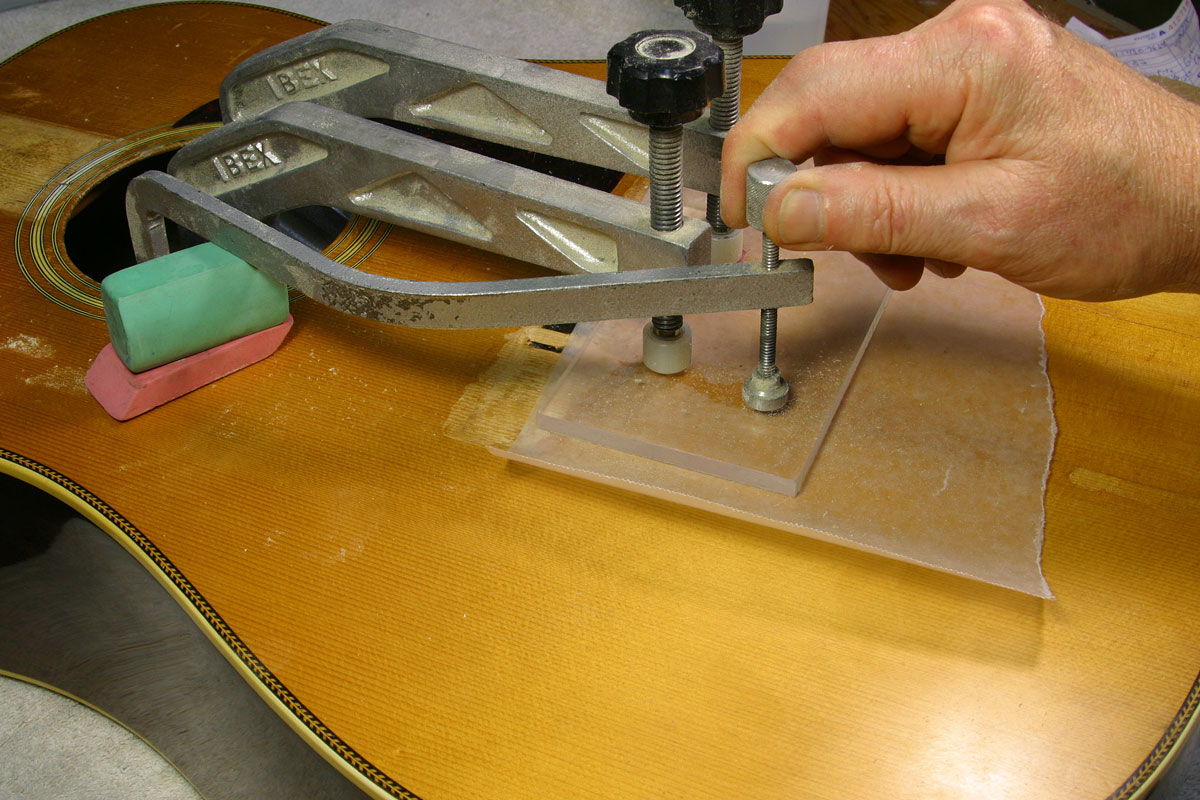
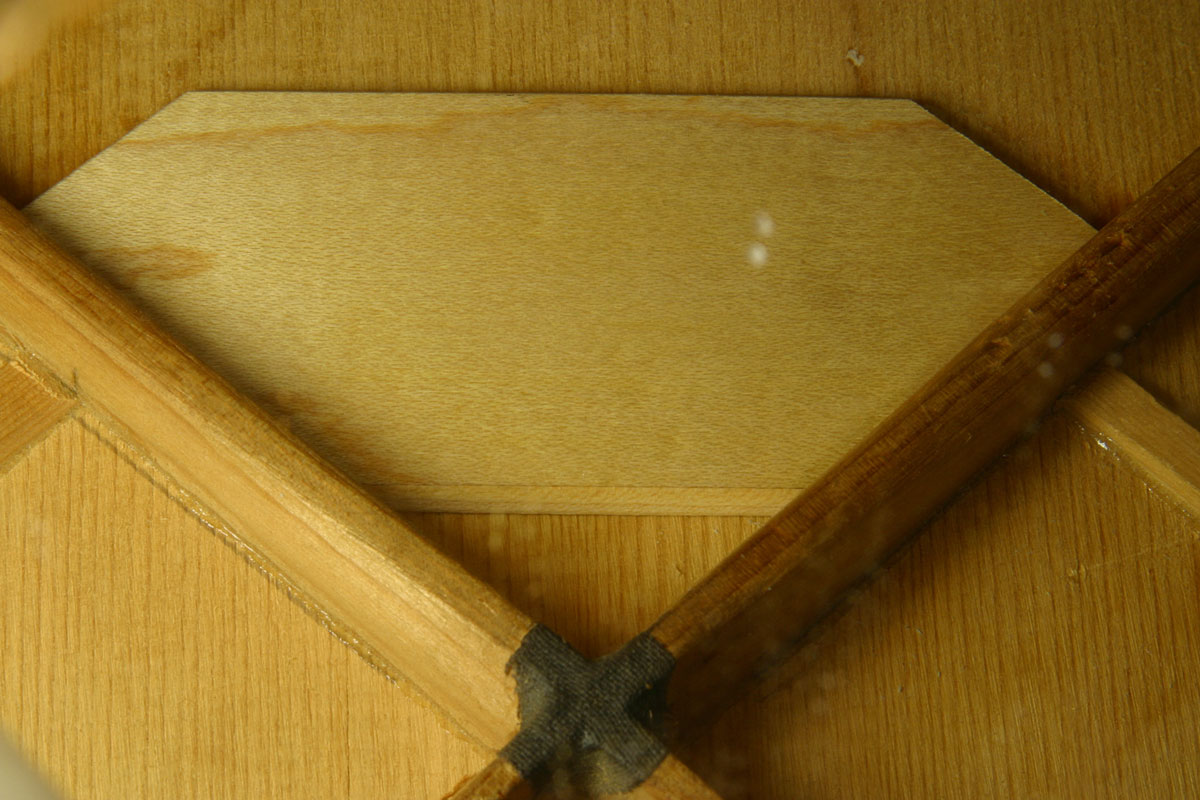
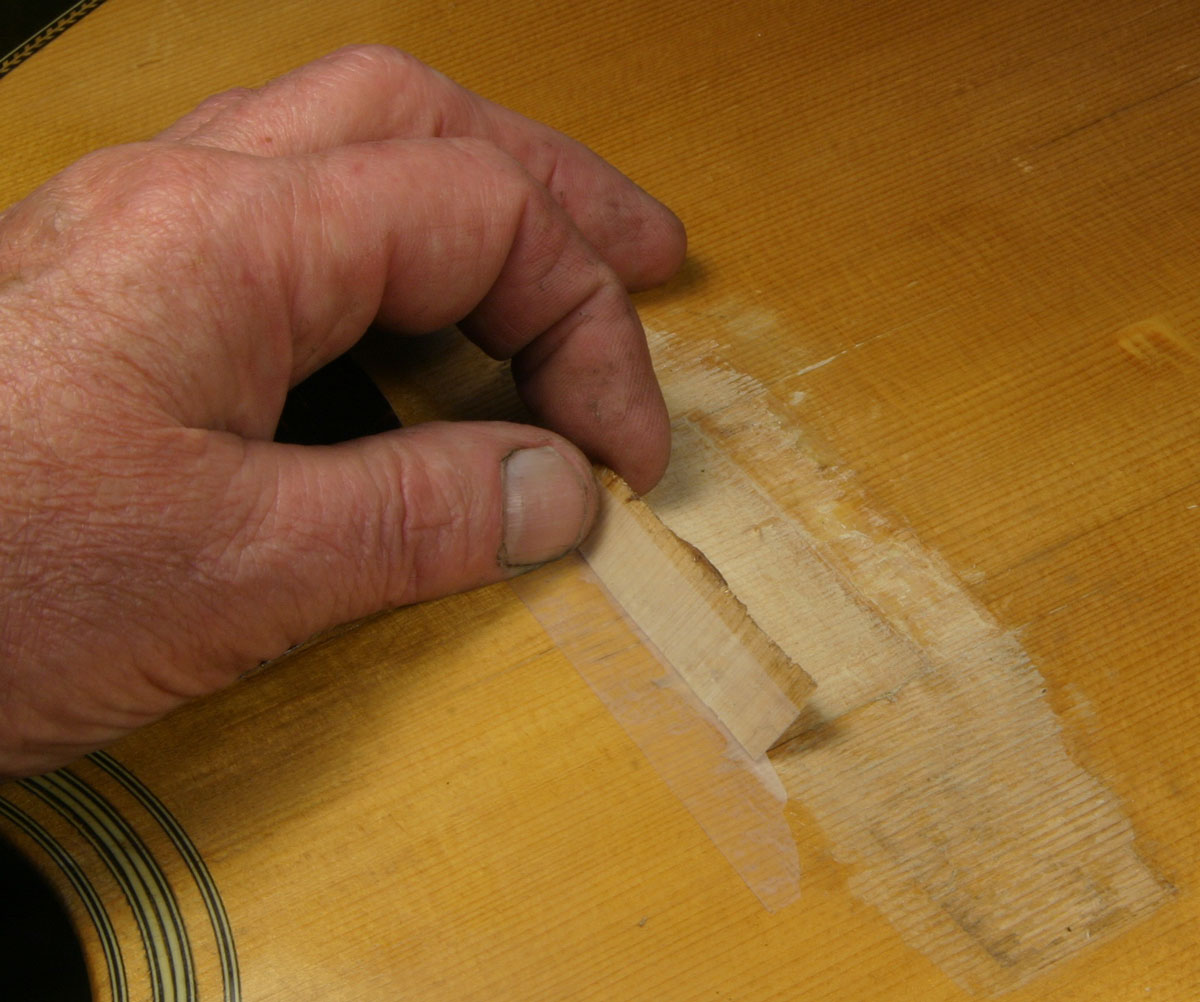
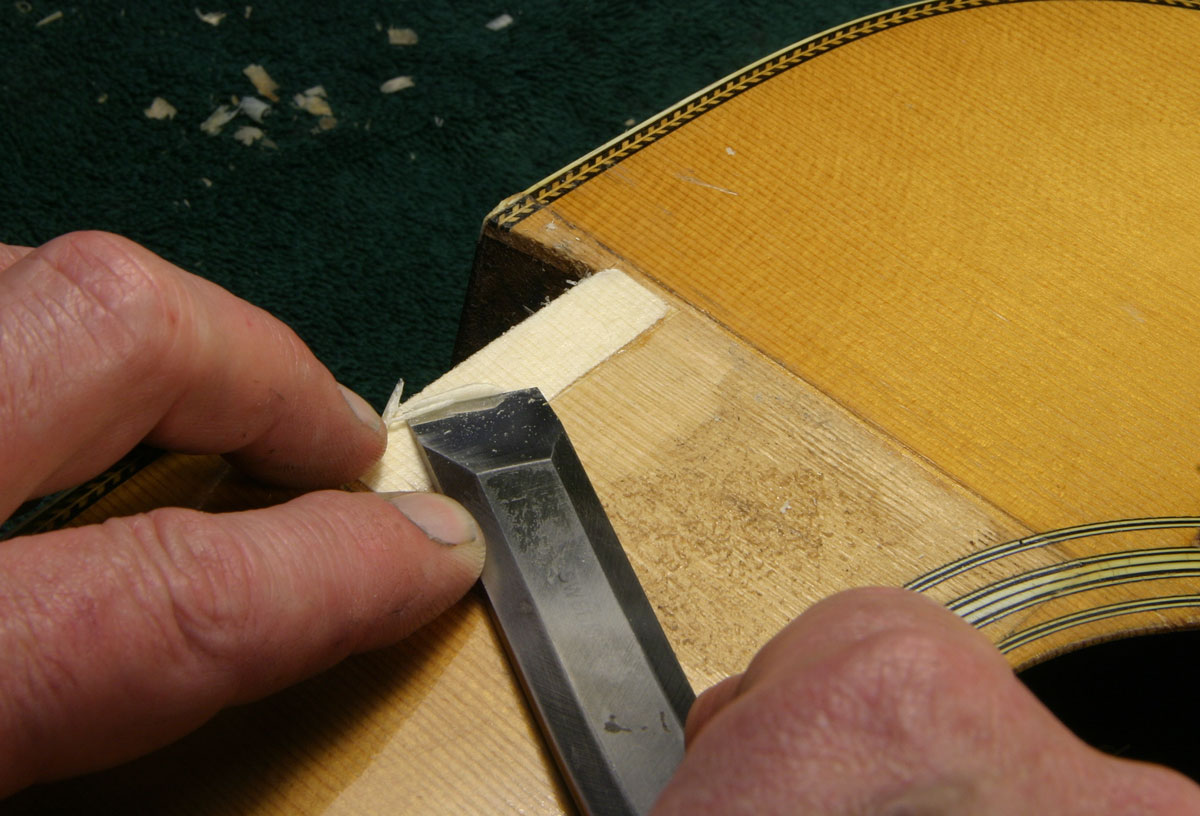
Time to patch the hole in the spruce. Rather than inlaying the piece with sharp vertical edges, I beveled the back edge so there would be extra support for the patch in the form of a scarf joint. First, I sliced downward to the bridge plate at a shallow angle, making the recess for the new wood more regular in shape:
By holding my new spruce patch in the contoured hole and drawing some thin carbon paper through the space, I was able to mark the patch to see how it fit:

Then it was a matter of carefully shaping the bottom of the patch by slicing off the high spots that where the marks showed:
Rinse, repeat until it fit well, and clamp the patch in place with some nice fresh hide glue:
Now for another 24 hour delay while glue dries. . .
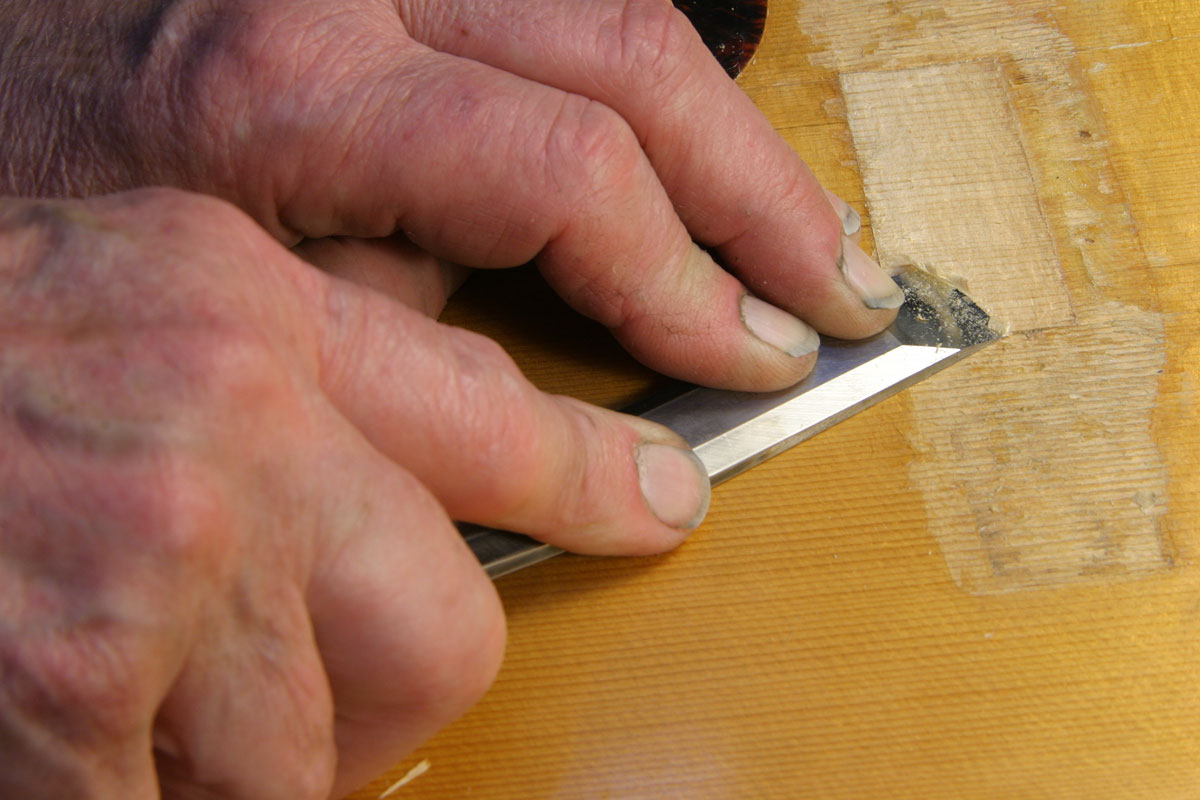
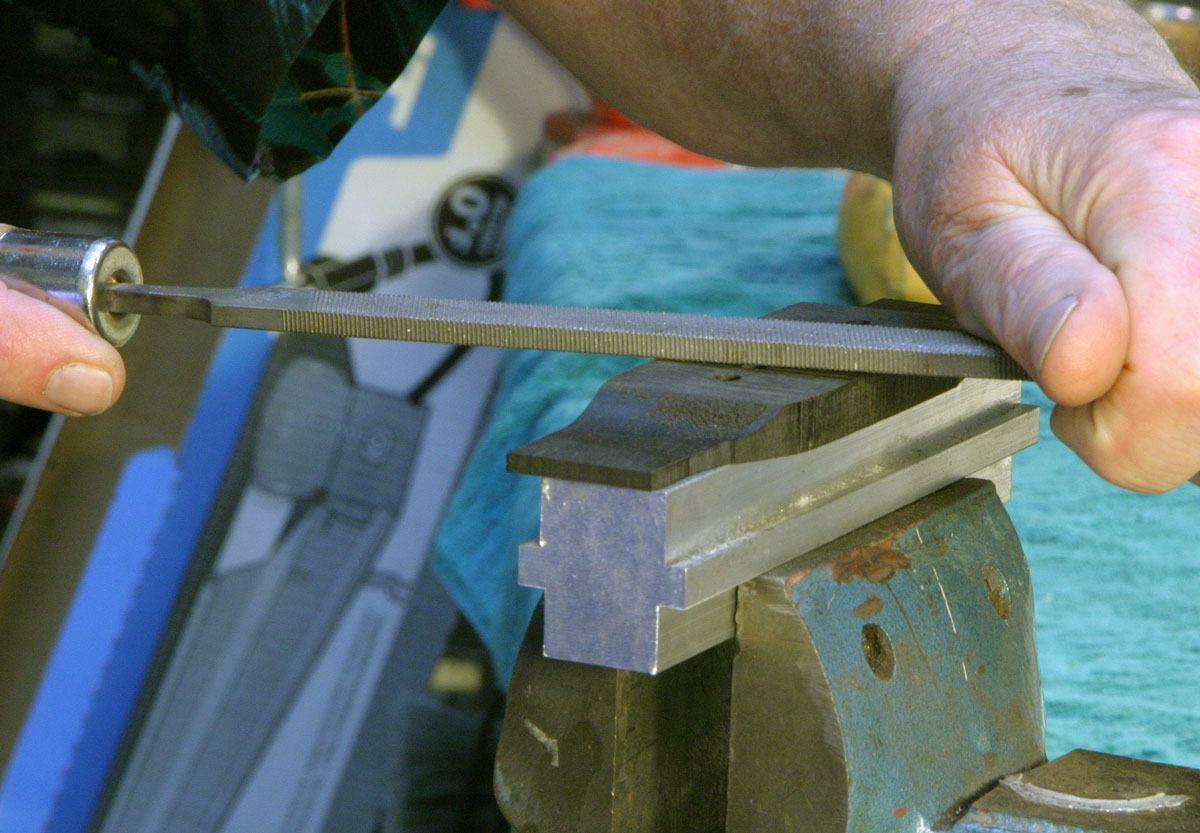
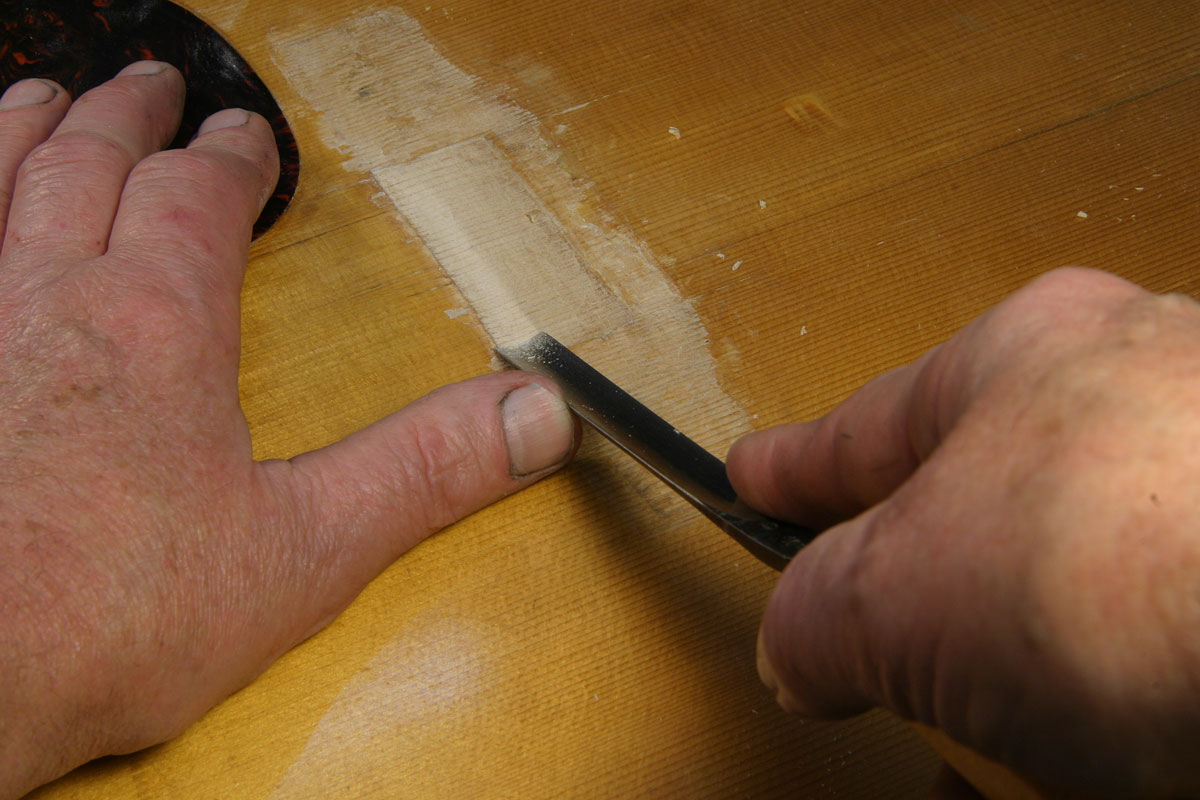
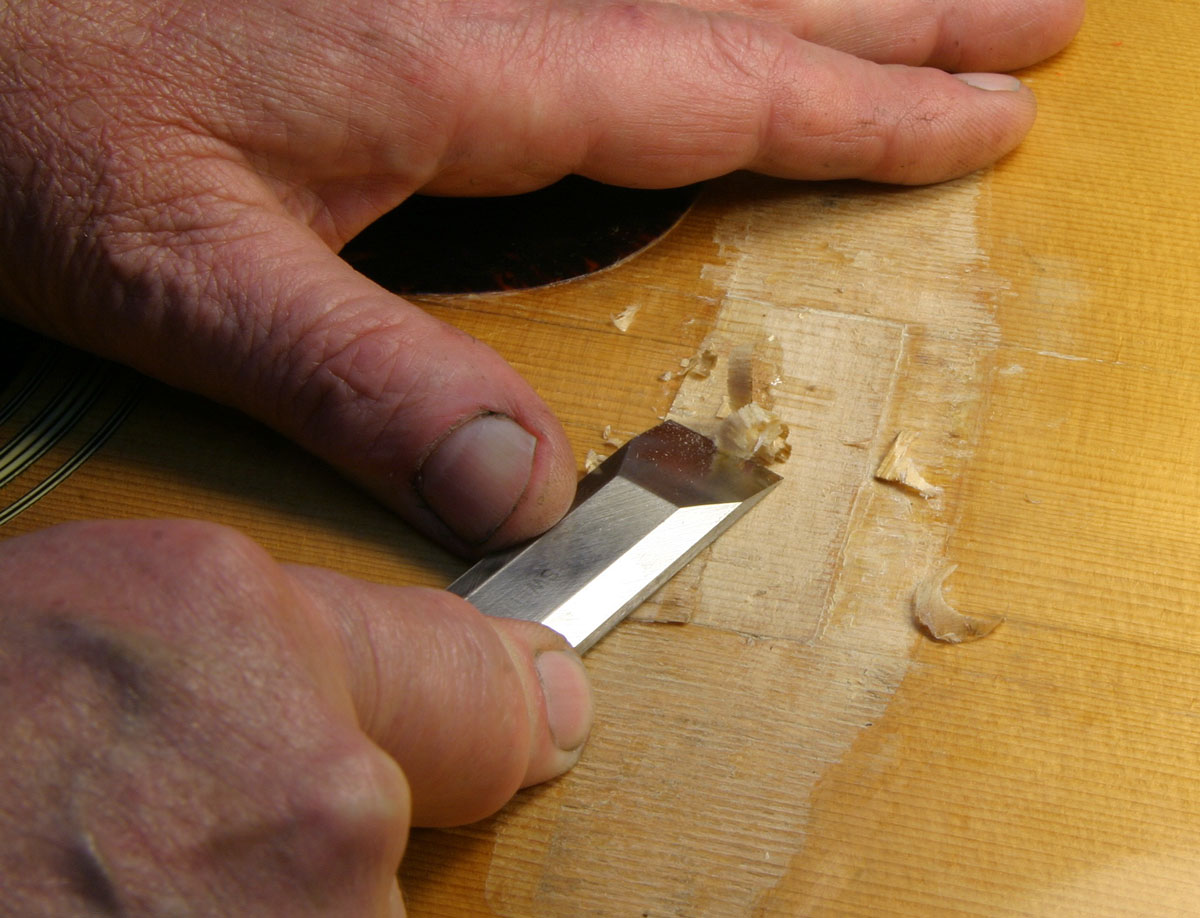
Here's another special tool. It's a chisel I heated and bent to a gentle curve. When I heated it with my propane torch, I clamped the business end of the chisel in the vise to act as a heat sink so I wouldn't draw the hardness and temper from the cutting edge. Now the chisel has a straight section for a few inches behind the cutting end, and it curves upward so I can use it for flush cutting on finished surfaces. In addition, I ground the edge to a seriously acute angle, making the chisel very delicate, so I only use it for leveling patches and crack splints on finished surfaces. The chisel can glide safely along the finest lacquered or French polished surface without scratching, and as soon as it hits something sticking up above the surface, it slices it right off.
I use this tool to good effect when leveling a patch in the bridge gluing area of guitars when I've needed to patch them:
In subsequent photos, I think you'll be able to see more detail of the chisel.
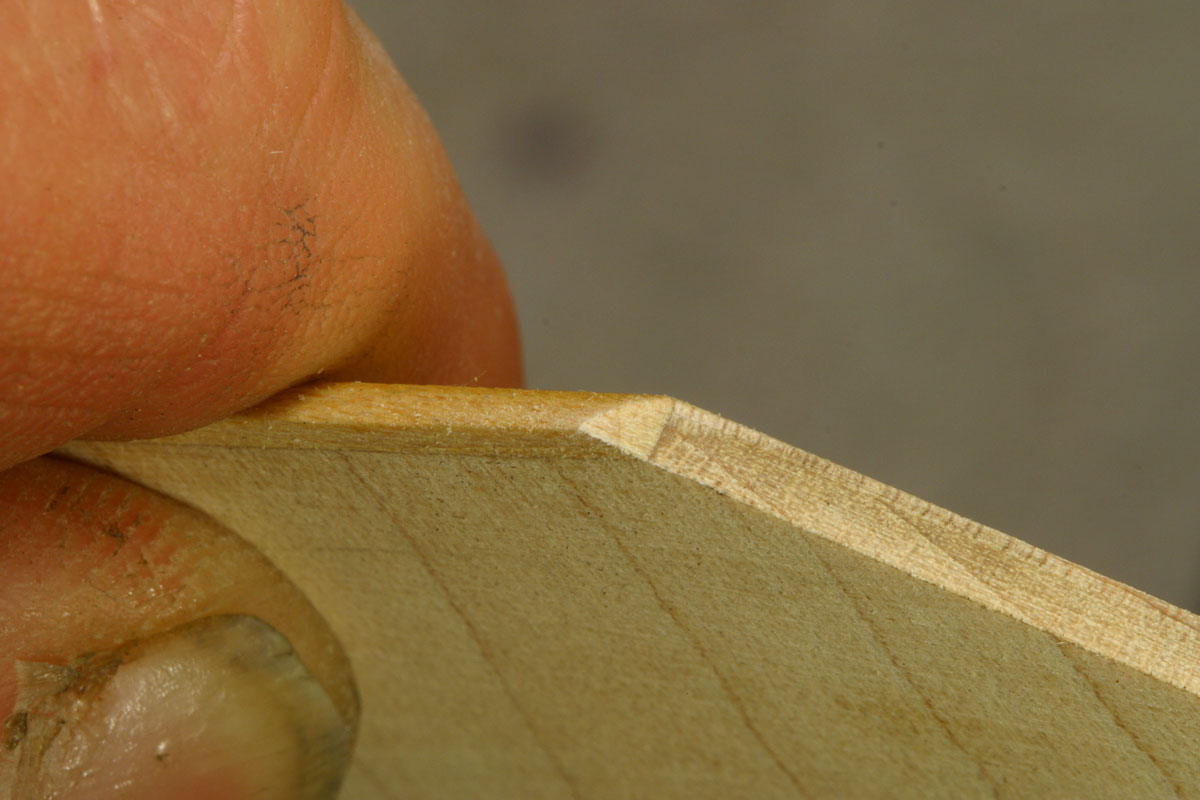
Unfortunately, the broken area of the top extended out in front of the bridge. This is how it looks when a bridge is located correctly:
The bridge in the photo is another from the collection of oldies, and I used it for measuring and marking the position because, unlike my new bridge, it already has a saddle for reference. Now the spruce patch sticking out in front doesn't resemble the original for grain spacing, color or reflectivity, so that will be my next part of the project.
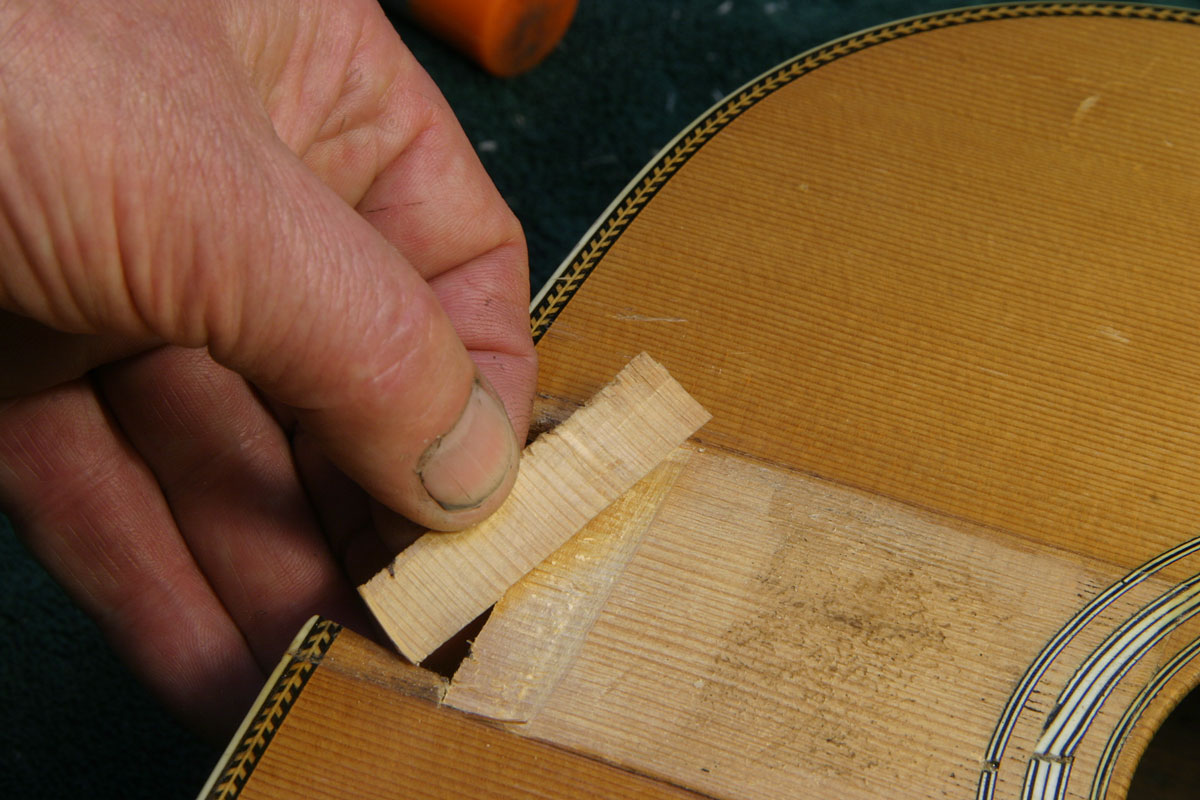
There's nothing like having the real thing when you need material for repair. And, as luck would have it, the area of spruce under the fingerboard is right in line with the patch I'd need to repair at the front of the bridge.
Using that bent chisel again, I chipped off a sliver of spruce right at the edge of the dovetail mortise:
Back at the disaster site, I took a small sharp gouge and carved out a shallow recess for the new cosmetic fill:

Fitting this new thin piece was a good deal easier that the structural fill, but the work went much the same way. Once I got the patch to fit, I taped it in place so the grain lines matched up as closely as possible, and clamped it up with some clear hide glue:
Because the patch had shallow, curved edges in front, it would not show a sharp line once I leveled it flush with the original wood. And, clear hide glue is the least likely to stain light wood, so it would help make that dividing line indistinct. Another overnight stay in the drying area was in order, of course.
That bent chisel's back on the scene, slicing off the high spots off the new little spruce flake, followed by a bit of block sanding to level the wood to the finish in front of the bridge area, followed by brushing the first coat of amber lacquer in an attempt to match the old finish:
The new bit of spruce doesn't have that nice yellowed look because it had been shaded by the fingerboard for the last seventy years, but it does have the same grain spacing and angle of reflectivity so it makes for a much better appearance than the piece I used to patch the full thickness of the hole. Only a bit of it will poke out from under the front of the bridge, and my hope is is that it will look like a stain more than a patch.
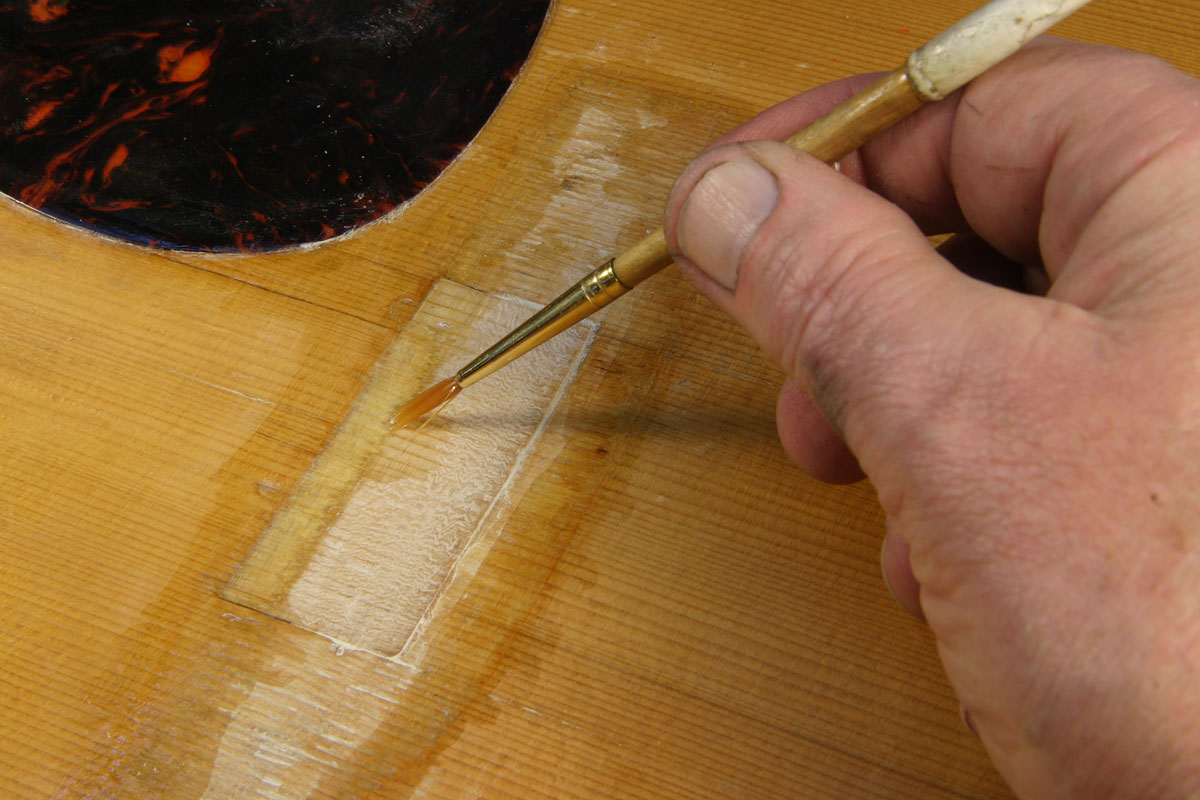
The area behind the bridge, along the epoxy trail crack repair and a few other spots where epoxy had been dripped and chipped off also got some new brush "drop filling."
The last bit for today was to level the new spruce I'd glued into the top where I'd harvested that little flake yesterday:
OK, now it's time for a little confession.
Touchup, particularly brushed and filled finish, takes a good long while to dry. In fact, it can take several times longer than a sprayed original lacquer finish because the fill may be twice or three times as thick as a sprayed finish.
So. . .
I waited until the finish touchup had dried for a full month before even starting this blog. Yes, that means the previous "days" were a long time ago, but I thought it would be more reasonable to present the job this way rather than to finish a day and say, "Come back in six weeks for the next installment."
I did touchup work on the cracks and bridge area by brushing, and a bit by spraying, but since it's repetitive and difficult to photograph, I didn't take any pictures of brushing, scraping, sanding and buffing.
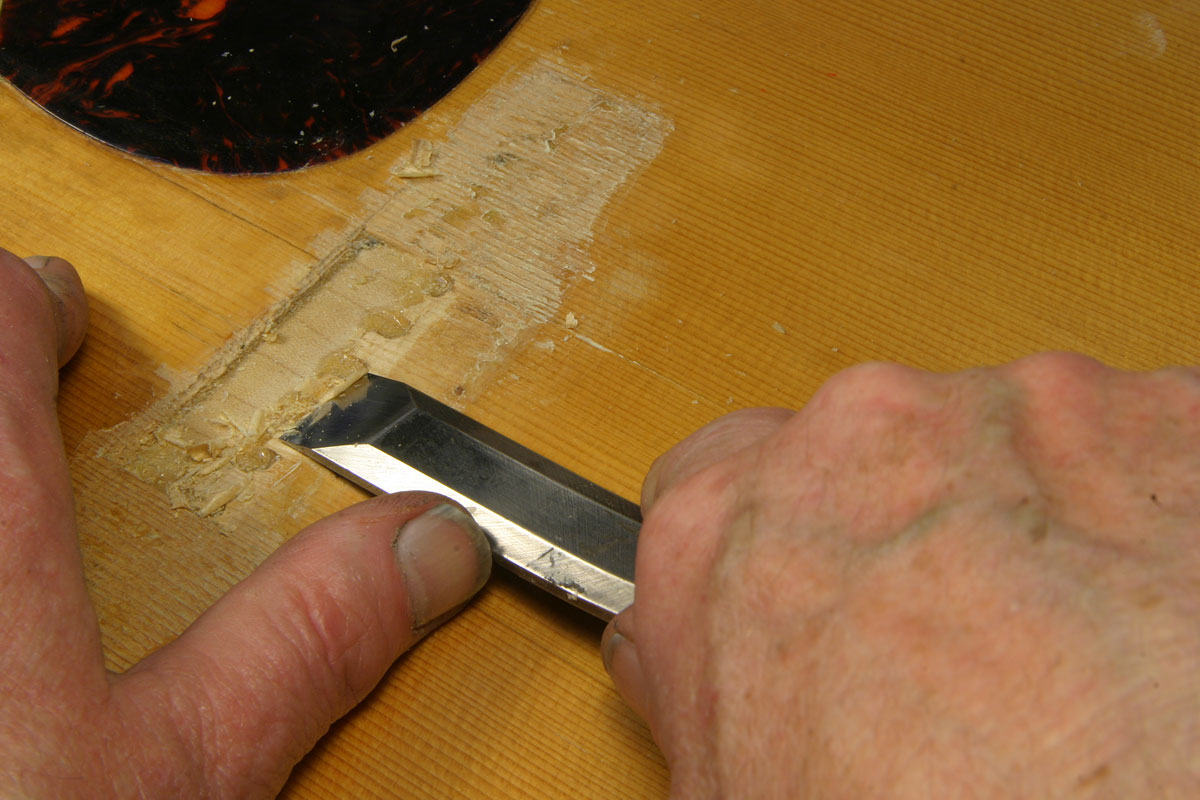
I did take a couple of photos of one little bit, though. One end of a long top crack was especially wide and black from contamination, so I decided to pick out a bit of the epoxy and replace it with a little colored stick shellac to improve the look a bit.
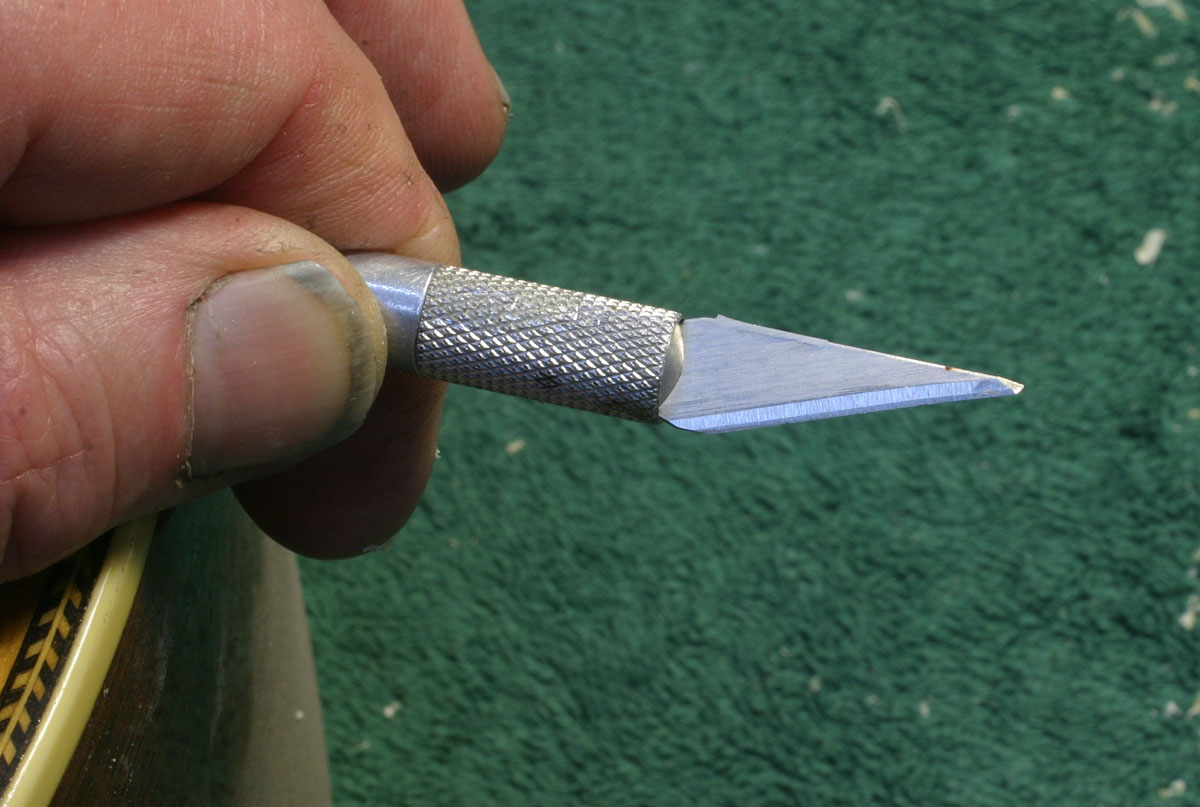
Here's another simple little tool - actually a modification of a standard X-acto #11 knife blade. I spent a little time with a fine sharpening stone and ground a little facet on the back side of the blade:

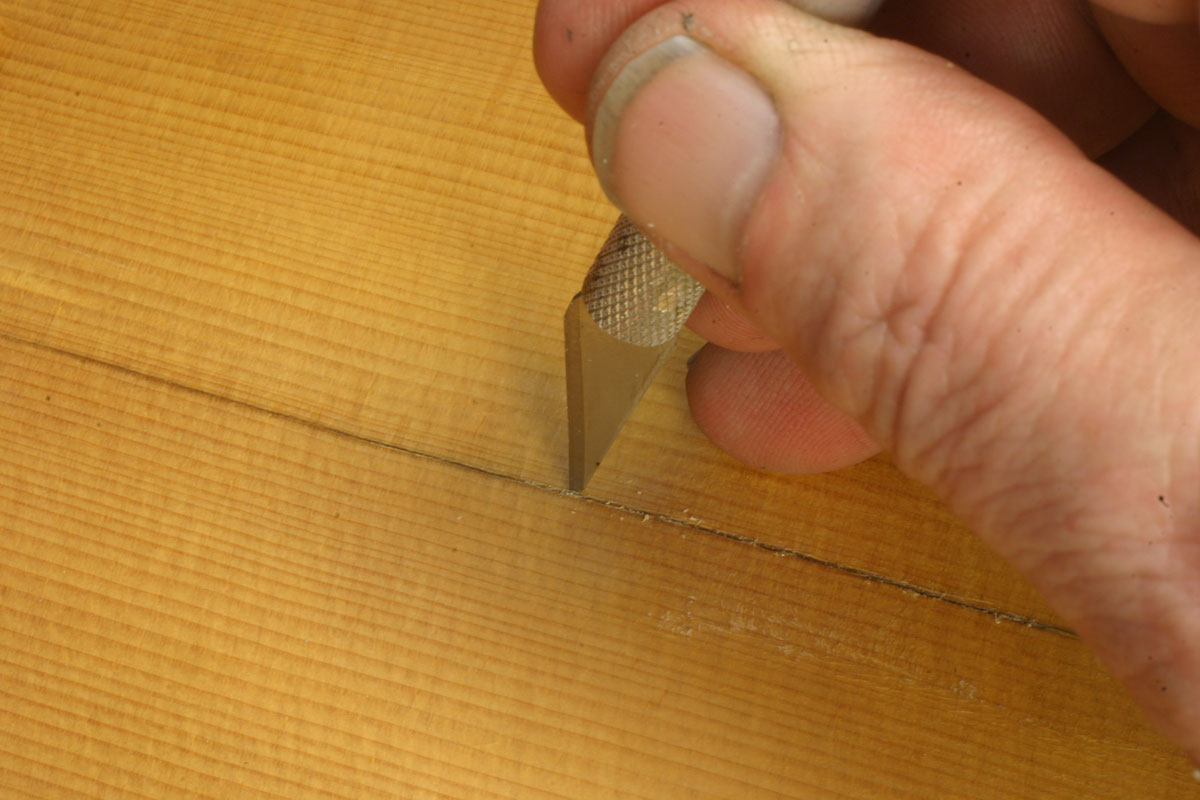
Now the blade is a little chisel that I can drag through the crack backwards, using that flat surface to cut an extremely narrow "V" channel right in the black repaired crack
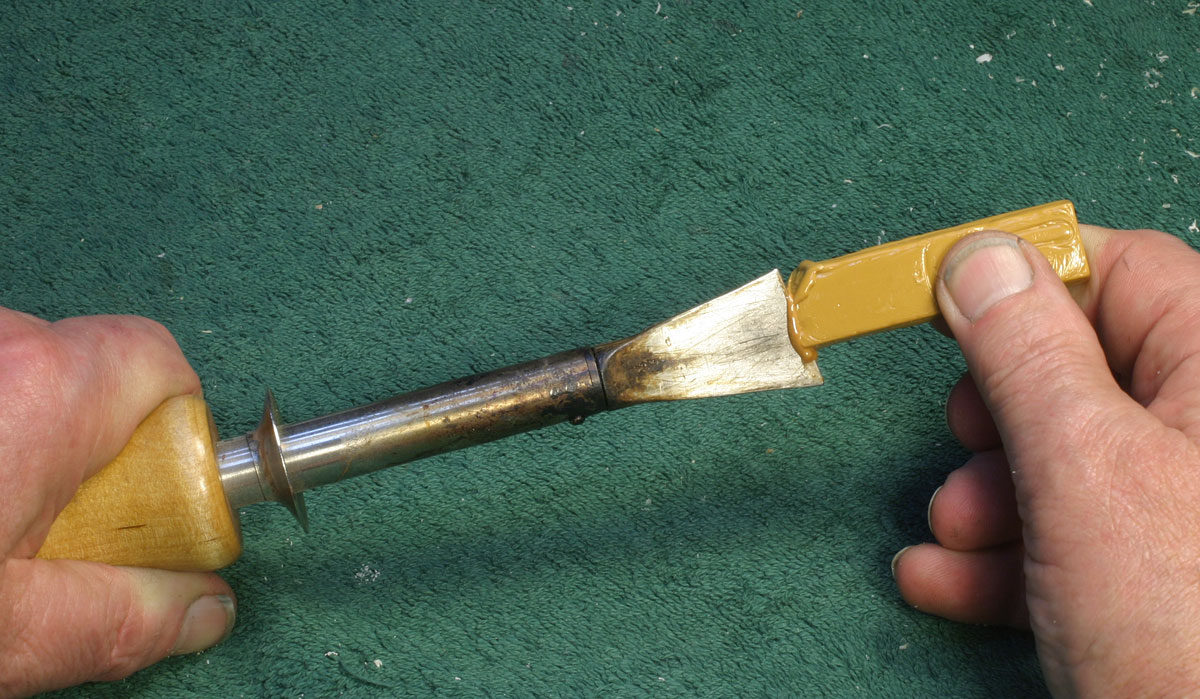
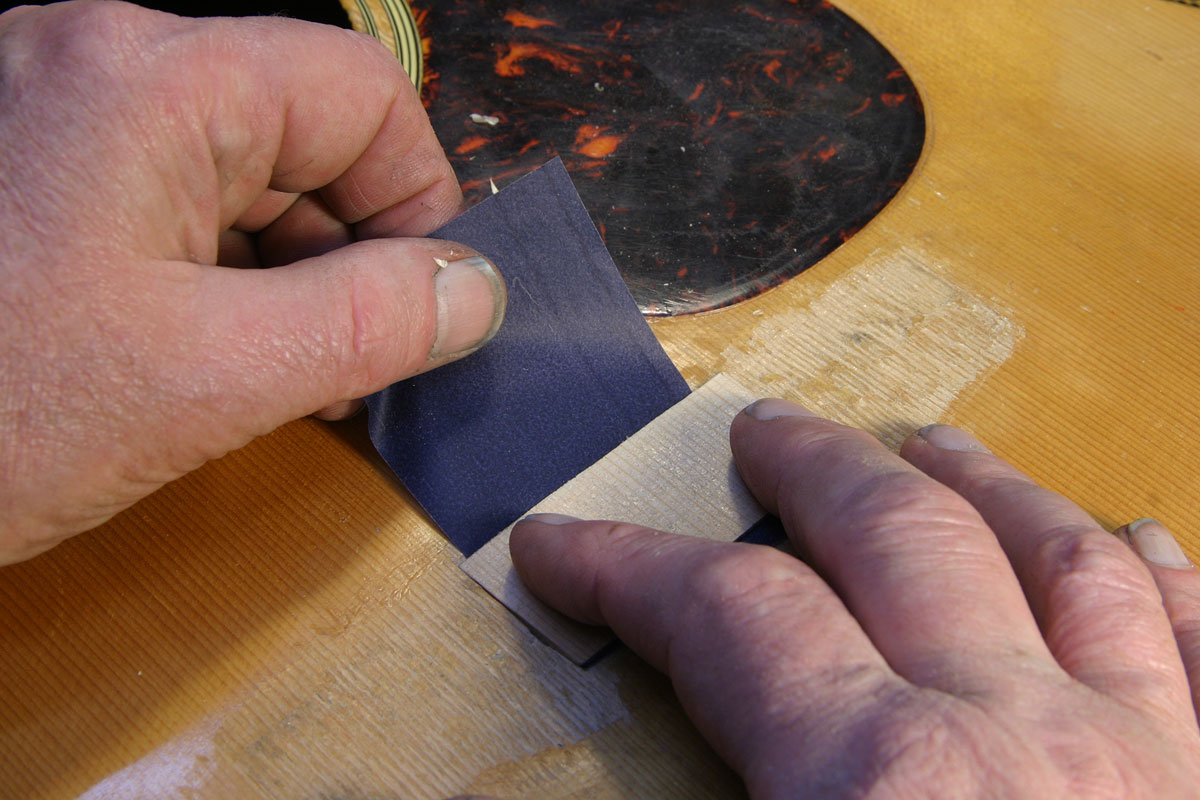
Stick shellac comes in little bars and is similar to sealing wax. It is used by melting and pressing into voids in the finish:
After leveling the new fill, the crack looked a bit better than it had before:
I have several FRETS.COM articles on neck resetting and fret work, so I didn't take photos of those processes for this job. You can find them on the Big Index Page. The work here went just like those.
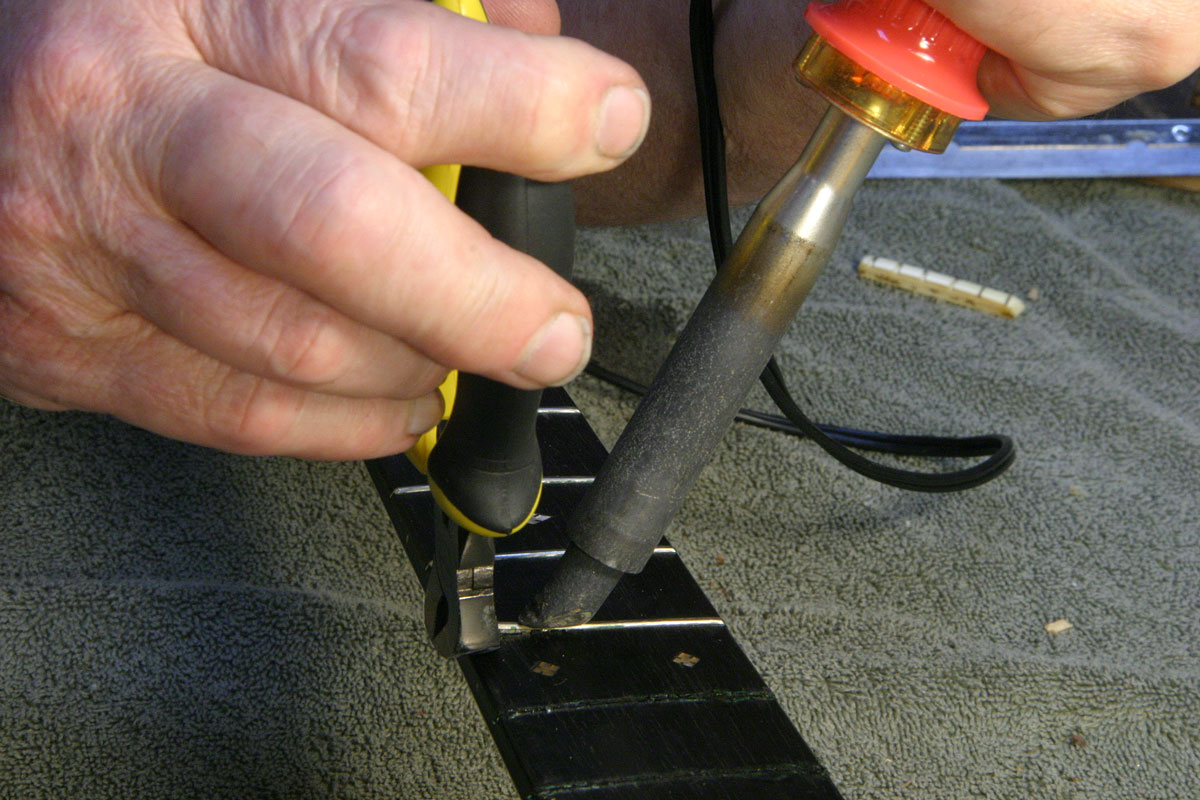
At this point the neck is back in place, at the appropriate angle, and I spent the afternoon refretting, first pulling the frets using my trusty soldering iron to provide enough heat to help them release easily:
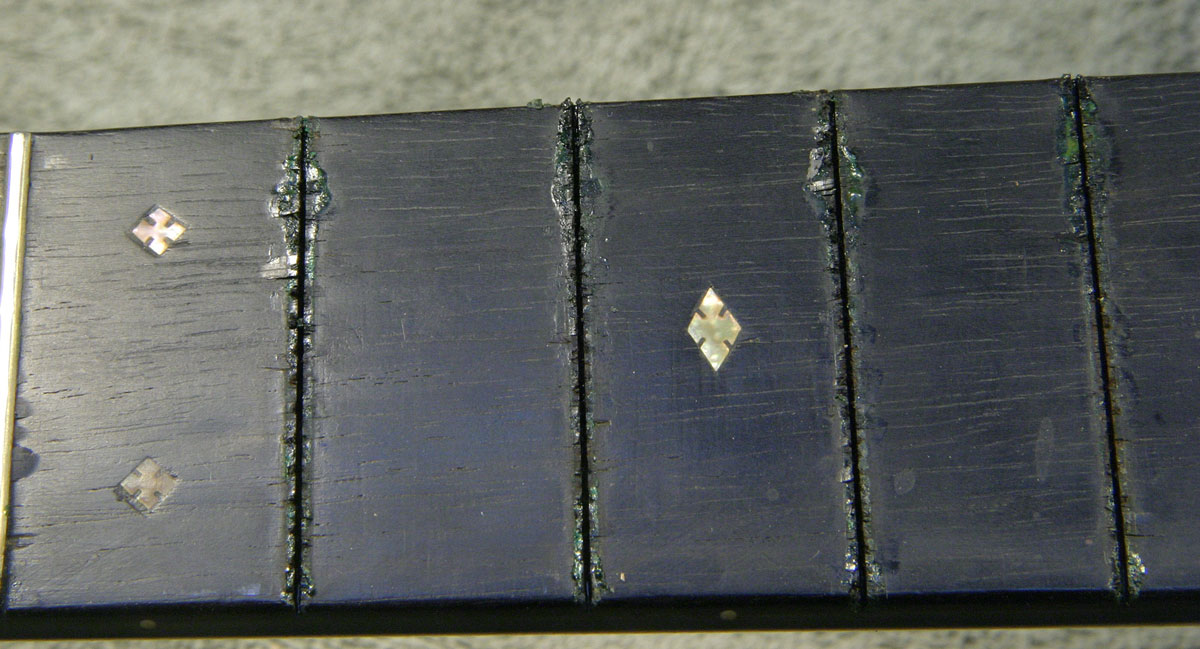
This what the fingerboard looked like - lots of tiny old chips from previous fret work, and hide glue residue:
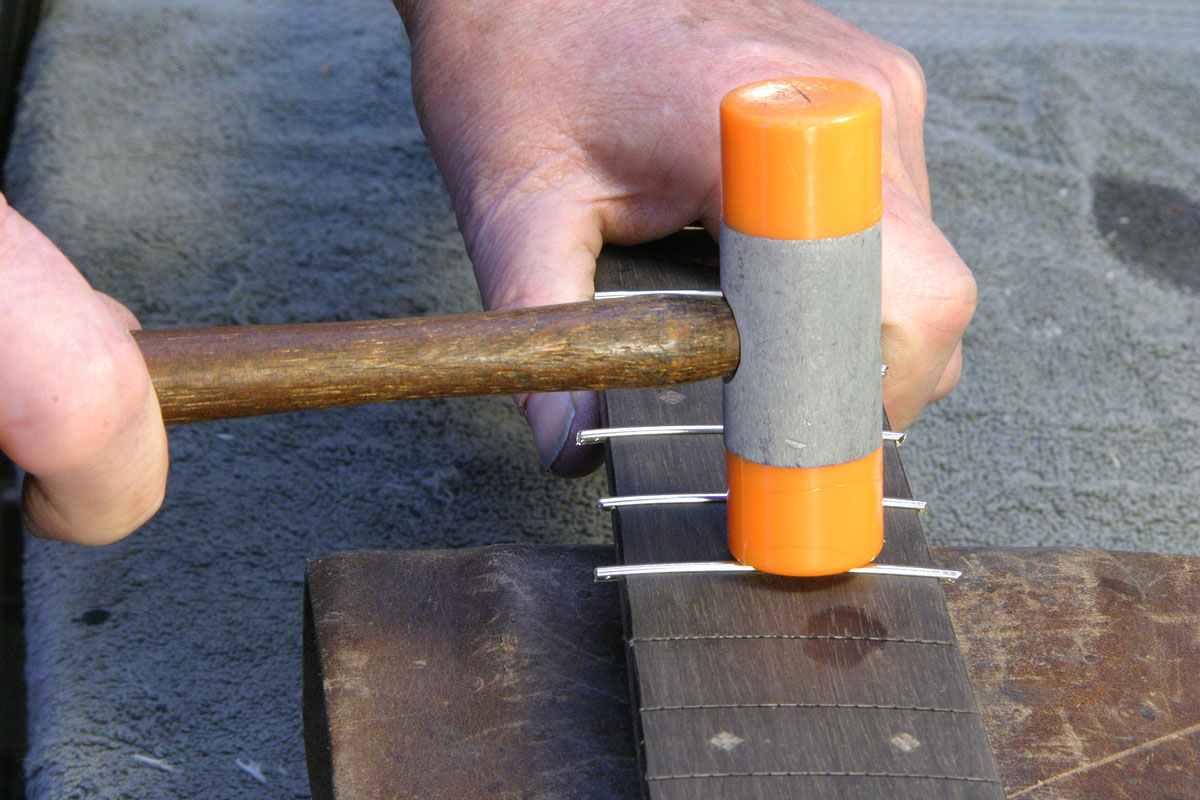
After leveling the board, I tapped in a new set of frets:
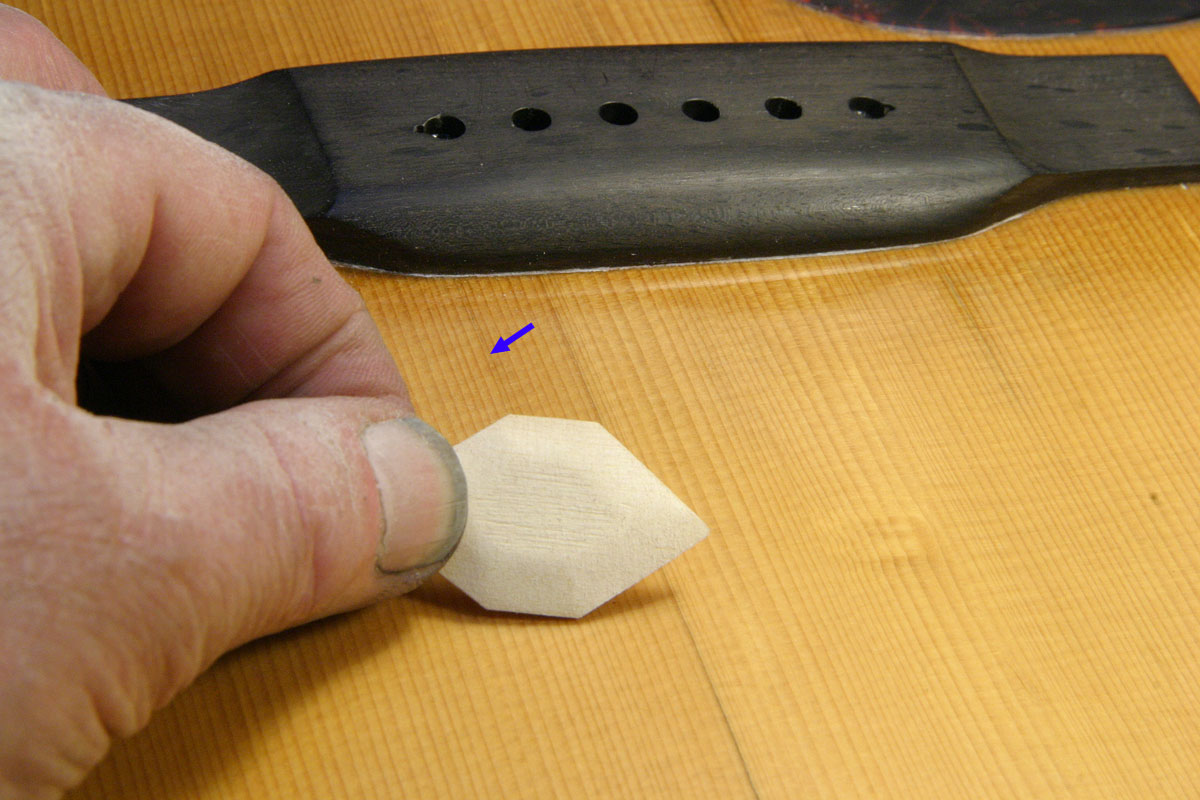
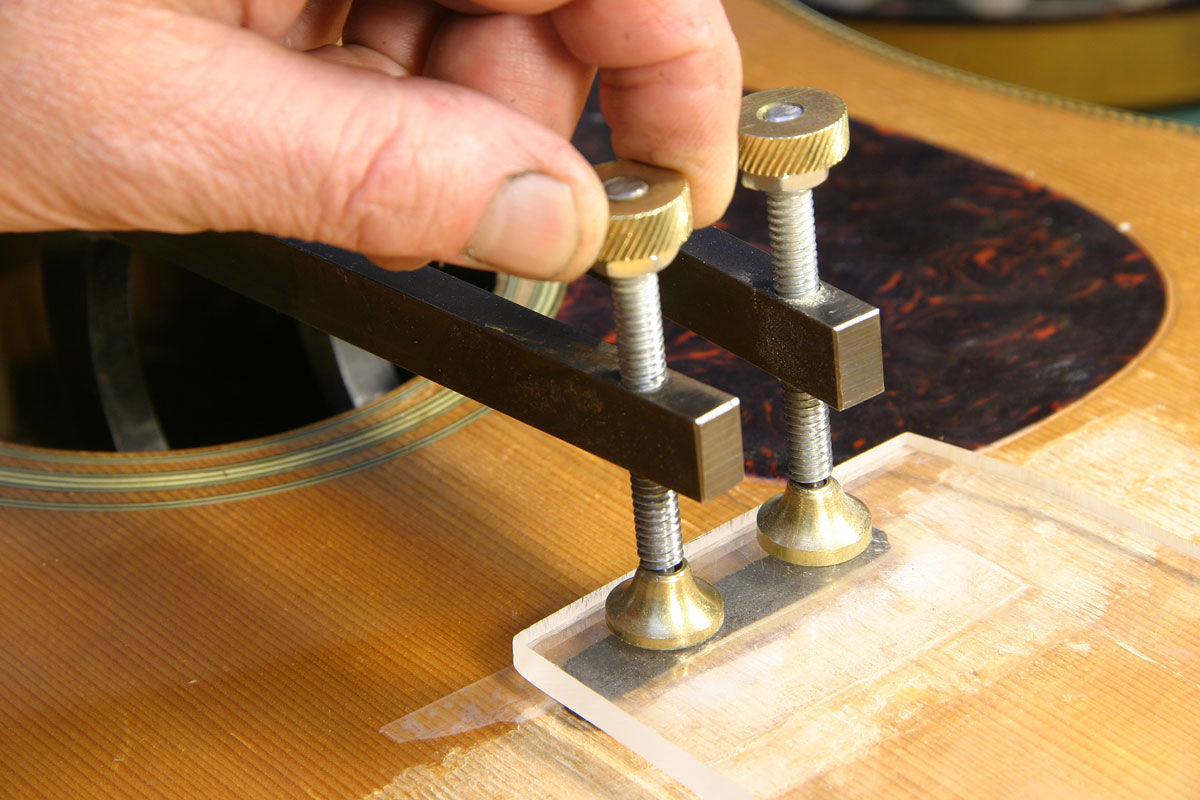
Once the frets were in, I turned my attention back to the top cracks. They'd been glued with epoxy, and I decided to add just a bit of reinforcement underneath to avoid having the cracks open up if the top received any downward force. Here's one of the little "diamond" shaped pieces of cross-grain spruce I used. This particular one is a bit oversize because it needs to span two adjacent cracks, one of which is only a couple of inches long, quite tight and hard to see in the photo below:
The spruce reinforcement ("cleat") is thinner than the top of the guitar, and thinned at the edges for two reasons. A nice sculpted patch looks better if you should be gazing around inside with a mirror, but more importantly, the thin tapered edges will flex if the top is pressed downward. A short stiff reinforcement is far more likely to pop right off if it gets leaned on.
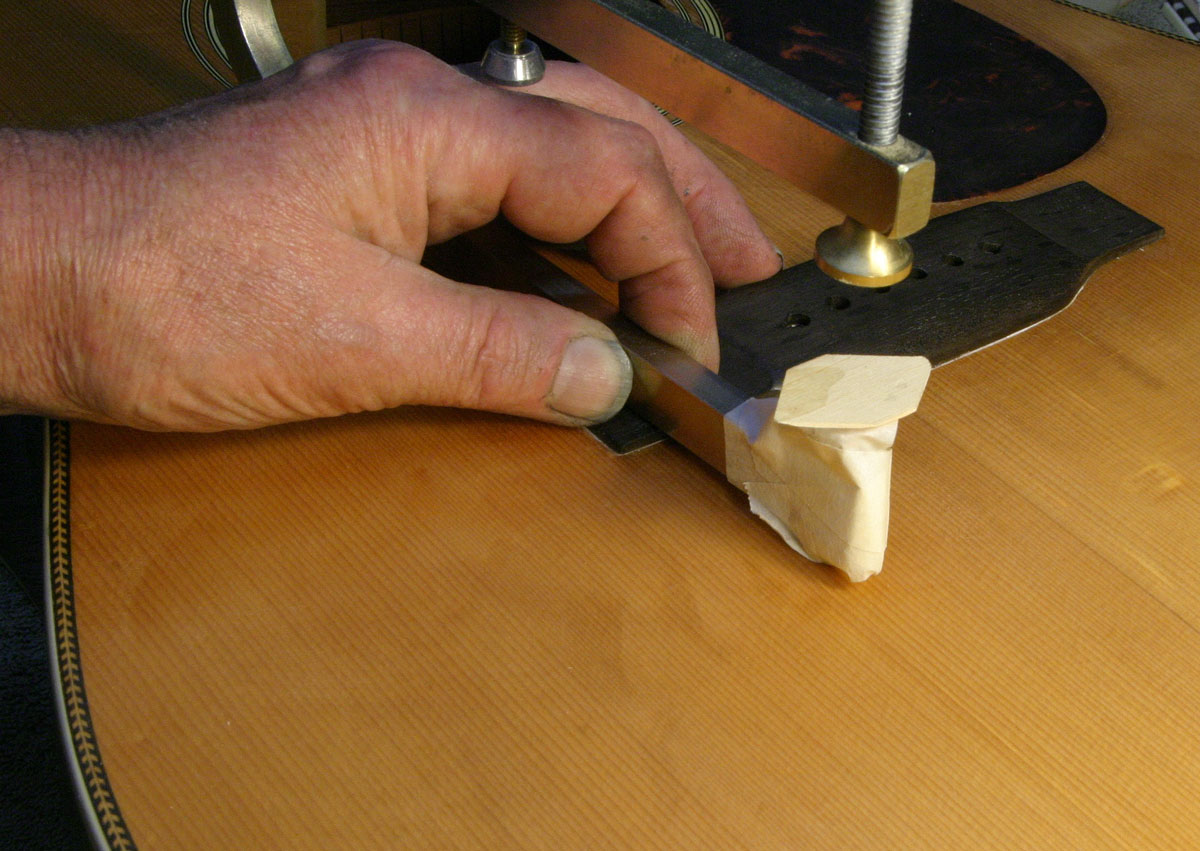
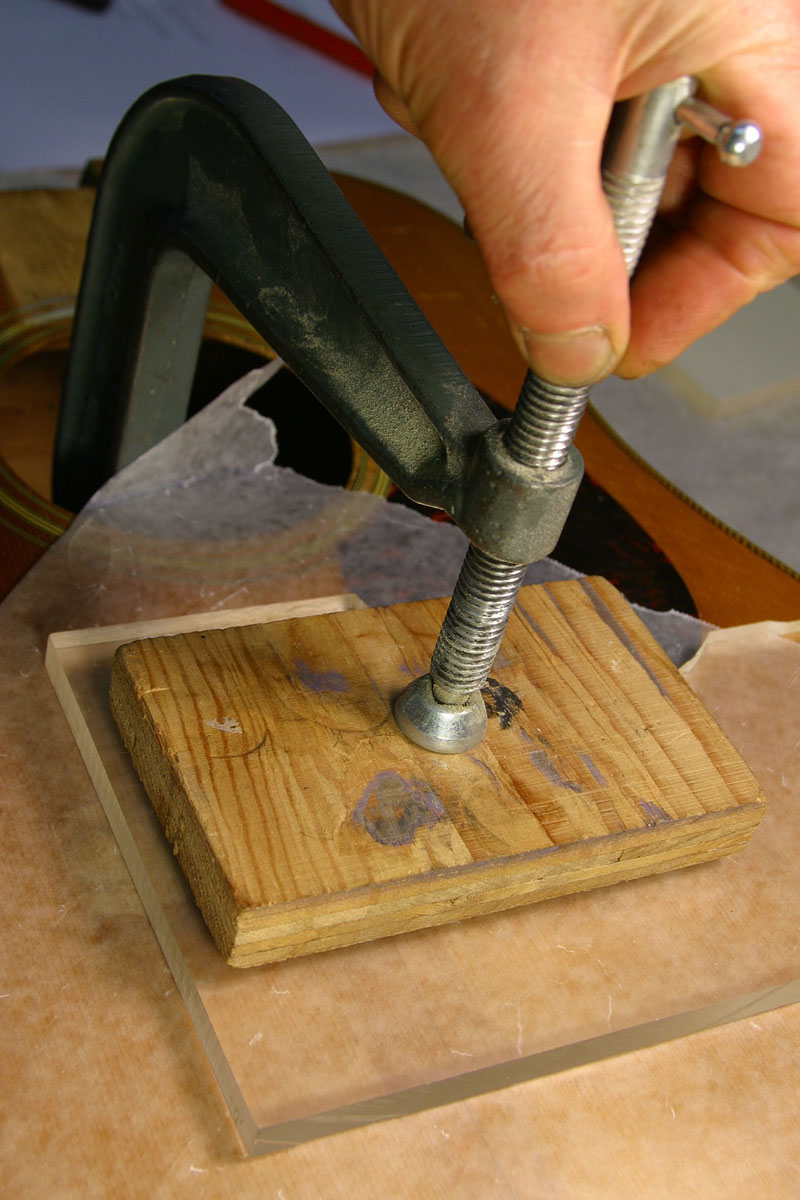
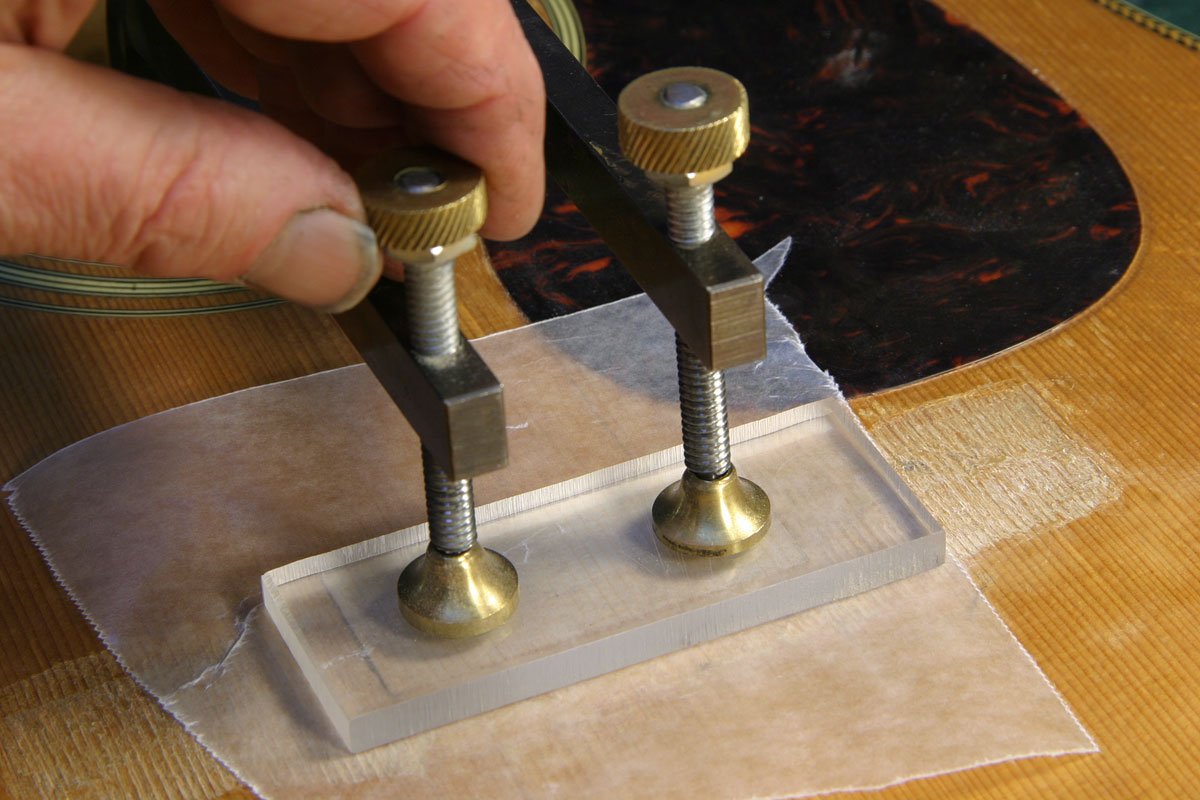
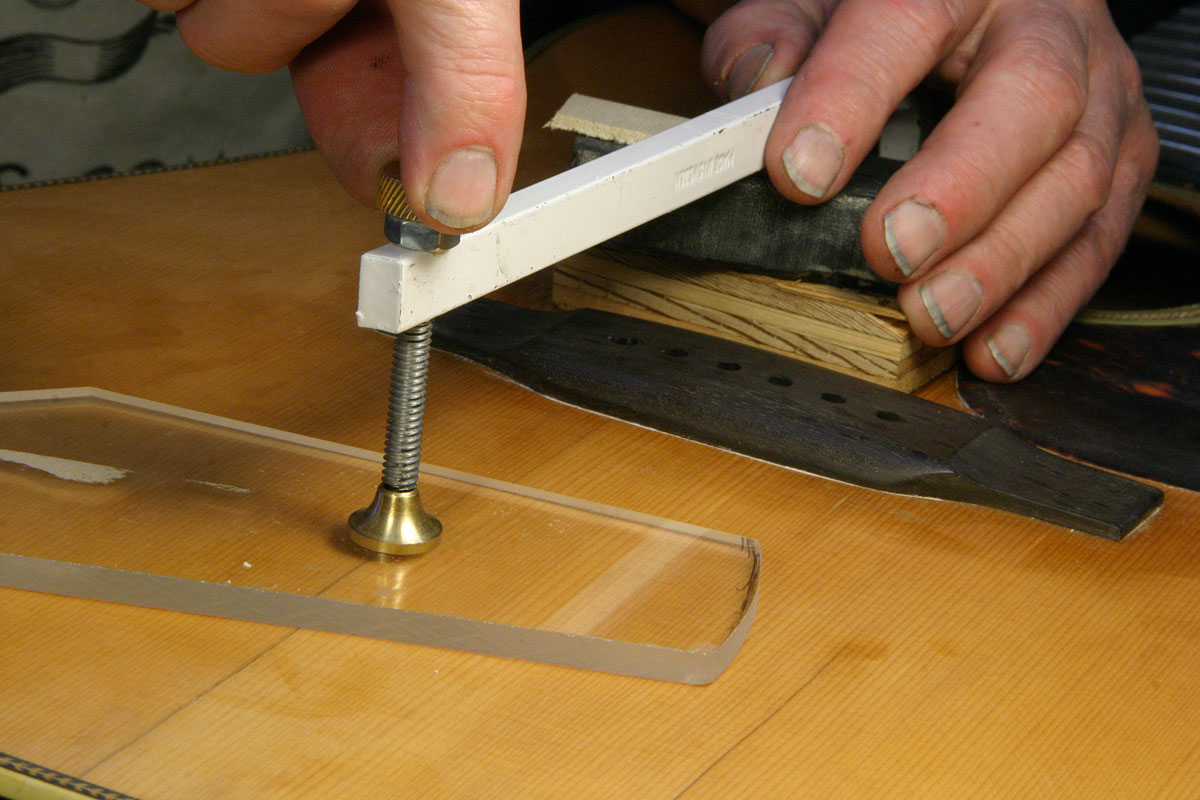
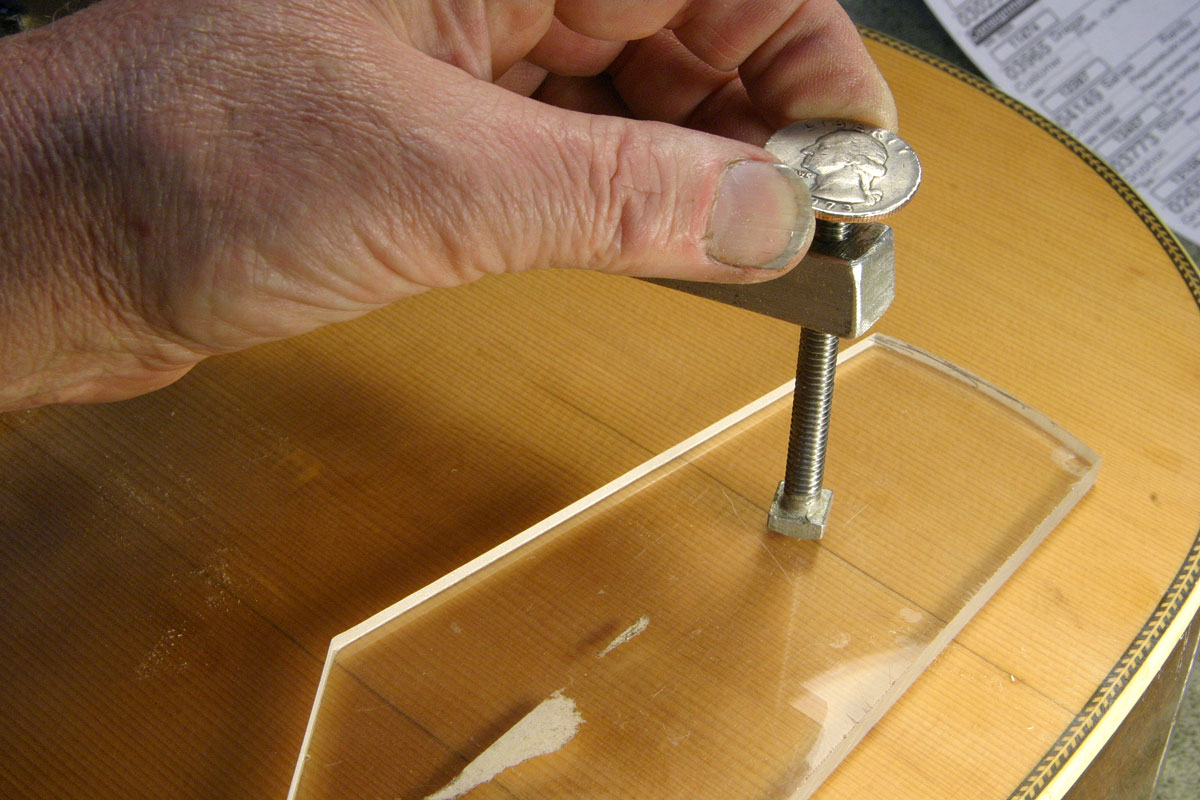
To be sure I get it right in place, I tape the patch to the bottom foot of a long clamp:
The foot of this clamp swivels, so I used a lot of tape to keep that from happening. the tape wraps around the clamp, with a short section of it sticky side up to hold the cleat.
Then with some glue on the piece, I feed the clamp in through the sound hole, and make sure the top swivel lands directly over the cracks.
Clear acrylic makes a great support for the clamp and allows a good view of the action. That block of plywood in front of the bridge is there to support the back end of the clamp to keep the pressure even and to keep the patch from slipping out of position underneath.
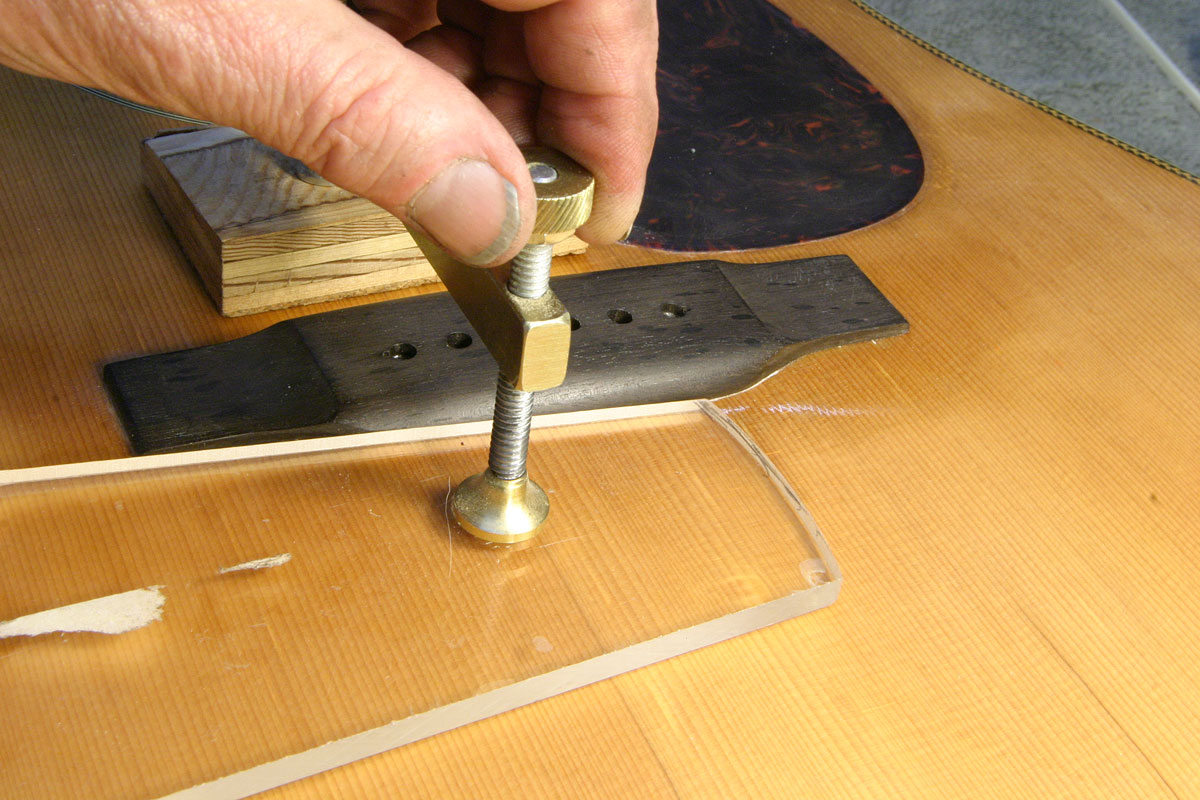
Today was a light duty day - just a few more crack reinforcements with diamond shaped spruce cleats, done one at a time.
Here's one with the same kind of clamp as I used before, but a slightly longer version, and as before, I blocked up the back end with some scrap wood and rubber pieces to keep the clamp aligned nicely:

To reach way down to the end of the long cracks, I turned to an old friend - the first long reach crack clamp I made almost 40 years ago. Not having much resource or ability in metal working, I bandsawed out the shape, and used a regular stove bolt for the screw. I silver-brazed on a special dated knurled knob:
The business end of the clamp has an angled top piece so I can feed it in through the soundhole easily, and the rest of it has a low profile to make it less likely to tip sideways as I'm aligning it. The frame is a full 1/2" thick by 5/8" wide so it's pretty rigid compared to other crack clamps of its length.
Originally, I just had another bolt for the bottom, but a few years ago I upgraded to what I call a "bigfoot swivel" that's siginificantly larger than the usual for this kind of clamp. Now that I'm a wanna-be machinist, I can make those myself.
You can't see the back end, but I have it blocked up to keep the clamp level, of course:
This photo gives a good closeup of the dated knurled knob. . .
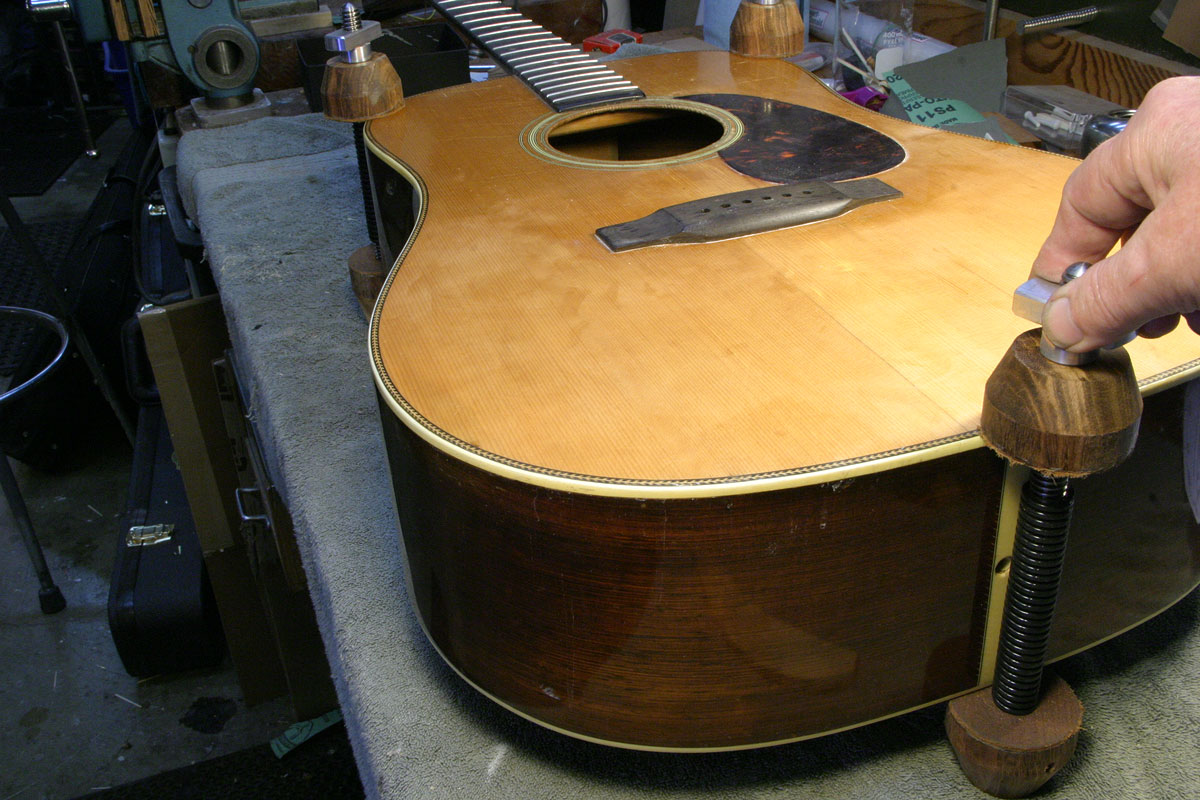
A few weeks ago I made a set of four spool clamps. At least that's what they look like:
In fact, I use them, either three or four at a time, as a sort of work stand for guitar repair. They are way oversize, with 1/2" acme threaded rods and two-inch hardwood spools, so they clamp on securely to provide sturdy legs so I can work all around the body of the guitar while it sits solidly on the bench. They are tall enough that I can add regular clamps around the perimeter without having to juggle the guitar or move it at all. That black ribbed covering on the screw is just a piece of split polyethylene tubing sold for covering bunches of computer wires, and stuff like that.
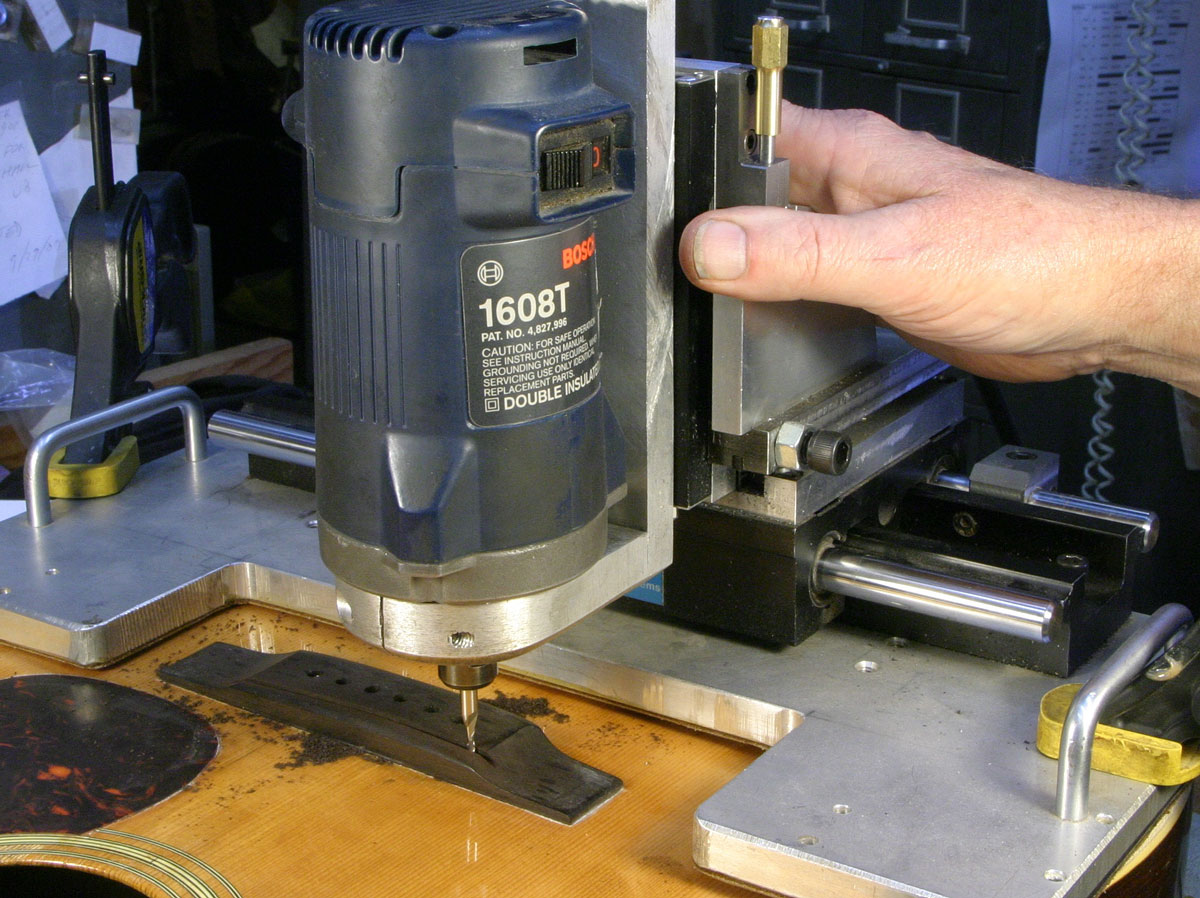
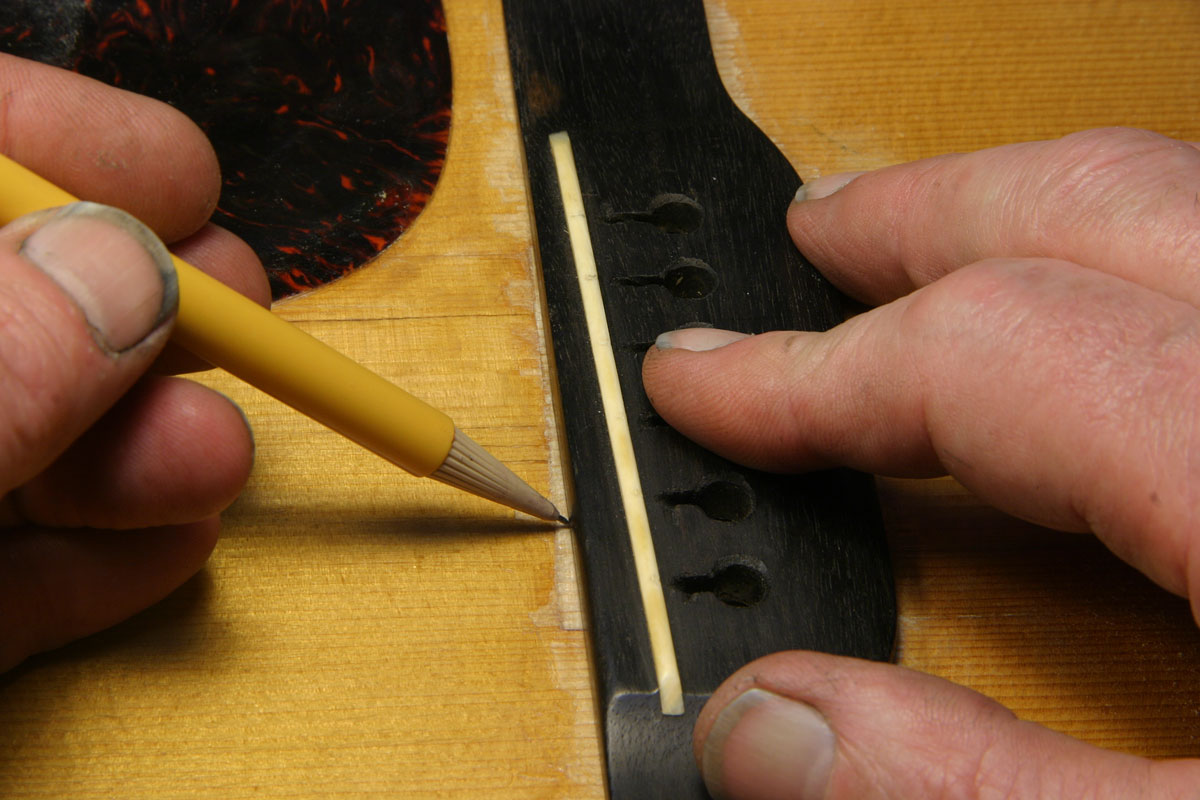
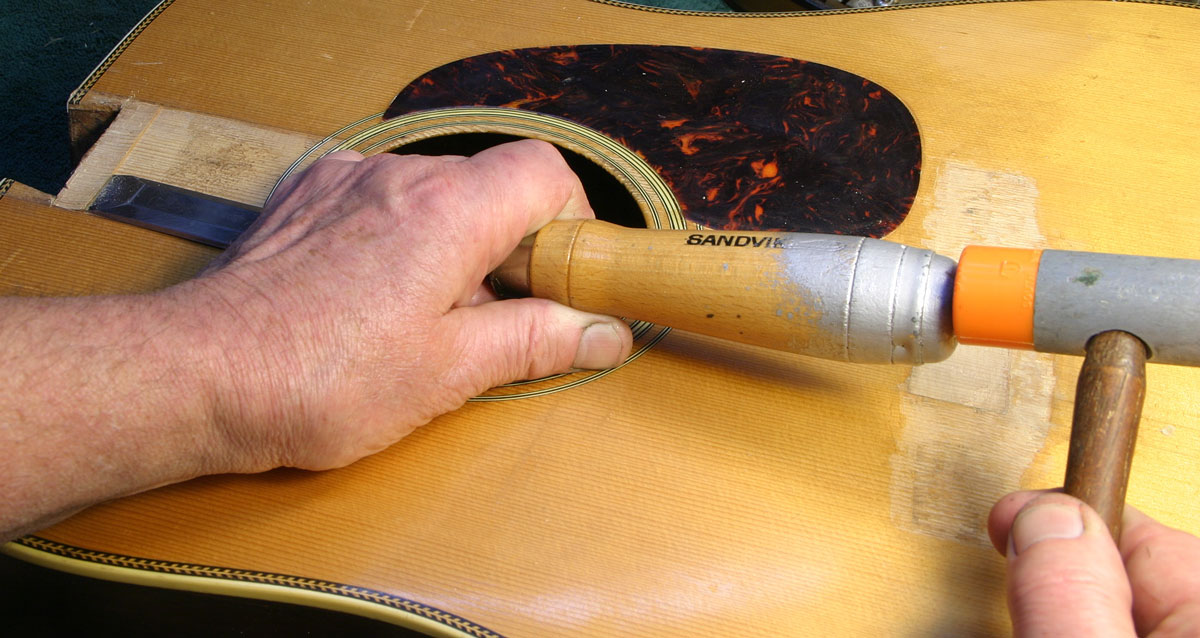
Here, I'm clamping my bridge saddle router mill to the top of the guitar after carefully aligning it to the marks I'd made for the saddle location:
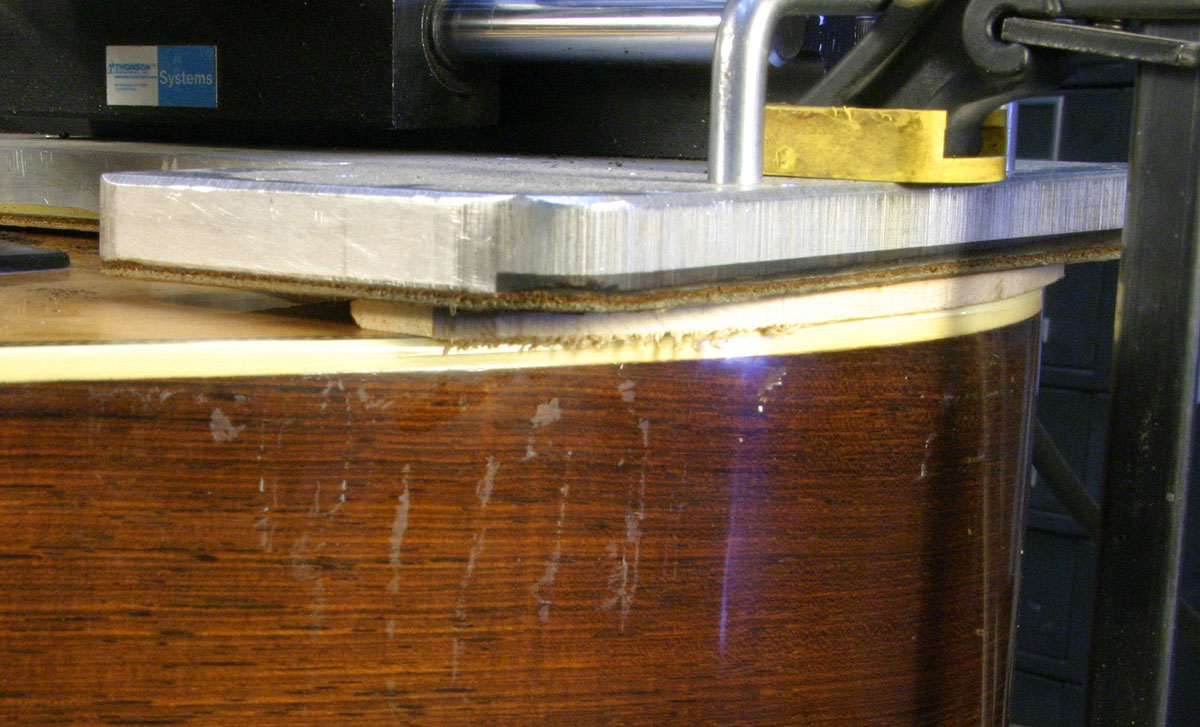
This 1940 replica bridge gets a "through-cut" saddle, and because I want to stay true to the 1940 design, I need to block up one end of the fixture so it will cut a saddle slot that's angled downward on the treble side by .040-.045" just like the original. After a quick bit of calculation, I settled on a 3/16" shim for the bass side:
A couple of quick passes through the bridge, and I had a nice clean slot. Next came reaming, chamfering and slotting the holes for the strings:
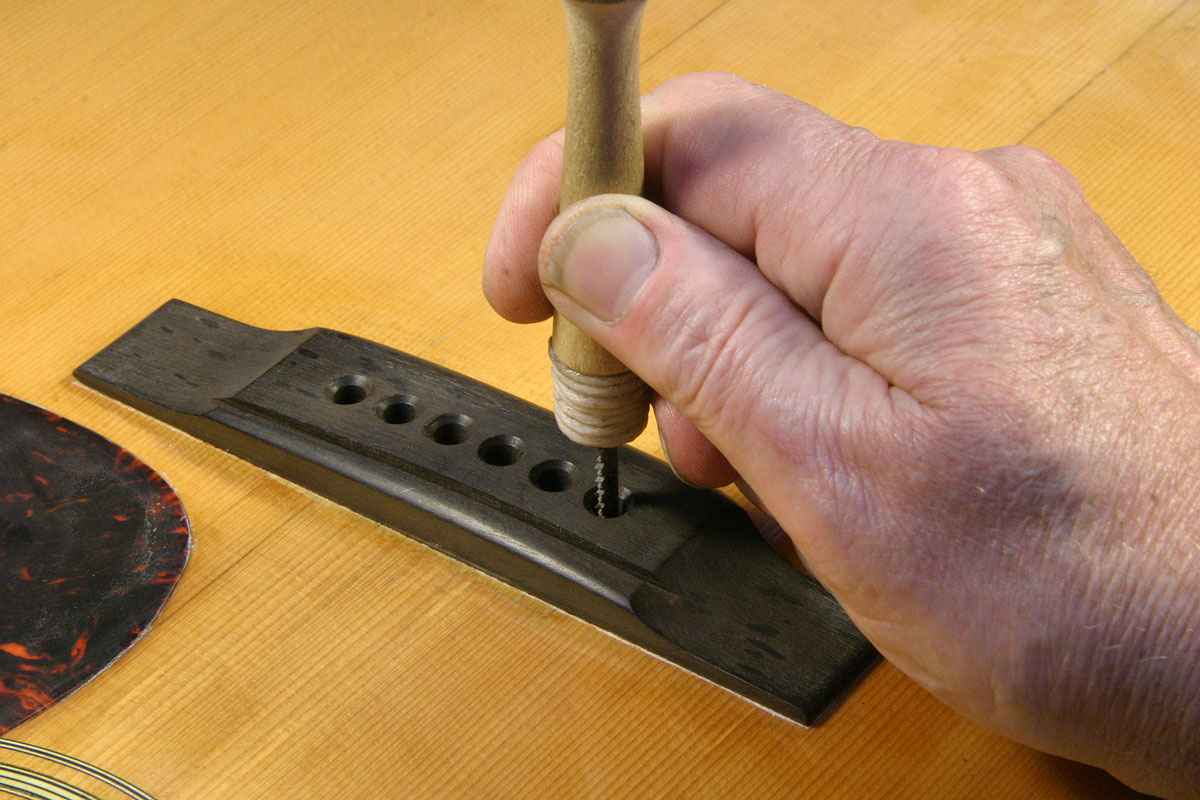
My slotting saw is a regular electric jig saw blade, mounted in a Shaker peg as a handle. It cuts on the pull stroke, so I have great control as I work.
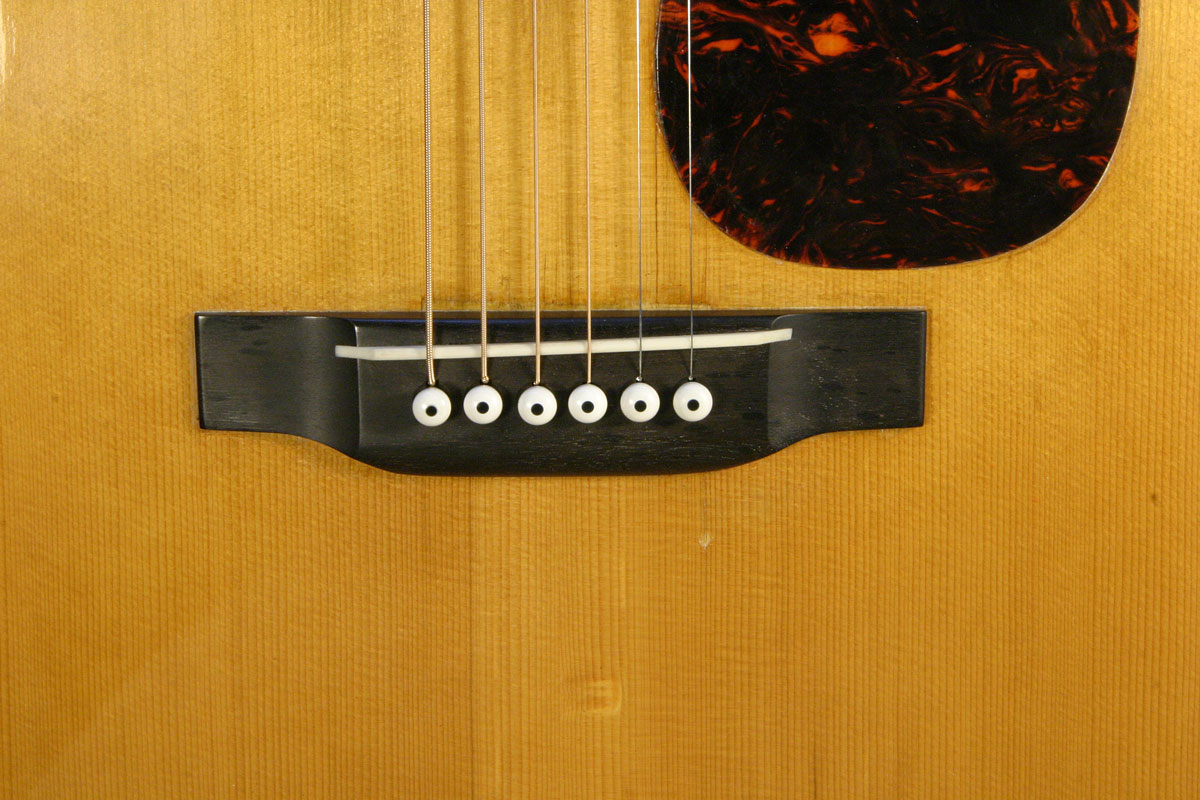
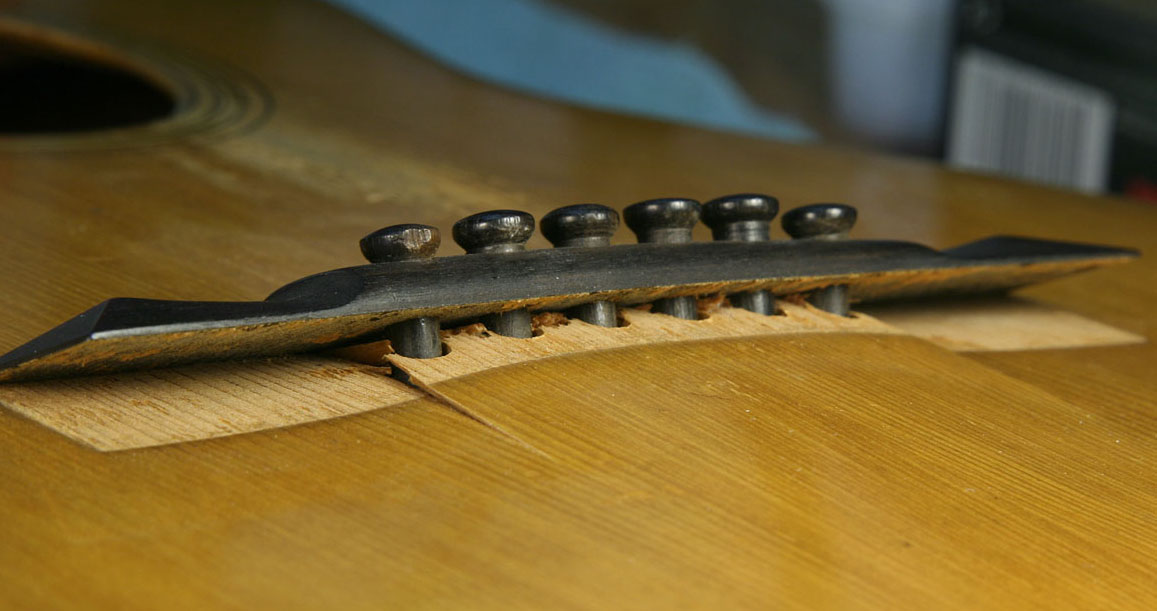
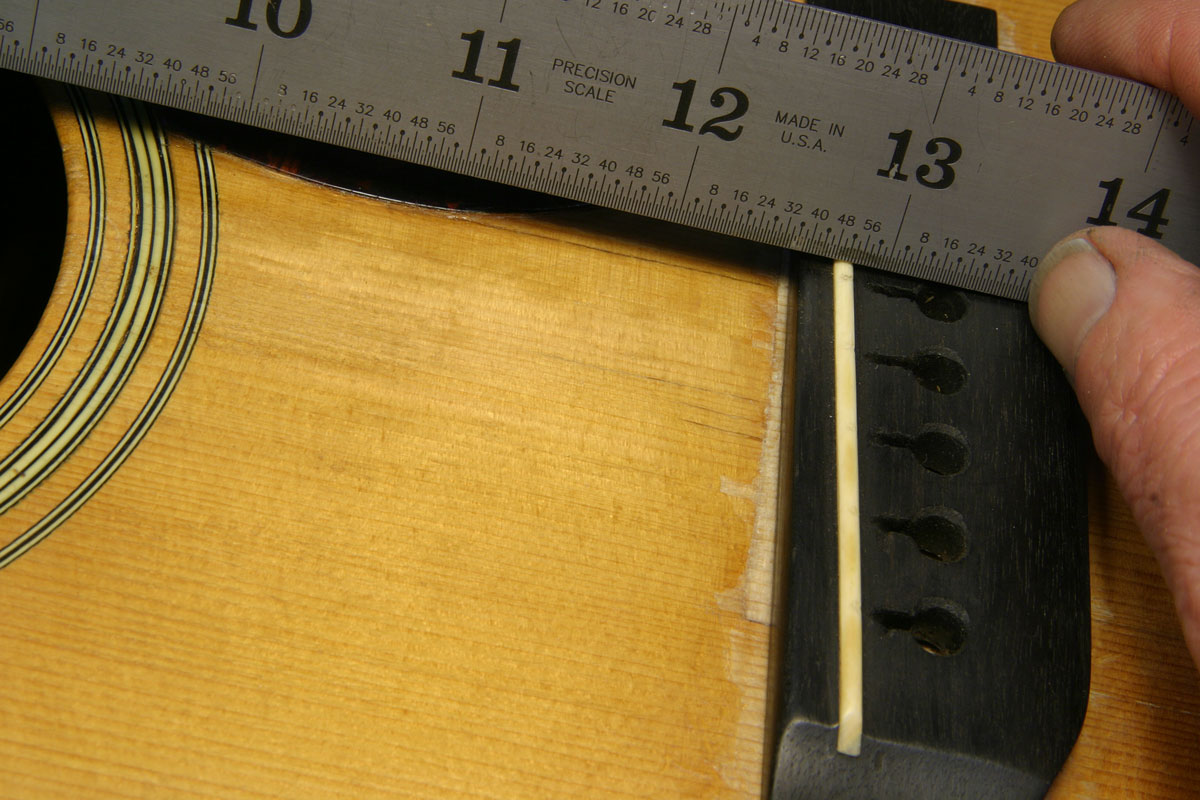
Fast forward to the final setup, new saddle, nut shimmed and adjusted, and the job is done:
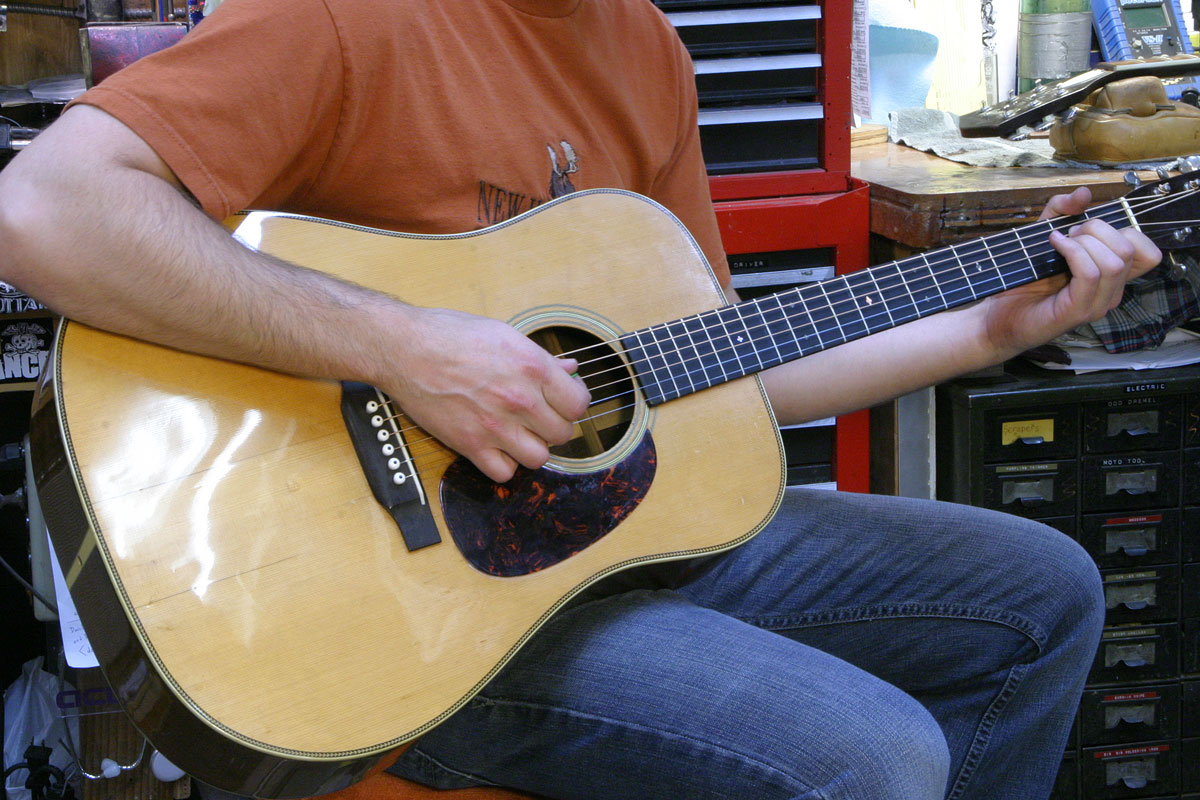
Brian was the first to give this one a tryout, and he was mightily impressed:
Even though it had spent the last couple of decades in a closet with the damage unattended, this old timer woke up after the ordeal and had a lot to say for itself. Tomorrow, I'll try to get Jack to record us a quick sound sample. . .