
Looking Back
Some random thoughts, and the obligatory "millennium article"
"Around the turn-of-the-century," I said when my customer asked me to estimate the age of his S. S. Stewart "Monogram" 5-string banjo. Without hesitation, he replied, "Whaddya mean, the turn-of-the-century is right now!"
"Turn-of-the-century." I'm going to miss that phrase. I've been using it a long time now, but I suppose it's to be another small casualty of Y2K. Another piece of Y2K fallout is, of course, an endless stream of retrospectives on TV, radio, and all the print media, including right here, in Guitarmaker. Yep, I'm just itching to give my opinions of the last thousand years of lutherie. . .
I started my career in 1969, and, since my vision of the craft extends about as far as the length of my own nose, I'll just basically skip the first 970 of those thousand years. Because I am a repairman, and this is a repair column, I'll leave the development and future of the designing and building of instruments to someone more qualified to discuss those topics. OK, now the topic is more the size I can handle.
In the last 30 years I've seen quite a change in the quality, style and ethics of fretted instrument repair. Looking back on some of the repair techniques, we're often tempted to judge the past rather harshly. I think it's just as important to maintain a sense of history about the way in which instruments were handled as it is to be aware of them as historical artifacts. A little mantra: "Don't judge the past by present standards." After all, what we're doing now will soon be the past, and new standards and styles will be in place. After 30 years, I'm in a position to look at some of my own work with a bit of horror.
I first met Dan Erlewine in 1994, when he came to the San Francisco area to meet some of the local "old timers" in guitar repair. I was flattered to be called by the world's best known guitar repairman, and I didn't mind thinking of him as an old timer, but to hear him refer to me as one was a bit of a surprise. (We're the same age, of course.) Clearly he meant "old timer" as a compliment, and I took it a such. In Silicon Valley, where I live, keeping the same job for 30 years is a rare thing, indeed. But, in the world of instrument craft, it's more like the length of time it takes to absorb many of the details of so many different types of instruments. As my violin maker friend, Boyd Poulsen, says, "The irony is that it takes a lifetime to learn it all, and by then you're ready to retire in old age."
Let's take a look at some specific examples of how things have changed in the world of guitar (and other fretted instrument) repair over the last generation or so.
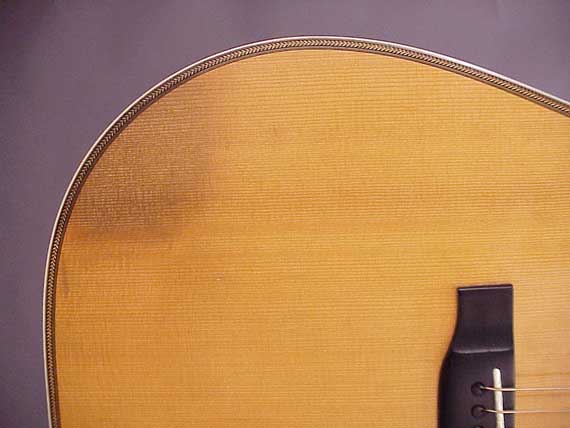
Not so long ago, most of us would have agreed that this kind of finish wear is downright ugly:
In fact, this guitar would have been worth more money if it had been refinished. Now, though, there's such a premium paid for vintage instruments with original finishes, that refinishing would seriously diminish its resale value. The charm of the "patina of honest wear" outweighs the fact that to some, it simply looks dirty.
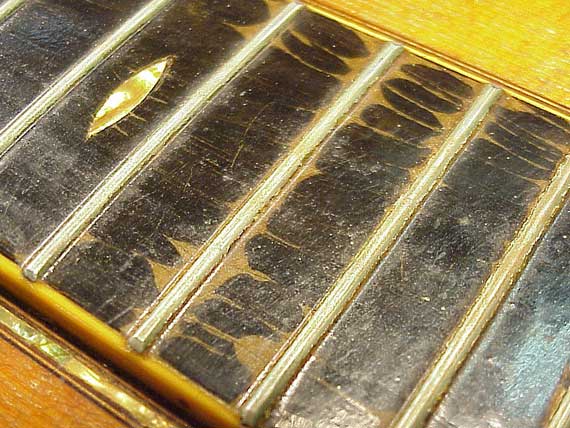
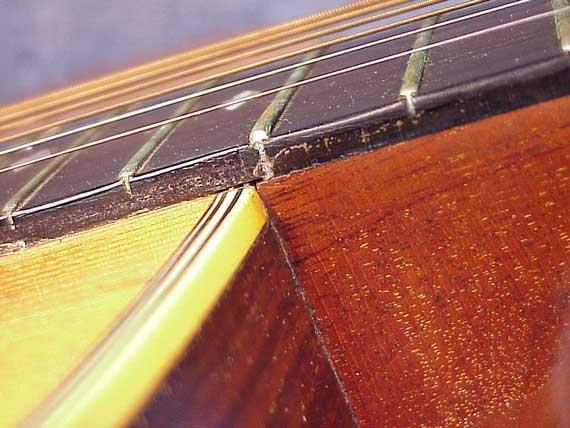
Some kinds of refinishing have an immediately unnatural look, and were never considered a good treatment for a fine instrument. Take, for instance, this 1939 Martin 000-42 fingerboard:
Even a generation ago, when this finish was newly applied, it would have been considered inappropriate because Martin never lacquered over the fingerboard and frets.
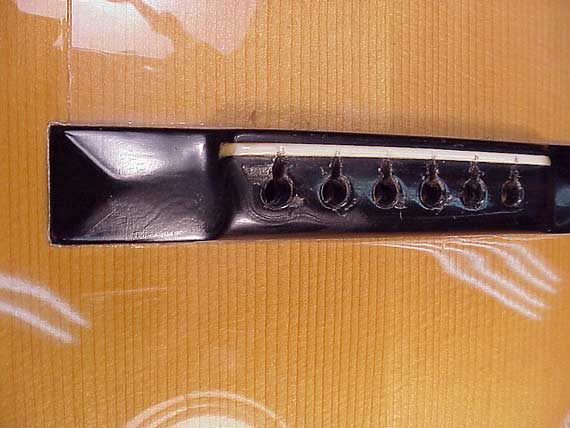
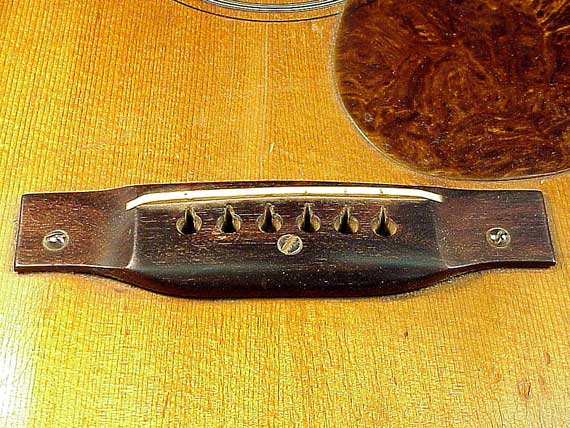
Likewise, the bridge of this 1920s Martin:
Unlike the 000-42 above, this instrument was refinished in 1964 very neatly, and professionally. The bridge was carefully finished as though it were a classical guitar, but otherwise the job was very well done. In fact, the entire instrument looked as though it had just left the factory. The only problem was the style of the finish. The person doing the repair probably simply didn't know that the original finish should have been shellac applied by "French polishing," and not a heavy coat of nitrocellulose lacquer. In those days there were no books on old Martin guitars, and very little communication among the repair community. The owner of the guitar was probably told that this kind of finish would enhance the guitar. Now, 35 years after the refinishing, virtually everyone would agree that the appearance, value, and desirability of this guitar was seriously reduced by the work.
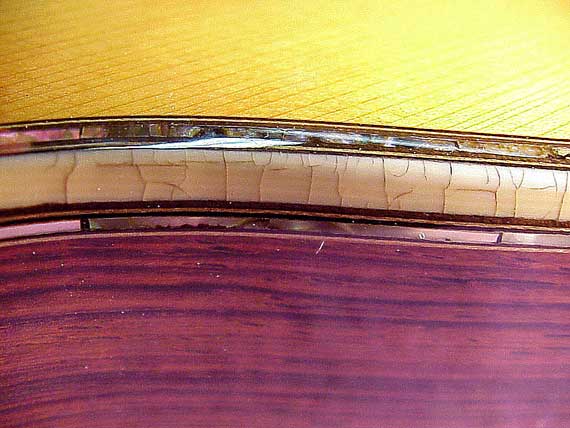
Something else happened, too. Look at the old celluloid binding:
It has about a million cracks, caused by the application of nitrocellulose lacquer. I've seen this damage hundreds of times, and it is always on an instrument which was refinished in with lacquer. At this point, the only way to restore the instrument to a currently satisfactory level is to replace all the celluloid binding, in addition to a sensitive refinishing with French polish. What would have been simply a worn older instrument is now a major restoration project. If, however, the refinishing had been done with shellac, more of the original look of the instrument would have been preserved, and the finish would not have injured the binding. Better yet, if the original finish had not been stripped but had been restored by French polishing, it's likely that much more of the "collector value" of the instrument would have been preserved.
It's tempting to think of the last 30 years' development of the instrument repair craft as being driven strictly by the increasing cash value of the instruments. Certainly, it's true in part. We now have guitars whose resale value may soon approach that of some of the great 17th century Italian violins. So, for the first time, there are fretted instruments that can support the most sophisticated restoration by their cash value alone. It's possible that a luthier will be able to spend an entire year working on restoring just one guitar, and even get paid well for the effort! Additionally, the current "climate" among instrument dealers and collectors is very conservative, with high cash prices being paid for the finest examples of the most "original" instruments.
Hearing of Martin guitars bringing $100,000.00 or more, owners of modest instruments become more concerned about modifying their instruments for fear of reducing their value as future collectors items. I regularly talk to musicians who are fearful of changing the tuning machines on Yamahas and other imported guitars because they've heard how important it is to "keep them original."
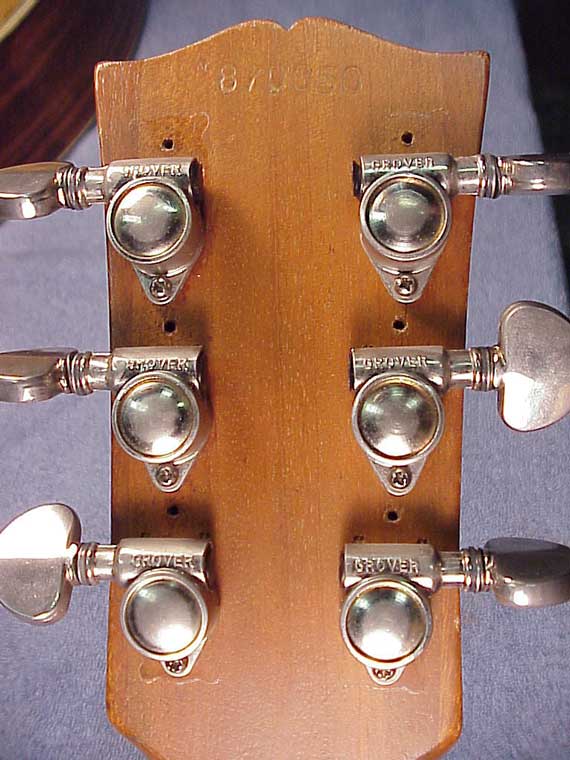
This Gibson LG-0 had new Grover Rotomatic tuners installed in the 1960s, replacing original, inferior hardware:
At the time, it was very clearly the thing to do, but now we're asking ourselves if it was such a good idea. Even though, thirty years later, the actual cash value of the guitar is not so high, and we wonder if the time will come when we'll be searching out original style gears to "restore" this instrument.
A couple of years ago, I had a banjo player come in with a pristine original turn-of-the-century (there it is again) August Pollman 5-string mandolin banjo. These were swell novelty instruments with a mandola type body and a 5-string neck. He wanted me to install new planetary geared tuners, and I suggested he consider the impact on the instrument's originality and resale value. He said, "Listen, this thing is in perfect condition because nobody could tune the goddamn thing to play it. What do you think it was made for, anyway?" So, off I went to countersink some tuners into a thick peghead which was made for friction pegs. In this case, all hands agreed that the improvement was justified, even though it resulted in a decrease in resale value.
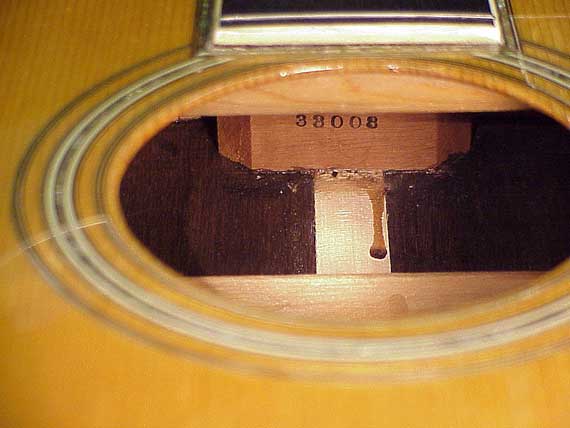
This 1947 Martin D-28 has a bit of decorative custom inlay:
I'll bet that when the inlay was originally done, it had little or no effect on the potential resale of this guitar. Now, however, you can peel stacks of C-notes off its cash resale value. With little or no chance of removing the inlay and restoring the original look, this guitar is pretty much stuck with its funky charm.
In the 1960s, when Martin refused to make any inlaid model guitars, it was common to "dress up" a D-28 with all manner of custom work. The best and most common custom jobs involved upgrading the appearance with inlay designs taken from older fancy Martin models. I personally did a number of "C. F. Martin" block letter inlaid pegheads, and I knew some fellows who converted D-28s to the fully abalone-trimmed D-45 style. That was expensive work, even in those days, and it was just about the only way for a regular guitarist to obtain a fancy Martin guitar. Later, as Martin reintroduced most of their old fancy models, the value of those old customized guitars started to drop. Now, with the veritable explosion of inlaid new Martins, let alone all the elegant and beautiful individually made instruments from independent luthiers, there's hardly any reason for such "upgrades." It's simply a matter of the changing times.
Here's another vintage Martin repair from the bad old days:
This is an 1840s vintage Martin 2-34,which originally had a solid ivory pin bridge. The luthier who replaced the bridge on this gut string guitar had the sensitivity to cut a stock classical bridge down to the size of the original bridge, so that a future restoration would be possible. So, even though it was done at a time when the value of the instrument didn't warrant the extra effort, or by a luthier who couldn't handle the job, it was done in a way that left room for the future. This luthier followed the prime directive for the repair business - the principle of reversibility. As it stands, this guitar will be easy to restore, but if he had used a full size classic bridge, there'd be hell to pay!
In fact, I've done my share of oversize bridge replacement. Years ago, before many luthiers had the "chops" to accomplish sophisticated finish touchup, and before "originality" was such a big deal, it was considered right and proper to replace a guitar bridge with an oversize version. If there were scars around the bridge from previous regluing or other damage, or if the bridge had been located in the wrong position originally, the standard repair was to make an oversize bridge to cover the scar. The thinking was that it looked much better to cover the scarred finish than to try to touch it up. Well, now we've changed our minds.
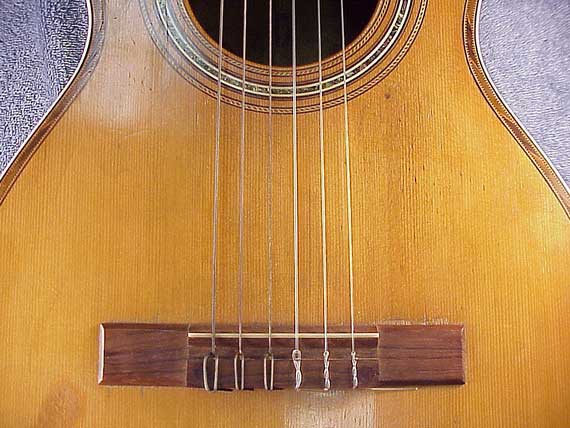
This 1950s Martin D-28 has a slightly oversize bridge:
Even though the job would be expensive, it might be a wise economic choice to replace the bridge with a standard one, and try to do the best possible job of disguising the 1/8" scar left by removing this oversize bridge. I am presuming, of course, that the object was to enhance the value of the guitar for sale.
It's a bit of incompetent repair work, more reminiscent of 60 years ago, but we've all seen bridges bolted on like this one:
This is a venerable old Martin, and it never deserved this kind of treatment. I included this particular photo because I wanted to share something I found in a 1930s wholesale music supply catalog. The item in the catalog was a set of bridge bolts used for reattaching loose guitar bridges, complete with instructions of how to make sure the screws go through the braces underneath. What a boon for the guitar repair profession. Not only do you destroy a perfectly good bridge, but you have an opportunity to crush the X-braces at the same time. Hey, if you're lucky, with the braces broken, the string tension may even destroy the entire guitar top. Cool.
While I'm on the topic of bridges, let's look at one more:
In the 1970s, it was routine to remove a bridge for regluing and introduce it to Mr. Beltsander. The thought was to prepare the bottom of the bridge to get a good glue joint. The problem was that when the bridge had been loose and under tension for a long time, it often "cupped" lengthwise. Then, when the bottom was sanded and the bridge reglued, the top retained that cupped appearance, sometimes looking downright ugly. Often, the repairer would carefully sand the tips of the bridge to make them flat, and then the bridge tips would be abnormally thin.
These days, it's far more common to remove the bridge and use heat, moisture, and clamping pressure to flatten it to its original shape before regluing it. Once reglued, it looks just as it did when it left the factory. This kind of change may seem somewhat trivial, but I think it's symptomatic of a greater change in the communication among the repair community.
Even delicate old guitars like this 1887 Martin were often subject to some rather crude repair work:
With this kind of top deformation, the conventional repair technique involved paving over the inside of the top with a huge bridge plate to flatten and reinforce the warped and broken spruce around the bridge. Failing that kind of repair, a new top was about the only alternative.
Nowadays, as the value of the instrument has risen dramatically, we can borrow some techniques from the violin repair community and take the body apart to perform a sophisticated wood graft under the bridge area:
Such a graft is not only more aesthetically pleasing, but it's also as strong as a big bridge plate, and it's unlikely to change the tonal performance of the guitar. Here, we're not violating the original style of construction, simply restoring the broken and deformed wood.
In the "bad old days," when I first got started in lutherie, there was essentially no literature on the subject of guitar repair or building. There were no associations of luthiers. In fact, most older and experienced luthiers were very secretive about their craft. I talked to a number of respected instrument builders who absolutely refused to give out their "trade secrets" and special sources. They claimed it would be bad for their business to encourage and help their competitors.
It took a "right smart while" for this attitude to change, but change it did. Thanks to the national associations of luthiers (G. A. L. and A. S. I. A.) we now have superb forums for discussion, learning and growth. We, as luthiers, have grown to respect ourselves. This is a very big deal. I think that with self-respect comes the opportunity to respect others who practice the same craft. As we share our techniques and knowledge, we enjoy the respect of our peers, which, in turn, enhances our self-respect. Then, we no longer try to hide ineffective or incompetent work behind a veil of secrecy. As I look back on those luthiers who refused to share their secret formulas and techniques, I find that each of them had capabilities far below their claims!
If there's one instrument repair job that is most emblematic of the changing climate over the last 30 years, it's the steel string guitar neck reset. As we all know these days, with the relentless pull of six (or twelve) steel strings, a guitar body slowly changes shape with the top doming up a little, the soundhole area sinking a little, and the back flattening a bit. The result is a change in the neck angle, accompanied by a dramatic rise in string height, or action. Over the last three decades, musicians and luthiers alike have learned to accept this glacial movement as part of the dynamics of a steel string guitar. We now accept that guitars may need to have their neck angle changed to restore the instrument's original geometry and playability.
Here's the hack job that could never have been called good work:
But, then, a 1/4-20 stove bolt will certainly handle the load, and we must try to remember that we don't know the circumstance. Maybe it was simply a do-it-yourself job:
Speaking of which, "home repairs" by owners should not be subject to the same criticism as professional luthier work. After all, you can do anything you want to your own guitar in your own home.
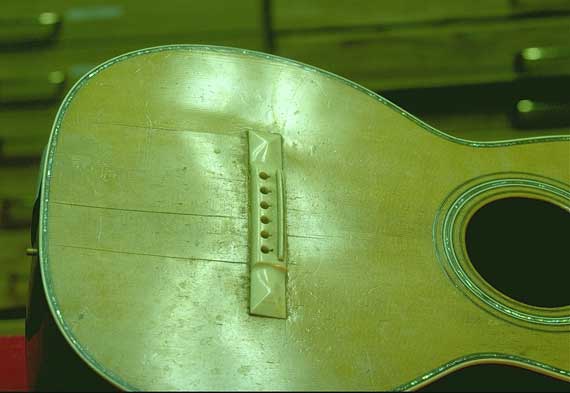
Incidentally, a number of my customers have shown me instruments that were strangely repaired or customized by Grandpa. They often want me to be respectful of old work, because they see it as a memento of their beloved relative. Personally, I think that's a great attitude. The 000-42 in the picture at the top of this article is one such guitar. Gramps led a big Hawaiian band, and doped lacquer or whatever all over the instrument, thinking it would stand up better in the local climate. Grandson asked if I could reset the neck and refret it without eliminating the "custom finish." We struck a compromise, and the instrument went back into service, playing very well, and retaining most of its funky look.
Thirty years ago, when I first started in the repair business, the issue of neck angle and neck resetting was a rather arcane one. Most manufacturers, including the one I began doing warranty service for, routinely denied the existence of the problem. One manufacturer even told me that I didn't have the sophisticated test equipment necessary to judge the neck angle in the first place.
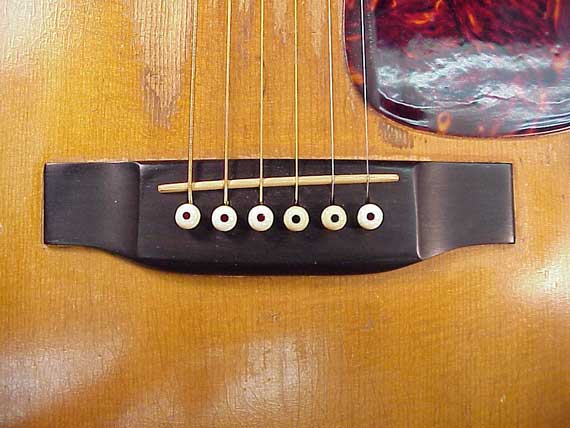
So, instead of resetting necks, many repair shops simply lowered the bridge like this:
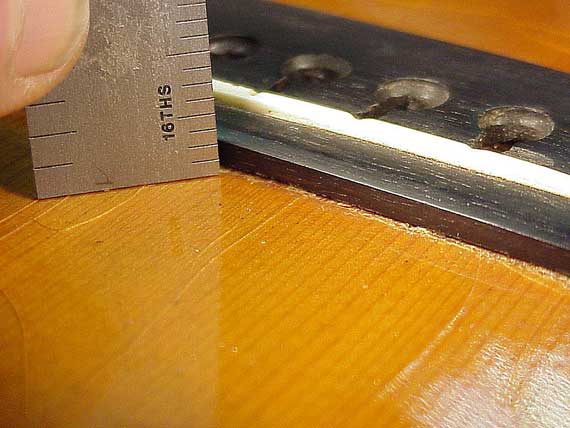
Check it out. The tallest part of the bridge is barely 1/8" thick. The bridge had been lowered years before, and the action has risen to the point that the guitar is basically unplayable. Now, it not only needs to have its neck reset, but it also needs a new bridge.
Guess what? As if cutting the bridge to near oblivion wasn't enough, the repair shop then went after the neck. The fingerboard, actually. They removed the frets, and "back planed" the fingerboard, thinning it near the nut to achieve a bit of a neck angle change.
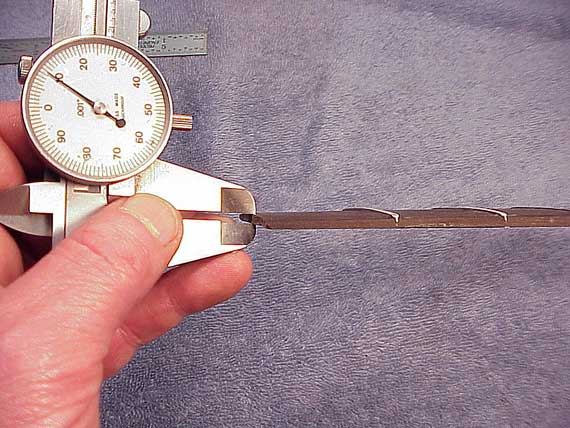
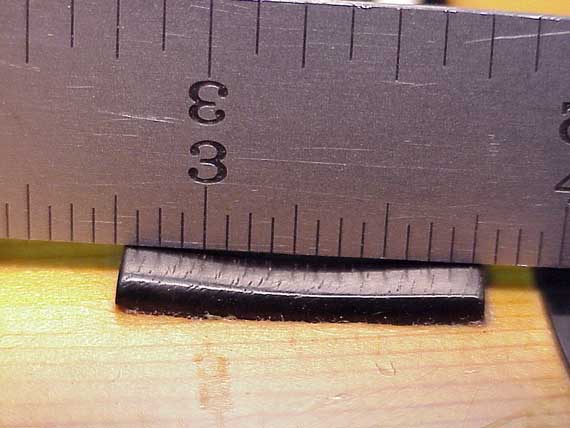
Here's the fingerboard after I removed it:
My dial caliper indicates that it's well under 1/8" thick at the center. Now, this 1947 Martin D-28 not only needs its neck reset and a new bridge, but it also needs a new fingerboard. So much for denial as a substitute for good diagnosis and repair.
At first I was taught that removing Martin necks was basically too risky. A better plan, I was told, was to loosen the back binding, then the back from the neck block and lining, so the neck could be pulled backward into the ideal position. Then, once the back was reglued, the work would begin. I was to recut the binding ledge, reinstall the original binding, and touch up the finish in the area. I performed this operation a number of times, always with good results in the playability department.
It was a lot of work, and risky, too. Risky because it is so difficult to loosen the back from the neck block, that the back often cracked a little. Here's an example of a job that went reasonably well, and is fairly typical of the results:
The glue spill is not normal, but the rest of the inside looks quite good. You can see where the back center reinforcement has been cut short to allow the neck block to be moved forward. On Martin instruments, this little sign is virtually always present, because it's really difficult to cut that piece cleanly, working through the soundhole.

Here's the back of that same guitar, a 1929 00-45:
When you think about it, this is a remarkable piece of work. Not only was the binding removed and replaced, so was the wood purfling and the pearl inlay. But, there is a telltale crack right down the back over the neck block, where it broke when being pried loose.
Now, it was when I confronted a 1920s Martin 00-45 that I broke down. Somehow I was able to swallow that bit about neck removal being more work than resetting by "slipping the neck block," but I was simply not about to re-channel that amount of pearl trimmed binding. I opted for neck removal when it came my turn to do a reset on one of these babies.
At the time, the conventional wisdom about removing necks was to cut the fingerboard at the point where the neck joins the body:
Then, after removing the portion of fingerboard over the body, it was time to pour hot water into the joint, heating it further, if necessary, by sticking a hot knife into the space at the end of the dovetail. Well, that's what I did with the 00-45, but it was a real fight, all the way. Then afterward, I began thinking about the stability of the final product. It occurred to me that the "tongue" of the fingerboard carries quite a load in case the neck receives a blow from the side.
Eventually, this sort of thinking led me to work out a way to steam out the neck. I'd remove the heel cap and drill a hole diagonally into the dovetail cavity to allow the steam to do its work. Years later, I'd learn from others who worked out similar methods, that removing the 15th fret gave just as good access to the joint, and was even easier than steaming from the back.
Now, thanks to our better communication through books, magazines, associations and workshops, we're all steaming necks out of Martin and other guitars with very little risk of damage.
The guitar manufacturers, too, are doing the same, and virtually all of them accept neck resetting as part of an honorable lifetime warranty.
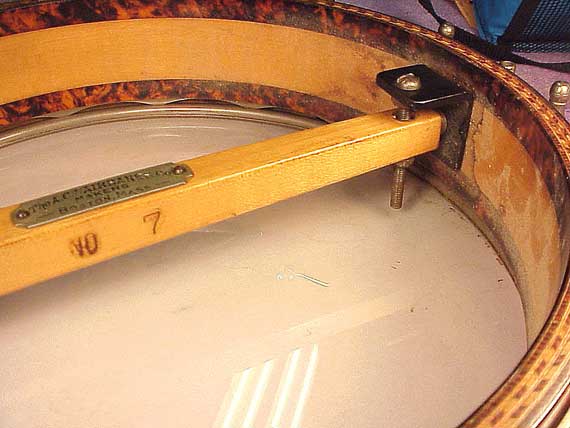
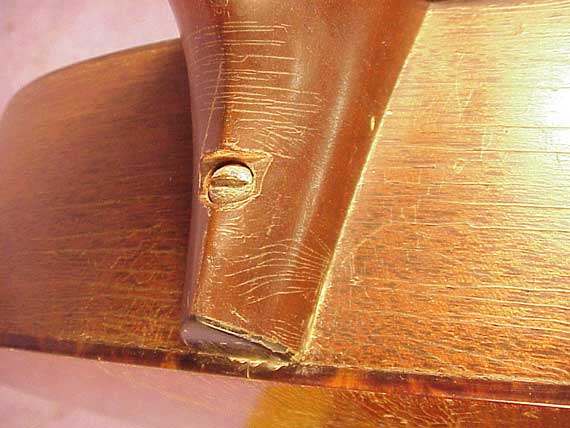
Guitars aren't the only instruments which have undergone this kind of change in quality of neck resetting. Here's a perfectly acceptable neck reset technique applied to a Fairbanks Whyte Laydie #7:
Instead of removing the dowel stick and resetting it to the correct angle, a luthier simply cut it short and installed an angle adjusting screw. Now, a banjo whose value should be approaching $10,000, will forever be worth considerably less than that, and it could still use the proper restoration.
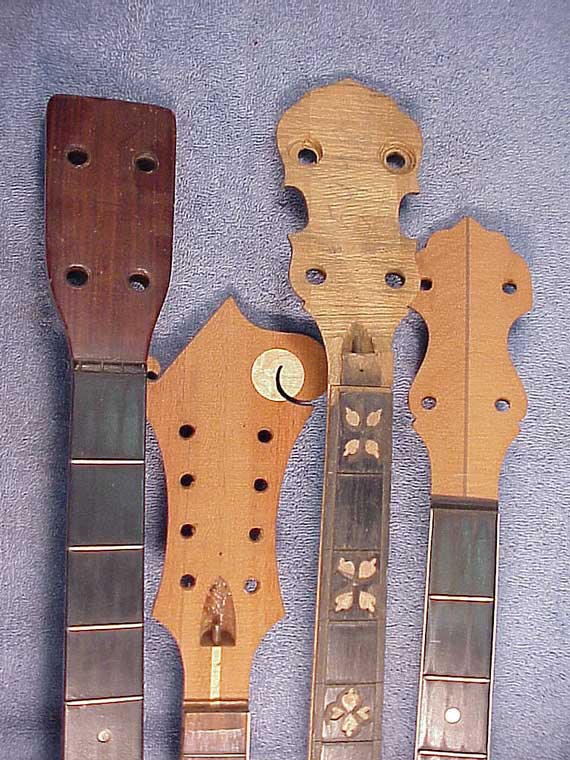
Here are a few more examples from my attic:
On the left, a Martin neck, removed from a 1930 OM-18P (plectrum guitar). Even in today's conservative market, though, the converted instrument is still worth more than the combination of the original instrument and what the work would cost today.
Next, a neck from a Gibson F-7 mandolin. I was paid good money to remove the short F-7 neck, and convert the mandolin to F-5 specifications. At the time it was clearly the thing to do. Now, the original would be worth more, even though it wouldn't play and sound as good.
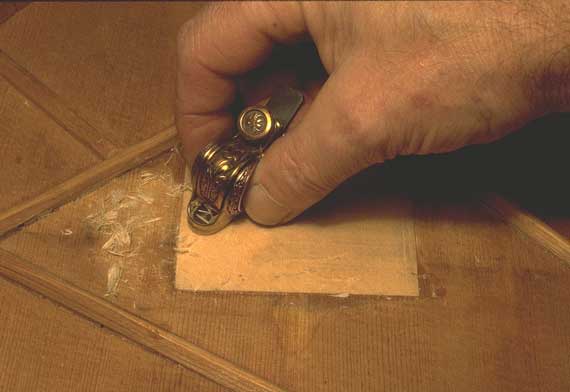
The two banjo necks are from original tenor banjos (Gibson TB-6, and Vegaphone) where I salvaged the original peghead overlay for use on the reproduction 5-string necks. At the time, 25 years ago, it was considered desirable to have the original overlay on the new 5-string neck. The original tenor necks had little or no salvage value. Things have really changed on that front. Now, it's considered far more desirable to retain the original neck intact. Such tenor necks have considerable salvage value today. (an understatement in the case of the TB-6.)
We've seen a lot of change in the instrument repair business in the last few decades. Far from the "alternative lifestyle" days of the '60s, we now are acting like a real profession. Just as surgeons, we're sharing all the techniques we develop, and thanks to the luthier organizations, we're giving each other credit where due. We've finally matured to the point where we understand that sharing and teaching isn't a matter of giving away trade secrets, but is a matter of growth for all of us. After all, the real "secret" of lutherie is no secret at all. No matter how good you get at it, you still have to do the work. I see the "secret" as being more a matter of the commitment to hard work. It takes a lot of hard work to do this job, and there's plenty of work to go around!