
Razor Blade Scraping
Finishing is certainly the most difficult of the lutherie techniques. There are more ways to mess up a finish than you can count. The finish is the just about the first thing you see on an instrument, and the first thing to be injured in normal use. Unlike furniture, a stringed instrument is literally right under your nose.
Finish is not only difficult to repair, it's equally difficult to photograph!
In working with finish repair, we're constantly called upon to fill small craters, scratches, cracks, pin holes, divots, dings, and all manner of wounds. The typical nitrocellulose lacquer finish has an ideal thickness somewhere around 0.006"
In order to repair a dent or other hole in a thin finish, we must first fill the area with compatible finish. The new finish will stand higher than the surrounding surface and must be leveled without destroying the original finish. Since it's impossible to determine the precise thickness of the finish, it's always risky business to level and polish a surface.
I present here a technique I've developed for minimizing the risk of sanding through finish while leveling a new filled spot.
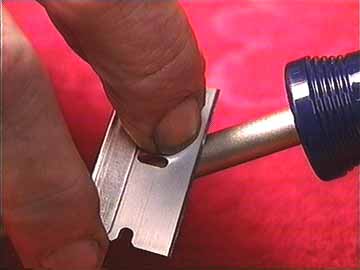
First I take a standard single edge razor blade and draw a bur on the edge in just the same manner as I would burnish a scraper blade:
The burnishing tool can be any round, reasonably hard piece of steel. My favorite tool is the handle of my Versa Vise. I'll use a large Phillips screwdriver if one is handy. I'm drawing the blade across the screwdriver in one quick pass to roll the edge so that it becomes a little like a tiny hook.
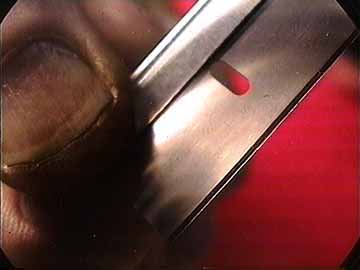
Here's the best I could do to photograph the burnished rolled edge. You can see the bevel of the original edge, and then the tiny rolled edge where it catches the light:
This is a very fine little bur, which I can feel by dragging the blade in a scraping motion across my finger. In one direction it skates along freely, in the other direction it drags sharply and I can feel the scraping action.
If I fail to get a good bur on the first stroke across my round tool, I throw the blade away and start with a new one. These things cost five cents apiece, so it's no big deal.
The burnished edge cuts with the same action as a regular cabinet scraper, but the edge is much finer, sharper and more delicate. It's insanely sharp, but very weak, so this little scraper has a very short but exciting life. I can't tell you how many times this technique has saved my butt.
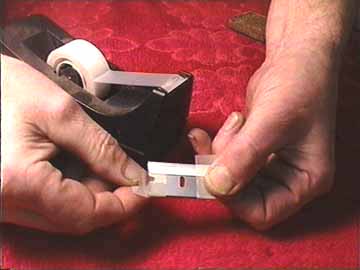
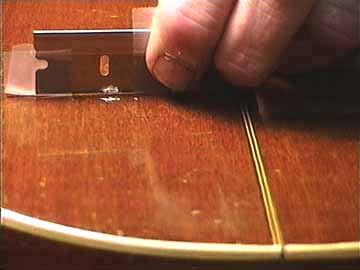
Now, I protect the ends of the blade with some clear plastic tape:
The tape is only about 1 or 2 mils thick, but it lasts for several scrapes before it wears through. I can add more tape, stronger or thicker tape, to suit the job at hand.
This tiny thickness of tape allows me to slide the blade across a flat finished surface without scratching. The tape holds the sharp edge safely above the surface:
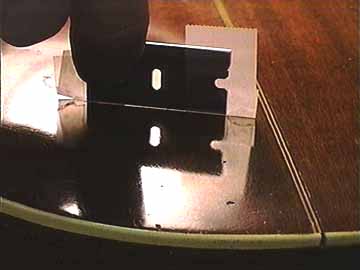
See how close the blade comes to the finish?
Now, let's scrape a spot.
I have a new lump of filled clear lacquer on this mandolin back. I can simply drag my scraper gently across the finish and over the lump, leveling it to the thickness of the tape on my blade:
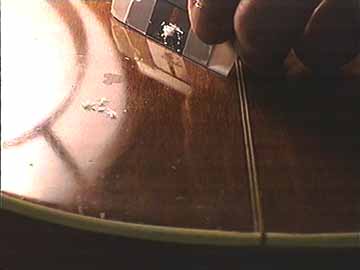
In fact, I'll feel and hear the point where the blade no longer cuts the lump as I scrape over it
As you can see in reflected light, I've scraped the filled spot completely even and flat:
My fill now stands about 1 mil above the surrounding finish. It should be relatively safe for me to sand with a hard block and very fine paper to level the spot and make it ready for polishing.
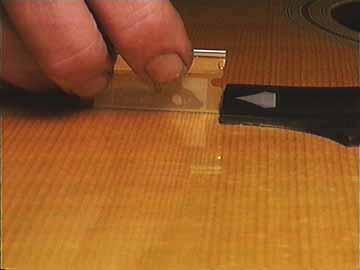
Scraping right into the very corner works the same way, but with the entire blade protected with tape except for the tiny cutting end edge:
This way it's no problem to scrape into the tiniest corner without gouging.
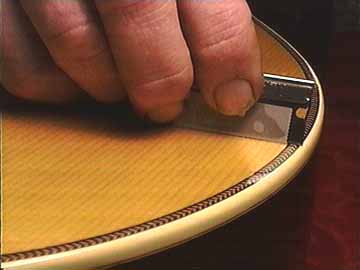
At the edge of an instrument, it's the same deal. I have the long surface of the blade covered with tape to stabilize my cutting action:
I hope this little blade trick is helpful to you. It certainly was a major breakthrough for me!