Things For Luthiers
  Repair Technique
    Setup
    Inlay
    Frets
    Tool Use
    High Tech Department
    Finish
    Structural
    Glue
    Guitar
      Structural
      Frets
      Pickguards
      Bridges
      Pickups
    Banjo
    Mandolin
    Ukulele
    Harp
    Case Repair
  Tools
My WorkBench
Making a Fluorescent Inspection Light
Proportional Nut Spacing Rule
Fret Tang Tools
Kenny Hill's Spring Go-Bars
A one-use Molding Plane
Fret Heater
Modified Soldering Gun for Pulling Frets
Upgrading Loose Dremel Bearings
A Slo-Mo Stationary Belt Sander
Dry Pigment Storage Box
Selecting String Cutters
Fret Height Gauge
A Simple Magnetic Tool Fence
Taylor's Super Driver
Bent Tools
Shot Bag Neck Support
Half a Pencil
Bridge Carving Machine
Shop-built Semiautomatic Lining Kerfer
Gryphon's Fret Saw
Joint Knife
A Two Bit Finger Saver
Long Probes
Articulated 'Take-Apart' Crack Clamp
Clamp Points for easy positioning
Bench Clamps
Adjustable saddle routing base
Special & Modified Clamps
Refret Saw Guide
Roy Noble's Dremel Router Base
Bob Gleason's Nut Handle
Folding Inspection Mirror
Dan Erlewine's Rockin' Pin Puller
Steve Crisp's Classical Guitar Tuning Stand
Bridge Pin Hole Slot Saw
Making Ergonomic Tool Handles
Tim's Saddle Pal
Making My Fret Expander Pliers
My Favorite Power Tool
My Weirdest Power Tool
Dovetail Neck Removal Fixture
Neck Removal Air Harness
Some of My Favorite Stock Tools
Check out the Spy Cam
Taper Thickness Gauge
  Shop Tips
  Data
  Product Reviews
Things For Musicians
  Accessories
My Field Trips
Tom Ellis Precision Pearl Inlay - Austin, Texas
Shubb Capos - Valley Ford, CA
Rick Davis, Running Dog Guitars - Richmond, VT
Ted Megas Guitars - San Francisco
Collings Guitars - Austin, Texas
Hideo Kamimoto's Shop - San Jose, CA
1999 Northern California Ukulele Festival
Taylor Guitars - El Cajon, CA
Northwoods Guitar Repair Seminar 1998 - Big Rapids, MI
Northwoods Seminar 2000
1998 Acoustic Guitar Festival - San Rafael, CA
Guild of American Luthiers Convention, 1998
Mario Martello - It's Super Mario!
Mario's San Franciscan
Bills ABC Music - San Bruno, CA
Joe Grubaugh & Sigurn Seifert, Violin Makers - Petaluma, CA
Down in Brian's Basement - Palo Alto, CA
Roberto-Venn School of Luthiery- Phoenix, AZ
Special Features
C. F. Martin & Co., Nazareth, PA
Collings Guitars- Austin, TX
Gibson's Acoustic Instrument Division, Nashville
Guitar Building with Jeff Traugott
CFox Guitars - Healdsburg, CA
Vogel Guitars - Quito, Ecuador
Kamaka Ukuleles - Honolulu
Tacoma Guitar Co.
U.S.A. Custom Guitars
Repair/Restoration Blogs
1867 Martin 1-26
1940 Martin D-28
1937 Martin D-28
1920 Gibson K-2 Mandocello
Gryphon
A Quick Tour of Gryphon
Gryphon's 30th Birthday Party
Hey, it's Ramblin' Jack Elliot!
Cats and Jammers
Book Reviews
About the Reviews
Guitar Finishing, Step by Step - by Dan Erlewine
Martin Guitars- by Richard Johnston & Jim Washburn
Gallery of New Instruments
Caution!
New Instrument Gallery
  Guitars
Fun Stuff
What They're Saying About Us
The Luthier's Kitchen
Yowl-A-Lele
Alice's Gryphon Page
Cool Plates
Washburn Made a Lot of Everything
Father & Daughter United after 32 Years!
Gryphon's Famous Free Picks
Folk Art Gallery
Fine Art Instruments by Robert Armstrong
Every Circus Needs a SIDESHOW
The ORIGINAL Dreadnought!
Nothing Like Those Old Master Finishes
The Foldo
Holiday Tie-Dye Peeps
Nancy's Dessert Cake Bites
Ditson Dreadnought
Mashed Potatoes
Split Pea Soup
Potato Peeler
Café Foldo
Papa Schnooger
Mod, oh yeah!
Dunn Dreadnought
Coffee Gangs
dreadnought guitar.
my floor lamp.
Quick and Easy Caesar
The Waybacks
Instrument History and Lore
Looking Backward at the 20th Century
->The Way We Were... "obsolete" repair styles
Origins of the 12-string Guitar
The World's Oldest Guitar
Washburn Banjo
Museum
FRETS.COM Museum
About The Museum
  Guitars
    Gibson
    Epiphone
    Washburn
    Selmer
    Gryphon
    Kay
  Banjos
    Gibson
    Weymann
    Paramount
    Bacon
    Fairbanks
    Vega
    Gryphon
    Misc.
  Mandolins
  Ukuleles
Home Shop Tech
HOME SHOP TECH Articles
#1 Sock Handle
#2 CD Paint Brush Can Cover
#3 Japanese Hand Saws
#4 Wax for Lubricating Saw Blades
#5 Pocket Knife
#6 Diamond Pocket Hone
#7 Air Blow Gun
#8 File Cleaning Trick
#9 Drilling Perfectly Clean Holes
#10 Clock Marker
#11 Disc Sander Cover
#12 Glue Thermometer
#13 Magnetic Fence
#14 Salad Tong Finger Saver
#15 Old Kitchen Knives
#16 Cutting Sandpaper
#17 Soundhole String Retainer
#18 Epoxy Leftovers
#19 Small File Handles
#20 String Crank
#21 Stain Palette
#22 Cotton Swab
#23 Portion Cups
#24 File Scraper
#25 Palette Knife Extension
#26 Saddle Contour
#27 Touch Up Lacquer Bottle
#28 Recycle Beverage Can
#29 Micrometer
#30 Toothbrushes
#31 Sander Safety
#32 Hemostats
#33 Compressed Air Lines
#34 Wine Cork Knife Point Protector
#35 Chisel Drawer Dividers
#36 Bent File Chisel
#37 Screwdriver Chisel
#38 Acetone Finish Test
#39 Bevel Fret Slot
#40 Solvent Cap Dispensing Cup
#41 Packing for Travel
#42 Pickup Brace Damage
#43 Coloring Glue
#44 Cutting Paper on Band Saw
#45 Quick Grip Brace Jack
#46 Wedge F-hole Clamp
#47 Guitar Wall Hanger
#48 Half Pencil
#49 Straw Pipette Extender
#50 X-brace Top Wrinkle
#51 Paper Pad Mixing Palette
#52 Fluorescent Replacement Bulbs
#53 Swing Arm Lamps
#54 Packing Pegheads
#55 Pyramid Bridge Clamping Caul - External
#56 Threaded Clamp Foot
#57 Masking Tape for Indexing Bridge
#58 Rubber Band Tuner Grommet Retainer
#59 Belt Sanding Celluloid
#60 Sharp Nut
#61 Side Crack Reinforcement
#62 Dry Pigment Sorting Block
#63 Paper Grain Direction
#64 Modify Drill Bit for Cutting Wood
#65 Fret Pullers Pull Other Things
#66 Heavy Duty Push Sticks
#67 Single Edge Razor Blades
#68 Acid Brushes
#69 Plastic Stretch Wrap for Tool Protection
#70 Bit Holder Blocks
#71 Cross Grain Sanding
#72 Truth in Labeling
#73 Plastic Wrap Glue Resist
#74 Cut Acid Brush
#75 Stretch Wrap Masking
#76 Spray Can Cap
#77 Spray Can Nozzle
#78 Kitchen Paring Knife for Shop Utility
#79 Powerless Belt Sanding
#80 Drill Index
#81 Grinder Support
#82 Leather Pliers Grip
#83 Paper Towel Holder
#84 Newspaper Drawer Liner
#85 File Handle
#86 Recycle Condiment Bottle
#87 Diagonal Cutter Selection
#88 Fatigue Mat
#89 Credit Cards
#90 PVC Shop Vacuum Tool
#91 String Retainer String
#92 Hex Wrench Rack Improvement
#93 Power Tool Casters
#94 Eyes and Ears
#95 Soft Vise Jaw Pads
#96 String
#97 Layout on Metal
#98 Storing Long Electrical Cords
#99 Hanging Coil Hoses
#100 Cutting Aluminum
#101 "Candling" Guitar Tops to See Brace Locations
#102 Locating and Tracing Braces with Magnets
#103 Foil Protection for Reamers
#104 Dry Sandpaper Lube
#105 Mixing Epoxy without Bubbles
#106 Spray Lube Siphon Tube Reinforcement
#107 Paper Towel Half Sheets
#108 Dusting Brush Modification
#109 Cutting Screws and Bolts
#110 Catalog Sale Flyers
#111 Gluing Bin Boxes
#112 Hacksaw
#113 Link Belt
#114 Freehand Band Saw Technique
#115 The Key Hole
#116 Ceiling Posters
#117 Magnetic Screwdriver
#118 Wide Disposable Brush
#119 Veneer Cutting on Band Saw
#120 Finding Center by Balance
#121 Hacksaw Duplicate Parts
#122 Chuck Key Magnet
#123 File Card for Cleaning Saw Blade
#124 Calculator Bag
#125 Door Storage
#126 Magnetic Pocket Screw Holder
#127 Paint Can Lid
#128 Quick Tape Strap for Sensitive Items
#129 Shop Vac Hose Strain Relief
#130 Coiling a Band Saw Blade
#131 Oil Spill Cleanup
#132 Wood Parallels
#133 Masking Tape Handles
#134 Wedges
#135 Tethered Door Stop Wedges
#136 Long Air Hoses
#137 Soda Straw Parts Storage
#138 Hanging Holes for Tools
#139 High Item Picker
#140 Tool Index Wood Infill
#141 Cardboard Drawer Liner
#142 Waste Basket Bungee
#143 Tool Covers
#144 Bungee
#145 Magnetic Bit Storage Drawer
#146 Platform Ladder
#147 Magnetic Tool Pickup
#148 Kitchen Hero - Cutting Board
#149 Kitchen Hero - Diamond Hone
#150 Photographs for insurance
#151 Unscrew Container Safely
#152 Little Boxes - Get Rid of Lid
#153 Swivel Casters for Tool Cabinets
#154 "Temporary" tool stands
#155 Tool Drawer Dividers
#156 Rope Trick: Cutting
#157 Broom Handle
#158 Hand Drill Countersink
#159 Using Digital Calipers
#160 Identifying Metric Hex Keys
#161 Dremel Carbide Cutoff Wheel
#162 Fence Hand Safety
#163 Empty Bin Boxes
#164 Cutting Bin Boxes
#165 Camphor
#166 Decant Epoxy to Avoid Quick Reaction
#167 Epoxy Mixing on File Folder "Palette"
#168 Wood Screw Pilot Drill Size
#169 Reverse Switch Safety Bolt
#170 Keyless Chucks
#171 Work Glove Storage Rack
#172 Cutting Spring on Grinder
#173 Stacking Tool Cabinet Bottoms
#174 Label Those Drawers
#175 Extra Drill Chuck
#176 Sauce Pan
#177 Ball End Hex Wrench
#178 Poly Bottle Bottom for Parts Washing Basin
#179 Square Bottle Bottom for Parts Drawer Bins
#180 Screws in Jars
#181 Salvage Hardware Drawer
#182 Cutting Long Cardboard Tubes
#183 Repetitive Length Cutting on Band Saw
#184 Mark Up Your Ruler
#185 Plastic Containers and Solvents
#186 Mobile Bin for Wood Scraps
#187 Scrap Bin Cover
#188 Scrap Bin Triage
#189 Ball Peen Hammers
#190 Old Rags to Prevent Under Bench Hunting
#191 Storing Magetic pickup tools
#192 Duct Tape Mallet
#193 Cut Down Old Paint Brush
#194 Plastic Bag Makes Emergency Glove
#195 Break a File to Make Short Ones
#196 Magnets to Hold V-Block
#197 Steel Rules May Have Poorly Cut Ends
#198 Buy Files by the Box
#199 Battery Charger Maintenance
#200 Extending Cable Ties
#201 Miter Gauge Alignment
#202 Recycle Paint Thinner
#203 Spray Can Freshness Reminder
#204 Pipette Sealing Trick
#205 Cookie Sheet Chip Pan
#206 Extension Cord Strain Relief
#207 Super Glue "String Needle"
#208 Heavy Duty Extension Cords
#209 Magnetic Book Hangup
#210 Paint Special Tool Handles for Identification
#211 Hang up those brooms
#212 Wood V-Blocks
#213 Miter Gauge Rip Fence
#214 Writing on Saw Table
#215 Saw Table Wax Lube
#216 Toilet Paper
#217 Dispensing Paint
#218 Cutting Short Pieces on Band Saw
#219 Recyled Cardboard Box Tote
#220 Phonograph Needle Scriber
#221 Wall Mounted Tin Can Tool Holders
#222 Dental Floss Sewing Thread
#223 Cut Paper Towel Roll
#224 Hand Tool Oiler for Rust Protection
#225 Tool Instructions Taped Inside Drawers
#226 Forstner Bits in Aluminum
#227 No-Mess Spill Wiping
#228 Roll Wrapper as Spill Wiper
#229 Shop Rags from Bed Sheets
#230 Cutting Shop Rags on the Band Saw
#231 Rubber and Vinyl Mats on Concrete Floors
#232 Tape for Removing Splinters
#233 Cutting Steel Wool Pads
#234 Paint Can Lid Installation
#235 Pouring from Gallon Cans
#236 Cutting Clear Plastic on the Band Saw
#237 Masking Tape Dispenser
#238 Toothpick Brush
#239 Bailing Wire Spool Retainer
#240 Twisting Wire
#241 Penetrating Epoxy Sealer
#242 Remove that Acrylic Plastic Protective Sheet
#243 Hex Key Cheater Bar
#244 Sand Bags
#245 Label Special Tools and Fixtures
#246 Masking Tape Storage
#247 Paraffin lube for Band Sawing Aluminum
#248 Special Push Sticks
#249 Paper Towel Core for Cord Storage
#250 Skinny "Paintbrush Broom"
#251 Blow out Shop Apron Pockets
#252 Buy Good Hacksaw Blades
#253 Grind the "Set" from Blades to Get Narrow Kerf
#254 Convertible Step Stool
#255 Photograph Your Work
#256 Sweep the Floor
#257 Tool Cabinet "Breadboard" Shelf
#258 Hang Goggles Near Tools
#259 Mark Edges to be Cut
#260 Garbage Can Table Top
#261 Magnetic Spray Can Holder
#262 Removing Box Labels
#263 Simple Dolly and Hoist to Move Heavy Items
#264 Recording Lent Tools
#265 Abrasive Paper for Sharpening Chisels
#266 Close the Gap on Grinding Wheel Tool Support
#267 Keep Band Saw Blade Guide Low
#268 Used Engine Oil for Shop Duty
#269 Shop Vac Hose Hanger
#270 Grinding Center Punch Point
#271 Pilot Drill Size for Large Drill Bit
#272 Reverse Drilling to Enlarge Hole
#273 Drill Clamp Feet for Accessories
#274 Glass Microscope Slide Scraper
#275 Bubble Wrap Packing Trick
#276 Cold Chisel Safety Tip
#277 A Really Simple Drill Guide
#278 Drill Press Center Finder
#279 Split Point Drill Bits
#280 Variable Pitch Band Saw Blade
#281 Guitar Strings for Other Uses
#282 Cyanoacrylate Catalyst Bottle
#283 Mangetic Holder for Small Parts
#284 Drilling Cotton Buffs
#285 Diamond Grinding Wheel Dresser
#286 Heat to Remove Sticky Labels
#287 Paint Metric Wrenches
#288 Stackable Cottage Cheese Containers
#289 Aligning Wood Screw Slots
#290 Drilling Round Things
#291 Screw Machine Length Drills
#292 Relief Cuts on Bandsaw
#293 Cross Cutting Long Board on Band Saw
#294 Glue Quick Grip Pads
#295 Resealing Caulk Cartridges
#296 Cyanoacrylate as Wood Sealer
#297 Messy Milling Project
#298 Drill Press Can Cut You When it's Turned Off
#299 Get a Big Vise
#300 Friendly Plastic Ergonomic Handles
#301 Mount Stuff on Cabinet Doors
#302 Wall Bumper Near Electrical Plugs
#303 Keep Dustpan in Trash Can
#304 Ice for Cooling at the Grinder
#305 Making Heavy Twine from Thin
#306 Ice Cube Tray Parts Storage
#307 Cable Ties for Hanging Tools
#308 Cleaning Measuring Tapes
#309 CD-ROM Canister for Adhesive Tape Storage
#310 Split Rivets
#311 Impact Driver
#312 Repetitive Bandsaw Cuts
#313 Old Shower Curtain as Tarp
#314 Replace Thumbscrews on Machines
#315 Have a Little Fun
#316 Magnetic Wrench Holders for Power Tools
#317 Measuring Centers on Uneven Sizes
#318 Reconditioning Sharpening Stones
#319 Magnetic Tool Holders for Drawers
#320 Improvised Masking Tape Bandage
#321 Lok-Line as Flexible Support
#322 Clamping with Drill Press
#323 Camera Tripod Stabilizing Weights
#324 Computer Labels for Drawers and Boxes
#325 Extra Casters for Welding Cart
#326 Use Long Screwdrivers
#327 Soaking Parts in Solvent
#328 Making Safe Edge Files
#329 Cut Cans for Shop Use
#330 Magnets for Bending in Vise
#331 Non Matching Handles are Best
#332 Steel Strap Shim Stock
#333 Stretch Wrap to Secure Solvent Labels on Cans
#334 Mark Pipette Graduations
#335 Keep a Shopping List
#336 Label Unusual leftover Hardware
#337 Magnet to Hold Abrasive Strips on Lathe
#338 Handle to Replace Thumb Screw
#339 Magnet Holds Water Bath on Grinder
#340 Magnets Hold Drill Index on Drill Press Table
#341 Label Grit on Sanding Belts
#342 Mouse Pads for Drawer Liners
#343 Cutting Shallow Notches on Band Saw
#344 Clearing Dispenser Bottle Opening
#345 Faucet Washer as Tool Foot
#346 1-2-3 Clamp It
#347 Tubing for Grinder Support of Thin Pieces
#348 Ring Testing Grinding Wheels
#349 Support Thin Stock for Drilling
#350 Digital Caliper as Tweezer
#351 High Speed Steel Taps
#352 Plastic Bag Thread Protection for Jars
#353 Shop Vac Sock
#354 Bandsaw Thin Stock on Edge
#355 Shop Towel Identification
#356 Pennies are Worth Having
#357 Bag Loose Wires and Cables
#358 Pizza Boxes
#359 Timer for Heat and Fan
#360 Cardboard Floor Mats
#361 Chip Curtain
#362 Cigarette Papers
#363 Age Date Glue Containers
#364 Don't Crumple Old Notes
#365 T-Shirt Tool Cover
$366 Liquid Hand Cleaner
#367 Shop Shelving
#368 Foot Control for Bench Vise
#369 Adjustable Wrench as Caliper
#370 Milk Carton Drawer Bins
#371 Long Bin Boxes on Narrow Shelves
#372 Pencil Sander
#373 Garage Sale Items Can Have Interesting Uses
#374 Hanging Rag Storage
#375 Note Holder at the Door
#376 Simple Upgrade for Quick Grip Clamps
#377 Keep Project Inspirations Handy
#378 Mark Source and Cost on Stock
#379 Label the Size of Staples in Your Staple Gun
#380 Easy Handle for Small Heavy Stock
#381 Check Steel Before Filing
#382 Paint with Your Socks
#383 Centering a Drill on Round Stock
#384 Impromptu Large Hex Key
#385 Cutting "Half a Kerf" on the Band Saw
#386 Squeeze the Last Bit out of a Glue Tube
#387 Use a Copier for Quick "Drawings"
#388 Measuring Over a Ledge
#389 Clean up "Spun" Drill Bit Shanks
#390 Changing the Zero Point on Graduated Dials
#391 Dispensing Small Amounts from Spray Can
#392 Paint Can Opener
#393 Broken Files are Handy in Close Quarters
#394 Buy Small Containers of Some Stuff to Save Money
#395 Kitchen Towels Have Four Lives
#396 Solvent "Recycling" Trick
#397 Still Hung Up on Rags
#398 Simple Leather Finger Saver
#399 Missing Stud
#400 How Much is Left in That Paint Can?
#401 Storing Spare Parts for Machines
#402 Label Adjustment of tools or Gauges
#403 Simple Grinder Safety
#404 Lubricate Wood Screws
#405 Break the Corner for a Tight Fit
#406 Weak Thread Locking Compound
#407 Rope Burn Trick
Glossary
An Illustrated Glossary
Archtop
Armrest
Backstrip
Ball End Strings
Bar Frets
Bearclaw
Belly Bridge
Binding
Birdseye Maple
Biscuit
Blind Saddle
Block Inlay
Book Matched
Bottleneck
Bout
Bowl Back
Box
Break Angle
Bridge
Bridge Pins
Bridge Plate
Button
Cantilevered Fingerboard
Capo
Celluloid
Check
Chipboard Case
Classical Guitar
Clown Barf
CNC Computer Numerical Control
Compensation
Cutaway
Dot Neck
Dovetail
Dreadnought
Ears
Edge Dots
End Block
End Piece
Endpin
Endpin Jack
f-Holes
Fan Bracing
Fiddleback Maple
Fifth String
Fifth String Capo
Figure
Fingerboard or Fretboard
Fingerpick
Fingerrest
Fingerstyle
First Position
First String
Flamed Maple
Flamenco Guitar
Flat Top
Flatpick
Flight Case
Frets
Gig Bag
Grain Runout
Hardshell Case Anatomy
Hawaiian Guitar
Hawaiian Nut
Heel
Heel Cap
Herringbone
High/Low Position
Hollow Body Electric Guitar
Ivoroid
Ladder Bracing
Lap Steel
Lining
Loop End String
Mitered Purfling
Mother-of-Pearl
Neck Block
Nut
Pearl Border
Peghead or Headstock?
Pegs
Pickguard
Pickup
Pin Bridge
Pinless Bridge
Purfling
Pyramid Bridge
Quilted Maple
Relief
Resonator
Resophonic
Ribbon Grain
Ribs
Rosette
Saddle
Scale Length
Scroll
Silk
Slack Key
Snakehead
Solid Body Electric Guitar
Spanish Heel
Steel
Steel Guitar
String Ramps
T-Bar
Tailpiece
Three Piece Back
Through Saddle
Thumbpick
Tie Block
Truss Rod
Truss Rod Cover
Volute
Waist
Which way is up?
X-Brace
General Stuff
About Me
What is FRETS.COM?
I'm on the cover!
Why FRETS.COM?
About the photographs. . .
Help!
Photo Studio
Contributors
my home shop this morning
Mario Martello 1924-2006
OOPS!
Resume
Links
FRETS Links
/Instrument History and Lore/

The Way We Were

This was converted from the original Frets.com site.
To view the original page click here

Let us not judge the past by present knowledge. . .

Fretted instrument repair has come a long way in our generation. Thirty years ago when I first started repairing guitars the general state of the art was just coming out of the Dark Ages. Not surprisingly, the average quality of repair work has matured and improved along with the average value of the instruments being repaired.

When we're examining a repair job that was done many years ago, it's important for us to remember that the instrument may have been of little actual cash value at the time. So, in a way, it's understandable that some pretty poor quality work was performed on instruments that are now taken as precious. When we are horrified to see a 1940 Martin D-28 with varnish brushed all over it, we must also be glad it the guitar wasn't simply thrown away and replaced because it was "ugly" at the time.

The same thing goes for customization. Some old instruments were converted for other use, some for electric amplification and some for "beautification."

Let's look at a few of the more common repairs and customization of the past.

Add a Tailpiece

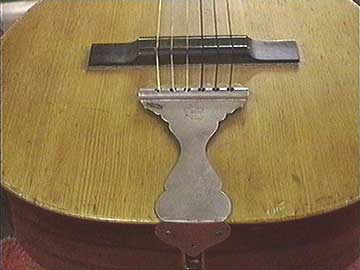
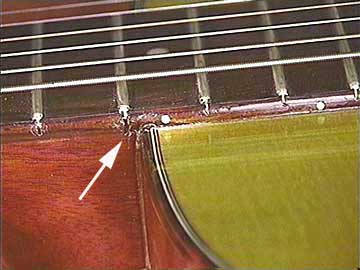
If you just can't seem to get the bridge to stay glued down, you can always add a tailpiece:

This Washburn guitar was made around 1910, and originally had a pin bridge. From the damage underneath, it's obvious that it had been reglued several times. Musical supply houses used to sell these cheap tin tailpieces for quick repairs, and we often see the scars left by their application to elegant instruments.


Neck Resetting by "Slipping the Back"

When I first started working on guitars I was told it was "too difficult and messy" to remove the neck for resetting to the correct angle. Our standard method of resetting Martin necks was to loosen the back of the instrument from the neck block and the linings, and push the neck backward, allowing the back to overhang at the heel. That technique allowed for really good control in adjusting the neck angle, but presented a host of other problems.

The back was easily cracked in the effort to loosen it from the neck block. The binding and purfling had to be removed, the back trimmed to fit, the binding channel recut and the binding reglued in place. Then there was all that finish touch up, if it was done at all.

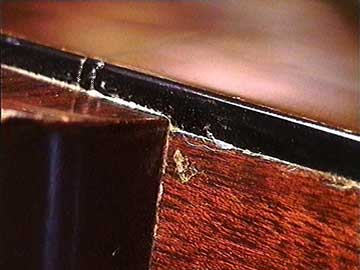
In the best case, this is the result:

You can see the little piece of binding that had to be inserted in the gap at the joint behind the heel.

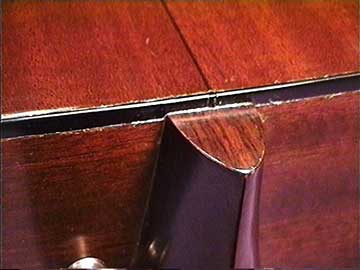
There are signs of the binding having been removed and reglued, and the finish touched up:

Inside at the neck block, you can see the results of the loosening and regluing.

Now, this one is a good example. I've seen lots of damage caused by this kind of reset work, including massive cracking and splintering of the back over the neck block, and damage to sensitive wood purfling.

After doing a few resets in this manner, I started to work on a technique for removing the neck intact, even though I was told it was too difficult. It turns out to be MUCH easier than doing the reset by loosening the back, but then who knew?

Cut Through the Fourteenth Fret

Early on, I was told that in order to get access to the neck joint it was necessary to cut the fingerboard through at the fret slot right at the body:

Then, after removing the end of the fingerboard from the top, the idea was to pour hot water into the joint to soften the glue. One serious problem with this system is that the fingerboard is no longer intact to provide support to the neck joint. That leaves the neck vulnerable to a sideways force (say if the guitar is dropped while it's in the case) which can cause the neck block to crack.

Thankfully, it wasn't too long before I (and lots of others, too) developed techniques for steaming the neck joint apart without cutting the fingerboard.

Teeny Dowels

Dowels are used to reinforce wood joints, right?

Here's a classic example of a good idea in the wrong application.

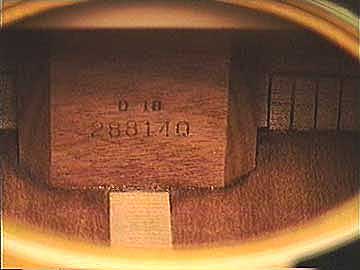
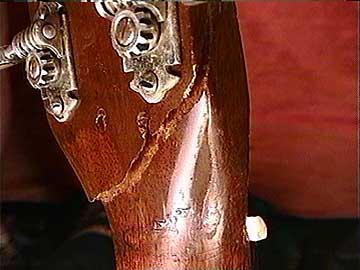
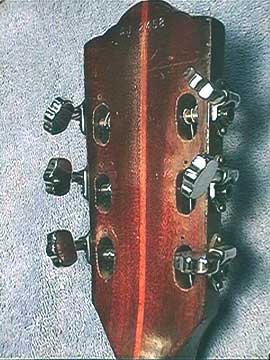
This 1940 D-18 had a broken headstock, which was reglued and "reinforced" with dowels:

As you can see, the dowels were really small, and because of the location of the crack, the were also really short. So, they didn't hold at all. They did look ugly, though. The neck broke again because the guitar was dropped, and the dowels pulled neatly through.

You can see the results from the top, too:

This is an example of a misguided effort to improve a simple glue joint. The dowels were visible from both the front and back, and only served to reduce the gluing surface by a small amount. I've seen much bigger diameter dowels make a much bigger mess, by the way.

Add a Pickup

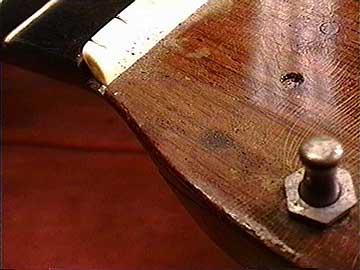
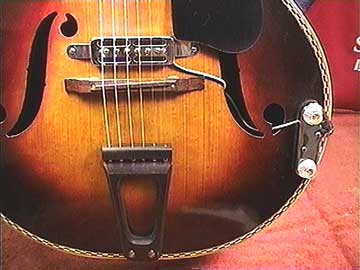
This isn't a particularly valuable guitar today, but it serves as an example of two interesting techniques.

The first is the application of a pickup system. Here, it's simply screwed into the face, so when it becomes obsolete, it leaves behind a bunch of little holes:

Nowadays, we're more sensitive to the application of pickups, because we've seen generations of electronics go into obsolescence.


Gear Conversion

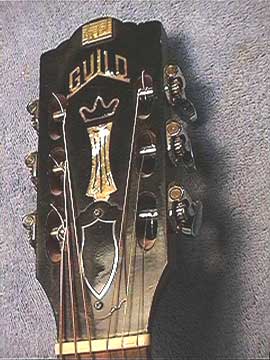
Well, this one is really quite horrible. I don't know when it was done, but it certainly was no earlier than the mid 1970s, because that's when the guitar was made. It takes a bit of doing to remember that we really have no way of knowing the motivation or reason for the work. It's still important to recognize that we don't know why, and since we can't go back, we must forgive it.

We often decry the loss of "originality" when replacing tuning machines, but such replacement usually at least results in an instrument that works better.

This one, with the increased downward pressure on the nut, actually doesn't work well at all:

I find this modification somewhat less forgivable than those coversions we see which were made during the "dark ages" of low guitar popularity. Grover Rotomatic or Schaller tuners could be had for less than 25 bucks, would have worked well, and would have been easy to install.


Faux Wood Grain

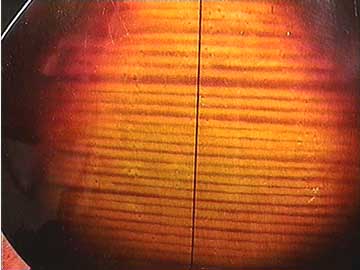
I have to show you two more pictures of this fine old archtop guitar. It's really quite a piece of work. The top and back are made of fine solid birdseye maple. But check out the wonderful finish:

Here the back is spray painted to simulate curly fiddle back maple grain. It's not a bad job for a production guitar; it's just a shame that they didn't simply let the birdseyes carry the show!

The top is even more amazing. Same tightly figured birdseye maple here, but this time they've painted it to look like spruce:

Gibson Mandolin Beautification Project

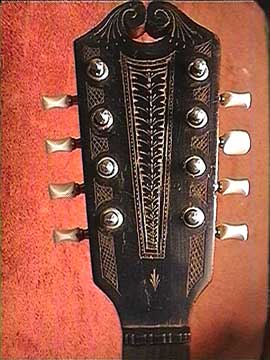
This is a classic Gibson style A mandolin from about 1915:

And, it has been richly incised to create a European flavor. Unfortunately, it's not the sort of work that can be easily undone.

Conversions

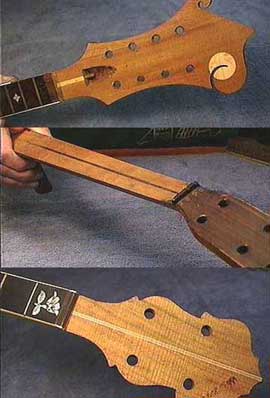
Here are three skeletons from my closet:
At the top, it's a neck from a 1930s Gibson F-7. More than twenty years ago I was asked to convert this instrument from the F-7 short neck to the F-5 long neck style. Most everyone would agree that the conversion successfully upgraded the instrument to a much more playable and better sounding mandolin. These days, however, we all agree that the collector value is greater than the "musical value" so it's not a wise thing to do.

The middle neck was one I removed from a Martin OM-18P, a plectrum 4-string guitar. I reshaped and transplanted a 1940s vintage D-18 neck onto that instrument, converting it to a regular six-string guitar.

Both of these jobs were done a long time ago and represented the current state of the art thinking at the time, so I feel I have nothing to apologize for. These necks do serve as a reminder of days past.

The bottom neck is a tenor banjo neck from which I salvaged the peghead overlay in order to make a five string replica neck. I acquired the neck, broken off at the heel, without the rest of the banjo. In 1974, I bandsawed off the peghead veneer as I had on other occasions to lend a bit of "authenticity" to my replica neck. That was at the time considered the proper thing to do, both to save effort in inlay work, and to capture a bit of originality. Most of the necks we salvaged in this way in the 1960s were not damaged, they were just four string necks, and not considered valuable at the time. These days, it's considered more appropriate to reproduce the peghead inlay, and keep the tenor neck intact. It seems obvious now, but it didn't then.

If you'd like to see the results of the five string conversion, click here for some photos of the Washburn banjo, which I still have after 25 years.

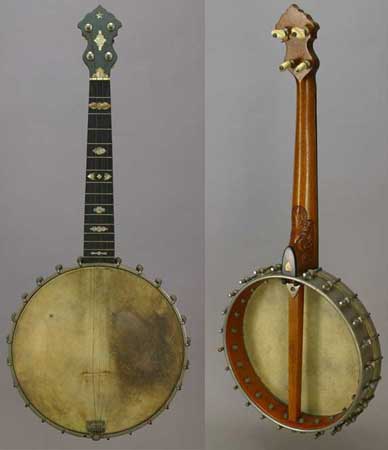
And, here's another old Washburn banjo. This one dates from about 1900, and appears to be a short neck tenor, with an inlay at an unusual position, namely the second fret:

A closer examination reveals that it was originally an elegant open back five string banjo that was skillfully cut down to make it into a short 15-fret tenor at a time (probably the 1920s) when the short neck tenor was a popular melody instrument.


No trace of the original fifth peg remains, and that second fret inlay was originally at the seventh fret. The only thing I know for sure is we have no place asking, "What were they thinking?" or "How could they have done that?" That was then, this is now. . .

Anything to Avoid Resetting That Neck

30 years ago it was commonplace to see complex repairs done in the effort to avoid resetting necks. Removing the neck seemed nearly impossible to many repairers, so they devised "workarounds" and other methods of achieving low action on guitars whose neck angle had changed. I actually heard of a violin maker who removed guitar tops and shaved the sides to achieve a taper toward the end block, and replaced the top, in effect, lowering the bridge by dropping the entire top lower in that region.

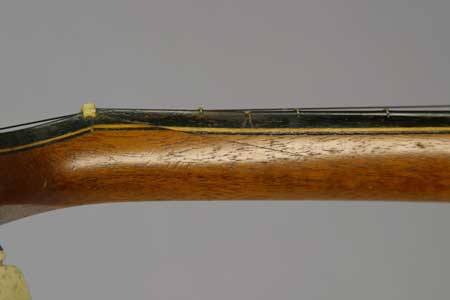
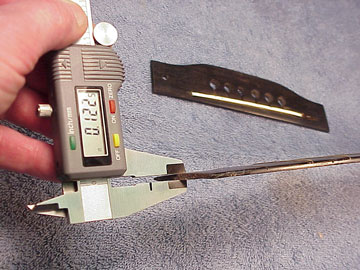
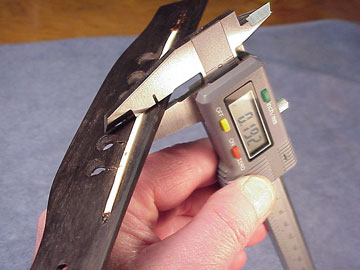
Here's a fingerboard I removed from a 1947 D-28:I have my caliper set to the maximum thickness at the nut. You can see that the fingerboard had been planed down to less than 1/8" which is half its original thickness. At the 14th fret the fingerboard was left at full thickness, tapering back toward the peghead in a effort to avoid resetting the neck.

It must have worked for a while at least, but now look at the bridge:

It, too, has been cut drastically lower. See, it's barely over 3/16" INCLUDING the height of the saddle!

BUT, after a few more years, the action was high again, and there was neither bridge nor fingerboard left to cut lower.

After resetting the neck and replacing the fingerboard and bridge with ones of stock dimension, the guitar once again played well. The best part of the job was the "test drive" because the sound was utterly transformed. With the bridge height restored, the trebles and midrange came out dramatically stronger. This guitar went from 98-lb. weakling to Superman in one week!

Can you make my neck wider?

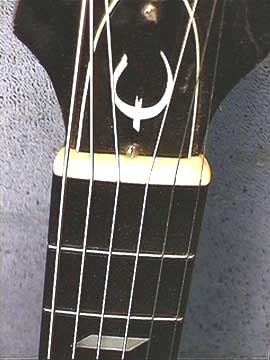
Here's one that had me a bit worried. This fellow brought in his 1960s Epiphone Texan, which was made by Gibson during the period they were into pathologically skinny necks. You know, the ones that are only 1-5/8" at the nut.

He wanted to have a new fingerboard made so his neck would be 1-3/4" wide at the nut, and I told him it wasn't possible. The problem would be that the profile of the neck would come out really strange and the edge of the fingerboard would of necessity have to be quite sharp.

Well, he prevailed and I made him the new fingerboard, almost cantilevered out in space. Just take a look at the nut profile on this guitar:

I figured he'd be instantly unhappy with the feel of the neck, and would want to have it made narrow again.

Wrong!

He's been playing this guitar happily since 1975 when I did the work.

So, here's a case where doing the "wrong" thing worked out right! Neither he nor I have any regrets about "violating" this instrument. At the time, of course, there was never a discussion of the value of "originality" I was just worried he would be dissatisfied with the work and might have blamed me for a custom job that was his idea. In fact, I doubt you could find a better custodian for this guitar or more loving home for it. In his hands the guitar is doing exactly what it was made to do -- making lots of music.

Unless otherwise credited, all content on Frets.com is
Copyright © 1969 - 2023 Frank Ford
All rights reserved.