
3-D Carver
Duplicating bridges with my 3-D Carver
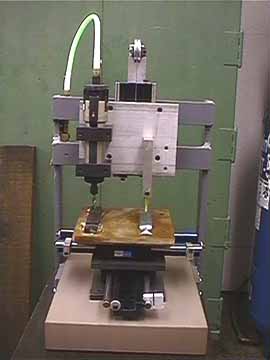
Here's my little machine:
It has a sliding table that moves in two dimensions, and a carriage that moves up and down with a stylus and cutter. I can guide the stylus over a pattern as I move the table around, and duplicate any small object with real precision.
The cutter is driven by an air turbine at 40,000 rpm. This turbine is no where near as heavy or loud as a router, and at that speed the cutter hardly "pulls" at all.
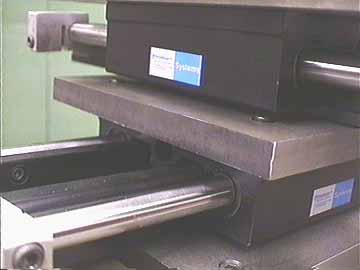
I made the machine around these very heavy duty Thomson Ball Bushing units:
Each unit is rated to handle a working load of 600 pounds and moves effortlessly on ball bearings. They are so precisely made that there is no looseness or play at all! (The only negative thing I can say about these bearings is that they are expensive.)
The simplicity of this design is that I didn't have to machine anything with precision. (That's what I need because I'm no machinist!) All I needed was to have the stylus and cutter move over identical paths, so I didn't even have to make sure that the bearing slides were exactly perpendicular. As long as the stylus and cutter are rigidly held on their carriage, everything else falls neatly into place.
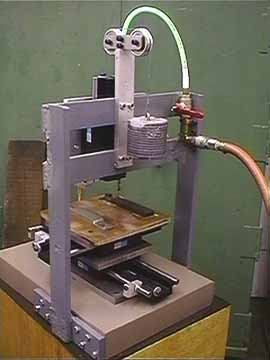
Here's the machine from the back:
Here, I have the vertical carriage balanced with a lead weight hanging from the ball bearing pulleys. As I guide the stylus over my pattern I have to exert very little effort to make contact. Even if I bump the stylus really hard the cutter doesn't dig in because the bearing units are so rigid.
Each horizontal bearing slide has a 1/4" thick steel top to increase the mass and stability as I move the slides around.
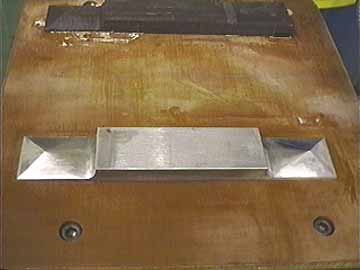
Here's my favorite template. I spent quite a bit of effort hand filing this baby out of a hunk of steel:
It's the exact finished size and shape of the standard Martin 1" x 6" pyramid bridge as used in the 1920s. I left the center section 3/8" high and square so I could customize each bridge to fit its guitar appropriately. I'd copy the original exactly, but usually I'm replacing a damaged one. This way I can contour the center section to accommodate a new neck angle, or whatever.
My work table is a piece of 1/4" phenolic that I screw to the machine's 1/4" steel table. I have my steel template screwed on from below, and I simply glue my bridge blanks to the table. If I use cyanoacrylate glue, catalyst and a piece of paper between the blank and the table I can secure the blank instantly and pry it off safely after it's shaped.
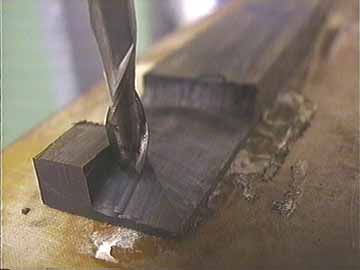
I do most all my cutting with a plain two flute end mill:
It cuts cleanly and fast.
My stylus is a brass rod turned to 1/4" diameter to match the cutter bit:
The brass stylus won't scratch my steel template and glides over it easily.
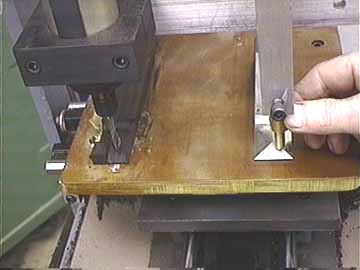
Here I'm copying an original ivory bridge:
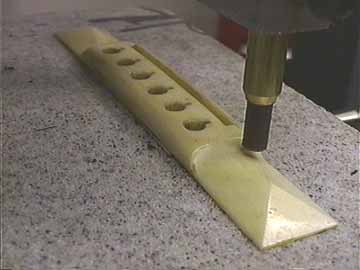
This bridge is smaller and more delicate than my template. I'm using a Delrin stylus to avoid scratching the ivory. I've glued the bridge to this Corian table with a piece of heavy paper between it and the table so I can pry it off when I'm through. If I drop down to a smaller bit and stylus I can duplicate the bridge pin holes. I'll leave the saddle slot for later because I prefer to do that job after the bridge is glued on the guitar.
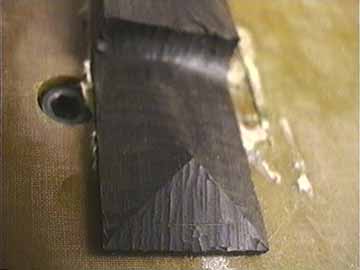
Here's the result I get using just the standard 1/4" end mill:
I just have a bit of hand sanding with 220 grit to smooth out the profiles.
As much as I like hand carving Martin pyramid bridges (I really do) this machine has saved me a few headaches. Especially when I'm carving an ivory bridge, I worry about that little slip that will force me to start over! With my 3-D bridge carving machine I don't sweat as much. . .