Things For Luthiers
  Repair Technique
    Setup
    Inlay
    Frets
    Tool Use
    High Tech Department
    Finish
    Structural
    Glue
    Guitar
      Structural
      Frets
      Pickguards
      Bridges
      Pickups
    Banjo
    Mandolin
    Ukulele
    Harp
    Case Repair
  Tools
My WorkBench
Making a Fluorescent Inspection Light
Proportional Nut Spacing Rule
Fret Tang Tools
Kenny Hill's Spring Go-Bars
A one-use Molding Plane
Fret Heater
Modified Soldering Gun for Pulling Frets
Upgrading Loose Dremel Bearings
A Slo-Mo Stationary Belt Sander
Dry Pigment Storage Box
Selecting String Cutters
Fret Height Gauge
A Simple Magnetic Tool Fence
Taylor's Super Driver
Bent Tools
Shot Bag Neck Support
Half a Pencil
Bridge Carving Machine
Shop-built Semiautomatic Lining Kerfer
Gryphon's Fret Saw
Joint Knife
A Two Bit Finger Saver
Long Probes
Articulated 'Take-Apart' Crack Clamp
Clamp Points for easy positioning
Bench Clamps
Adjustable saddle routing base
Special & Modified Clamps
Refret Saw Guide
Roy Noble's Dremel Router Base
Bob Gleason's Nut Handle
Folding Inspection Mirror
Dan Erlewine's Rockin' Pin Puller
Steve Crisp's Classical Guitar Tuning Stand
Bridge Pin Hole Slot Saw
Making Ergonomic Tool Handles
Tim's Saddle Pal
Making My Fret Expander Pliers
My Favorite Power Tool
My Weirdest Power Tool
Dovetail Neck Removal Fixture
Neck Removal Air Harness
Some of My Favorite Stock Tools
Check out the Spy Cam
Taper Thickness Gauge
  Shop Tips
  Data
  Product Reviews
Things For Musicians
  Accessories
My Field Trips
Tom Ellis Precision Pearl Inlay - Austin, Texas
Shubb Capos - Valley Ford, CA
Rick Davis, Running Dog Guitars - Richmond, VT
Ted Megas Guitars - San Francisco
Collings Guitars - Austin, Texas
Hideo Kamimoto's Shop - San Jose, CA
1999 Northern California Ukulele Festival
Taylor Guitars - El Cajon, CA
Northwoods Guitar Repair Seminar 1998 - Big Rapids, MI
Northwoods Seminar 2000
1998 Acoustic Guitar Festival - San Rafael, CA
Guild of American Luthiers Convention, 1998
Mario Martello - It's Super Mario!
Mario's San Franciscan
Bills ABC Music - San Bruno, CA
Joe Grubaugh & Sigurn Seifert, Violin Makers - Petaluma, CA
Down in Brian's Basement - Palo Alto, CA
Roberto-Venn School of Luthiery- Phoenix, AZ
Special Features
C. F. Martin & Co., Nazareth, PA
Collings Guitars- Austin, TX
Gibson's Acoustic Instrument Division, Nashville
Guitar Building with Jeff Traugott
CFox Guitars - Healdsburg, CA
Vogel Guitars - Quito, Ecuador
Kamaka Ukuleles - Honolulu
Tacoma Guitar Co.
U.S.A. Custom Guitars
Repair/Restoration Blogs
1867 Martin 1-26
1940 Martin D-28
1937 Martin D-28
->1920 Gibson K-2 Mandocello
Gryphon
A Quick Tour of Gryphon
Gryphon's 30th Birthday Party
Hey, it's Ramblin' Jack Elliot!
Cats and Jammers
Book Reviews
About the Reviews
Guitar Finishing, Step by Step - by Dan Erlewine
Martin Guitars- by Richard Johnston & Jim Washburn
Gallery of New Instruments
Caution!
New Instrument Gallery
  Guitars
Fun Stuff
What They're Saying About Us
The Luthier's Kitchen
Yowl-A-Lele
Alice's Gryphon Page
Cool Plates
Washburn Made a Lot of Everything
Father & Daughter United after 32 Years!
Gryphon's Famous Free Picks
Folk Art Gallery
Fine Art Instruments by Robert Armstrong
Every Circus Needs a SIDESHOW
The ORIGINAL Dreadnought!
Nothing Like Those Old Master Finishes
The Foldo
Holiday Tie-Dye Peeps
Nancy's Dessert Cake Bites
Ditson Dreadnought
Mashed Potatoes
Split Pea Soup
Potato Peeler
Café Foldo
Papa Schnooger
Mod, oh yeah!
Dunn Dreadnought
Coffee Gangs
dreadnought guitar.
my floor lamp.
Quick and Easy Caesar
The Waybacks
Instrument History and Lore
Looking Backward at the 20th Century
The Way We Were... "obsolete" repair styles
Origins of the 12-string Guitar
The World's Oldest Guitar
Washburn Banjo
Museum
FRETS.COM Museum
About The Museum
  Guitars
    Gibson
    Epiphone
    Washburn
    Selmer
    Gryphon
    Kay
  Banjos
    Gibson
    Weymann
    Paramount
    Bacon
    Fairbanks
    Vega
    Gryphon
    Misc.
  Mandolins
  Ukuleles
Home Shop Tech
HOME SHOP TECH Articles
#1 Sock Handle
#2 CD Paint Brush Can Cover
#3 Japanese Hand Saws
#4 Wax for Lubricating Saw Blades
#5 Pocket Knife
#6 Diamond Pocket Hone
#7 Air Blow Gun
#8 File Cleaning Trick
#9 Drilling Perfectly Clean Holes
#10 Clock Marker
#11 Disc Sander Cover
#12 Glue Thermometer
#13 Magnetic Fence
#14 Salad Tong Finger Saver
#15 Old Kitchen Knives
#16 Cutting Sandpaper
#17 Soundhole String Retainer
#18 Epoxy Leftovers
#19 Small File Handles
#20 String Crank
#21 Stain Palette
#22 Cotton Swab
#23 Portion Cups
#24 File Scraper
#25 Palette Knife Extension
#26 Saddle Contour
#27 Touch Up Lacquer Bottle
#28 Recycle Beverage Can
#29 Micrometer
#30 Toothbrushes
#31 Sander Safety
#32 Hemostats
#33 Compressed Air Lines
#34 Wine Cork Knife Point Protector
#35 Chisel Drawer Dividers
#36 Bent File Chisel
#37 Screwdriver Chisel
#38 Acetone Finish Test
#39 Bevel Fret Slot
#40 Solvent Cap Dispensing Cup
#41 Packing for Travel
#42 Pickup Brace Damage
#43 Coloring Glue
#44 Cutting Paper on Band Saw
#45 Quick Grip Brace Jack
#46 Wedge F-hole Clamp
#47 Guitar Wall Hanger
#48 Half Pencil
#49 Straw Pipette Extender
#50 X-brace Top Wrinkle
#51 Paper Pad Mixing Palette
#52 Fluorescent Replacement Bulbs
#53 Swing Arm Lamps
#54 Packing Pegheads
#55 Pyramid Bridge Clamping Caul - External
#56 Threaded Clamp Foot
#57 Masking Tape for Indexing Bridge
#58 Rubber Band Tuner Grommet Retainer
#59 Belt Sanding Celluloid
#60 Sharp Nut
#61 Side Crack Reinforcement
#62 Dry Pigment Sorting Block
#63 Paper Grain Direction
#64 Modify Drill Bit for Cutting Wood
#65 Fret Pullers Pull Other Things
#66 Heavy Duty Push Sticks
#67 Single Edge Razor Blades
#68 Acid Brushes
#69 Plastic Stretch Wrap for Tool Protection
#70 Bit Holder Blocks
#71 Cross Grain Sanding
#72 Truth in Labeling
#73 Plastic Wrap Glue Resist
#74 Cut Acid Brush
#75 Stretch Wrap Masking
#76 Spray Can Cap
#77 Spray Can Nozzle
#78 Kitchen Paring Knife for Shop Utility
#79 Powerless Belt Sanding
#80 Drill Index
#81 Grinder Support
#82 Leather Pliers Grip
#83 Paper Towel Holder
#84 Newspaper Drawer Liner
#85 File Handle
#86 Recycle Condiment Bottle
#87 Diagonal Cutter Selection
#88 Fatigue Mat
#89 Credit Cards
#90 PVC Shop Vacuum Tool
#91 String Retainer String
#92 Hex Wrench Rack Improvement
#93 Power Tool Casters
#94 Eyes and Ears
#95 Soft Vise Jaw Pads
#96 String
#97 Layout on Metal
#98 Storing Long Electrical Cords
#99 Hanging Coil Hoses
#100 Cutting Aluminum
#101 "Candling" Guitar Tops to See Brace Locations
#102 Locating and Tracing Braces with Magnets
#103 Foil Protection for Reamers
#104 Dry Sandpaper Lube
#105 Mixing Epoxy without Bubbles
#106 Spray Lube Siphon Tube Reinforcement
#107 Paper Towel Half Sheets
#108 Dusting Brush Modification
#109 Cutting Screws and Bolts
#110 Catalog Sale Flyers
#111 Gluing Bin Boxes
#112 Hacksaw
#113 Link Belt
#114 Freehand Band Saw Technique
#115 The Key Hole
#116 Ceiling Posters
#117 Magnetic Screwdriver
#118 Wide Disposable Brush
#119 Veneer Cutting on Band Saw
#120 Finding Center by Balance
#121 Hacksaw Duplicate Parts
#122 Chuck Key Magnet
#123 File Card for Cleaning Saw Blade
#124 Calculator Bag
#125 Door Storage
#126 Magnetic Pocket Screw Holder
#127 Paint Can Lid
#128 Quick Tape Strap for Sensitive Items
#129 Shop Vac Hose Strain Relief
#130 Coiling a Band Saw Blade
#131 Oil Spill Cleanup
#132 Wood Parallels
#133 Masking Tape Handles
#134 Wedges
#135 Tethered Door Stop Wedges
#136 Long Air Hoses
#137 Soda Straw Parts Storage
#138 Hanging Holes for Tools
#139 High Item Picker
#140 Tool Index Wood Infill
#141 Cardboard Drawer Liner
#142 Waste Basket Bungee
#143 Tool Covers
#144 Bungee
#145 Magnetic Bit Storage Drawer
#146 Platform Ladder
#147 Magnetic Tool Pickup
#148 Kitchen Hero - Cutting Board
#149 Kitchen Hero - Diamond Hone
#150 Photographs for insurance
#151 Unscrew Container Safely
#152 Little Boxes - Get Rid of Lid
#153 Swivel Casters for Tool Cabinets
#154 "Temporary" tool stands
#155 Tool Drawer Dividers
#156 Rope Trick: Cutting
#157 Broom Handle
#158 Hand Drill Countersink
#159 Using Digital Calipers
#160 Identifying Metric Hex Keys
#161 Dremel Carbide Cutoff Wheel
#162 Fence Hand Safety
#163 Empty Bin Boxes
#164 Cutting Bin Boxes
#165 Camphor
#166 Decant Epoxy to Avoid Quick Reaction
#167 Epoxy Mixing on File Folder "Palette"
#168 Wood Screw Pilot Drill Size
#169 Reverse Switch Safety Bolt
#170 Keyless Chucks
#171 Work Glove Storage Rack
#172 Cutting Spring on Grinder
#173 Stacking Tool Cabinet Bottoms
#174 Label Those Drawers
#175 Extra Drill Chuck
#176 Sauce Pan
#177 Ball End Hex Wrench
#178 Poly Bottle Bottom for Parts Washing Basin
#179 Square Bottle Bottom for Parts Drawer Bins
#180 Screws in Jars
#181 Salvage Hardware Drawer
#182 Cutting Long Cardboard Tubes
#183 Repetitive Length Cutting on Band Saw
#184 Mark Up Your Ruler
#185 Plastic Containers and Solvents
#186 Mobile Bin for Wood Scraps
#187 Scrap Bin Cover
#188 Scrap Bin Triage
#189 Ball Peen Hammers
#190 Old Rags to Prevent Under Bench Hunting
#191 Storing Magetic pickup tools
#192 Duct Tape Mallet
#193 Cut Down Old Paint Brush
#194 Plastic Bag Makes Emergency Glove
#195 Break a File to Make Short Ones
#196 Magnets to Hold V-Block
#197 Steel Rules May Have Poorly Cut Ends
#198 Buy Files by the Box
#199 Battery Charger Maintenance
#200 Extending Cable Ties
#201 Miter Gauge Alignment
#202 Recycle Paint Thinner
#203 Spray Can Freshness Reminder
#204 Pipette Sealing Trick
#205 Cookie Sheet Chip Pan
#206 Extension Cord Strain Relief
#207 Super Glue "String Needle"
#208 Heavy Duty Extension Cords
#209 Magnetic Book Hangup
#210 Paint Special Tool Handles for Identification
#211 Hang up those brooms
#212 Wood V-Blocks
#213 Miter Gauge Rip Fence
#214 Writing on Saw Table
#215 Saw Table Wax Lube
#216 Toilet Paper
#217 Dispensing Paint
#218 Cutting Short Pieces on Band Saw
#219 Recyled Cardboard Box Tote
#220 Phonograph Needle Scriber
#221 Wall Mounted Tin Can Tool Holders
#222 Dental Floss Sewing Thread
#223 Cut Paper Towel Roll
#224 Hand Tool Oiler for Rust Protection
#225 Tool Instructions Taped Inside Drawers
#226 Forstner Bits in Aluminum
#227 No-Mess Spill Wiping
#228 Roll Wrapper as Spill Wiper
#229 Shop Rags from Bed Sheets
#230 Cutting Shop Rags on the Band Saw
#231 Rubber and Vinyl Mats on Concrete Floors
#232 Tape for Removing Splinters
#233 Cutting Steel Wool Pads
#234 Paint Can Lid Installation
#235 Pouring from Gallon Cans
#236 Cutting Clear Plastic on the Band Saw
#237 Masking Tape Dispenser
#238 Toothpick Brush
#239 Bailing Wire Spool Retainer
#240 Twisting Wire
#241 Penetrating Epoxy Sealer
#242 Remove that Acrylic Plastic Protective Sheet
#243 Hex Key Cheater Bar
#244 Sand Bags
#245 Label Special Tools and Fixtures
#246 Masking Tape Storage
#247 Paraffin lube for Band Sawing Aluminum
#248 Special Push Sticks
#249 Paper Towel Core for Cord Storage
#250 Skinny "Paintbrush Broom"
#251 Blow out Shop Apron Pockets
#252 Buy Good Hacksaw Blades
#253 Grind the "Set" from Blades to Get Narrow Kerf
#254 Convertible Step Stool
#255 Photograph Your Work
#256 Sweep the Floor
#257 Tool Cabinet "Breadboard" Shelf
#258 Hang Goggles Near Tools
#259 Mark Edges to be Cut
#260 Garbage Can Table Top
#261 Magnetic Spray Can Holder
#262 Removing Box Labels
#263 Simple Dolly and Hoist to Move Heavy Items
#264 Recording Lent Tools
#265 Abrasive Paper for Sharpening Chisels
#266 Close the Gap on Grinding Wheel Tool Support
#267 Keep Band Saw Blade Guide Low
#268 Used Engine Oil for Shop Duty
#269 Shop Vac Hose Hanger
#270 Grinding Center Punch Point
#271 Pilot Drill Size for Large Drill Bit
#272 Reverse Drilling to Enlarge Hole
#273 Drill Clamp Feet for Accessories
#274 Glass Microscope Slide Scraper
#275 Bubble Wrap Packing Trick
#276 Cold Chisel Safety Tip
#277 A Really Simple Drill Guide
#278 Drill Press Center Finder
#279 Split Point Drill Bits
#280 Variable Pitch Band Saw Blade
#281 Guitar Strings for Other Uses
#282 Cyanoacrylate Catalyst Bottle
#283 Mangetic Holder for Small Parts
#284 Drilling Cotton Buffs
#285 Diamond Grinding Wheel Dresser
#286 Heat to Remove Sticky Labels
#287 Paint Metric Wrenches
#288 Stackable Cottage Cheese Containers
#289 Aligning Wood Screw Slots
#290 Drilling Round Things
#291 Screw Machine Length Drills
#292 Relief Cuts on Bandsaw
#293 Cross Cutting Long Board on Band Saw
#294 Glue Quick Grip Pads
#295 Resealing Caulk Cartridges
#296 Cyanoacrylate as Wood Sealer
#297 Messy Milling Project
#298 Drill Press Can Cut You When it's Turned Off
#299 Get a Big Vise
#300 Friendly Plastic Ergonomic Handles
#301 Mount Stuff on Cabinet Doors
#302 Wall Bumper Near Electrical Plugs
#303 Keep Dustpan in Trash Can
#304 Ice for Cooling at the Grinder
#305 Making Heavy Twine from Thin
#306 Ice Cube Tray Parts Storage
#307 Cable Ties for Hanging Tools
#308 Cleaning Measuring Tapes
#309 CD-ROM Canister for Adhesive Tape Storage
#310 Split Rivets
#311 Impact Driver
#312 Repetitive Bandsaw Cuts
#313 Old Shower Curtain as Tarp
#314 Replace Thumbscrews on Machines
#315 Have a Little Fun
#316 Magnetic Wrench Holders for Power Tools
#317 Measuring Centers on Uneven Sizes
#318 Reconditioning Sharpening Stones
#319 Magnetic Tool Holders for Drawers
#320 Improvised Masking Tape Bandage
#321 Lok-Line as Flexible Support
#322 Clamping with Drill Press
#323 Camera Tripod Stabilizing Weights
#324 Computer Labels for Drawers and Boxes
#325 Extra Casters for Welding Cart
#326 Use Long Screwdrivers
#327 Soaking Parts in Solvent
#328 Making Safe Edge Files
#329 Cut Cans for Shop Use
#330 Magnets for Bending in Vise
#331 Non Matching Handles are Best
#332 Steel Strap Shim Stock
#333 Stretch Wrap to Secure Solvent Labels on Cans
#334 Mark Pipette Graduations
#335 Keep a Shopping List
#336 Label Unusual leftover Hardware
#337 Magnet to Hold Abrasive Strips on Lathe
#338 Handle to Replace Thumb Screw
#339 Magnet Holds Water Bath on Grinder
#340 Magnets Hold Drill Index on Drill Press Table
#341 Label Grit on Sanding Belts
#342 Mouse Pads for Drawer Liners
#343 Cutting Shallow Notches on Band Saw
#344 Clearing Dispenser Bottle Opening
#345 Faucet Washer as Tool Foot
#346 1-2-3 Clamp It
#347 Tubing for Grinder Support of Thin Pieces
#348 Ring Testing Grinding Wheels
#349 Support Thin Stock for Drilling
#350 Digital Caliper as Tweezer
#351 High Speed Steel Taps
#352 Plastic Bag Thread Protection for Jars
#353 Shop Vac Sock
#354 Bandsaw Thin Stock on Edge
#355 Shop Towel Identification
#356 Pennies are Worth Having
#357 Bag Loose Wires and Cables
#358 Pizza Boxes
#359 Timer for Heat and Fan
#360 Cardboard Floor Mats
#361 Chip Curtain
#362 Cigarette Papers
#363 Age Date Glue Containers
#364 Don't Crumple Old Notes
#365 T-Shirt Tool Cover
$366 Liquid Hand Cleaner
#367 Shop Shelving
#368 Foot Control for Bench Vise
#369 Adjustable Wrench as Caliper
#370 Milk Carton Drawer Bins
#371 Long Bin Boxes on Narrow Shelves
#372 Pencil Sander
#373 Garage Sale Items Can Have Interesting Uses
#374 Hanging Rag Storage
#375 Note Holder at the Door
#376 Simple Upgrade for Quick Grip Clamps
#377 Keep Project Inspirations Handy
#378 Mark Source and Cost on Stock
#379 Label the Size of Staples in Your Staple Gun
#380 Easy Handle for Small Heavy Stock
#381 Check Steel Before Filing
#382 Paint with Your Socks
#383 Centering a Drill on Round Stock
#384 Impromptu Large Hex Key
#385 Cutting "Half a Kerf" on the Band Saw
#386 Squeeze the Last Bit out of a Glue Tube
#387 Use a Copier for Quick "Drawings"
#388 Measuring Over a Ledge
#389 Clean up "Spun" Drill Bit Shanks
#390 Changing the Zero Point on Graduated Dials
#391 Dispensing Small Amounts from Spray Can
#392 Paint Can Opener
#393 Broken Files are Handy in Close Quarters
#394 Buy Small Containers of Some Stuff to Save Money
#395 Kitchen Towels Have Four Lives
#396 Solvent "Recycling" Trick
#397 Still Hung Up on Rags
#398 Simple Leather Finger Saver
#399 Missing Stud
#400 How Much is Left in That Paint Can?
#401 Storing Spare Parts for Machines
#402 Label Adjustment of tools or Gauges
#403 Simple Grinder Safety
#404 Lubricate Wood Screws
#405 Break the Corner for a Tight Fit
#406 Weak Thread Locking Compound
#407 Rope Burn Trick
Glossary
An Illustrated Glossary
Archtop
Armrest
Backstrip
Ball End Strings
Bar Frets
Bearclaw
Belly Bridge
Binding
Birdseye Maple
Biscuit
Blind Saddle
Block Inlay
Book Matched
Bottleneck
Bout
Bowl Back
Box
Break Angle
Bridge
Bridge Pins
Bridge Plate
Button
Cantilevered Fingerboard
Capo
Celluloid
Check
Chipboard Case
Classical Guitar
Clown Barf
CNC Computer Numerical Control
Compensation
Cutaway
Dot Neck
Dovetail
Dreadnought
Ears
Edge Dots
End Block
End Piece
Endpin
Endpin Jack
f-Holes
Fan Bracing
Fiddleback Maple
Fifth String
Fifth String Capo
Figure
Fingerboard or Fretboard
Fingerpick
Fingerrest
Fingerstyle
First Position
First String
Flamed Maple
Flamenco Guitar
Flat Top
Flatpick
Flight Case
Frets
Gig Bag
Grain Runout
Hardshell Case Anatomy
Hawaiian Guitar
Hawaiian Nut
Heel
Heel Cap
Herringbone
High/Low Position
Hollow Body Electric Guitar
Ivoroid
Ladder Bracing
Lap Steel
Lining
Loop End String
Mitered Purfling
Mother-of-Pearl
Neck Block
Nut
Pearl Border
Peghead or Headstock?
Pegs
Pickguard
Pickup
Pin Bridge
Pinless Bridge
Purfling
Pyramid Bridge
Quilted Maple
Relief
Resonator
Resophonic
Ribbon Grain
Ribs
Rosette
Saddle
Scale Length
Scroll
Silk
Slack Key
Snakehead
Solid Body Electric Guitar
Spanish Heel
Steel
Steel Guitar
String Ramps
T-Bar
Tailpiece
Three Piece Back
Through Saddle
Thumbpick
Tie Block
Truss Rod
Truss Rod Cover
Volute
Waist
Which way is up?
X-Brace
General Stuff
About Me
What is FRETS.COM?
I'm on the cover!
Why FRETS.COM?
About the photographs. . .
Help!
Photo Studio
Contributors
my home shop this morning
Mario Martello 1924-2006
OOPS!
Resume
Links
FRETS Links
/Repair/Restoration Blogs/

Shoring Up a Serious Cave-in!

This was converted from the original Frets.com site.
To view the original page click here

Day 1: Inspection and disassembly

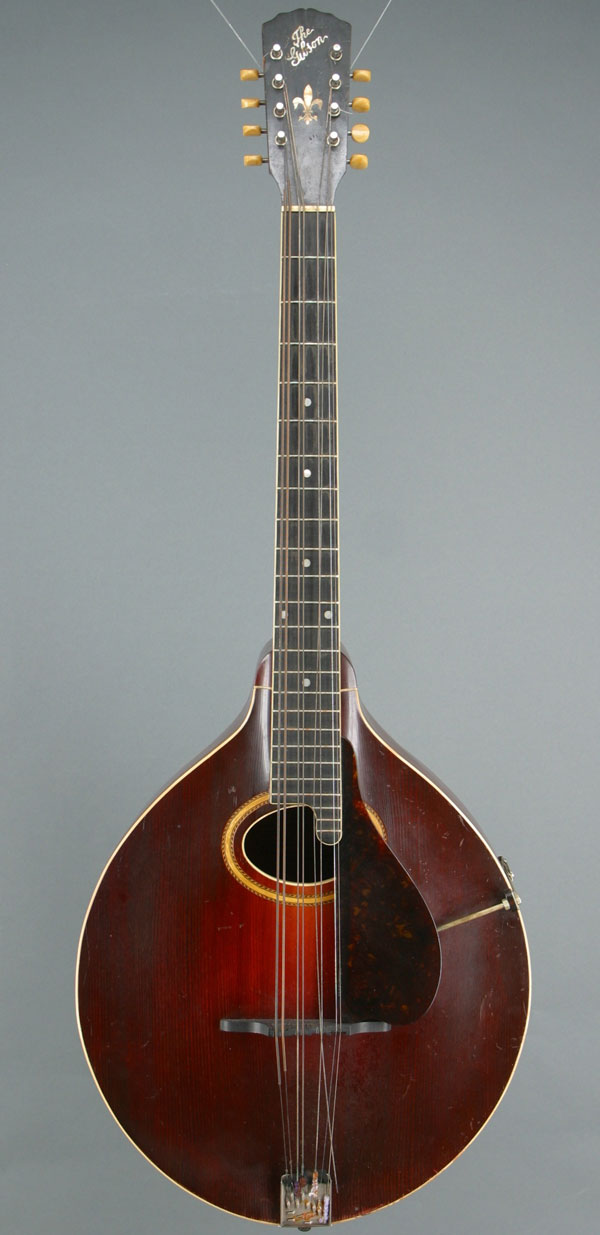
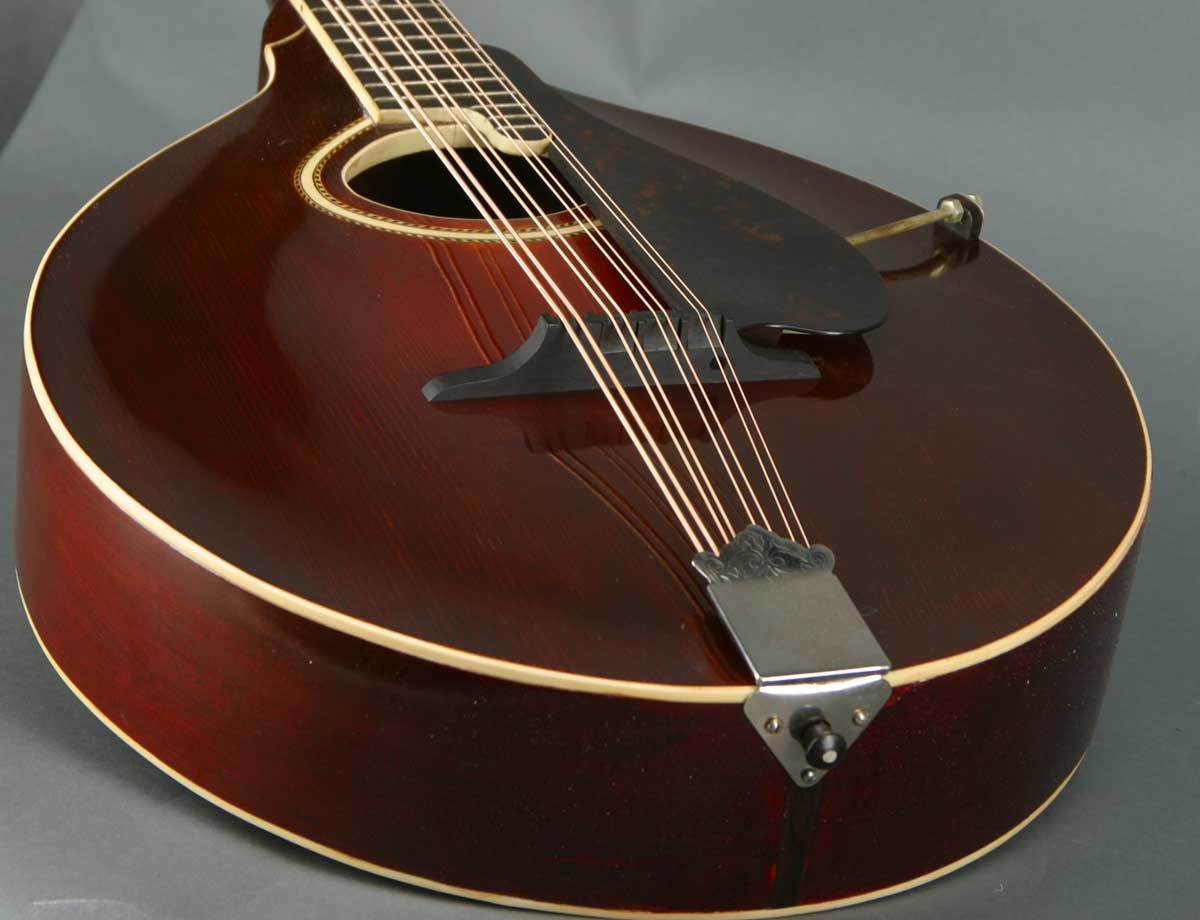
It may not be obvious in the photo, but this Ninety year old Gibson K-2 mandocello has seen its share of hard times. It's a classic relic from the days of the great mandolin orchestras, and it has the potential of doing its job once again, after some serious restorative effort:


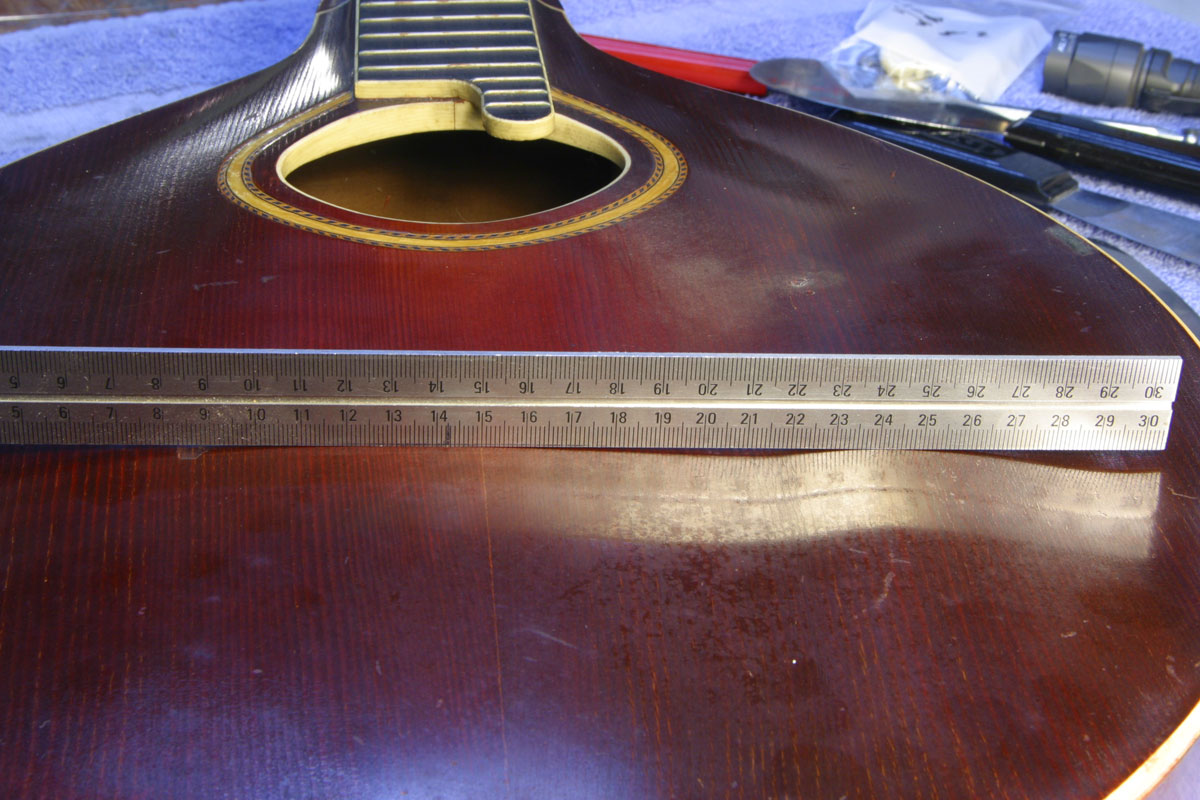
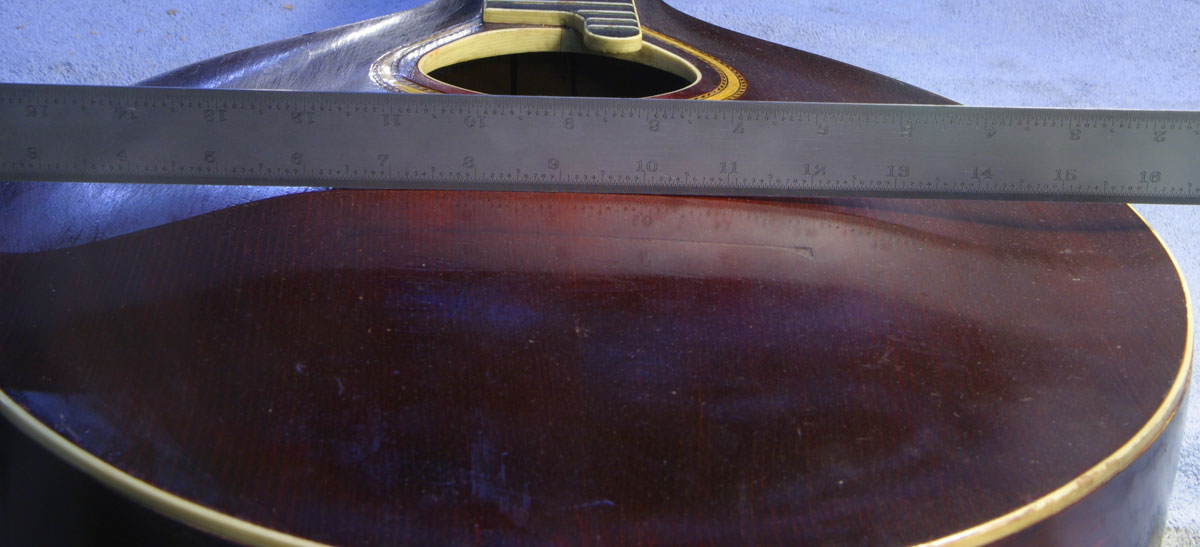
Shown in strong reflective light, the top damage is quite evident:

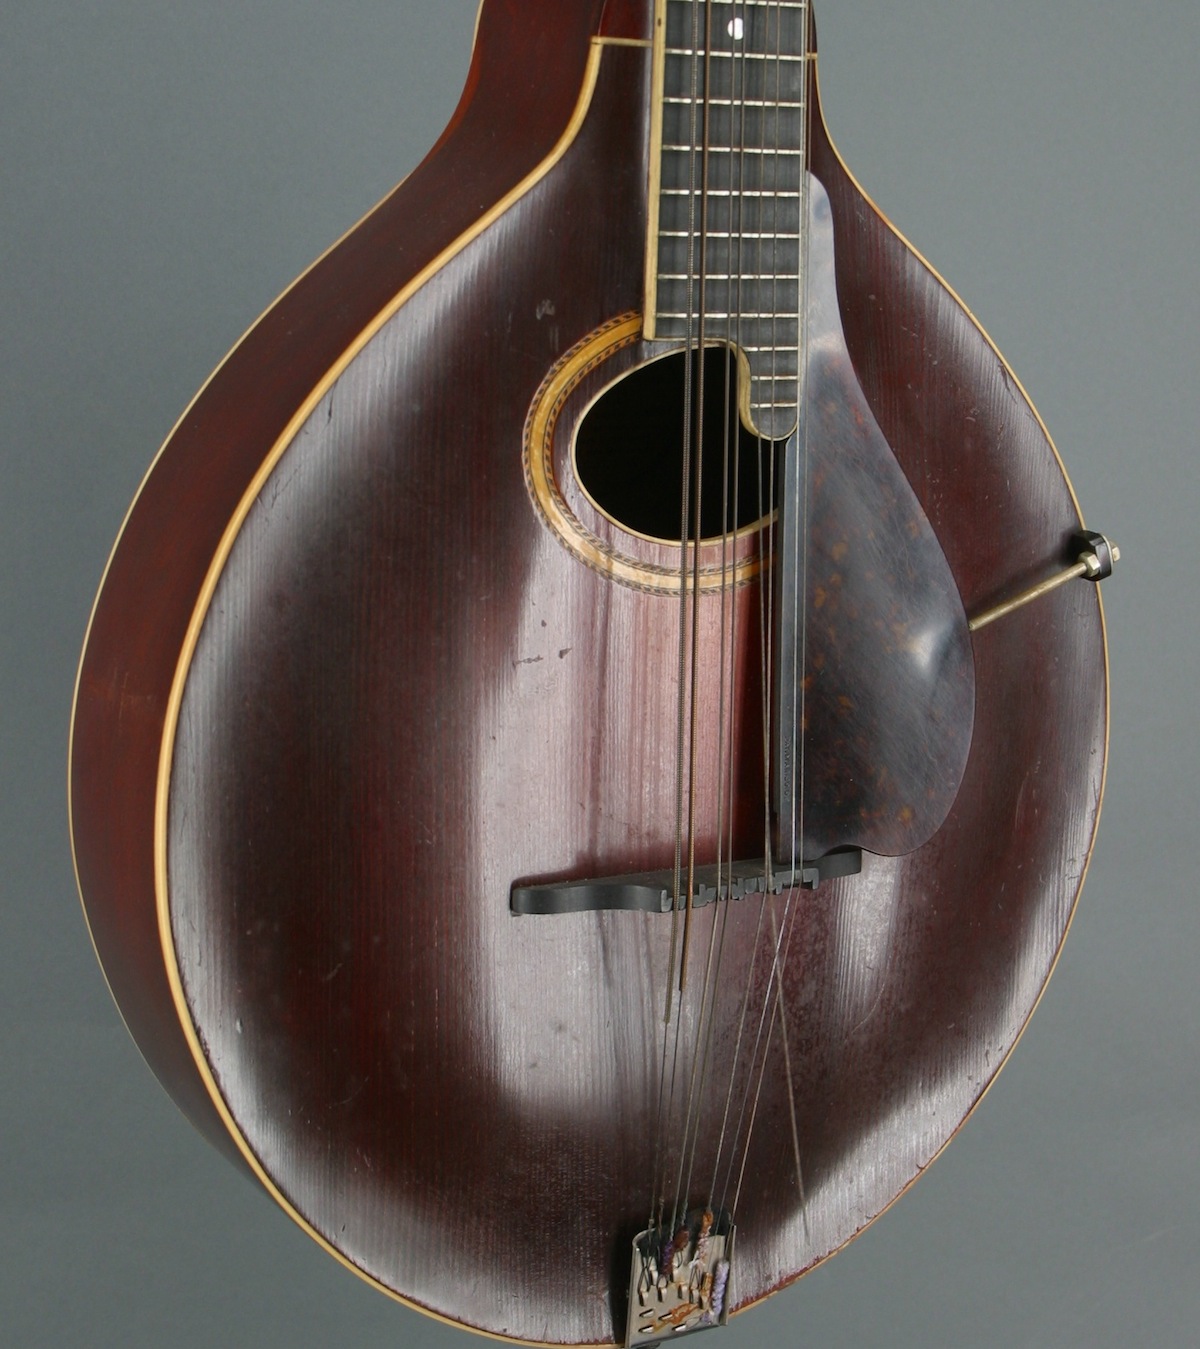
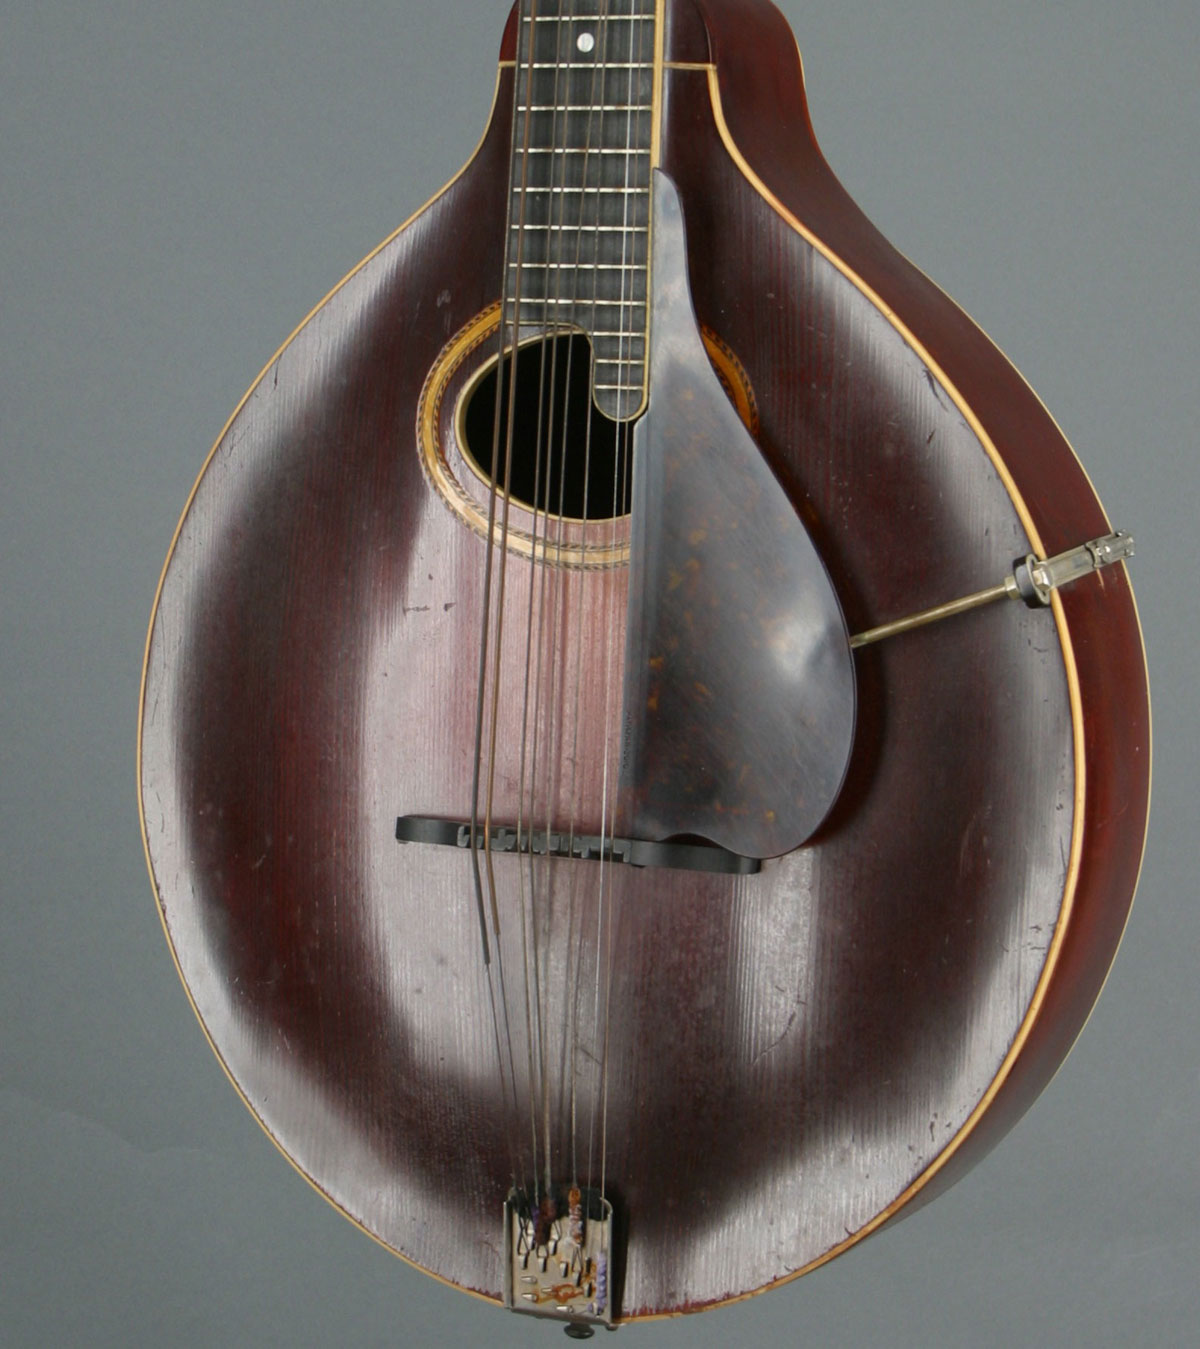
A bit "under built" from the get-go, the top started to sag under the load of downward pressure at the bridge, particularly on the treble side. Even with the string tension released, the sagging are is very pronounced, to say the least:


Here's yet another view of the top distortion:


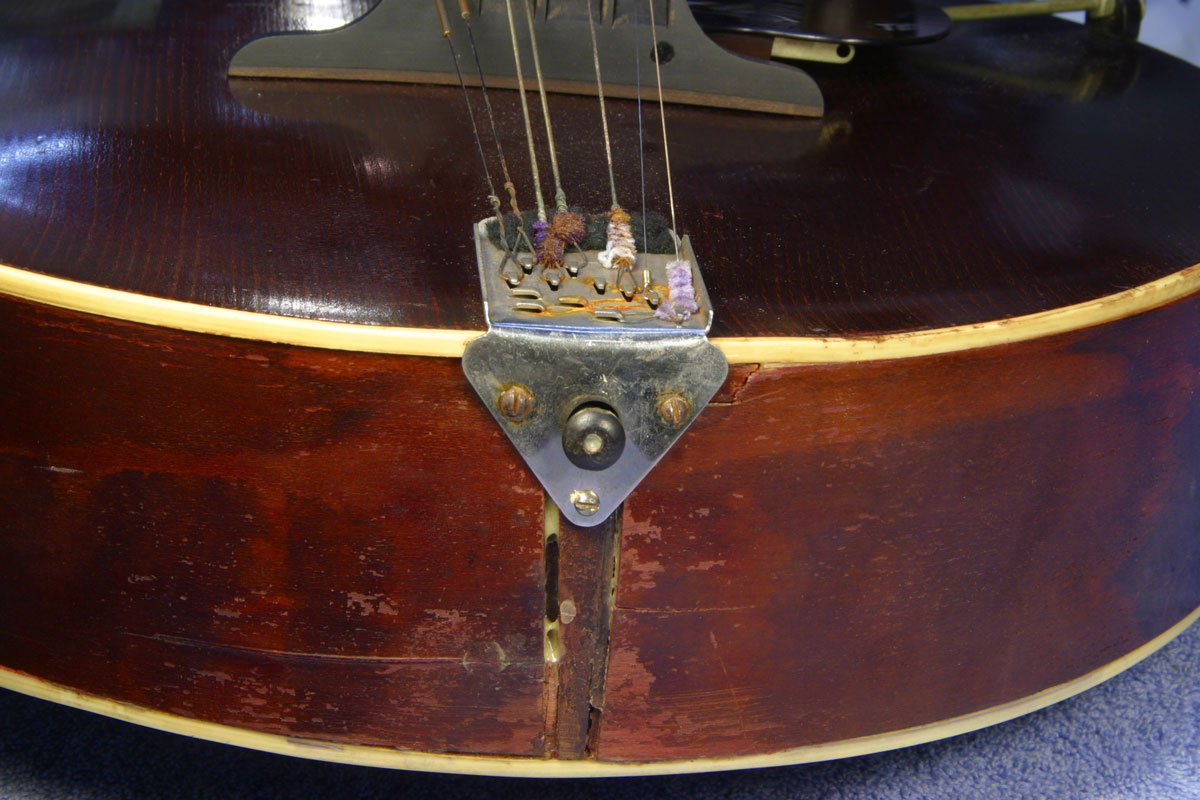
As you can see, the bridge has had a very thick shim added to raise the action as the top began to fail" =


And, adding insult to injury, there's been some seriously bad "repair" done to loose areas where glue failure occurred. Notice the gobs of white glue above and the deformation and cracking of the sides.

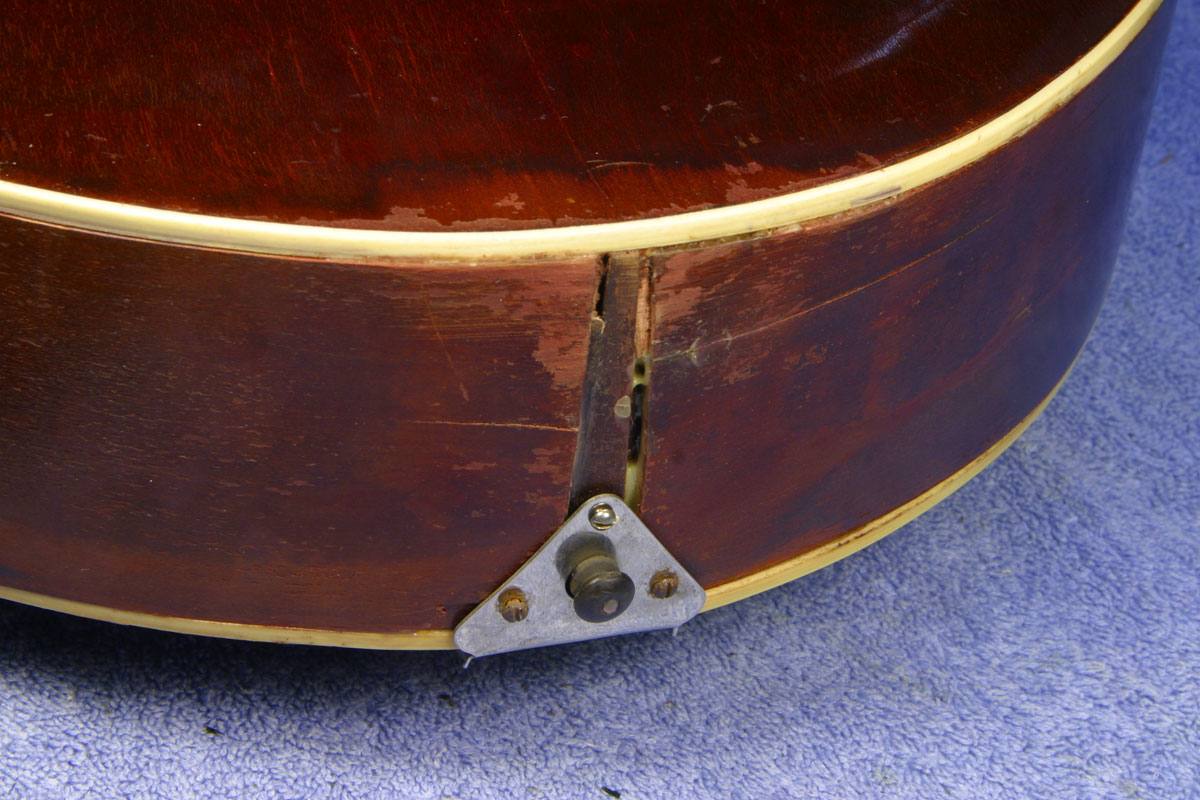
Two more photos of the misaligned end block area. Along with the sagging area of the top, the instrument was close to complete structural failure at the tailpiece.

As if that weren't enough, there's an equally messy misalignment and glue job at the neck block area. This poor thing was really potted in white glue:


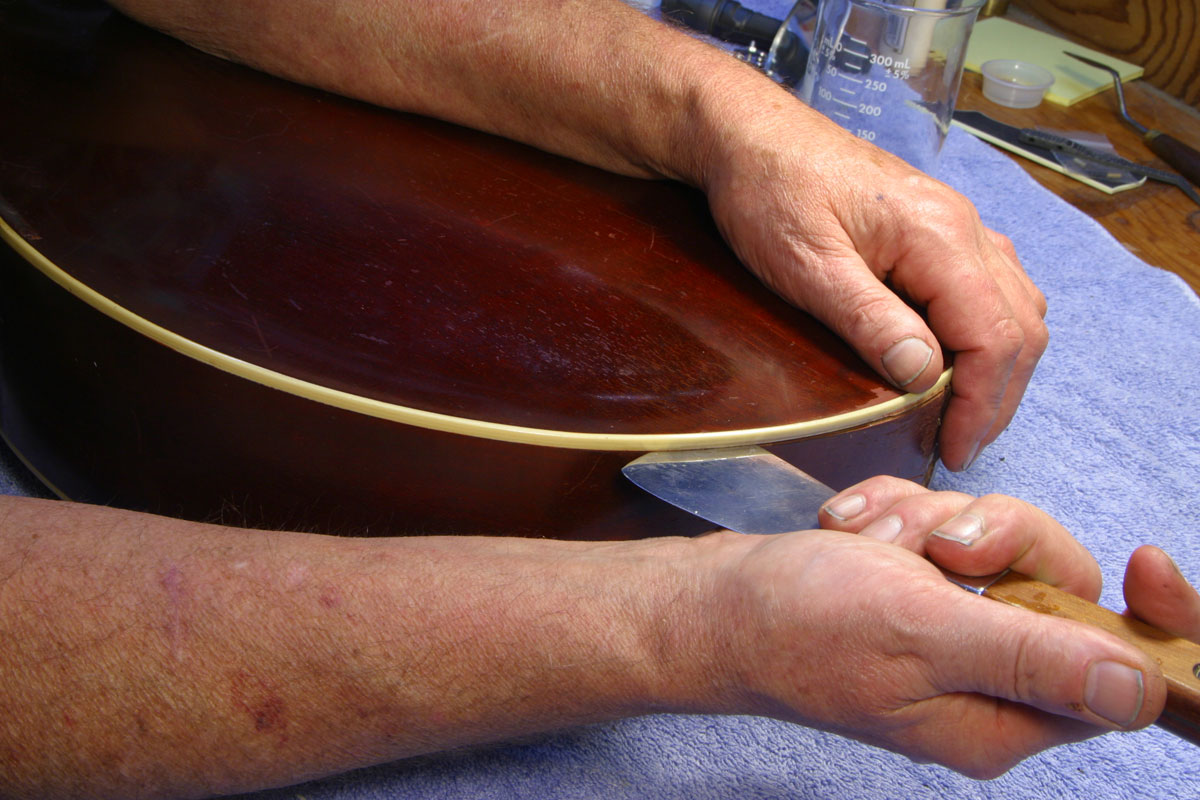
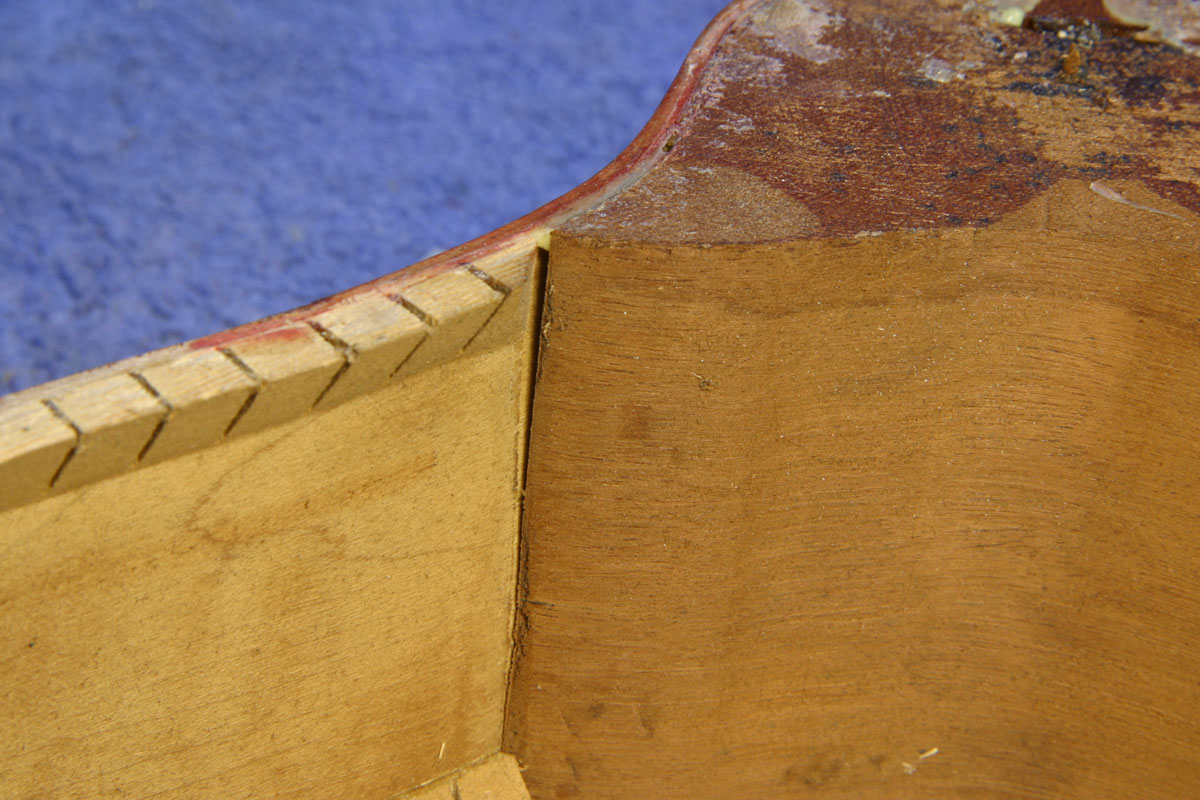
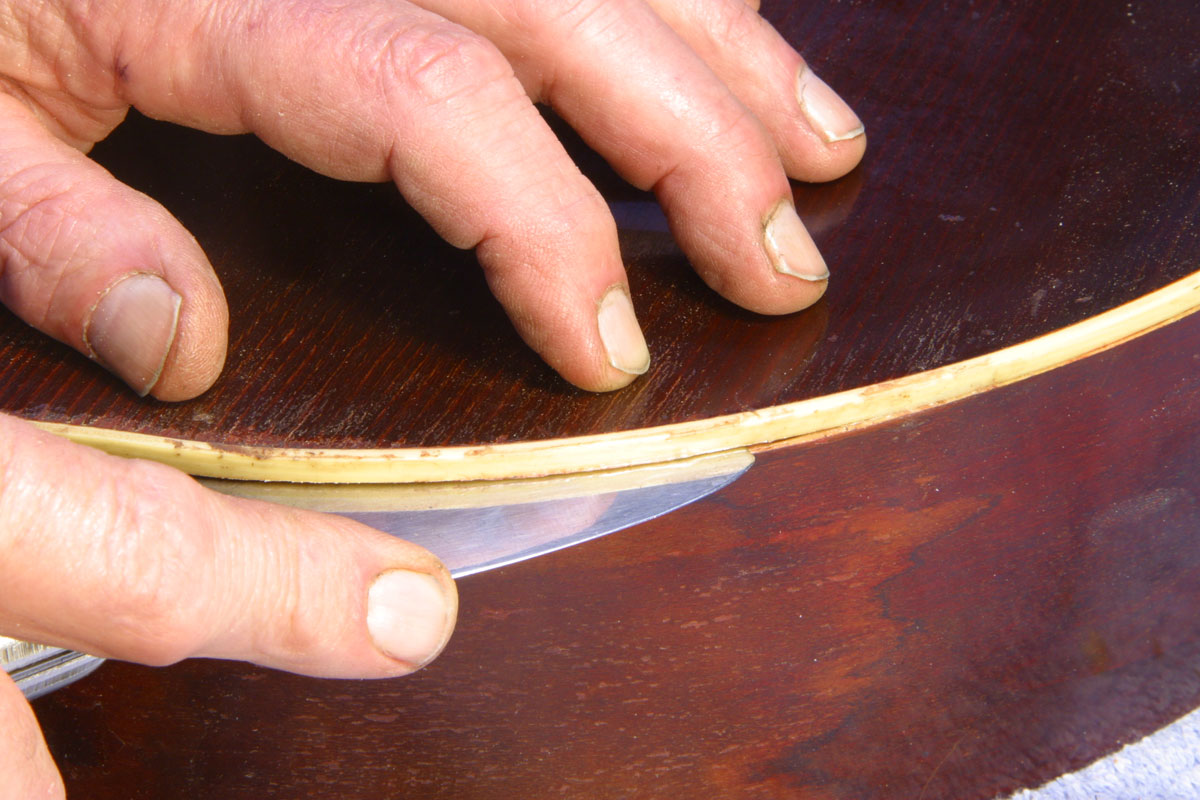
One thing for certain was the need to take the back off the instrument to fully assess the damage and put things back in order. Working around the sides with my favorite sharpened putty knife, I was able to pry the back loose, a little section at a time:


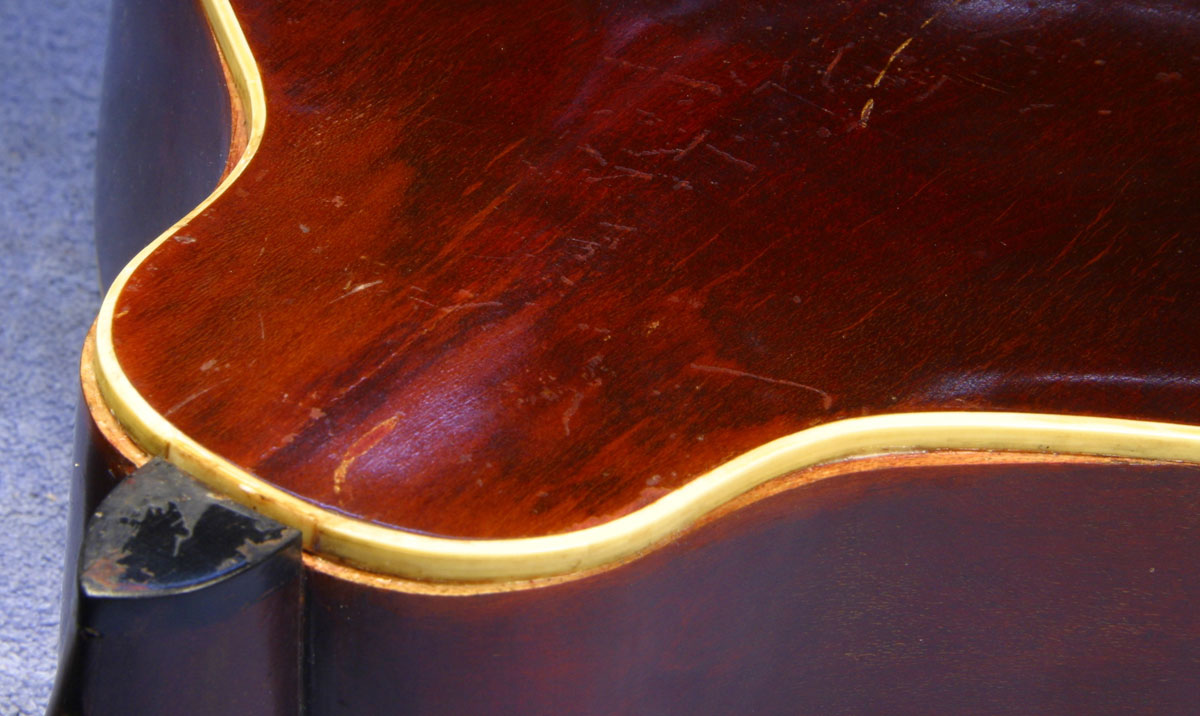
Most of the Gibson mandolin family instruments have the top and back binding right at the glue joint edge, so it isn't necessary to remove the binding to take the back off:

From mandolin to mandola to mandocello, these old Gibsons were built with only one small brace inside, just below the oval sound hole. As one might expect, the tops of the old mandolins and mandolas also fail occasionally, but a sagging top is more likely with the larger expanse of unsupported soundboard of the mandocello.

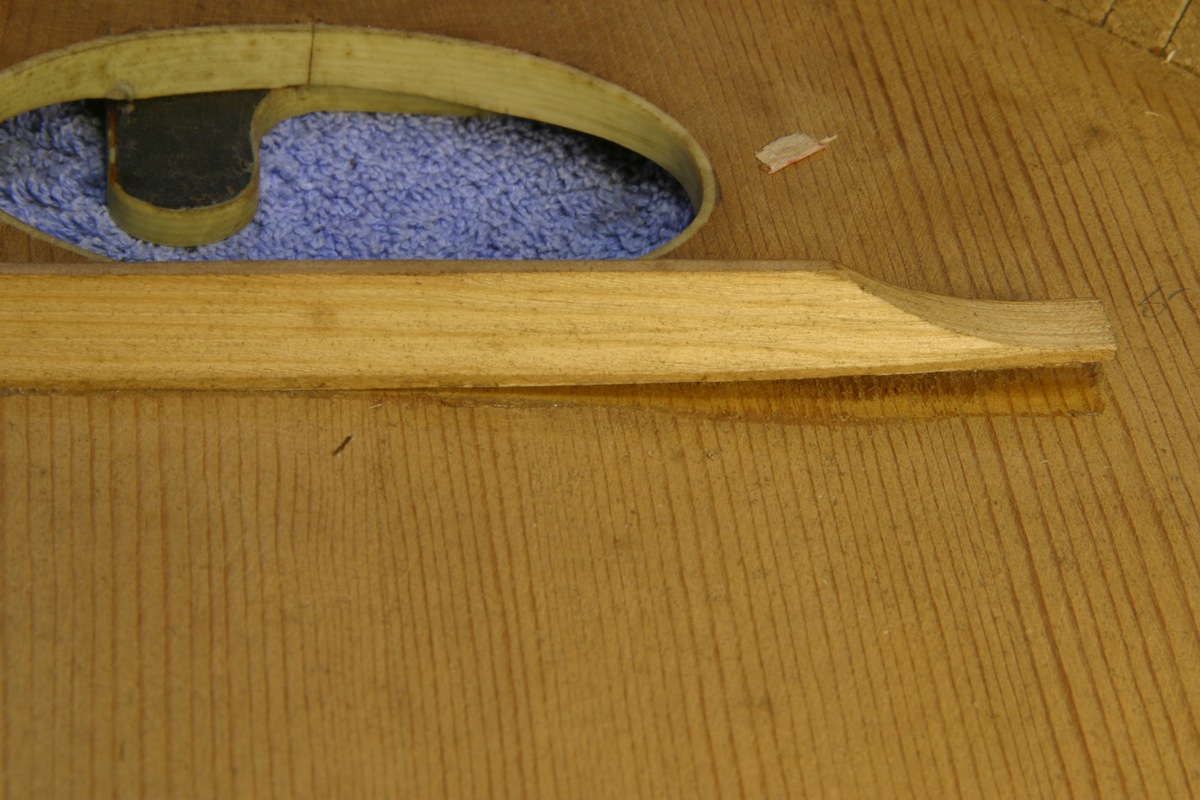
This brace was seriously loose, of course, contributing to the weakness of the top:


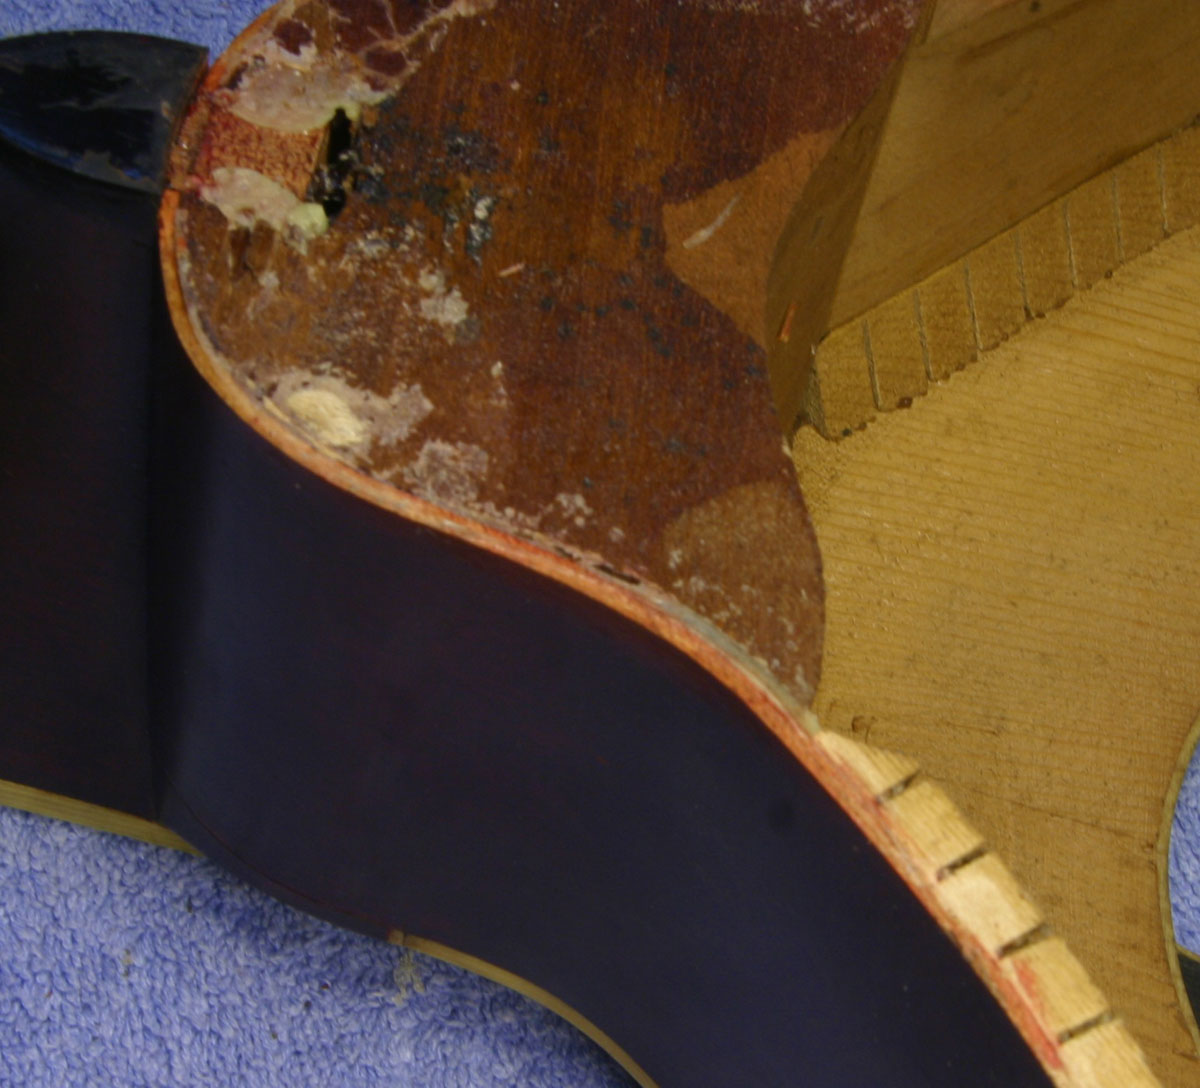
As expected, there was a nice mess of glue around the neck block:


Just for a bit of added "convenience" the glue had run way down between the sides and the curved neck block sections:


All that would have to be cleaned out, of course.

Day 2: The Plaster Mold


Before attacking the glue and other side damage from previous repair efforts, I decided to make the plaster mold of the top contour so I could set it aside to dry while I worked on other parts of the job. I'd be needing a good mold of the top contour to be able to recreate the original shape where the top had collapsed, and a plaster mold is the quickest and easiest way to get that mold made.
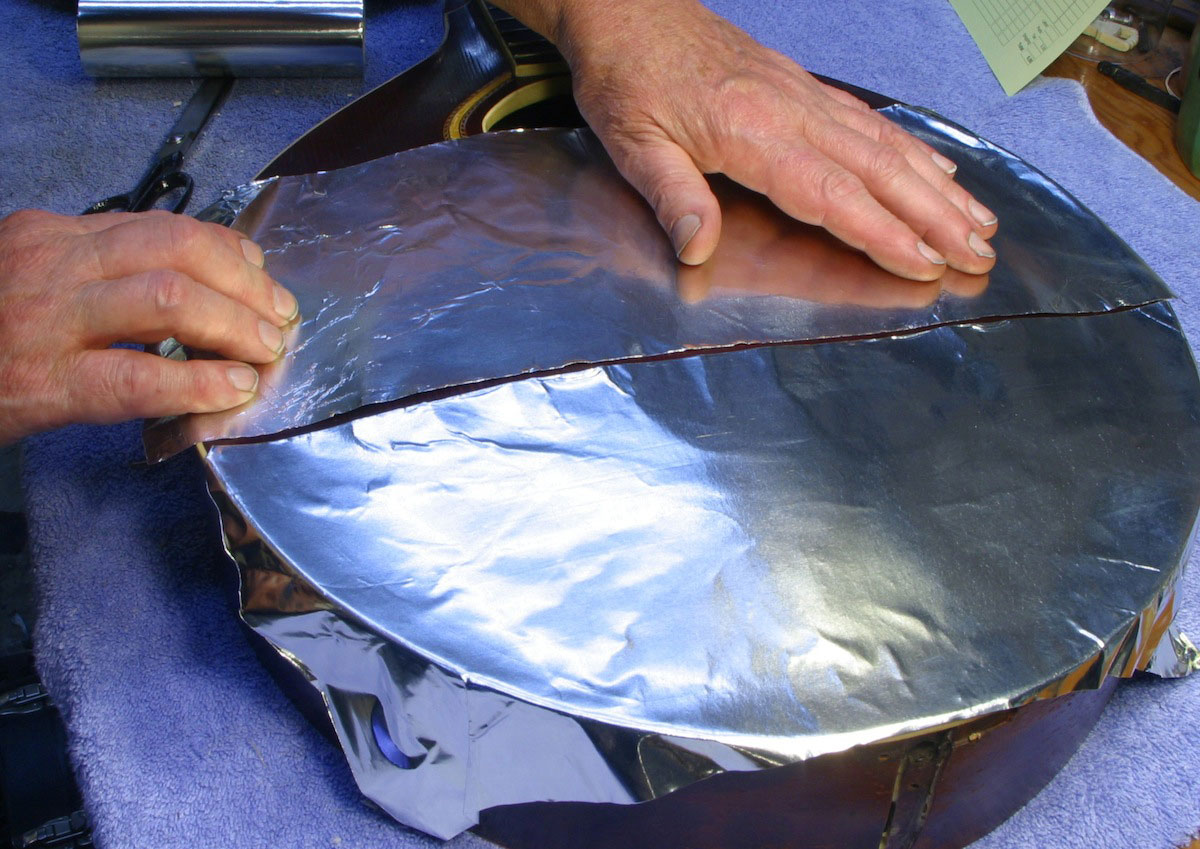
To protect the top finish, I covered the entire area with tin foil:

Now, it's important to know that I'm not using "tin foil" as a generic, meaning "aluminum foil." This is REAL tin foil, and it has a characteristic that's really desirable for this job. Unlike aluminum foil, tin foil has no "temper" and it's really limp. If you've never handled the stuff, you're in for a treat - it's so flexible that it feels almost like cloth. Unlike aluminum foil, I can smooth it down to fit the precise contours of a surface and it doesn't tend to spring back at all.

In case you're wondering where to get tin foil, I'll say that the only source of supply I've found is through dental supply companies. My foil is 1 mil thick, and I wouldn't want it thicker. My pal, Joe, has some that's 0.7 mils thick, and it seems even a bit nicer than mine. No, it's not cheap. When I called my local dental supply, they had no problem selling foil to a civilian. . .

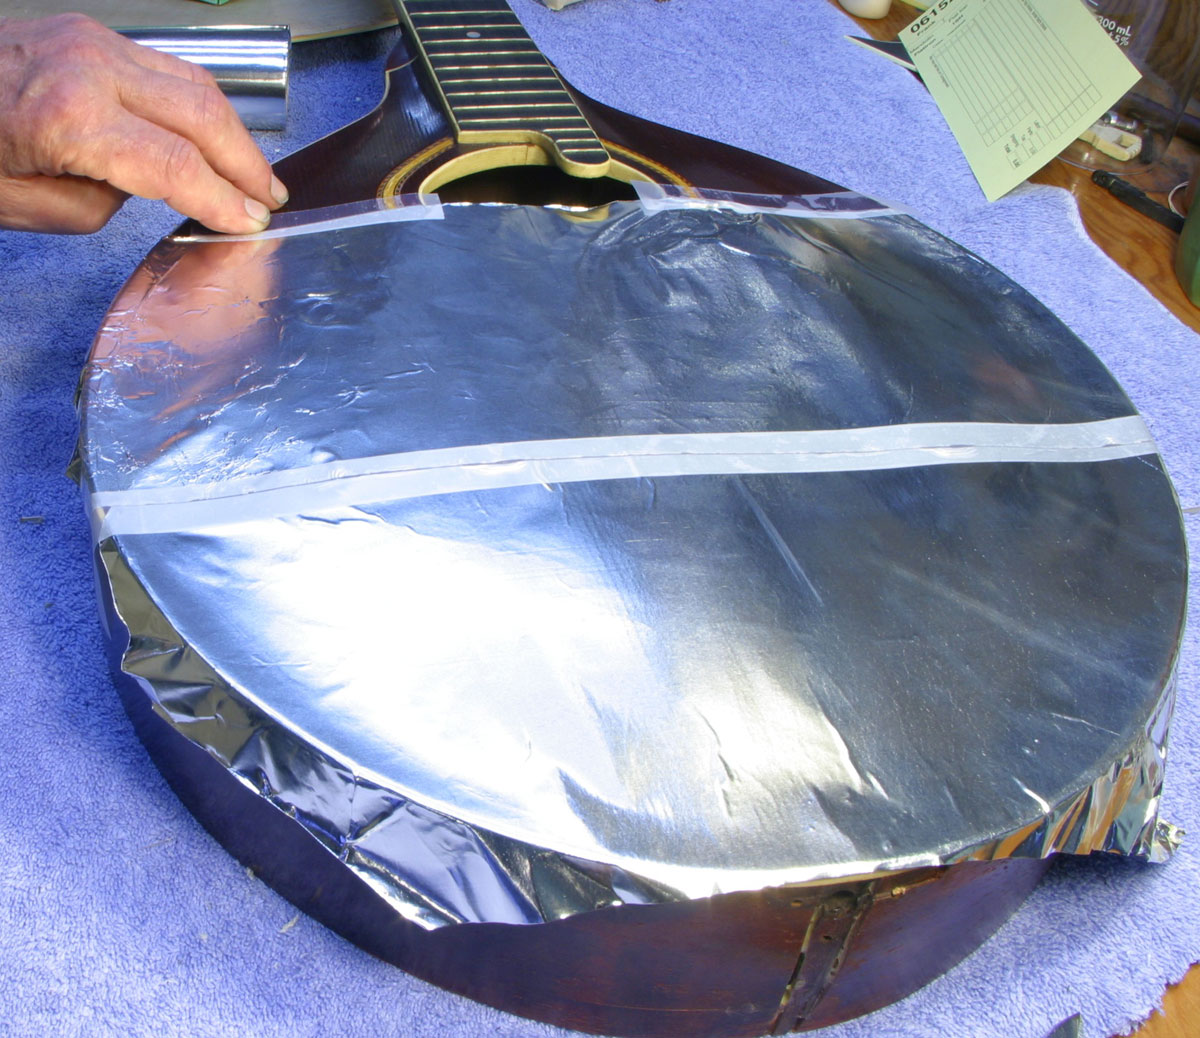
Because I was about to lay a great mess of plaster of Paris on top, I made sure to seal the joint with some thin tape - I wouldn't want any moisture leaking through:


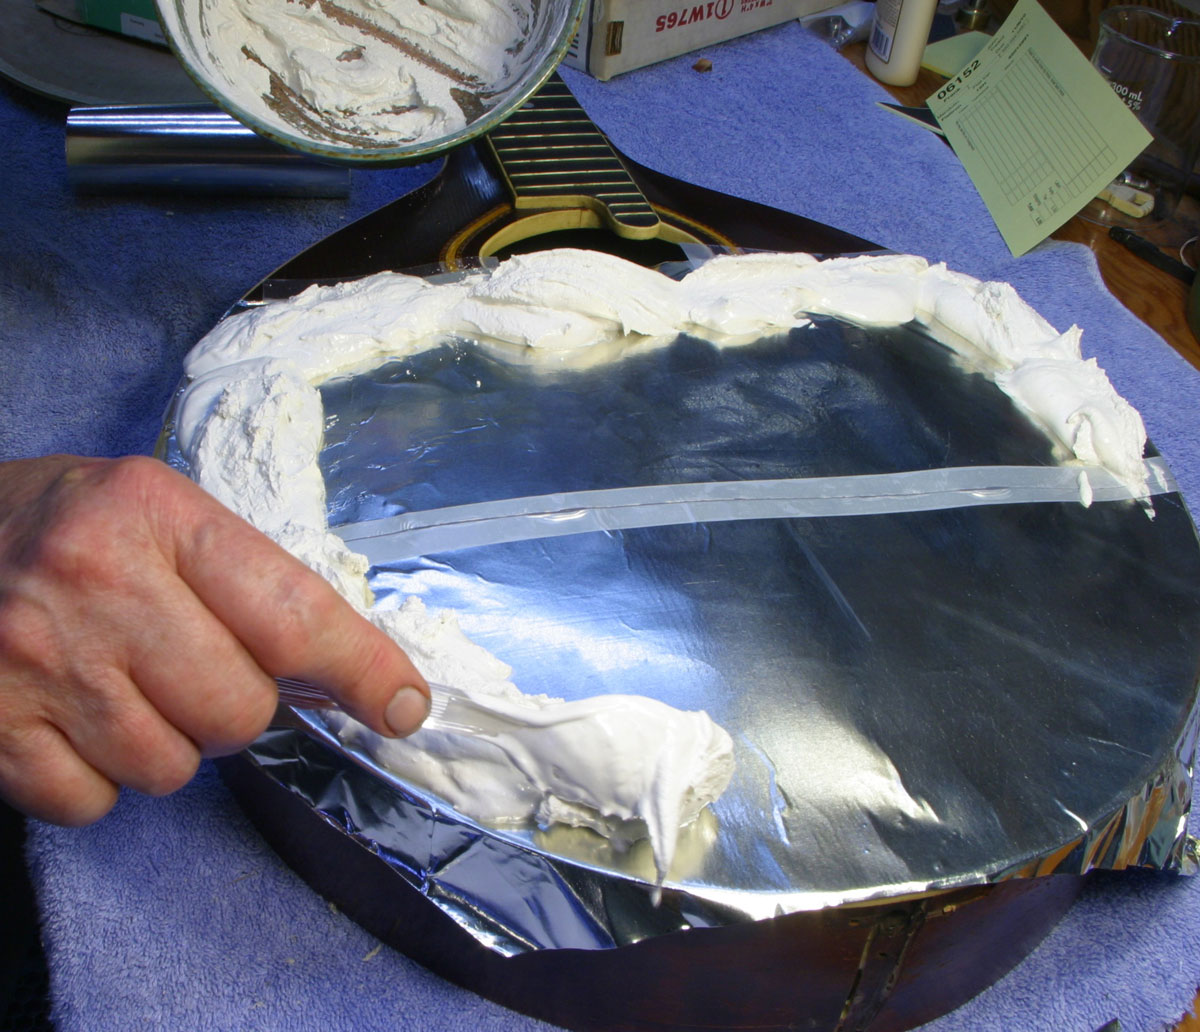
I mixed the plaster to peanut butter consistency, and formed a dam around the edge:


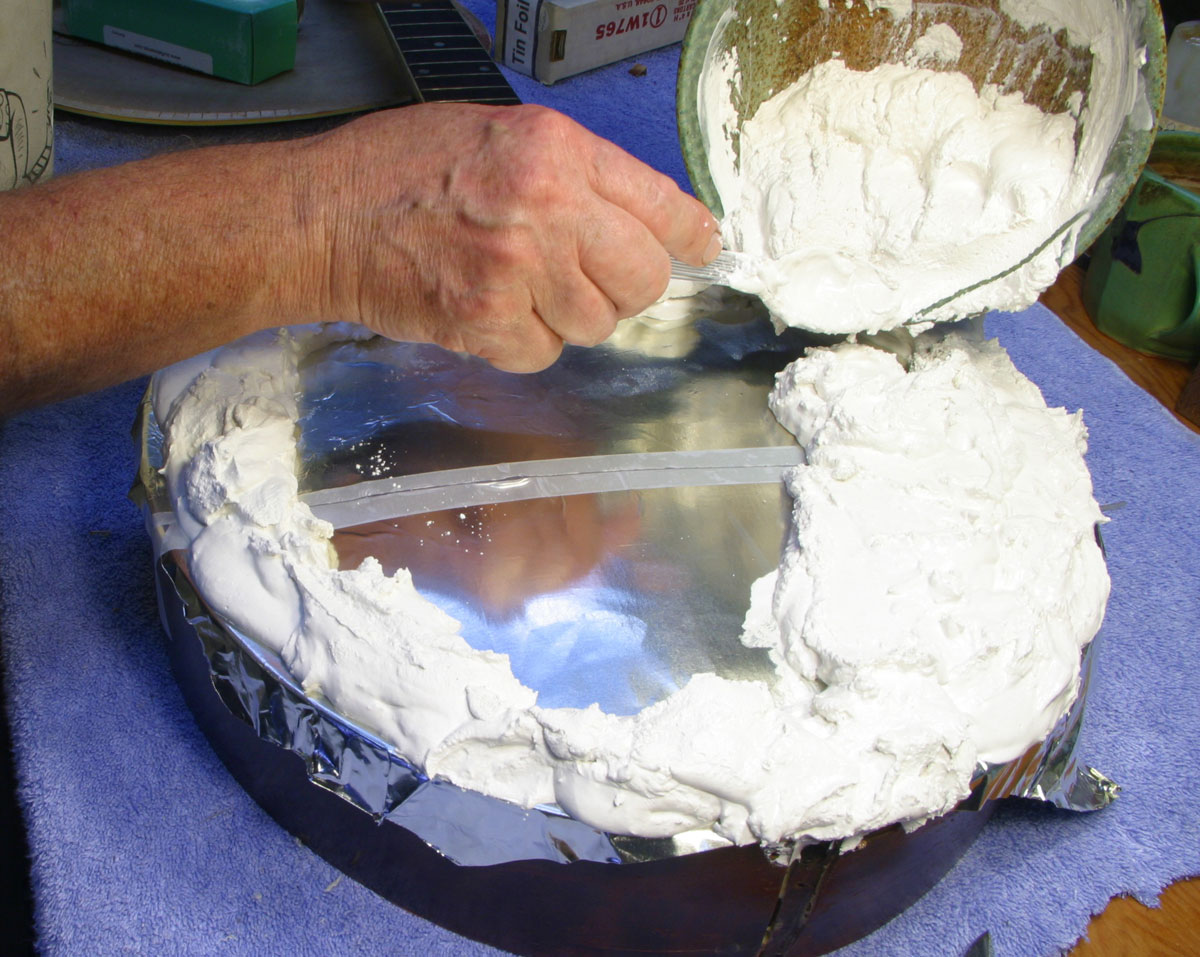
Then with some at mayonnaise thickness, I filled in the rest, mixing small batches so I could handle it comfortably before it began to set:


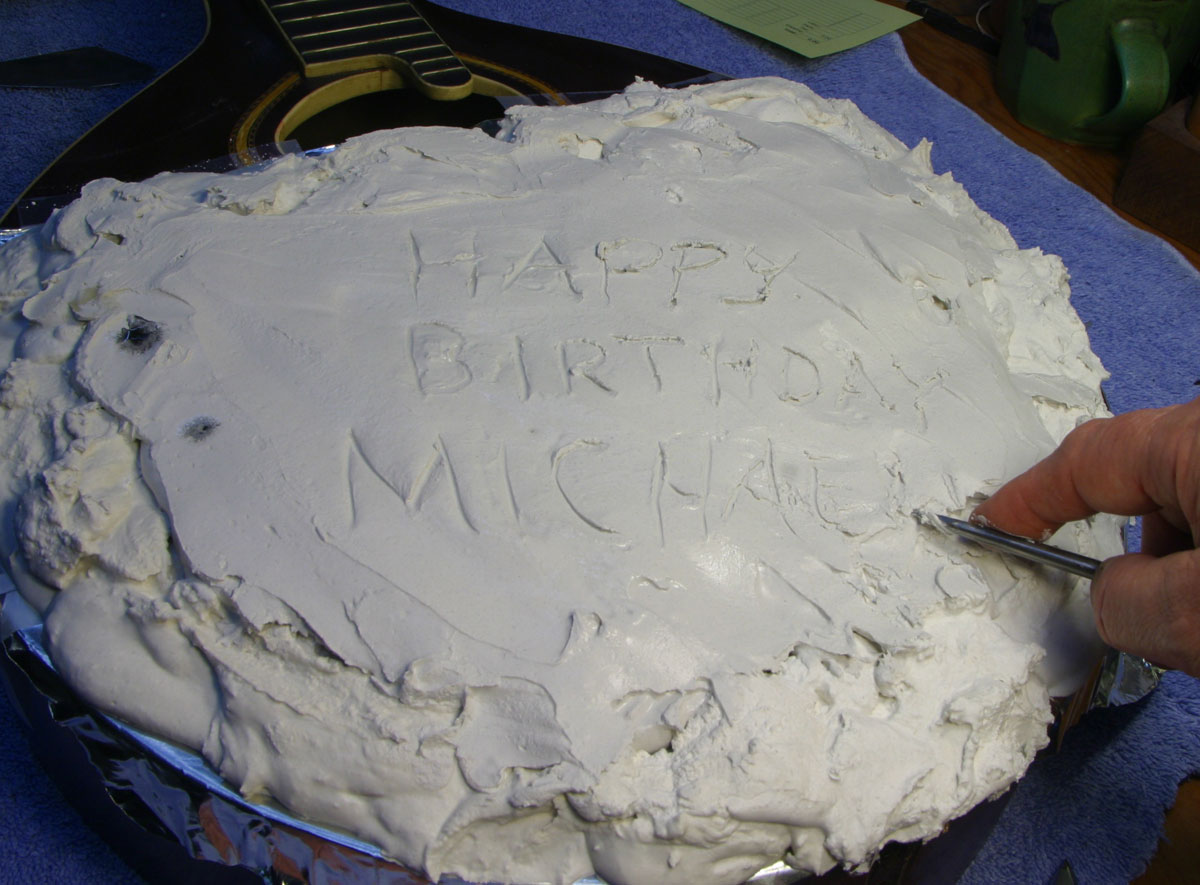
Once the entire area was covered, I waited about an hour for it to set up so it could be handled:


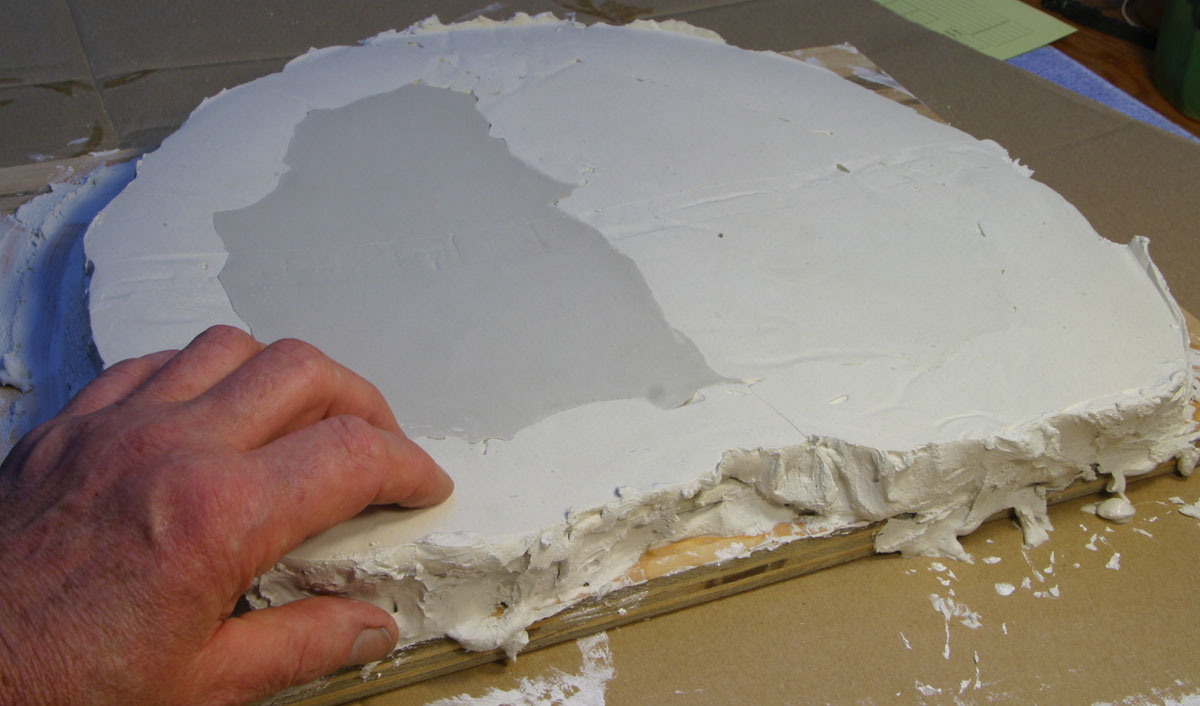
Then, taking that big hunk of plaster off the instrument, I turned it over, and glued it down to a 3/4" plywood work board:


It would spend the next week or so drying out fully. By the way,one patch looks gray in the photo above because one of my batches was from a different brand of plaster, so it came out darker looking.

Day 3: Sticky Old Glue!


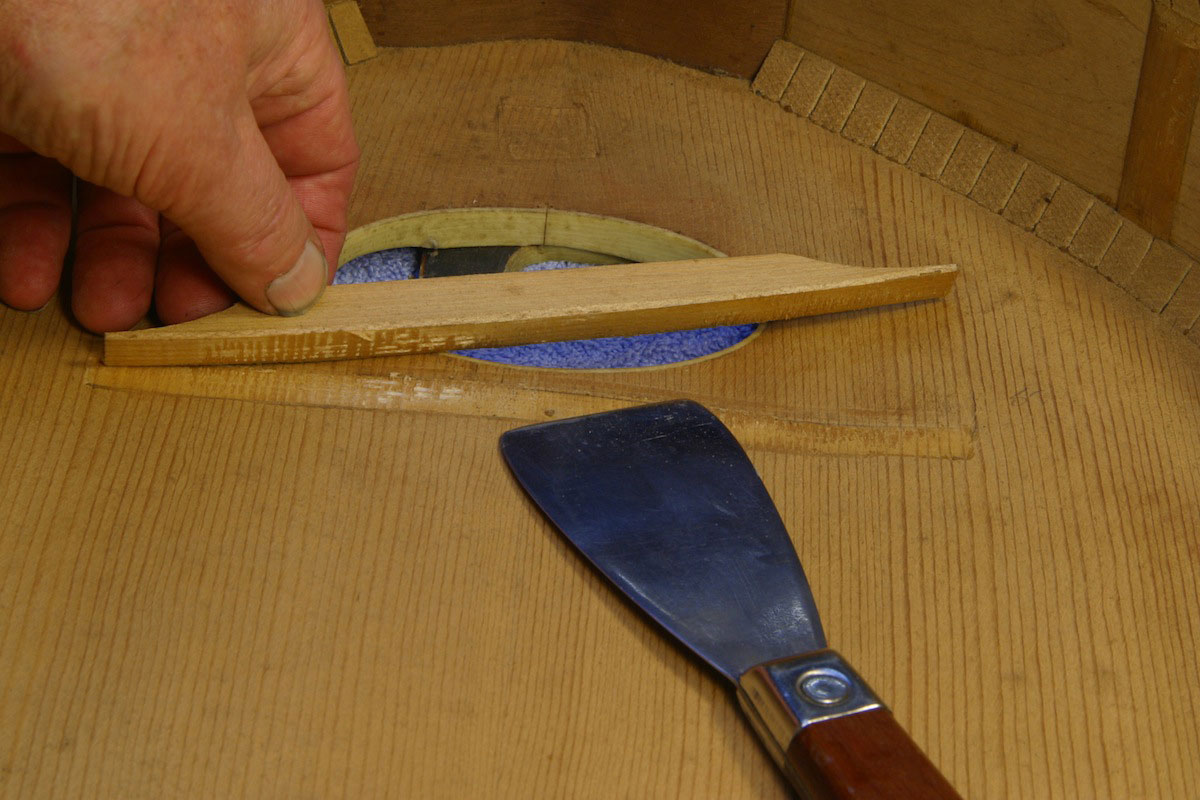
The sound hole brace popped of with the merest jab of my putty knife, so I put it aside while I worked on the damaged sides:

Well, that white glue had run way down into the space between the loose sides and neck block, so I had to break out my steaming rig and squirt hot steam as far into the joint as I could to soften the glue:


Nasty stuff - but once it's softened it can be teased out like strings of freshly chewed bubble gum. It took a right smart while to get it all out of there, but with reapplications of steam and increasingly thinner blade palette knives, I got the job done:


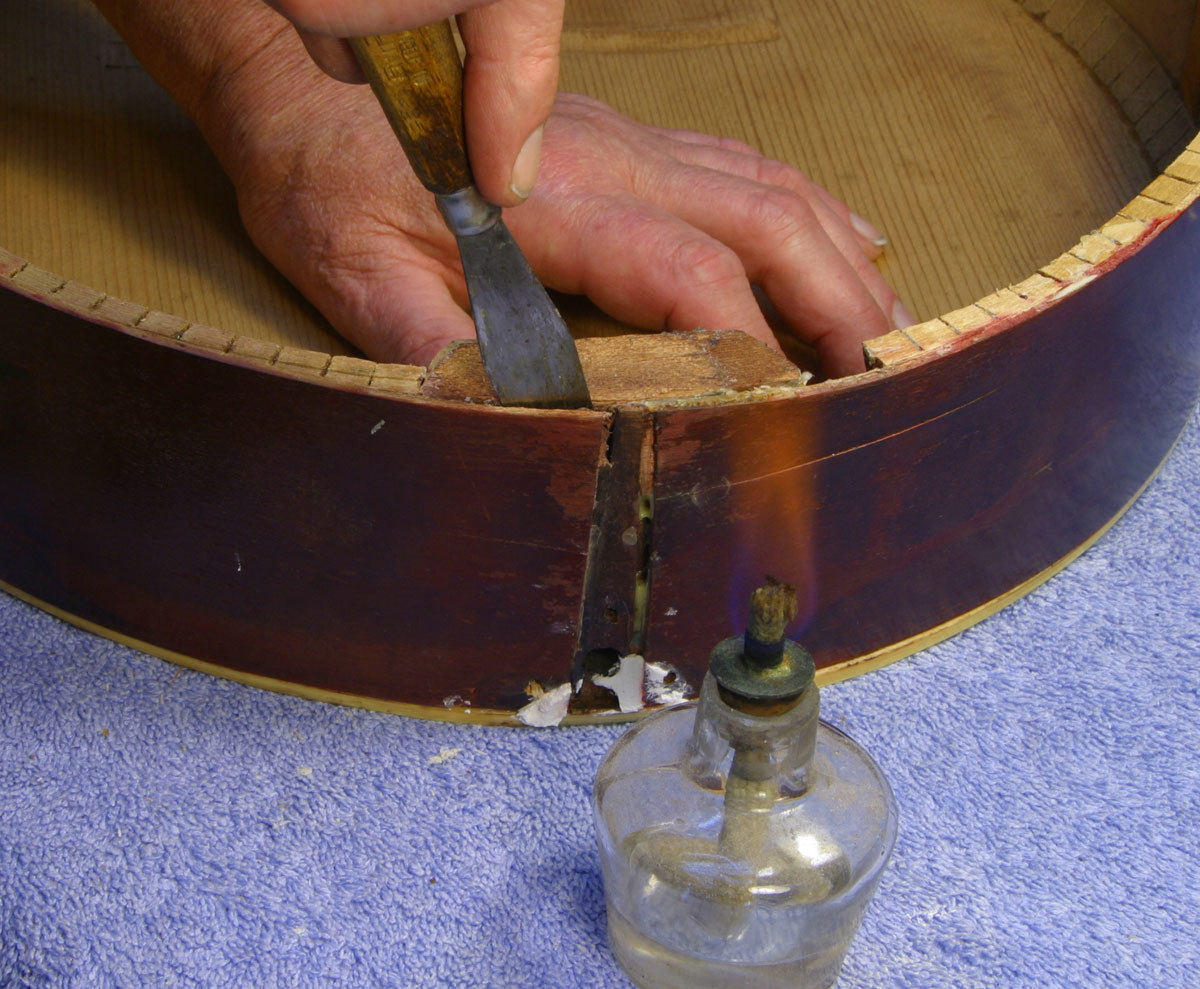
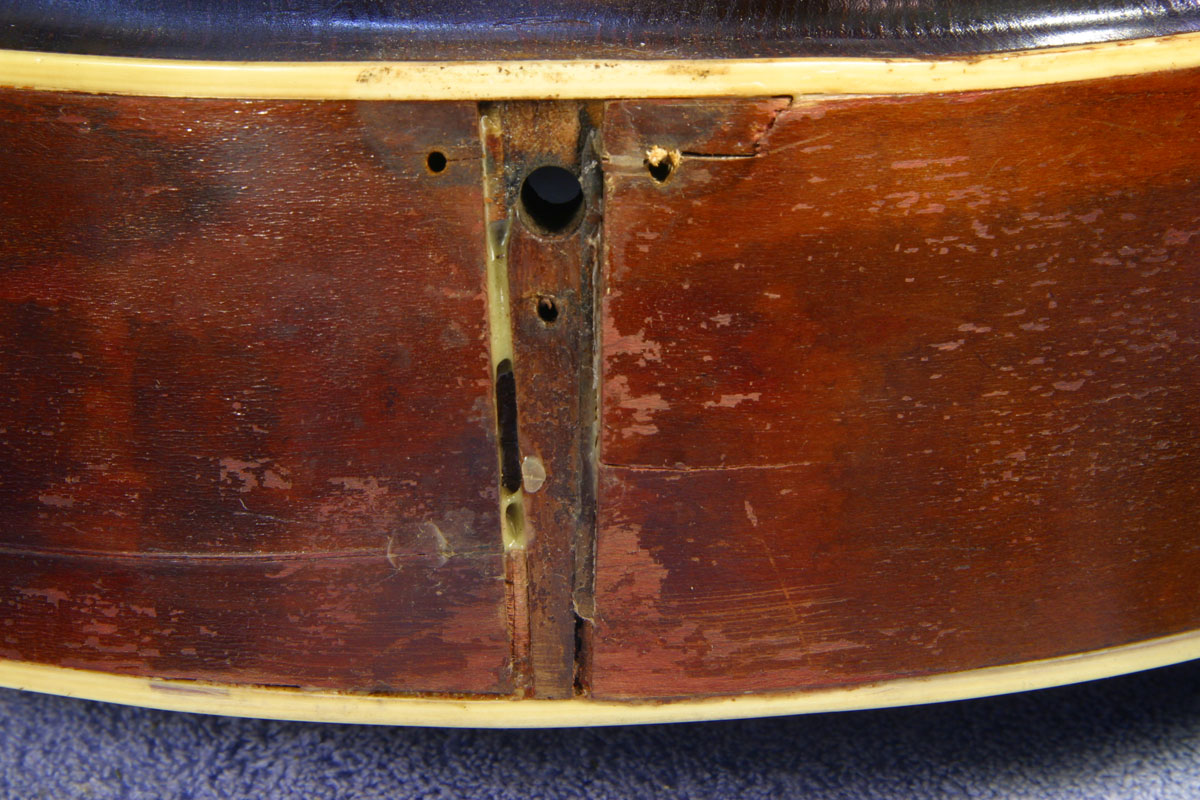
Down at the butt end of this beast, the sides were much more damaged and the white glue much more liberally applied. I had to take everything apart here, so I used a hot knife directly on the thick glue:
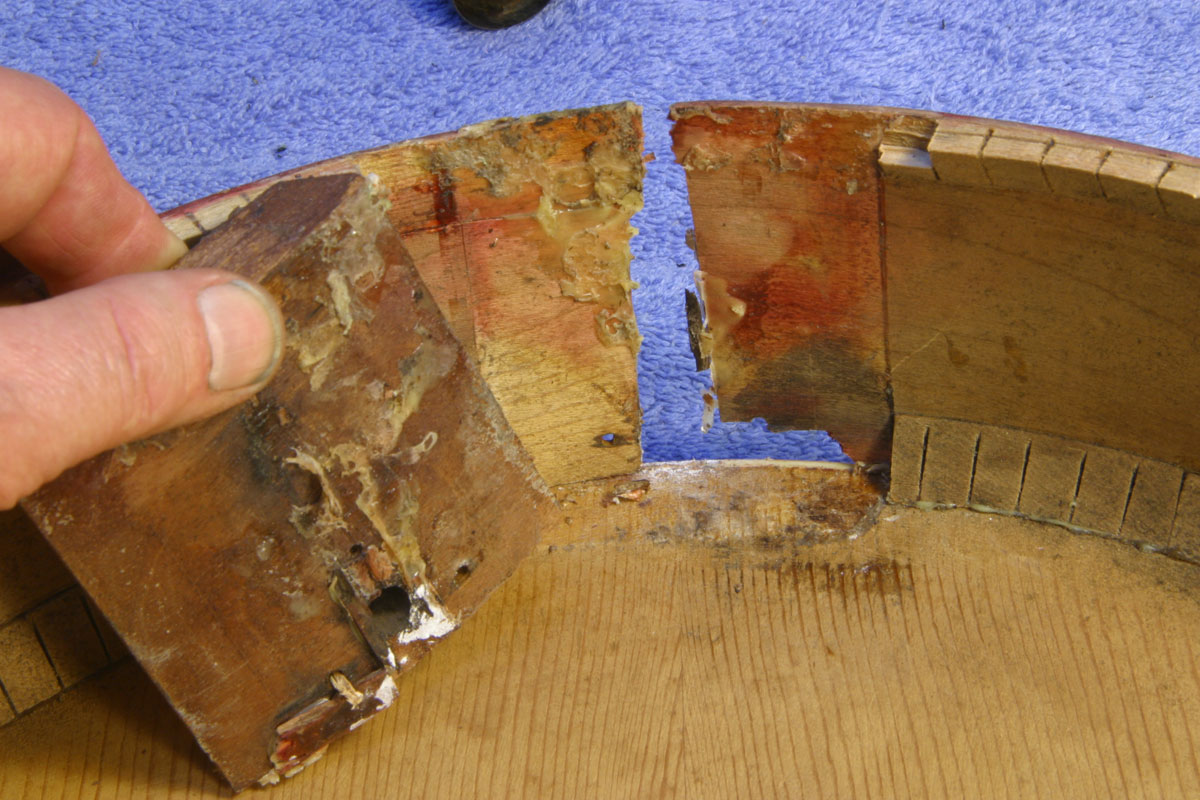

Not a pretty sight!


Everything had been reglued out of alignment, and there was white glue everywhere, including the joint between the top and the sides.

Turning back to the neck block area, I spent some time making up special contoured clamping blocks to press the sides back into contact with the neck block. Those are the white maple ones with cork padding to avoid damage to the finish. Those blocks would slide right off the curved surface when clamped, so I made up a big block I could use to hold them in place. Once I gave my setup a quick dry run, I added some nice new hide glue to the joint:


Working quickly, I was able (with the help of an extra pair of hands) to clamp everything in a matter of seconds, before the glue began to gel:


Day 4: End Block


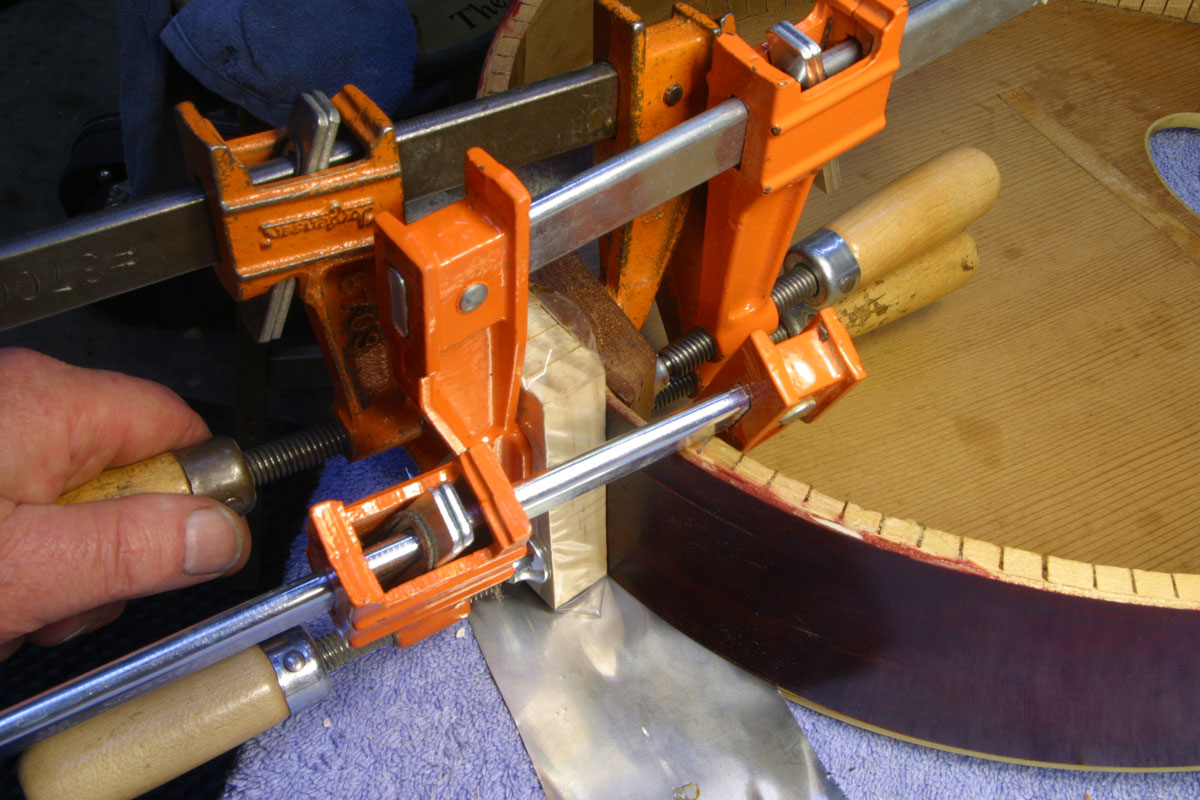
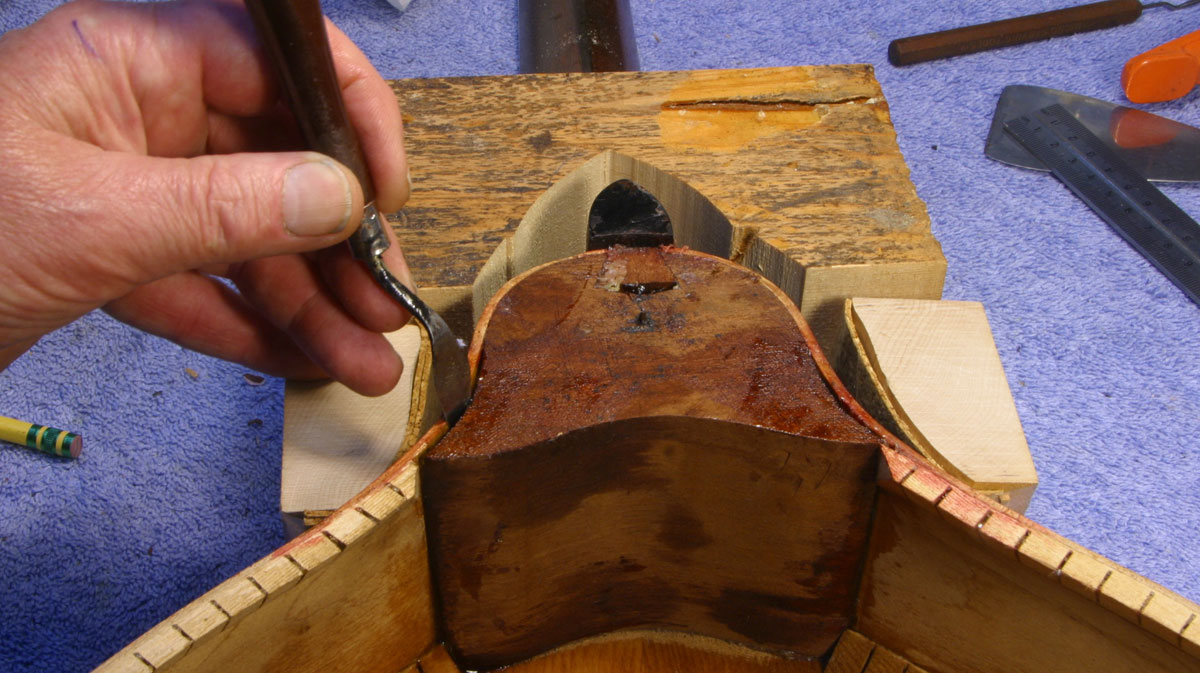
Regluing the end block was comparatively straightforward. After cleaning off all the old glue, I realigned the sides, slathered on some new glue and clamped it up, using a heavy wood clamping call with a number of saw kerf slots to allow it to bend to conform to the rounded contour of the end block:

To avoid gluing the loose top to the block or linings, I slipped a piece of thin steel shim stock in the loose area. I'd want to be able to do that regluing operation separately, when I'd be able to see alignment clearly.

Day 5: Regluing the Top


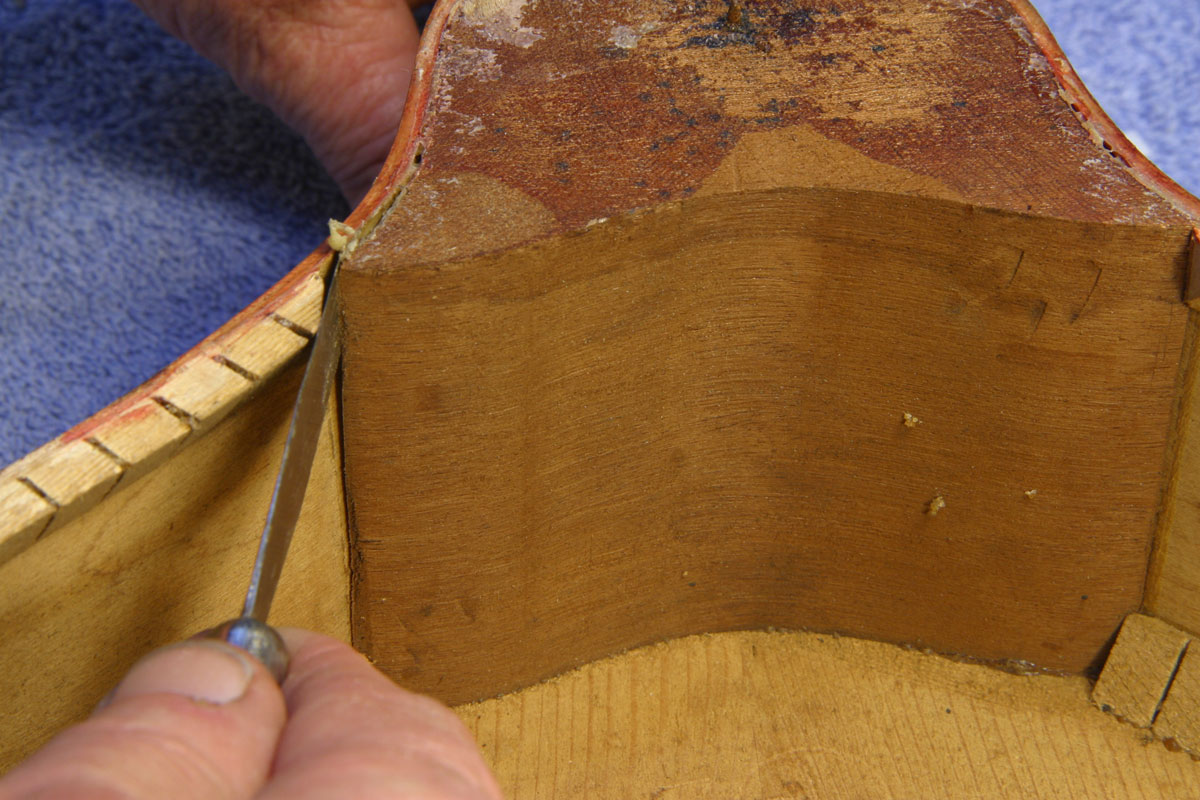
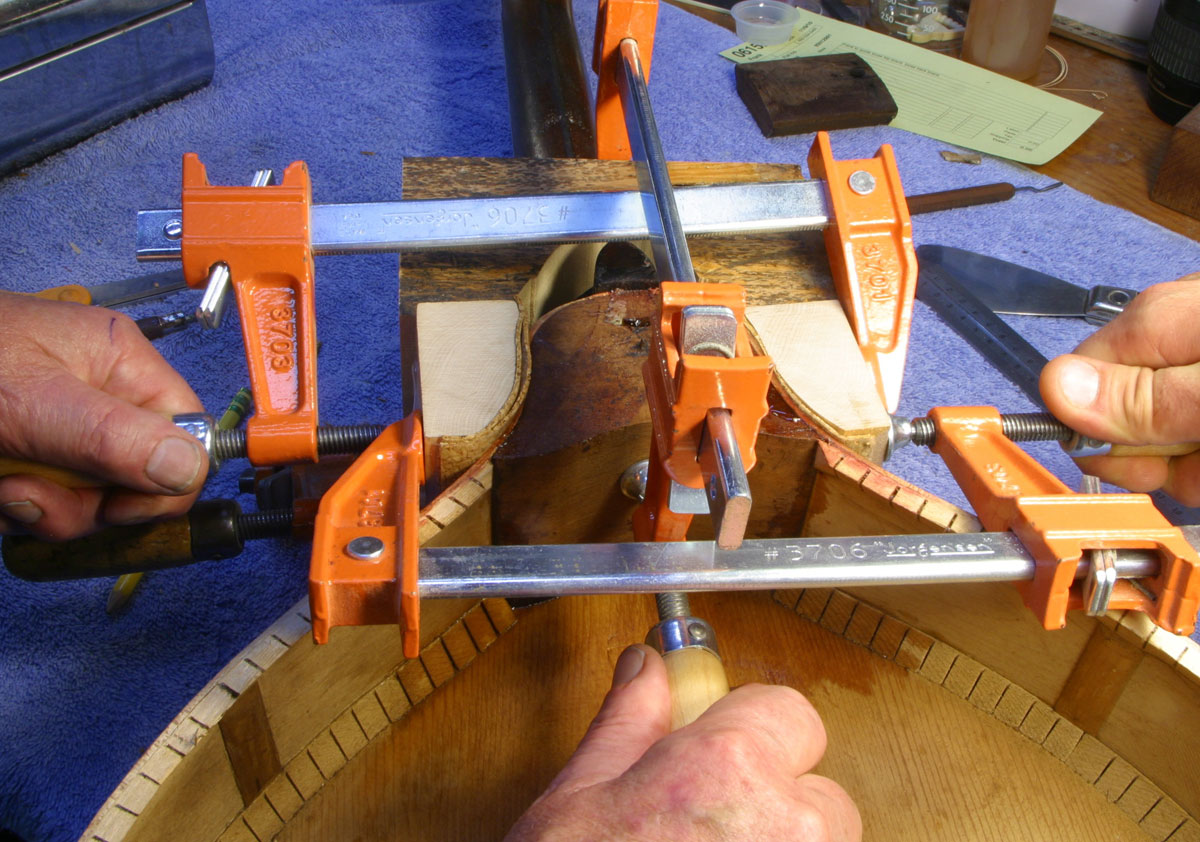
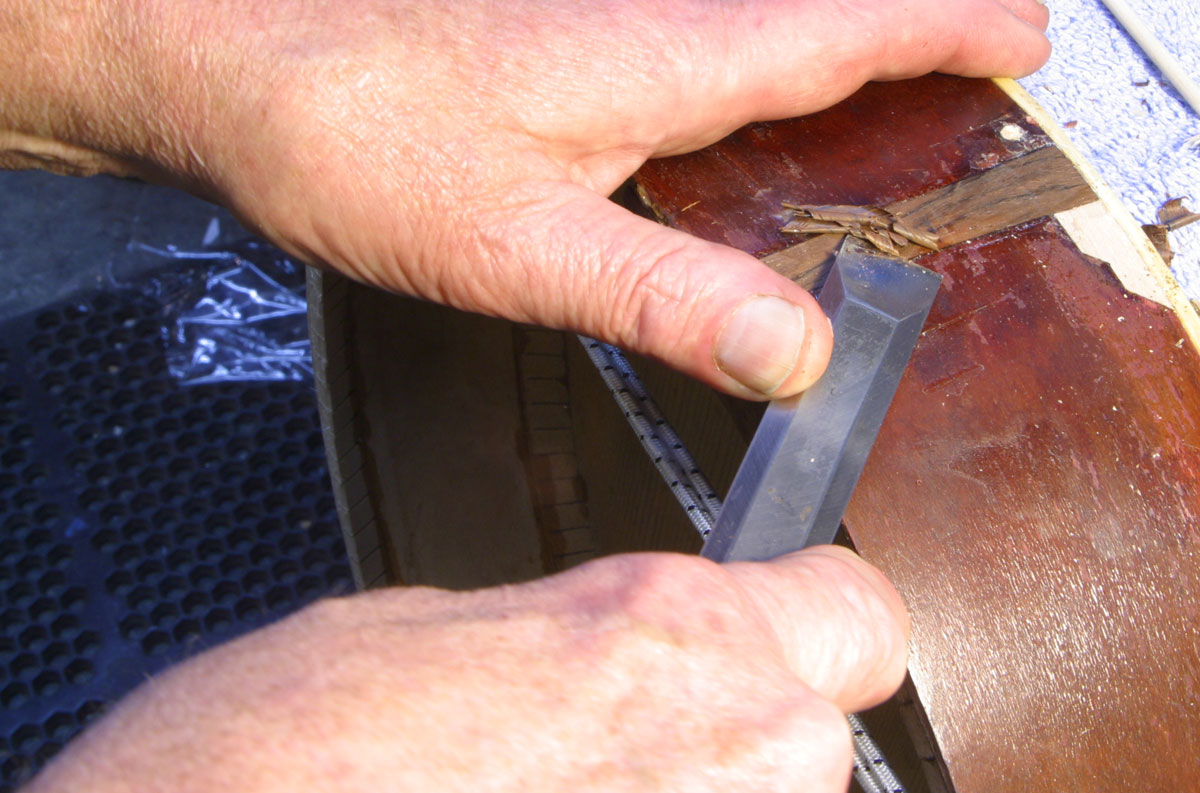
Some sections in the area near the end block had the top reglued out of alignment with the sides, and nearby portions of the same joint were loose, with the sides distended outward. First I broke loose all the offending joint area with my trusty sharpened putty knife:

Then, after cleaning out the old dried white glue, it was time to reglue the end block and sides to the top. It took a couple of big bar clamps to press the sides inward to mate up with the perimeter of the top, and more than a half dozen shorter clamps to press everything together after I pasted in some nice new hide glue:


OK, time to put it aside to allow the glue to dry. I usually leave it clamped at least 24 hours, so I'm certain that the glue is fully dried and solid.

Day 6: Patching a Hole in the Side


I decided to get some of the small stuff out of the way before attacking the collapsed arch in the top. The end pin hole and tailpiece mounting screw holes were enlarged and generally pretty messed up, so I thought it would be a good idea to fill them completely and redrill appropriate holes when it was time to remount the tailpiece.
A machinist's taper pin reamer in the ol' Makita made a good job of rounding up the end pin hole. I just ran it all the way through to get a good cylindrical bore:

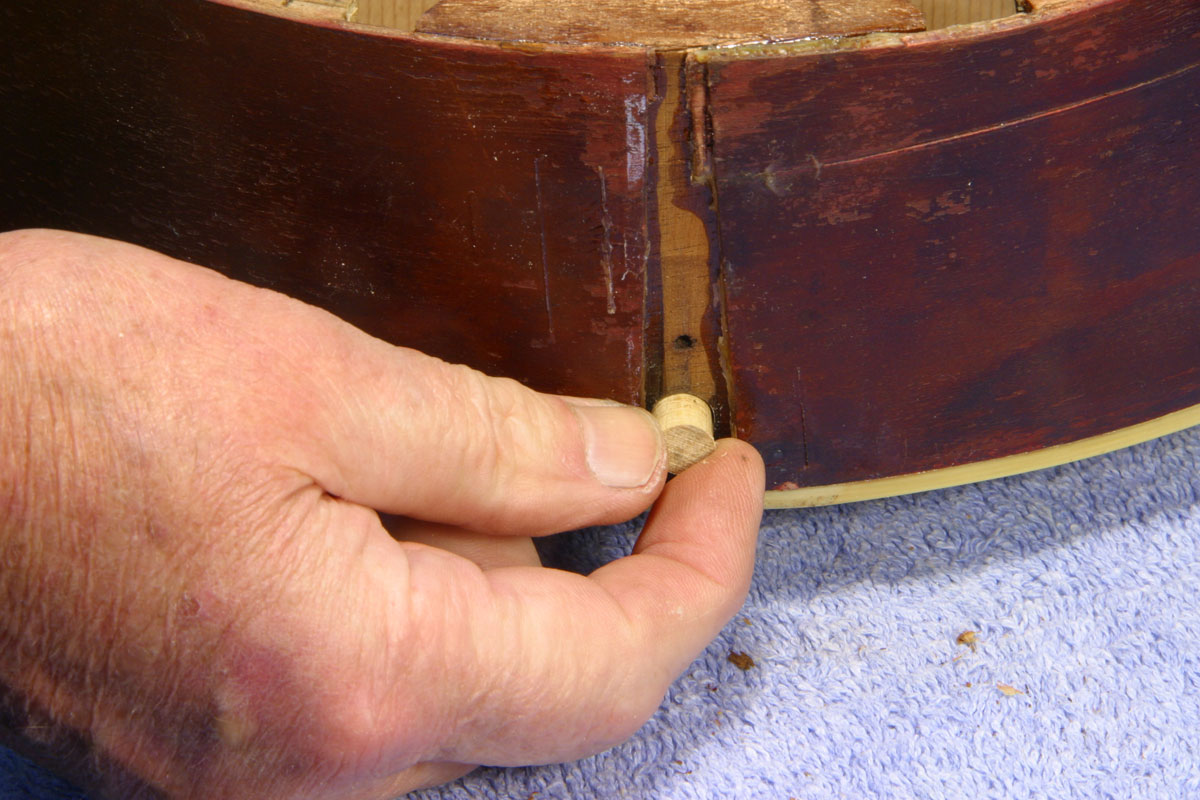
A hardwood dowel fit nicely, and I glued it right in place - it took a few light hammer blows to seat it tightly:


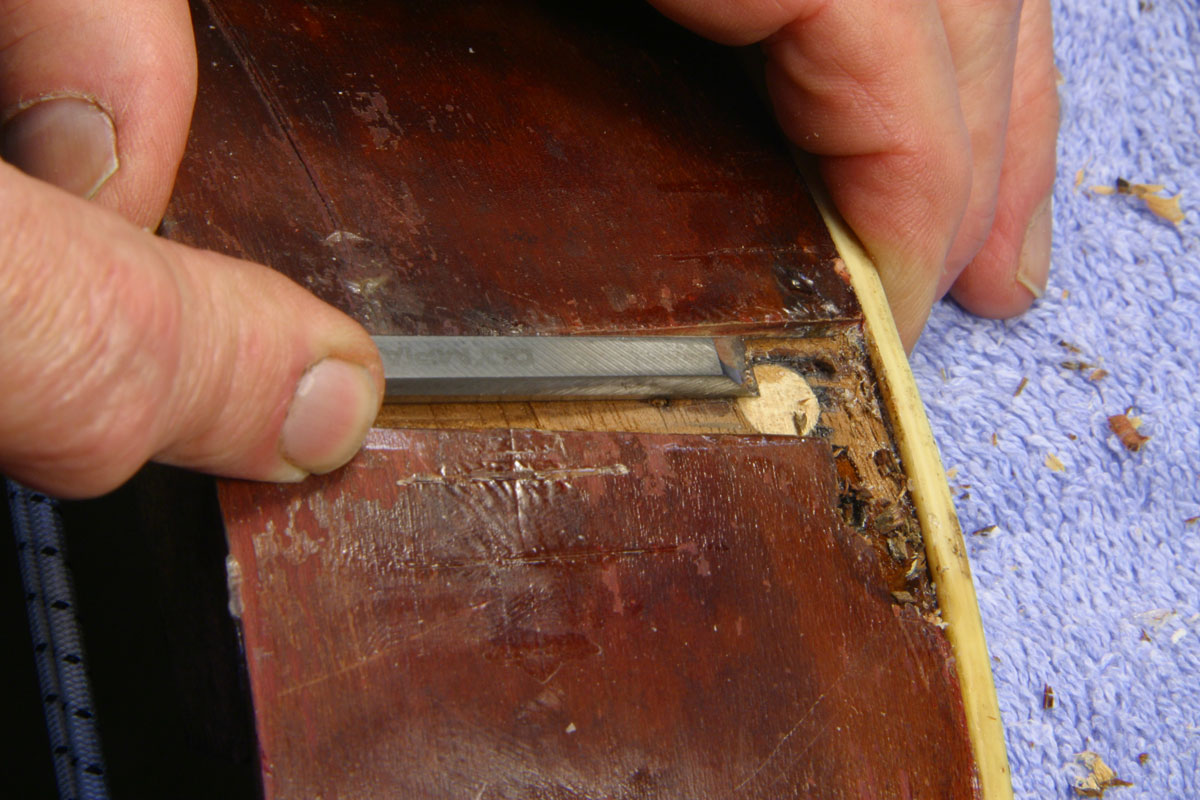
Because the dowel was a tight fit, I could trim it with my chisel:


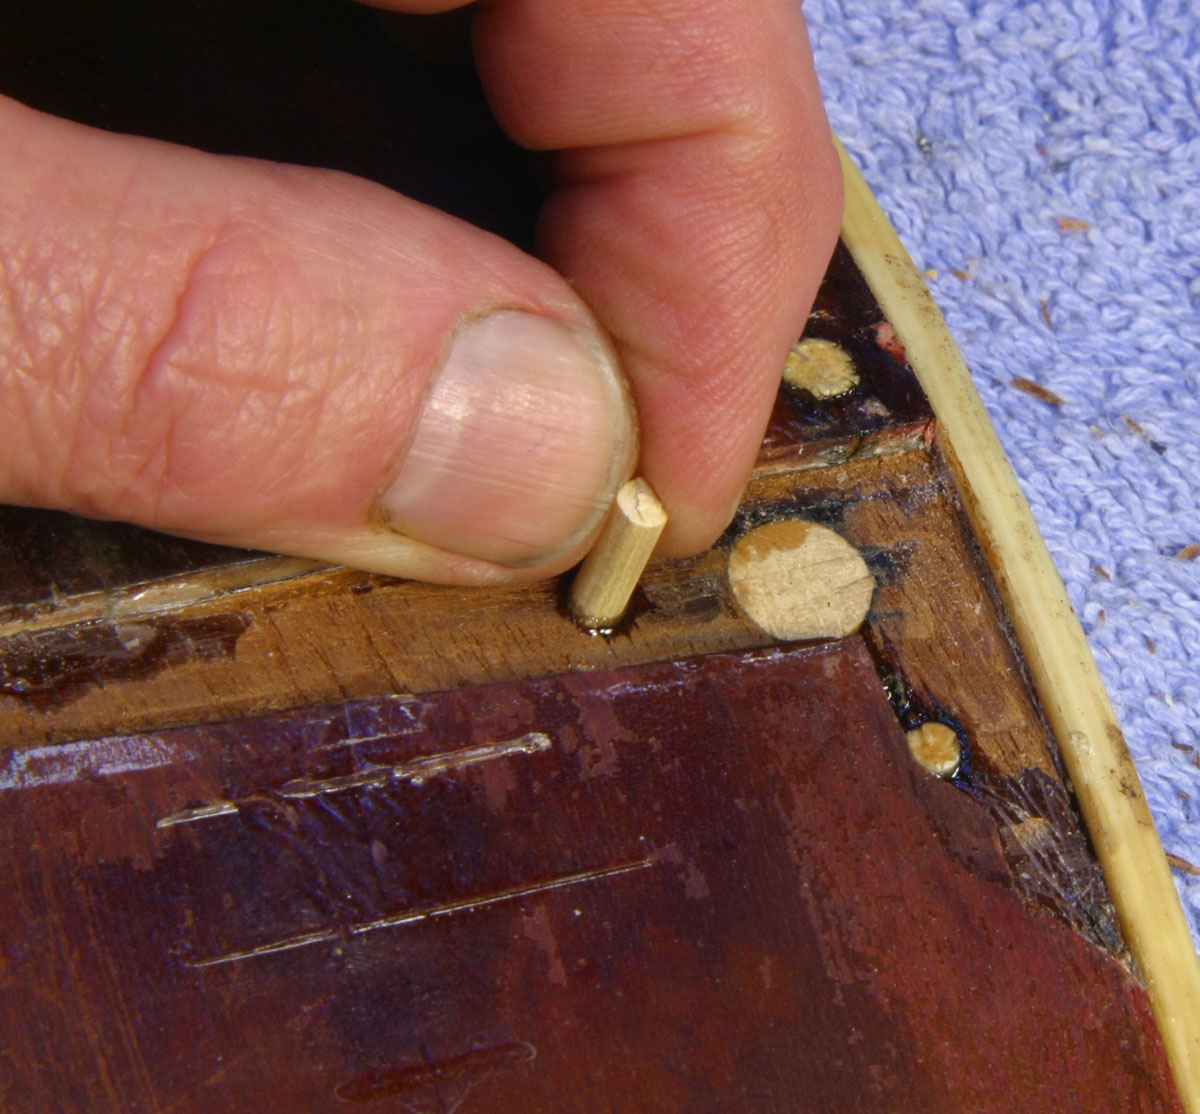
And I did pretty much the same thing with the other holes:


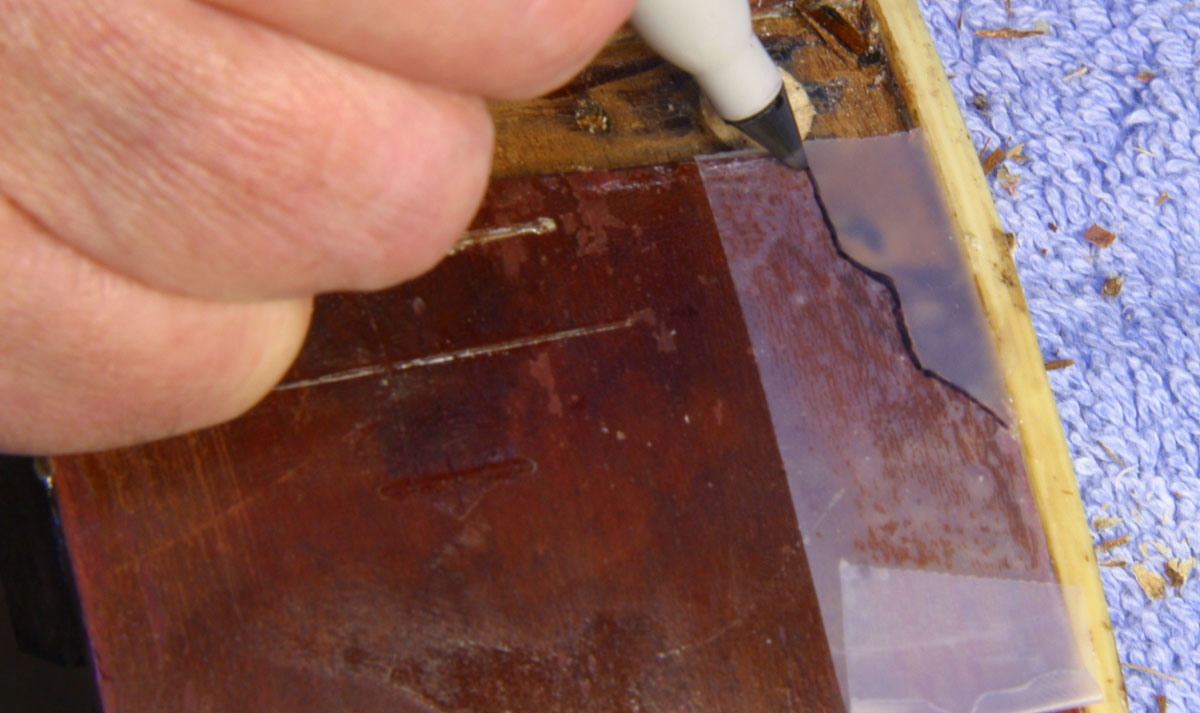
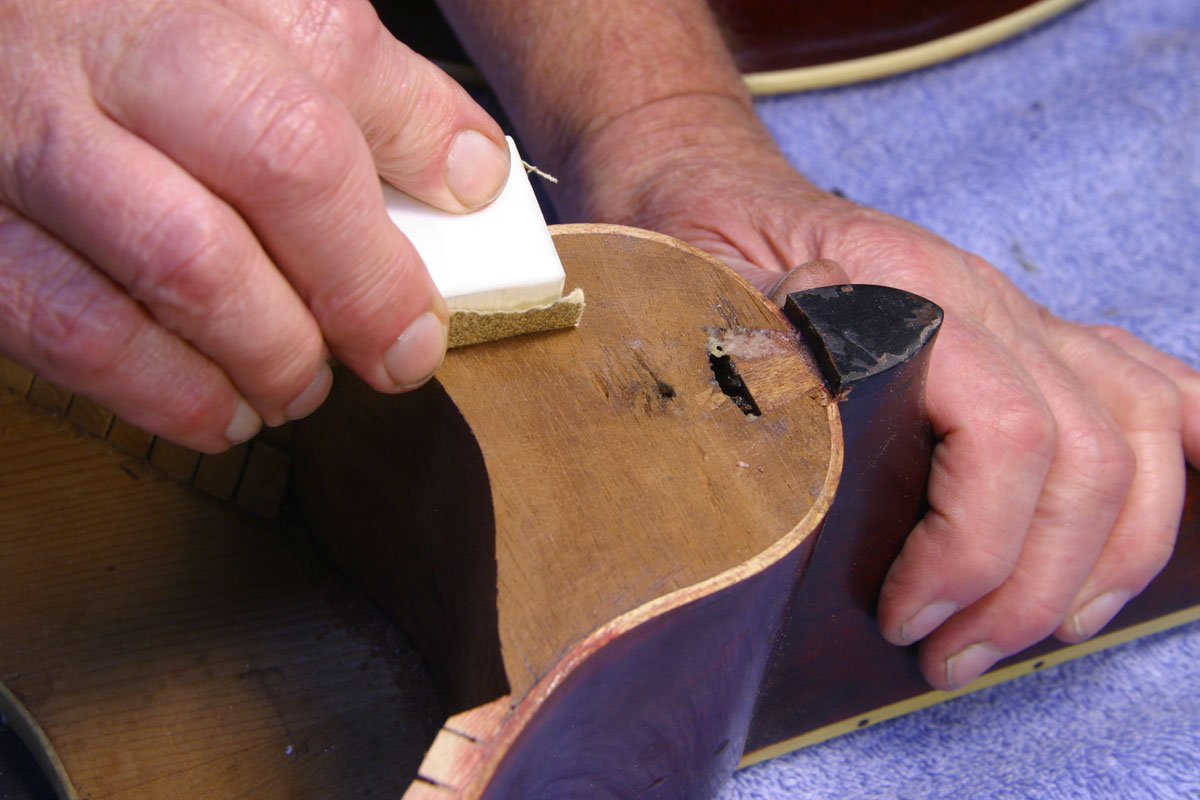
That nasty irregular hole would be another issue. I chopped the edges just a bit with a chisel to make them into a more regular shape, and then traced the outline on a piece of transparent tape:


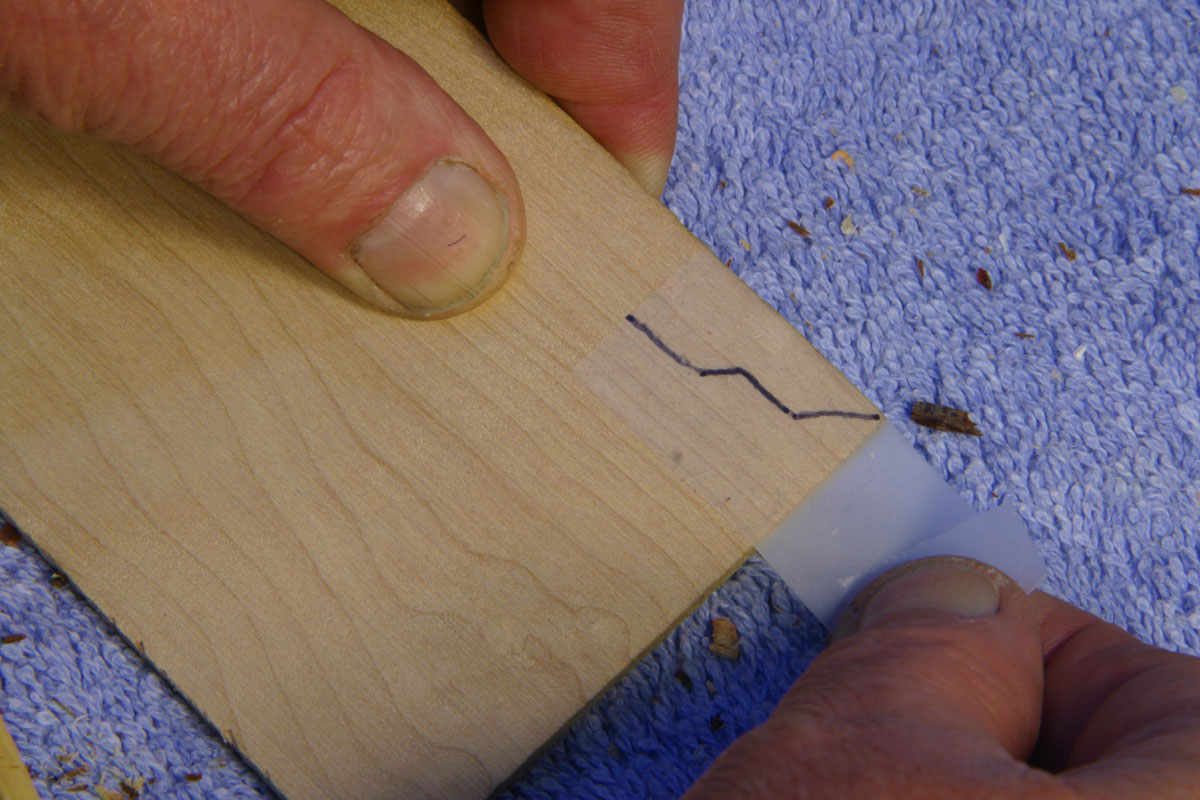
With the tape on a thin piece of maple, I had a nice clear cut line to guide me at the band saw to rough out the plug:


After truing up the edges with a knife, I had a decent fit, and I glued it in place:


Unlike the dowels, this one needed to dry overnight.

Day 7: End Wedge

A short day today. I leveled the maple plug by slicing with my sharp flat chisel:

Then, I made up a new rosewood end piece, and glued it in place:


Naturally, it would have to dry overnight as well.

Day 8: End Wedge


An even shorter day - just a matter of trimming the rosewood end wedge with the flat chisel:

Tomorrow (or the next day) is a big day - time to work with the plaster cast and start to restore the top arch.

Day 9: Reforming the Arch


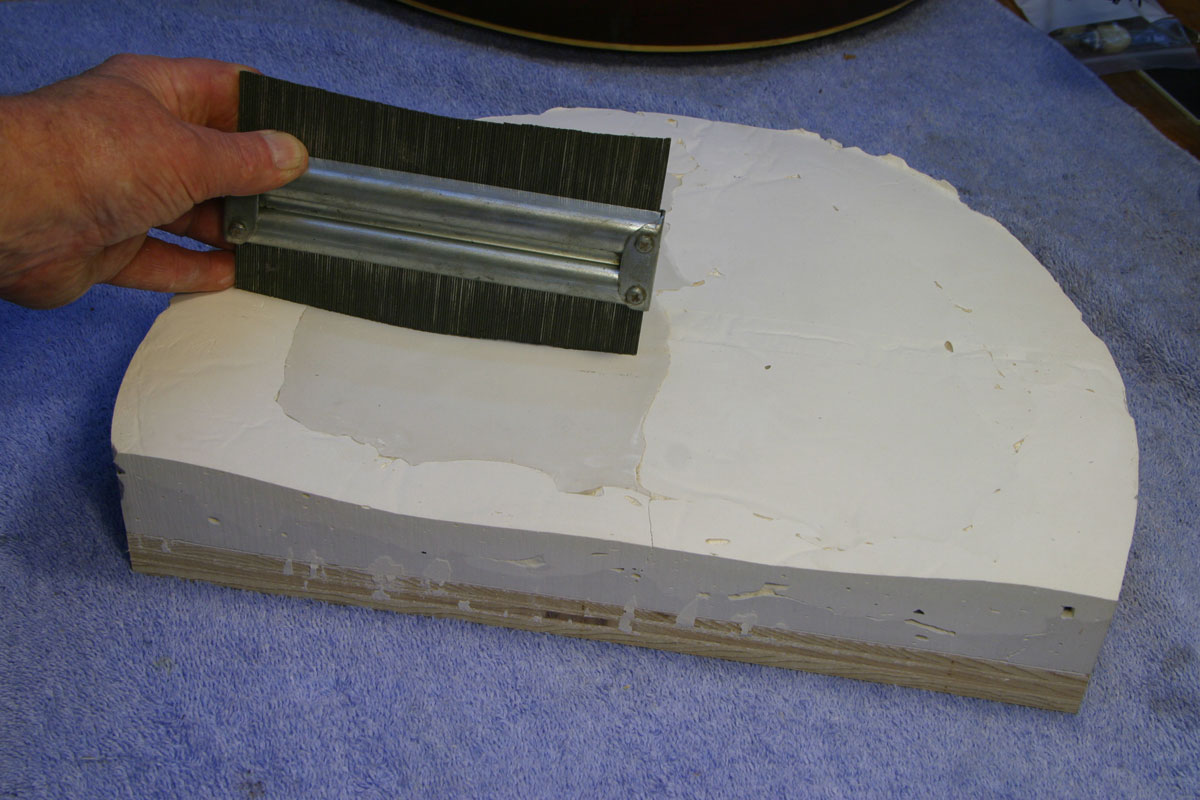
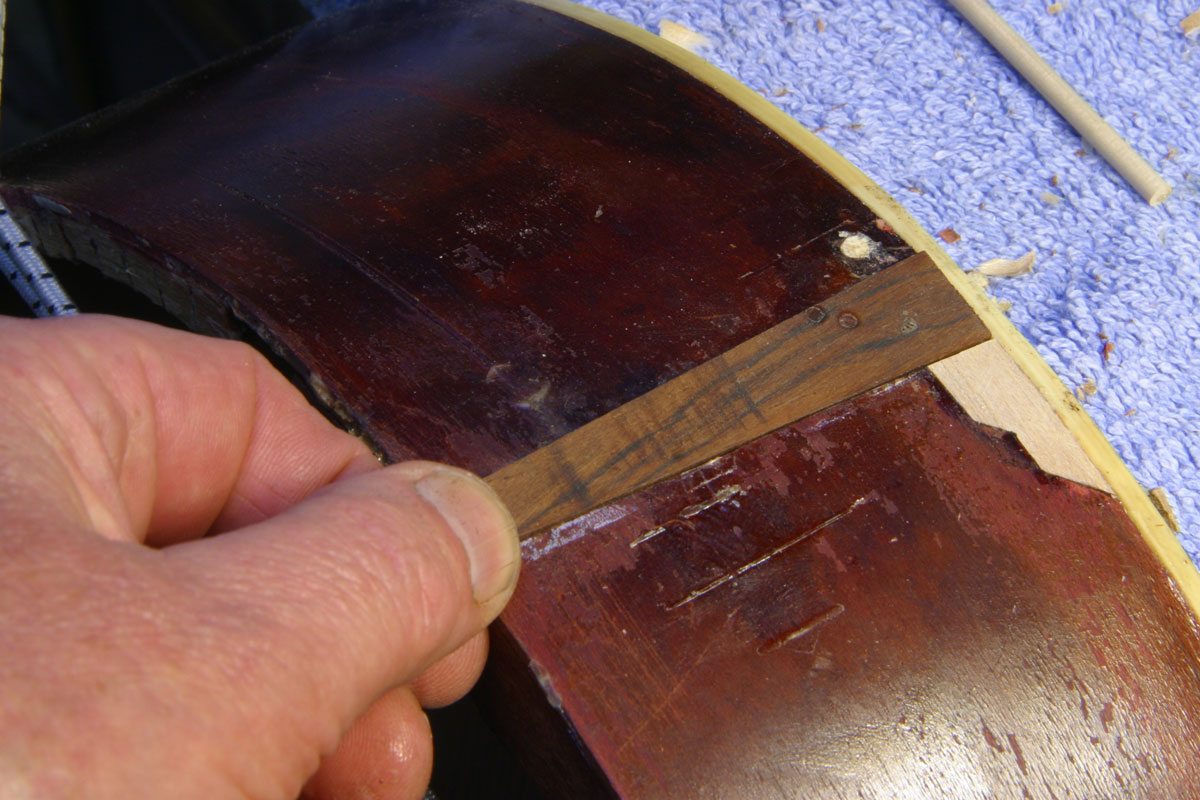
Take a look at these two photos. I pressed the contour gauge down against the undamaged (bass) side of the plaster mold, and when I compared the arch to the treble side (right) I could see lots of daylight at the ends because the mold had a pronounced hump where it reflected the collapsed portion of the top


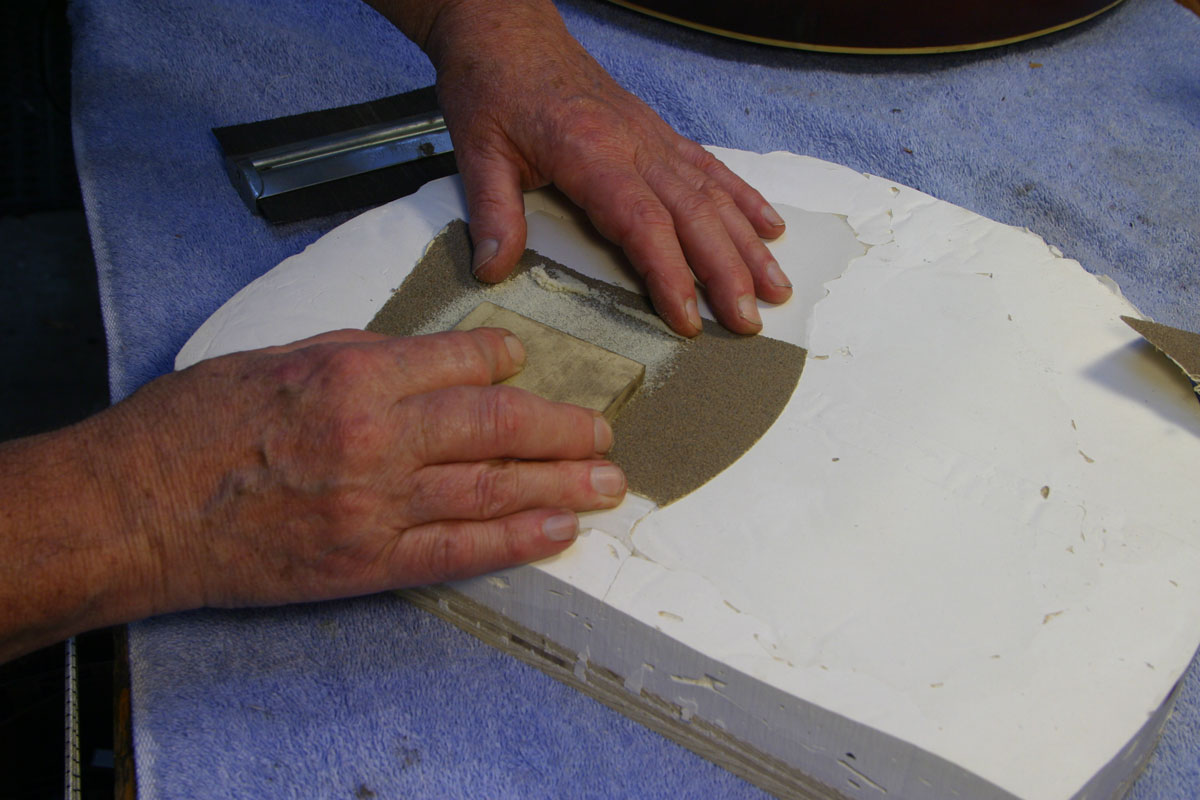
I figured it would be handy to have a contoured sanding block to help correct the treble side of the mold, so I laid some coarse sandpaper down on the bass side, and used that contour to form my sanding block:


My favorite material for this use is a high density polyurethane foam - it sands really easily and it's rigid enough to hold its shape. Cork works well, but is just a bit softer and more flexible.

Here's another pair of shots - one showing the fit of the sanding block on the bass side, and the other revealing that nasty hump in the mold on the treble:

Then, it was a matter of sanding and scraping to even out the contour:


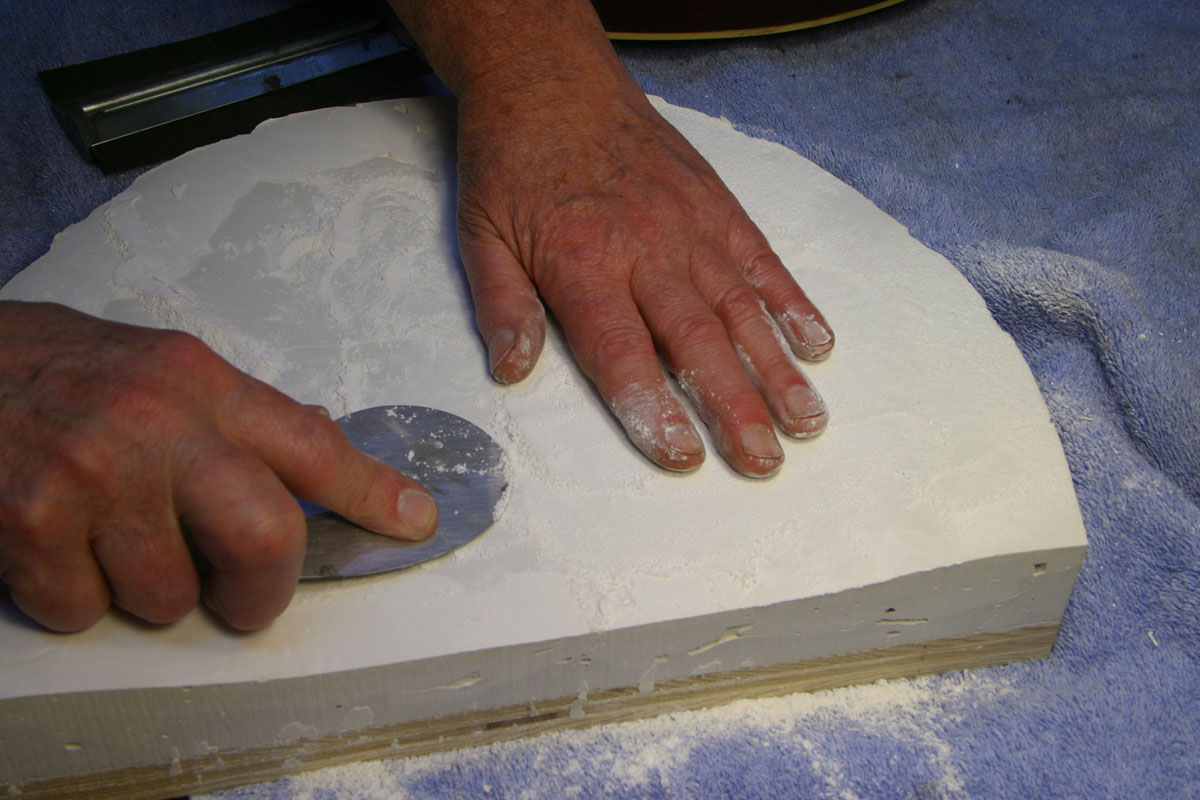
The sandpaper loaded like crazy with plaster, so I did a fair bit of bulk removal with curved scrapers, constantly feeling the surface with the flat of my hand to keep from digging in too deeply in spots.

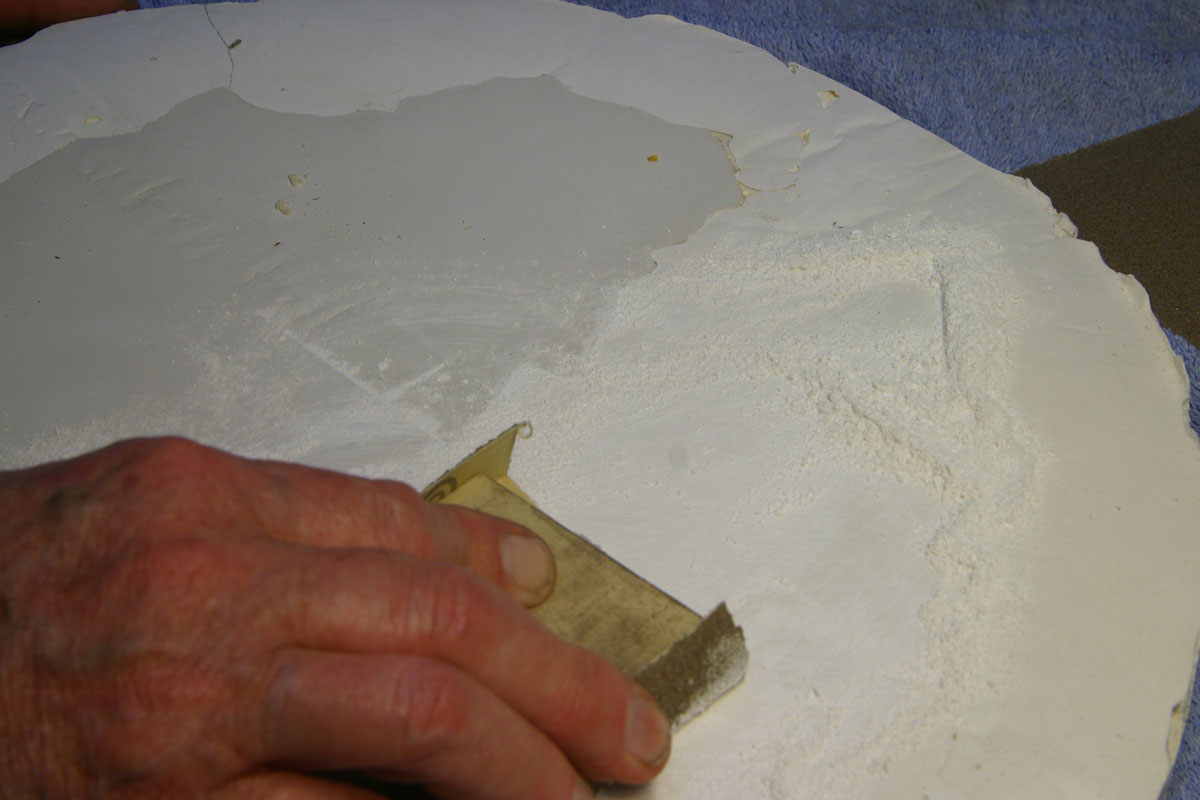
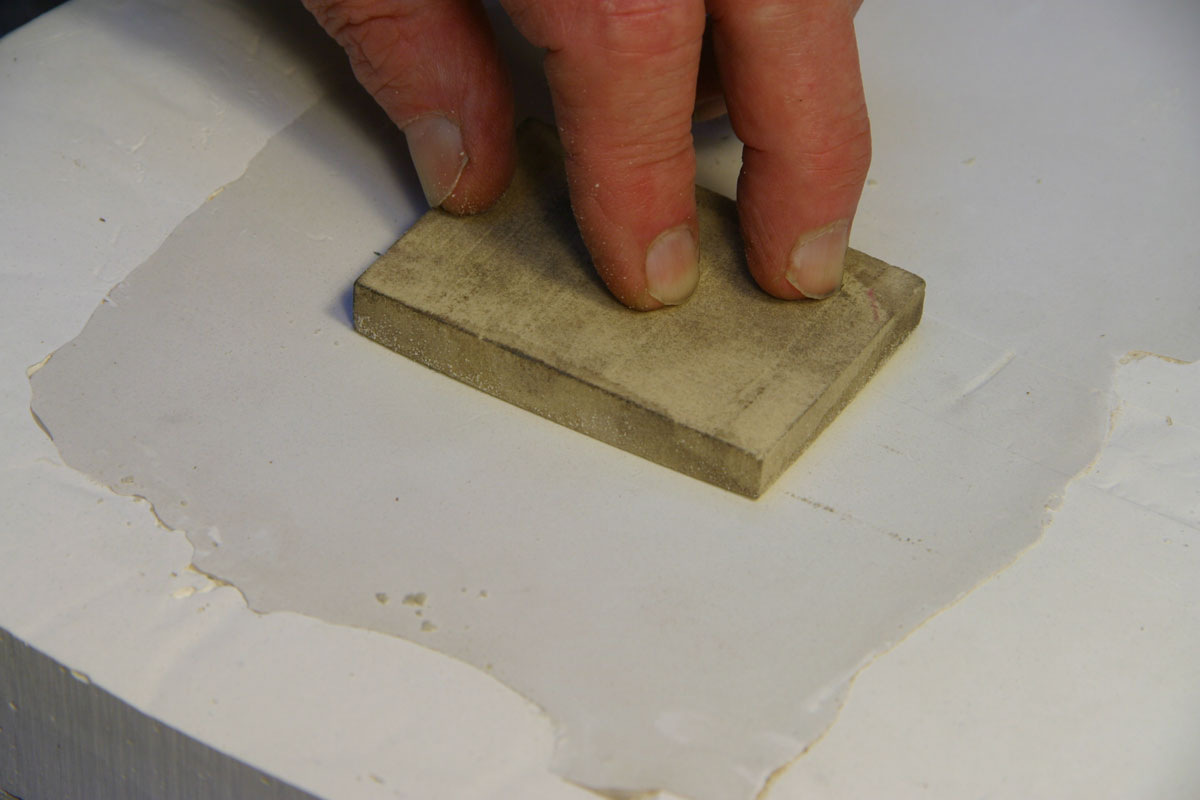
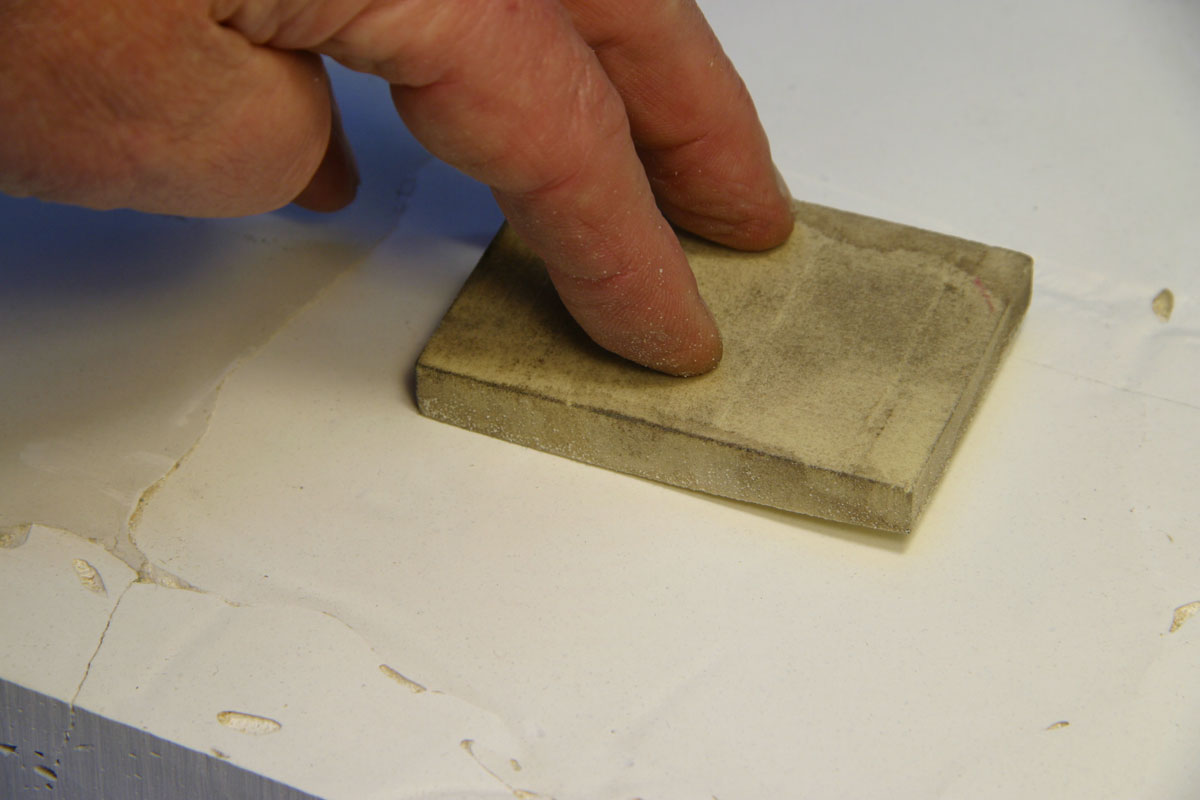
The sanding block made it easy to "fair" out the curve:


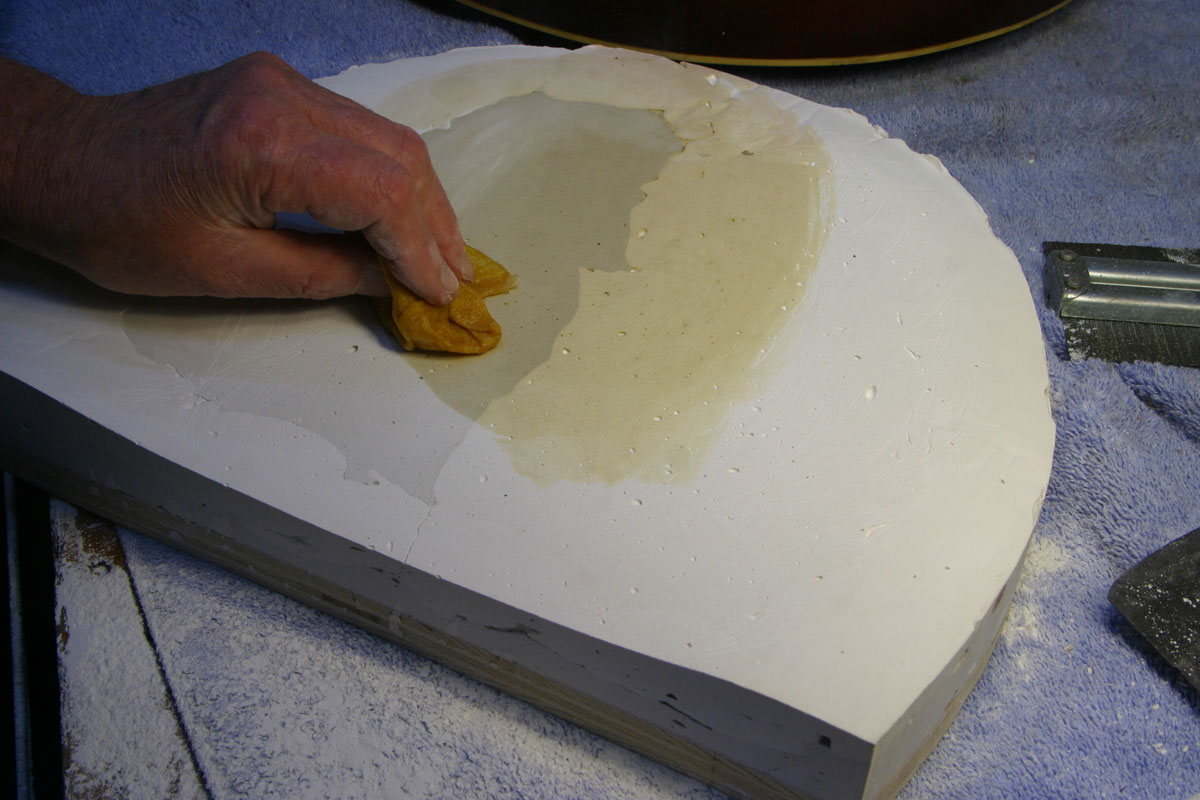
Once I was satisfied with the contour of the mold I wiped it down with some shellac to give the surface a bit of a shine so I could inspect it visually in reflected light - just another check for irregularity:


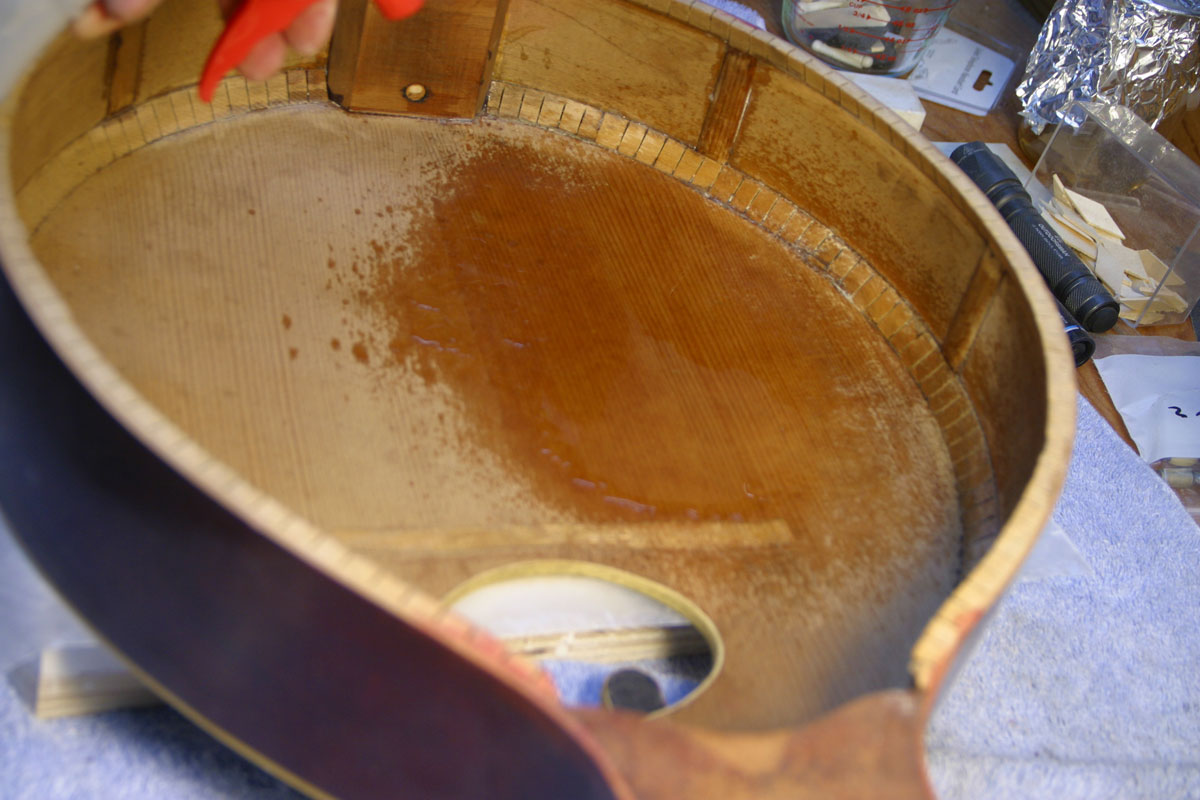
OK, now for the real deal I spritzed the inside of the top with water, to get it about as wet as I could without dunking it in the sink:


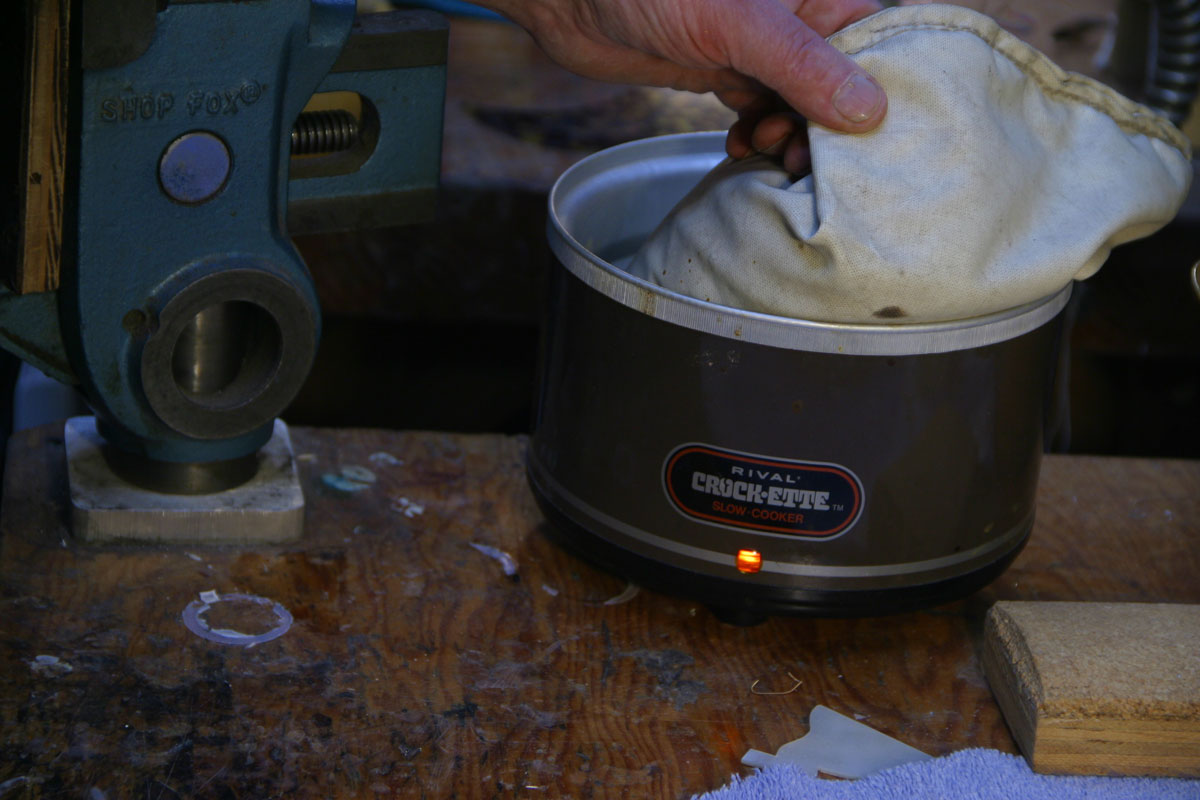
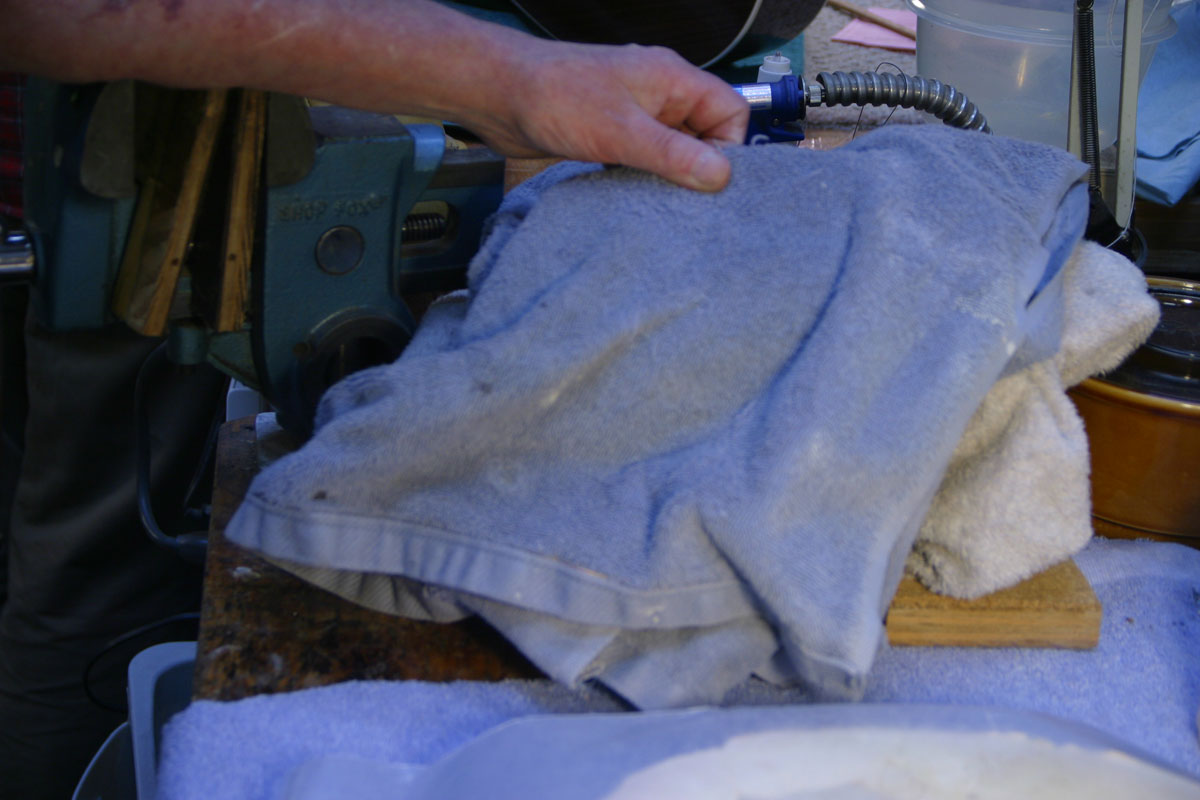
About an hour earlier, I'd stuck a sandbag into my old soup cooker, and covered the entire rig with insulating towels:


The idea was to heat the sandbag to around 150F - you know, "soup temp."

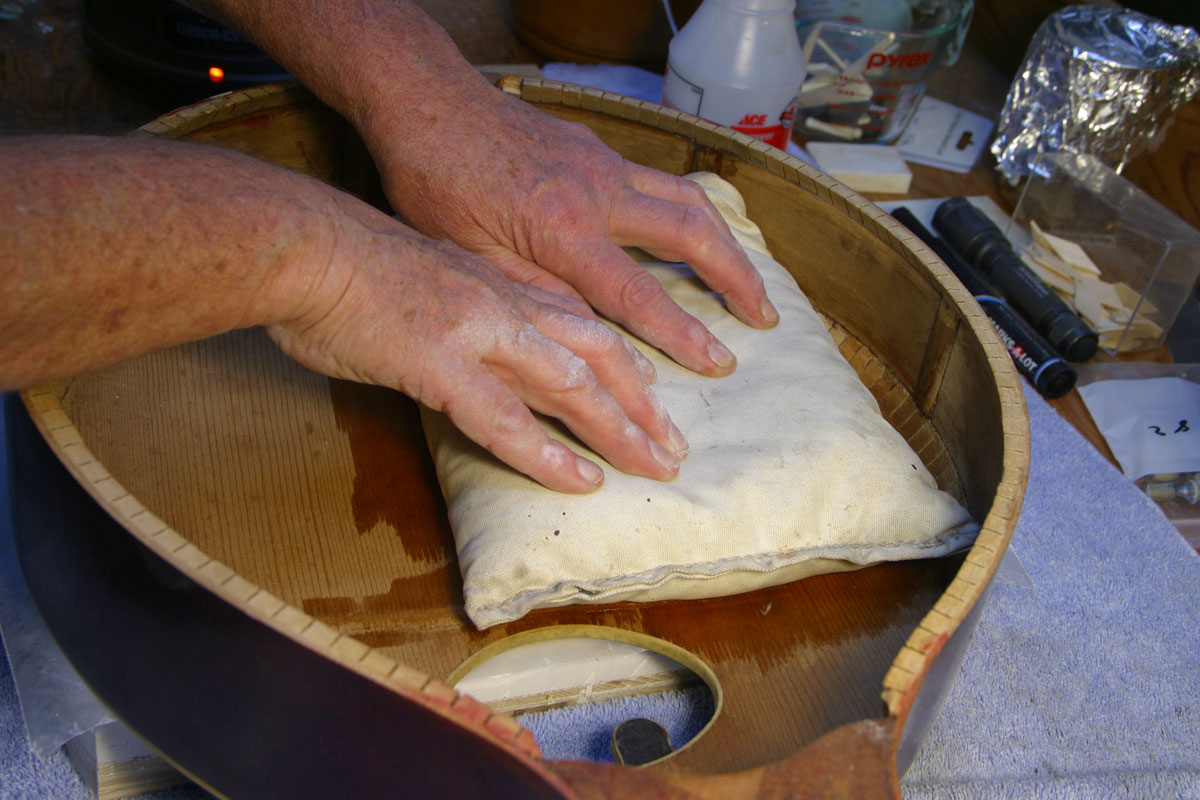
Then in went the hot sandbag - right on top of the wet surface. I squashed the sand around and pressed it down to distribute pressure as evenly as possible


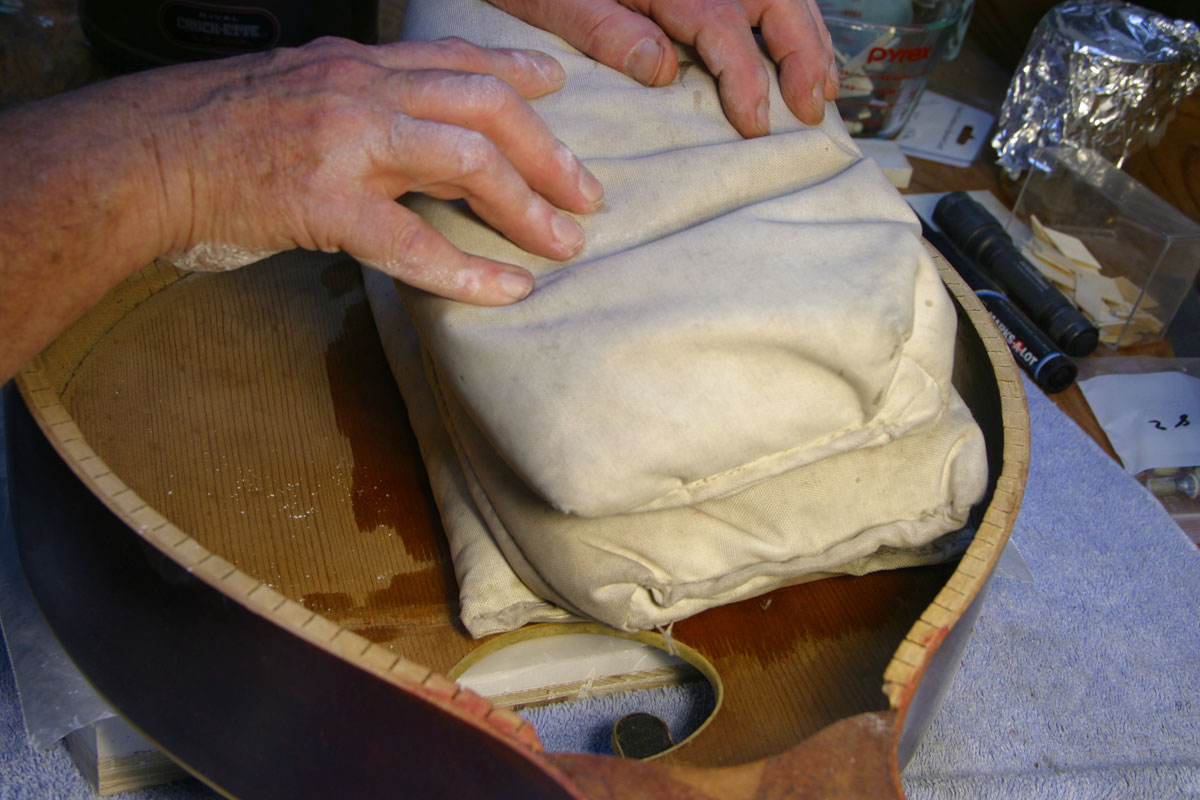
For extra pressure, I added the rest of my sandbag collection:


Then, it was back upstairs for the top to settle in, cool and dry out. I left it under the sandbags for several days.

Day 10: Arch Restored!

Well, after some time under pressure, the top looked almost as though it had never collapsed. While it has regained its original shape, it certainly wouldn't be strong enough to carry the load of eight heavy steel strings tuned to pitch. A bit of reinforcement under the bridge could help hold things in shape.

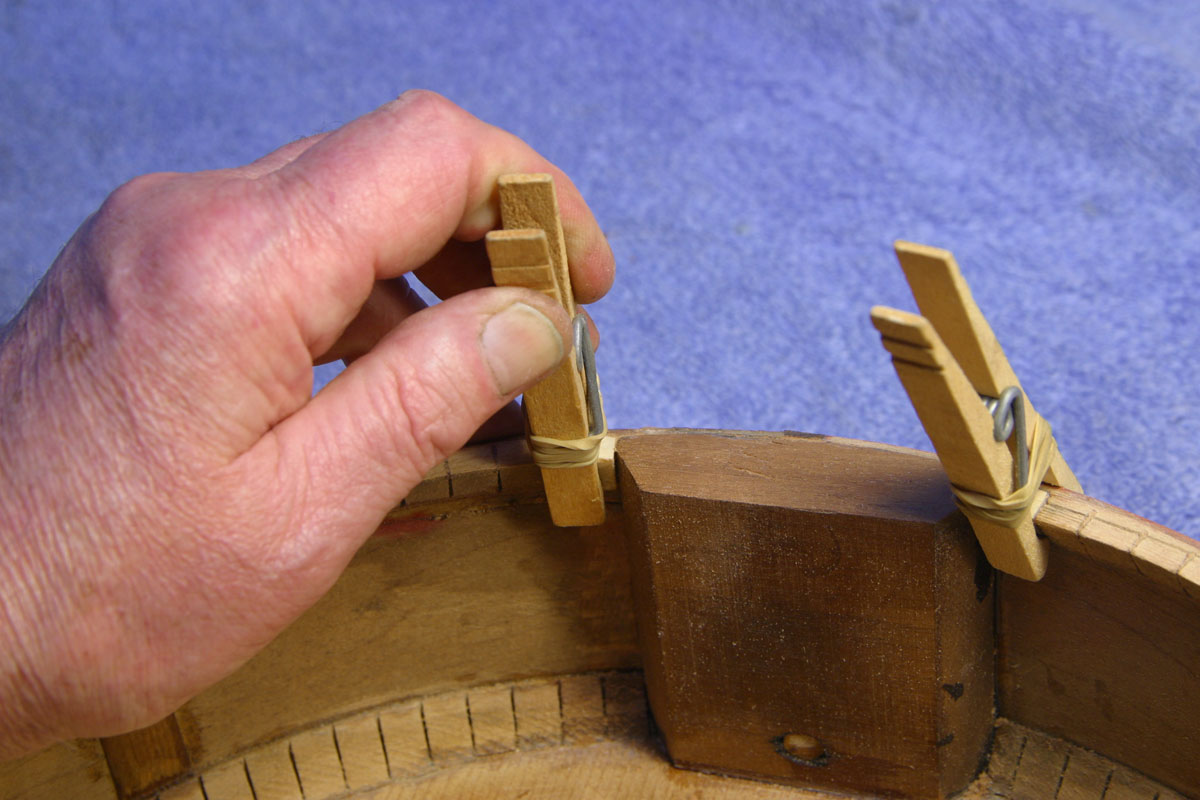
Here's the original sound hole brace - it retained its original curvature, so I glued it back in place:


Day 11: Bridge Brace

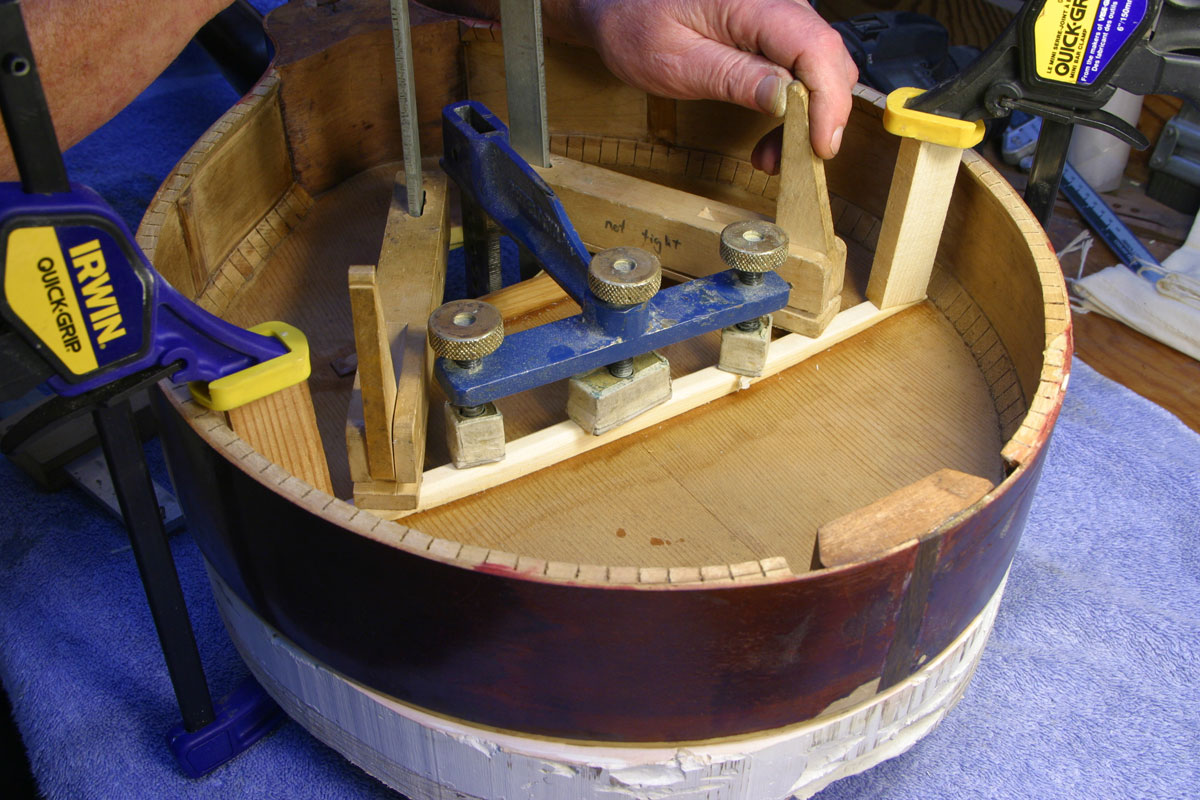
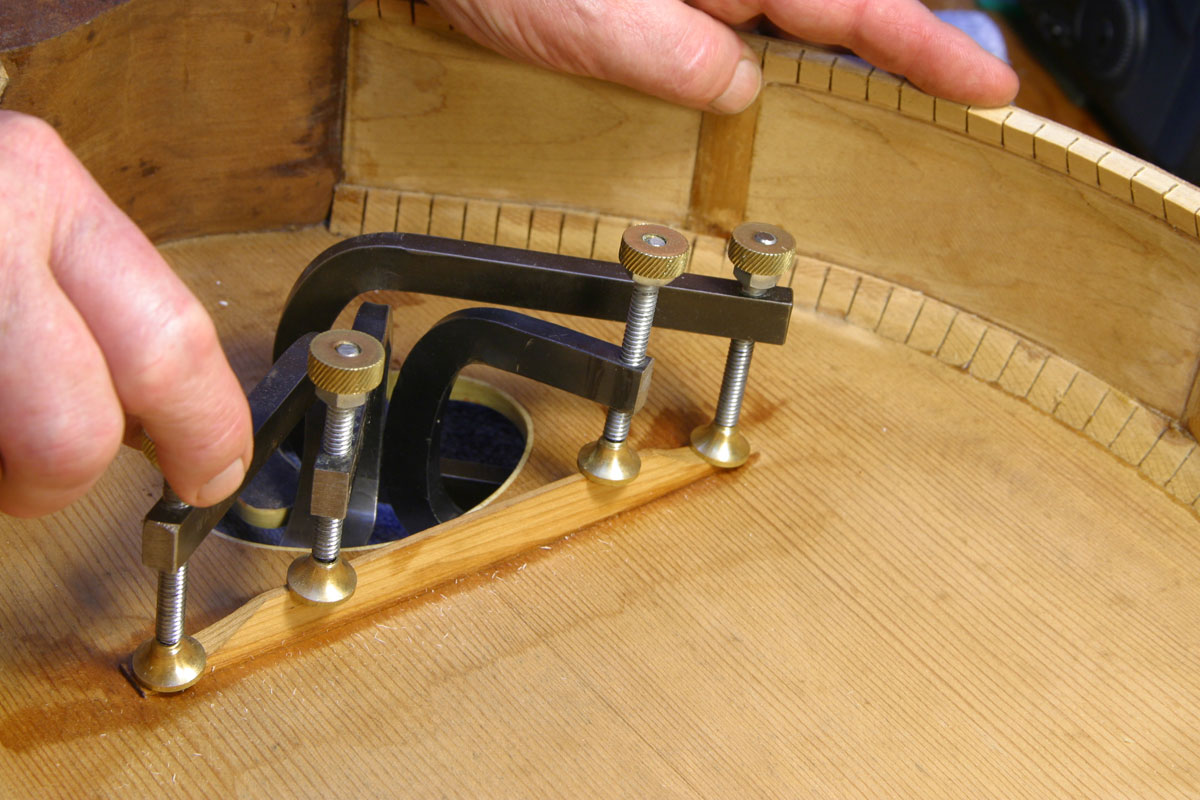
Today's job was to make and glue in that brace to reinforce the top in the bridge are. It was a matter of hand-fitting the brace to the arch of the top, and then gluing and clamping it, using the plaster mold to support the top arch:


Day 12: Preparing to Reglue the Back


The back had come off cleanly, as those things go, but there was still some leftover glue to clean off the mating surfaces before it could be reglued. I spent some time with sanding blocks and scrapers to prepare the surfaces for regluing:

Hide glue doesn't adhere well to surfaces contaminated by dirt or oxidation, so I scraped the back as well, paying special attention to the areas where the glue had failed before:


A few bits of lining were either loose or missing, so I took care to reglue and replace them:


Day 13: Preparing to Reglue the Back


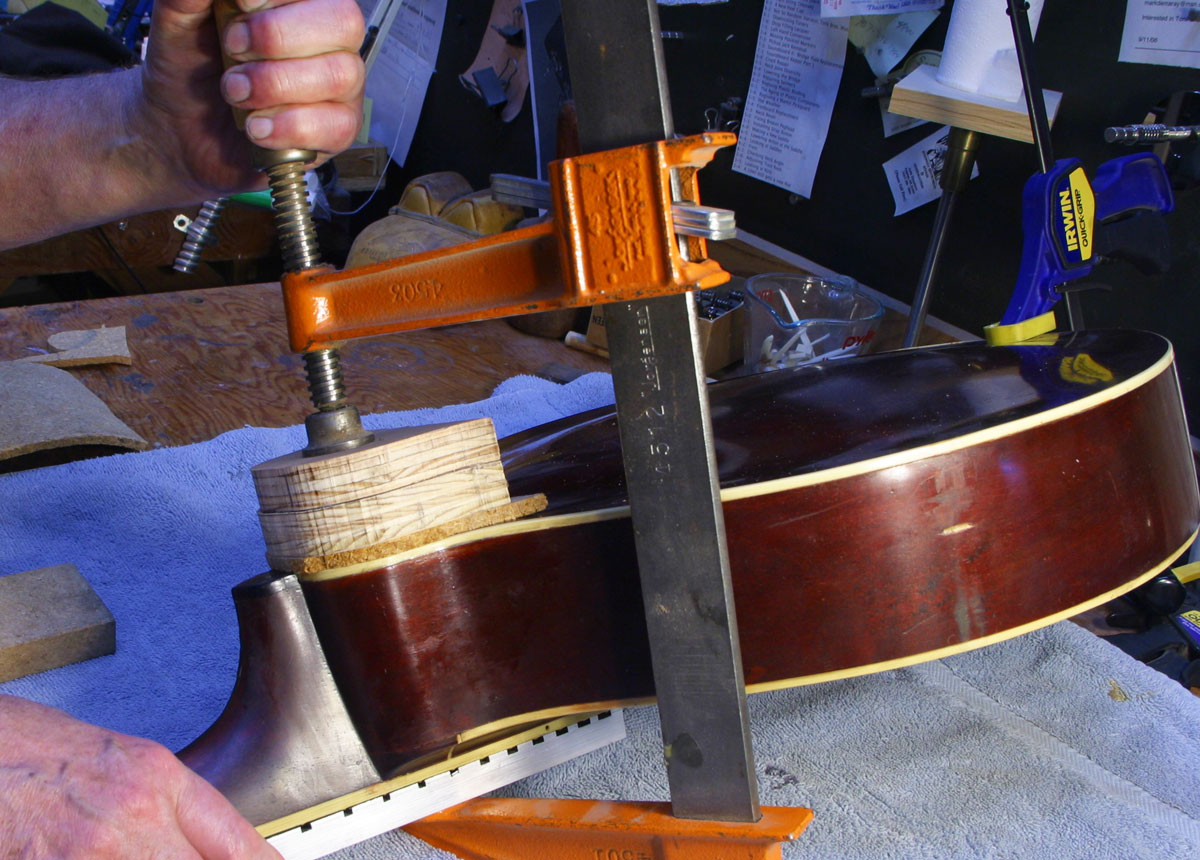
I wish I could have shown how much the sides were distended and out of alignment from the back, but I wasn't able to line up the shot adequately. Suffice it to say, there would be no way for me to be certain to have been able to reglue the back in one go, so I chose to reglue the neck block area first to maintain the best alignment I could in that area. If you look at the end block area you'll see I have a clamp there - it's to keep the center line of the back in agreement with the center of the end block and end pin hole. I made up a heavy padded caul to distribute pressure and clamped the back to the end block with hide glue:

Now with that heavy area tied down, I'd be able keep things aligned as I began to force the sides to line up with the back.

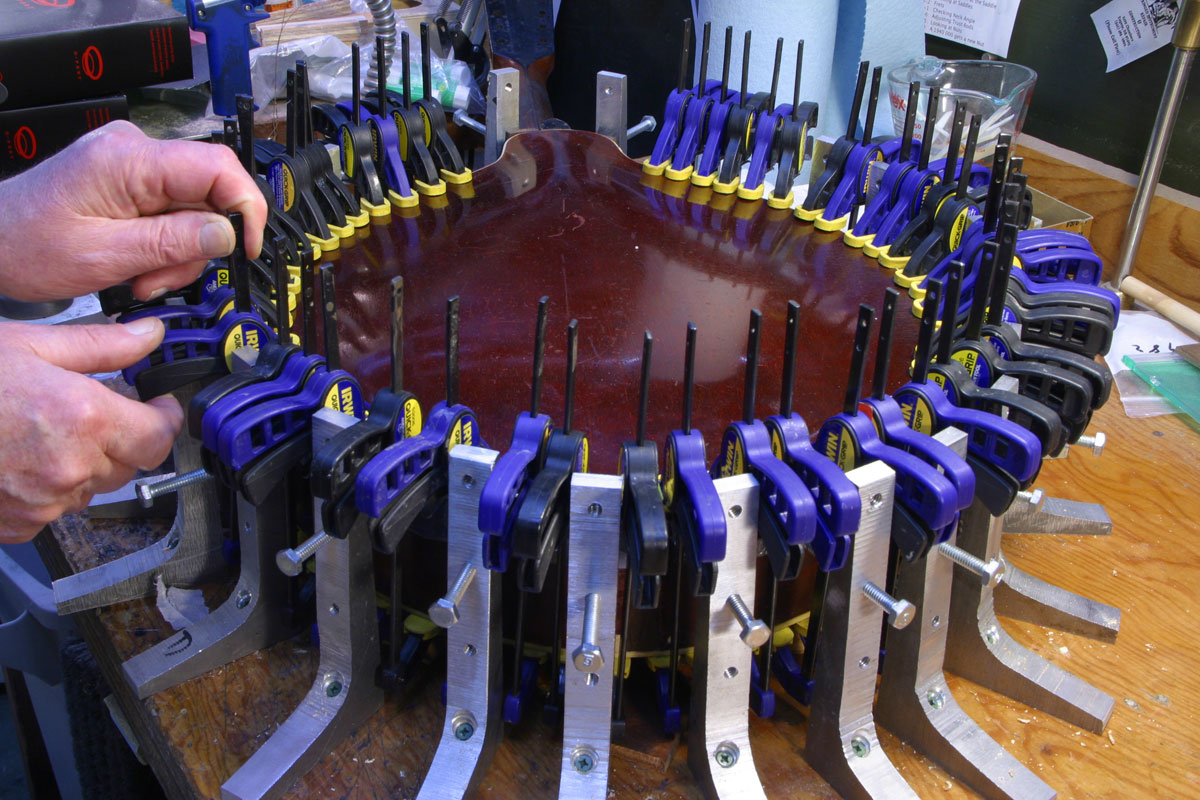
Day 14: Clamping & Regluing the Back

Despite the fact that there's only a single photo here, I must say that this particular day was the "big one." In order to align the sides with the back, I used every one of my right-angle bench clamps, pressing in like crazy all around the periphery. I also used a small bar clamp between all the bench clamps to press the back down and provide clamping pressure for gluing the back to the sides, linings and end block:

Just setting all this up took a long time, but because I had previously glued the back to neck block in good alignment, all the parts fit back together as I slowly increased inward pressure all around the body.

Day 15: Color Day

Because there was a good deal of tension in the clamping job, I chose to let it remain clamped for an extra couple of days before releasing the clamps. Once the clamps were off, I used hot water to dissolve and remove the excess glue:

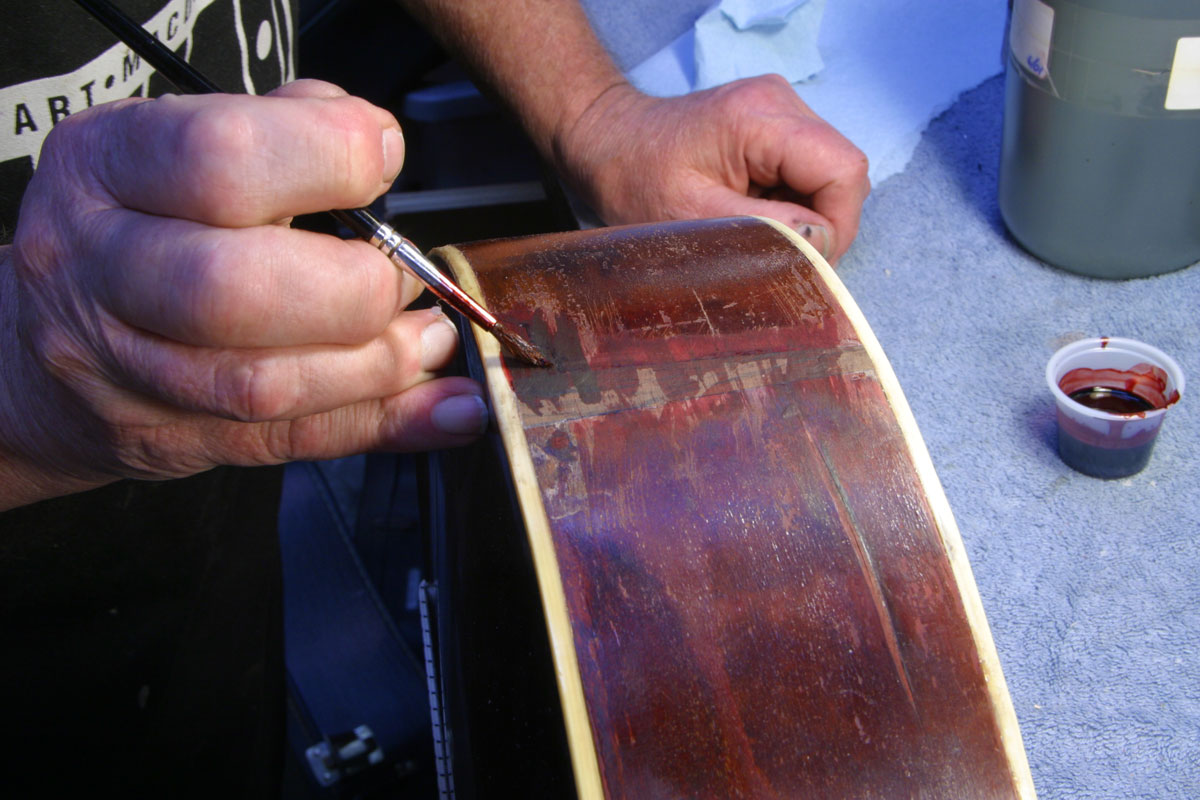
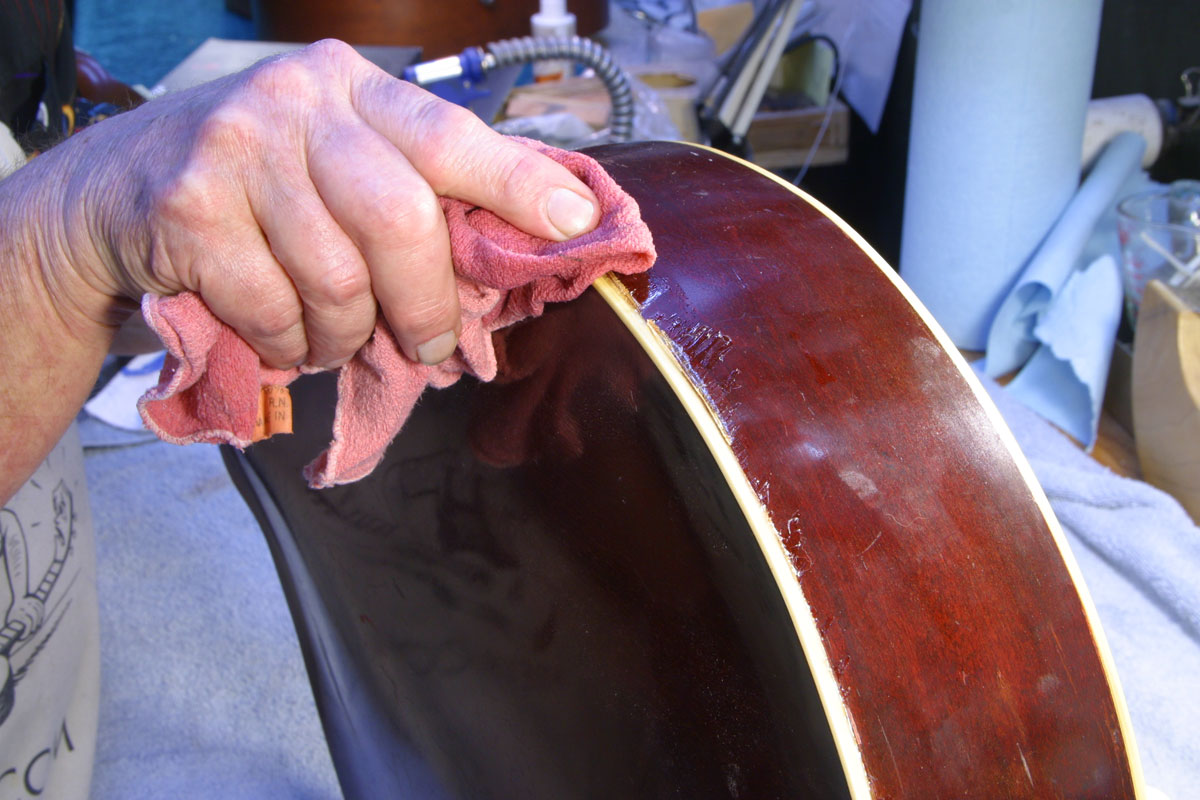
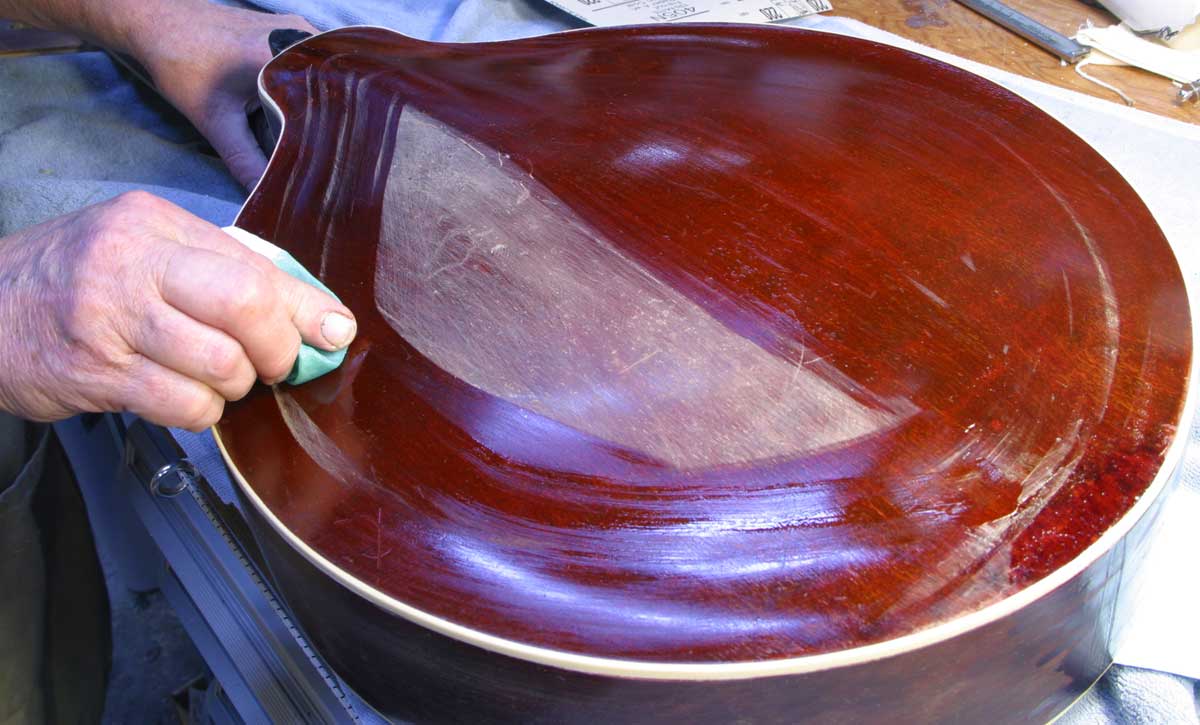
After everything was dry, I went over to the stain cabinet, picked out some transparent dye (in MEK) and mixed up a batch of red with a little brown to approximate the original coloring on the maple back and sides.

Using a nice artist brush, I applied the stain to the raw wood where all the old stain had been damaged by water and previous work, and right over the old finish as well in some spots:


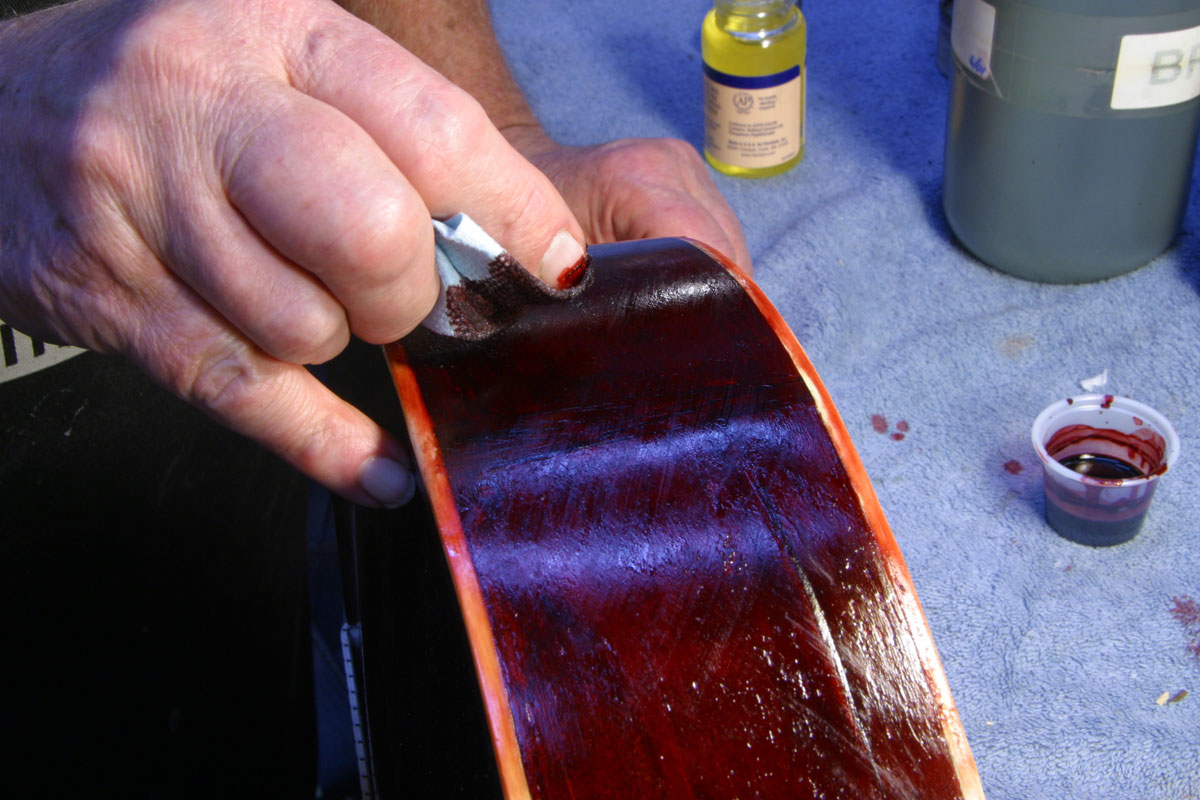
Then, I blended the color with a rag and some more stain diluted in alcohol:


As you can see, the stain went everywhere, even all over the binding. The stain dried immediately, and I wiped a few thin coats of shellac over all of it to seal the stain so it wouldn't be damaged by handling as I worked the next day.

Day 16: Scraping the Binding:

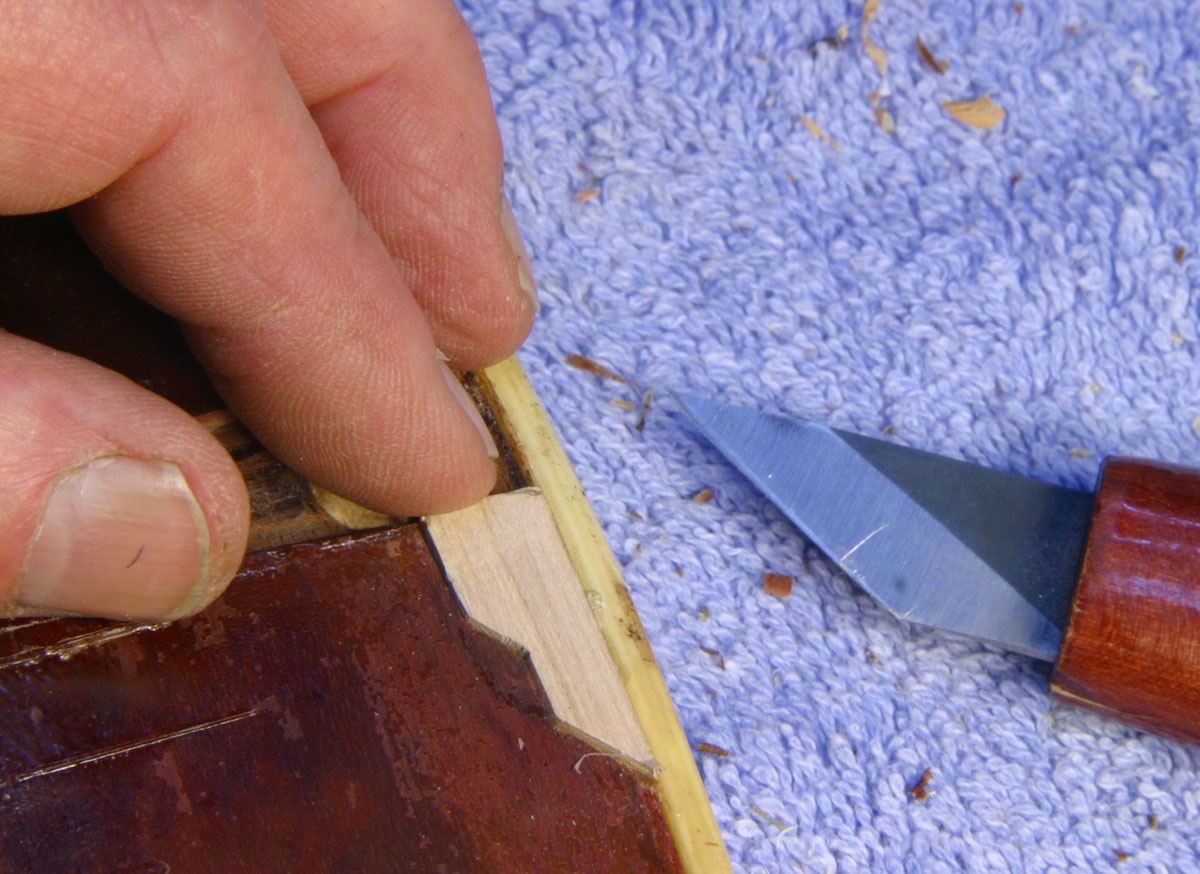
Now, for the last bit of color work - removing the stain from the binding. My favorite binding scraper is a small piece of hard steel with a 45-degree bevel on each end. Both ends are the same, and both are sharpened the same. I use a small diamond hone to put a really nice sharp edge on the end of the scraper:

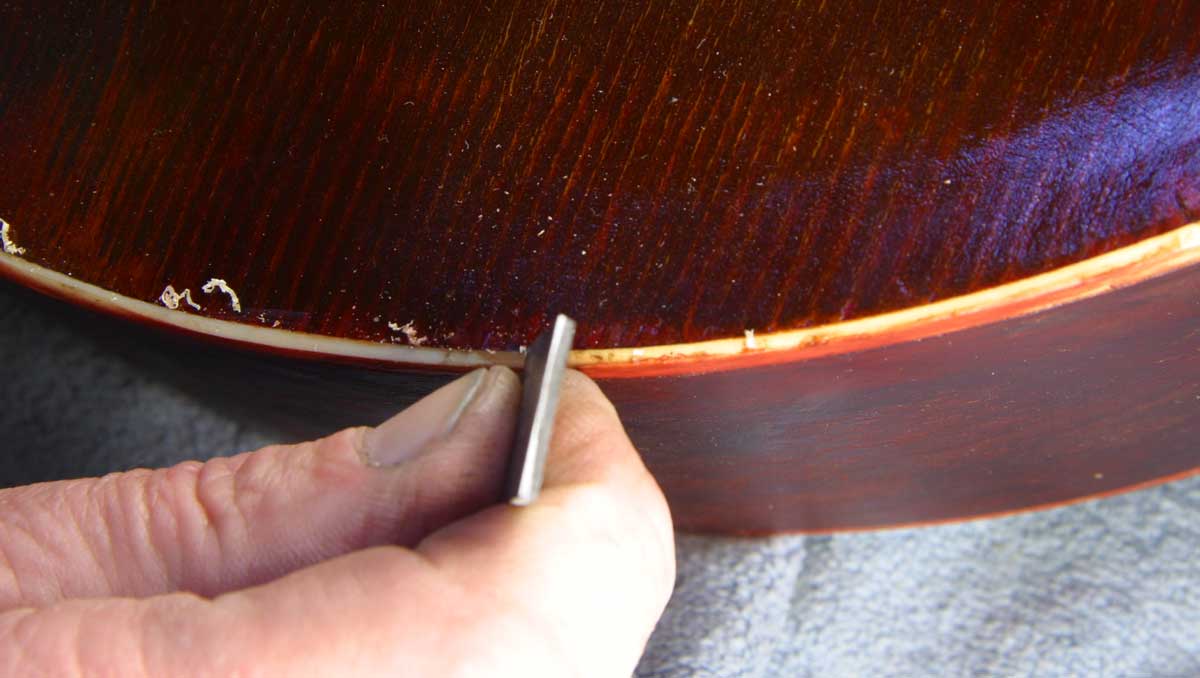
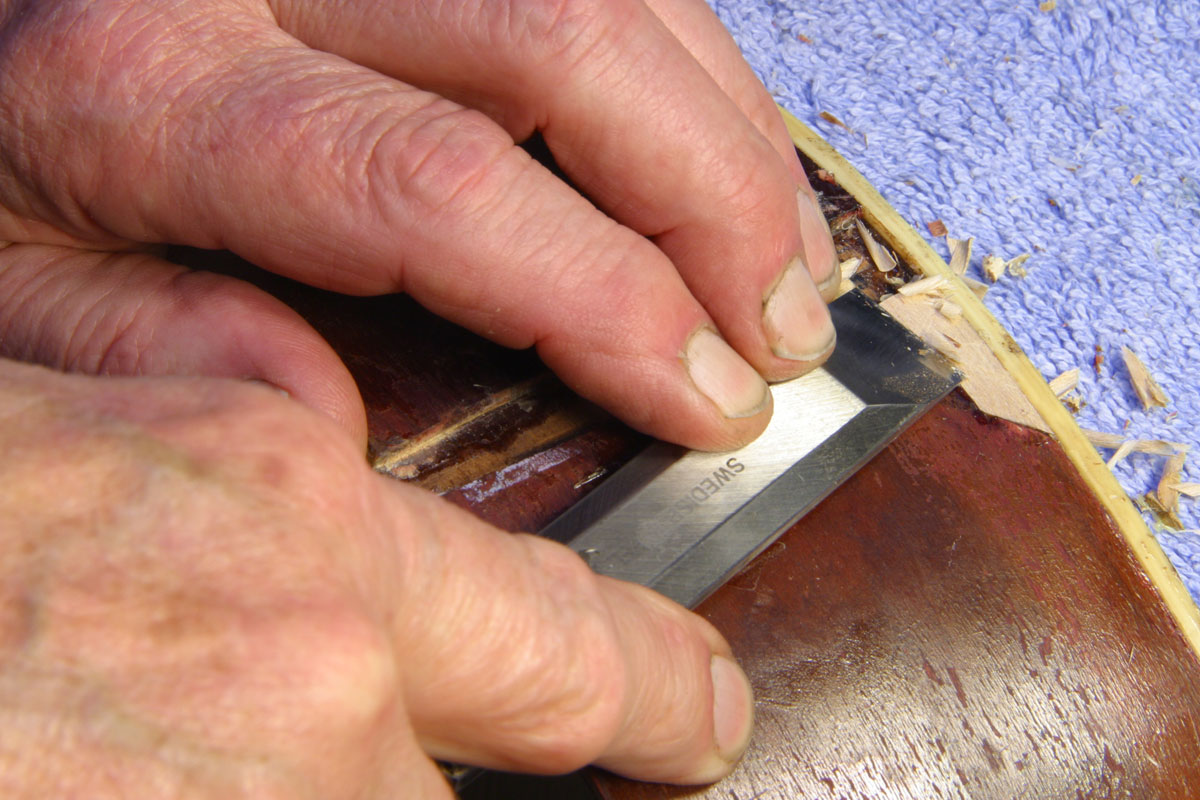
I hold the scraper nearly vertical as I guide it with my fingers to scrape the finish and a tiny bit of the surface of the ivoroid binding:

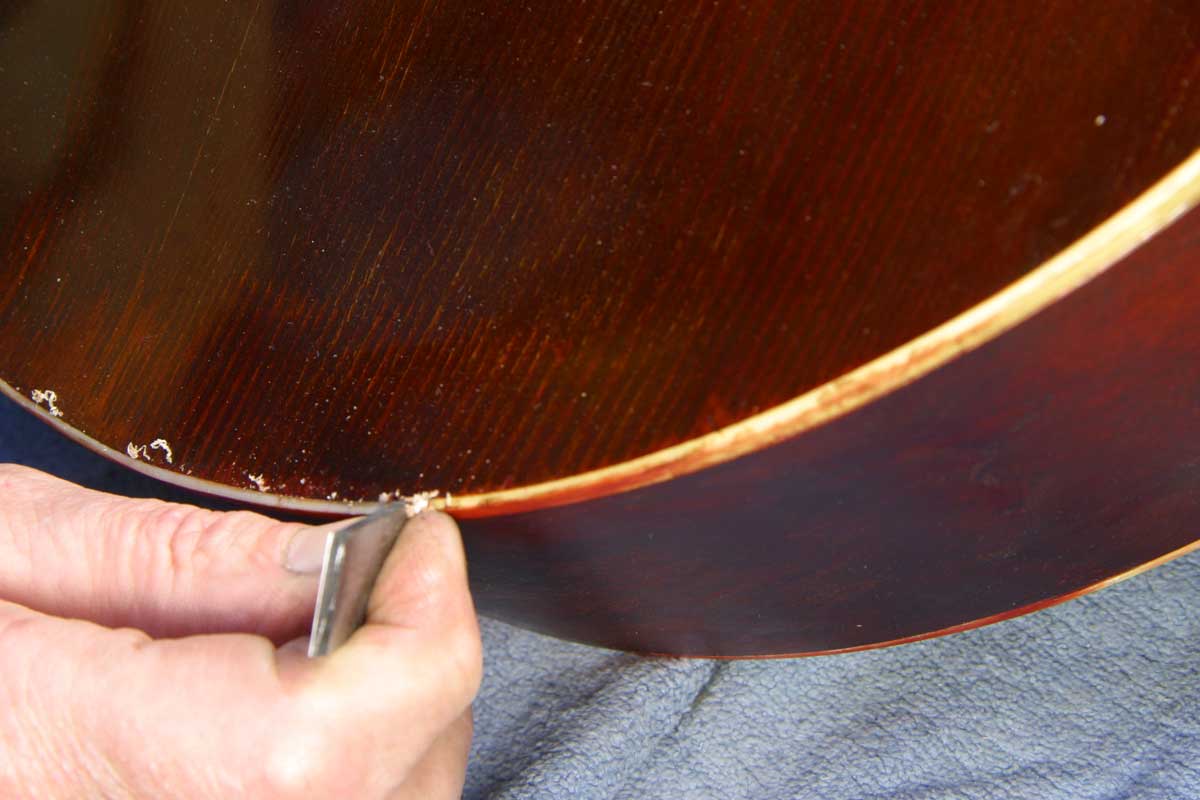
This operation really cleans up the look of the finish and makes the colors really come alive!

Day 17: Finishing


This is one of those "days" that's really a series, with days of work, separated by several days for finish to dry. The finish is shellac, applied in the classic rubbing technique known for centuries as "French polishing." It's this final clear coat that levels out the finish and gives the whole instrument a fine glow.

Before adding finish, I scuff sanded the entire surface to allow the new shellac some extra surface area to get a real "bite" as it dissolves into the old finish. My first coat was very wet indeed, to make sure I got serious adhesion:

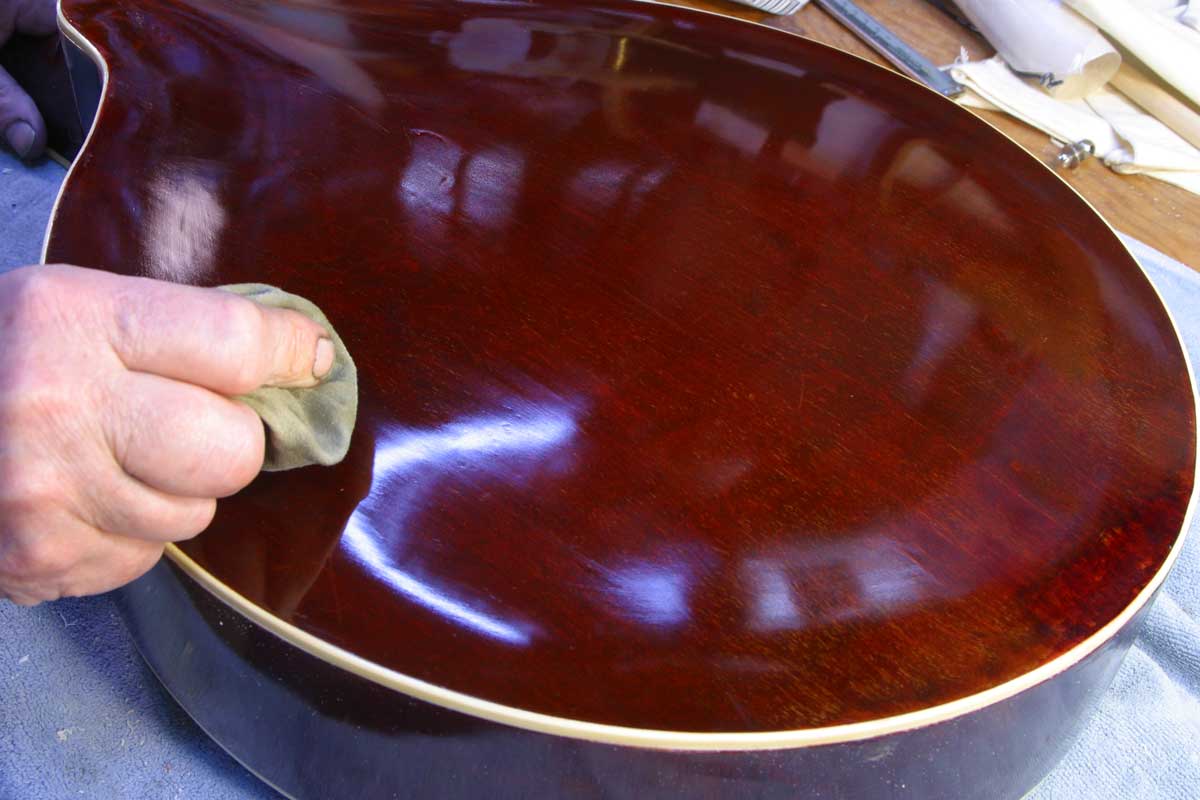
In the days that followed I slowly built a nice coating to achieve a good smooth look:


Day 18: The End


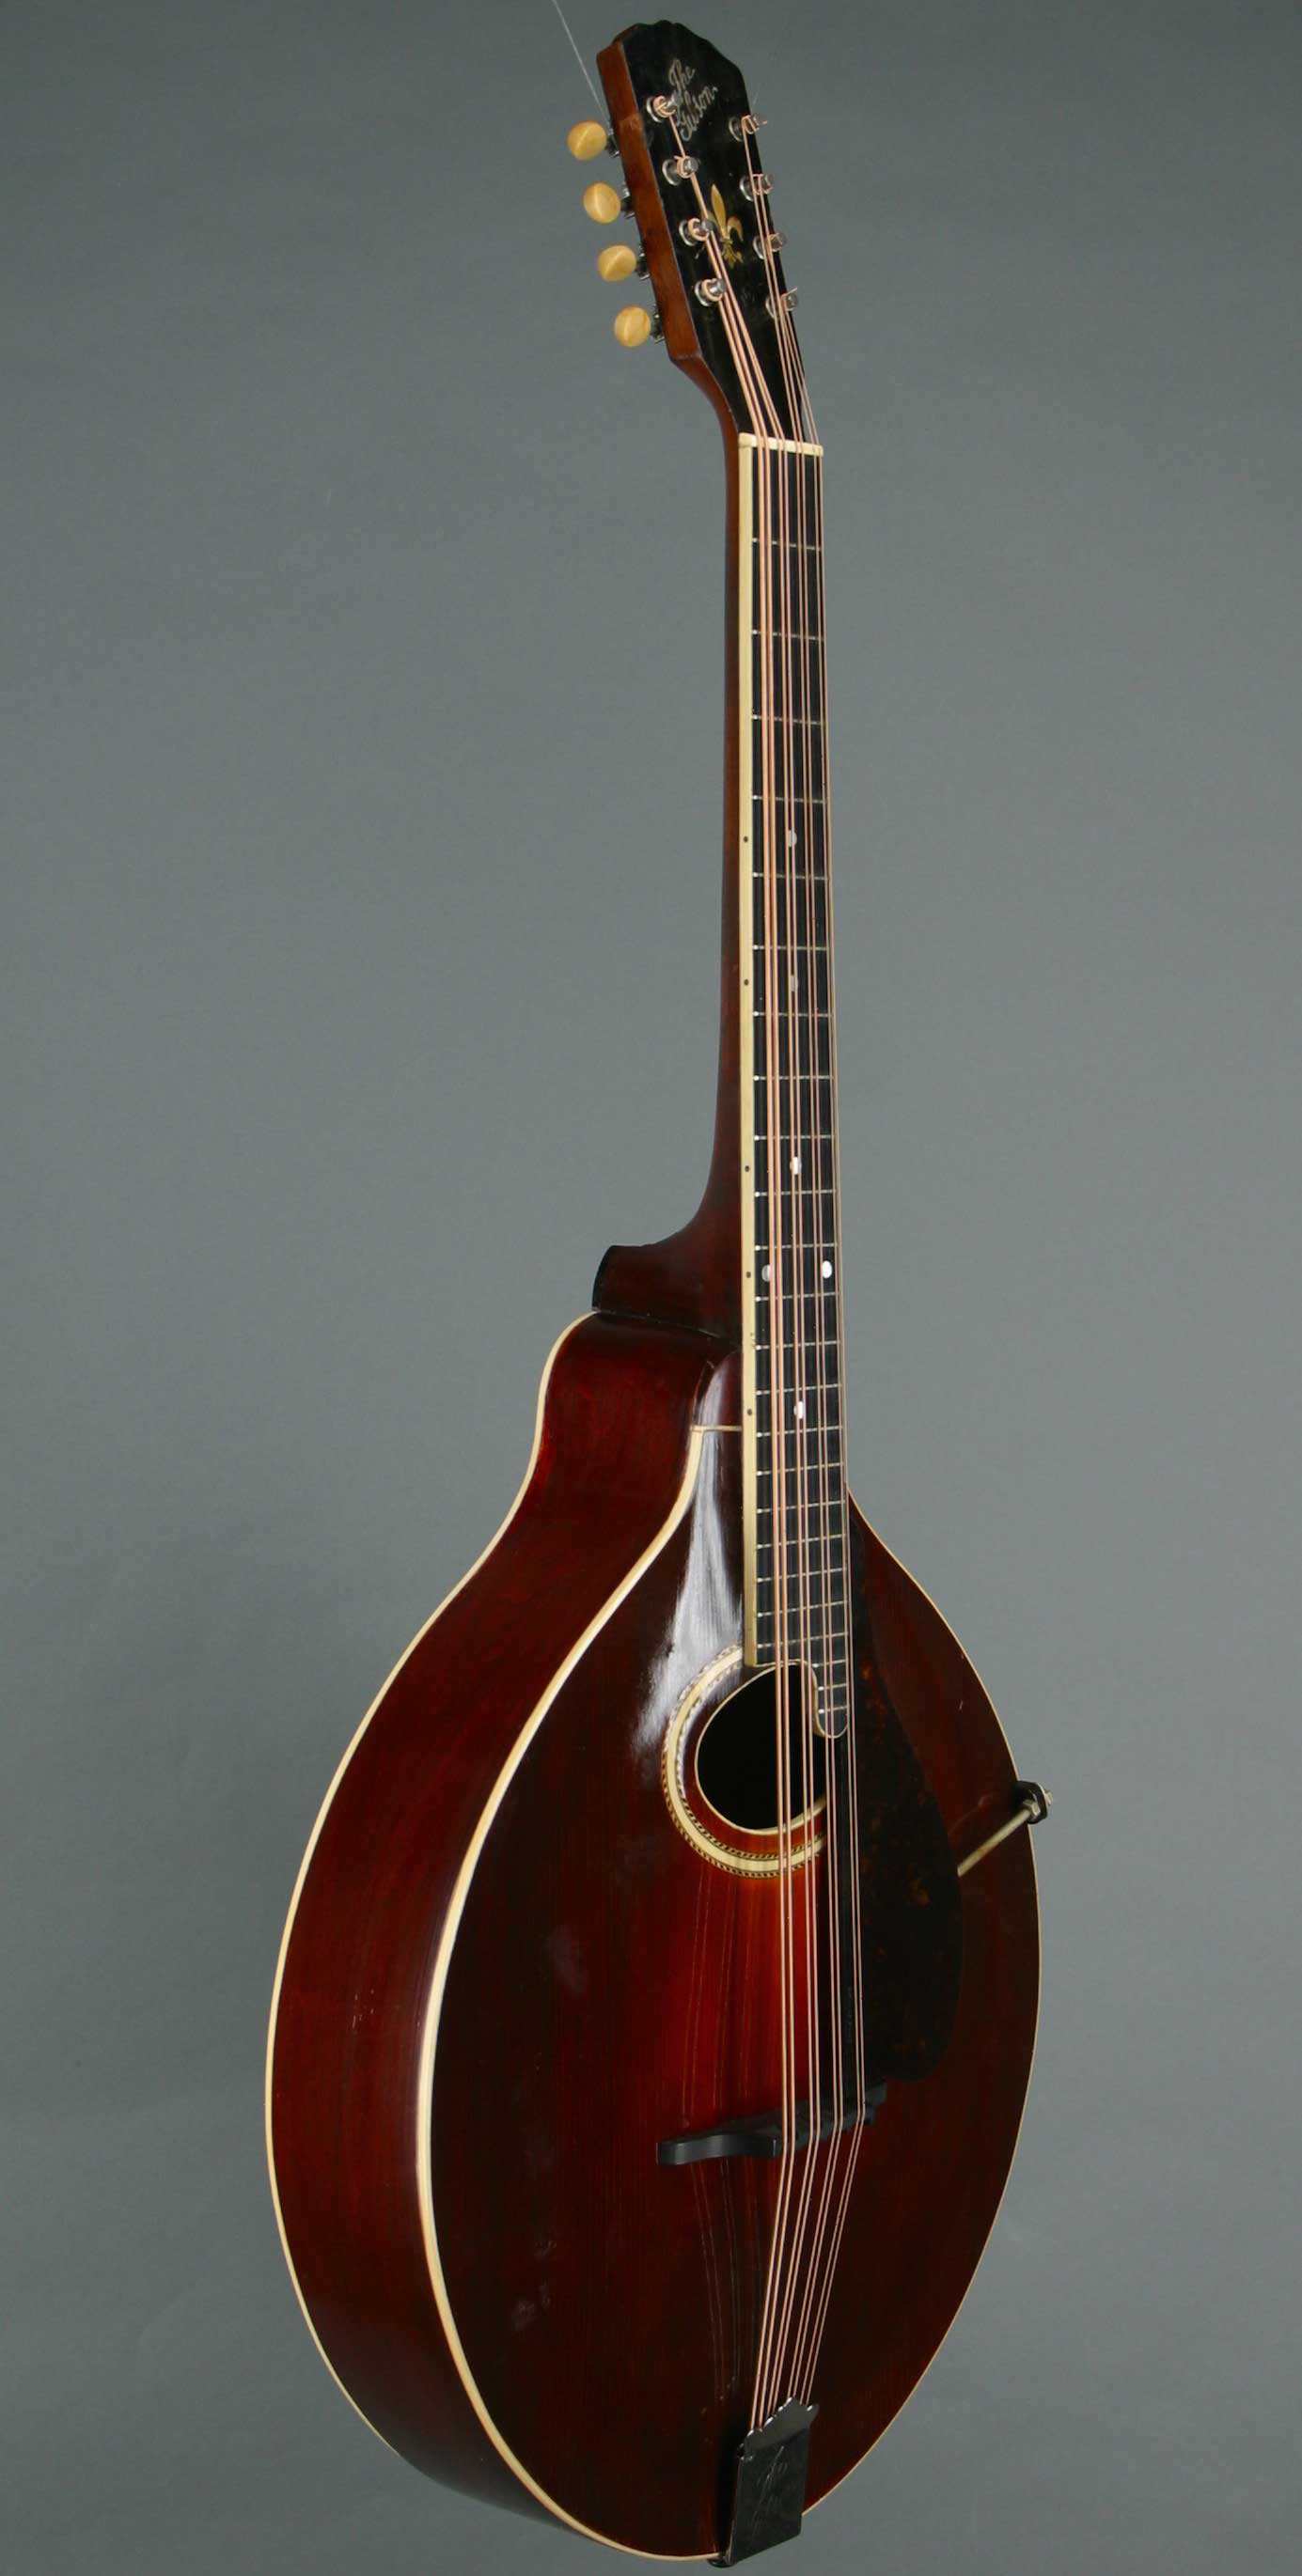
Some new strings and a bit of setup work were all that remained, so today is the day for some final "studio" photographs of the result - a fine looking and solid old instrument, ready to make some fine music:

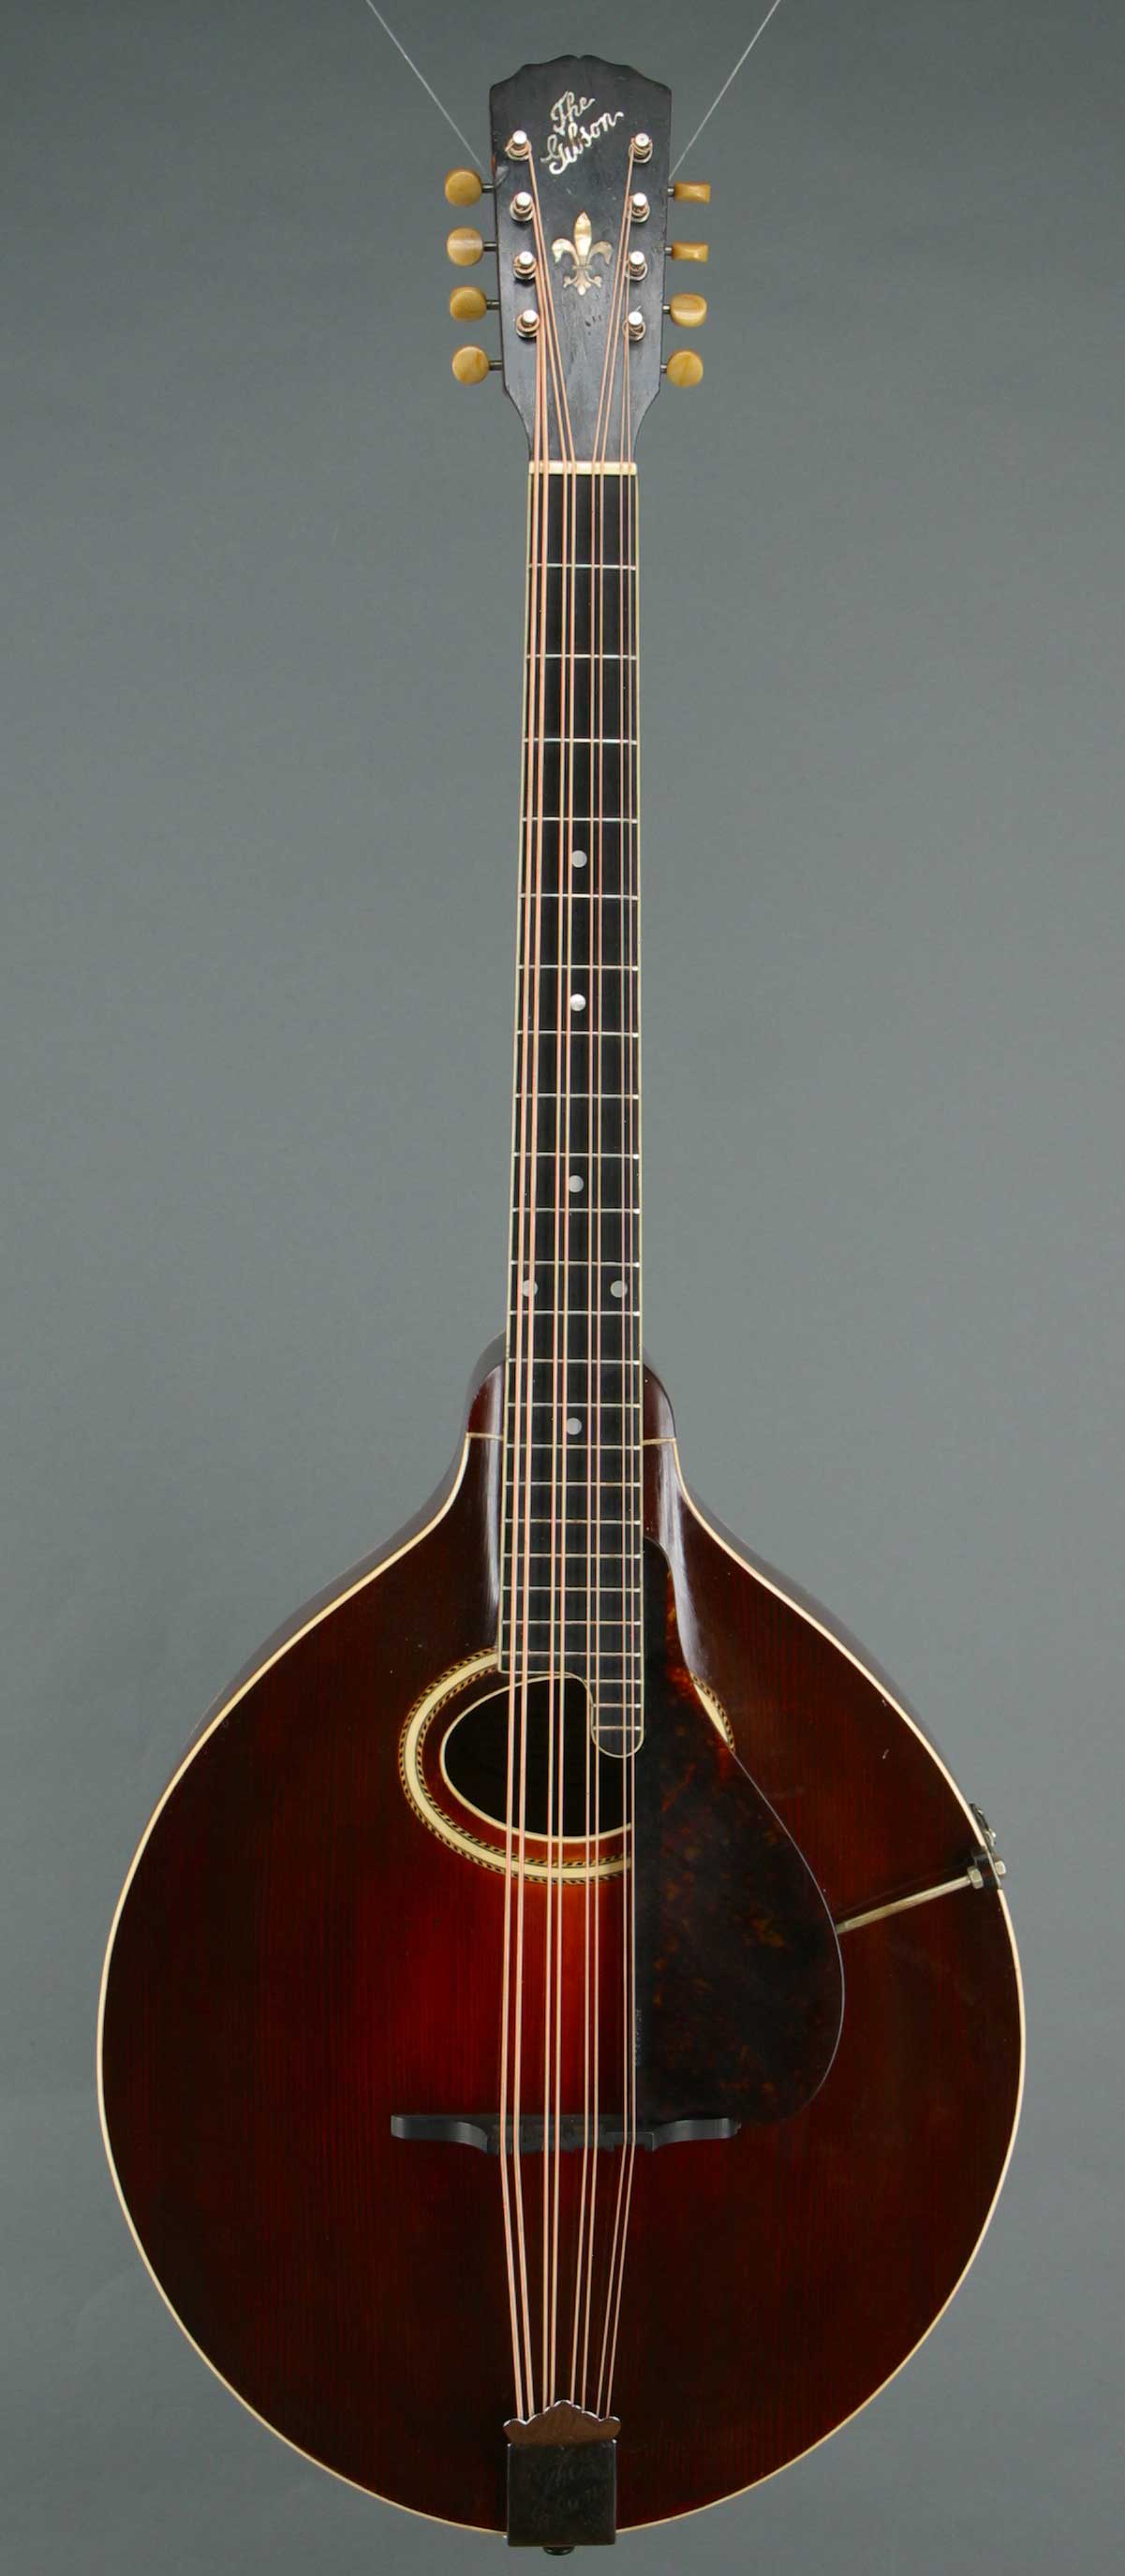
There's no sign of that top failure now:


Unless otherwise credited, all content on Frets.com is
Copyright © 1969 - 2023 Frank Ford
All rights reserved.