
Cross Brace Top Wrinkle!
It's the dreaded Cross Brace Top Wrinkle!
Look out for this one. It's serious. In fact I think it's so serious, I'm going to waste an entire page just talking about the damage, and move on to the repair later.
If you go to a vintage guitar show, I'll bet you can spot at least one vintage Martin guitar with the classic top wrinkle right over the cross brace behind the bridge. As far as I know, there's only one cause for looseness of the top over the cross brace -- heat. In the high heat of a parked car (150 to 175 degrees Fahrenheit) the bond strength of the glue is reduced and the top can actually be pulled away from the cross brace by the tension of the strings.
The reason this is serious business is that it isn't always diagnosed early, and it isn't 100% certain that it can be reglued successfully. All the tension of the strings is concentrated at the bridge, and most players are aware that the bridge might pull loose, especially during heat stress. Loosening of the top braces under the bridge is not commonly discussed, even though it is sometimes a chronic problem with a guitar that may endanger its life!
Let's take a look at a classic example. It's a 1949 Martin D-28, and it has definitely seen some overheating. The bridge had been replaced some time ago, but the looseness of the top appears not to have been noticed. OR, perhaps it was noticed, and reglued, but the glue didn't hold.
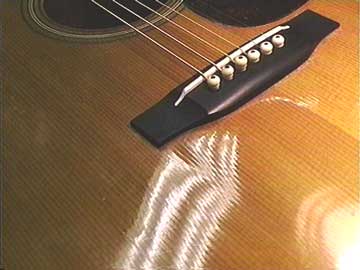
Here's the subject of our scrutiny:
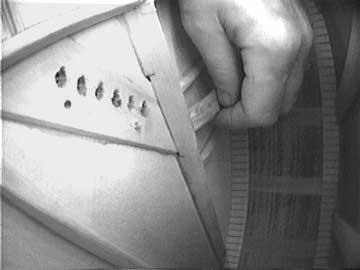
I tried to photograph the light reflection from my overhead fluorescents, so you could see the wrinkle formed right behind the bridge.
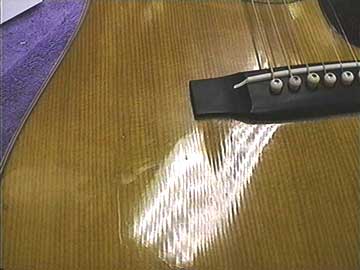
Here's a shot from a slightly different angle:

Let me balance a straightedge on the top so you can see the bulge and dip of the wrinkle a bit more graphically:
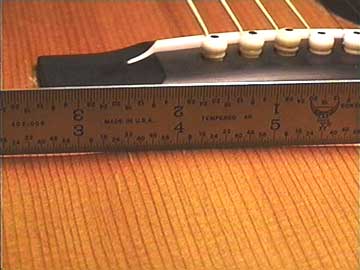
And a little closer:
When I see this kind of wrinkle in this location, I don't have to look inside to check if the brace is actually loose. I know it is.
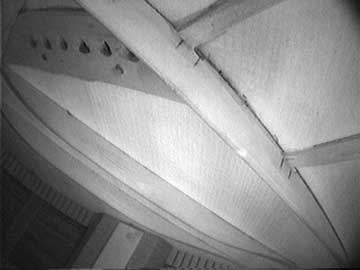
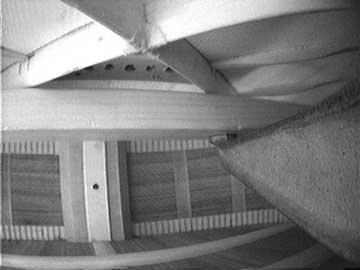
I put the black & white inspection camera inside so you can see the looseness:
It's not easy to see the dimension of the gap with this camera and lighting arrangement. Look closely at the top to the left of the major cross brace. See that very slight dark shadow? That's the shadow of the bridge, as revealed by the ambient light passing through the top. Right in the area of the shadow, the top is pulled completely loose from the brace.
This is particularly nasty business on the older Martins, because the bridge plate is mortised under the brace, eliminating half of the brace's gluing surface contacting the top. On the next page, you'll be able to see the mortised bridge plate.
Now, when it comes time to reglue that brace, we have a challenge. Small gluing surface, and old glue in the joint that can't be removed. That means we're gluing new glue to old glue, and wood glue has little or no cohesive strength. We hope to get it glued solidly, and clamped well so there is no extra glue left in the joint. A lot of glue buildup in the joint will cause it to fail for sure!
Now, epoxy would be an exception. Epoxy has great cohesive strength and will fill wide gaps successfully. The thing is that epoxy is a giant mess to work with inside a guitar, making cleanup tricky. Not only that, but epoxy is not recognized as good restorative material except in dire emergency. If regluing isn't successful, then perhaps epoxy is a reasonable choice. Otherwise, it might be necessary to add a short auxiliary brace in that area to help carry the load of the pull on the bridge, and couple the top to the cross brace.
OK, enough bad news, now let's glue this one up!
The repair is really quite simple. You just get some glue under the loose brace, and clamp it up.
Like so many other jobs, the Devil is in the details.
First I'll work some glue under the brace using my shortened palette knife:
It's not hard to get some glue in there, but it's impossible not to smear it around the top area. I can use damp rags to wipe the excess off so the job will look neat after it's done.
Now's a good time to take a look at that mortised bridge plate. Notice also, there are two old screw holes from a previous "repair" to an older loose bridge. That's another good sign there was heat damage. The previous repairman was obviously not sophisticated, and probably didn't notice the loose brace. Left unattended this kind of looseness can compromise the life span of the guitar top.
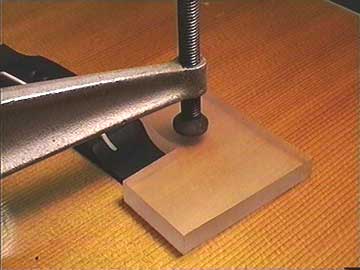
Once I have my glue in there, it's not too difficult to clamp the brace:
I'm using a ten inch long piece of redwood with a cork facing to press up against the brace. The soft facing keeps me from denting the brace, and the extra length allows me to balance against the opposite cross brace, so the clamp doesn't have to balance precariously on a skinny brace. I'm using a heavy clamp and squeezing the brace pretty hard to really flatten out the top in the area of looseness.
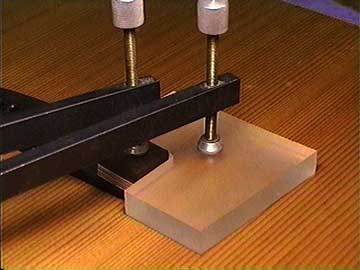
To help flatten the top, I'm using a very heavy 1/2" thick acrylic caul:
I have the caul cut to fit around the bridge so that I'll get great distribution of clamping pressure. The polished acrylic surface guarantees that I won't mar the finish, and the extra width keeps me from pressing in a telltale crease in the spruce.
Ideally, I'd be doing this job with a really big flat caul on top, with the bridge off (before regluing it.) In this case a previous repairer reglued the bridge first, but sometimes the bridge stays glued down while the brace becomes loose in the stress of excess heat. Either way, I'll glue the brace back without removing the bridge.
I looked inside after trial clamping, and found that I wasn't getting quite enough clamping pressure directly under the bridge, so I changed the setup just a bit:
Thist time I have two clamps, one right on top of the bridge. One clamp or two, the choice is a matter of getting clamping pressure where it's needed. If the bridge is directly over the area of looseness, then two clamps usually make the most sense.
I'm not showing the "after" photo, because it just looks like a regular guitar, and you can't see anything special.