Things For Luthiers
  Repair Technique
    Setup
    Inlay
    Frets
    Tool Use
    High Tech Department
    Finish
    Structural
    Glue
    Guitar
      Structural
      Frets
      Pickguards
      Bridges
      Pickups
    Banjo
    Mandolin
    Ukulele
    Harp
    Case Repair
  Tools
My WorkBench
Making a Fluorescent Inspection Light
Proportional Nut Spacing Rule
Fret Tang Tools
Kenny Hill's Spring Go-Bars
A one-use Molding Plane
Fret Heater
Modified Soldering Gun for Pulling Frets
Upgrading Loose Dremel Bearings
A Slo-Mo Stationary Belt Sander
Dry Pigment Storage Box
Selecting String Cutters
Fret Height Gauge
A Simple Magnetic Tool Fence
Taylor's Super Driver
Bent Tools
Shot Bag Neck Support
Half a Pencil
Bridge Carving Machine
Shop-built Semiautomatic Lining Kerfer
Gryphon's Fret Saw
Joint Knife
A Two Bit Finger Saver
Long Probes
Articulated 'Take-Apart' Crack Clamp
Clamp Points for easy positioning
Bench Clamps
Adjustable saddle routing base
Special & Modified Clamps
Refret Saw Guide
Roy Noble's Dremel Router Base
Bob Gleason's Nut Handle
Folding Inspection Mirror
Dan Erlewine's Rockin' Pin Puller
Steve Crisp's Classical Guitar Tuning Stand
Bridge Pin Hole Slot Saw
Making Ergonomic Tool Handles
Tim's Saddle Pal
Making My Fret Expander Pliers
My Favorite Power Tool
My Weirdest Power Tool
Dovetail Neck Removal Fixture
Neck Removal Air Harness
Some of My Favorite Stock Tools
Check out the Spy Cam
Taper Thickness Gauge
  Shop Tips
  Data
  Product Reviews
Things For Musicians
  Accessories
My Field Trips
Tom Ellis Precision Pearl Inlay - Austin, Texas
Shubb Capos - Valley Ford, CA
Rick Davis, Running Dog Guitars - Richmond, VT
Ted Megas Guitars - San Francisco
Collings Guitars - Austin, Texas
Hideo Kamimoto's Shop - San Jose, CA
1999 Northern California Ukulele Festival
Taylor Guitars - El Cajon, CA
Northwoods Guitar Repair Seminar 1998 - Big Rapids, MI
Northwoods Seminar 2000
1998 Acoustic Guitar Festival - San Rafael, CA
Guild of American Luthiers Convention, 1998
Mario Martello - It's Super Mario!
Mario's San Franciscan
Bills ABC Music - San Bruno, CA
Joe Grubaugh & Sigurn Seifert, Violin Makers - Petaluma, CA
Down in Brian's Basement - Palo Alto, CA
Roberto-Venn School of Luthiery- Phoenix, AZ
Special Features
C. F. Martin & Co., Nazareth, PA
Collings Guitars- Austin, TX
Gibson's Acoustic Instrument Division, Nashville
->Guitar Building with Jeff Traugott
CFox Guitars - Healdsburg, CA
Vogel Guitars - Quito, Ecuador
Kamaka Ukuleles - Honolulu
Tacoma Guitar Co.
U.S.A. Custom Guitars
Repair/Restoration Blogs
1867 Martin 1-26
1940 Martin D-28
1937 Martin D-28
1920 Gibson K-2 Mandocello
Gryphon
A Quick Tour of Gryphon
Gryphon's 30th Birthday Party
Hey, it's Ramblin' Jack Elliot!
Cats and Jammers
Book Reviews
About the Reviews
Guitar Finishing, Step by Step - by Dan Erlewine
Martin Guitars- by Richard Johnston & Jim Washburn
Gallery of New Instruments
Caution!
New Instrument Gallery
  Guitars
Fun Stuff
What They're Saying About Us
The Luthier's Kitchen
Yowl-A-Lele
Alice's Gryphon Page
Cool Plates
Washburn Made a Lot of Everything
Father & Daughter United after 32 Years!
Gryphon's Famous Free Picks
Folk Art Gallery
Fine Art Instruments by Robert Armstrong
Every Circus Needs a SIDESHOW
The ORIGINAL Dreadnought!
Nothing Like Those Old Master Finishes
The Foldo
Holiday Tie-Dye Peeps
Nancy's Dessert Cake Bites
Ditson Dreadnought
Mashed Potatoes
Split Pea Soup
Potato Peeler
Café Foldo
Papa Schnooger
Mod, oh yeah!
Dunn Dreadnought
Coffee Gangs
dreadnought guitar.
my floor lamp.
Quick and Easy Caesar
The Waybacks
Instrument History and Lore
Looking Backward at the 20th Century
The Way We Were... "obsolete" repair styles
Origins of the 12-string Guitar
The World's Oldest Guitar
Washburn Banjo
Museum
FRETS.COM Museum
About The Museum
  Guitars
    Gibson
    Epiphone
    Washburn
    Selmer
    Gryphon
    Kay
  Banjos
    Gibson
    Weymann
    Paramount
    Bacon
    Fairbanks
    Vega
    Gryphon
    Misc.
  Mandolins
  Ukuleles
Home Shop Tech
HOME SHOP TECH Articles
#1 Sock Handle
#2 CD Paint Brush Can Cover
#3 Japanese Hand Saws
#4 Wax for Lubricating Saw Blades
#5 Pocket Knife
#6 Diamond Pocket Hone
#7 Air Blow Gun
#8 File Cleaning Trick
#9 Drilling Perfectly Clean Holes
#10 Clock Marker
#11 Disc Sander Cover
#12 Glue Thermometer
#13 Magnetic Fence
#14 Salad Tong Finger Saver
#15 Old Kitchen Knives
#16 Cutting Sandpaper
#17 Soundhole String Retainer
#18 Epoxy Leftovers
#19 Small File Handles
#20 String Crank
#21 Stain Palette
#22 Cotton Swab
#23 Portion Cups
#24 File Scraper
#25 Palette Knife Extension
#26 Saddle Contour
#27 Touch Up Lacquer Bottle
#28 Recycle Beverage Can
#29 Micrometer
#30 Toothbrushes
#31 Sander Safety
#32 Hemostats
#33 Compressed Air Lines
#34 Wine Cork Knife Point Protector
#35 Chisel Drawer Dividers
#36 Bent File Chisel
#37 Screwdriver Chisel
#38 Acetone Finish Test
#39 Bevel Fret Slot
#40 Solvent Cap Dispensing Cup
#41 Packing for Travel
#42 Pickup Brace Damage
#43 Coloring Glue
#44 Cutting Paper on Band Saw
#45 Quick Grip Brace Jack
#46 Wedge F-hole Clamp
#47 Guitar Wall Hanger
#48 Half Pencil
#49 Straw Pipette Extender
#50 X-brace Top Wrinkle
#51 Paper Pad Mixing Palette
#52 Fluorescent Replacement Bulbs
#53 Swing Arm Lamps
#54 Packing Pegheads
#55 Pyramid Bridge Clamping Caul - External
#56 Threaded Clamp Foot
#57 Masking Tape for Indexing Bridge
#58 Rubber Band Tuner Grommet Retainer
#59 Belt Sanding Celluloid
#60 Sharp Nut
#61 Side Crack Reinforcement
#62 Dry Pigment Sorting Block
#63 Paper Grain Direction
#64 Modify Drill Bit for Cutting Wood
#65 Fret Pullers Pull Other Things
#66 Heavy Duty Push Sticks
#67 Single Edge Razor Blades
#68 Acid Brushes
#69 Plastic Stretch Wrap for Tool Protection
#70 Bit Holder Blocks
#71 Cross Grain Sanding
#72 Truth in Labeling
#73 Plastic Wrap Glue Resist
#74 Cut Acid Brush
#75 Stretch Wrap Masking
#76 Spray Can Cap
#77 Spray Can Nozzle
#78 Kitchen Paring Knife for Shop Utility
#79 Powerless Belt Sanding
#80 Drill Index
#81 Grinder Support
#82 Leather Pliers Grip
#83 Paper Towel Holder
#84 Newspaper Drawer Liner
#85 File Handle
#86 Recycle Condiment Bottle
#87 Diagonal Cutter Selection
#88 Fatigue Mat
#89 Credit Cards
#90 PVC Shop Vacuum Tool
#91 String Retainer String
#92 Hex Wrench Rack Improvement
#93 Power Tool Casters
#94 Eyes and Ears
#95 Soft Vise Jaw Pads
#96 String
#97 Layout on Metal
#98 Storing Long Electrical Cords
#99 Hanging Coil Hoses
#100 Cutting Aluminum
#101 "Candling" Guitar Tops to See Brace Locations
#102 Locating and Tracing Braces with Magnets
#103 Foil Protection for Reamers
#104 Dry Sandpaper Lube
#105 Mixing Epoxy without Bubbles
#106 Spray Lube Siphon Tube Reinforcement
#107 Paper Towel Half Sheets
#108 Dusting Brush Modification
#109 Cutting Screws and Bolts
#110 Catalog Sale Flyers
#111 Gluing Bin Boxes
#112 Hacksaw
#113 Link Belt
#114 Freehand Band Saw Technique
#115 The Key Hole
#116 Ceiling Posters
#117 Magnetic Screwdriver
#118 Wide Disposable Brush
#119 Veneer Cutting on Band Saw
#120 Finding Center by Balance
#121 Hacksaw Duplicate Parts
#122 Chuck Key Magnet
#123 File Card for Cleaning Saw Blade
#124 Calculator Bag
#125 Door Storage
#126 Magnetic Pocket Screw Holder
#127 Paint Can Lid
#128 Quick Tape Strap for Sensitive Items
#129 Shop Vac Hose Strain Relief
#130 Coiling a Band Saw Blade
#131 Oil Spill Cleanup
#132 Wood Parallels
#133 Masking Tape Handles
#134 Wedges
#135 Tethered Door Stop Wedges
#136 Long Air Hoses
#137 Soda Straw Parts Storage
#138 Hanging Holes for Tools
#139 High Item Picker
#140 Tool Index Wood Infill
#141 Cardboard Drawer Liner
#142 Waste Basket Bungee
#143 Tool Covers
#144 Bungee
#145 Magnetic Bit Storage Drawer
#146 Platform Ladder
#147 Magnetic Tool Pickup
#148 Kitchen Hero - Cutting Board
#149 Kitchen Hero - Diamond Hone
#150 Photographs for insurance
#151 Unscrew Container Safely
#152 Little Boxes - Get Rid of Lid
#153 Swivel Casters for Tool Cabinets
#154 "Temporary" tool stands
#155 Tool Drawer Dividers
#156 Rope Trick: Cutting
#157 Broom Handle
#158 Hand Drill Countersink
#159 Using Digital Calipers
#160 Identifying Metric Hex Keys
#161 Dremel Carbide Cutoff Wheel
#162 Fence Hand Safety
#163 Empty Bin Boxes
#164 Cutting Bin Boxes
#165 Camphor
#166 Decant Epoxy to Avoid Quick Reaction
#167 Epoxy Mixing on File Folder "Palette"
#168 Wood Screw Pilot Drill Size
#169 Reverse Switch Safety Bolt
#170 Keyless Chucks
#171 Work Glove Storage Rack
#172 Cutting Spring on Grinder
#173 Stacking Tool Cabinet Bottoms
#174 Label Those Drawers
#175 Extra Drill Chuck
#176 Sauce Pan
#177 Ball End Hex Wrench
#178 Poly Bottle Bottom for Parts Washing Basin
#179 Square Bottle Bottom for Parts Drawer Bins
#180 Screws in Jars
#181 Salvage Hardware Drawer
#182 Cutting Long Cardboard Tubes
#183 Repetitive Length Cutting on Band Saw
#184 Mark Up Your Ruler
#185 Plastic Containers and Solvents
#186 Mobile Bin for Wood Scraps
#187 Scrap Bin Cover
#188 Scrap Bin Triage
#189 Ball Peen Hammers
#190 Old Rags to Prevent Under Bench Hunting
#191 Storing Magetic pickup tools
#192 Duct Tape Mallet
#193 Cut Down Old Paint Brush
#194 Plastic Bag Makes Emergency Glove
#195 Break a File to Make Short Ones
#196 Magnets to Hold V-Block
#197 Steel Rules May Have Poorly Cut Ends
#198 Buy Files by the Box
#199 Battery Charger Maintenance
#200 Extending Cable Ties
#201 Miter Gauge Alignment
#202 Recycle Paint Thinner
#203 Spray Can Freshness Reminder
#204 Pipette Sealing Trick
#205 Cookie Sheet Chip Pan
#206 Extension Cord Strain Relief
#207 Super Glue "String Needle"
#208 Heavy Duty Extension Cords
#209 Magnetic Book Hangup
#210 Paint Special Tool Handles for Identification
#211 Hang up those brooms
#212 Wood V-Blocks
#213 Miter Gauge Rip Fence
#214 Writing on Saw Table
#215 Saw Table Wax Lube
#216 Toilet Paper
#217 Dispensing Paint
#218 Cutting Short Pieces on Band Saw
#219 Recyled Cardboard Box Tote
#220 Phonograph Needle Scriber
#221 Wall Mounted Tin Can Tool Holders
#222 Dental Floss Sewing Thread
#223 Cut Paper Towel Roll
#224 Hand Tool Oiler for Rust Protection
#225 Tool Instructions Taped Inside Drawers
#226 Forstner Bits in Aluminum
#227 No-Mess Spill Wiping
#228 Roll Wrapper as Spill Wiper
#229 Shop Rags from Bed Sheets
#230 Cutting Shop Rags on the Band Saw
#231 Rubber and Vinyl Mats on Concrete Floors
#232 Tape for Removing Splinters
#233 Cutting Steel Wool Pads
#234 Paint Can Lid Installation
#235 Pouring from Gallon Cans
#236 Cutting Clear Plastic on the Band Saw
#237 Masking Tape Dispenser
#238 Toothpick Brush
#239 Bailing Wire Spool Retainer
#240 Twisting Wire
#241 Penetrating Epoxy Sealer
#242 Remove that Acrylic Plastic Protective Sheet
#243 Hex Key Cheater Bar
#244 Sand Bags
#245 Label Special Tools and Fixtures
#246 Masking Tape Storage
#247 Paraffin lube for Band Sawing Aluminum
#248 Special Push Sticks
#249 Paper Towel Core for Cord Storage
#250 Skinny "Paintbrush Broom"
#251 Blow out Shop Apron Pockets
#252 Buy Good Hacksaw Blades
#253 Grind the "Set" from Blades to Get Narrow Kerf
#254 Convertible Step Stool
#255 Photograph Your Work
#256 Sweep the Floor
#257 Tool Cabinet "Breadboard" Shelf
#258 Hang Goggles Near Tools
#259 Mark Edges to be Cut
#260 Garbage Can Table Top
#261 Magnetic Spray Can Holder
#262 Removing Box Labels
#263 Simple Dolly and Hoist to Move Heavy Items
#264 Recording Lent Tools
#265 Abrasive Paper for Sharpening Chisels
#266 Close the Gap on Grinding Wheel Tool Support
#267 Keep Band Saw Blade Guide Low
#268 Used Engine Oil for Shop Duty
#269 Shop Vac Hose Hanger
#270 Grinding Center Punch Point
#271 Pilot Drill Size for Large Drill Bit
#272 Reverse Drilling to Enlarge Hole
#273 Drill Clamp Feet for Accessories
#274 Glass Microscope Slide Scraper
#275 Bubble Wrap Packing Trick
#276 Cold Chisel Safety Tip
#277 A Really Simple Drill Guide
#278 Drill Press Center Finder
#279 Split Point Drill Bits
#280 Variable Pitch Band Saw Blade
#281 Guitar Strings for Other Uses
#282 Cyanoacrylate Catalyst Bottle
#283 Mangetic Holder for Small Parts
#284 Drilling Cotton Buffs
#285 Diamond Grinding Wheel Dresser
#286 Heat to Remove Sticky Labels
#287 Paint Metric Wrenches
#288 Stackable Cottage Cheese Containers
#289 Aligning Wood Screw Slots
#290 Drilling Round Things
#291 Screw Machine Length Drills
#292 Relief Cuts on Bandsaw
#293 Cross Cutting Long Board on Band Saw
#294 Glue Quick Grip Pads
#295 Resealing Caulk Cartridges
#296 Cyanoacrylate as Wood Sealer
#297 Messy Milling Project
#298 Drill Press Can Cut You When it's Turned Off
#299 Get a Big Vise
#300 Friendly Plastic Ergonomic Handles
#301 Mount Stuff on Cabinet Doors
#302 Wall Bumper Near Electrical Plugs
#303 Keep Dustpan in Trash Can
#304 Ice for Cooling at the Grinder
#305 Making Heavy Twine from Thin
#306 Ice Cube Tray Parts Storage
#307 Cable Ties for Hanging Tools
#308 Cleaning Measuring Tapes
#309 CD-ROM Canister for Adhesive Tape Storage
#310 Split Rivets
#311 Impact Driver
#312 Repetitive Bandsaw Cuts
#313 Old Shower Curtain as Tarp
#314 Replace Thumbscrews on Machines
#315 Have a Little Fun
#316 Magnetic Wrench Holders for Power Tools
#317 Measuring Centers on Uneven Sizes
#318 Reconditioning Sharpening Stones
#319 Magnetic Tool Holders for Drawers
#320 Improvised Masking Tape Bandage
#321 Lok-Line as Flexible Support
#322 Clamping with Drill Press
#323 Camera Tripod Stabilizing Weights
#324 Computer Labels for Drawers and Boxes
#325 Extra Casters for Welding Cart
#326 Use Long Screwdrivers
#327 Soaking Parts in Solvent
#328 Making Safe Edge Files
#329 Cut Cans for Shop Use
#330 Magnets for Bending in Vise
#331 Non Matching Handles are Best
#332 Steel Strap Shim Stock
#333 Stretch Wrap to Secure Solvent Labels on Cans
#334 Mark Pipette Graduations
#335 Keep a Shopping List
#336 Label Unusual leftover Hardware
#337 Magnet to Hold Abrasive Strips on Lathe
#338 Handle to Replace Thumb Screw
#339 Magnet Holds Water Bath on Grinder
#340 Magnets Hold Drill Index on Drill Press Table
#341 Label Grit on Sanding Belts
#342 Mouse Pads for Drawer Liners
#343 Cutting Shallow Notches on Band Saw
#344 Clearing Dispenser Bottle Opening
#345 Faucet Washer as Tool Foot
#346 1-2-3 Clamp It
#347 Tubing for Grinder Support of Thin Pieces
#348 Ring Testing Grinding Wheels
#349 Support Thin Stock for Drilling
#350 Digital Caliper as Tweezer
#351 High Speed Steel Taps
#352 Plastic Bag Thread Protection for Jars
#353 Shop Vac Sock
#354 Bandsaw Thin Stock on Edge
#355 Shop Towel Identification
#356 Pennies are Worth Having
#357 Bag Loose Wires and Cables
#358 Pizza Boxes
#359 Timer for Heat and Fan
#360 Cardboard Floor Mats
#361 Chip Curtain
#362 Cigarette Papers
#363 Age Date Glue Containers
#364 Don't Crumple Old Notes
#365 T-Shirt Tool Cover
$366 Liquid Hand Cleaner
#367 Shop Shelving
#368 Foot Control for Bench Vise
#369 Adjustable Wrench as Caliper
#370 Milk Carton Drawer Bins
#371 Long Bin Boxes on Narrow Shelves
#372 Pencil Sander
#373 Garage Sale Items Can Have Interesting Uses
#374 Hanging Rag Storage
#375 Note Holder at the Door
#376 Simple Upgrade for Quick Grip Clamps
#377 Keep Project Inspirations Handy
#378 Mark Source and Cost on Stock
#379 Label the Size of Staples in Your Staple Gun
#380 Easy Handle for Small Heavy Stock
#381 Check Steel Before Filing
#382 Paint with Your Socks
#383 Centering a Drill on Round Stock
#384 Impromptu Large Hex Key
#385 Cutting "Half a Kerf" on the Band Saw
#386 Squeeze the Last Bit out of a Glue Tube
#387 Use a Copier for Quick "Drawings"
#388 Measuring Over a Ledge
#389 Clean up "Spun" Drill Bit Shanks
#390 Changing the Zero Point on Graduated Dials
#391 Dispensing Small Amounts from Spray Can
#392 Paint Can Opener
#393 Broken Files are Handy in Close Quarters
#394 Buy Small Containers of Some Stuff to Save Money
#395 Kitchen Towels Have Four Lives
#396 Solvent "Recycling" Trick
#397 Still Hung Up on Rags
#398 Simple Leather Finger Saver
#399 Missing Stud
#400 How Much is Left in That Paint Can?
#401 Storing Spare Parts for Machines
#402 Label Adjustment of tools or Gauges
#403 Simple Grinder Safety
#404 Lubricate Wood Screws
#405 Break the Corner for a Tight Fit
#406 Weak Thread Locking Compound
#407 Rope Burn Trick
Glossary
An Illustrated Glossary
Archtop
Armrest
Backstrip
Ball End Strings
Bar Frets
Bearclaw
Belly Bridge
Binding
Birdseye Maple
Biscuit
Blind Saddle
Block Inlay
Book Matched
Bottleneck
Bout
Bowl Back
Box
Break Angle
Bridge
Bridge Pins
Bridge Plate
Button
Cantilevered Fingerboard
Capo
Celluloid
Check
Chipboard Case
Classical Guitar
Clown Barf
CNC Computer Numerical Control
Compensation
Cutaway
Dot Neck
Dovetail
Dreadnought
Ears
Edge Dots
End Block
End Piece
Endpin
Endpin Jack
f-Holes
Fan Bracing
Fiddleback Maple
Fifth String
Fifth String Capo
Figure
Fingerboard or Fretboard
Fingerpick
Fingerrest
Fingerstyle
First Position
First String
Flamed Maple
Flamenco Guitar
Flat Top
Flatpick
Flight Case
Frets
Gig Bag
Grain Runout
Hardshell Case Anatomy
Hawaiian Guitar
Hawaiian Nut
Heel
Heel Cap
Herringbone
High/Low Position
Hollow Body Electric Guitar
Ivoroid
Ladder Bracing
Lap Steel
Lining
Loop End String
Mitered Purfling
Mother-of-Pearl
Neck Block
Nut
Pearl Border
Peghead or Headstock?
Pegs
Pickguard
Pickup
Pin Bridge
Pinless Bridge
Purfling
Pyramid Bridge
Quilted Maple
Relief
Resonator
Resophonic
Ribbon Grain
Ribs
Rosette
Saddle
Scale Length
Scroll
Silk
Slack Key
Snakehead
Solid Body Electric Guitar
Spanish Heel
Steel
Steel Guitar
String Ramps
T-Bar
Tailpiece
Three Piece Back
Through Saddle
Thumbpick
Tie Block
Truss Rod
Truss Rod Cover
Volute
Waist
Which way is up?
X-Brace
General Stuff
About Me
What is FRETS.COM?
I'm on the cover!
Why FRETS.COM?
About the photographs. . .
Help!
Photo Studio
Contributors
my home shop this morning
Mario Martello 1924-2006
OOPS!
Resume
Links
FRETS Links
/Special Features/

Jeff Traugott's Way

This was converted from the original Frets.com site.
To view the original page click here

Building guitars Jeff Traugott's Way

I hope you enjoy this pictorial tour of Jeff Traugott's guitar building style. Like so many of today's best luthiers, Jeff is ready and eager to share his methods and small discoveries. I asked him for some special tricks, and he said, "Well, I don't know if I have any. I mostly build by hand." True enough, Jeff is a traditional craftsman, relying on his skill as a woodworker and judge of materials, rather than computer aided gear, tricky fixtures and high tech tooling.

Jeff's is a one-man shop, and he designs all his processes for himself. I suppose for the individual luthier, the real tools are more a matter of hand and eye combined with enough experience so that things seem to fall into place intuitively.

There are some operations Jeff does only about once a year, like cutting fret slots or making linings and brace stock, so it isn't really possible for me to include every operation in the construction sequence. Rather than trying to make this a "how-to" article, I'm attempting to give an overall impression of how a traditional luthier works.

Here are some links for further info and photos:

1998 Field Trip to Jeff's Shop
A Traugott Baritone Guitar
The Traugott "Millennium"
Jeff Traugott's Web Site


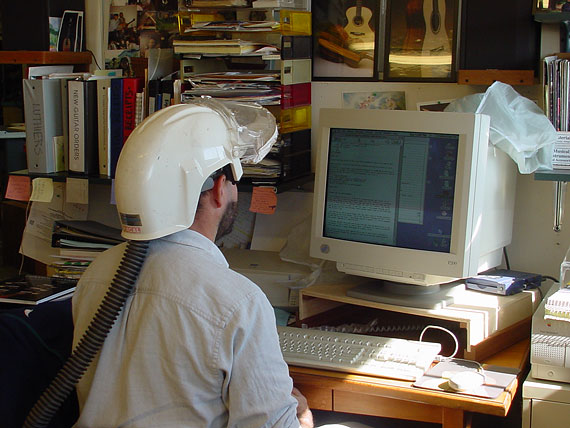
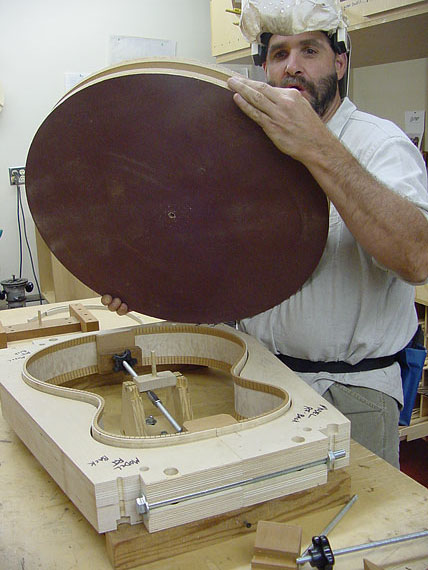
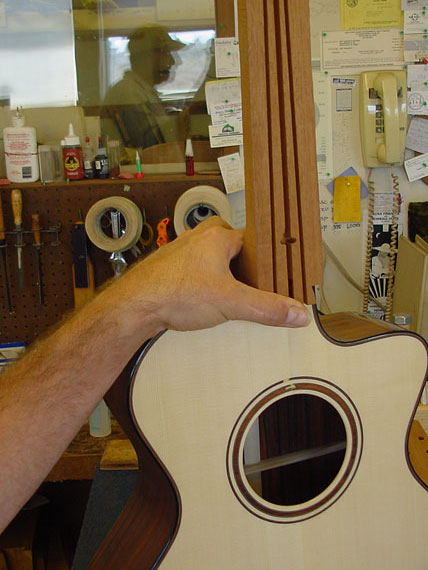
Jeff's office is a corner of his "setup" room, where he does all the final work on his guitars, and where he keeps his business organized. Here, he's looking over an order for a new custom guitar. Like most luthiers, Jeff grabs a little office time during the day as he's actually building the instruments. He's wearing his respirator because he's been doing some power sanding.

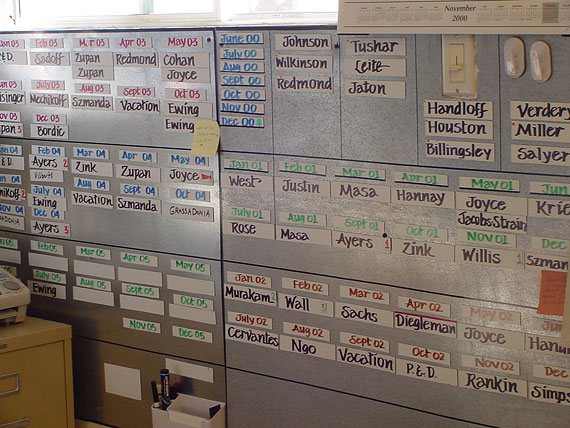
On the wall, he has a neat magnetic chart with the next four years' guitars all planned out. An individual luthier isn't just an "arteest" but is also a business owner. As with any business, organization is a key to success.

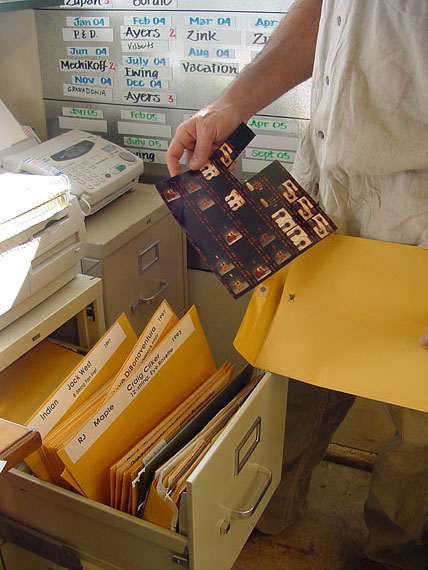
Right at hand, Jeff has a file drawer with specifications and photos of all the instruments he's made over the years. He says he never knows when a prospective client will want to see some detail of his past work.

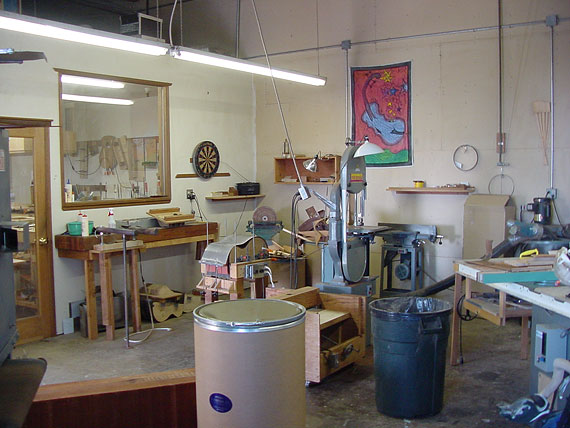
Jeff's shop is divided into several rooms. There's a large room with machine tools, where all the rough work gets done. Through the window, you can see into his humidity controlled room where he stores the wood for the next few years' guitars. Also, this his where he does all gluing, fine sanding, and all body assembly.

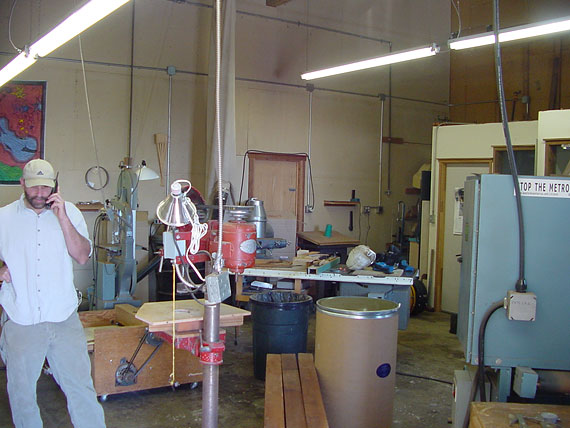
Jeff, like most of us, contends with the interruptions of phone calls. At the right rear, there is a small finish drying and buffing room, which abuts his large spray booth.

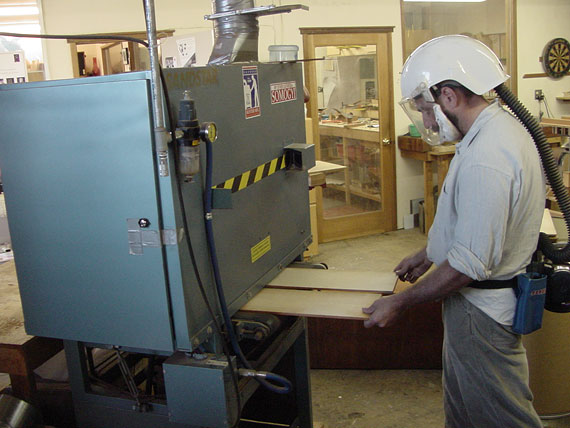
Body construction starts with a trip through the wide belt sander. Tops, backs and sides must be sanded to precise uniform thickness. But first, they get a quick trip through to make them uniform and a bit over thickness in preparation for joining the book matched backs and tops.

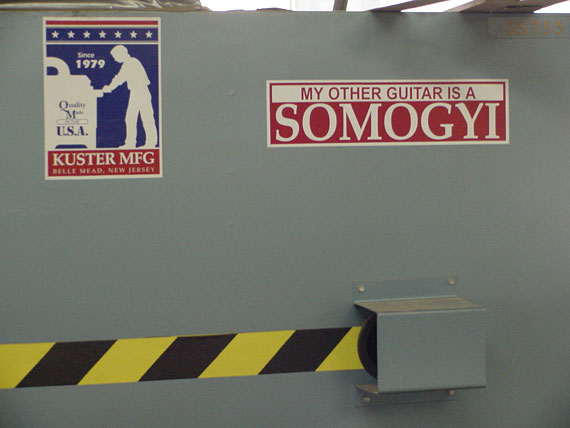
If there's one thing a luthier needs in addition to a wide belt sander, it's a sense of humor!

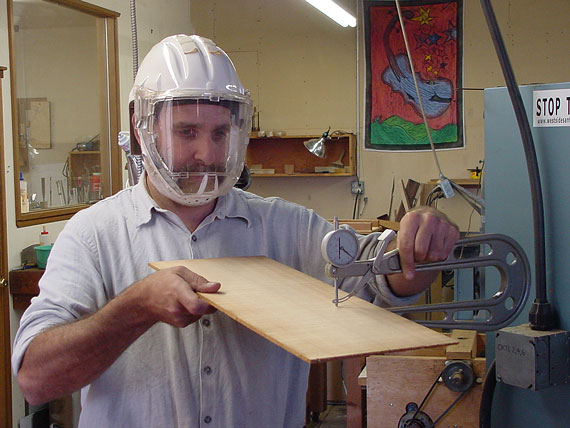
He's checking the thickness with a dial caliper made just for luthiers. It has a very deep throat so it can measure into the center of a guitar top.

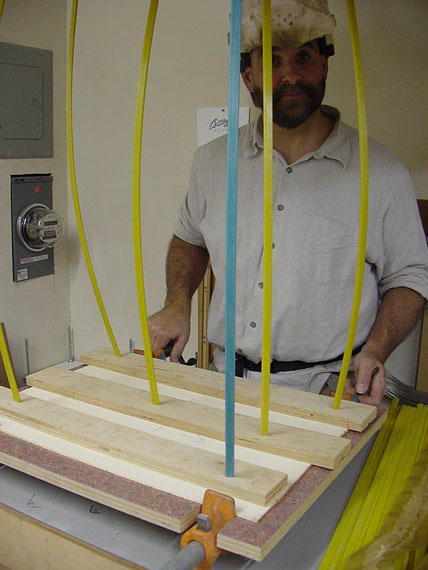
Jeff has a simple fixture for clamping the two halves of the top and back together. It's a pair of bar clamps which are mounted under a work board. Those vertical rods are "go-bars" which hold the top down and keep it from buckling upward as lateral pressure is applied. If you don't know about "go-bars" you will after you read on.

After the glue dries, the top is ready to go back through the wide belt sander to be reduced to its final thickness.

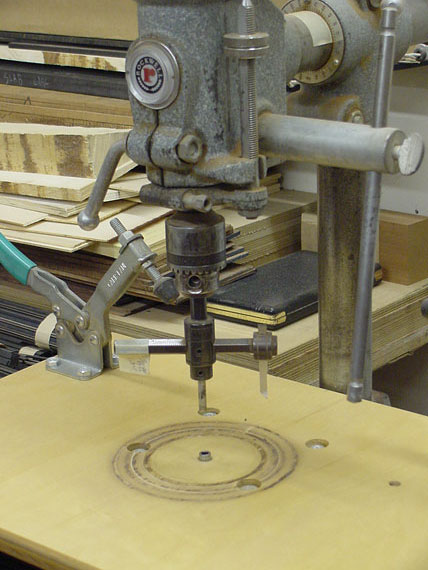
Also in the humidity controlled room, there's a little drill press dedicated to making the grooves for soundhole rings.

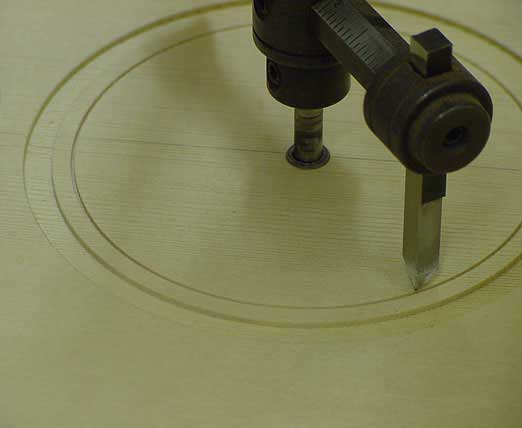
In fact, Jeff makes a large number of unique instruments, so he's always making test cuts as he lays out a special pattern. That's why he prefers to use a regular circle cutter, rather than to make a special tool for a specific ring pattern

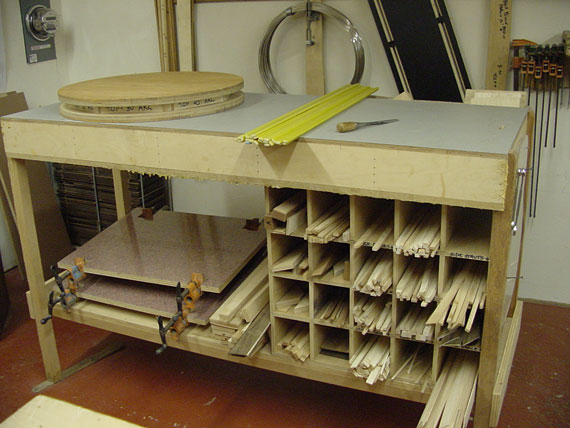
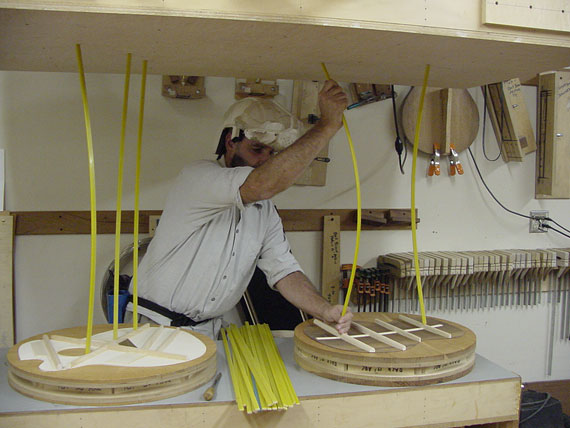
OK, back to the go-bars. This is Jeff's go-bar deck. It's platform or work table, with a low "ceiling" above it. Under the table top, you can see bins containing spruce stock he has milled to the appropriate sizes for all the various braces he uses on the guitar tops and backs.

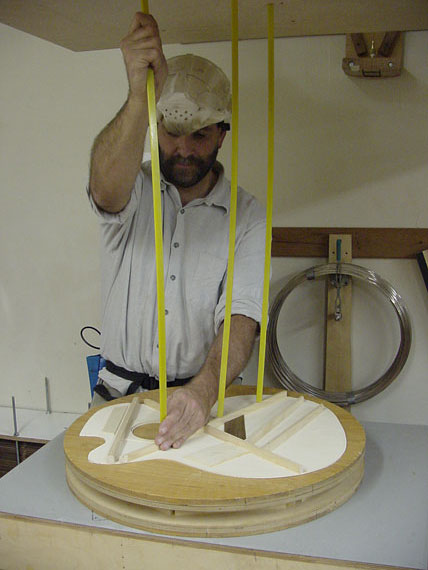
To clamp the braces, he simply takes one of these little fiberglass rods, and springs it into position Because the rod is almost nearly straight when it is in place, it exerts plenty of clamping pressure.

Both the top and back are braced by clamping into these round "dished" forms, which provide the proper radius curvature appropriate for the finished guitar.

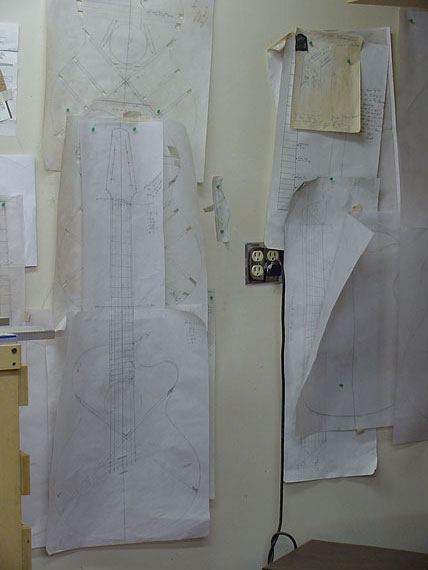
Over on the wall, there's more evidence of custom design work, both past and in progress. . .

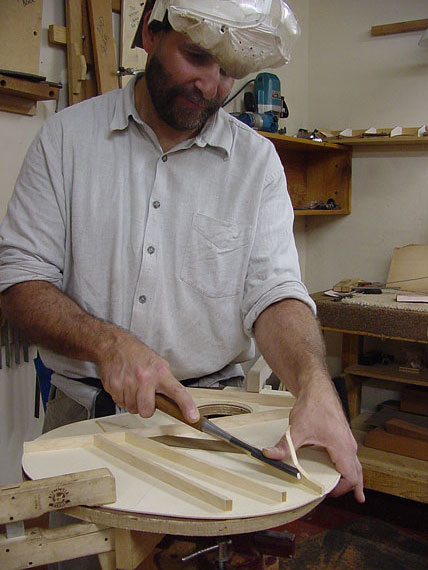
After the tops and backs are ready, Jeff hand carves the contours of both the top and back braces. If the braces were shaped before gluing, Jeff would need lots of special clamping fixtures in addition to the traditional go-bar deck.

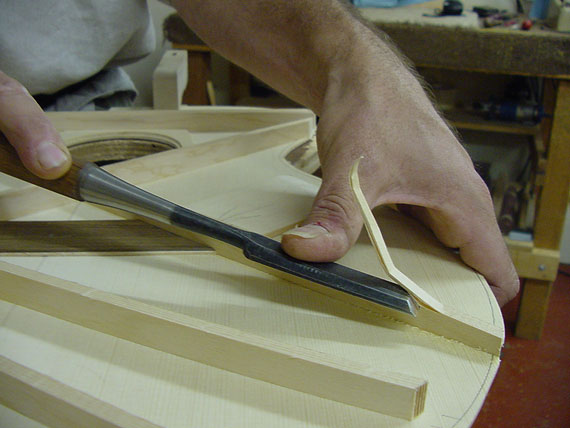
Many individual luthiers prefer to shape the braces by hand because it gives an opportunity to use discretion to modify the thickness and contour for optimum performance.

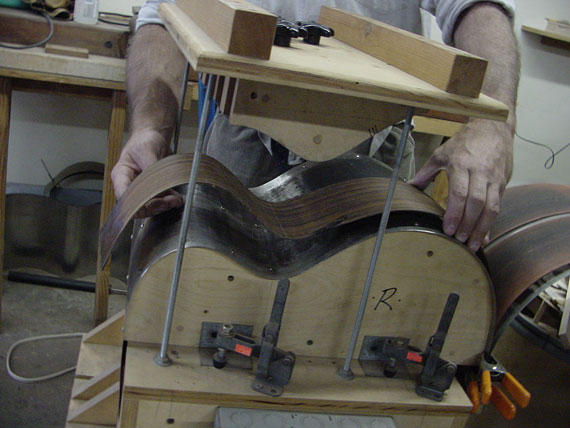
Jeff bends his sides by placing them on this heated form, with a mating piece that clamps downward at the "waist." Curled off to the far right, you can see the flexible electric heating elements.

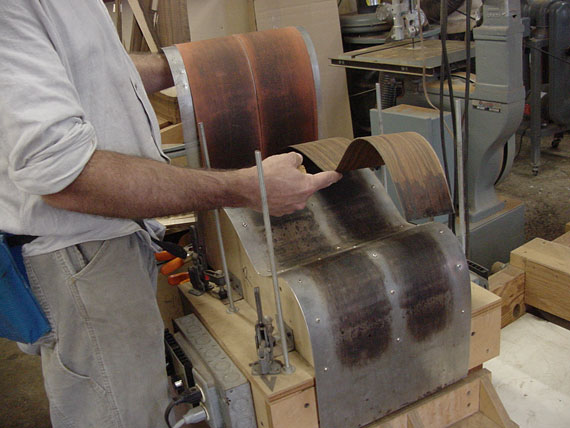
After they come off the bending form, the sides are approximately the right shape.

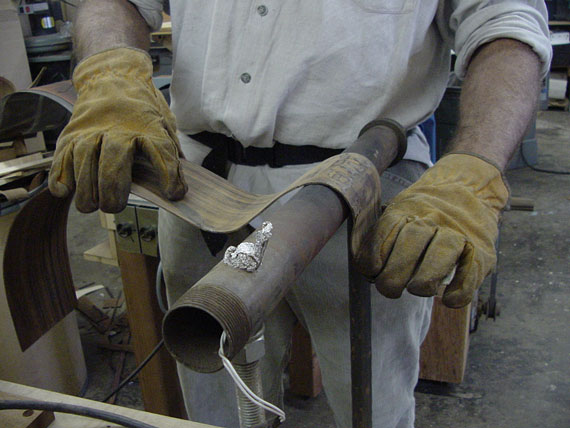
Jeff adds the bend for the cutaway, working strictly by hand over a heated pipe. He also uses the hot pipe to make unique body shapes.

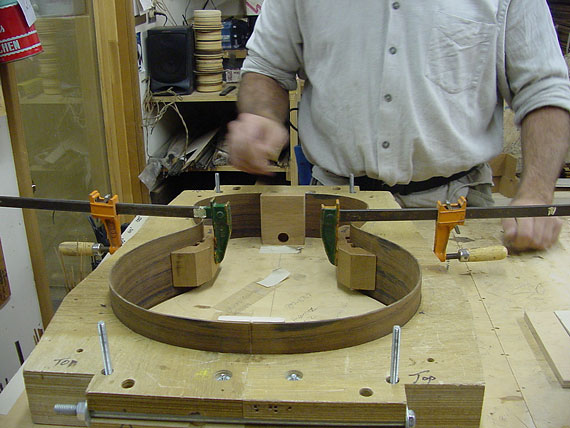
The sides are clamped in a heavy mold to maintain their shape as the body building progresses.

Most of Jeff's tools are deceptively simple. This is an expanding clamp which presses the neck and end block into position as they are glued.

All around the humidity controlled room, there are guitar parts in progress, and stacks of wood for future guitars.

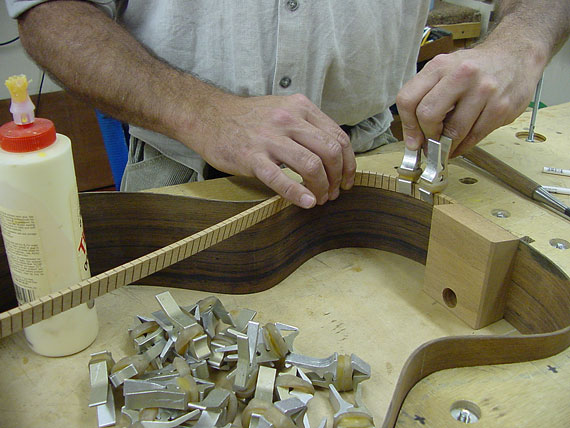
While the sides are still in the mold, Jeff glues in the linings.

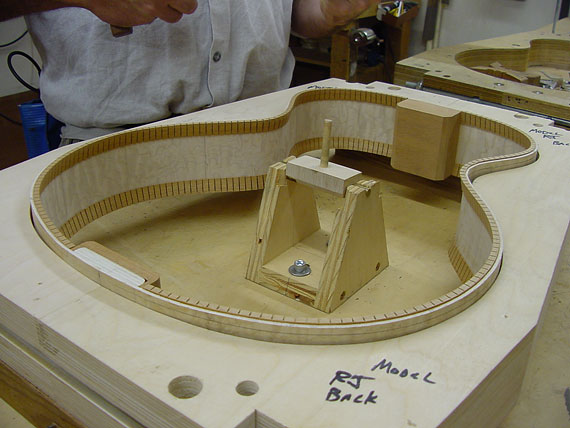
The heavy mold is bolted to the bench, and Jeff has a special little pivot screwed right in the center.

He takes his big "dish," a wood form with sandpaper glued to its concave surface, and places it on the pivot dowel pin.

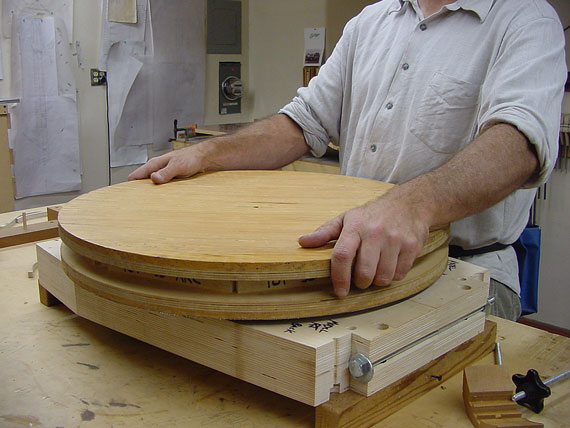
Then, all he has to do is spin the disc around and around to give the end block, neck block, sides, and lining the exact radius to which the top and back were clamped in the go-bar deck.

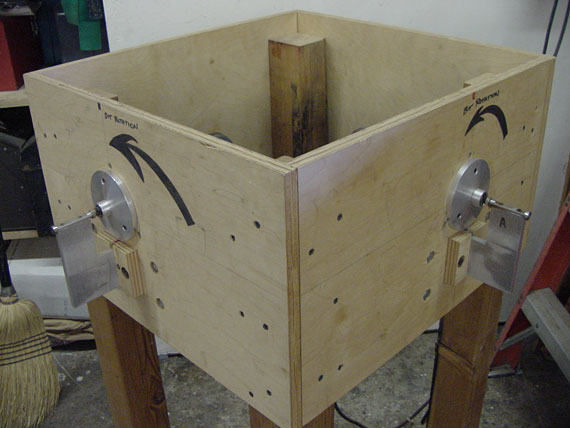
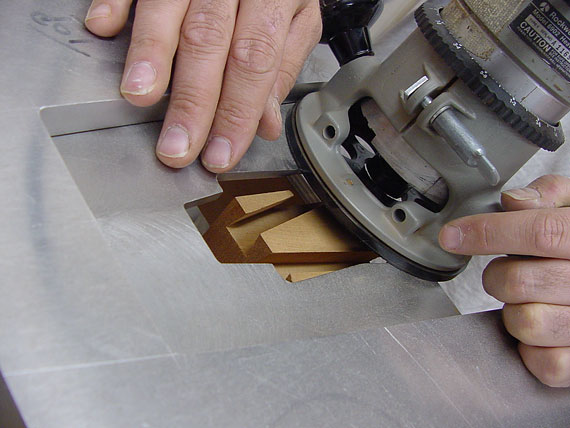
Unfortunately, Jeff was not ready to bind any guitars as I took these photographs, so I'll have to settle for just showing his setup instead. Here it is, a pair of routers mounted horizontally.

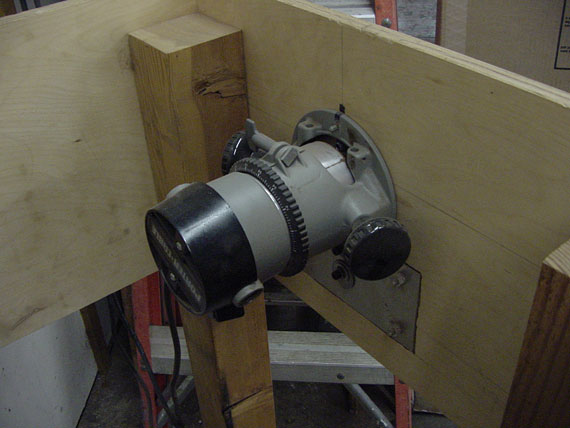
They are regular routers and just hang inside this movable box affair.

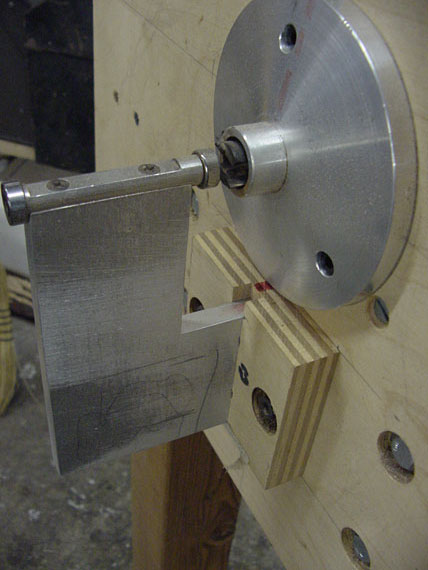
Outside, the router bit is centered in a convex aluminum guide, outboard of which is mounted a "finger" with two ball bearing guides. Jeff guides the guitar around, holding the sides tightly against these two bearings.

The result is a neat channel all around the top and back, ready to receive the binding. Once the binding is installed, the body is completely formed, and finishing begins.

Look at these big mahogany planks. Jeff buys mahogany in big boards, a full four inches thick. That way, make all his necks from single pieces of mahogany, orienting the grain in the most favorable direction.

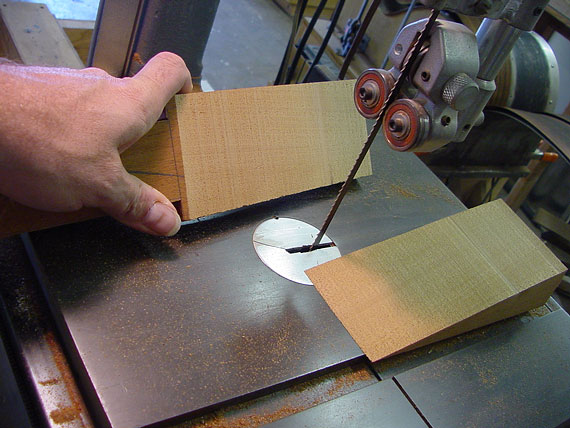
He cuts the neck's lateral profile on the bandsaw.

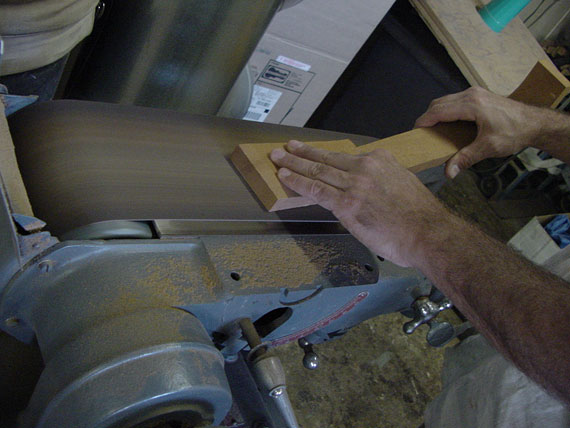
And surfaces the face of the peghead on a belt sander.

This is his old shop-built thickness sander, in semi-retirement, being used to even out the peghead thickness and sand the back side.

Cutting the dovetail is an operation best performed with a router. Jeff's fixture holds the neck at the correct angle as he guides the router. He can clamp the body inside this form to cut the mating portion in the neck block.

This heavy aluminum template assures him of consistent results with no slipping.

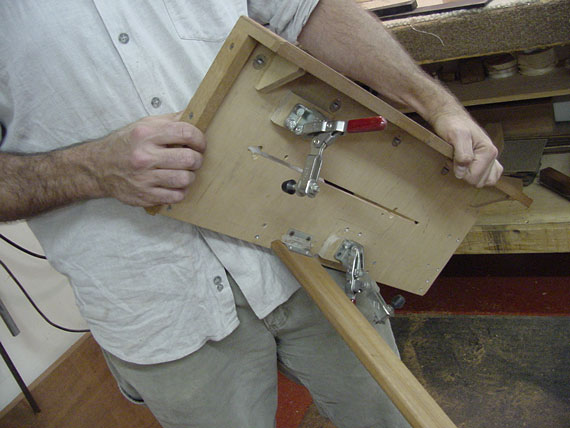
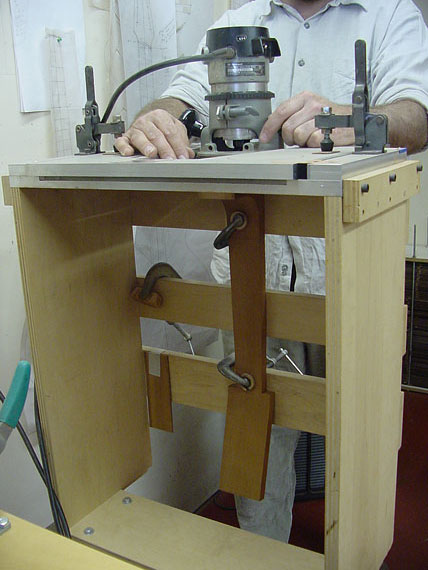
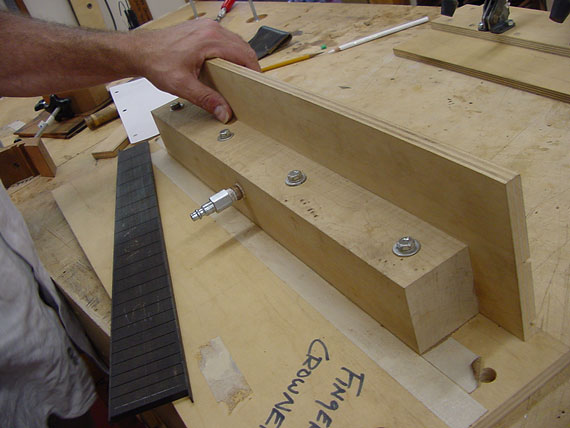
Here's a clever little router fixture. It's a sort of table that Jeff clamps into a vise mounted on a free standing pedestal.

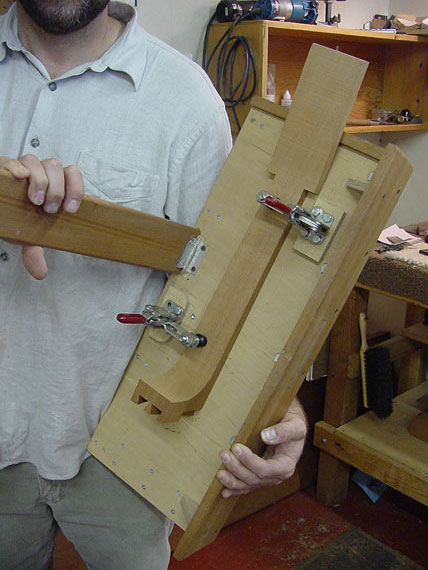
Underneath, he has the neck clamped in place.

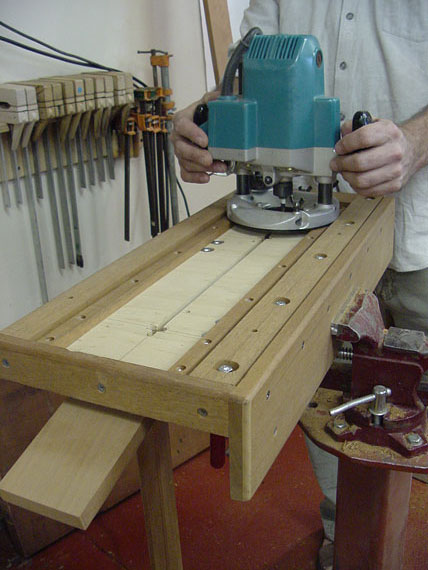
And, with the fixture clamped in the vise, it's ready to go. He uses two different routers with this rig. The big one, here, is for making the groove into which the truss rod will be inserted.

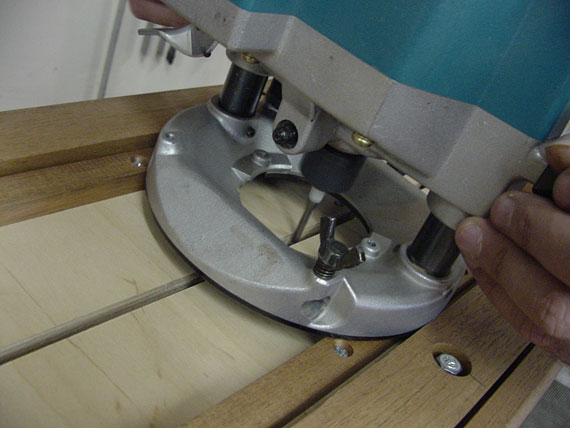
A pair of rails on the edge keep the router right on track.

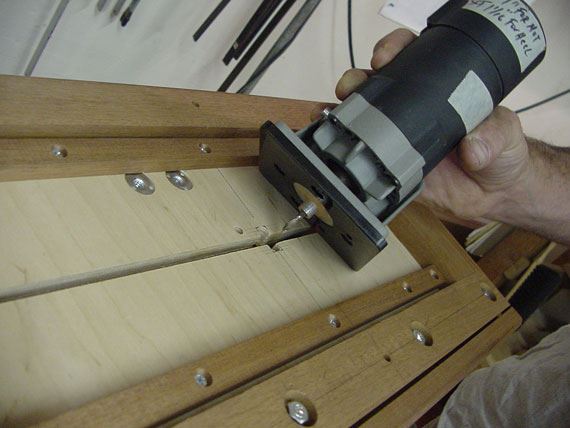
This smaller router rides in the space between the lower rails, and the bit runs in the same groove as the big router. By shifting the neck underneath the table, Jeff can cut a pair of extra grooves alongside the main truss rod groove.

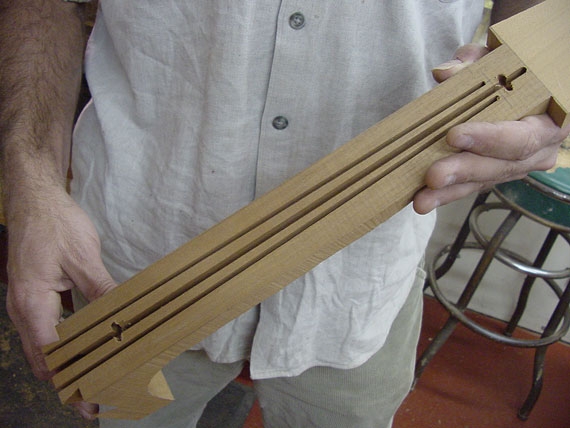
Notice that the grooves are not exactly parallel, but run in approximately the same taper as the edges of the neck.

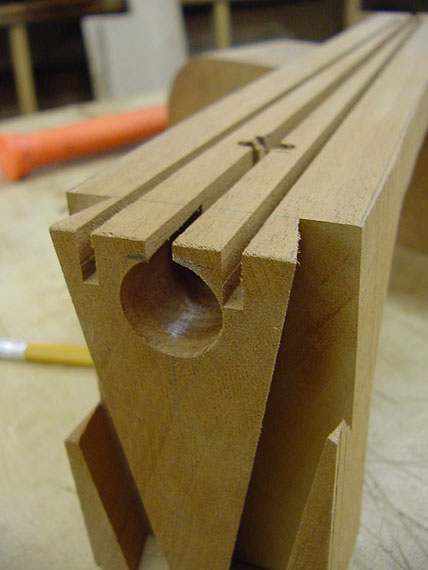
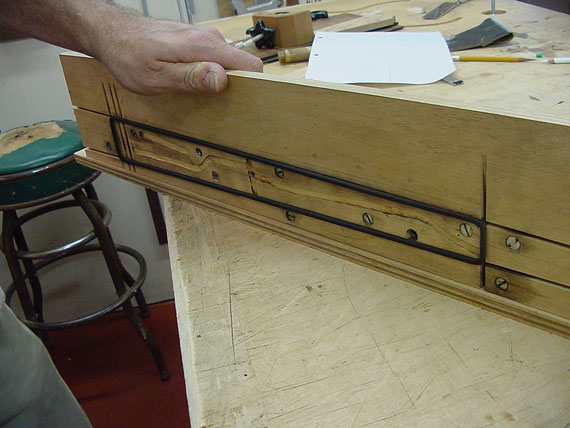
From the end you can see the truss rod adjusting pocket, and the depth of the two outer grooves.

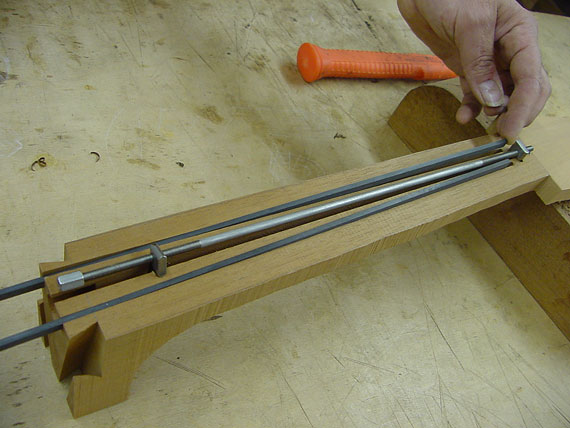
Jeff uses two stiffening rods of carbon fiber composite in addition to the adjustable truss rod, for greater neck stability.

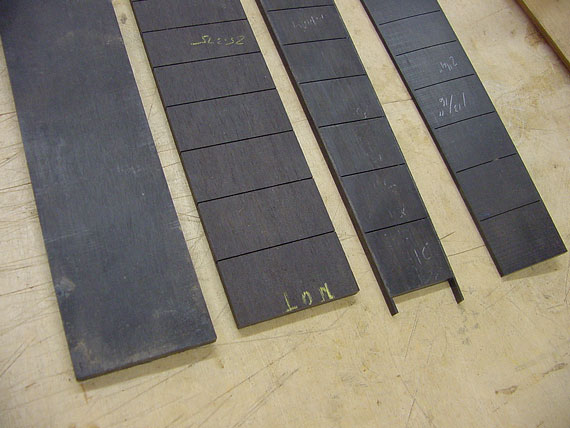
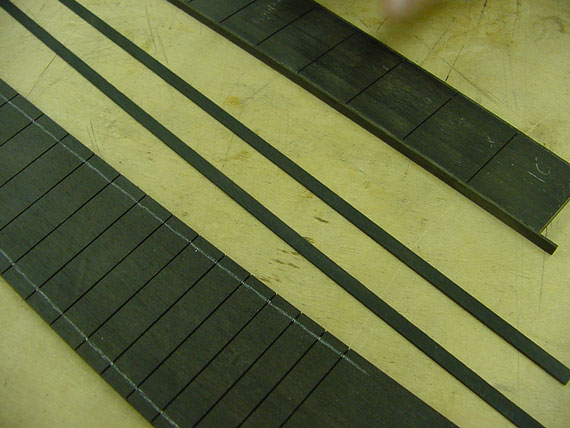
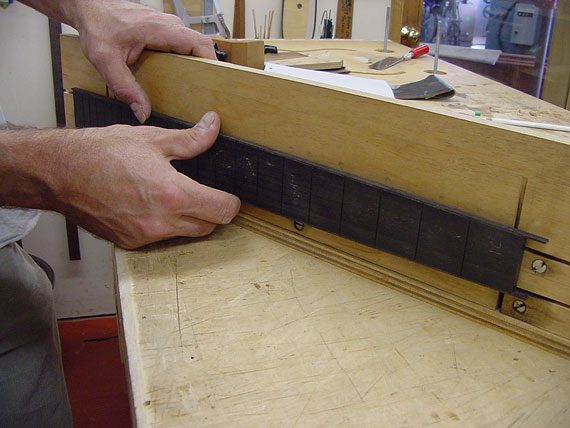
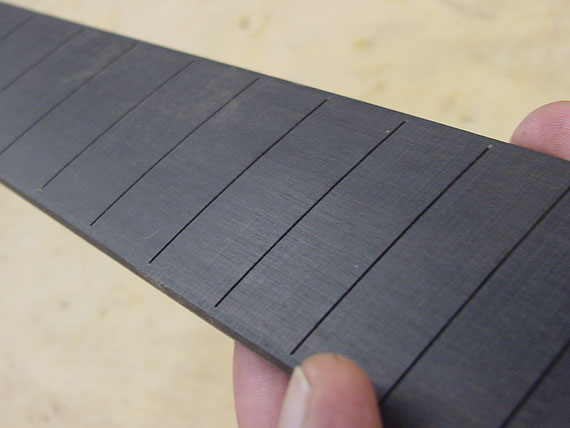
Here are the various stages of fingerboard preparation., from left to right:
the blank board, fret slots cut; binding glued on, and completed.

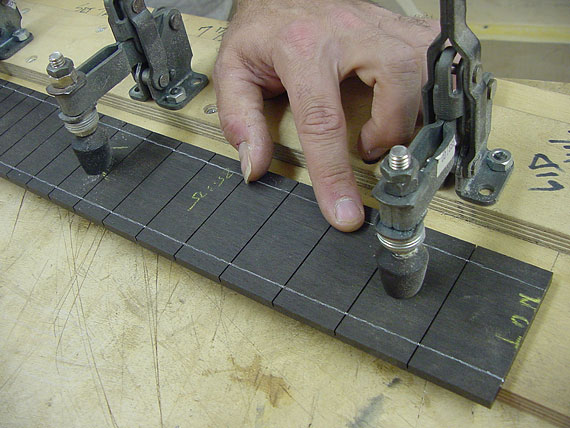
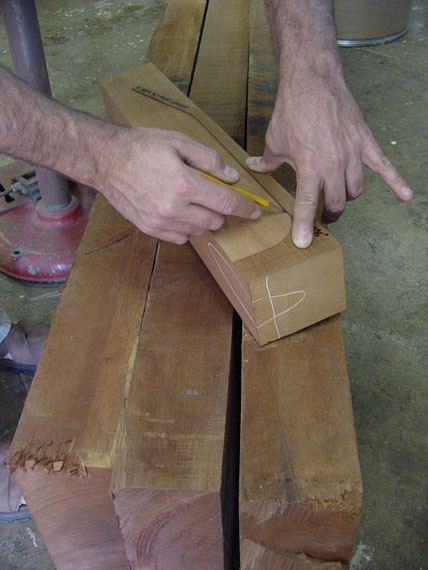
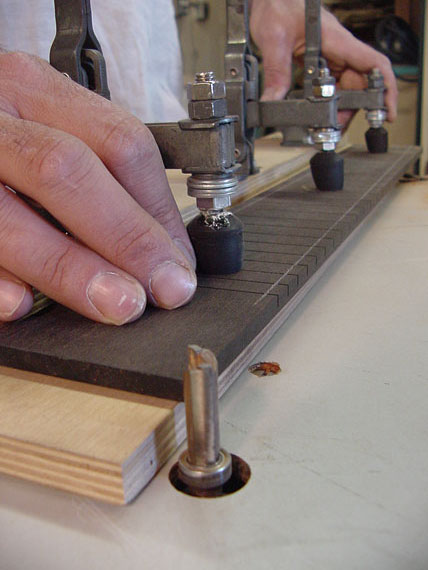
After cutting the fret slots on his table saw, Jeff carefully marks the fingerboard profile with a thin white pencil line. I asked him why he didn't just make up a bunch all the same, and he told me it was because he's called on to make so many different custom styles.

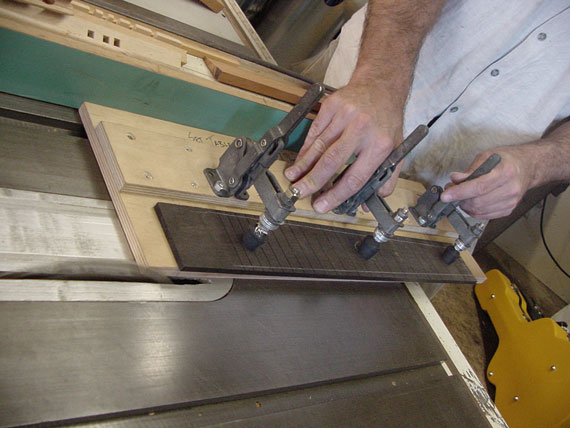
A quick stock removal on the table saw.

And, final shaping on the router/shaper. This vertical router is set up for pattern duplicating, with a bearing collar to guide along the various templates Jeff uses for cutting out parts.

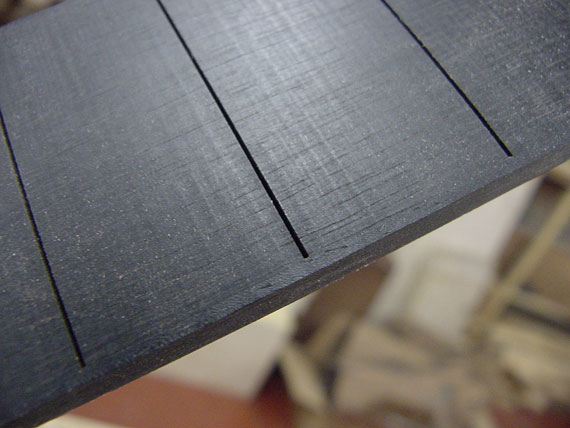
All of his fingerboards get binding. In fact, most of them are ebony boards with ebony binding. Jeff prefers the trim appearance of a bound fingerboard, so the ends of the frets and fret slots are not visible from the edge.

He makes all of his own wooden binding and glues it in place, using tape to hold it while the glue dries.

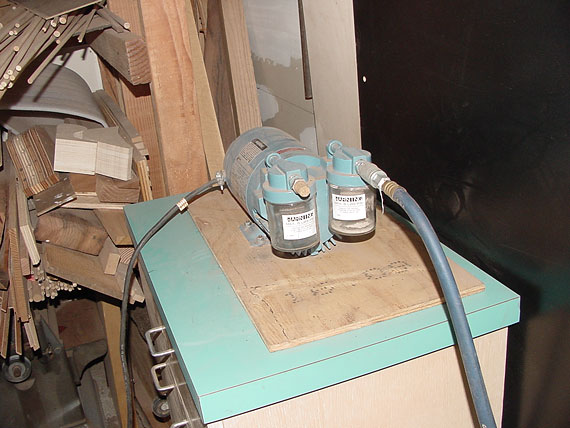
These days, many luthiers use vacuum clamping for fixturing as well as gluing. Jeff has a small vacuum pump way over in the corner, which he uses for holding delicate parts onto various shaper templates.

This is the back side of his fingerboard profiler.

From the front, it's just a rubber gasket forming a vacuum chamber.

He aligns the fingerboard by careful measurement, again preferring the hand-and-eye method over jigging because he makes so many different styles.

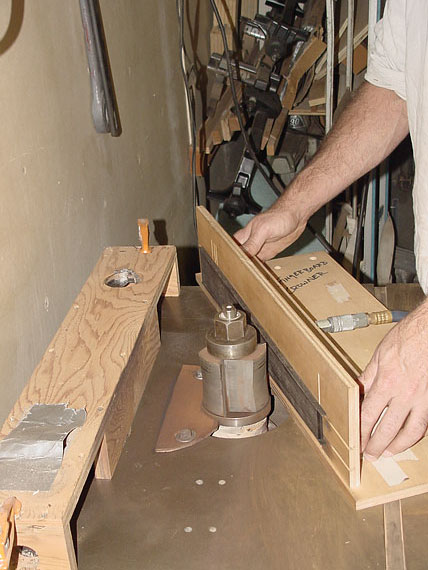
With the vacuum drawn, the fingerboard can stand up to this big custom cutter head!

And, it comes off clean as a whistle.

In fact, that's a fine finished surface.

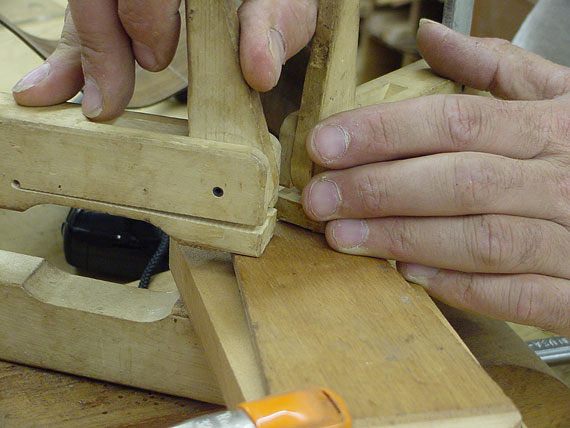
Back in the setup room, the neck gets its first dovetail fitting'

Even in this rough state, Jeff makes sure the neck fit is just about perfect.

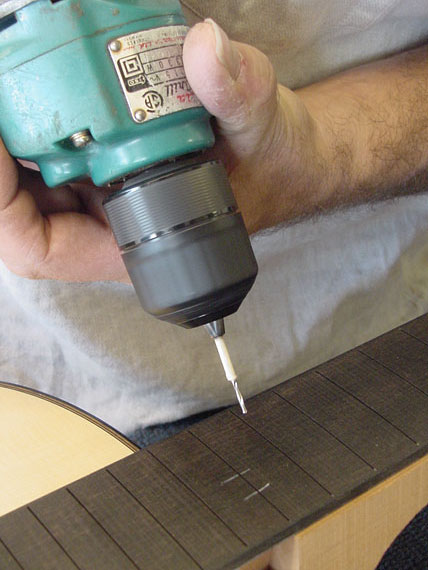
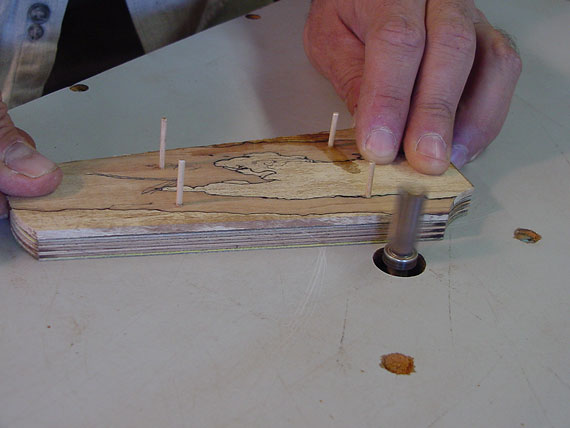
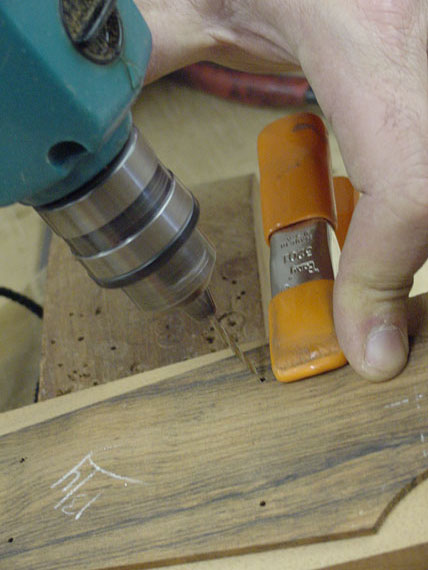
With the neck mounted on the body, he positions the fingerboard on the neck, and drills a pair of tiny holes for locator pins, so he can glue it right where he wants it.

With the neck back off the body, he glues the fingerboard in perfect alignment, thanks to those two little removable steel pins. Now, you may notice that this neck has a peghead overlay on. Depending on the instrument, he may laminate and shape the peghead before or after gluing the fingerboard.

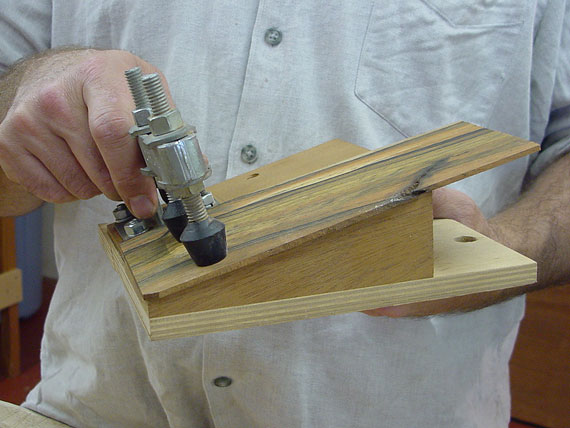
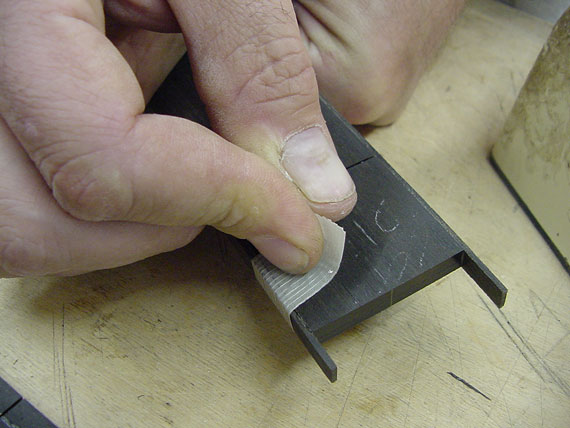
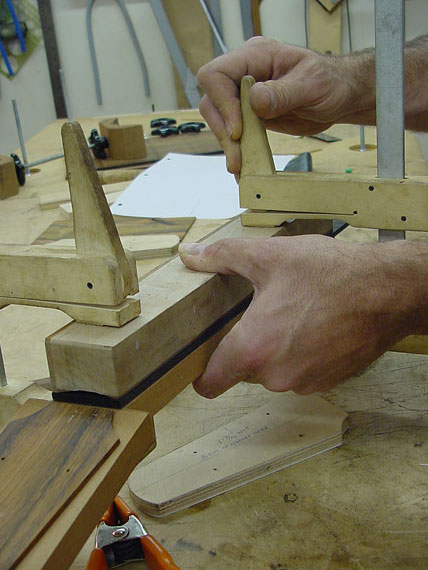
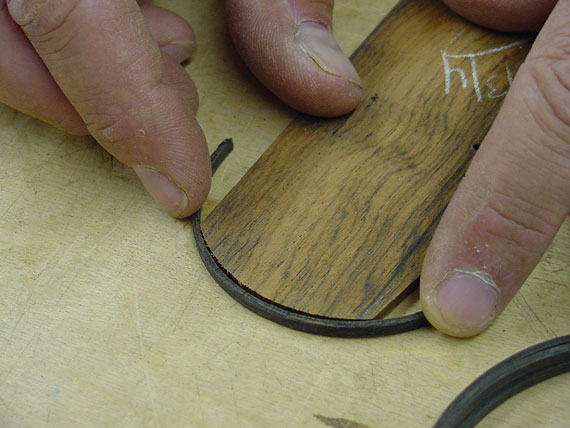
To facilitate fitting the nut, Jeff likes to cut the end of the peghead veneer at precisely the correct angle before gluing it on. This little tapered fixture works with his router table to produce that bevel cut at the nut end of the veneer.

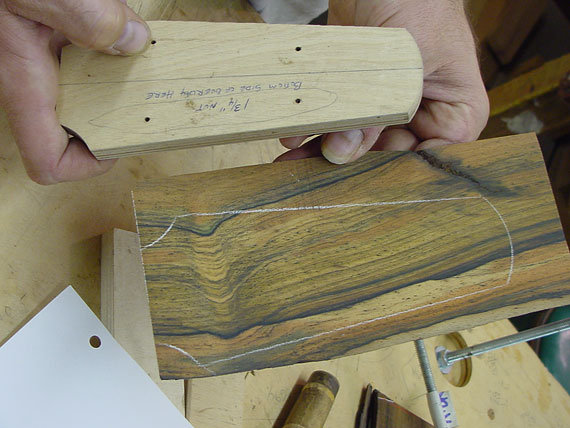
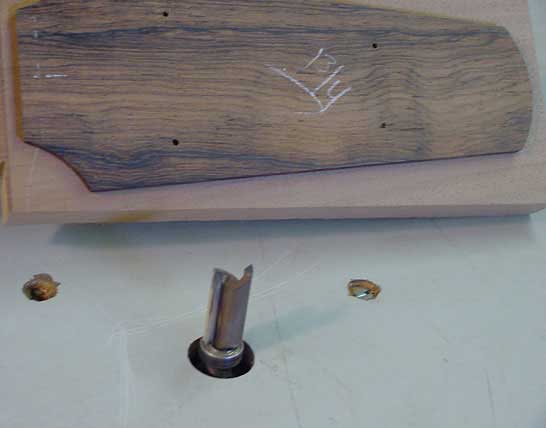
Then, he places a peghead shape template on the veneer, drills some locating pin holes where the tuner posts will be, and pins the veneer to the template with some skinny dowels.

The template rides up to the pattern copy bit on the shaper table, and the peghead veneer is shaped to match the template.

Staking the veneer out on the work table, Jeff cuts, bends, miters, and glues the binding on the veneer.

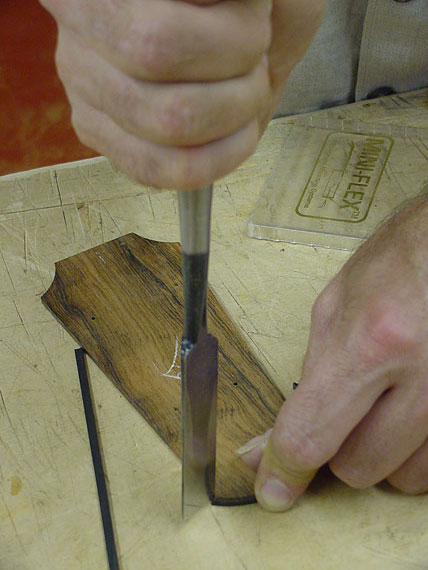
Not all pegheads get binding. This Brazilian rosewood one is being fitted with ebony binding.

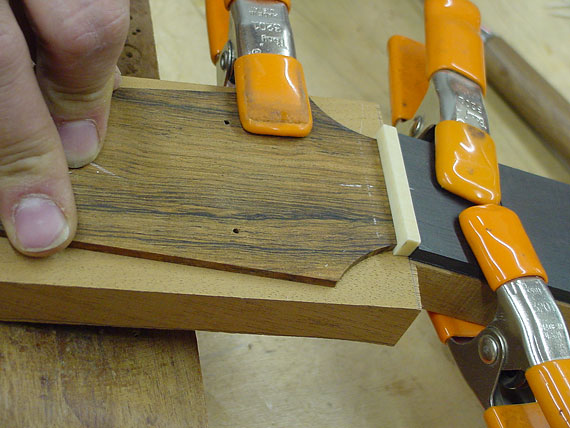
After the pehgead veneer is cut and prepared, Jeff clips it in place after inserting a nut blank. That way, he's assured that the nut will fit just right.

More locating pins, this time through the same holes he used on the shaper template.

These are also small wood dowels, and he breaks them off flush with the surface after applying glue.

The locating pins will disappear when the tuner holes are drilled. By breaking them off, he doesn't have to make a special clamping caul for gluing the peghead veneer.

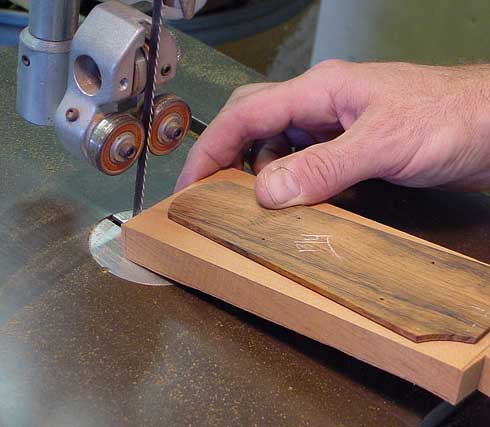
If there's a lot of outboard waste, Jeff trims it roughly on the bandsaw. Notice the saw isn't running. We're just photographing, no cutting. He assured me that he keeps his fingers away from those teeth.

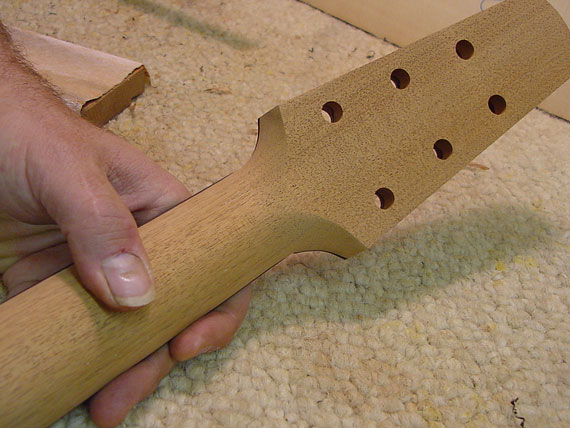
Now, the peghead veneer itself becomes the template, and rides along that bearing as the cutter trims the neck to match.

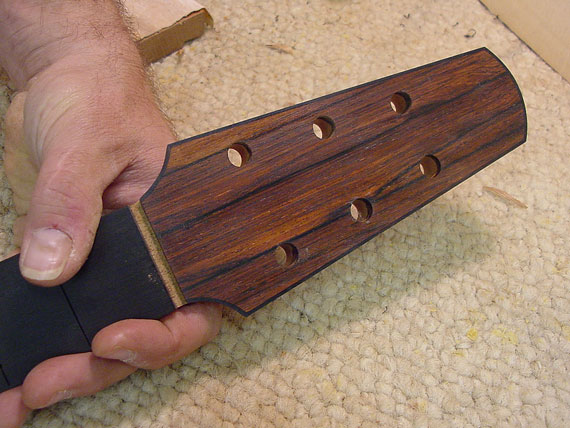
After the holes are drilled, the neck finally has that Traugott signature look.

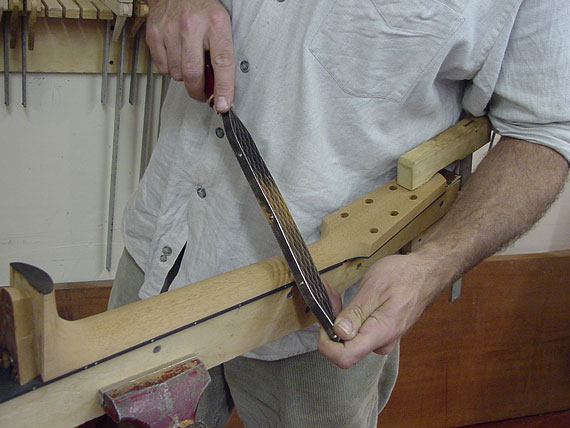
OK, we staged these next few shots, but it's better than nothing, I think. Jeff uses this heavy saw-rasp thingy to carve his necks.

Also, he likes this small spokeshave. For a custom builder, hand carving the necks allows for infinite variability. Jeff could set up some shaper templates, but he tells me he likes to carve them by hand. There is a therapeutic nature to this kind of hand woodwork, don't you think?

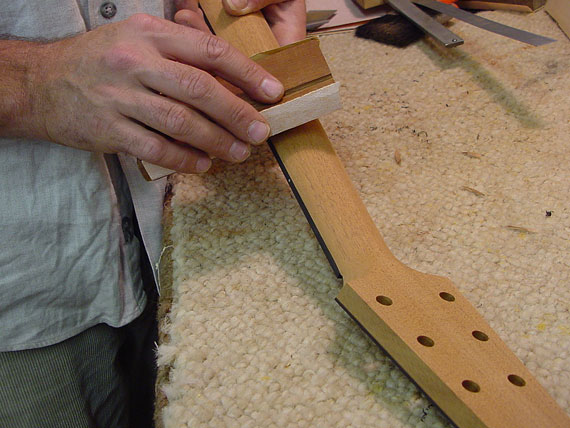
Block sanding helps him keep his profiles smooth and straight.

This neck is now all but finished.

Time to go back to the body for a final fitting. Jeff inserts some paper thin shims at the bottom of the dovetail pocket,

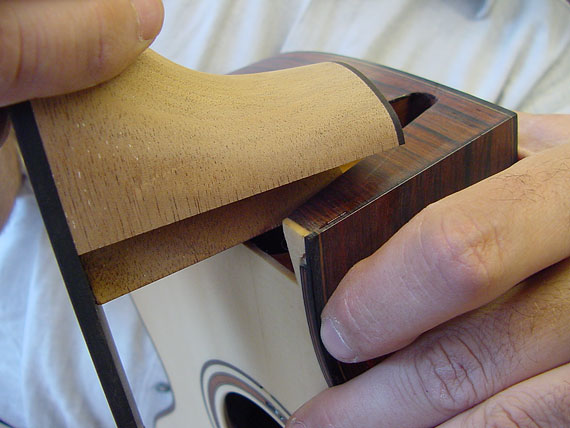
slips the neck in place,

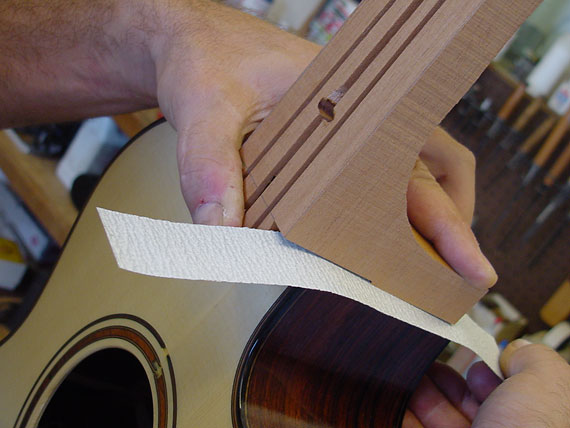
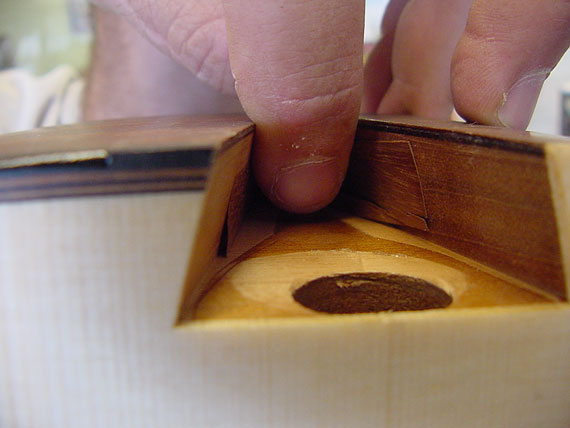
And clamps it up tightly. In fact, it's so well fitted that it doesn't need glue to hold it in place. Before taking the clamps off, Jeff has a quick little special trick.

See those two strips of tape? They are fastened to the underside of the fingerboard, and will hold the end down to the body when he presses them up tightly inside.

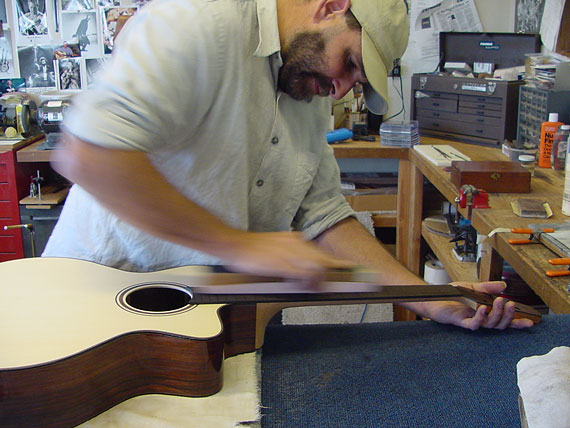
Now, with the clamps off, Jeff "shoots" the fingerboard perfectly straight by sanding with a long block. He said the thickness of the tapes under the end raises the fingerboard just enough to create the perfect "drop-off" over the body. Clever, eh?

Once he's pleased with the straightness of the neck, he can begin fretting.

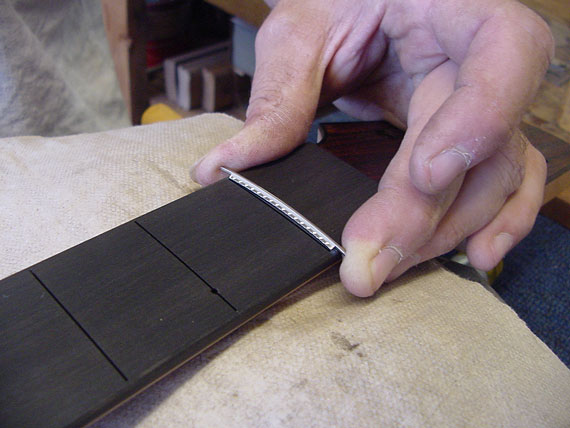
Each fret gets trimmed to fit, overhanging the binding.

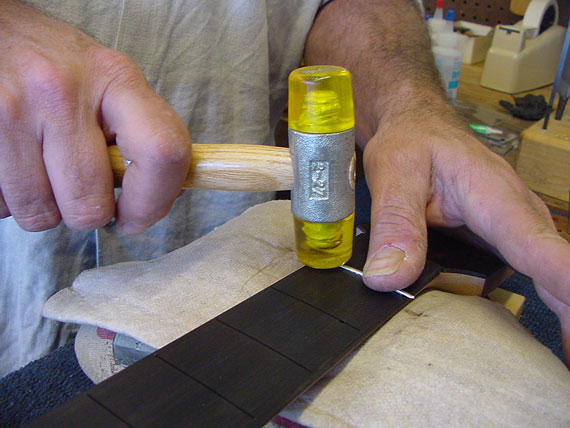
Jeff uses a plastic hammer to avoid injury to the top of the fret crown.

After frets are installed, it's into the spray booth for some lacquer. All of Jeff's instruments are finished with high gloss nitrocellulose lacquer.

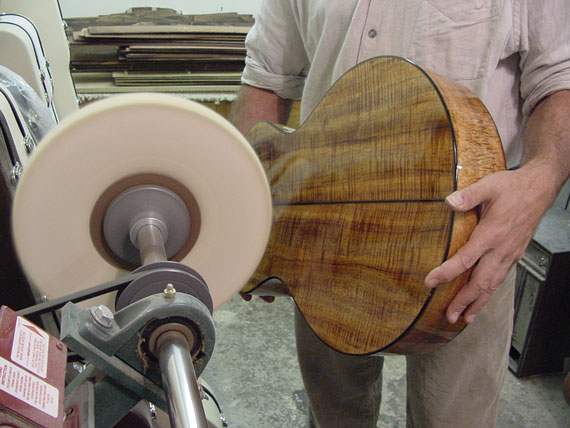
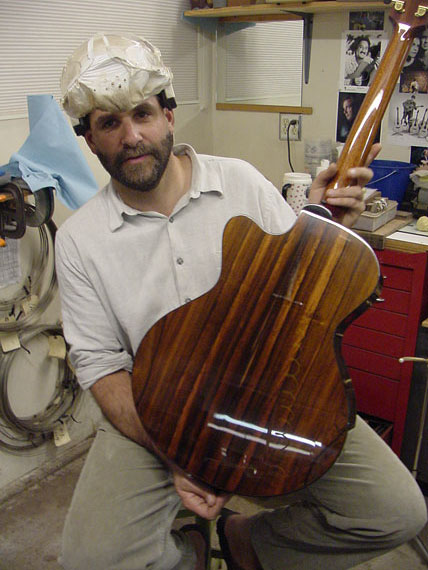
After weeks of spraying, sanding, spraying and drying, a final buffing gives the body and and neck a high class look. While you're at it, look at that koa back. That's what I call "mother-of-curl!"

Back in the setup room, the neck gets fitted back on and glued in place.

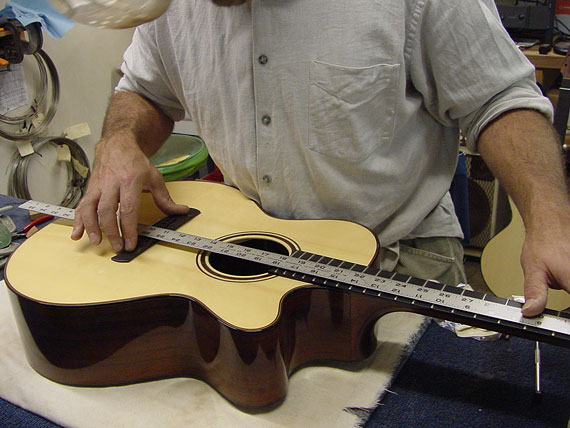
Jeff makes each bridge himself, and locates it for optimum intonation by careful measurement.

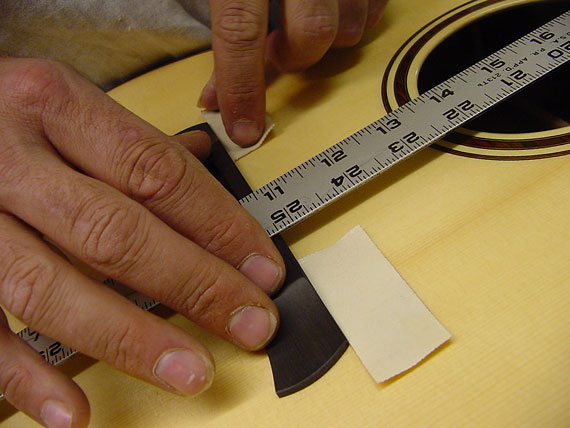
Here again, he works by measurement rather than with standardized templates because he gets involved in so many different scale lengths, unusual tunings and stringing, not to mention the infamous "fan fret" models.

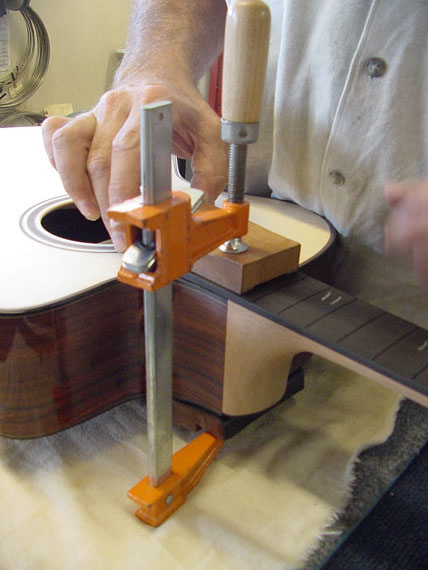
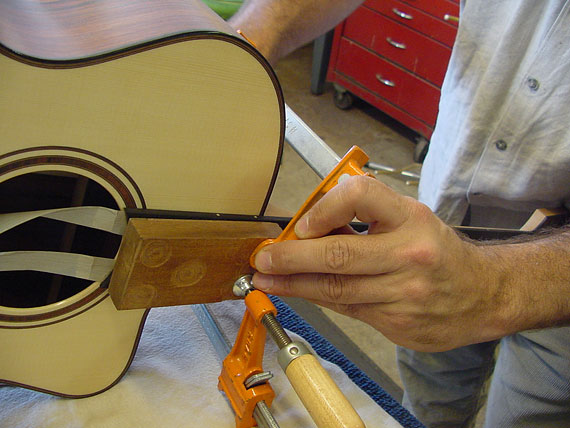
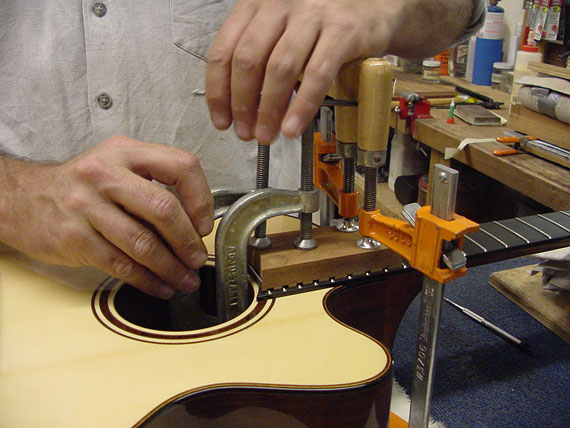
Held in place against the temporary strips of masking tape, Jeff drills the first and sixth bridge pin holes to locate the bridge precisely.

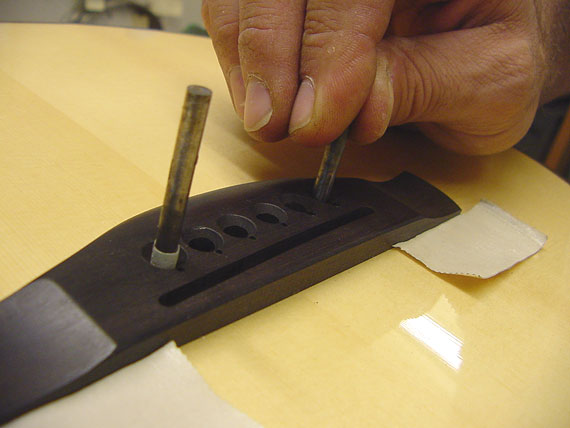
These are two steel locating pins, machined to fit very tightly so there won't be any shifting when the bridge is clamped in place.

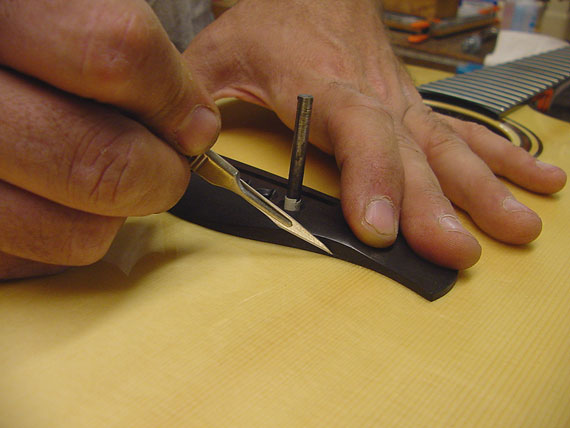
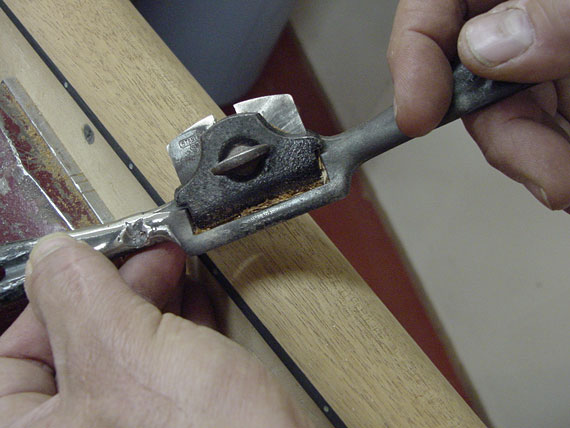
The sharpest scalpel makes a clean scribe line right into the precious new finish. Jeff takes pains to scrape off every bit of finish under the bridge to get the best possible glue joint.

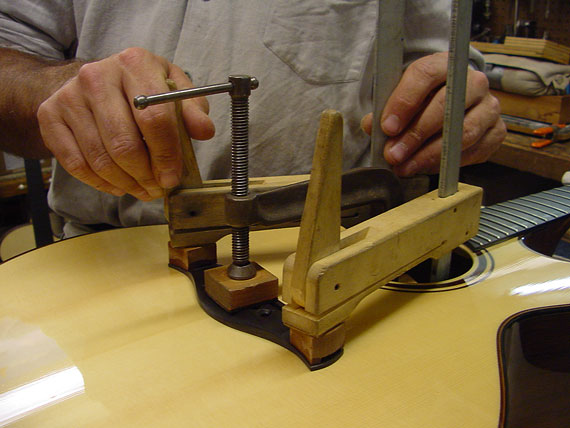
The last gluing operation is the bridge.

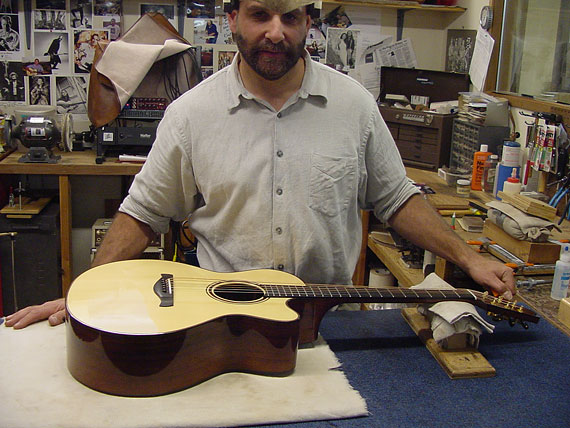
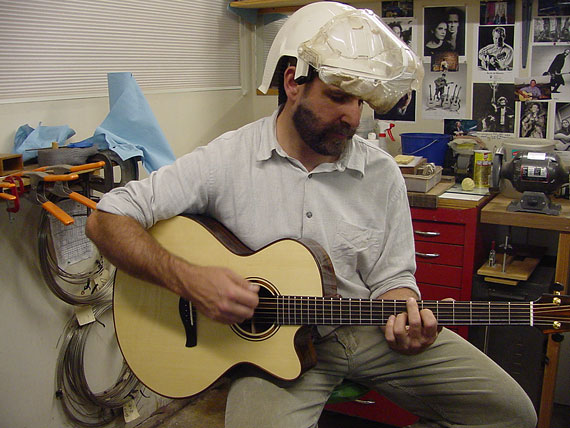
Finally, time to set up, make a saddle and nut, install tuners and string it.

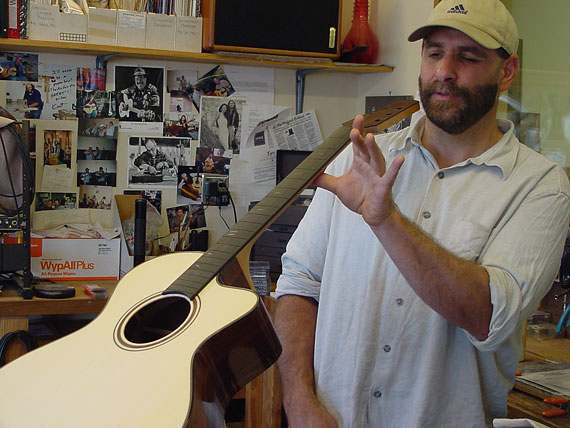
Here's Jeff with his latest creation. It's a Brazilian rosewood fingerstyle cutaway, and it looks great.

Here's the moment. . .


Unless otherwise credited, all content on Frets.com is
Copyright © 1969 - 2023 Frank Ford
All rights reserved.